1
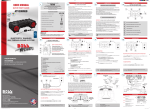
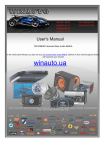
SPECIFICATIONS
Power Supply
DC9V - 15V
Lens Angle (Deg.)
170º
TV System
PAL/NTSC
Video Output
1.0vp-p, 75Ω
S/N Ratio
≥ 48 dB
IP Rating
IP68
Operating Temp. (Deg. C)
-30ºC ~ +70ºC (RH95% Max.)
White Balance
Auto
Minimum Illumination
0.5 LUX
AGC
Auto
Resolution (TV Lines)
420
Electronic Shutter
1/60(NTSC) 1/50(PAL)
1/10,000 Second
Effective Pixels
656*492
Above parameters can be modified without notification.
USER’S MANUAL
CAM21
MINI DIGITAL CAMERA
DO NOT FULLY RELY ON REVERSE CAMERA
WHEN BACKING UP.
ALWAYS CHECK YOUR SURROUNDINGS
BEFORE BACKING UP.
BOSS Audio Systems
3451 Lunar Court • Oxnard, CA 93030
www.bossaudio.com | 800.999.1236
tech support: www.bossaudio.com/support
0714
INSTALLATION
TROUBLESHOOTING GUIDE
The following checklist might help to solve the problems when using this unit.
Please double check to insure connection and procedure of operation is done
properly before using checklist.
1. WIRE CONNECTION
AV
DC 12V
Power/Video
PROBLEM
DC 12V
Camera
Red and black back lights 12V line
CAUSE/SOLUTION
Check that power cable is securely connected.
NO IMAGE
Check to insure there is a good connection between
video-in and monitor.
Check that REVERSE GEAR is engaged.
Check to insure correct monitor setup.
Complete all required connections so that all lines are hidden in vehicle.
IMAGE BLURRING
Check for water/water stain or dust on camera lens.
Clean camera lens
2. CAMERA INSTALLATION
Camera should be installed in the following configuration:
Flush Mount – Install the camera using the supplied Hole Saw. Camera
should be mounted where it will not interfere with taillights, visibility of
license plate or other safety items. (see diagram 1)
Attention: Camera switch is controlled by engaging REVERSE GEAR.
Vehicle Body
IMAGE SHAKING
Check to insure camera is mounted and secured tightly.
IMAGE SLANTED
Adjust camera mounting bracket
NOTE:
If problems persist – consult nearest service dealer. DO NOT attempt to
disassemble or modify unit.
(diagram 1)