1
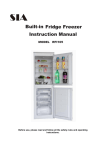
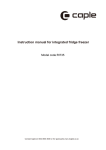
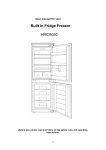
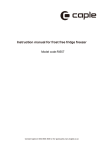
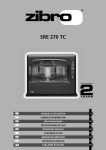
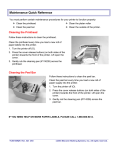
USER INSTRUCTIONS FULLY INTEGRATED FRIDGE-FREEZER UBF501 UBF701 DECLARATION OF CONFORMITY The manufacturer of the product/s described herein, to which this description refers, declares on its sole responsibility that the product/s meet the relevant fundamental safety, health and protection requirements of the relevant EU guidelines and that the corresponding test reports are available for examination by the relevant authorities and can be requested from the seller of the appliance, especially with regard to CE Declaration of Conformity issued by the manufacturer or with the manufacturer‘s approval. Moreover, the manufacturer declares that the parts of the appliance described in this user manual, which come into contact with fresh food, do not contain any toxic substances. Your 1st year Guarantee Your appliance carries a 12 months part and labour warranty. To fulfil the conditions of your guarantee, the appliance must be correctly installed and operated in accordance with the instructions and only be used for normal domestic purposes. Please note that the guarantee and service available only apply to the United Kingdom Mainland. Customer Service In case of difficulty please call the Customer Service Helpline on 0844 800 7848 Please ensure that you have the model and serial number to hand when calling customer service. Please keep your receipt or invoice in a safe place as they will be required as proof of purchase. Appliance365 Ltd, 730 Mandarin Court, Warrington, Cheshire, WA1 1GG, UK UBF701 RF-285 3001FF UBF501 HRF-295 3002FF 2 Instruction for use Combined Fridge & Freezer The user instructions apply to several models, for this reason there may be some differences in the details given, according to the type of the appliance. refrigerant can circulate freely and thus ensure that your appliance will work efficiently. If possible, place your appliance in a cool, well aired, dry room. Do not place your appliance in direct sunlight, nor in a room at high temperature. Do not place your appliance in the vicinity of any sources of direct heat such as heating, ovens, cooking stove etc. (This would mean the compressor would have to work harder and as a result the power consumption would be considerably higher). 1 Protecting the environment / advice for disposal Packing Serves to protect the appliance during transportation and recyclable materials have been used for packaging. ¦ Corrugated board/cardboard (mainly from waste paper) ■ shaped parts in PS (foamed CFC-free polystyrene) ■ foils and bags in PE (polyethylene) ■ strapping tapes in PP (polypropylene) Please hand over all packaging to the nearest official collection point, so that all the different materials can be re-used or recycled as far as possible and any illegal depositing of such materials is thus avoided. 2 Deciding where to locate your appliance In order to avoid any damage or injury to persons or other items, the appliance should be unpacked by two people and placed in the chosen location. Before positioning it, check that your new appliance has no visible damage. On no account should you start up your appliance if it is damaged. Check the appliance carefully for: Damage to the packaging which might indicate that might indicate that the appliance has been mishandled during transportation. Damage to the outer casing Any visible damage to the cable / plug. If in any doubt let the customer service department check the appliance. It must at all costs be avoided, that any environmentally damaging refrigerant leaks out by starting up the appliance. If installation near a direct heat source cannot be avoided, we recommend fitting a suitable insulation plate between the appliance and the heat source (do not use asbestos), or at least the following minimum distances must be observed: from a gas or electric cooker 3 cm from a radiator or oven etc. 30 cm from another refrigerating appliance 2 cm Do not place any appliances, which give off heat such as microwaves, toasters etc. on the appliance. Never obstruct the ventilation grille. Always pull out the plug itself and never pull the cable when cutting the appliance off from the mains supply. WARNING ! Leave the appliance standing in its final position for at least 2 hours before switching it on, so that the circulation of the refrigerant stabilises and no operating problems occur. Before connecting up the appliance, make sure that it is absolutely dry inside - especially in the corners. Danger warnings Depending on its composition, the refrigerant can be easily flammable . The refrigerant circuit has been hermetically sealed and has been tested many times for possible leaks. Any inexpert interference might well create a fire hazard. Make sure nothing mechanically effects the circulation of the refrigerant, nor, in particular, the accessible parts around the compressor. 3 Installing your appliance a) Unpack the fridge / freezer. b) In order not to unnecessarily waste raw materials, the handles (requiring smaller packaging) have not been mounted onto the separate parts of the appliance. Mount the door handles and at the same time any other enclosed parts according to the relevant instructions enclosed separately. c) Remove any objects from inside the appliance. d) Carefully remove all film and adhesive tape from the casing of the door. e) Remove any polystyrene pieces from around the compressor (if present). f) Remove all documents and accessories from inside the appliance. Only expert professional personnel should intervene on the refrigerating system. Warning! Any refrigerant spilling out can injure your eyes. In the event of eye contact with the refrigerant, wash your eyes instantly under plenty of running water and call/consult a doctor (an eye specialist) immediately. The appliance, according to its climate category, is meant for use at certain room temperatures. These temperatures should not be exceeded! The climate category for your particular appliance is marked on the rating plate. The categories are: g) Clean the inside of the appliance with lukewarm water and vinegar and dry it thoroughly with a soft cloth. Do not use washing liquids, sharp or abrasive household products or any other cleaning agents containing soda. name of climate category SN N ST T Make sure that the pipes for the circulation of the refrigerant are not damaged in any way during installation of the appliance. The appliance must only be used for the purpose for which it is intended. The appliance must be placed on a firm, level surface. This is the only way to ensure that the 4 suitable room temperatures + 10° C to + 32°C + 16° C to + 32°C + 18° C to + 38° C + 18° C to + 43° C 5 Instruction for use Combined Fridge & Freezer immediately (see “What to do when.....“ at the back of the user manual). Never use a screwdriver or any other sharp-edged metal tool to remove the layers of ice. The inside walls are very delicate and can be easily damaged by sharp edges. Use only plastic or wooden scrapers with no sharp edges. The plastic inside of your appliance could melt and the escaping gas or foam could be ignited by sparks or by the naked flame. On no account should a steam cleaning device be used to defrost the layers of ice in the appliance (great risk of an electric shock). Proceed as follows to defrost your appliance: 9 Cleaning and maintenance 1. Provide a suitable non-metallic container (a plastic container or wash-basket). 2. Make absolutely sure that you remove the plug from the power socket. 3. Dry your hands thoroughly to prevent skin damage from contact with ice (it is advisable to use gloves). 4. firmly in newspaper. Place it in the container already prepared and place the container in a cool, dry room. 5. Cover the container all around with a thick blanket. 6. Remove the drawers by pulling them as far out as possible and then raising them slightly. 7. As described previously, scrape the thickest ice carefully from inside the freezer and put it in the kitchen sink. 8. If your appliance is equipped with a drip duct at the bottom of the appliance, pull it out and place a bowl to catch the dripping water underneath it. 9. If necessary, speed up defrosting by placing a large bowl of warm (not too hot) water on the bottom of the appliance and close the door. 10. If your appliance is not equipped with a drip duct, place an absorbent cloth underneath the front of the appliance and wipe up the defrosting water with a sponge. 11. Thoroughly clean the inside. Wipe it out with warm water and a little vinegar and then rinse it out with clear water. 12. Dry it thoroughly with a soft cloth and air it for 3-4 minutes. 13. Close the door and plug the appliance back in. 14. Reset the temperature dial to the maximum setting. (if your appliance is equipped with green and red pilot lights, these will come on) and if the SUPER FREEZE SWITCH is provided, switch it on (the yellow light will also come on). 15. Now refill the drawers with the frozen food - the oldest items at the top. To prevent the frozen food from defrosting, carry out the steps described above within two hours at the most. As a firm rule, unplug the power plug or switch off at the mains. For the upkeep of the external appearance of your fridge / freezer, clean the outside every now and again with furniture polish or with an enamel protecting product (never, on any account use it inside). Clean the door seal with warm water now and again but do not use any cleaning products. Clean your appliance regularly. The various parts inside the fridge / freezer are generally not suitable for dishwashers. These should be washed by hand with warm water and a little washing-up liquid. Never use the cleaning agent neat and on no account use any abrasive or acid, i.e. chemical cleaning products. A general all purpose pH neutral cleaning agent is recommended. ■ The rating plate inside or outside your appliance should not be damaged and should never be removed - this is essential for servicing. Make sure, when cleaning, that no water runs onto any electrical parts inside the appliance. ■ If there is a heat exchanger -called condenser- on the back of your fridge / freezer, this should be cleaned regularly. Dust and dirt impede the release of heat from the inside and considerably increase energy consumption. For best results, use a soft brush or a duster to remove dust from the condenser. Special tips for cleaning the fridge Clean the drain hole in the fridge from time to time with, for example, cotton buds, in order to keep it clear. Switching off the appliance If your appliance is going to be switched off for longer periods (such as during holidays), it should be left open to prevent odours from building up inside. If your appliance has a lock, set the lock in the “closed” position with the doors open and keep the key well away from small children to prevent accidents. 16. When the red pilot light goes off, reset the temperature dial to a medium setting. If provided, switch off the SUPER FREEZE SWITCH after about 12, but no later than 24 hours (the yellow light will go off). Ice and frost layers which build up to a certain thickness on the inside walls, act as insulation and prevent the dispersion of the coldness. These must be removed from time to time. To remove the layers of ice from the inside walls, use a plastic or wood scraper with no sharp edges. When doing this, remove the drawers and lay a cloth on the bottom of the appliance to catch the ice as it is scraped off so that it can be easily removed. The method least likely to damage your appliance when removing the layers of ice is to defrost it. 10 Using the fridge Switching on / off and selecting the temperature Temperature dial (thermostat) The temperature dial switches the appliance on and off and sets the cooling temperature. Defrosting In normal circumstances (opening the freezer 4 – 5 times a day) the freezer compartment should be defrosted once or twice a year (more often in other circumstances). The fridge compartment is defrosted automatically. Switch on: Turn the temperature dial clockwise. Your fridge has been switched on. The light in the fridge compartment comes on. The compressor runs until the set temperature has been reached. Danger warnings Never use electrical appliances to defrost your appliance, such as a hair dryer, fan heater, dehumidifiers, de-icing sprays or anything with a naked flame (e.g. candles). Temperature settings: Turn the dial anticlockwise, the lowest setting = slight cooling 7 8 Instruction for use Combined Fridge & Freezer English STORAGE TABLE Fresh food Suitable packaging GB approx. storage time in months 2-3 4 6 8 10-12 Mincemeat > Polyethylene freezer bag > z Sausages > Polyethylene freezer bag > z Small fish > Polyethylene freezer bag > z Heart / liver > Polyethylene freezer bag > z Ice cream > Plastic container > z Fruit > Plastic container > z Cheese > Polyethylene freezer bag > z Bread > Polyethylene freezer bag > z Large fish > Polyethylene freezer bag > z Cake / biscuits > Glass container > z Pork > Aluminium foil > z Beef > Aluminium foil > z Rabbit > Aluminium foil > z Lamb > Aluminium foil > z Mushrooms > Polyethylene freezer bag > z Asparagus > Polyethylene freezer bag > z Vegetables (cut) > Polyethylene freezer bag > z Strawberries > Polyethylene freezer bag > z Flans > Aluminium foil > z Chicken > Aluminium foil > z Turkey > Aluminium foil > z Duck > Aluminium foil > z Goose > Aluminium foil > z Cauliflower > Polyethylene freezer bag > z Beans > Polyethylene freezer bag > z Pepperoni > Polyethylene freezer bag > z Preserves > Glass container > z Preserved fruit > Glass container > z Ice lollies > Aluminium foil > z 10 Instruction for use Combined Fridge & Freezer 1 2 3 11 IMPORTANT: When you install your appliance it is important to bear in mind its climatic rating. In order to find out the climatic rating of your appliance, you should check the rating plate. The rating plate is located on the front left edge of the inside of the fridge section. You will need to open the door of your appliance to be able to find it. The rating plate will indicate the ambient temperature range that your appliance will function correctly within. Description of the UBF701 fridge freezer 1. 2. 3. 4. 5. Control panel Fridge light Safety glass shelves (x 4) Salad crisper drawers Freezer drawers 6. Fridge door upper shelf cover 7. Fridge door shelf 8. Half width door shelf cover 9. Half width door shelves 10. Bottle shelf Description of the UBF501 fridge freezer 1. 2. 3. 4. 5. 6. 7. 8. Safety glass shelves (x 4) Salad crisper drawers Freezer drawers Fridge door upper shelf cover Fridge door shelf Thermostat dial Fridge light Bottle shelf A C -15 -18 B -21 -25 -32 MAX. ON D ° ALARM MAX. SUPER FREEZE MIN. E MIN. A Refrigerator thermostat for temperature setting B Freezer thermostat for temperature setting C Buzzer release key D Fast freeze key Note: G F H E Power indicator (green) F Freezer temperature indicators (orange) G Freezer over temperature indicator (red) ALARM H Freezer fast freeze indicator (yellow) Thermostat (A & B) on position MAX. = coldest temperature Thermostat (A & B) on position MIN. = warmest temperature / Thermostat OFF 1. Connect your appliance to the power socket. The power indicator E lights up Use a coin for temperature adjustment 2. Set the thermostat A first to position MAX. to activate the Refrigerator After 24 hours you may set the thermostat to a middle position for normal operation . In summertime please set a little colder Set the thermostat B first to position MAX. to activate the Freezer The red ALARM indicator G lights up and the alarm buzzer sounds. You may release the buzzer by pushing the buzzer release key C 3. The red ALARM indicator G extinguishes when a temperature of -15 to -18°C inside the freezer is reached. (Observe the orange temperature indicators F ) Now reactivate the alarm buzzer by pressing the key D Activate the fast freeze key D. The yellow indicator H lights up 4. The fast freeze function should be deactivated by pressing the key D after 24 hour or latest when the temperature indicator F (-32°C) lights up. Now you may set the thermostat B to a middle temperature for normal operating. In summertime please set a little colder. Repeat operating 3. and 4. always after defrosting the freezer subject to technical changes 13 Note: Consistent with our continuing product development policy, improvements may have been made which render the contents of this package slightly different to that shown. Model No-UBF501 / UBF701 July 2009 Appliance 365 Ltd Cranage House 730 Mandarin Court Centre Park Warrington WA1 1GG United Kingdom www.appliance365.co.uk