1
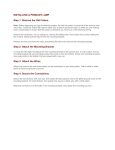
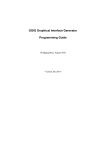
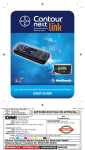
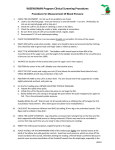
CHO-02-026 GDX QRGuide_7 7/9/02 11:49 AM Page 1
Analyzer Display
Optics Check Cartridge Procedure
Cartridge
This icon will be used with “up” and “down” arrow icons to prompt
the user to insert or remove a cartridge from the Analyzer.
Hourglass
This indicates that the operator must wait for an action to be performed
before proceeding. If a number is displayed, it is a countdown timer.
Rotate Cartridge
A single icon prompts the user to rotate the cartridge. This will be used
in conjunction with flashing lights placed around the edge of the
cartridge to indicate the position to rotate to.
Error Message
The number displayed is an error message.
Pour Solution
A single icon to prompt the user to pour the solution into the A1C Test
Cartridge funnel.
Insert/Remove/Mix
These two icons will be used in combination with either the Cartridge
icon or the Solution Tube icon to prompt the user to perform an operation.
Keypad
The keypad icons comprise “left” and “right” arrows and “enter”
button. They perform a function when they are solid (as shown). When
they are present in outline only, they are not active, and pressing them
will not produce a response from the Analyzer.
Result
The number displayed is the percentage of hemoglobin A 1c (A1C) in the
test sample.
Blood Drop
This icon will be used to prompt the user to take a blood sample.
Identification Number
The number displayed is the unique test identification code.
Solution Tube
This icon will be used along with the “up” and “down” arrows to prompt
the user either to remove a tube or mix a blood sample in the tube.
Computer Connection
A single icon to indicate a link-up with an external device such as a
printer or computer, shown during download.
Error Codes
If the Analyzer displays an error
code while you are running a test,
the test must be stopped.
Record the error code, then continue
to turn the cartridge in a clockwise
direction until the cartridge is back
to its original position at the start
of the test. The cartridge can then
be removed. Press the round enter
button and insert a new test
cartridge.
A list of error codes can be found in the
Cholestech GDX Analyzer User Manual.
1 Plug in the Analyzer and allow
to warm up.
4 The Rotate Cartridge icon
is
displayed, the Analyzer beeps, and
a red light flashes at Position 2.
Turn the Optics Check Cartridge to
Position 2. “ ” is displayed briefly
and the Hourglass icon appears.
6 The Rotate Cartridge icon
is
displayed. Turn the Optics Check
Cartridge to Position 0.
A1C TEST PROCEDURE
2 Insert the Optics Check Cartridge
when the Insert Cartridge icon
flashes.“ ” is displayed briefly
and the Hourglass icon appears.
7 The Remove Cartridge icon
appears. Remove the cartridge.
5 The Rotate Cartridge icon
is
displayed, the Analyzer beeps, and
a red light flashes at Position 3.
Turn the Optics Check Cartridge to
Position 3. “ ” is displayed briefly
and the Hourglass icon appears.
3 The Rotate Cartridge icon
is
displayed, the Analyzer beeps, and
a red light flashes at Position 1.
Turn the Optics Check Cartridge to
Position 1. “ ” is displayed briefly
and the Hourglass icon appears.
8 The Analyzer displays the result.
Press the enter button
to clear.
PLEASE NOTE: For more detailed
instructions, always refer to the
package insert and user manual.
The picture below shows the Analyzer
displaying the error code 2.
3347 Investment Boulevard
Hayward, CA 94545-3808 USA
TEL (800) 733-0404, (510) 732-7200
FAX (510) 732-7227
www.cholestech.com
Cholestech GDX is a trademark of Cholestech Corporation.
© 2002 Cholestech Corporation 201407W REV 06/02
Quick Reference Guide
403 12328 Rev A
CHO-02-026 GDX QRGuide_7 7/9/02 11:49 AM Page 2
A1C Test Procedure
GETTING STARTED
1 Plug in the Analyzer and leave
to warm up.
POSITION 1
POSITION 2
1 When the red light flashes, rotate to 4 Obtain a drop of blood as for a
Position 1.
blood glucose test. Form a good
blood drop. Do not allow blood to
smear down finger.
The diagram below shows an
overfilled, an underfilled and a
correctly filled pipette.
Overfilled
2 Insert the test cartridge when you
see
. Immediately push down
the cartridge until you hear it
“click” into place.
the blood is expelled and carefully
withdraw the pipette. If the blood
does not come out of the pipette,
release the pipette bulb and
squeeze again. Always ensure that
no liquid or blood remains in the
pipette before throwing it away.
10 Press enter
.
60-second countdown.
At the end of the countdown, the
Analyzer will beep.
At the end of the countdown, the
Analyzer will beep and a red light will
flash at Position 2.
At the end of the countdown, the
Analyzer will beep and a red light will
flash at Position 3.
1 Rotate to Position 2.
1 Rotate to Position 3.
The blue-capped tube will rise
from the cartridge.
Use the pipette provided to collect
the blood sample. DO NOT SQUEEZE
THE BULB. Hold the pipette
horizontally and touch the edge of
the blood drop.
POSITION 0
1 When the Analyzer beeps,
rotate to Position 0.
The clear-capped tube will rise
from the cartridge.
Underfilled
2 Remove the red-capped tube and
unscrew the cap.
7 Squeeze the bulb until all of
POSITION 3
2 Remove the cartridge.
11 Invert tube 3 times.
Correctly Filled
2 Remove cap and pour the solution
8 Replace cap and invert tube
into the funnel.
5 times.
2 Remove cap and pour the solution
into the funnel. NO BUTTON PRESS
IS NECESSARY.
5 Remove the opened tube from the
test cartridge.
3 Record results.
You will see the Hourglass icon
followed by the Rotate Cartridge
icon .
3 Place the cap on a nearby flat
surface and put the opened tube
back into the cartridge.
12 Remove cap and pour the solution
The blood will flow along the tube
until it covers the air hole. The
black line is only a guide to the
position of the air hole.
into the funnel. NO BUTTON PRESS
IS NECESSARY. 50-second
countdown.
9 Put the tube back into
the cartridge.
6 Place the tip of the pipette into
the tube just below the surface
of the liquid.
3 Press enter
.
40-second countdown.
The Analyzer automatically senses the
liquid and the intermittent beep
continues for up to 20 seconds while
the instrument takes a reading.
80-second countdown.
At the end of the countdown,
the Hourglass icon appears.
4 Press enter
to clear the display.