1
WHAT'S NEW - PRONTO 2 VERSIONS
WHAT'S NEW
PRONTO 2 VERSIONS
Legend:
N: New feature.
C: Changes.
F: Bug Fix .
Pronto 2
MICRO
ENCODER
DECODER
VERSION
6.10
6.10/6.10
6.10/6.10
DATE
02/20/01
N: New ancillary data speed: 2400 bps.
C: Ancillary data speed selection from the menu (OFF - 300 - 2400 - 9600).
Pronto 2
MICRO
ENCODER
DECODER
VERSION
6.00
6.00/6.00
6.00/6.00
DATE
01/15/01
N: Pronto 2 accepts new Universal ISDN terminal adapter.
N: New remote control protocol based in commands.
N: The INF-VERSION option shows the version on the display.
Pronto 2
MICRO
ENCODER
DECODER
VERSION
5.30
5.02/5.02
5.04/5.03
DATE
08/22/00
N: The AES/EBU input works at any sampling frequency (32, 44.1 & 48 KHz) in G711 or G722
modes
Pronto 2
MICRO
ENCODER
DECODER
VERSION
5.2
5.01/5.01
5.02/5.02
DATE
02/09/00
N: Echo cancellor in G711 mode.
N: Multiplex in G711 mode.
F: The dialling invitation tone didn't stop during the dialling operation.
WHAT'S NEW - PRONTO 2 VERSIONS
Pronto 2
MICRO
ENCODER
DECODER
VERSION
5.1
5.01/5.01
5.01/5.01
DATE
02/02/01
First version
PRONTO_ISDN 2
USER’S MANUAL V6.1
INTRODUCTION TO VERSION 5.0 ...................................................... 3
INTRODUCTION ..................................................................................... 6
ABOUT THIS MANUAL ......................................................................... 7
PRONTO_ISDN 2 WITH ISDN TERMINAL ADAPTER
1.
BLOCK LAYOUT............................................................................................ 8
1.1 PRONTO ISDN 2: DUAL CODEC FOR VOICE COMMUNICATIONS ... 8
- AUDIO INTERFACE ............................................................................................. 8
- AUDIO DSP........................................................................................................... 9
- COMMUNICATIONS............................................................................................. 9
- CONTROLLER .................................................................................................... 10
A) FRONT PANEL KEYPAD................................................................................ 10
B) EXTERNAL TELEPHONE ............................................................................... 10
C) REMOTE CONTROL FROM A PC .................................................................. 10
D) REMOTE CONTROL BY SIGNAL GROUNDING .......................................... 11
1.2 PRONTO_ISDN 2: MPEG LAYER II CODEC ............................................ 12
- AUDIO INTERFACE ........................................................................................... 12
- AUDIO DSP......................................................................................................... 12
- COMMUNICATIONS........................................................................................... 13
- CONTROLLER .................................................................................................... 13
2.
OPERATION.................................................................................... 15
2.1 PRONTO_ISDN 2 FRONT PANEL ............................................................ 15
2.1.1. CALL1 AND CALL2 KEYS .................................................................. 15
2.1.2. END1 AND END2 KEYS ..................................................................... 16
2.1.3. ON AIR1 AND ON AIR2 KEYS............................................................ 16
2.2 DISPLAY...................................................................................................... 18
2.3 MENU........................................................................................................... 19
+ {L1} .......................................................................................................... 20
+ {L1}--{CALL} .......................................................................................... 20
+ {L1}--{TA}................................................................................................ 23
+ {L1}--{CODEC} ....................................................................................... 26
+ {L2} .......................................................................................................... 32
+ {CONF} .................................................................................................... 33
+ {CONF}--{BOOK} ................................................................................... 34
+ {CONF}--{REMOTE}.............................................................................. 34
+ {CONF}--{AUD_IN} ................................................................................ 35
+ {CONF}--{AUTOM}................................................................................ 35
+ {CONF}--{NET}....................................................................................... 37
+ {INF} ........................................................................................................ 39
PRODYS
1
PRONTO_ISDN 2
USER’S MANUAL V6.1
2.4 EXTERNAL TELEPHONE......................................................................... 41
2.4.1. USE IN G711/G722 MODES ................................................................ 41
2.4.2. USE IN MPEG MODES........................................................................ 43
2.5 REMOTE CONTROL ................................................................................. 45
3.
DISPLAY INFORMATION FIELDS .................................................... 47
4.
FRECUENTLY-ASKED QUESTIONS................................................... 51
5.
CONNECTORS............................................................................................... 55
5.1 ANALOG AUDIO ........................................................................................ 55
5.2 DIGITAL AUDIO ........................................................................................ 55
5.3 AUXILIARY DATA..................................................................................... 55
5.4 REMOTE CONTROL ................................................................................ 55
5.5 RS232 INTERFACE .................................................................................... 55
5.4 MICROSWITCHES .................................................................................... 55
6.
JUMPERS ......................................................................................................... 56
6.1 SELECTION OF AUDIO OUTPUT GAIN............................................... 56
6.2 100 OHM RESISTORS IN THE TERMINAL ADAPTER ........................ 56
APPENDIX A TECHNICAL SPECIFICATIONS .................................... 57
APPENDIX B MENU TREE STRUCTURE ............................................... 58
7.
PRONTO_ISDN 2 WITH X21 INTERFACE....................................... 61
7.1 X21 PRONTO_ISDN 2 FRONT PANEL..................................................... 62
7.2 X21 PRONTO_ISDN 2 DISPLAY .............................................................. 63
7.3 X21 PRONTO_ISDN 2 MENU ................................................................... 64
7.4 X21 DISPLAY INFORMATION FIELDS................................................... 71
7.5 X21 PORTS CONNECTORS...................................................................... 72
7.6 X21-X21 CONNECTION ........................................................................... 72
7.7 X21-V35 CONNECTION ........................................................................... 72
7.8 PRONTO ISDN_2 X21 MENU ................................................................... 73
PRODYS
2
PRONTO_ISDN 2
USER’S MANUAL V6.1
INTRODUCTION TO VERSION 5.0
The version 5.0 of PRONTO_ISDN 2 is a response to the many suggestions and
features requirements from users since its lauching into the market. Some of these
features have already been incorporated in previous versions and significant
modifications in software and hardware are included in this new version. We
recommend users familiar with previous versions to read thoroughly these pages to
become acquainted with the changes and improvements introduced.
HARDWARE MODIFICATIONS:
1.- Rear pannel:
• The DB25 connector for the remote control is now divided in two: A DB9
connector specifically to connect the remote control terminal of the PRONTO (i.e.
PC) and a DB15 connector with line status monitorisation signals and ON_AIR
functions remote control and automatic call. Two more audio status monitorisation
signals (synchronised or not) have been added besides those of line status available in
previous versions.
•
A DB15 connector to access a X21/V35 port has been added to carry out, without
the need of any hardware installation, the connection to an ISDN BRI (with the
terminal adaptor) as well as to any other kind of digital network through this port.
The simultaneous use of both communication interfaces permits to utilised the
PRONTO as a communication unit with back-up through the ISDN (this option
requires a specific software not supplied with the standard version).
•
Six microswitches have been added for specific configuration of some parameters.
This configuration takes place during the power up of the unit and cannot be changed
during its functionning. The programmed microswitches up to this version are:
Microswitch no. 1:
UP
Acoustic signal deactivated
DOWN
Acoustic signal activated
Microswitch no. 2:
UP
Pronto-2 works with ISDN terminal adaptor
DOWN Pronto-2 works with X.21 interface
Microswitch no. 3:
Not utilised in this version
Microswitch no. 4:
UP
Auxiliary data speed = 300 bps.
DOWN
Auxiliary data speed = 9600 bps.
Only for 6.0 or older versions.
Microswitch no. 5:
Not utilised in this version
Microswitch no. 6:
Not utilised in this version
Microswitch no. 7:
Not utilised in this version
Microswitch no. 8:
Not utilised in this version
2.- Other hardware modifications:
• A RING signal generator has been included on the mother board for the analog
telephone to be connected to the RJ11 connector on the front pannel. This way,
when a call is received in G711/G722 through any of the lines and the telephone
is activated and the answering mode is manual (TA-ANSW option in MANUAL)
the phone will ring.
•
An acoustic signal has been inserted in the unit to warn you of any incoming call
through any of the two lines. This signal can be activated or deactivated through
the programming of one of the microswitches on the rear pannel.
PRODYS
3
PRONTO_ISDN 2
USER’S MANUAL V6.1
•
There is on the mother board a jumper to disconnect the fan only when the unit is
working in a cool place.
•
All relevant hardware changes have been performed to help carry out the
software update from a PC using a software application supplied for free by
PRODYS.
MODIFICATIONS AFFECTING THE SOFTWARE:
1.- New MPEG modes when the Pronto-2 is set to work with ISDN (terminal
adaptor activated):
MONO at 128 Kbps and DUAL at 64 and 128 Kbps. The insertion of these new
modes bring out the following changes in the selection branch of the MPEG mode in
the menu tree:
G711
G722
MPEG
A LAW
J52
64 Kbps
MONO
48 KHz
JS
MODE
DUAL
24 KHz
CCS
MONO*
JS
TELOS
DUAL
* Only the JS and DUAL options are available in
CCS.
* Only the JS and DUAL options are available in CCS.
Modes are grouped in two subgroups: those working at bit rate 64 Kbps and
those working at bit rate 128 Kbps. These last ones are divided on the menu tree in
three options depending on the protocole utilised to perform the inverse multiplex
(transmission-reception of coded audio at 128 Kbps through two B channels at 64
Kbps.) and therefore depending also on the compatibility wanted. Once the protocole is
selected (J52, CCS o TELOS) select the mode MONO, DUAL or JOINT STEREO.
The MONO mode is not available when selecting CCS mode.
We can select amongst modes at 64 Kbps, MONO, DUAL or JOINT STEREO
at sample rate of 48KHz or 24KHz. When selecting one of these modes, only line 1 is
available.
PRODYS
4
PRONTO_ISDN 2
USER’S MANUAL V6.1
The insertion of these new modes implies changes in the information on the
display. You will find detailed information in chapter 3 regarding the information
fields of the DISPLAY.
2.- New MPEG modes for Pronto-2 working with X.21:
G711
G722
MPEG
A LAW
MODE
MONO*
48 KHz
JOINT
AUX_DATA
DUAL
OFF
ON
24 KHz
* MONO NOT AVAILABLE AT 256 KbPS
3.- The auxiliary data transmission speed when working with any of the MPEG modes
can be of 300 bps or 9600 bps. The speed selection is made through the configuration of
the microswitch no. 4, not from the menu. If we select the INF option in the menu, the
DISPLAY will show the selected transmission speed. 6.1 or later versions, the speed is
selectable from menu (300, 2400 or 9600 bps).
4.- G722 detects automatically statistical framing or H221/H242.
5.- The analog telephone connected to the front pannel of the unit will send a tone to
advise you to dial the number once you have selected the line through which you want
to make the call (once you have pressed *1 or *2). Once the call is made, a calling tone
will be heard until the communication is established.
6.- The selection codes of audio coding mode from the analog telephone have been
extended to select new modes. See chapter 2.4 for more detailed information.
PRODYS
5
PRONTO_ISDN 2
USER’S MANUAL V6.1
INTRODUCTION
Pronto_ISDN 2 is a new concept in audio codecs that provides all the
requirements for voice transmission of a radio station in a single piece of equipment and
that allows audio communications of higher quality, since it supports the ISO/MPEG
Layer II standard.
As a codec for voice communications it can work under the G711 standard for
telephone communications (3.1 kHz) or under the G722 standard for communications
requiring high voice quality (7 kHz). Its communications interface allows direct
connection with a basic rate ISDN interface (S0 interface) and both B channels (64 kbps)
may be used independently and with the G711/G722 combination required. Version 5.0
and laters include a X21 interface on the mother board possibiliting the connection
of the unit to other digital communication networks (dedicated networks,
communications satellites).
When working in the G711 mode, the Pronto_ISDN 2 is an alternative to hybrid
telephones, allowing standard voice communications with both the ISDN network and
the analog telephone network. Connecting a conventional analog telephone to the front
panel of the equipment allows communications to be established or received remotely
and the call then passed to the programme on hold or on air, in the usual manner in
which hybrids are used for the basic telephone network.
When the G722 mode is selected, the equipment allows high quality voice
communications via the ISDN with the advantage, compared to other audio encoding
systems, of its small delay.
As a codec for greater quality audio communications, it incorporates the two
ISO/MPEG Layer II compression modes most widely used by radio stations: Mono,
Dual and Joint Stereo. It also provides an AES/EBU digital audio input/output interface
and a connector for transmitting/receiving auxiliary data simultaneously with the MPEG
audio.
PRODYS
6
PRONTO_ISDN 2
USER’S MANUAL V6.1
ABOUT THIS MANUAL
Major part of this manual makes reference to the Pronto_ISDN 2 version with
ISDN terminal adapter. As we mentioned previously, the version 5.0 includes the ISDN
terminal adapter and the X21 interface in the same unit. The user can select which one he
wants to work with by configuring one microswitch on the rear panel. The first part of
this manual refers to the operation when the ISDN terminal adapter is selected. There is
a specific chapter describing the operation when the X21 interface is used .
The information is arranged in the following sections:
A) BLOCK LAYOUT
In this chapter there is a description in the form of a block layout of how
Pronto_ISDN 2 works dependig on the chosen configuration (DUAL CODEC FOR
VOICE COMMUNICATIONS or MPEG LAYER II CODEC).
B) OPERATION
The Pronto_ISDN 2 is configured, controlled and reports to the user via a
micro-controller system that can be accesed from different types of interfaces. In this
chapter it’s described each one of them in the following sections:
- FRONT PANEL : Control and configuration keys.
- DISPLAY
- MENU: Complete description of the menu options.
- EXTERNAL TELEPHONE: The use of the external telephone connected to
the RJ11 socket on the front panel.
- REMOTE CONTROL: Description of the Pronto_ISDN 2 remote control.
C) DISPLAY INFORMATION FIELDS
Description of how the DISPLAY arranges the information to show the current
line status and an explanation of each one of the messages showed.
D) FREQUENTLY ASKED QUESTIONS
In this chapter the user can find answers to the most common problems working
with the Pronto_ISDN 2.
E) CONNECTORS
Description of the rear panel connectors.
F) JUMPERS
Description of the configuration jumpers located inside of the equipment.
G) APPENDIX A: TECHNICAL SPECIFICATIONS
H) APPENDIX B: MENU TREE STRUCTURE
I) APPENDIX C: PRONTO_ISDN X21
Complete description of the equipment operation when the Pronto_ISDN 2
works with the X21 communication interface.
PRODYS
7
PRONTO_ISDN 2
USER’S MANUAL V6.1
PRONTO_ISDN 2 WITH ISDN TERMINAL ADAPTER
M The microswitch no. 2 allows the user to select the communicaton interface he
wants to use (ISDN terminal adapter or X21 interface). The following chapters of
this manual explain the operation of PRONTO_ISDN 2 when the ISDN terminal
adapter is selected. To configure the unit this way, it is necessary to put the
microswitch no. 2 in UP position before starting up the unit.
1.- BLOCK LAYOUT
One of the most unique features of the Pronto_ISDN 2 is that, depending on the
compression mode selected, it is configured in two very different ways. On the one hand,
it can operate as a dual codec for voice communications (G711 and G722 modes); i.e.,
the equipment contains two completely separate audio encoders/decoders; and on the
other, as a single codec working in MPEG 1 Layer II compression mode, at operating
rates of 64 or 128 kbps. The Pronto_ISDN 2 user must always be aware of which of
these two general configurations is operative in order to understand both the operation
mode and its possibilities. As an aid to this, the following is a description in the form of a
block layout of how the Pronto_ISDN 2 works, depending on the chosen configuration.
1.1 PRONTO_ISDN 2: DUAL CODEC FOR VOICE
COMMUNICATIONS
The Pronto_ISDN 2 has an operations menu and several remote controls for
selecting the audio compression mode. The equipment is also able to handle two totally
independent communications on lines 1 and 2.
The use of these communications lines is different depending on the compression
mode selected. Specifically, the equipment has three standard compression modes: G711
(telephone-quality voice, 3.1 kHz), G722 (high quality voice, 7 kHz) and MPEG 1 Layer
II (radio quality audio when working at 128 kbps). If the Pronto_ISDN 2 is configured
in one of the voice compression modes (G711 or G722), it operates as two separate
audio encoders/decoders.
Configuration of the Pronto_ISDN 2 is explained below in the chapter on
operation modes. Meanwhile, the following describes the block layout when in this
configuration, to enable a better understanding of how it works.
Ø AUDIO INTERFACE
The Pronto_ISDN 2 can either work with analog audio (two inputs and two
outputs, all electronically balanced) and digital audio in AES/EBU format – one of the
two can be selected from the menu. When the Pronto_ISDN 2 works as a dual
G711/G722 codec, inputs and outputs are assigned as follows:
The left channel audio I/O is used for the audio signals routed to line 1 and
the right channel audio I/O is used for the audio signals routed to line 2.
PRODYS
8
PRONTO_ISDN 2
USER’S MANUAL V6.1
Thus the equipment can manage two separate communications simultaneously.
The Pronto_ISDN 2 also has an auxiliary audio I/O via an RJ11 socket to which a
conventional analog telephone can be connected and used instead of one of the I/O
channels. But the most outstanding feature is that the multi-frequency keypad of the
remote telephone can also be used to control some of the audio codec functions such as,
for example, making a call or placing a call on air. The Pronto_ISDN 2 therefore works
similarly to a hybrid telephone.
Regardless of whether or not the auxiliary telephone is used, the audio received
on either of the two communications lines can be placed on hold (the person at the other
end of the line does not enter into the programme) or on air, using the ON AIR 1 and
ON AIR 2 control keys on the front panel.
The gain levels at each output can be configured to 0, +4 or +6 dB using jumpers
inside the equipment.
M
When a communication is established in G711 mode, the audio output is
automatically set to hold, while in any other mode (G722 or MPEG) it is
automatically passed on air.
Ø AUDIO DSP
The AUDIO DSP block contains two totally separate blocks, each of which can
encode/decode in either of the G711 or G722 compression modes.
When working in G711 mode, it is possible to establish communications with the
analog telephone network, so that the Pronto_ISDN 2 operates in a way that is very
similar to that of a hybrid telephone, with the advantage that the digital connection is free
of impedance adaptation problems (the separation between transmission and reception
depends only on that supplied by the network).
The mode selection can be made for each line manually before establishing a
communication or can be detected automatically on an incoming call.
Ø COMMUNICATIONS
The terminal adaptor block is the ISDN interface. This device makes and answers
calls, sends line status information (connected, disconnected, calling, etc) and of course
sends and receives the data. It can independently handle two 64 kbps data
channels (channels B1 and B2 on a basic ISDN access line), so that the Pronto_ISDN 2
distinguishes between lines 1 and 2. It supports the EURO_ISDN 2 standard and is
specifically designed for connection to a basic rate ISDN interface (BRI, S0 connection
point). Connection is made using two RJ45 connectors, one of which allows the
connection of another device to the same basic access line in a bus configuration (the
Pronto_ISDN 2 offers the possibility of connecting two 100 Ohm resistors so that it acts
as the bus termination equipment).
As well as the typical functions, such as making, answering or releasing calls, it
offers the following possibilities:
− Assigning a local number to each line so that it only accepts calls made to that
number.
PRODYS
9
PRONTO_ISDN 2
USER’S MANUAL V6.1
− Recognition of the calling number and the possibility of accepting the call or
not.
− Calling with sub-address to route a single device among several connected to
the same basic access line.
The communications interface for ISDN communications can also be
replaced with two X21 ports, enhancing possibilities of connecting the equipment
to other digital communication networks (dedicated networks, communications
satellites).
Ø CONTROLLER
The Pronto_ISDN 2 offers various configuration and control possibilities:
A) FRONT PANEL KEYPAD
All the functions available in the Pronto_ISDN 2 can be accessed from
the keypad on the front panel of the equipment. A display provides information to
the user on what is happening at all times. The control keys are grouped as
follows:
MENU:
The ⇐, ⇑, ⇒ keys allow movement through the menu tree
structure and the MENU/ENTER key selects the required option.
DIALLING: Keypad for dialling calls.
CALL1-2 : These keys allow quick access to the dialling options on the menu,
to make the procedure easier.
They also display the calling or called number when the associated line is
connected or accept an incoming call when the associated line is in the manual
answer mode.
END 1-2:
These keys terminate a communication.
ON AIR 1-2: Control keys for placing a call on air or on hold.
B) EXTERNAL TELEPHONE
Some menu options can be accessed using multi-frequency tones. The
chapter on operations with an external telephone provides further details.
C) REMOTE CONTROL FROM A PC
The DB 25 connector on the rear panel of the equipment includes an RS
232 interface for controlling the Pronto_ISDN 2 from a PC.
D) REMOTE CONTROL BY SIGNAL GROUNDING
The DB 25 connector on the rear panel also includes control lines that
give the control engineer access to the on air functions simply by grounding a
PRODYS
10
PRONTO_ISDN 2
USER’S MANUAL V6.1
contact. It is also possible to monitor incoming calls on both lines (RING 1 and
RING 2 signals).
PRODYS
11
PRONTO_ISDN 2
USER’S MANUAL V6.1
1.2 PRONTO_ISDN 2: MPEG LAYER II CODEC
The Pronto_ISDN 2 also offers the possibility of working under the MPEG 1
Layer II compression algorithm in the modes most widely used in the broadcast
environment. This involves a change in the configuration of the equipment as shown in
the block layout on the next page.
There is a fundamental difference to the previous case, in that when an MPEG
compression mode is chosen, only one audio encoder/decoder is available. This does not
mean, however, that the equipment cannot handle two communications lines (the two B
channels of a basic access line, for example), so that, using the J52 standard protocols, it
can send and receive encoded audio at a binary rate of 128 kbps. However, two codecs
working at 64 kbps are not available.
To summarise, when one of the MPEG modes available in the Pronto_ISDN 2 is
selected, dual codecs are not available and the functions associated with line 2 are
disabled. This leads to two particular case for modes at 128 Kbps:
- When a call is made on line 1, another call is automatically made to the same
number on line 2.
- When line 1 is hung up, line 2 will automatically be hung up also after a few
seconds.
- After a call is established on both lines, if the call is cut off on one of the
lines, the system will try to recover the call by making a call to the same
number, provided that the call on the other line is not cut off after a timeout
of 3 seconds.
Ø AUDIO INTERFACE
When the Pronto_ISDN 2 is configured in one of the available MPEG modes,
the audio interface is associated to one sole audio codec. When the MPEG mono 64
kbps mode is selected, the operational audio I/O is that of the left channel (L).
An important difference in the way that the audio interface works when
G711/G722 is selected is that the external telephone is disabled with auxiliary audio I/O
and can only be used for remote control.
Given that the audio I/O is always associated with a single communication
(whether working in mono or stereo), the analog switch that enables or disables audio
output (call on air or on hold) is controlled from one sole device (the ON AIR 1 key or
the ON AIR 1 remote control).
Ø AUDIO DSP
The main feature of this block when the Pronto_ISDN 2 is working in MPEG
mode is that the equipment has only one encoder/decoder available. Basically, there are
two possible modes available within the MPEG standard:
a)
MONO, 64 Kbps, Fs= 48 Khz.
b)
JOINT STEREO, 128 Kbps, Fs= 48 Khz.
PRODYS
12
PRONTO_ISDN 2
USER’S MANUAL V6.1
M The following MPEG modes are available from version 5.0:
•
•
•
•
•
•
MONO 64 Kbps (Fs= 48 & 24 KHz).
DUAL 64 Kbps (Fs= 48 & 24 KHz).
JOINT STEREO 64 Kbps (Fs=48 & 24 KHz).
MONO 128 Kbps (Fs=48 KHz).
DUAL 128 Kbps (Fs=48 KHz).
JOINT STEREO 128 Kbps (Fs=48 KHz).
When working at 128 kbps, considering that the communications interface is
connected to ISDN line (two B channels at 64 kbps each), it is necessary to program a
communications protocol that carries out inverse multiplexing. This consists of dividing
the information stream into two 64 kbps channels when transmitting encoded audio and
reconstructing the 128 kbps from the two data channels received in the case of incoming
audio. The ITU J52 standard is used by the Pronto_ISDN 2 to guarantee compatibility
with other equipment on the market. There is a third selectable mode in MPEG which is
a variation of J52 and which has been used to make the Pronto_ISDN 2 compatible with
the CDQ Prima family of audio codecs when these are working in H221 2 line mode.
Ø COMMUNICATIONS
The communications block is exactly the same when working in G711/G722
mode as when in MPEG mode. The differences lie in the way in which each
communications channel is handled, given that in this case the use of one or two channels
will always be associated with a single encoder/decoder; i.e., the user sees the
communication as a single channel, whether it is 64 kbps or 128 kbps. For this reason, in
the joint stereo modes the second call is made automatically or the local number assigned
to line 2 automatically becomes the same as that for line 1.
Ø CONTROLLER
The control features are the same as when the Pronto_ISDN 2 is configured as a
dual codec for voice transmission (G711/G722).
PRODYS
13
PRONTO_ISDN 2
PRODYS
USER’S MANUAL V6.1
14
PRONTO_ISDN 2
USER’S MANUAL V6.1
2.- OPERATION
The Pronto_ISDN 2 is configured, controlled and reports to the user via a
micro-controller system that can be accessed from different types of interfaces. Each
interface has been designed to cover all the requirements of users in a typical radio or TV
station. The following chapter describes the operation of the Pronto_ISDN 2 with each
of these options.
2.1
PRONTO_ISDN 2 FRONT PANEL
The most complete control interface is found on the front panel of the equipment.
The keys on it provide access to all the equipment configuration and control functions
and the display provides status information (type of encoding used, line status, etc).
The keypads provided are:
a) Menu keypad – comprising the ⇐, ⇑ and ⇒ keys for scrolling through the
menu and the MENU/ENTER key for selecting the required action or parameter.
b) Dialling keypad – telephone keypad for dialling the number to be called on the
selected line.
c) Call control keypad – two groups of three lighted keys called CALL 1, END
1, ON AIR 1, CALL 2, END 2 and ON AIR 2; the first group is assigned to line
1 and the second to line 2. These keys are used for the must usual tasks such as
calling, hanging up or transfering a call to the programme (ON AIR).
2.1.1 KEYS
CALL
1
CALL
2
These keys provide direct access to the menu dialling options (CALL 1 to
call on line 1 and CALL 2 for line 2) provided that the corresponding line is free.
On pressing one of these, the user may dial a number directly on the keypad on
the front panel, re-dial the last number dialled or select a number entered in the
telephone book.
Each key has a LED to indicate the following situations:
- Light off:
Line disconnected
- Light on:
Line connected
- Flashing light: Call in progress or incoming call detected.
Once the line is connected, you can press the CALL key of the respective
line to display the number called if the call was made from the unit, or the calling
number in the case of an incoming call.
If an incoming call is detected on a line configured for manual answer,
you can accept the call by pressing the CALL key for that line.
PRODYS
15
PRONTO_ISDN 2
USER’S MANUAL V6.1
M When working in any MPEG mode, the CALL 2 key is disabled and
the following message is displayed when it is pressed:
I N
M P E G
M O D E
N O T
A V A I L A B L E
2.1.2 KEYS
END
1
END
2
These keys terminate the call on the line corresponding to each key. The
key’s LED goes out to show that its associated line is disconnected.
M
Working in MPEG mode at 128 Kbps, line 2 is simultaneously
disconnected when the END1 key is pressed. Only Line 2 can be hung up,
however, by pressing END2 without this affecting line 1.
2.1.3 KEYS
ON AIR
1
ON AIR
2
These keys switch the audio to/from the programme. When the key’s
LED is on, this indicates that the call is on air, that is, the audio received on this
line is present at the audio output for this communications line. Depending on the
compression mode being used, once a communication is established and
synchronised, the Pronto_ISDN 2 will be configured as follows:
- Communication in G711 mode: When the communication is
established, the call is on hold (ON AIR disabled).
- Communication in G722 mode: When the communication is
established, the call is on air (ON AIR enabled).
- Communication in MPEG mode: When the communication is
established, the call is on air (ON AIR enabled).
The following restrictions apply to the use of these keys:
• When a line is disconnected, pressing the ON AIR key for that line will not
change the status of the respective switch and LED.
• When a connection is established in any of the MPEG modes, the ON AIR 2
key is disabled, becoming slaved to the status of the ON AIR 1 key. If it is
pressed, the following message is displayed:
I N
M P E G
M O D E
N O T
A V A I L A B L E
PRODYS
16
PRONTO_ISDN 2
USER’S MANUAL V6.1
• If the communication is established with an external telephone, the audio
input/output for that line will be the telephone, and therefore the ON AIR key
for the line and its remote control are disabled. They are only re-enabled when
the user returns control to the front panel.
MWhen the remote control is enabled, the ON AIR 1 and ON AIR 2 keys
are disabled.
PRODYS
17
PRONTO_ISDN 2
2.2
USER’S MANUAL V6.1
DISPLAY
The Pronto_ISDN 2 display comprises the status panel, which continually shows
the status of the two lines, and the menu display, showing different options in a tree
structure.
1.- STATUS DISPLAY: Once the equipment is suitably initialised, the display
controller starts to show the status of each line, switching between the status for line 1
and that for line 2 every 5 seconds. The information shown for each line includes the line
concerned (L1 or L2), its status (connected or not), compression mode, input audio,
telephone control and audio synchronisation state (“FRAMED” means synchronised).
When the user carries out any action on a line, or an event occurs that requires the user’s
attention, the status display warns the user of this situation, such as, for example, when a
call is being made and an incoming call is detected on a line (RING). The following are
two examples of display messages.
L 1
G 7
C O N E C T E D
2 2
F R A M E D
- A -
L 2
G 7
C O N E C T E D
1 1
F R A M E D
- A -
The meaning of each field that can be potentially displayed in the status display is
briefly explained in Chapter 3 of this manual.
M
By pressing Key 1 or 2 on the front panel, status of line 1 or line 2 will be
immediately shown on the display.
2.- MENU DISPLAY: When ENTER/MENU is pressed, the equipment’s menu
is displayed. If no other action takes place during the next 17 seconds, the display
automatically switches back to the status display.
The different menu options are explained below in detail. You are recommended to
follow these explanations along with the menu tree included at the end of this manual.
PRODYS
18
PRONTO_ISDN 2
USER’S MANUAL V6.1
2.3 MENU
The user can use the menu of options on the display to control all the functions
necessary for working with the Pronto_ISDN 2. The ⇐, ⇑ and ⇒ keys are used to
move through the different options, and the MENU/ENTER key is used to select the
required option.
⇒ : Moves to the menu option to the right. When the last option is selected, this
key returns the selection to the first one, i.e., the leftmost one. The selected
option is shown on the display between braces ({}).
⇐ : Moves to the menu option on the left. When the first option is selected, this
key moves the selection to the last one, i.e., the rightmost one. The selected
option is shown on the display between braces ({}).
⇑ : Steps up one level in the menu. When at the topmost level, this exits the menu
function and returns to the status display for each line.
MENU/ENTER : Enables the option between braces and passes program control
to the subroutine associated with that option.
The menu is entered by pressing the ENTER/MENU key, causing the following
to appear on the display:
{
L 1
M E N U
} L 2
C O N F
I N F
The arrow keys⇐ ⇒ are used to move from one option to another; for example,
if the right arrow key is pressed, the menu item L2 appears enclosed between braces
({}). The selected option will always appear between braces. If, at the end of the line, ⇒
is pressed, the selection point will return to the start of the line. Likewise, if L1 is
selected and ⇐ is pressed, INF will be selected. This applies to all the menu screens.
When ENTER is pressed, the menu for the selected option, enclosed in braces, is
displayed.
The meaning of the above options is:
• L1: Functions and parameters for configuring Line 1.
• L2: Functions and parameters for configuring Line 2.
• CONF: General equipment configuration parameters, affecting both Line 1
and Line 2.
PRODYS
19
PRONTO_ISDN 2
USER’S MANUAL V6.1
• INF: More information for each line, additional to the data shown on the
status display.
The parts of the tree corresponding to the L1 and L2 options are exactly
the same for modes G711 and G722, with the difference that in MPEG mode, the
menu for L2 will be disabled.
The following gives details of each of these selections.
+ {L1}
On selecting L1, the display shows:
L 1
{ C A L L
M E N U
}
T A
C O D E C
• CALL: Dialling functions for line 1.
• TA: Terminal adaptor configuration for line 1.
• CODEC: Audio encoding/decoding mode configuration for line 1.
Selecting these leads to:
+ {L1}--{CALL}
On pressing ENTER/MENU with the CALL option selected, the display
shows:
L 1
{ D I A L
M E N U
} R D I A L
B O O K
• DIAL: This option is selected for dialling directly on the telephone keypad on
the front panel. Dialling may be carried out from an external telephone when
this mode is selected from the CONF option on the main menu.
M
AUTOMATIC DIALLING: Two specific control lines in the DB25
connector on the rear panel allow automatic dialling (see 2.5 REMOTE
CONTROL ).
• RDIAL: Dial the last number dialled. This number is lost when the equipment
is switched off.
PRODYS
20
PRONTO_ISDN 2
USER’S MANUAL V6.1
• BOOK: Call a number stored in the telephone book.
The following are further details of these options:
+ {L1}--{CALL}-{DIAL}
When this option is selected, the display shows:
L 1
1 2
D I A L
3
4
As the user dials numbers, these appear on the display and a flashing
cursor moves to the right. The ⇐ key can be used to erase numbers and to move
the flashing cursor to the left, up to the starting point. Up to 16 digits can be
entered.
When the user presses the ENTER/MENU key, the equipment starts to
dial the number on the screen on line 1; this number will be stored in memory for
possible re-calls with the redial option.
M CALL PROCEDURE AT 128 Kbps
On selecting any of the MPEG modes at 128 Kbps (using the two B
channels of a BRI) the user may call two different numbers or the same
through the two B channels. In this case, pressing the ENTER/MENU key
right after dialling the number associated to line 1, as previously mentioned,
the DISPLAY will show:
L 2
1 2
D I A L
3
4
Then the user will have the option to modify the number associated
to line 2 or to leave it as it is if the number to dial is the same as the one of
line 2. By pressing the ENTER/MENU key the two calls are established. The
same will automatically happen once the above display comes on and the
user does not press any key for 5 seconds.
The following is displayed:
L 1
1 2
C A L L I N G .
3 4 5 6 7 8
.
.
When the action is complete, i.e., communication is established or it is
decided that this is not possible, the system leaves the menu and returns to the
display for normal operation.
Once communication has been established, it is possible to see the number
that was dialled by pressing the CALL1 key located on the front panel of the
equipment. The following message will be briefly displayed.
PRODYS
21
PRONTO_ISDN 2
L 1
1 2
USER’S MANUAL V6.1
C O N E C T E D
3 4 5 6 7 8
T O
M CALL WITH A SUBADDRESS:
To dial a number with a subaddress, just press the hash key (on the
phone or the front panel) and then enter a digit from 0 to 9. When the
hash key is pressed a point will be displayed to indicate the subaddress.
+ {L1}--{CALL}-{RDIAL}
This is the re-dialling option. When it is selected and ENTER/MENU is
pressed, the display shows the last number dialled on this line. If no number has
been dialled previously, the area of the display used to show the number remains
blank.
L 1
1 2
3
4
5
R D I A L
6 7 8
When ENTER/MENU is pressed, the system operates in the same way as
for DIAL.
+ {L1}--{CALL}-{BOOK}
Option for entering the telephone book, select a number and dial. The
telephone book can hold up to 16 numbers. The CONF option on the main menu
contains an option for entering numbers. When BOOK is chosen, the display
shows:
L 1
3 3
3
4
5
6
B O O K
7 8
{
1 }
The number between braces is the index number in the telephone book;
the ⇒ and ⇐ keys can be used to move through the book to higher and lower
index numbers, respectively. At index number 16, if the ⇒ key is pressed, the
first index number is displayed again. If ⇐ is pressed at the first number, the
system moves to the last level. The ⇑ key moves one level up.
Once the index number is selected, pressing ENTER/MENU will cause
the system to dial it in the same way as for DIAL and RDIAL.
PRODYS
22
PRONTO_ISDN 2
USER’S MANUAL V6.1
+ {L1}--{TA}
Used for selecting parameters to configure the terminal adaptor. The
display shows:
L 1
T E R M I N A L
A D A P
{ L N U M } C N U M
A N S W
• LNUM: Abbreviation for “LOCAL NUMBER”. This option allows the local
number associated with line 1 to be configured. Configuring the local number
of a line means that the line will only respond to calls to that number. Thus, if
multiple numbers are available on the same line, a different local number can
be assigned to each line, providing automatic line selection (and selection of its
associated audio) from the calling terminal, or if there are several devices on
the same bus, select one of them (sub-addressing). The local number is
recorded in the equipment’s non-volatile memory.
M When working in MPEG mode, the local number assigned to line 2
automatically becomes that assigned to line 1 and cannot be changed
while the equipment is in any MPEG mode. On returning to the
G711/G722 configuration, the previous value for line 2 is recovered.
• CNUM: Abbreviation for “CALLING NUMBER”. This option allows up to
three calling numbers to be configured for each line. The calling number means
that when the equipment receives a call, it will check that it has been made
from one of the numbers programmed with this option. It will only answer
calls from one of these three numbers if automatic answer mode has been
selected. In manual answer mode, the calling number will be displayed on the
screen and the user can decide whether or not to answer it. The programmed
calling numbers are independent for each line. Thus, a call filter can be
programmed to prevent the entry of unwanted calls. Calling numbers are
recorded in the equipment’s non-volatile memory.
M When working in MPEG mode, the only call filters that are enabled
are those programmed for line 1, and these are also applied to line 2.
On return to the G711/G722 configuration, the numbers
programmed for line 2 will be recovered.
• ANSW: Abbreviation for “ANSWER” Used to select the answer mode for the
Pronto_ISDN 2.
M In MPEG mode, the answer mode will be automatic and cannot be
changed. On return to the G711/G722 configuration, the previously
saved configuration will be recovered.
PRODYS
23
PRONTO_ISDN 2
USER’S MANUAL V6.1
The following are further details of these options:
+ {L1}--{TA}-{LNUM}
This option assigns a local number to line 1 or de-assigns it. When a local
number has been assigned to a line, the terminal adaptor will only answer if that
number is called. When ENTER/MENU is pressed, the display shows:
L 1
L N U M
{ N O N E }
N U M B E R
If NONE is selected, no local number will be assigned to the line. If
NUMBER is selected, the display changes to:
L 1
-
L O C A L
N U M B E R
As numbers are entered at the dialling keypad, they appear on the display
as with the dialling processes. When ENTER/MENU is pressed, the number is
assigned as the local number.
M When a local number is associated to a line, the equipment will only
answer calls made to that number and will not notify anything else even
if the call is made to another number assigned to the same basic rate
interface. Consequently, if the equipment does not answer a call, check
the programmed local number.
M When
working in MPEG mode, the local number assigned to line 2
automatically becomes that assigned to line 1 and cannot be changed
while the equipment is in any MPEG mode. On returning to the
G711/G722 configuration, the previous value for line 2 is recovered.
+ {L1}--{TA}-{CNUM}
This option allows one or more telephone numbers (up to 3) to be
assigned as the telephone numbers to which the equipment will answer when they
call. This prevents the equipment from answering an unwanted call (for example,
a caller who has dialled the wrong number). When a call is received,
the caller’s telephone number is stored in a variable which is accessible to the
micro-controller. This will decide whether or not to answer, depending on
whether or not it matches one of the programmed numbers. When
ENTER/MENU is pressed with the CNUM option selected, the display shows:
L 1
PRODYS
C N U M
{ O F F }
O N
24
PRONTO_ISDN 2
USER’S MANUAL V6.1
If the OFF option is selected and the line is in auto answer mode, the call
will be answered automatically regardless of the number making the call.
If the calling numbers are enabled, the display will show the same contents
but “ON” will be enclosed in braces instead of “OFF”. If they are enabled, and in
addition, the line is in auto answer mode, any call on this line will be answered or
rejected depending on whether the calling number matches one of the numbers
stored in the table. Enabling the calling number table thus serves as a call
selection filter. The equipment contains a non-volatile memory so that even when
it is switched off, the numbers in the telephone book do not disappear. The book
has a capacity for three numbers (for each line).
When L1-TA-LNUM-ON is selected, the following appears on display:
L 1
-
C A L
L I N G
N U M
1
The number at the top right of the display shows the index number in the
book of the calling number; the ⇒ and ⇑ keys can be used to step through the
book to higher or lower index numbers, respectively. At index 3, pressing the ⇒
key will move to the first index and from the first index, pressing the ⇑ key will
move up a level in the menu tree. The user may change the numbers stored in the
table using the keypad on the front panel.
As the user dials numbers, these appear on the display and a flashing cursor
moves to the right. The ⇐ key can be used to erase numbers and to move the
flashing cursor to the left, up to the starting point. Up to 16 digits can be entered
per number.
M When
the calling number is enabled and a call is received from a
number that does not match any of those programmed, the following is
displayed:
R E J E C T
C A L L
L 1
C A L L I N G
N U M B E R : Y
M When
a call is received and the answer mode is manual, the calling
number is displayed and the user can decide to answer or not (by
pressing the CALL key of the line on which the call has been received).
M In MPEG mode, the calling numbers of line 1 will be used in the calls
received on line 2, so that the numbers stored for line 2 are not used but
stored so that they can be enabled on return to G711/G722 mode.
PRODYS
25
PRONTO_ISDN 2
USER’S MANUAL V6.1
+ {L1}--{TA}-{ANSW}
This option allows the answering mode to be selected: MANUAL, in
which the system advises of an incoming call and waits for the user to answer it;
and AUTO, in which the equipment itself answers the call.
L 1
A N S W E R
{ A U T O }
M A N U A L
If the answer mode for line 1 is manual, the screen will have the same
contents, but MANUAL will be enclosed in braces.
If the AUTO mode is chosen, the line’s answer mode will be automatic. In
this answer mode, if the calling numbers are enabled and the calling number does
not match any one of those stored in the corresponding table, the call will be
rejected, in which case the display will advise of the situation.
If the MANUAL mode is chosen, calls are answered manually, so that
when a call is received on a line, the associated CALLx LED will flash to show
the situation; and to establish the connection, the user presses the CALLx key.
M In MPEG mode, the answer mode of both lines is AUTO and cannot be
changed by the user. Since the configurations of both lines, however,
are stored in non-volatile memory, the configuration previously
established will be recovered on return to G711/G722 mode.
+ {L1}--{CODEC}
This option allows the encoding/decoding mode for line 1 to be selected.
Note that the selected mode will have important effects on the operation of the
equipment, as described on the Pronto_ISDN 2 block layout section. The display
will show:
L 1
C O D E C
{ G 7 1 1 } G 7 2
2
M P E G
• G711: G711 encoding mode, suitable for telephone voice communications
(3.1 kHz). This is the mode to select when calling a terminal connected to
the analog telephone network (PSTN).
• G722: G722 encoding mode for high quality voice communications (7
kHz).
• MPEG: MPEG 1 Layer II compression mode. This mode can only be
accessed from the menu associated to line 1 and allows a choice of three
possible configurations depending on the bit rate (64 or 128 Kbps), the
audio mode (MONO, DUAL or JOINT STEREO) and wished
PRODYS
26
PRONTO_ISDN 2
USER’S MANUAL V6.1
compatibility (J52, CCS or TELOS). Other MPEG standard parameters
are configured by default as follows:
Sampling frequency = 48 Khz.
CRC enabled
+ {L1}--{CODEC}-{G711}
The G711 will work under A law standard when the selected ISDN
protocol is EURO_ISDN. In the rest of the ISDN protocols, the G711 selected
will be under the Mu Law.
•
Echo Canceler in G711:
When a line is configured in G711, it is possible to active an automatic
electric echo canceler . The electric echo canceler can be activated or deactivated
from the frontal panel by pressing the following keys:
By pressing *1 : The Echo Canceler is activated-deactivated in line 1.
By pressing *2 : The Echo Canceler is activated-deactivated in line 2.
The display will show the echo canceler state of the following way:
L
L
2
G
2
G
7
7
D
1
I
1
O
1
C
1
L
N
F
E
E
C
E
C
O
-
A -
C
C
T E D
E C O
-
A -
The state of the echo canceler is saved in a non-volatil memory to be
recovered when the unit is restarted or when the G711 mode is selected again.
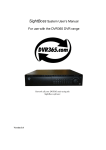
•
Multiplex (multiconference) in G711 communications:
This special configuration allows to stablish a multiconference between
the PRONTO and two G711 communications. When this mode is selected the L
input and output is the only audio interface is working. The following block
diagrams explains how it works:
PRODYS
27
PRONTO_ISDN 2
USER’S MANUAL V6.1
Tx L1
L
INPUT
G711 ENC
L1
+
Rx L1
G711 DEC
L1
Tx L2
L
OUTPUT
+
+
G711 ENC
L2
Rx L2
G711 DEC
L2
It is only available in G711 communications. The user must be sure that
both lines are disconnected before to activate it. By pressing *3 in the front panel
keys the multipex mode is activated-desactivated. When it is activated, the
display indicates it of the following way:
L
2
G
7
1
I
1
D
L
E
M
-
U X
A -
The state of the multiplex mode is saved in a non-volatil memory to be
recovered when the unit is restarted or when the G711 mode is selected again.
MWhen the external analog telephone is using one of the two lines and the
multiplex mode is activated, this line will be disconnected of the multiplex.
+ {L1}--{CODEC}-{G722}
When ENTER/MENU is pressed, the G722 compression mode is selected
directly ; no further configuration is required.
+ {L1}--{CODEC}-{MPEG}
When L1 CODEC MPEG is selected, the display shows:
L 1
C O D E C
M P E G
{ M O D E } A U X _ D A T A
The MODE option allows the line to be configured for any MPEG
encoding mode.
PRODYS
28
PRONTO_ISDN 2
USER’S MANUAL V6.1
The AUX_DATA option enables or disables the sending/receiving of
auxiliary data in MPEG mode.
When L1-CODEC-MPEG-MODE is selected, the display shows:
<
-
L 1
6
M P E G
4 K b p s
M O D E J 5 2
>
The arrow keys on the upper line advise that there are more available
options. On pressing ⇐ the display will show:
<
-
L 1
M P E G
M O D E C C S
{ T E L O S }
>
On pressing ⇒ the display will show:
<
•
- L 1
M P E G
M O D E { C C S }
T E L O S
>
64 Kbps
Selecting the 64 Kbps option and pressing the ENTER/MENU key will
allow the selection of the MONO, DUAL or JOINT STEREO mode. The menu
on the display will show:
L 1
M P E
{ M O N O }
G
M O D E
J S
D U A L
Once the mode is selected, press the ENTER/MENU key to select the
sampling frequency (48 Khz or 24 Khz). The menu on the display will show:
L 1
{ 4
M P E
8 K }
G
M O N O
2 4 k
-
-
-
M
The MONO mode at a sampling frequency of 24 Khz is compatible
with CDQPrima configured as follows:
ENCODER:
Bit Rate= 64 Kbps; Algorithm MPEGL2; Sample rate 24 Khz;
ALG MODE Mono; LINE FMT 1 LN.
DECODER:
INDEP, that is, independent of encoder.
PRODYS
29
PRONTO_ISDN 2
USER’S MANUAL V6.1
•
J52
Selecting the J52 option and pressing the ENTER/MENU key will allow
the selection of the MONO, DUAL or JOINT STEREO mode. The menu on the
display will show:
L 1
M P E G
{ M O N O }
•
M O D E
J S
D U A L
CCS
Selecting the CCS option and pressing the ENTER/MENU key will allow
the selection of the DUAL or JOINT STEREO mode. The menu on the display
will show:
L 1
-
M P E
- - -
G
{
M O D E
J S }
D U A L
M The CCS modes permit the compatibility between the PRONTO_ISDN
2 and CDQ Prima configured as:
ENCODER:
Bit Rate= 128 Kbps; Algorithm MPEGL2, CCN or CCS; Sample
rate 48 Khz; ALG MODE Joint Stereo; LINE FMT H221_2LINES
•
TELOS
Selecting the TELOS option and pressing the ENTER/MENU key will
allow the selection of the MONO, DUAL or JOINT STEREO mode. The menu
on the display will show:
L 1
M P E
M O N O
G
M O D E
J S
D U A L
M
The JSTELOS mode permits the compatibility between the
PRONTO_ISDN 2 and the TELOS ZEPHYR configured as ISO/MPEG
Layer II JOINT STEREO and two 64 Kbps channels. This mode is
compatible as well with the following CCS units:
CDQ2000-> The encoder configured in ISO/MPEG Layer II JOINT
STEREO and sampling frequency of 48 Khz. The decoder can work
independent or not. In previous version to the 4.0, the decoder must be
configured independent of the encoder (configuration of swithc nº 6 in
UPPER position).
PRODYS
30
PRONTO_ISDN 2
USER’S MANUAL V6.1
CDQPrima->
ENCODER:
Bit Rate= 128 Kbps; Algorithm MPEGL2, CCN or CCS; Sample
rate 48 Khz; ALG MODE Joint Stereo; LINE FMT CCS 2 LN.
In previous version to the 4.0, the decoder must be configured
independent of the encoder.
When L1-CODEC-MPEG-AUX_DATA is selected, the display shows:
L 1
C O D E C
{ O F F } 3 0 0
M P E G
2 4 0 0
D T
9 6
If the sending/receiving of auxiliary data in MPEG mode is enabled, 300,
2400 or 9600 would be the option between braces. The data format would be
asynchronous, 8 data bits, 1 START/STOP bit, no parity.
M Auxiliary data are included in the MPEG audio frame, at the expense of
replacing any audio bits. 300 bps is a good balance between audio
quality and transmission rate.
M The format of auxiliary data included in the MPEG frame is compatible
with that employed in the CDQ Prima audio codec family from CCS
(GENERIC, MUXRATE=300, 2400 or 9600, DSPRATE = 300, 2400 or
9600, MUXMODE= NOMUX).
PRODYS
31
PRONTO_ISDN 2
USER’S MANUAL V6.1
+ {L2}
When L2 is selected, the system enters the tree structure for configuring
line 2. The part of the menu tree for options L1 and L2 is identical for the G711 o
G722 modes. In MPEG mode, however, the menu for L2 is disabled and any
attempt to gain access to it will be rejected with a message stating that this is not
possible in MPEG mode. This is due to the fact that once the MPEG mode is
selected in line 1, line 2 is only operational for communications and it is not
possible to select a G711 OR G722 mode, for example, for it.
Below are the restrictions related to the use of L2.
M If the PRONTO_ISDN 2 is configured for G711/G722 mode and line 2
is connected, an MPEG compression mode cannot be selected in line 1.
To achieve this, it is necessary to terminate the communication on line
2.
M If the PRONTO_ISDN 2 is configured in G711/G722 mode in line 1, it is
only possible to choose between G711 or G722 on line 2. This is due to
the fact that in MPEG mode there is one sole codec, operating
according to the settings of line 1. In MPEG mode, line 2 is enabled
only as an additional communications channel for this codec.
PRODYS
32
PRONTO_ISDN 2
USER’S MANUAL V6.1
+ {CONF}
This main menu option accesses the section for the general configuration
of the equipment - those parameters that affect both line 1 and line 2. The display
shows:
{
< - B O O K }
C O N F
R E M O T E
-
>
The arrows at the sides show that the display can be moved sideways to
show two more configuration options for the user. Thus, if the option between
braces is BOOK and the ⇐ key is pressed, the display shows:
< - A U D _
C O N F
I N
A U T
- - >
{ N E T }
If the ⇒ key is pressed in this situation, the screen reverts to the previous
state.
• BOOK: Telephone book. Allows up to 16 numbers to be saved, each
of which can be accessed from either of the two lines. All numbers are
saved in non-volatile memory.
• REMOTE: Selection of required remote control.
• AUD_IN: Selection of analog or digital audio input.
• AUTOM: Selection of the manual or automatic operation mode of the
codec. In automatic mode, the equipment configures the codec to
different modes once a connection is established until audio is
synchronised in a certain mode, which is then considered to be the
mode in which the calling equipment is working. The automatic mode
can only be enabled if one of the MPEG modes has been selected.
M If the PRONTO_ISDN 2 is configured in G711/G722 mode, it
•
PRODYS
will attempt synchronisation only in one of these two modes,
regardless of whether the automatic mode is enabled or not.
Therefore, a call from a codec that does not work in one of
these two modes cannot be syncronised.
NET: Selection of the ISDN protocol if the version of terminal
adapter allows it.
33
PRONTO_ISDN 2
USER’S MANUAL V6.1
+ {CONF}-{BOOK}
3
3
3
4
5
6
B O O K
7 8 -
{
1 }
Provides access to the telephone book in order to edit one or more
numbers. The user can enter up to 16 numbers in this book. These numbers can
then be used to make calls. The equipment contains a non-volatile memory so
that even when it is switched off, the numbers are retained in the telephone book.
The number in the top right of the display is the index in the telephone
book; the ⇒ and ⇑ keys can be used to move through the telephone book to
higher or lower index numbers, respectively. If ⇒ is pressed at index number 16,
the system moves to the first index number. If ⇑ is pressed at index number 1, the
system moves to the previous level in the menu tree structure. The user can
change the numbers stored in the table using the keypad on the front panel.
As the user dials numbers, these appear on the display and a flashing
cursor moves to the right. The ⇐ key can be used to erase numbers and to move
the flashing cursor to the left, up to the starting point. Up to 16 digits can be
entered per number.
When the user presses ENTER/MENU, the number currently shown on
the display is saved in the memory at the position indicated by the index number.
Once saved, further index numbers can be selected and filled. To exit and return
to the CONF menu, press the up arrow key.
+ {CONF}-{REMOTE}
There are two possibilities: a) Enable the external analog telephone
connected to the front panel; and b) Enable the ON_AIR remote control
functions related to the DB25 connector on the rear panel.
C O N F
R E M O T E
{ P H O N E }
C O N T R O L
The PHONE option can only be enabled (ON) or disabled (OFF); and the
same applies to CONTROL. Therefore, the selection of either leads to the
following displays:
C O N F
P H O N E
{ O N }
R E M O T E
O F F
C O N F
R E M O T E
C O N T R O L
{ O N } O F F
PRODYS
34
PRONTO_ISDN 2
USER’S MANUAL V6.1
The ⇑ key returns to the CONF menu.
For detailed information on the operation of both options, see the chapters:
EXTERNAL TELEPHONE AND REMOTE CONTROL CONNECTOR.
+ {CONF}-{AUD_IN}
These options allow the user to select between analog or digital audio
input (AES/EBU format).
C O N F
A U D I O
{ A N A L O G } A E S / E B U
If the AES/EBU audio input is selected, the display will be the same
except that the AES/EBU option will be enclosed in braces.
Information on the audio input is stored in the non-volatile memory so
that it is retained even when the equipment is switched off.
The audio interface selected is shown on the bottom right of the status
screen as follows.
With the analog input selected:
L 1
6
I D L
4 k
E
M N
- A -
With the digital input selected:
L 1
I D L
G 7 2 2
E
- D -
+ {CONF}-{AUTOM}
C O N F
O N
A U T O M A T I
{ O F F }
C
If the automatic mode is active, the display will be the same except that
the ON option will be enclosed in braces.
M The
AUTOMATIC mode works only when the PRONTO_ISDN 2 is
configured for one of the three MPEG modes.
When the equipment is in automatic MPEG mode and a call is received on
one or both lines, the equipment will look for the encoding mode of the incoming
call(s), but if it is G711, the equipment operates directly in this mode because it is
inmediately detected.
PRODYS
35
PRONTO_ISDN 2
USER’S MANUAL V6.1
The equipment will continue to search until line 1 is synchronised, which
is considered to mean tha the encoding mode selected for both lines is correct.
During the search stage, the equipment goes through all the data
configuration modes (the same for both lines regardless of the number of
connected lines), following this sequence:
a) If the unit detects a H221 frame, this next searching sequence will
follow:
J52-> G722 -> CCS -> J52...
b) If the unit does not detect a H221 frame, this next searching sequence
will follow:
TELOS -> 64 Kbps -> G722 -> TELOS...
An specific search time is employed for each mode.
If the call is not synchronised in any mode, the equipment will restart searching as
from JOINT STEREO 128 Kbps.
While the equipment is searching, the display will flash the currently
selected encoding mode and the word SEARCH for each of the connected lines.
While the equipment is searching, the user cannot access the menu with
the ENTER key. If an attempt is made, the following message is displayed:
N O T
A V A I L A B L
S E A R C H I N G . . .
E
In automatic mode, certain restrictions apply to the reception of calls.
- If during the search process in line 1, a call is received on line 2 in G711
voice mode, the call will be rejected and the following message is displayed:
R E J E C T
C A L L
L 2
G 7 1 1
N O T
A L L O W E D
- When two calls are received in data mode and the equipment ends its
search by synchronising the MPEG MONO 64 Kbps mode, line 2 will be
disconnected automaticaly, since only line 1 is used in this mode.
- If a call in data mode is received and synchronised, the search ends and a
second incoming call will not start a new search because the equipment will keep
the same mode for both lines. But if G722 is the mode in line 1, line 2 will
automatically detect a voice call. If MPEG Mono 64 Kbps is the mode in line 1,
incoming calls to line 2 will be rejected, with the following display message:
R E J E C T
C A L L
L 2
M O D E
N O T
A L L O W E D
PRODYS
36
PRONTO_ISDN 2
USER’S MANUAL V6.1
- If a second call is received while in a search process, the
encoding/decoding mode of line 2 will not be altered, and will be configured for
the same mode as line 1, i.e., the search process is undertaken for both lines.
M The
equipment stores the encoding/decoding mode for both lines, so
that if it is changed as a result of an automatic search, the initial mode
can be recovered when both lines are disconnected.
M In
G711/G722 mode, the equipment is automatically configured to
G711 for incoming voice calls and to G722 for incoming data calls, on
any of the two lines. When the call ends on one line, the line always
returns to the initial encoding mode if it is different.
M Automatic
mode only works for the reception of calls. Also, mode
storage and recovery only takes place in the case of changes generated
by the reception of calls.
M If
the PRONTO_ISDN 2 is configured in G711/G722 mode, the
automatic mode will attempt synchronisation only in one of these two
modes, regardless of whether the automatic mode is enabled or not.
Therefore, a call from a codec that does not work in one of these two
modes cannot be syncronised.
+ {CONF}-{NET}
This option allows to configure the ISDN terminal adapter with diferent
protocols.
There are two version of terminal adapters: EURO_ISDN terminal adapter and
Universal terminal adapter. The PRONTO_ISDN 2 recognizes automatically the
terminal adapter enabling the available options only when the universal adapter is
detected.
When the NET option is selected, the display will show:
< - C O N F
N E T
{ E I S D N }
A T T 5 E
- - >
S S
The arrows at the sides show that the display can be moved sideways to
show two more configuration options for the user. Thus, if the option between
braces is EISDN and the ⇐ key is pressed, the display shows:
< - C O N F
{ D M S 1 0 0 }
PRODYS
N E T
N A T
1
- >
37
PRONTO_ISDN 2
USER’S MANUAL V6.1
The ISDN protocolos are the following:
q
q
q
q
EISDN: This is the type of ISDN available in Europe and in most countries
except for North America. It hasn't SPID.
AT&T 5ESS.
Northern Telecom DMS100.
National ISDN 1 o NAT1: This kind of switch is also provided by AT&T
and Northen Telecom.
The AT&T 5ESS, DMS 100 and NAT1 request the SPID (Service Profile
Identification) numbers to the ISDN network company. These numbers (one of
each B channel) are provided by the telephone company and they must be
introduced always that one of these kind of ISDN is selected.
The PRONTO_ISDN 3 will request them once one of these ISDN
protocols are selected:
L 1
-
S P
I D
N U M B E R
L 2
-
S P
I D
N U M B E R
Once an ISDN type is selected, the terminal adapter will be loaded with
the new software. The display will show the following:
L O A D I N G
T A
MIt isn't necessary to reset the unit or to disconnect the ISDN to perform
this operation.
MIf the terminal adapter version only admits EURO_ISDN, when the user
selects the option NET, the display will show the following message:
I N
N O T
PRODYS
E
I S D N
A V A I L A B L
E
38
PRONTO_ISDN 2
USER’S MANUAL V6.1
+ {INF}
This option allows to obtain information about the software version and
the status of each line.
The display will show:
I N F O R M A T I O N
{ V E R S I O N }
L I N E
+{INF}-{VERSION}
The display will show the following information:
MICRO: Microcontroller version.
DSPcod: Encoder DSP version.
DSPdec: Decoder DSP version.
TA: ISDN terminal adapter version when the unit is working in ISDN
mode.
X21: X21 interface version when the unit is working in X21 mode.
M I C R O : 6
D S P c o d :
.
6
0
.
0
0
0
/
6
.
0
>
0
The arrows at the sides show that the display can be moved sideways to
show the rest of version information.
[ T A : 2. 0
D S P d e c
1
:
]
6
.
0
0
/
6
.
0
>
0
+{INF}-{LINE}
When this option is selected, the following message is displayed:
L
I N E
{ L 1
I N F O R M A T I O N
}
L 2
The ⇐,⇒ and ENTER keys can be used to obtain the following additional
information about the lines:
• CN -> YES or NO, depending on whether the call filter (CALLING
NUMBER) is enabled.
• LN -> If a local number has been entered, it is shown at the bottom of the
display.
• If the answering mode is manual or automatic.
PRODYS
39
PRONTO_ISDN 2
USER’S MANUAL V6.1
• The sampling frequency (permanent at 48 Khz).
• The cycle redundancy code (always ON).
• Auxiliary data enabled/disabled in MPEG modes and the data speed selected
(300, 2400 or 9600 bps).
L 1
L N :
C N : N O
5 3 0 0
A U T
F s : 4 8
C R C
A U X _ D A T A : 3 0
: Y
0
- -
>
E S
- - >
The content of the display changes according to the current operation mode: In
G711/G722 mode, the information on the sampling frequency, auxiliary data
and CRC cannot be displayed. In MPEG mode, this information can be
displayed and the arrow displayed on the right indicates that it is available.
PRODYS
40
PRONTO_ISDN 2
2.4
USER’S MANUAL V6.1
EXTERNAL TELEPHONE
When PHONE ON is selected from the CONF REMOTE menu of the
Pronto_ISDN 2, this enables the use of an analog telephone connected to the RJ11
socket on the front panel. From this moment on, the system controller activates access to
the multi-frequency tone decoder connected to the telephone and can receive commands
from the telephone, using its dialling keys.
The use of the telephone depends on the configuration mode of the equipment.
The main difference is that the telephone can replace an audio I/O channel in G711/G722
modes, and this is not possible in MPEG modes. The use and control features of the
telephone for both cases, are described below.
2.4.1. USE IN G711/G722
( MAKING A CALL
1.- Lift the handset.
2.- Select the line:
- Press * and then 1 to select line 1
- Press * and then 2 to select line 2
The display of the Pronto_ISDN 2 will show the DIAL screen for the selected
line and the audio for line 1 will be that of the telephone. At the same time, the
telephone will receive a dialling invitation tone.
3- Dial the number. The display will show the number as it is dialled.
4.- Press * to make the call.
The display will then show information regarding the progress of the call. If the
call is established, PH1 and PH2 will be displayed at the top to show the line
assigned to the telephone. A intermittent tone will be heard on the telephone until
the communication is established.
( TERMINATING A CALL
The call is terminated simply by hanging up the telephone, provided that it
has control of the line (this is so if PH1 or PH2 is displayed).
( PLACING A CALL ON HOLD
Once the telephone call is established, pressing * will transfer the audio
automatically to the main input and output (the XLR connectors of the
Pronto_ISDN 2), with the output in the MUTE state (call on hold).
MOnce a call has been placed on hold, hanging up the telephone will not
terminate the call. When the telephone no longer has control of the line
PH1 or PH2 is no longer displayed.
PRODYS
41
PRONTO_ISDN 2
USER’S MANUAL V6.1
( TRANSFERING THE CALL TO THE PROGRAMME (ON AIR)
Once communication has been established using the telephone, pressing #
will automatically transfer the audio to the main input and output (the XLR
connectors of the Pronto_ISDN 2) in the ON AIR position. If the system is on
hold, the audio output will be activated.
MOnce
a call has been transfered to the programme, hanging up the
telephone will not terminate the call. When the telephone no longer has
control of the line PH1 or PH2 is no longer displayed.
( RETRIEVING THE CALL
Simply press “*” and the line number (“1” or “2”). When a line is recovered
with the telephone, the switch for the respective line is taken to “on hold” state
and the LED of the respective ON AIR key goes off (if it was previously lighted
up). The two lines cannot be controlled at the same time with the telephone. If
one is under control, it must be released and the other line recovered, to gain
control of the latter. Pressing “*” will release any control of a line, and then the
other line can be recovered.
( ANSWERING AN INCOMING CALL:
When a line in manual answer mode receives a call, the LED of the CALL
key will flash. If the handset is lifted then or was already unhung, the telephone
will gain control of the line which received the call. If the equipment is in MPEG
mode, the answering mode is automatic and the external telephone is not
relevant.
( SELECTING AN ENCODING MODE
With the line disconnected:
1.- Press # 1 1 consecutively to select G711 on line 1.
2.- Press # 1 2 consecutively to select G722 on line 1.
3.- Press # 2 1 consecutively to select G711 on line 2.
4.- Press # 2 2 consecutively to select G722 on line 2.
5.- Press 7 # 1 3 consecutively to select 64 Kbps MONO
6.- Press 8 # 1 3 consecutively to select 64 Kbps JOINT
7.- Press 9 # 1 3 consecutively to select 64 Kbps DUAL
8.- Press 7 # 1 4 consecutively to select J52 MONO
9.- Press 8 # 1 4 consecutively to select J52 JOINT
10.- Press 9 # 1 4 consecutively to select J52 DUAL
11.- Press 8 # 1 5 consecutively to select CCS JOINT
12.- Press 9 # 1 5 consecutively to select CCS DUAL
13.- Press 7 # 1 6 consecutively to select TELOS MONO
14.- Press 8 # 1 6 consecutively to select TELOS JOINT
15.- Press 9 # 1 6 consecutively to select TELOS DUAL
PRODYS
42
PRONTO_ISDN 2
USER’S MANUAL V6.1
2.4.2. USE IN MPEG MODES
( MAKING A CALL
1.- Lift the handset.
2.- Select the line:
- Press * and then 1 to select line 1
MSince it is not possible to make a call on line 2 in MPEG modes, the
combination of “*” and “2” is not allowed and would result in the
following message:
I N
M P E G
M O D E
N O T
A V A I L A B L E
The display of the Pronto_ISDN 2 will show the DIAL screen for line 1.
3- Dial the number. The display will show the number as it is dialled.
4.- Press * to make the call.
The display will then show information regarding the progress of the call.
Contrary to the previous case, the audio is not controlled by the
telephone, so the display will not show any relevant information.
( TERMINATING A CALL
- Press * and then 1 to hang up line 1 (and line 2 if it is connected).
- Press * and then 2 to hang up line 2.
( PLACING A CALL ON HOLD OR ON AIR
- Press # and then 1 to toggle the “ON AIR” state of line 1 (and of line 2 if it is
connected).
MSince the ON_AIR2 key is not enabled in MPEG modes, the combination
of “#” and “2” is not allowed and would result in the following message:
I N
M P E G
M O D E
N O T
A V A I L A B L E
( ANSWERING AN INCOMING CALL
Not allowed.
PRODYS
43
PRONTO_ISDN 2
USER’S MANUAL V6.1
( SELECTING AN ENCODING MODE
The encoding mode is selected the same way as in the previous case.
M If the telephone is disabled and multifrequency tones are used for the
audio inputs, the control codes are the same as those used with the
telephone enabled in MPEG mode.
PRODYS
44
PRONTO_ISDN 2
USER’S MANUAL V6.1
2.5 REMOTE CONTROL
RS232 INTERFACE
The Pronto_ISDN 2 can be remotely controlled from a PC using a specific
application for its control or from a dedicated terminal. The DB9 connector has
the following pinout:
PIN
1
2
3
4
5
SEÑAL
NC
Tx 232
Rx 232
NC
GND
PIN
6
7
8
9
SEÑAL
NC
NC
NC
NC
For connection to a PC:
PRONTO
PC
2
................. 2
3
................. 3
5
................. 5
CONTROL DEDICATED LINES
A DB 15 connector is provided on the rear panel of the Pronto_ISDN 2 for remote
control access. The following table shows the pinouts of this connector.
PIN
1
2
3
4
5
6
7
8
SEÑAL
REM_ON_AIR 1
REM_ON_AIR 2
AUTOM_DIAL_L1
AUTOM_DIAL_L2
NC
DGND
DGND
+15 VA
PIN
9
10
11
12
13
14
15
SEÑAL
L_REM_CALL 2
L_REM_CALL 1
L_REM_ACT
FRAMED_1
FRAMED_2
NC
AGND
a) PRONTO_ISDN 2 INPUT LINES
a.1) ON AIR: Specific control lines may be used from a remote point
to place calls ON AIR simply by grounding the signals.
REM_ON_AIR 1: Grounding this signal sets line 1 ON AIR.
REM_ON_AIR 2: Grounding this signal sets line 2 ON AIR.
PRODYS
45
PRONTO_ISDN 2
USER’S MANUAL V6.1
a.2) AUTOMATIC DIALLING: Specific control lines may be used to
automatic dialling. By grounding AUTOM_DIAL_L1 a call is made
automatically through the LINE 1 to the number saved in the phone book
index 1 and by grounding AUTOM_DIAL_L2 a call is made
automatically through the LINE 2 to the number saved in the phone book
index 2.
b) PRONTO_ISDN 1 OUTPUT LINES
These are TTL-type signals with the following functions:
L_REM_CALL 1: Indicates a call on line 1 when intermittent; line
disconnected when at 0 and line connected when at 1.
L_REM_CALL 2: Indicates a call on line 2 when intermittent; line
disconnected when at 0 and line connected when at 1.
L_REM_ACT: 1 when the remote control signals are activated.
FRAMED_1: Line 1 audio synchronized when at 1.
FRAMED_2: Line 2 audio synchronized when at 1.
PRODYS
46
PRONTO_ISDN 2
USER’S MANUAL V6.1
3 DISPLAY INFORMATION FIELDS
In normal operation, the display shows the current line status information. This
information is arranged as follows:
A
B
L 1
G 7
C
C O N E C T E D
2 2
F R A M E D
D
E
P H 1
- A -
F
A) Shows the line to which the information refers, L1 or L2.
B) Shows the state of the communications line:
IDLE:
DISCONNECTED
CONNECTED
RING:
RECEIVING A CALL
CALLING
C) When the audio input/output associated with one of the two lines is connected to the
external telephone (after pressing * 1 with the external telephone enabled), this field
of the display will show PH1 for line 1 and PH2 for line 2. Otherwise, this field is
blank.
M In this field, will be indicated the specific MPEG mode: MN (MONO), DU
(DUAL) and JS (JOINT STEREO)
For example, if the MPEG mode selected is MONO 64 Kbps the display will
show the following:
L 1
6
I D L
4 K
E
M N
- A -
D) Encoding mode selected:
G711, G722, 64 Kbps, J52, CCS or TELOS.
E)
This field shows whether the decoder is synchronised (FRAMED) or not (blank).
Once a connection is established, audio is not available at the output until the decoder
is synchronised.
F) Shows the audio input selected on the menu:
-A- : Analog audio input
-D- : AES/EBU digital audio input.
The display shows another series of messages whose meaning is:
PRODYS
47
PRONTO_ISDN 2
USER’S MANUAL V6.1
1)
L 1
1 2
C A L L I N G .
3 4 5 6 7 8 9
.
.
A call has been made but has still not connected.
The bottom line shows the number called.
M Once the connection has been established, the number called can be
displayed by pressing the CALL1 key if the call has been made on
line 1, or CALL2 if it is on line 2. When the key is pressed, the
display shows:
L 1
1 2
C O N E C T E D
3 4 5 6 7 8 9
L 1
1 2
R I N G
3 4 5 6 7 8
T
O
2)
9
A call has been received on the line shown (L1 or L2).
The bottom line shows the caller’s number.
M Once the connection has been established, the caller’s number can be
displayed by pressing the CALL1 key if the call has been received on
line 1, or CALL2 if it is on line 2. When the key is pressed, the
display shows:
L 1
1 2
C O N E C T E D
3 4 5 6 7 8 9
T
O
3)
R E J E C T
C A L L
L 1
C A L L I N G
N U M B E R : Y
A call has been received on the line shown (L1 or L2) but has been
rejected since the call filter (caller number ON) is enabled and the
caller’s number does not match any of the numbers programmed.
PRODYS
48
PRONTO_ISDN 2
USER’S MANUAL V6.1
4)
R E J E C T
C A L L
L 2
G 7 1 1
N O T
A L L O W E D
A call in G711 mode has been received on line 2 and the other line is
connected and searching for audio synchronisation. The call is rejected.
5)
R E J E C T
C A L L
L 2
M O D E
N O T
A L L O W E D
A call has been received on line 2 and the other line is connected in 64
kbps MPEG MONO mode. The call is rejected since in this mode only
line 1 can be used.
6)
N O
P H Y S I C A L
L I N E
I
S D N
There are ISDN connection problems. Very probably the equipment is
not connected to the ISDN line (BRI) or the cable is faulty.
7)
I N
M P E G
M O D E
N O T
A V A I L A B L E
This message appears when an attempt is made to access an option
that is not allowed in MPEG mode.
8)
N O T
A V A I L A B L
S E A R C H I N G . . .
E
This message appears when an attempt is made to enter the menu during an
automatic search.
9)
L O A D
PRODYS
I N G
D S P
s
49
PRONTO_ISDN 2
USER’S MANUAL V6.1
When the equipment is switched on, the micro-controller cannot load the
software into the DSPs. If the message remains on the screen or the
equipment re-initiates the start-up sequence, contact technical service.
10)
P R E S S
T O
G O
E N T E R
K E Y
I N T O
M E N U
This message appears after exiting the menu or when the equipment is
switched on.
PRODYS
50
PRONTO_ISDN 2
USER’S MANUAL V6.1
4 FREQUENTLY-ASKED QUESTIONS
Why doesn’t the equipment receive calls made to our number?
1. If the equipment is not connected correctly to an ISDN socket, it cannot
receive any calls. Even though the ISDN connection is apparently correct, the line status
can be checked by making a call. If the line does not respond correctly, the following
message is displayed:
N O
P H Y S I C A L
L I N E
I
S D N
2. If the equipment is configured with a local number for a line, it will reject any
call to any other number without the user noticing. The local number serves to
differentiate between multiple devices connected to the same number. The solution is to
select the NONE option in the terminal adapter configuration menu (see Chapter 2.3 CONF - REMOTE).
3. If the equipment’s call filters are activated for a line (CNUM activated), all
calls to that line will be rejected if they do not match those of the filter. When a call is
rejected, the display shows:
R E J E C T
C A L L
L 1
C A L L I N G
N U M B E R : Y
Why don’t the ON AIR1 and ON AIR2 audio switches work?
1. If the equipment’s remote control is active, it will be the remote control that
handles the status of the switches (and LEDs), and the ON AIR1 and ON AIR2 keys are
disabled (see Chapter 2.3 -CONF - REMOTE).
2. If the control for a line is taken by the telephone, the ON AIR switch for that
line is disabled.
Why doesn’t the telephone work?
If, after the telephone has been correctly connected to the front panel, it does not
work, check the menu to see whether it has been enabled (see Chapter 2.3 - CONF REMOTE).
Why doesn’t the DTMF tone detector by line work?
If the control by external telephone is enabled, the detection of DTMF tones by
line is disabled. It can be enabled by disabling the control by external telephone (see
Chapter 2.3 - CONF - REMOTE).
PRODYS
51
PRONTO_ISDN 2
USER’S MANUAL V6.1
Why is audio connected to the analog inputs not sent to the remote end?
1. If the audio selected is digital, the audio sent to the remote end will be that
which enters via the digital audio connector in the AES/EBU format; therefore, if no
audio is supplied to the digital input, no audio will be received by the remote end. The
status screen displays information on the input audio chosen for each line. -A- indicates
that the corresponding line has analog audio selected as its input and -D- denotes digital
audio. (See Chapter 3 for the display information fields.)
These values may be changed from the general configuration menu. (see Chapter 2.3
- CONF - REMOTE).
2. If the audio chosen is correct but is still not received at the remote end, check
that the control of the line in question is not taken by the telephone, in which case it will
be the sound from the telephone’s microphone that is sent to the remote end. When the
line control is taken by the telephone, the display shows PH1 (if the telephone is
controlling the audio on line 1) or PH2 (if the telephone is controlling the audio on line
2). (See chapter 3 for the display information fields.)
To release the control of the line, the call may be left on air (by pressing #) or on
hold (by pressing *). When the telephone loses control of the line, the letters PHx
disappear from the display (see Chapter 2.3 -CONF - REMOTE).
Why is the audio connected to the digital inputs not sent to the remote end?
1. If the selected audio input is analog, the audio sent to the remote end will be
that entering the XLR connectors for analog audio; therefore, if no audio is supplied to
these analog inputs, the remote end will not receive any audio. The status display informs
on the input audio selected for each line. -A- indicates that the respective line has analog
audio selected as its audio input, while -D- indicates that digital audio is selected. (See
Chapter 3 for the display information fields.)
These values may be changed from the general configuration menu (see Chapter 2.3
- CONF - REMOTE).
2. If the audio chosen is correct but is still not received at the remote end, check
that the control of the line in question is not taken by the telephone, in which case it will
be the sound from the telephone’s microphone that is sent to the remote end. When the
line control is taken by the telephone, the displays shows PH1 (if the telephone is
controlling the audio on line 1) or PH2 (if the telephone is controlling the audio on line
2). (See Chapter 3 for the display information fields.)
To release control of the line, the call can be left on air (by pressing #) or the call
can be placed on hold (by pressing *). When the telephone loses control of the line,
the letters PHx disappear from the screen (see Chapter 2.3 - CONF - REMOTE).
Why does the equipment not synchronise itself to an incoming call or does
not enter the automatic search mode?
There are two different possible situations:
PRODYS
52
PRONTO_ISDN 2
USER’S MANUAL V6.1
1. If the equipment is not configured to automatic mode, it will not automatically
search for the audio encoding mode of the incoming call. Therefore, if this mode does
not match the mode configured for the line in question, the audio will not synchronise.
M When
the equipment is not configured for automatic detection and is in
G711/G722 mode, any call in G711 mode will be detected and synchronised
immediately. A call in any other mode will cause the equipment to configure
itself in G722 mode for the line in question.
M When
the equipment is not configured for automatic detection and is in
MPEG mode, any call in a mode other than G711 will cause no change in the
encoding of the equipment, but if the mode of the incoming call is G711, the
call will be rejected.
2. The equipment is configured in automatic mode but not in one of the MPEG
modes, so the automatic function will not operate as such. The automatic function
operates when the current encoding mode on line 1 is one of the MPEG modes and
a call is received in a mode other than G711 (data mode). If the encoding mode at
the remote end is one of the MPEG modes, the equipment will detect the incoming call
as a call in data mode and will configure the encoding mode to G722 automatically, but
not in automatic search mode.
M In order for the equipment to operate automatically, it must be configured in
one of the MPEG encoding (decoding) modes.
M When
the equipment is configured for automatic operation and is in the
MPEG mode, a voice (G711) call will not cause it to enter directly into the
search mode but will cause it to configure itself immediately in this mode.
From this moment on, until both lines are disconnected, the equipment will
remain in the G711/G722 mode and will follow the operation established for
this mode.
Why does the equipment change the encoding mode when a call is
disconnected?
If the communication was established via an incoming call, the equipment – either
through the automatic search mode (in MPEG mode) or through its ability to distinguish
between voice mode (G711) and the rest (in the G711/G722 mode) – may
change the encoding (decoding) mode for the line in question in order to synchronise
with the remote audio but, when the communication ends, the equipment will
automatically re-establish the mode that was assigned for the line before the
communication took place.
Why does the equipment not accept calls to the local number for line 2?
When the equipment is in MPEG mode, the local number for line 2 is not taken
into account and is the same as that for line 1. Any call to the local number established
for line 2 will be rejected without the user noticing it.
PRODYS
53
PRONTO_ISDN 2
USER’S MANUAL V6.1
Why does the display show a rejection message for a call from a number
that is in the table of calling numbers for line 2?
When the equipment is in the MPEG mode, the calling numbers for line 2 (line 2
filter) are ignored, and those for line 1 are used. To prevent the rejection of a call in this
case, the number for the incoming call must match one of those assigned to the line 1
selective filter.
Why does the equipment change the answering mode from manual to
automatic or vice versa when changing from one operational mode to another
(MPEG to G711/G722 or G711/G722 to MPEG)?
When the equipment is configured in MPEG mode, the reply modes for both lines
are automatic and the user cannot change them. When the equipment is restored to
G711/G722 mode, the reply modes for both lines will be those that are stored in memory
for the previous configuration for this mode.
PRODYS
54
PRONTO_ISDN 2
USER’S MANUAL V6.1
5 CONNECTORS
5.1 ANALOG AUDIO
PIN 1
PIN 2
PIN 3
5.2 DIGITAL AUDIO
PIN
1
2
3
4
5
GND
+
-
SIGNAL
AES/EBU IN GND
NC
GND
AES/EBU OUT -
PIN
6
7
8
9
SIGNAL
AES/EBU IN +
NC
GND
AES/EBU OUT +
SIGNAL
NC
Tx
Rx
NC
GND
PIN
6
7
8
9
SIGNAL
NC
NC
NC
NC
5.3 AUXILIARY DATA
PIN
1
2
3
4
5
5.4 REMOTE CONTROL
PIN
1
2
3
4
5
6
7
8
SEÑAL
REM_ON_AIR 1
REM_ON_AIR 2
AUTOM_DIAL_L1
AUTOM_DIAL_L2
NC
DGND
DGND
+15 VA
PIN
9
10
11
12
13
14
15
SEÑAL
L_REM_CALL 1
L_REM_CALL 2
L_REM_ACT
FRAMED_1
FRAMED_2
NC
AGND
SEÑAL
NC
Tx 232
Rx 232
NC
GND
PIN
6
7
8
9
SEÑAL
NC
NC
NC
NC
FUNCTION
BUZZER
COMMUNIC. INTERFACE
X
X
UP
OFF
TA
X
X
DOWN
ON
X21
X
X
5.5 RS232 INTERFACE
PIN
1
2
3
4
5
5.6 MICROSWITCHES
Nº
1
2
3
4
PRODYS
55
PRONTO_ISDN 2
USER’S MANUAL V6.1
6 JUMPERS
6.1 SELECTION OF AUDIO OUTPUT GAIN
The PRONTO_ISDN 2 can be configured for output gains of +0 dB, +4 dB and
+6 dB. This configuration only affects the analog audio output. The configuration is
carried out using configuration jumpers inside the equipment, near to the XLR audio
output connectors, as follows:
A) 0 dB GAIN
JP2
JP5
JP3
JP6
JP4
JP7
B) +4 dB GAIN
JP2
JP5
JP3
JP6
JP4
JP7
C) +6 dB GAIN
JP2
JP5
JP3
JP6
JP4
JP7
6.2 100 OHM RESISTORS IN THE TERMINAL ADAPTER
When the PRONTO_ISDN 2 is connected to a basic access ISDN with a
bus configuration and the equipment forms the bus termination, it is necessary to
load it with 100 Ohm resistors. These may already be located in the network
connector, but if not the PRONTO_ISDN 2 contains internal programming
jumpers that allow their insertion. They are easily located, near the RJ45
connectors.
P2
P3
100Ω
Ω RESISTORS CONNECTED
PRODYS
56
PRONTO_ISDN 2
USER’S MANUAL V6.1
APPENDIX A TECHNICAL SPECIFICATIONS
Stereo audio input:
Balanced analog input:
Maximum input level +18 dBu.
Input impedance 20 kOhm.
Balanced digital input:
AES/EBU format: EIAJ CP-340 type I/IEC-958 Pro
Sampling frequency converter: 1:2 to 2:1.
Stereo audio output:
Balanced analog output:
Maximum output level +18 dBu.
Output impedance 50 Ohm.
Balanced digital output:
AES/EBU format: EIAJ CP-340 type I/IEC-958 Pro
Sampling frequency converter: 1:2 to 2:1.
Audio properties:
Quantification: 20 bits A/D and D/A converter.
S/N ratio > 85 dB typical.
Crosstalk < 80 dB
Phase difference < 0.3º
Compression:
ISO/MPEG Layer II (ISO 11172-3) :
Modes: Mono, Dual & Joint Stereo.
Bit rates: 64, 128 kbps.
Fs: 48 (24 Khz available in 64 Kbps)
G722 (Statistical framing mode and H221/H242)
G711
Frequency response:
MODO
BIT RATE
Fs
BANDWIDTH
20Hz,10.5 Khz. (+/- 0.5 dB)
MPEG MONO
64 Kbps
48
20Hz,10.5 Khz. (+/- 0.5 dB)
MPEG MONO
64 Kbps
24
20Hz, 4 Khz. (+/- 0.5 dB)
MPEG DUAL
64 Kbps
48
20Hz, 4.5 Khz. (+/- 0.5 dB)
MPEG DUAL
64 Kbps
24
20Hz, 4.5 Khz. (+/- 0.5 dB)
MPEG JS
64 Kbps
48
20Hz, 6 Khz. (+/- 0.5 dB)
MPEG JS
64 Kbps
24
20Hz, 18-20 Khz. (+/- 0.5 dB)
MPEG MONO
128 Kbps
48
20Hz,10.5
Khz. (+/- 0.5 dB)
MPEG DUAL
128 Kbps
48
20Hz, 15-20 Khz. (+/- 0.5 dB)
MPEG JS
128 Kbps
48
20Hz, 7
Khz. (+/- 0.5 dB)
G722
64 Kbps
16
300Hz,
3.4
Khz.
(+/- 0.5 dB)
G711
64 Kbps
8
Auxiliary data:
RS-232: Asynchronous, 8 bits, no parity, 1 start/stop bit, 300, 2400 or 9600 bps.
In MPEG modes only.
Communications:
Depending on the version of the ISDN terminal adapater:
EURO_ISDN terminal adapter or
Universal ISDN terminal adapter: EURO_ISDN, AT&T 5ESS, DMS100 y
NAT1.
Power supply:
94-250 V AC 50/60 Hz
Dimensions:
HEIGHT:
WIDTH:
DEPTH:
Weight:Approximately 3 kg
PRODYS
30 W ;
Voltages: +5 V, -5 V, +15 V, -15 V
1U ( 4.44 cm)
19” RACK (48.26 cm)
30 cm.
57
PRONTO_ISDN 2
USER’S MANUAL V6.1
APPENDIX B MENU TREE STRUCTURE
MAIN MENU
L1
L2
CONF
INF
L1:
CALL
DIAL
RDIAL
TA
BOOK
NONE
LNUM
NUMBER
CODEC
CNUM
ANSW
OFF
ON
1
2
AUTO
3
G711
G722
MPEG
MANUAL
MODE
64 Kbps
MONO
J52
JS
48 KHz
DUAL
24 KHz
CCS
MONO*
TELOS
JS
AUX_DATA
OFF
300
2400
9600
DUAL
* IN CCS MODE ONLY AVAILABLE
JOINT STEREO & DUAL
PRODYS
58
PRONTO_ISDN 2
USER’S MANUAL V6.1
PRONTO_ ISDN 2 MENU
L2: ONLY AVAILABLE WHEN G711 or G722 IS SELECTED IN LINE1
L2
CALL
DIAL
RDIAL
TA
BOOK
NONE
PRODYS
LNUM
NUMBER
CODEC
CNUM
ANSW
OFF
ON
1
2
AUTO
G711
G722
MANUAL
3
59
PRONTO_ISDN 2
USER’S MANUAL V6.1
PRONTO_ ISDN 2 MENU
CONF:
BOOK
1
2
REMOTE
16
PHONE
AUD_IN
CONTROL
ANALOG
NET
AES/
EBU
EISDN
5ESS
DMS100
SPID1
OFF
AUT
NAT1
OFF
ON
SPID2
ON
INF:
INF
VERSION
LINE
L1
PRODYS
L2
60
PRONTO_ISDN 2
USER’S MANUAL V6.1
7.- PRONTO_ISDN 2 WITH X21 INTERFACE
M The microswitch no.2 is to select the communicaton interface the user wants to
utilised (ISDN terminal adapter or X21 interface). The next chapters of this
manual explain the operation of PRONTO_ISDN 2 when the X21 interface is
selected. To configure the unit this way, microswitch no.2 must be in DOWN
position before starting up the unit.
This configuration increases the possibilities for connecting the equipment to
other digital communication networks (dedicated networks, satellite communications).
The equipment automatically detects that the PRONTO_ISDN 2 has been
configured with the X21 interface and enters a different operational mode that the one
used for ISDN terminal adapter connection.
The method for moving between and selecting the different menu options is the
same as when connected to an ISDN with a terminal adapter, using the ⇒,⇐,⇑ and
ENTER keys. Note that the rest of the front panel keys are disabled, because, basically,
there is no establishment of calls but direct point-to-point communication.
The port speed can be selected from among three values on the X21 menu:
-64 kbps
-128 kbps
-256 kbps
Depending on the speed selected the equipment allows the following audio
modes:
•
When the equipment is configured at 64 kbps, the mode of line 1 in the menu
allows the selection between mode G711,G722, MPEG Mono 64 kbps (Fs= 48 or 24
KHz), MPEG DUAL 64 Kbps or JOINT STEREO 64 Kbps.
•
When the equipment is configured at 128 kbps, the encoding mode can be
selected between MPEG MONO 128 Kbps (Fs = 48 KHz), MPEG DUAL 128 Kbps
(Fs = 48 KHz), or MPEG JOINT STEREO 128 Kbps (Fs = 48 KHz).
• When the equipment is configured at 256 kbps, the encoding mode can be selected
between MPEG DUAL 128 Kbps (Fs = 48 KHz), or MPEG JOINT STEREO 128
Kbps (Fs = 48 KHz).
M In this case, the user may choose two encoding (decoding) modes for line 1,
while option 2 of the menu is disabled, in which case the following message
will appear:
I N
X 2 1
M O D E
N O T
A V A I L A B L E
PRODYS
61
PRONTO_ISDN 2
USER’S MANUAL V6.1
7.1 X21 PRONTO_ISDN 2 FRONT PANEL
The dialling and control keypad (CALL, END and ON_AIR keys) are disabled
when Pronto_ISDN 2 is working with a X21 interface. Pressing any of the control
keys will result in the following message:
I N
X 2 1
M O D E
N O T
A V A I L A B L E
The LED of each control key will operate of the following way:
• KEYS
CALL
1
CALL
2
CALL1 LEDS will always be lighted on (Pronto_ISDN 2 ready to work)
• KEYS
END
1
END
2
END1 will always be lighted off (Pronto_ISDN 2 ready to work) and
END2 will be lighted on indicating that L2 is not available.
• KEYS
ON AIR
1
ON AIR
2
ON_AIR1 and ON_AIR2 LEDS will be lighted on unless the equipment
is in ‘searching mode’ in which case these LEDS will be flashing.
M
Unlike the use with a terminal adapter, with the X21 interface, when a
communication is established in any mode, the audio output is automatically
passed on air, so the analog switches that enable or disable audio outputs are
disabled .
M
Unlike the use with a terminal adapter, with the X21 interface, the external
telephone is disabled.
PRODYS
62
PRONTO_ISDN 2
USER’S MANUAL V6.1
7.2 X21 PRONTO_ISDN 2 DISPLAY
The Pronto_ISDN 2 display comprises the status panel, which continually shows
the status of the two lines, and the menu display, showing different options in a tree
structure.
1.- STATUS DISPLAY: Once the equipment is suitably initialised, the display
controller starts to show the status of each line, switching between the status for line 1
and that for line 2 every 5 seconds. The information shown for each line includes the line
concerned (L1 or L2, this one always in IDLE state), speed port selected (64, 128 or 256
kbps), compression mode, input audio and audio synchronisation state (“FRAMED”
means synchronised). The following are two examples of display messages.
L 1
X 2
G 7 2 2
1
1 x 6 4
K b
F R A M E D
- A -
The meaning of each field that can be potentially displayed in the status display is
briefly explained in C.4 section.
2.- MENU DISPLAY: When ENTER/MENU is pressed, the equipment’s menu
is displayed. If no other action takes place during the next 17 seconds, the display
automatically switches back to the status display.
The different menu options are explained below in detail. You are recommended
to follow these explanations along with the menu tree included at the end of this manual.
PRODYS
63
PRONTO_ISDN 2
USER’S MANUAL V6.1
7.3 X21 PRONTO_ISDN 2 MENU
The user can use the menu of options on the display to control all the functions
necessary for working with the Pronto_ISDN 2. The ⇐, ⇑ and ⇒ keys are used to
move through the different options, and the MENU/ENTER key is used to select the
required option.
⇒ : Moves to the menu option to the right. When the last option is selected, this
key returns the selection to the first one, i.e., the leftmost one. The selected
option is shown on the display between braces ({}).
⇐ : Moves to the menu option on the left. When the first option is selected, this
key moves the selection to the last one, i.e., the rightmost one. The selected
option is shown on the display between braces ({}).
⇑ : Steps up one level in the menu. When at the topmost level, this exits the menu
function and returns to the status display for each line.
MENU/ENTER : Enables the option between braces and passes program control
to the subroutine associated with that option.
The menu is entered by pressing the ENTER/MENU key, causing the following
to appear on the display:
{
L 1
M E N U
} L 2
C O N F
X 2
1
The arrow keys⇐ ⇒ are used to move from one option to another; for example,
if the right arrow key is pressed, the menu item L2 appears enclosed between braces
({}). The selected option will always appear between braces. If, at the end of the line, ⇒
is pressed, the selection point will return to the start of the line. Likewise, if L1 is
selected and ⇐ is pressed, X21 will be selected. This applies to all the menu screens.
When ENTER is pressed, the menu for the selected option, enclosed in braces, is
displayed.
The meaning of the above options is:
• L1: Functions and parameters for configuring Line 1.
• L2: In X21 mode not available.
• CONF: General equipment configuration parameters, affecting both Line 1
and Line 2.
• X21: Port speed.
The following are further details of these options:
PRODYS
64
PRONTO_ISDN 2
USER’S MANUAL V6.1
+ {L1}
Depending on the speed selected (2x64, 128 or 256 kbps) the menu
options will be differents as detail below:
A) 64 Kbps
When the equipment is configured at 2 x 64 kbps, selecting L1 the display
shows:
L 1
C O D E C
{ G 7 1 1 } G 7 2
2
M P E G
If the encoding/decoding mode for the line is either G722 or MPEG, the
display will be as above but with the line mode between braces.
MWhen
the equipment is in ‘searching mode’, option L1 in the main
menu is disabled, and the following messsage will show when pressing the
ENTER/MENU key:
N O T
A V A I L A B L E
S E A R C H I N G . . .
This option allows the encoding/decoding mode for line 1 to be selected.
Note that the selected mode will have important effects on the operation of the
equipment, as described on the block layout section of Pronto_ISDN 2
The line 1 mode menu allows selection between the next modes:
• G711: G711 encoding mode, suitable for telephone voice communications
(3.1 kHz).
• G722: G722 encoding mode for high quality voice communications (7
kHz).
• MPEG: MPEG 1 Layer II compression mode. This mode can only be
accessed from the menu for line 1 and allows a choice of three possible
configurations depending on bit rate (64 or 128 Kbps), audio mode
(MONO, DUAL or JOINT STEREO) and whised compatibility (J52,
CCS or TELOS). Other MPEG standard parameters are configured by
default as follows:
Sampling frequency = 48 Khz.
CRC enabled
PRODYS
65
PRONTO_ISDN 2
USER’S MANUAL V6.1
+ {L1}--{G711}
This mode allows one sole option:
L 1
{ A
C O D E C
L A W }
G 7 1 1
- - - -
Ley A is the standard mode used in Europe.
+ {L1}--{G722}
When ENTER/MENU is pressed, the G722 compression mode is selected
directly ; no further configuration is required.
+ {L1}--{MPEG}
When L1 CODEC MPEG is selected the display shows:
L 1
C O D E C
M P E G
{ M O D E } A U X _ D A T A
The MODE option allows the line to be configured for any MPEG
encoding mode.
The AUX_DATA option enables or disables the sending/receiving of
auxiliary data in MPEG mode.
When L1-MPEG-AUX_DATA is selected, the display shows:
L 1
C O D E C
{ O F F } 3 0 0
M P E G
2 4 0 0
D T
9 6
If the sending/receiving of auxiliary data in MPEG mode is enabled, 300,
2400 or 9600 would be the option between braces. The data format would be
asynchronous, 8 data bits, 1 START/STOP bit, no parity.
M Auxiliary data are included in the MPEG audio frame, at the expense of
replacing any audio bits. 300 bps is a good balance between audio
quality and transmission rate.
M
The format of auxiliary data included in the MPEG frame is
compatible with that employed in the CDQ Prima audio codec family from
CCS (GENERIC, MUXRATE=300, 2400 or 9600, DSPRATE = 300, 2400 or
9600, MUXMODE= NOMUX).
PRODYS
66
PRONTO_ISDN 2
USER’S MANUAL V6.1
When L1-MPEG-MODE is selected and the equipment is configured at
2x64 Kbps, the display shows:
< - L 1
M P E G
{ M O N O }
J S
M O D E - >
D U A L
Selecting the audio mode and pressing the ENTER/MENU key will allow
select the sampling frequency (48 Khz or 24 Khz). The menu on the display will
show:
L 1
{ 4
M P E
8 K }
G
M O N O
2 4 k
-
-
-
M
The MONO mode at a sampling frequency of 24 Khz is compatible
with CDQPrima configured as follows:
ENCODER:
Bit Rate= 64 Kbps; Algorithm MPEGL2; Sample rate 24 Khz;
ALG MODE Mono; LINE FMT 1 LN.
DECODER:
INDEP, that is, independent of encoder.
B) 128 Kbps
When the equipment is configured at 128 kbps , on selecting L1 the display
shows:
L 1
- -
C O D
- -
E C
- -
-
{ M P E G }
In this case, the user may choose a MPEG encoding (decoding) mode for
line 1,while option L2 of the menu is disabled.
When L1-MPEG-MODE is selected and the equipment is configured at
128 Kbps, the display shows:
L 1
M P E
M O N O
G
M O D E
J S
D U A L
If the encoding/decoding mode for the line is MONO, the display will be
as above but with the MONO mode enclosed in braces.
PRODYS
67
PRONTO_ISDN 2
USER’S MANUAL V6.1
C) 256 Kbps
When the equipment is configured at 256 kbps , on selecting L1 the display
shows:
L 1
- -
C O D
- -
E C
- -
-
{ M P E G }
In this case, the user may choose a MPEG encoding (decoding) mode for
line 1,while option L2 of the menu is disabled.
When L1-MPEG-MODE is selected and the equipment is configured at
256 Kbps, the display shows:
L 1
-
M P E
- -
G
M O D E
J S
D U A L
+ {L2}
This option will be always deactivated.
+ {CONF}
This main menu option accesses the section for the general configuration
of the equipment - those parameters that affect both line 1 and line 2. The display
shows:
{ A U D _
C O N F
I N }
A U T O M
AUD_IN: Selection of analog or digital audio input.
AUTOM: Selection of the manual or automatic operation mode of the
codec. In automatic mode, the equipment configures the codec to
different modes until audio is synchronised in a certain mode, which is
then considered to be the mode in which the remote equipment is
working.
+ {CONF}-{AUD_IN}
These options allow the user to select between analog or digital audio
input (AES/EBU format).
PRODYS
68
PRONTO_ISDN 2
USER’S MANUAL V6.1
C O N F
A U D I O
{ A N A L O G } A E S / E B U
If the AES/EBU audio input is selected, the display will be the same
except that the AES/EBU option will be enclosed in braces.
Information on the audio input is stored in the non-volatile memory so
that it is retained even when the equipment is switched off.
The audio interface selected is shown on the bottom right of the status
screen (See X21 display informations fields).
+ {CONF}-{AUTOM}
C O N F
O N
A U T O M A T I
{ O F F }
C
If the automatic mode is active, the display will be the same except that
the ON option will be enclosed in braces.
When the equipment is in automatic mode (automatic on), it is not in any
MPEG mode, and neither line 1 nor line 2 are synchronised, it operates directly in
‘searching mode’. The equipment will search the correct encoding (decoding)
mode until either line 1 or line 2 are synchronised, which is considered to mean
that the encoding mode selected for both lines is correct.
When the equipment is in automatic mode (automatic on), it is in any
MPEG mode, and the line 1 is not sychronised, it also operates in ‘searching
mode’. The equipment will continue to search until line 1 is synchronised, which
is considered to mean that the encoding mode selected for both lines is correct.
While the equipment is searching, the display will flash the currently
selected encoding mode, the word SEARCH and the ON AIR 1 and ON AIR 2
leds for each of the lines. Likewise, the user cannot access the line 1 in the main
menu with the ENTER key. If an attempt is made, the following message is
displayed:
N O T
A V A I L A B L
S E A R C H I N G . . .
E
If the automatic mode is disabled (the user can access to the configuration
menu althougth the equipment is in ‘searching mode’), the equipment will stop to
search the correct encoding (decoding) mode.
During the search stage, the equipment goes through all the data
configuration modes (the same for both lines), following this sequence:
a) When the equipment is configured at 64 Kbps:
DUAL -> MONO -> JOINT STEREO -> G722 -> DUAL...
b) When the equipment is configured at 128 Kbps:
PRODYS
69
PRONTO_ISDN 2
USER’S MANUAL V6.1
DUAL -> MONO -> JOINT STEREO -> DUAL...
c) When the equipment is configured at 256 Kbps:
DUAL -> JOINT STEREO -> DUAL...
An specific search time is employed for each mode.
If the call is not synchronised in any mode, the equipment will restart
searching as from the first encoding (decoding) mode.
+ {X21}
This main menu option accesses the section for the speed port
configuration . The display shows:
B I T
R A T E
{ 6 4 }
1 2 8
K B P S
2 5 6
If the speed port is either 128 or 256, the display will be as above but with
the line mode enclosed in braces.
PRODYS
70
PRONTO_ISDN 2
USER’S MANUAL V6.1
7.4 X21 DISPLAY INFORMATIONS FIELDS
In normal operation, the display shows the current line status information. This
information is arranged as follows:
A
B
L 1
X 2
G 7 2 2
C
1
1 x 6 4
K b
F R A M E D
- A D
E
A) Shows the line to which the information refers, L1 or L2.
B) Shows the port speed:
64 Kb, 128 Kbps or 256 Kbps
C) Encoding mode selected:
G711, G722, MONO, DUAL o JOINT STEREO for 64 Kbps.
MONO, DUAL o JOINT STEREO for 128 Kbps.
DUAL o JOINT STEREO for 256 Kbps.
D)
This field shows whether the decoder is synchronised (FRAMED) or not (blank).
Once a connection is established, audio is not available at the output until the decoder
is synchronised.
F) Shows the audio input selected on the menu:
-A- : Analog audio input
-D- : AES/EBU digital audio input.
PRODYS
71
PRONTO_ISDN 2
USER’S MANUAL V6.1
7.5 X21 PORT CONNECTORS
PIN
1
2
3
4
5
6
7
8
SIGNAL
NC
TA
NC
RA
NC
SA
NC
GND
PIN
9
10
11
12
13
14
15
SIGNAL
TB
NC
RB
NC
SB
NC
NC
7.6 X21-X21 CONNECTION
PRONTO LINE INTERFACE
TA
TB
RA
RB
SA
SB
GND
TA
TB
RA
RB
SA
SB
GND
7.7 X21-V35 CONNECTION
PRONTO LINE INTERFACE
TA
TB
RA
RB
SA
SB
GND
PRODYS
P
S
R
T
V
X
B
72
PRONTO_ISDN 2
USER’S MANUAL V6.1
7.8 PRONTO_ ISDN 2 X21 MENU
MAIN MENU:
L1
L2
CONF
X21
INF
L1:
CODEC
G722
MPEG
MODE
AUX_DATA
OFF
MONO**
JS
300
2400
9600
DUAL
* ONLY AVAILABLE AT
48 KHz
24 KHz*
64 Kbps
** ONLY AVAILABLE
AT 256 Kbps
PRODYS
73
PRONTO_ISDN 2
USER’S MANUAL V6.1
PRONTO_ ISDN 2 X21 MENU
CONF:
AUD_IN
AES/
ANALOG
X21
EBU
OFF
ON
X21
64
INF:
AUT
128
256
INF
VERSION
PRODYS
74