1
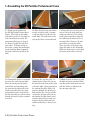
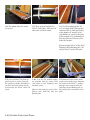
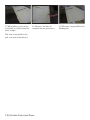
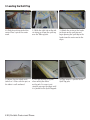
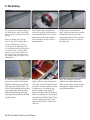
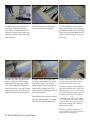
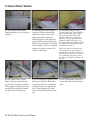
HQ Portable Professional Frame
Setup Instructions
05/05/10
© 2010 Handi Quilter, Inc.
Designed by a Quilter, for Quilters.®
1. Assembling the HQ Portable Professional Frame
1.1 Thank you for purchasing
the HQ HQ Portable Professional
Frame. This frame is adjustable
to fit tables up to 101/2 feet long for
crib-size to king-size quilts. We
recommend that you set it up at
the longest length that will fit in
your room. To begin setting up
this frame, remove the continuous
tracks from box. Bow in opposite
direction until they lay flat on the
table.
1.2 Place the bases over the tracks
at each end of the table. A groove
is cut into the base to fit over the
track. Note: The track nearest the
edge of the table is the back track.
1.3 Clamp the bases securely at the
end or side of the table with two
clamps on each base. The clamps
can be placed anywhere along the
base allowing the frame to be set
on most tables. However, 30 inch
wide tables are most desirable.
There are holes in the bases that
align with holes in the Adjustable
Table ends that can be used to bolt
the frame to the table, if desired.
1.4 Command® Strips are provided
to secure the tracks to your table.
Place the carriage on the tracks
and roll the carriage along, placing strips on the underside of the
track as you roll. Place the strips
perpendicular to the track and allow the non-adhesive end to extend
beyond the track, to aid in removal
if needed.
1.5 Locate the side arm with 3 Yshaped latches. Place this arm on
the outside of the base on the right
side of the table (when standing at
the front of the table). Each side
arm has multiple sets of holes to
bolt into the base. Use the middle
set of holes to begin with, but do
not tighten the bolts firmly until
you have placed the carriage and
machine on the tracks and have
confirmed that this is the best setting.
1.6 Bolt the arms to the bases with
the bolts and nuts provided. While
standing at the front track, the arm
with the latches is bolted to the
base on your right side.
2 HQ Portable Professional Frame
1.7 Once the right arm is securely
bolted to the base, the setup should
look like this. Repeat the process
to install the arm on the left side of
the table.
1.10 Create four 10 1/2’ poles in
the following order: First, add a
4” section to each gear section to
create three 8’ poles. Then add a 2
1/2’ section to the end opposite the
ratchets to complete a 10 1/2’ pole.
Combine the remaining 3 pole sections in the same order to create an
Idler pole.
Pole Identification
Take-up pole has a black grip.
Idler pole has no ratchets.
Quilt Top pole has one ratchet.
Backing pole has one ratchet.
1.8 After confirming that this is the
best setting, tighten the bolts using
a 7/16” socket or wrench. Level the
arms as you tighten the bolts. This
step takes place after checking the
setting when you place the carriage
and machine on the tracks.
1.9 Identify the pole sections. There
are three 4’ sections with ratchets
(one has a black rubber grip), five
4’ sections and four 2 1/2’ sections.
1.11 Install the Take-up pole
Slide the end with the 2 1/2’ section
into the top hole on the left side arm
(standing in front of the table).
NOTE: If desired, frame can be adjusted to fit different table lengths
by using different combinations of
pole sections.
While pushing in the snap button,
slide the pole through the top hole
on the right side arm.
Install the remaining poles
In the same fashion, install the Idler
pole below the Take-up pole. The
Quilt Top pole and Backing poles
are installed in the two front pairs
of holes.
3 HQ Portable Professional Frame
Join the pole sections together by
using the provided couplers. Press
the snap button and push the coupler inside the adjoining pole until
the pin pops out of the hole.
1.12 This photo shows the frame
set up at 8’.
1.13 Next, prepare to attach the
Velcro® to the poles. Measure in 6”
from each end of the frame.
1.14 Peel the backing off the Velcro® and apply to the Take-up pole,
starting at the 6” mark and ending
at the opposite 6” mark. Use the
snap buttons as a guide to keep the
Velcro straight. It is recommended
that you place the Velcro in a line
below the buttons.
Repeat to apply Velcro® to the Quilt
Top pole and the Backing pole. Do
not put Velcro® on the Idler pole.
1.15 Once the Velcro® has been applied to a pole, it can be clipped at
the couplers to enable diassembly. If
you don’t intend to change the size
of your frame, the Velcro® can be left
uncut.
1.16 A set of 9 1/2’ marked leaders
are provided with this frame. Fold
each leader in half lengthwise and
mark the center.
1.17 Matching leader center marks
to pole center marks, begin attaching
the leaders to the Velcro® , working
from the center to each end of the
Quilt Top pole and Backing pole so
Measure and mark the center of the they hang to the center between the
Take-up pole, Quilt Top pole and poles.
Backing pole.
4 HQ Portable Professional Frame
1.18 In the same fashion, attach the
remaining leader to the Take-up pole,
so the leader falls to the back of the
frame.
Next, refer to the Q Drive user
manual for instructions for placing
the carriage and machine head on
the frame.
5 HQ Portable Professional Frame
2. Loading a Quilt
the fabric
from the center out to the left and then the center
out has been sufficiently caught by
Loosely
to the right. It does not matter which direction you woven fabrics can pull through
close
to the raw edge. Always begin the p
attach first as long as you always begin in the
center.
process from the center out to each side.
Matching up the center of the leader with
pin on your backing, begin pinning the f
attached
to the
bellynot
bar.overlappin
(the belly
Place
the
pins end
to end,
Matching up the center of the leader withleader
the center
first
pole
closest
to
your
belly).
The
fabri
leaving
big gaps between pins. Be consi
pin on your backing, begin pinning the fabric
to the
Find the center of your backing fabric
being
1/8”within
beyond
leader
to
placing
the pins
theyour
serged
stitchi
leader attached to the belly bar. (the bellyextend
bar is about
the
aware if the fabric is directional. the
fabric has been sufficiently caught by
leaders.
first pole closest to your belly). The fabric
should
woven fabrics can pull through i
extend about 1/8” beyond your leader to Loosely
assure that
close
to
the
the fabric has been sufficiently caught by the pins. raw edge. Always begin the p
process
Loosely woven fabrics can pull through if
pinnedfrom
too the center out to each side.
close to the raw edge. Always begin the pinning
2.2 Matching
of theout
leader
process the
fromcenter
the center
to each 2.3
side.Place the pins end to end, not
with the center pin (or mark) on the
overlapping the pins, or leaving big
backing, begin pinning the fabric to
gaps between pins. Be consistent in
the leader attached to the Backing
With
ratchet
engaged,
rollor
the backin
placing
thethe
pins
within
hem
Place
the
pins
end
tothe
end,
not
overlappin
pole. The fabric should extend about
pole,serged
being
careful
smooth
fr
leaving
big edge
gaps between
pins.wrinkles
Be consi
near the
ontothe
lead1/8” beyond
the
leader
to
assure
ter
out
to
the
edges.
As
long
as
the
ratche
theor
pins within the serged stitchin
ers. placing
Place the
pinsa end
to end,
not overlapping
the pins,
Place
pin on
the center
mark.
that the
fabricbig
hasgaps
beenbetween
sufficiently
in theingears, the fabric will be rolled in th
leaders.
leaving
pins. Be consistent
caughtplacing
by the the
pins.
direction.
pins within the serged stitching
on
the shows a leader with
(NOTE:
Photo
leaders.
a serged edge, which may be difLoosely woven fabrics can pull
ferent from the leader that was
through if pinned too
provided with the Pro-Frame. The
closely to the raw edge. Always begin
technique for loading is the same,
the pinning process from the center
regardless of the type of leaders
out to each end.
used.)With
With the wrong side of the backing fabric
facingthe
up,ratchet engaged, roll the backin
pole,
being
drape the fabric over the take-up roller. This
gives
youcareful to smooth wrinkles fr
ter
out
to
With
the
ratchet
engaged,
roll
the
backing
onto
the
a good visual that the fabric is oriented correctly. the edges. As long as the ratche
infloor)
the
the fabric
willroll
be that
rolled
th
pole, being
carefulup,
to smooth
wrinkles
from
thegears,
cen-Watch
(Wrong
side facing
right side
facing the
as you
theinedg
direction.
ter out to the edges. As long as the ratchet is engagedric is not hour-glassing, rathe
in the gears, the fabric will be rolled in the correct top of itself.
direction.
1. Pinning the Back
2.1 Pinning the Back.
Note: 2” long sharp pins with large
pear-shaped heads are recommended for all pinning steps.
Find the center of the backing
fabric, being
aware if the fabric is directional.
2.4 With the ratchet engaged, roll
the backing onto the
pole, being careful to smooth
wrinkles from the center out to
the edges. As long as the ratchet is
engaged
in the gears, the fabric will be
rolled in the correct
direction.
2.5 While rolling, gently “massage” 2.6 Shown is an example of rolled
the fabric from the center to the
fabric that is hour-glassing, not
edges, so that the edge of the fabric rolling precisely on top of itself.
does not “hour glass” (pull to the
Watch as you roll that the edg
center from both edges) or shift to
ric is not hour-glassing, rather
one side or the other.
fabric
top of itself.
WatchThe
as you
roll that the edge of the fabshould roll precisely
of
ric is on
nottop
hour-glassing,
rather rolling on
itself. See “hour-glassing”
top of itself.example
in next photo.
6 HQ Portable Professional Frame
As you roll, use the seams in your back
as a guide to keep the fabric straight.
This seam is not even so it needs to be
adjusted.
2.7 While rolling, use the seams
in the back as a guide to keep the
fabric straight.
Massage the fabric to
any unevenness.
2.8 “Massage” the fabric
to the fabric2.9
seam out
is now parallel to the
Massage
to The
straighten
any unevenness. Backing pole.
straighten out any unevenness.
This seam is not parallel to the
pole, so it needs to be adjusted.
The seam now runs st
the horizontal line of t
The seam now runs straight along
the horizontal line of the pole.
7 HQ Portable Professional Frame
mark.
3. Loading the Quilt Top
2. Loading the Quilt Top
With the right side of the fabric facing up, drape the quilt top over the
take up roller.
3.1 Fold the quilt top to find the
center. Place a pin at the center
mark.
Find the center of
your quilt top. Place
a pin at the center
mark.
3.2 With the right side of the fabric facing up, drape the quilt top
over the Take-up pole.
3.3 Match the center of the leader
to the pin on the quilt top and
begin pinning the quilt top to the
leader from the center out to the
edges.
Match the center of the
the pinofonthe
yourfabric facWith theleader
rightto side
quilt
top
and
begin
pining up, drape the quilt top over the
ning from the center out
take up toroller.
the edges.
Wea
end
bett
Use your piecing as a guide when y
on the pole. You can see the seam is
massage the fabric until it is straigh
Weave the pin at both
ends so the fabric is
better anchored.
3.4 Weave the pin at both ends
(take 2 or 3 “bites with the pin) so
the fabric is well-anchored.
Match the center of the
leader to the pin on your
quilt top and 3.6
begin
pin3.5 Use the piecing as a guide
This seam is is parallel to the
center
when rolling the fabricning from theQuilt
Topout
pole.
to
the
edges.
on the pole. If a seam is not
straight, massage the fabric until
it is parallel to the Quilt Top pole.
Seam is straight horizontally.
3.
Weave the pin at both
ends so the fabric is 3. Loading the take up roller
better anchored.
8 HQ Portable Professional Frame
Release the ratchet on your belly bar
3. Loading the take up roller
4. Loading the Take-up pole
Release the ratchet on your belly bar
4.1 Release the ratchet on the
Backing pole.
Unroll some of the backing fabric,
bringing it under the Quilt Top
pole. Bring the leader from the
Take-up pole forward, passing
it under the Idler pole. Find the
position where the quilt back lines
up naturally with the leader.
under the pole that the top fabric
rolled on. Bring the leader from t
take up roller forward passing un
the idler bar. (Idler bar is at the b
under the take up roller with no V
attached.) Find the position where
quilt back lines up naturally with
leader.
Unroll the backing fabric bringing it
under the pole that the top fabric is
rolled on. Bring the leader from the
take up roller forward passing under
4.2
thebar.
leader
to bar
theisbacking
thePin
idler
(Idler
at the back
fabric,
beginning
at
the
center
under the take up roller with noand
Velcro
working
toward
each
edge. where the
attached.)
Find the
position
quilt back lines up naturally with the
leader.
9 HQ Portable Professional Frame
Begin pinning the leader and the
backing fabric from the center out as
you have done previously.
Begin pinnin
backing fabr
you have do
5. The batting
5.1 Gently place the batting between
the Backing pole and the Quilt Top
pole, being careful not to stretch the
batting.
Bring the batting up to the top
pinned edge of the backing fabric.
If using a flat batting, such as a
needle-punched cotton/poly, basting the batting to the backing fabric
is recommended. If using a fluffy
batting (such as a thick polyester),
this step must be skipped, because
the hopping foot gets caught in the
batting fibers.
Tip:
Channel lock is a great tool for squaring a quilt
on the frame.
Tip
The batting
Place the 4.
channel
lock on one of the front Channel lock is a great t
wheels of the machine.
on the frame.
Gently place your batting between the quilt backing Place the channel lock o
pole and top pole, being careful not to stretch the batwheels of the machine.
ting. Bring the batting up to the top pinned edge of your
backing fabric.
5.2 With the channel lock in
Tip: For basting a straight line
place, stitch a plumb line (straight
across the quilt, a channel lock is
horizontal
linea across the top
recommended.
the channel
WithPlace
the channel
locked attached,
stitch
edge
of
the
batting).
Tip:
lock on oneplumb
of theline
front
wheels
(straight horizontal line across
the This creates a
Channel
a batting).
great
for
squaring
a quilt
straight
toa use as a guide for
of the machine
to lock
help
stitch
a toolThis
top edge
of is
the
givesline
you
on
the
frame.
the next
step.
horizontal straight
line. line to place the edge
of your
quiltWith
top the channel locked
Place
the
channel
lock
on
one
of
the
front
on before you begin your quilting.
plumb line (straight hori
wheels of the machine.
top edge of the batting).
straight line to place the
on before you begin you
stitching
plumbstitch
line, arelease the
With theAfter
channel
lockedthe
attached,
ratchet
on the
quilt topline
pole
and the
bring the
plumb line
(straight
horizontal
across
quilt
top
edge
up
to
the
stitching
top edge of the batting). This gives you a line.
straight line to place the edge of your quilt top
After stitching the
on before you begin your quilting.
ratchet on the qui
quilt top edge up
5.3 After stitching the plumb line,
release the ratchet on the Quilt
Top pole and bring the quilt top
edge up to the stitching line. (If
using a fluffy batting with no basting, simply align all three edges,
backing, batting and quilt top,
keeping them parallel to the Takeup pole leader.
5.4 Slide the end of the side
Note: The clamps are used to
stabilize the quilt backing only.
clamp’s Velcro® tape through the
slit in the side arm. Grip the back- They are not to be used to stretch
ing fabric securely with the clamp. the backing, which would result
In some cases, the batting may
in quilting problems.
also be caught in the clamp. It
After stitching the plumb line, release the
depends on howratchet
wide the
backing
on the quilt top pole and bring the
fabric and batting
are.
Doedge
not up
grip
quilt
top
to the stitching line.
the quilt top. Pull the Velcro® tape
until the quilt is just taut, then
attach to the Velcro® strip on the
side arm.
10 HQ Portable Professional Frame
desire.
You can use the clamp as is or you can use the Velcro
strap and pin to the backing. When using the ruler
base this works very well. Notice the wider backing
fabric.
You can use 2 clamps pe
Tighten the fabric so there is gent
across the top edge within 1/8”. T
ing should encase this basting. A
sure with your left hand to help el
tucks.
5.5 When doing ruler work, the
ruler base can bump into the
side clamp. To work around this,
consider reversing the clamp and
pinning the Velcro tape end to the
quilt backing.
5.6 Two clamps per side may be
used if desired (not included).
5.7 After stabilizing the backing
fabric with clamps, the next step is
to stabilize the top of the quilt top.
Place
vertically about every 6
You can use 2 clamps per
sidepins
if desired.
inches within the top 3”-4” of the
quilt top.
Place some pins vertically about every 6
inches to stabilize the fabric.
Each time you roll the quilt you w
down the left edge within 1/8”. U
hand to apply gentle pressure to s
straight line.
Tighten the fabric so there is gentle tension. Baste
across the top edge within 1/8”. The finished binding should encase this basting. Apply gentle pressure with your left hand to help eliminate any
tucks.
5.8 Turn the poles to tighten the
fabric so there is gentle tension.
Baste across the top edge within
1/8”. The finished binding will encase this basting, so it won’t show.
Apply gentle pressure with the left
hand to help eliminate any tucks.
5.9 Next, slowly baste down the
left edge, again within 1/8” of the
edge of the fabric. Use the left
hand to apply gentle pressure to
help stitch a straight line. This
step ensures a stable beginning to
each quilting pass.
Finally, stabilize the right side. There
are two accepted methods (and two
schools of thought) for this step.
1. Stabilize with pins placed horizontally (perpendicular to the edge of the
quilt top) about every 6”. Leaving the
right side unbasted provides space for
any fullness to move while quilting.
OR
Note: Each time the quilt is rolled
2. Baste down the right side (within
onto the Take-up pole, it is impor- 1/8” of the edge) in the same manner
Each
time
you
the quilt as
you
tant that the
left
edge
beroll
basted.
thewill
left baste
side. This helps to prevent
down the left edge within 1/8”.
Use
your
tucks from
forming in the backing
hand to apply gentle pressure
to stitch
fabric
whileaquilting.
straight line.
11 HQ Portable Professional Frame
Whichever method you choose, be
sure to stabilize the right side before
beginning the quilting pass.
A
d
Y
s
b
f
6. Correct Fabric Tension
5. Correct Fabric Tension
tensioned too tigh
Fabric tensioned too tight causes polesFabric
to
bow.
bow.
Quilt loaded properly ready for quilting.
6.1 This photo shows a quilt
loaded properly and it is ready for
quilting.
6.3 This photo shows the fabric
6.2 Do not roll the Take-up pole
tensioned correctly. There should be
too tight. Fabric tensioned too
barely enough room to fit a finger
Fabric
tensioned
causesthepoles
tight causes poles
to bow.
This too tight
between
pole to
and
the bed
of
Fabric
tensioned
correctl
Fabric
correctly.
You
should
have
bow.
photo shows poles
that tensioned
were
machine. When these
results are
enough
room to
fit youritfinger
obtained,
is timebarely
to go back
and room to fi
rolled too tight, barely
so the enough
pole bows
tighten
the
bolts
holding
the
side
between
the
pole and the
the space
pole and the bed of machine.
upward, allowingbetween
too much
between the idler pole and the bed
of the machine. If there is enough
room for a hand (as shown), the
tension is too tight.
arms to the bases (as discussed in the
Assembling the HQ Portable Professional Frame Step 1.7).
Note: If the fabric is tensioned correctly and there is still too much
room between the fabric and the bed
of the machine, then the side arms
are set too high. To correct, lower
the side arms, tighten the bolts, and
recheck.
Fabric tensioned correctly.
You should have
The enough
backingtension
is too loose.
Not enough
The fabric
Not
on fa
barely
enough tension
room to on
fit fabric.
your finger
time
rollrolled
the quilt
tha
needs to
rolled
careful not
to you
needs
to be
tighter
between
thebepole
andtighter.
the bedBe
of machine.
tightened
properly
to
elim
bow your poles by over tightening. bow your poles by over t
6.4 This photo shows a quilt
loaded without enough tension
on the fabric. To correct, roll the
Take-up pole to tighten the fabric
sandwich. Be careful not to bow
the poles by over-tightening.
6.5 In this photo, the backing and 6.6 This photo shows proper tenbatting are too Not
loose.
Each tension
time on sion
onThe
both
the back and top of
enough
fabric.
fabric
the quilt is rolled,
it istoimportant
quilt.
needs
be rolled tighter.
Be careful not to
Proper tension on both th
to keep all layers
tensioned
propbow your poles by over tightening.
quilt.
erly. A loose backing will cause
tucks in the backing during quilting.
12 HQ Portable Professional Frame