1
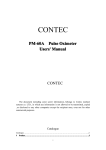
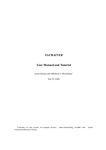
E-17 Electrical Fryer
User’s Manual
CONTENT
1.
Brief Introduction
1.1 Brief Introduction
1.2
Technical Parameters
1.3
Function Profile
1.4 Safe Operation Notice
1.5 Warranty
2.
Installation
3.
Actions before 1st operation
4.
Pre-operation Cleaning
5.
Putting in Oil
6.
Circuit Diagram Display
7.
Operation Procedure
7.1 Temperature setting
7.2 Time Setting
7.3 A-F Button Setting
7.4 Conversion between Fahrenheit and Celsius
7.5 Temperature setting checking
8.
Frying Process
9.
Filteration
10. Preventive Maintenance
11. Turing Off
12. Common Malfunction and Solution
13. Circuit Diagram
2
1.Brief Introduction
1.1 Brief Introduction
Electirc computer fryer E17 of Master series are specially designed for fast food
restaurants, convenience stores and other similar shops to fry food such as chicken,
chicken loaf, slice of fish and French fries (potato chips, potato doughnuts). E17 is a
frying oven specially designed for sequencing management and equipped with the
computer program controller and frying program of intelligent management. It has
high-power heating elements and the temperature can be raised quickly. Its
efficiency is high and capacity large. Oil discharge pipe with big caliber is designed
in the cooling area. The frying area is 14”(35.56mm)*17”(43.18mm)
1.2
1.
2.
3.
4.
Technical Parameters
Dimension: 400(W)×800(D)×(850+250)H mm
Fuel tank capacity: 32 liters, Actual loading: 28 liters.
Power: 18KW
Power supply: Three-phase Five-wire 380V/50Hz
1.3
Function Profile
1. Intelligent setting and multi-function integrated, each cylinder could frying six
categories food at the same time, each product button have a variety of timing
settings.
2.
Automatic temperature delay system ensures frying quality when putting
variety of food .
3. Real-timecountdown display, click the L / R can view oil temperature , then
click L / R check setting temperature.
4 Double temperature limit controls. Automatically power cutting off when exceeds
the safety level.
5
Cancelling function by holding on product button for three seconds to exit, and
then restart. Or click the up / down key within 10 seconds.
1.4 Safe Operation Notice
1. Operation must strictly obey rules regarding safe use of power.
2. Guarantee fryer operated only by personnel:
-Staffs been specially trained and according to operational procedures to
operate.
3. Fryer operated only when safety can be ensured. Since all malfunctions may
cause danger, it must be repaired immediately in case of any malfunction.
4. Before operation, all safety devices and removable parts must be installed and
tested. Fryer be operated only when it is checked and no problem is found. The
power supply of fryer must be cut off before removing any components. The unit
must not be used in the course of maintenance. All components must be installed in
accordance with the regulation.
5. The removal of any removable parts can be carried out only after the unit is
shut down and cooled. Checking and repairing circuit and fryer, as well as
installation of the fryer, must be done by electricians. The power supply and wiring
3
must be checked regularly for any error and fryer must be immediately repaired after
the electric wire is blown.
6. Periodic inspection of power supply, key components. Damage of fuse wire
must be repaired immediately.
Notice: Be careful to avoid scald when arranging the food. Do not touch the unit
when it is running or generating heat.
1.5 Warranty
Fryer can only be used for frying food. The company will not be responsible for any
malfunction caused by using the unit for other abnormal purposes.
The following situations are not covered in the warranty:
1. This unit is not properly used or is not used based on the design intent.
2. Improperly installation or maintaining.
3. The unit continues to operate when damaged.
4. Operational procedures are ignored; in particular, caused by process of
storage, installation, testing, repairing or maintenance.
5. Parts are replaced without the written permission of the distributor.
6. Lack of daily maintenance for parts that are easy to be worn or damaged.
7. Force majeure.
2.
Installation
i.
A well ventilated environment must be guaranteed for the installation of the
opened frying oven and its working area must be far away from inflammables.
1) adjust casters and installation height
2) Install security network, vent pipes and other accessories putted in cylinder
ii.
The installation of power supply: Adopt 3×6+2×4mm cable to connect the
power supply of three-phase Fivewire system (380V/50Hz). There must be reliable
ground wire.
3.
1.
2.
3.
4.
st
Actions before 1 operation
Level Fryer.
Close oil drain valve, add water to between Min- Max Line
Adjust temperature to 88 º C for boiling
Drain out water, clean Fryer.
4. Pre-operation Cleaning
Before adding oil, take following cleaning procedures first (at least once per month).
1. Close oil valve, adding cold water, cleaning agents.
2. Turn on the General Power Switch on Jack Box. Then start computer board
operation, ajust temperature to 88 º C for boiling cylinder, around approximately 45
to 60 minutes. Need be watched during the process to prevent overflow events.
3. Shut down power, adding water, cleaning cylinder and liquid discharges.
4. Clean twice again, don’t leave water trails.
5. Putting in Oil
Shut down drain valve and turn off power switch, remove basket support frame,
filling oil between Min-Max line, then put on support frameagain, and insure putting
4
-down heating tubes immerse in oil.
If using oil shortning, it should be pressed tightly inside cylinder and space around
heating tube should be fullfilled, (to prevent damage) .
Note: Take care of oli splashing if Fryer be moved during operation. And it’s better
to drain out oil then move.
6. Circuit Diagram Display
PROG: Program
L / R: Switch, Temperature
A-F: Product
and
DOWN ARROW: Time channel selection
7. Operation Procedure
Switch: Turn on the General Power Switch on the Jack Box. Hop on the power
switch on control board, screen displays flashing boldface and when the boldface
stay the lower right corner of the screen, press L / R button for three seconds.
Relays on function and left screen shows ----, with right-screen display temperature
degrees.
To shut off, after countdown, holding down the L / R button to 3 seconds
then shut down. At this point, bottom right corner of the screen displays only a
boldface, and then the closure of general power supply.
7.1 Temperature setting
1) Hold the key PROG to six seconds and left screen display PASS, right display a
boldface, this time,entering a password A BCD (to be completed within 10 seconds).
2) Press the L key, middle screen display Lc / f (c / f said Celsius / Fahrenheit),
right screen shows - degrees, said current temperature of the cylinder;
3) Then click L button, middle screen display L0, right screen shows - degrees,
5
said the current setting temperature. By E / F button to adjust temperature settings
(Recommended170 degrees Celsius), E up and F down
4) Then click the L button, middle screen show the L1,right window shows degrees, said safty temerature, ibid by E / F adjusted to between 190-200;
5) Then click L button, middle screen show the L2, the right window shows - that
said the temperature-controlled zone, by E / F adjusted to between 10-15.
6) At this point, the temperature settings to complete.
7) After setting, press PROG to exit.
7.2 Time Setting
1) Press PROG for six seconds, entering code ABCD, press button, to the
frying ands stiring-up setting.
2) Middle screen display product No.01, indicates channel No.01’s time setting,
left screen shows PROG, right screen displays frying setting time. Press E / F button
to adjust. Then clcik D and right screen shows the R-: - time, that indicate stir-up
timing, also by press E / F button to adjust
3) Then press button, No.1 Time be saved and,enter No.2 time channel, middle
screen display channel No. 02, right screen shows channel setup time -:--, to repeat
the previous steps for setting up.
4) Respectively set to 01-09 channel. Finished time set-up.
5) Click PROG set to exit.
7.3 A-F Button Setting
1) Press A when temperature achieve setting temperature on dispaly. A indicator
lighting, middle screen shows the current A key products by default channel No. 01,
left window shows channel setup time and started the countdown. Time could be
adjusted by
or
button to select from No.1 to No.9 Channel.
For example: Press A button after middle window display of 01, left window shows
2:30 and start the countdown, but time required is of channel 03’s 6:30. Thus double
click , middle screen will display 03, left screen display 6:30 (after 10 seconds 03
figure went out) channel 3 time automatically saved to the A button, which need to
be completed within 10 seconds. A setting be completed.
2) The same method for left buttons’ setting.
7.4 Conversion between Fahrenheit and Celsius
Press PROG button for 6 seconds and enter code ABCD, press L, middle screen
shows the LC / LF, C / F, said Celsius and Fahrenheit temperature unit, press D to
convert then press PROG to exit.
7.5 Temperature setting checking
Click L / R button, screen shows C - degrees, said current cylinder temperature.
Then click L / R button,screen shows P - degrees, said current setting temperature.
After ten seconds automatically return to the current status.
8. Frying Process
1) Temperature achieving frying point, start to put in food and select appropriate
product button. Product indicator green lighting, begins to the countdown. When
6
time to setting stiring-up timing, indicator turns to blue flashing lights and
accompanied by three consecutive sound alarm to remind that when the countdown
reaches 0, then display shows the END. The indicator light turns red indicates the
product has been completed frying.
2) Computer automatically delay system,offer quality protection for cooked food
3) The countdown real-time displaying, click the L / R button you can view the
current furnace oil temperature, and then click L / R button you can view setting
temperature,
4) Pressed wrong button, click product button for three seconds to exit, and then
restart other product button. Or adjusting by /
within 10 seconds, re-select the
time/channel product button.
5) Three types foodcould be cooked in one cylinder.
6) When electric heating tubes pulling up, power supply will be automatically
interrupted, down to resume.
9.
1.
2.
3.
4.
5.
Filteration
Take care when releasing oil to cylinder, boiling oil can cause serious burns.
If the valve has been jammed by food remains, please clean up
When re-oiling to pot, please remove food remains first.
Filteration at least one time a day.
Regurate filteration can keep quality of frying and prolong oil life.
10. Preventive Maintenance
1. Daily clean fryer inside and outside. Smear with a dry cloth to clean all
parts, removing oil and dust.
2. Weekly clean cylinder and heating tube.
Notice:Do not use when cylinder is hollow.
11. Turing Off
1. Oil filteration, covered with a lid, and then power off.
2. When using suspetion for long time, power off, drain outoil and make total clean.
12. Common Malfunction and Solution
Problem
Cause
Heating tube damaged
No Heating
or
Contactor damage
Solution
Check/change
Check/change
7
low
temperature
Probe damaged
Power supply not on
Low temperature setting
Power safty cut off power
supply
Check/change
Check power supply
Resetting
Refer follow solutions
Resetting and press safty controls
reset
Safty controls damaged
Check/change
Probe damaged or loose
Check/change
Solid state relay damaged
Check/change
Control board damaged
Check/change
Buzzer or circuit damaged
Check/Change
No alarm
Control board damaged
Check/Change
Transformer/Fuse damaged Check/Change
No display on
Control board damaged
Check/Change
control board
No power supply
Check/Change
Notice: Repairing and maintenance must taken by professionall
Safty controls
cut off power
supply
Oil
temperature
too high
Temperature setting high
8
13. Circuit Diagram
3KW/230V
All the contents of this operation Manual are aimed only at the product then
designed. Our company reserves the right for changing the product design. Please
excuse us for not updating the Manual in time in case of any design change!