1
LABEL PRINTER PRO
Owner’s
Manual
NOTICE: LSAD-3 Adapter required with this machine. LSAD-3 complies
with California Energy Commission Appliance Efficiency Regulations.
&EDERAL#OMMUNICATIONS#OMMISSION&##$ECLARATIONOF#ONFORMITY
+3UN#ORPORATION
3-#$RIVE0/"OX
3OMERSET7)
0HONE
0RODUCT.AME -ODEL.UMBER +3UN,!"%,02).4%202/
+3UN,!"%,02).4%202/
4HISDEVICECOMPLIESWITHPARTOFTHE&##2ULES/PERATIONISSUBJECT
TOTHEFOLLOWINGTWOCONDITIONS4HISDEVICEMAYNOTCAUSEHARMFUL
INTERFERENCEANDTHISDEVICEMUSTACCEPTANYINTERFERENCERECEIVED
INCLUDINGINTERFERENCETHATMAYCAUSEUNDESIREDOPERATION
.OTE4HISEQUIPMENTHASBEENTESTEDANDFOUNDTOCOMPLYWITHTHELIMITSFOR
A#LASS"DIGITALDEVICEPURSUANTTOPARTOFTHE&##2ULES4HESE
LIMITSAREDESIGNEDTOPROVIDEREASONABLEPROTECTIONAGAINSTHARMFUL
INTERFERENCEINARESIDENTIALINSTALLATION4HIS%QUIPMENTGENERATESUSES
ANDCANRADIATERADIOFREQUENCYENERGYANDIFNOTINSTALLEDANDUSEDIN
ACCORDANCEWITHTHEINSTRUCTIONSMAYCAUSEHARMFULINTERFERENCETORADIO
COMMUNICATIONS(OWEVERTHEREISNOGUARANTEETHATINTERFERENCEWILL
NOTOCCURINAPARTICULARINSTALLATION)FTHISEQUIPMENTDOESCAUSEHARMFUL
INTERFERENCETORADIOORTELEVISIONRECEPTIONWHICHCANBEDETERMINEDBY
TURNINGTHEEQUIPMENTOFFANDONTHEUSERISENCOURAGEDTOTRYTOCORRECT
THEINTERFERENCEBYONEORMOREOFTHEFOLLOWINGMEASURES
q 2EORIENTORRELOCATETHERECEIVINGANTENNA
q )NCREASETHESEPARATIONBETWEENTHEEQUIPMENTANDRECEIVER
q #ONNECTTHEEQUIPMENTINTOANOUTLETONACIRCUITDIFFERENTFROMTHATTO
WHICHTHERECEIVERISCONNECTED
q #ONSULTTHEDEALERORANEXPERIENCEDRADIO46TECHNICIANFORHELP
q 4OENSURECOMPLIANCEWITHTHELIMITSFORA#LASS"DIGITALDEVICETHE
ENCLOSEDINTERFACECABLESHOULDBEUSED)F!PPLICABLE
q -ODIlCATIONSORCHANGESCOULDVOIDTHEUSERSTOOPERATETHEEQUIPMENT
ISNOTEXPRESSLYAPPROVEDBY+3UN#ORPORATION
Introduction
Thank you for purchasing LABEL PRINTER PRO.
This manual is divided into four sections:
1. Getting Started
2. Basic Operations 1
3. Basic Operations 2
4. Additional Functions
Please read this manual before using your LABEL PRINTER PRO.
This manual contains CAUTION and WARNING notices which must be observed
and tips that can assist you complete the task more easily and more effectively.
Be sure to keep this manual handy for future references
.
● All rights reserved. No part of this manual may be reproduced, stored in a retrieval system,
or transmitted in any form or by any means, electronic, mechanical, photocopying,
recording, or otherwise, without our prior written permission.
● The contents of this manual are subject to change without notice.
● All effort have been made to ensure the accuracy of the contents of this manual.
However, should any errors be detected, we would greatly appreciate being informed of
them.
x Texts and user's symbols you have entered are temporary saved in this device, but not
kept for extended period of time. we shall not be liable for damages, losses, costs, or
expenses incurred as a result of malfunction, repair, test, or battery exhaustion of this
device.
x About the labels
Before attaching labels, be sure to check the purpose of use and the material of the
adhered surface. Depending on the material, environmental conditions, etc., following
problems may occur.
-Color of the labels changes
-Labels come off
-Texts on the label wear off
-Cannot peel off the labels
-Glue remains on the adhered surface
-The adhered surface absorbs the color of the label
-The adhered surface is damaged
We shall not be liable for any damages, losses, costs, or expenses arising from these
problems.
x Do not carry out any operations not described in this manual, or LABEL PRINTER PRO
may break or cause injury.
PeelGuardTM is a trademark of K-Sun Corporation.
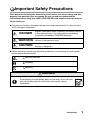
Important Safety Precautions
Items below should always be followed to protect users, their surroundings and their
property from possible injury or damage. Be sure to read and understand the
instructions before using your LABEL PRINTER PRO and keep this manual handy for
future references.
● Precautionary notations throughout the text are categorized relative to 1) personal injury
and 2) damage to equipment.
DANGER
Signals a precaution which, if ignored, will result in serious
or fatal personal injury. Pay extra caution in performing
procedures preceded by DANDGER headings.
WARNING
Signals a precaution which, if ignored, could result in
serious or fatal personal injury.
CAUTION
Signals a precaution which, if ignored, could result in
damage to equipment.
● Please familiarize yourself with the following definitions and meanings for each symbol
before reading the precautions.
Important reminder
Prohibited
Mandatory
DANGER
When using the battery
If liquid leaking from the battery gets into your eyes, do not rub your
eyes. Wash them well with clean water and contact a doctor
immediately.
Introduction
1
WARNING
When using the AC adapter
Do not attempt to use any adapters other than the AC adapter
bundled with the device. This may cause damage, overheating, fire,
or electric shock.
Be sure to use the AC adapter with the proper voltage. Using it with
other voltage levels may cause fire, smoke, overheating, or electric
shock.
Not bundled
AC adapter
Not 120V
Do not pull the AC adapter cord excessively or put a heavy object
on it. This may cause fire or electric shock.
WARNING
When using the battery
Do not use batteries with their
and
terminals reversed. This
may cause leakage, overheating, or explosion.
If liquid from the battery enters your mouth, rinse immediately with
plenty of water and consult a doctor.
If liquid from the battery comes in contact with your skin or cloth,
wash away with water. This may cause damage to your skin.
Do not use a new battery and an old battery, or different types of
batteries at the same time. Doing so may cause leakage,
overheating, or explosion.
Not specified
battery
When the battery runs down, take it out of the device immediately. If
a flat battery is left inside the device for long periods, gas emitted
from the battery may cause leakage, overheating, explosion, or
damage to the device.
If you do not use LABEL PRINTER PRO for an extended period,
take out the batteries from the device. Gas emitted from the battery
may cause leakage, overheating, explosion, or damage to the
device.
Follow the instructions given on the label or a package of the
battery. Misuse of the batteries may cause leakage, overheating,
explosion, injury, or damage to the device.
2
Introduction
Instructions
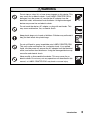
WARNING
Other
Do not step on, drop, hit, or have strong impacts on this device. This
may cause fire or electric shock. If your LABEL PRINTER PRO is
damaged, turn the power off, remove the AC adapter from the
electrical outlet, and contact local distributor. Using the damaged
device may cause fire and electric shock.
Do not touch the device, AC adapter, or plug with wet hands. This
may cause malfunction, fire, or electric shock.
Keep plastic bags out of reach of children. Children may suffocate if
they put their heads into plastic bags.
Do not spill liquid or spray insecticide onto LABEL PRINTER PRO.
This may cause malfunction, fire, or electric shock. If you spilled
liquid, turn the power off, remove the AC adapter from the electrical
outlet, and contact local distributor. Using the damaged device may
cause fire and electric shock.
Never modify or disassemble the device. This may cause fire or
electric shock. Do not carry out any operations not described in this
manual, or LABEL PRINTER PRO may break or cause injury.
Introduction
3
CAUTION
When using the battery
Follow the instructions given on the label or a package of the
battery. Misuse of the batteries may cause leakage, overheating,
explosion, injury, or damage to the device.
Instructions
Cleaning PeelGuardTM
Be sure to turn the power off before removing a PeelGuardTM tray.
When cleaning, do not put your fingers inside the PeelGuardTM.
Otherwise, you might cut your fingers.
Auto-cutter
Keep your fingers off the exit slot where the labels come out during
printing or when the cutter is operating. This may cut your fingers.
Other
Do not put anything heavy on LABEL PRINTER PRO or leave it in
unstable position. This may cause injury or damage to the device.
Always turn the power off before removing the AC adapter from the
electrical outlet. This may cause malfunction of the device.
About the labels
Before attaching labels, be sure to check the purpose of use and
the material of the adhered surface. Depending on the material,
environmental conditions, etc., following problems may occur.
x Color of the labels change
x Labels come off
x Texts on the label wear off
x Cannot peel off the labels
x Glue remains on the adhered surface
x The adhered surface absorbs the color of the label
x The adhered surface is damaged
We shall not be liable for any damages, losses, costs, or expenses
arising from these problems.
4
Introduction
Check
Precautions when using tape cartridges
■ Use precautions when installing tape cartridges Do not drop or disassemble
the tape cartridges. This may cause malfunction of the cartridges.
■ Do not pull or squeeze the label coming out of the exit slot. This may cause
malfunction of the device.
■ Tape cartridges should be stored in a dark cold place away from direct
sunlight, heat, moisture, and dust. It is recommended that you use the tape
cartridge as soon as possible after opening.
Precautions when installing tape cartridges
■ Tighten the ink ribbon
Insert a pencil or a similar tool into the hole of the tape cartridge and
turn it slightly toward the direction of the arrow. If the ink ribbon is not
tightened, it may come in contact with the printhead during installation.
This may bend or break the ink ribbon and damage the tape cartridge.
■ Install the tape cartridge properly
Insert the tape cartridge fully with its label side
up until the cartridge is secured by the fixing
tab of the main unit. When installing a new tape
cartridge or one with an extended tape end,
straighten the tape end and pass it through the
tape guide. If the tape cartridge is not installed
properly, tape may be bent or the tape
cartridges may pop out of the main unit during
printing. This may cause damage or the
malfunction of the tape cartridge.
■ Feed the tape after installation (
+
)
After installing the tape cartridge, be sure to feed the tape by pressing the
key and
the
key at the same time. If the tape is not fed properly, tape may be bent or the
tape cartridges may pop out of the main unit during printing. This may cause damage or the
malfunction of the tape cartridge.
See
"Feeding the tape" (p.30).
Introduction
5
General cautions
■ Be sure to read and understand the "Important Safety Precautions" before using
your LABEL PRINTER PRO.
■ Unplug the AC adapter from both the device and the outlet after use. This may prevent
possible accidents caused by tripping over the cord.
■ Do not use or store the device in direct sunlight, in places with dust or excessive humidity,
or in extreme temperatures.
■ Do not attach labels on people, living things, public buildings or properties of others.
■ Do not block or insert objects into the AC adapter socket or the tape eject slot.
■ Never touch the printhead.
■ Be sure to use the tape cartridges that has "LABELShop Tape Mark".
■ Avoid using a tape cartridge with no remaining tapes or pressing
without installing
tape cartridge. This may cause overheating and malfunction of the printhead.
■ Always press
+
to feed the tape. Never pull out the tape forcibly, otherwise
the tape cartridge will be broken and unusable.
■ Handle the tape cartridges with care, and avoid having impacts on them.
■ Do not handle the keyboard roughly. Do not use a pencil or a sharp material to press the
keys. This may damage the keyboard.
■ LABEL PRINTER PRO makes sounds when ejecting tapes. This is normal operation for the
device.
■ Be careful not to cut yourself when using scissors.
■ Do not insert labels that has no "LABELShop Tape Mark" into the PeelGuardTM.
■ Be sure to turn the power off after use.
■ If your LABEL PRINTER PRO is not to be used for long periods, remove the batteries, AC
adapter, and tape cartridge from the main unit. LABEL PRINTER PRO, batteries, AC
adapter, and tape cartridges should be stored in a dark cold place away from direct
sunlight, excessive temperature and humidity, magnetism, vibration and dust.
■ If a battery is left inside the device for extended period of time, liquid from the battery may
leak. Follow the instructions given on the package of the battery and replace it before the
expiry date.
■ Dispose of the used batteries according to the local regulations.
■ LABEL PRINTER PRO contains a lithium battery to save texts, files, and user’s symbols.
See the sticker on the backside of the main unit as a guide for the timing and replace the
lithium battery. To replace the battery, consult the local dealer or our customer center.
Replacement is performed at your expense.
■ Do not carry out any operations not described in this manual. It may cause injury or
damage to the device.
■ Contents, specifications, and design described in this manual are subject to change without
prior notice.
6
Introduction
Using This Manual
About this manual
This manual contains the following sections:
Getting Started
Describes preparations required before using LABEL PRINTER PRO.
Basic Operations
Divided into two sections.
"Basic Operation 1" explains operations such as entering texts and attaching labels.
"Basic Operation 2" gives information on text screen operations (e.g. adding paragraphs) and
PeelGuardTM. Those who attempt to use LABEL PRINTER PRO for the first time will find it
easy to start with "Basic Operation 1".
Additional Functions
Describes useful information that can assist you complete the task more easily and more
effectively. With additional functions, you can select documentary forms and styles, register
files and addresses. Read and understand "Basic Operations 1" and "Basic Operations 2"
before you begin on this section.
Symbols used in this manual
The following symbols are used in this manual:
Symbol
1 , 2
Indicates operation procedures.
Indicates the character keys.
,
,
Description
,
Indicates the function keys.
Indicates the keys to move the cursor or select an item.
See
Introduces the reference pages. Refer to the specified pages as
necessary.
Indicates useful tips.
Explains limitations and conditions that you should be aware of.
Labels in this manual: Labels contained in this manual are all samples and may differ from
actual labels.
Introduction
7
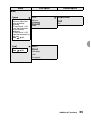
Contents
Introduction
● Important Safety Precautions.................. 1
Precautions when using tape
cartridges ............................................. 5
Precautions when installing tape
cartridges ............................................. 5
General cautions.................................. 6
● Using This Manual .................................. 7
About this manual ................................ 7
Symbols used in this manual ............... 7
● Contents.................................................. 8
● Unpacking the Device ........................... 10
● Setting Up ............................................. 11
1.Preparation ..................................... 11
2.Turning the power on ...................... 11
3.Entering texts (Example: NAME) .... 11
4.Changing the text size .................... 12
5.Printing labels ................................. 13
6.Attaching labels............................... 14
7.Turning the power off ...................... 14
Getting Started
● LABEL PRINTER PRO Parts ................ 16
Top side ............................................. 16
Internal parts ...................................... 16
Bottom................................................ 17
Backside ............................................ 17
LABEL PRINTER PRO Keys ............. 18
● Display Indicators.................................. 20
Display indicators............................... 20
Switching display (Graphic) ............... 22
Adjusting Display Level...................... 23
● Preparation ........................................... 24
1.Connecting the AC adapter............. 24
2.Installing the batteries......................25
............................. 25
3.Installing tape cartridges ................. 27
4.Turning the power on ...................... 29
5.Feeding the tape ............................. 30
8
Introduction
Basic Operations 1
● Creating the Sample Label
(from entering text to completion) ......... 32
1.Entering text .................................... 33
2.Inserting space................................ 34
3.Entering symbol .............................. 35
4.Viewing print image (Preview)......... 36
5.Printing label ................................... 37
6.Attaching label ................................ 38
● Turning the Power Off ........................... 39
Basic Operations 2
● Editing Text ........................................... 42
Using the cursor keys......................... 42
Entering text ....................................... 42
Deleting/Inserting text ........................ 43
Undoing the deletion .......................... 43
Deleting all the text............................. 44
● Adding New Lines (Line Break)............. 45
Starting a new line.............................. 45
Moving the text to the next line .......... 46
Joining the two lines........................... 46
● Adding New Paragraphs ....................... 47
Starting a new paragraph................... 48
Dividing into paragraphs .................... 48
Deleting specific paragraphs.............. 49
● Rounding Off the Corners ..................... 50
Cleaning PeelGuardTM ....................... 51
Additional Functions
● Improving the Appearance of the Label
- Using the decoration functions - ......... 54
Setting functions................................. 55
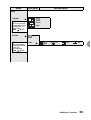
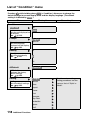
● List of "Length" Menu (English) ............. 57
● Lista del menú "Longitud" (Español) ..... 57
● List of "Style" Menu (English) ................ 58
● Lista del menú "Estilo" (Español) .......... 61
● List of "Mode" Menu (English) ............... 64
● Lista del menú "Modo" (Español) .......... 66
Function description (Length)............. 68
Function description (Style)................ 69
Function description (Mode)............... 74
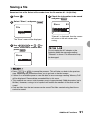
● Recalling a Previously Designed Label
(Form) ................................................... 79
Creating a label .................................. 79
List of "Form/Fixed Form" menus ....... 82
Sample forms ..................................... 83
● Recalling/Saving Text............................ 90
Using the key..................................... 90
About "File"......................................... 90
Saving a file ........................................ 91
Recalling a files .................................. 92
Deleting a file...................................... 93
Copying a file...................................... 94
● Using User's Symbols ........................... 95
Creating and saving user's symbols... 98
Modifying user's symbols ................... 99
Loading a user's symbol..................... 99
Copying a user's symbol .................. 100
Deleting a user's symbol .................. 101
Creating and registering a user's symbol
from a reference symbol................... 102
● Printing Sequence Numbers and
Bar Codes............................................ 104
Creating a label with a sequence
number ............................................. 104
Printing sequence numbers.............. 105
Creating a label with a bar code ....... 107
Bar code printing .............................. 107
● Extra Print Functions
(Repeat, Enlarge) ................................ 110
List of "Extra Print" menu.................. 110
Prints the same label continuously
(Repeat) ........................................... 111
To create a label that is wider than the
width of the tape (Enlarge) ............... 112
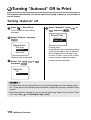
● Turning "Autocut" Off to Print .............. 116
Turning "Autocut" off......................... 116
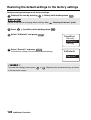
● Setting Default Settings ....................... 117
List of "Condition" menu ................... 118
Setting the Display Units .................. 119
Setting the Display Language .......... 120
Adjusting the Print Density ............... 121
Restoring the default settings to the
factory settings ................................. 122
Changing default settings ................. 123
● Resetting LABEL PRINTER PRO........ 124
Resetting .......................................... 125
Appendix
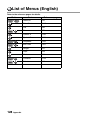
● List of Menus (English) ........................128
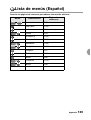
● Lista de menús (Español) ....................129
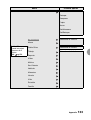
List of "Symbol A/Symbol B" menus
(English) ...........................................130
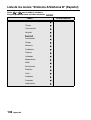
Lista de los menús "Símbolos A/
Símbolos B" (Español)......................132
List of "Feed" menu ..........................134
List of "Delete" menu ........................134
● Messages On the Display....................135
When an error message appears .....135
● Problems and Solutions.......................137
The device does not operate
normally ............................................137
Nothing appears on the display even
after pressing ...................................137
Keyboard does not operate ..............137
Display turns off unexpectedly..........137
Nothing is printed when pressing ....138
Text is not printed properly ...............138
The printed label is not cut
automatically.....................................138
Printing stops in the middle of
the text..............................................138
PeelGuardTM does not work
properly.............................................139
Contents of files are gone.................139
You cannot attach labels ..................139
● Cleaning LABEL PRINTER PRO.........140
● List of Characters.................................141
Key layout.........................................141
Character table .................................141
● Specifications.......................................142
Introduction
9
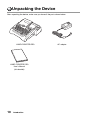
Unpacking the Device
After unpacking the device, make sure you have all the parts shown below:
LABEL PRINTER PRO
LABEL PRINTER PRO
User’s Manual
(this booklet)
10
Introduction
AC adapter
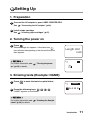
Setting Up
1. Preparation
1
Connect the AC adapter to your LABEL PRINTER PRO.
See
"Connecting the AC adapter" (p.24).
2
Install a tape cartridge.
See
"Installing tape cartridges" (p.27).
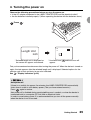
2. Turning the power on
1
Press
.
Selected length unit appears. A line head icon
that indicates the beginning of the line and the cursor
then appears.
Length Unit
inch
X.X
in
For further information, see
on" (p.29) for details.
"Turning the power
1
3. Entering texts (Example: NAME)
1
Press
2
Press the following keys:
,
"NAME" appears on the screen.
to enter the texts in capital letters.
For further information, see
Label" (p.32) for details.
,
,
X.X
in
NAME
1 N A M E
"Creating the Sample
Introduction
11
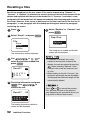
4. Changing the text size
1
Press
.
"Style" menu appears.
2
Press
press
or
.
to select "Lines", and
3
Press
press
or
.
to select "1 Line", and
4
Press
press
or
.
to select "
Style
Vertical
Lines
Layout
Style
Vertical
Lines
Layout
Lines
Equal
1 Line
2 Lines
1c", and
1 Line
1b
1c
1d
5
Press
or
.
12
Introduction
to select "End?", and press
Style
Frame
End?
6
Press
press
or
.
to select "Label", and
Area?
Label
Paragraph
X.X
in
NAME
1 N A M E
For further information, see
details.
"Improving the Appearance of the Label" (p.54) for
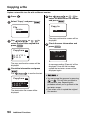
5. Printing labels
1
Hold down the
key (= Preview).
key and press [Graphic]
NAME
2
Press
.
Printing starts after "Length" and "Width" are
displayed on the screen.
When the printing is completed, LABEL PRNTER
PRO automatically cuts the tape.
Do not pull the tape forcibly.
For further information, see
Auto
Width
X.X"
X/X"
1
"5. Printing label" (p.37) for details.
Introduction
13
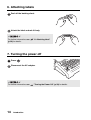
6. Attaching labels
1
Peel off the backing sheet.
2
Attach the label and rub it firmly.
For further information, see
(p.38) for details.
"6. Attaching label"
7. Turning the power off
1
Press
2
Disconnect the AC adapter.
.
For further information, see
14
Introduction
"Turning the Power Off" (p.39) for details.
Getting Started
This section describes how to connect the AC adapter to your LABEL
PRINTER PRO and turn the power on. If you are a first time user, it is
recommended that you read this section first.
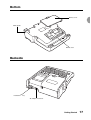
LABEL PRINTER PRO Parts
Top side
Tape verification window
Top cover button
Display
PeelGuardTM
PeelGuardTM slot
PeelGuardTM table
PeelGuardTM guide
Internal parts
Top cover
Tape cartridge
case
Fixing tab
Tape guide
Tape eject slot
Print/cut lamp
16
Getting Started
Bottom
Battery cover
Cable guide
Battery case
Backside
PeelGuardTM tray
AC adapter connector
Getting Started
17
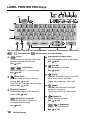
LABEL PRINTER PRO Keys
The functions of each key are described below. To perform the operation indicated by
+
, hold down the
key and press the specified key.
(Print)
Prints the text you entered on the tape,
and cuts the tape automatically.
See
p.37.
+
(= Feed/Cut)
Feeds the tape 0.7", or cuts the tape.
See
p.30.
(Extra Print)
Performs repeat printing or enlarge
printing. See
p.110.
Press this key to disable the auto-cutter
feature. See
p.116.
[Graphic] (Graphic)
Switches the display of the text entry
screen. See
p.22.
+[Graphic] (= Preview)
Shows the preview of the label by
scrolling the whole image.
See
p.36.
18
Getting Started
[Light]/[Dark] (Display level)
Adjusts the density level of the display.
See
p.23.
(Length)
Sets the length of the label.
See
p.68.
(Style)
Specifies vertical/horizontal, size of the
texts, layout, frame, and table.
These items make up a "text style".
(Mode)
Specifies font, decorate, Exp./Red.,
border/art, and space.
These items make up a "text mode".
(Symbol A)
Shows available symbols.
See
p.130.
+
(= Sequence)
Enters sequence numbers.
See
p.105.
(Symbol B)
Shows available symbols, registers/calls
user’s symbols.
See
p.131.
+
(= BarCode)
Enters bar codes.
See
p.104.
(File)
Registers the text you entered.
See
p.90.
(ON, OFF)
Turns on/off the power. See
p.29.
(PC)
Switches the status so that the LABEL
PRINTER PRO can be connected to a
computer when using the CD-ROM
(MaxiLabel® Pro).
(Caps lock)
(= Sample form, Fixed form)
+
Calls sample forms and fixed forms.
See
p.79.
(Undo)
Recalls previously deleted objects.
See
p.43.
+
(= Condition)
Changes the set values in the various
settings such as display level or print
density.
See
p.119.
+
Enters texts in capital letters.
See
p.33.
(Space)
Inserts space. See
p.34.
(Cursor keys)
Moves the cursor or highlighted items to
up, down, right, or left.
See
p.42.
(Escape, Back space)
Deletes the text to the left of the cursor.
Cancels the current operation.
+
(= Cursor jump)
Moves the cursor directly to the
beginning of the paragraph/line or the
end of the paragraph/line. When
selecting items, shows the start or last
option.
See
p.42.
+
(= Delete)
Deletes the texts or the paragraphs.
See
p.49.
(Select, Line break)
Selects one of the options.
Starts a new line (line break).
See
p.12.
Character keys (
Enters texts. See
...)
p.141.
+
(= New paragraph)
Starts a new paragraph.
See
p.47.
(Shift)
Hold down the
key and press the
function keys to activate the functions
written on the upper part of the keys. To
enter in small letters or some symbols,
hold down the
key and press the
character keys.
Getting Started
19
Display Indicators
Display indicators
<Text enter screen>
Line head icon
(
...
,
...
)
Appears on the line head to show the
current line number. When there is a
text(s) to be printed on the label,
and
appear on the line head.
and
appear when there is no texts on
the line.
and
mean that you
cannot print the line.
See
p.45.
Confirmed texts (Example: 12AB)
Texts to be printed on the label.
Text mode change icon ( )
Appears when you change the text mode
such as font or decorate.
See
p.56.
20
Getting Started
Cursor ( )
A movable indicator on a display,
marking the position at which a character
can be entered, corrected, or deleted.
See
p.42.
Memory full icon ( )
Appears when the maximum number of
letters (approx. 175 letters) are entered.
You cannot enter any letters until you
delete a part of or whole of the text.
Print information
Shows the tape width of the installed
cartridge and expected length of the
current label.
This information may not be displayed
depending on the settings.
See
p.36.
Print image
Shows the print image of the current
label. This information may not be
displayed depending on the settings.
See
p.36.
Text size indicator
Shows the text size of the character
under the cursor.
Numbers from 1 through 7 correspond to
inches as follows:
1
2
3
4
5
6
7
0.2"
0.3"
0.4"
0.5"
0.7"
Font indicator
Shows the font of the character under the
cursor.
0.08" 0.1"
Length indicator
Lights when "Length" is selected.
CapsLock indicator
Lights when the
key is pressed or
when entering capital letters.
Vertical indicator
Lights when "Vertical" is selected.
Decorate indicator
Lights when "Decorate" is selected.
Getting Started
21
Switching display (Graphic)
Enter a text while displaying the text line, print image, length, and width of the label.
Display switches each time the [Graphic] key is pressed.
<Pattern 1> (Default)
Text you entered appears on the screen up to
three lines. The print image and the length of
the label are displayed.
X.X
in
My Name
Address
Phone
2 M y N a
3 A d d r e
4 P h o n e
[Graphic] key
<Pattern 2>
Text you entered appears on the screen up to
two lines. The rough print image and the length/
width of the label are displayed.
X.X
in
X.X
in
My Name
Address
Phone
3 A d d r e
4 P h o n e
[Graphic] key
<Pattern 3>
Text you entered appears on the screen up to
four lines. Other information will not be
displayed.
1
2 M y N a
3 A d d r e
4 P h o n e
x Display only switches when entering texts. Pressing [Graphic] does not affect the display
of the menu screen.
See
"Display indicators" (p.20).
x When pattern 2 is selected, the reaction of the display may become slow.
x Hold down the
key and press [Graphic] (= Preview) to scroll the print image on the
entire screen.
See
"Viewing print image (Preview)" (p.36)
x Adjust the display level to the most comfortable eye level.
See
"Adjusting Display Level" (p.23)
22
Getting Started
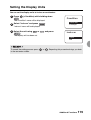
Adjusting Display Level
Display level is adjustable at 11 different levels. Adjust the display level by pressing
[Light] or [Dark] to the most comfortable eye level.
● Lightening the display
Display becomes lighter each time the [Light] key is pressed.
● Darkening the display
Display becomes darker each time the [Dark] key is pressed.
The display level remains even after the power is turned off. To initialize the level,
hold down the
key and press [Light] or [Dark].
Getting Started
23
Preparation
1. Connecting the AC adapter
Connect the AC adapter that comes with your LABEL PRINTER PRO to supply power
from the electrical outlet (AC120V).
1
Connect the AC adapter to the
connector on your LABEL
PRINTER PRO firmly, and route
the cord through the guide as
shown below.
* Be sure to connect the adapter as
far as it can go so as to supply
power steadily.
2
Plug the other end of the AC
adapter into the electrical outlet.
Cable guide
x Unplug the AC adapter from both the device and the outlet after use. This may prevent
possible accidents caused by tripping over the cord.
x When handling the AC adapter cord, be sure not to pull it forcibly or bend it repeatedly.
This may break the cord.
x The safety feature of the device may cut the circuit of the AC adapter when the plug
shorts out or on other occasions.
x LABEL PRINTER PRO warranty does not apply to the AC adapter.
24
Getting Started
2. Installing the batteries
Your LABEL PRINTER PRO also works with batteries when an electrical outlet is not
available. Six AA alkaline batteries are required.
1
Remove the battery cover.
Take off the cover while releasing the tab.
Be sure to turn off the power before installing
the batteries.
2
Insert the batteries.
Insert six AA alkaline batteries with the
correct polarity as shown.
3
Close the battery cover.
Adjust the two tabs to the holes of the main
unit, and close the battery cover firmly until it
clicks.
x Use AA alkaline batteries only. Other types of battery have short lives, and the message
to notify the user that the battery is running out may not be displayed.
x You can print labels with batteries installed, however, it is strongly recommended that you
connect the AC adapter before printing.
x Make sure to use the dedicated AC adapter only.
Getting Started
25
x Print speed becomes slower when the AC adapter is not connected.
x Printing on the wide tape will temporarily cause the device to consume a large amount of
current, and can cause the device to display "Change Batteries" even if new batteries are
installed. This is normal operation for the device.
x Print speed becomes slower when the batteries are running low, then "Change Batteries"
appears on the display. Replace all the batteries with new ones or connect the AC
adapter immediately, otherwise the LABEL PRINTER PRO may turn off in the middle of
the operation or during printing.
x New AA alkaline batteries will supply enough power for the device to print on one tape
cartridge (0.7" x 26') at room temperatures. However, when you operate the device in
cold places or print on wide tapes, the life span of the batteries becomes shorter. You are
recommended to use the AC adapter as much as possible. Use the dedicated AC
adapter only.
x Make sure to turn off the power after use.
x If your LABEL PRINTER PRO is not to be used for long periods, remove the batteries
from the device to avoid possible leakage.
x Dispose of the used batteries according to your local regulations.
x LABEL PRINTER PRO contains a lithium battery to save text, files, and extended
characters. See the sticker on the backside of the main unit as a guide for the timing and
replace the lithium battery. To replace the battery, consult the local dealer or our
customer center. Replacement is performed at your expense.
26
Getting Started
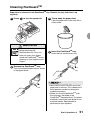
3. Installing tape cartridges
1
Tighten the ink ribbon
Insert a pencil or a similar tool into the
hole of the tape cartridge and turn it
slightly toward the direction of the arrow.
2
Press the top cover button
Press the button to open the top cover
slightly.
Make sure that the power is turned off
beforehand.
3
Open the top cover
x Do not open the top cover forcedly. Top
cover stops when it meets the stopper.
x Do not lift up the device by holding the
top cover.
4
Install the tape cartridge
Insert the tape cartridge fully with its
label side up until the cartridge is
secured by the fixing tab of the main
unit. When installing a new tape
cartridge or one with an extended tape
end, straighten the tape end and pass it
through the tape guide.
Straighten the
tape end.
Insert the
cartridge with its
label side up.
Pass the tape end
through the tape guide.
Getting Started
27
5
Close the top cover.
Hold down the cover gently to close.
If you close the top cover without inserting
the tape cartridge, your LABEL PRINTER
PRO or the tape cartridge may be
damaged.
Tabs
Removing the tape cartridge
To ensure proper printing, the tape cartridge is
secured to the main unit firmly.
To remove, place your fingers in the space
provided on both sides of the cartridge as
shown in the figure, lift the tab indicated by (A)
first, then lift the tab indicated by (B), and pull
out the cartridge.
Fixing tab
(located inside)
x LABEL PRINTER PRO supports six different width of the tape cartridges (204,206,209,
212,218,224). Number of lines printed on the tape varies depending the tape
width.
See
"Maximum number of lines" (p.45)
x Tape cartridges should be stored in a dark cold place away from direct sunlight,
excessive temperature and humidity, and dust.
x It is recommended that you use the tape cartridge as soon as possible after opening.
x When installing the tape cartridge, insert it firmly as far as it can go.
28
Getting Started
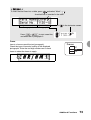
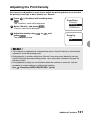
4. Turning the power on
Observe the following precautions before you turn the power on.
x Is the AC adapter connected to the LABEL PRINTER PRO and the electrical outlet?
x Are the batteries installed properly? (When operating the device with the batteries alone.)
1
Press
.
Length Unit
inch
* Selected length unit is displayed on
the screen for approx. one second.
X.X
in
1
* Line head icon (
appear.
and the cursor will
Text you have entered remains even after turning the power off. When the device is turned on
again, the text appears after the selected length unit is displayed. Selected options for the
settings such as font and text size are also indicated.
See
"Display indicators"(p.20)
Auto power-off
If there is no activity for approx. five minutes, the LABEL PRINTER PRO automatically
shuts down in order to save battery power. (Text you have entered remains.)
Press
again to restore.
Auto power-off is disabled during creating/editing user's symbols, or when the device is
connected both to a computer (PC link) and an electrical outlet.
In order to save battery power, it is recommended that you turn off the power manually
when the device is not to be used.
Getting Started
29
5. Feeding the tape
After installing the tape cartridge, make sure to feed the tape so as to take up the slack
of the tape.
1
Hold down the
key and press
(= Feed/Cut).
Feed/Cut menu appears.
2
Press
Cut".
3
Press
.
When "Feed" is selected, the device feeds the tape 0.7". When "Feed/Cut" is selected,
the device feeds and cuts the tape automatically.
or
to select "Feed" or "Feed/
Feed/Cut
Feed
Feed & Cut
Cut
Next
You are now ready to proceed to the next step.
Follow the procedures described on the following pages to learn how to create labels.
See
"Creating the Sample Label" (p.32)
30
Getting Started
Basic Operations 1
- Creating basic labels -
This section describes LABEL PRINTER PRO basic operations.
You will learn how to enter text, print, and create simple labels.
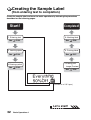
Creating the Sample Label
(from entering text to completion)
Create the sample label and learn the basic operations by following the procedures
described on the following pages.
Start!
Completed!
1. Entering text
6. Attaching label
See
P.33.
2. Inserting space
See
P.34.
3. Entering symbol
See
See
5. Printing label
See
P.37.
4. Viewing print
image (Preview)
P.35.
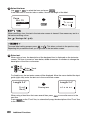
See
(Printed on a 218" tape.)
Let's start!
32
P.38.
Basic Operations 1
P.36.
1. Entering text
To enter text in capital letters or insert characters written on the keyboard keys in
yellow, you need to use the
key.
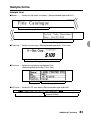
Ex. :
You are entering this text.
1
Enter "50%Off".
Press
,
.
Hold down the
Hold down the
Press
twice.
X.X
in
key and press
key and press
(= %).
.
Everything
50%Off
1 v e r y t h
2 0 % O f f
Caps Lock
Hold down the
key and press
to enter the text in capital letters.
In this mode, CapsLock indicator will light up. To cancel this mode, hold down the
and press
again.
Basic Operations 1
key
33
2. Inserting space
A space you enter is indicated by "
label.
", and it will be a one-byte blank on the printed
Ex. :
You are inserting a space here.
1
Press
.
A space is inserted.
X.X
in
" " is displayed on the text enter screen, however,
the symbol will not appear on the printed label.
1 e r y t h i
2 % O f f
Everything
50%Off
REFERENCE
Two-byte space
With the LABEL PRINTER PRO, you can select the size of the space from one byte or two
byte. Size of a two-byte space equals to approximately the size of two characters
combined.
To insert a two-byte space, press
and select "Mark" - "
".
If the "SPACE" - "Proportional" setting is set to "Off", however, the size of one-byte space
becomes equivalent to that of two characters.
See
"Space" (p.78).
Text enter screen
One-byte
space
Space size
Two-byte
space
Space
34
size
Basic Operations 1
Printed with the
Printed with the
"Proportional" setting "On" "Proportional" setting "Off"
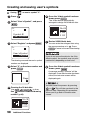
3. Entering symbol
Ex. :
You are entering this symbol.
1
Press
.
"Symbol-A" menu appears.
2
Press
3
Press
.
Symbols included in the "Shop" group appears.
or
X.X
in
to select "Shop".
Everything
50%Off
Symbol-A
Shop
X.X
in
Everything
50%Off
Shop
4
Press
or
to select "
".
X.X
in
Everything
50%Off
Shop
5
Press
.
X.X
in
Everything
50%Off
1 r y t h i
2 O f f
Basic Operations 1
35
x To cancel the operation, press
,
, or
.
x A menu or a symbol you selected comes at the head of other options from the next time
(learning function).
x To enter two-digit numbers, select "DoubleFigure" from the symbol menu.
See
"Printing two-digit numbers vertically" (p.70).
x Press
and select "Mark" to show the
and
icons. Selecting one of these
icons works as follows:
: Ruled-line icon
Draws ruled lines.
See
"Frame" (p.72).
: Two-byte space
Inserts a two-byte space.
See
"Two-byte space" (p.34).
4. Viewing print image (Preview)
LABEL PRINTER PRO can display the print image of the label on the screen so that
you can check the image before you actually print the label. This feature prevents
possible misprint and waste of tapes.
1
Make sure that the tape cartridge is installed properly.
To display the print image precisely, make sure that the tape width of the installed tape
cartridge is appropriate to your text.
2
Hold down the
key and press [Graphic] (=
Preview).
The print image scrolls on the entire screen.
Press any of the following keys to temporarily stop
the scrolling text:
,
,
,
,
Text remains stopped while the key is pressed.
Refiolease the key to scroll the text again.
To cancel the preview, press
or
Everythin
50%Off
.
x Preview only appears while entering text or fixed form.
x "No Tape!" will appear on the screen if the tape cartridge is not installed or not installed
properly. Preview will not be displayed at this time.
x When you entered too many lines of text to be printed on the tape, "Line Over!" will
appear on the screen. Preview will not be displayed at this time.
x Preview should be used as a guide. It may not match the printed label exactly.
36
Basic Operations 1
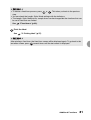
5. Printing label
Before you start printing, make sure that the tape cartridge is correctly installed and
the AC adapter is connected properly.
1
Press
.
Expected length and width of the label will be
displayed after "Wait" appears. Printing is started
subsequently.
Auto
Width
2.2"
3/4"
1
LABEL PRINTER PRO automatically cuts the tape when the printing is completed. To
cancel the printing, press
.
x When you press
during printing, the device cuts the tape and turns the power off.
x When you print the same label repeatedly, the total number of the printed labels will
appear on the screen.
x The total number of the printed labels returns to "1" when you change or modify the text
(characters or the style). The number is counted up to "100", then returned to "1".
x LABEL PRINTER PRO makes sounds when ejecting tapes. This is normal operation for
the device.
x To carry out the extra print (repeat, enlarge, or auto-cut off), press
.
See
"Extra Print Functions (Repeat, Enlarge)" (p.111).
x
x
x
x
x
x
x
x
x
Time before the printing starts may become longer if you entered complex texts.
Do not insert your fingers in the tape eject slot.
Do not pull the tape until the printing is completed.
Do not open the top cover during printing. When the top cover is opened, a built-in
protection circuit turns the power off and interrupts the printing.
Make sure that the ejected tape does not block the tape ejection slot.
"No Tape!" will appear on the screen if the tape cartridge is not installed or not installed
properly.
When you entered too many lines of text to be printed on the tape, "Line Over!" will
appear on the screen. In that case, delete some lines or install a wider tape.
Length of the label shown on the screen is a guide and may not match the length of the
printed label exactly.
LABEL PRINTER PRO does not print texts longer than 52.5'.
Basic Operations 1
37
6. Attaching label
Peel off the backing sheet of the label to attach.
1
Peel off the backing sheet.
2
Attach the label and rub it firmly.
Ever ythin g
50% Off
You can round off the corners of the
printed labels.
See
"Rounding Off the Corners"
(p.50)
x You might find it hard to peel off some of the backing sheets depending on the tape
types.
x Keep the labels away from a solvent or a thinner, and do not rub the labels with a pencil
or similar sharp tools. Otherwise the texts printed on the labels may be thin and the
labels may tear or peel.
x Characters printed on the white ink labels turn black when rubbed with a metal object.
Rub the labels with a rubber eraser to restore.
x Labels may peel off easily when attached to rough surface.
x Labels may peel off easily or not adhere well when attached to wet, oily or dusty surfaces.
x If you attach the label to the object that has writing on the surface with a pen, the pen ink
may leak in and damage the label.
x Avoid exposing labels to rain or sunlight. Do not place them in an outdoor location.
x Do not attach labels on people, living things, public buildings or properties of others.
x About labels
Before attaching labels, be sure to check the purpose of use and the material of the
adhered surface. Depending on the material, environmental conditions, etc., following
problems may occur.
• Color of the labels change
• Labels come off
• Texts on the label wear off
• Cannot peel off the labels
• Glue remains on the adhered surface
• The adhered surface absorbs the color of the label
• The adhered surface is damaged
We shall not be liable for any damages, losses, costs, or expenses arising from these
problems.
38
Basic Operations 1
Turning the Power Off
1
Press
.
When LABEL PRINTER PRO is turned
on, press
to turn the power off.
Text you have entered remains even
after turning the power off.
The text appears when the device is
turned on again.
2
Disconnect the AC adapter.
Disconnect the AC adapter both from the electrical outlet and the device.
Wind the AC adapter cable to store.
x If your LABEL PRINTER PRO is not to be used for long periods, remove the batteries,
AC adapter, and tape cartridge from the main unit. Texts, files, and user's symbols you
entered are saved even after the device is turned off.
If a battery is left inside the device for extended period of time, liquid from the battery may
leak. Follow the instructions given on the package of the battery and replace it before the
expiry date.
x LABEL PRINTER PRO contains a lithium battery to save texts, files, and use's symbols.
See the sticker on the backside of the main unit as a guide for the timing and replace the
lithium battery. To replace the battery, consult the local dealer or our customer center.
Replacement is performed at your expense.
NEXT
This is the end of "Basic Operation 1". In "Basic Operations 2", you will learn how to create
the labels with multiple lines or paragraphs.
"Additional Functions" gives you useful information that can assist you create your own
labels more easily and more effectively.
Basic Operations 1
39
40
Basic Operations 1
Basic Operations 2
- Creating labels for various purposes -
In this section, you will learn to create the labels with multiple lines or
paragraphs so that you can arrange the layout as you like.
You will also learn how to round off the corners of the labels.
Editing Text
You can edit the text by inserting or deleting characters.
Using the cursor keys
A vertical line " " appears on the display is called cursor. The cursor indicates the
position at which a character can be entered or deleted.
X.X
in
Label
1 L a b e l
Cursor
Press the cursor keys
to move the cursor.
Maximum number of the characters displayed on the screen is
6 columns x 4 lines. When you keep on entering characters
beyond this limit, characters you entered in the beginning will
not be displayed on the screen. In this case, move the cursor
to check the entire text.
Cursor key
Cursor moving direction
+
Moves the cursor one character to the right. Hold down the key to move the
cursor at high speed.
Moves the cursor one character to the left. Hold down the key to move the
cursor at high speed.
Moves the cursor to the previous (upper) line. Hold down the key to move the
cursor at high speed.
Moves the cursor to the next (lower) line. Hold down the key to move the
cursor at high speed.
Moves the cursor to the beginning of the line. When the key is pressed more
than once, the cursor jumps to the beginning of the previous line each time
the key is pressed.
Moves the cursor to the end of the line. When the key is pressed more than
once, the cursor jumps to the end of the next line each time the key is
pressed.
Moves the cursor to the beginning of the paragraph. When the key is pressed
more than once, the cursor jumps to the beginning of the previous paragraph
each time the key is pressed.
Moves the cursor to the end of the paragraph. When the key is pressed more
than once, the cursor jumps to the end of the next paragraph each time the
key is pressed.
+
+
+
To perform the operation indicated by
+
, hold
and press the specified key.
Entering text
X.X
in
May
1M ay
42
Basic Operations 2
Use the character keys to enter the texts.
See
"Creating the Sample Label" (p.32)
Deleting/Inserting text
Undoing the deletion
Move the cursor to the right of the
character and press
to delete the
character. To insert characters, move the
cursor to the position where you want to
insert them.
If you delete the characters by mistake,
press
immediately to restore.
Ex. :Delete "May" from "May 1st." and
insert "June" instead. The text
should read "June 1st.".
1
1
Press
1s
2
Press
"May".
1s
three times to delete
1M ay
three times to delete "May".
1M ay
Press
or
to move the cursor
to the right of "y".
1M ay
Press
or
to move the cursor
to the right of "y".
1M ay
2
Ex. :Delete "May" from "May 1st." and
then restore.
1s
1s
x3
x3
1
1
1st
3
The cursor comes to the beginning of
the line.
3
1st
Enter "June".
1 Ju n e
Press
.
Text you have deleted appears
character by character each time the
key is pressed.
1 M ay
1
1
If the total number of the characters
exceeds the limit (approx. 175 characters)
when inserting the characters, the memory
full icon [ ] appears at the end of the text.
Characters beyond the limit will be deleted
from the end of the text automatically.
If you delete the characters by mistake,
press
immediately to restore.
x If you press any of the keyboard keys
other than the following seven keys (
[Graphic])
immediately after you delete the text,
undo feature will be disabled and the
characters will not be restored.
x Maximum of 30 characters will be
restored.
x You can also undo "Delete all" or "Delete
paragraph".
Basic Operations 2
43
Deleting all the text
The text you entered remains even after turning the power off. To delete all the text,
select "Delete all" manually.
1
Hold down the
key and press
(= Delete).
"Delete" menu appears.
Delete
Please note that when you select "All" from
the "Delete" menu, various settings
included within the text will also be
deleted.
All
Paragraph
2
Select "All", and press
.
The display goes out for a moment, and
all the text will be deleted. The display
then returns to the text enter screen.
1
To delete the paragraph with the cursor,
select "Paragraph".
See
"Deleting specific
paragraphs" (p.49)
44
Basic Operations 2
x Press
immediately to restore the
deleted characters.
x "Delete all" does not clear the following
information.
Files, user's symbols, set values for
various settings, items that the device
has learned such as symbols, text that
the user was entering, selected pattern
of the display
x In order to change all the settings to
their default, you need to initialize your
LABEL PRINTER PRO.
See
"Resetting LABEL PRINTER
PRO" (p.124)
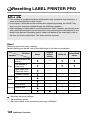
Adding New Lines (Line Break)
To start a new line, press
to insert a line break.
Maximum number of lines
LABEL PRINTER PRO supports tape cartridges ranging from 0.16" to 0.9" of width. Number
of lines you can enter varies depending on the width of the installed tape cartridge.
Tape width
Number of lines
204
Up to one
206
Up to two
209
Up to three
212
Up to four
218
224
Up to six| Up to eight
x Line head icon appears at the beginning of the line to show which line you are editing.
When there is text(s) to be printed on the label,
,
...
and , ... appear on
the line head.
,
...
and , ... appear when there is no texts on the line.
x
and
mean that you cannot add new lines any more. When you press
at
this time, "Line Over!" will be displayed. In order to print the label, delete the line with the
icon.
See
"Message On the Display (Line Over!)" (p.135)
Starting a new line
Press
at the end of the line to start a new line (line break).
Ex. :Entering three lines of text.
1
Enter "Room 1" and press
1R o o m
1
The line head icon appears at the
beginning of the second line.
1 R o o m
2
.
2
Enter "Room 2" and press
1R o o m
2R o o m
.
1
2
The line head icon appears at the
beginning of the third line. Enter "Room
3" in the line.
1 R o o m
2 R o o m
3
Basic Operations 2
45
Moving the text to the
next line
When you insert a line break in the middle
of the text, the characters to the right of
the cursor move to the next line.
Joining the two lines
Move the cursor to the right of the line
head icon to move the text to the upper
line.
Ex. :Joining the two lines.
Ex. :Dividing "Room 1 Class A" in two
lines.
Remove the
line break.
Insert a line break.
1
Press
or
to move the cursor
to the right of the space next to "1".
X.X
in
1 1
2
Room 1 Clas
Move the cursor to the right of the
line head icon
.
1
2
3
4
C l a s
Press
.
The line head icon appears at the
beginning of the second line, and
"Class A" moves to the second line.
X.X
in
1
2
S p
Ro
C l
Te
a
o
a
a
n
m
s
c
Press
.
"Class A" in the third line joins the text in
the second line. "Teacher: Mr. Jones" in
the fourth line moves to the third line.
Room 1
Class A
1 R o o m
2 C l a s
1a n i s h
2om 1
C
3a c h e r :
x Place the cursor at the beginning of the
fourth line and press
to move the
text in the line to the third line. The fourth
line will automatically be deleted.
x The line head icon
on the first
line of the first paragraph will not be
removed.
46
Basic Operations 2
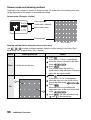
Adding New Paragraphs
The label below consists of three blocks. Each block is called paragraph in this
manual, and each paragraph is made with a group of lines or a single line. By dividing
a text into several paragraphs, you can change the number of lines or the style of the
text on a paragraph-by-paragraph basis.
You can divide a text into 10 paragraphs at a maximum within one label.
A label with three paragraphs
Paragraph 1
Paragraph 2
Paragraph 3
The paragraphs are placed horizontally when printed, however, they are aligned vertically on
the display.
[On the display]
Paragraph 1
Paragraph 2
Paragraph 3
Office
Extension
Room 1 #101
Room 2 #102
Room 3 #103
Basic Operations 2
47
Starting a new paragraph
Dividing into paragraphs
Hold down the
key and press
at the end of the paragraph to
start a new paragraph.
When you divide a text into paragraphs,
the text at the right of the cursor moves to
the next paragraph.
Ex. :Inserting a text in two paragraphs.
Ex. :Adding a new paragraph.
Paragraph 1
1
Paragraph 2
Paragraph 1
Start a new
paragraph at the
right of " " in
paragraph 1.
Enter the text in paragraph 1.
Enter " Office" in the first line and
"Extension" in the second line.
1 f i c e
2 n s i o n
Paragraph 1
1
2
Place the cursor ar the end of the
text, press
+
.
A new paragraph is created. The line
head icon
will appear at the
beginning of the new paragraph.
3
Enter the text in paragraph 2.
Enter the text as follows:
Fist line:
Room 1 #101
Second line: Room 2 #102
Third line: Room 3 #103
To start a new line, press
at the
end of the line.
1
2
3
48
# 1 0 1
# 1 0 2
# 1 0 3
Basic Operations 2
Paragraph 2
Paragraph 3
Move the cursor to the right of " "
on the first line in paragraph 1.
1
Of f
2 E x t e
2
1
Of f
2 E x t e
1
Paragraph 2
Press
+
.
The text to the right of the cursor moves
to the new paragraph. The cursor
moves to the beginning of the new
paragraph. The text in paragraph 2
moves to paragraph 3.
1
1 O f f i
x A newly-created paragraph takes over
the text style of the previous paragraph.
See
"Function description
(Style)"(p.69)
Deleting specific paragraphs
When you delete the unnecessary paragraphs, not only the text but also the attribute
such as the style and the text mode specified to the paragraph will also be removed.
Ex. :Deleting paragraph 2.
Paragraph 1
Paragraph 2
Paragraph 3
Delete paragraph 2.
Paragraph 1
1
Move the cursor to paragraph 2.
Put the cursor in anywhere within the
paragraph you want to delete.
1
1 O f f i
2
Press
+
(= Delete).
"Delete" menu appears.
Delete
All
Paragraph
When you select "All" and press
,
all the text you entered will be deleted.
3
Press
,
,
, or
select "Paragraph".
Delete
All
Paragraph
to
Paragraph 2
4
Press
.
The display goes out for a moment, and
the paragraph will be deleted.
The display then returns to the text
enter screen.
1
1 R o o m
x Please note that when you select
"Paragraph" from the "Delete" menu, all
the text included within the paragraph
will be deleted.
x When you delete a paragraph by
mistake, press
immediately to
restore. If you press any of the keyboard
keys other than the following seven keys
(
[Graphic])
immediately after you delete the text,
undo feature will be disabled and the
characters will not be restored.
x To cancel deleting the paragraph in the
middle of the operation, press
.
Basic Operations 2
49
Rounding Off the Corners
Your LABEL PRINTER PRO contains PeelGuardTM that
allows you to round off the corners of the labels.
This feature lets the labels look better and prevents
them from being peeled off.
For 209, 212, and 218 tapes
For 224 tapes
Rounds off one corner at a time.
Rounds off two corners at the same time.
1
Set one side of the label against
either right or left guide of the
PeelGuardTM, and insert the label
as far as it will go.
2
Pull out the label when you hear
the clicking noise several times.
3
Set the other side of the label
against the guide, and round off
the corner in the same manner.
1
Set both sides of the label against
the PeelGuardTM, and insert the
label as far as it will go.
2
Pull out the label when you hear
the clicking noise several times.
x When inserting the label, be sure to
keep it straight against the PeelGuardTM
guide.
x The labels should be inserted as far as
they will go.
x PeelGuardTM will not be activated during printing or when the top cover is opened.
x Once you insert the label to the PeelGuardTM, do not move the label up and down.
Otherwise the label may stick and the corners may not be rounded.
x Do not insert mechanical pencils, clips, or any other objects other than the labels into the
PeelGuardTM slot. This may damage the PeelGuardTM.
50
Basic Operations 2
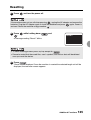
Cleaning PeelGuardTM
Paper dust is collected in the PeelGuardTM tray. Remove the tray and clean it up
regularly.
1
Press
to turn the power off.
3
Throw away the paper dust.
Clear the paper dust in the tray with a
cotton swab.
4
Insert the PeelGuardTM tray.
Insert the tray into the main unit.
WARNING
Be sure to turn the power off
before removing the
PeelGuardTM tray. Also, you
must not insert your fingers
inside the PeelGuardTM during
cleaning, or you might cut your
fingers.
2
Remove the PeelGuardTM tray.
Pull out the PeelGuardTM tray as shown
in the figure below.
x New LABEL PRINTER PRO may have
paper dust in the tray. This is because of
the inspection carried out during the
production process.
x When you use the PeelGuardTM over
the long term, the blade of the
PeelGuardTM becomes blunt. To replace
the blade, consult the local dealer or our
customer center. Replacement is
performed at your expense.
Basic Operations 2
51
52
Basic Operations 2
Additional Functions
- Using LABEL PRINTER PRO freely and creatively -
This section describes how to make better use of the function keys.
You will learn to change the orientation of the label, improve the
appearance of the label, and save the entered text.
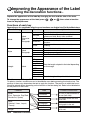
Improving the Appearance of the Label
- Using the decoration functions Improve the appearance of the label by changing the font and the size of the texts.
To change the appearance of the label press
,
, or
then select a function
from the displayed menu.
Functions of each key
Depending on the specifiable effective area, functions are divided into File/Style/Mode keys.
Function key
Item
Function
Description
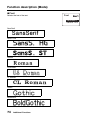
Font
Label
Character
Line
Paragraph
Mode
Sets the font.
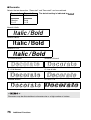
Selects Outline, Shadow, Shadow Outline
effects and Italic, Bold, Italic and Bold.
Expands or reduces the text size.
Sets Correction line, Underline, Art, and
Borders.
Reduces and increases inter-character
spacing.
Sets vertical, orientation.
Sets the text size line by line.
Sets the proportion of each line.
Sets Frames and Tables.
Decorate
Exp./Red.
Border/Art
Space
Style
Label
Paragraph
Length
Label
Vertical
Lines
Layout
Frame
Cassette
MD
Mini DV
8mm Video
VHS
3.5FD
CD Case
Binder
Off
1.0" - 15.0"
Sets the length adapted to the label depending
on the usage.
Sets the length of the printed label.
Effective area and the position of the cursor
To select a function, move the cursor to the effective area before pressing the function key. The
position of the cursor determines the text to apply the function. The position at which the cursor
should be placed differs depending on the function or the item being set. Refer to the table below
for the position of the cursor.
Function
Mode
(Font, Decorate, Exp./Red,
Border/Art, Space)
Style
(Vertical, Lines, Layout,
Frame)
Length
54
Additional Functions
Area
Position of the cursor
Character
In front of the character to
be set (left side).
Line
Anywhere within the line
to be set.
Paragraph
Anywhere within the
paragraph to be set.
Label
Anywhere within the text
to be set.
Setting functions
Functions can be set through the following procedure:
1
Place the cursor.
When applying the function to a character, place the cursor in front (left side) of the
character.
When applying the function to a whole line or a paragraph place the cursor in the line or
paragraph respectively.
When applying the function to the entire text, place the cursor anywhere within the text.
See
"Effective area and the position of the cursor" (p.54).
2
Press a function key. (
,
3
Select a function.
Select a function using
or
Length
Length
Binder
Off
1.0
4
, or
)
and press
Style
Style
Vertical
Lines
Layout
Set the options for each function.
Select an option using
or
and press
.
Ex. : The "Font" option of "Mode"
5
Select "End?"
Once a function has been set, the next function
within the same menu appears.
.
Mode
Mode
Font
Decorate
Font
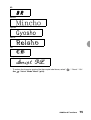
SansSerif
SansS. HG
Mode
Space
End?
A different function can be set within the same menu
(in this case "Mode"). Select a function using
or
and press
.
Follow the same steps as in 4 and 5 .
Once the setting is complete select "End?" and press
.
Proceed to step 6 .
To set a different function (in this case "Style" or "Length"), return to the text enter screen
after step 6 and press another function key.
Additional Functions
55
6
Set the effective area of a set function.
Set the effective area of a set function.
Referring to the table below set a effective area using
or
and press
.
Once the setting is complete, the text enter screen
will be displayed again.
(When selecting "Length", the effective area screen
will not be displayed and the text enter screen
appears again at step 5 .)
Area?
Label
Character
Line
● When setting the "Mode"
Label
Applies the selected style to the whole text (nothing changes on the text
screen).
Character
(Text mode change icon) appears where the cursor is positioned.
The selected mode applies from the character immediately after
to the
end of the line (or until the next ).
Line
(Text mode change icon) is displayed at the beginning of the line where
the cursor is placed, the selected mode applies from the characters after
until the end of the line (or until the next ).
Paragraph
(Text mode change icon) is displayed on the first line of the paragraph
where the cursor is placed, the selected mode applies from the characters
after
until the end of the paragraph.
● When setting the "Style" function
Label
The selected style applies to the whole text (nothing changes on the text
screen).
Paragraph
The selected style applies to the paragraph where the cursor is positioned
(nothing changes on the text screen).
● When setting the "Length" function
The effective area screen is not displayed (nothing changes on the text enter screen).
x The
(Text mode change icon) is not printed.
x
can be deleted. Deleting
will apply the settings of the previous .
If there is no
applied to the text, the settings of "Label" or the default settings apply.
x The factory settings of each function (default) can be checked on pages "List of "Length"
Menu" (p.52), "List of "Style" Menu" (p.58), and "List of "Mode" Menu" (p.64). These
settings can be changed using "Setting Initial Settings (Default Settings)" (p. 117).
x Pressing a function key or
while performing settings returns to the previous screen.
Repeating this operation cancels the settings and takes you back to the text enter screen.
x You can check part of the settings on the indicators.
See
"Display Indicators" (p.20)
Settings can also be checked by pressing the function key of each function and
displaying the options of the function. The inverted option is the current setting.
x Characters may be distorted due to effects, text size or a high number of strokes.
56
Additional Functions
List of "Length" Menu (English)
The default setting is indicated by Bold .
Menu
First option
Second option
Length
Cassette
MD
Left
Length
You can specify the
length of the label.
See
p.68.
Mini DV
8mm Video
Center
VHS
3.5FD
Right
CD Case
Binder
Off
1.0" - 15.0"
Lista del menú "Longitud" (Español)
El ajuste predeterminado se indica mediante Negrita .
Menú
Primera opción
Segunda opción
Longitud
Casete
MD
Izq.
Longitud
Puede especificar
la longitud de la
etiqueta.
See
p.54.
Mini DV
8mm Vídeo
Centro
VHS
3.5FD
Der.
CD Melta
Carpeta
Desactivar
1.0" - 15.0"
Additional Functions
57
List of "Style" Menu (English)
The default setting is indicated by Bold .
Menu
First option
Second option
Style
Vertical
On
Vertical
You can set the
orientation of the
characters.
See
p.69.
Off
Lines
Equal
Equal
You can set the
same text size
for each line.
See
p.71.
1 Line
Auto format
You can set the
text size of each
line to be
displayed as a
combination of
pictographs.
See
p.71.
(Auto format)
2 Lines
3 Lines
1 Line
1a
1b
1c
1d
2a
2b
2c
2d
2e
2f
2g
2h
3a
3b
3c
3d
3e
3f
3g
3h
3i
3j
2 Lines
3 Lines
3k
4 Lines
4 Lines
4a
4b
4c
4d
4e
5-8 Lines
58
Additional Functions
Menu
First option
Second option
Style
Layout
Left
Layout
You can set the
alignment of the
characters of
each line.
See
p.72.
Center
Right
Frame
Off
Table
You can create
table labels that
look like
pictographs.
See
p.72.
Table
01
02
03
Additional Functions
04
59
Menu
First option
Second option
Style
01
02
03
04
05
06
07
08
09
10
11
12
13
14
15
16
17
18
19
20
21
22
23
24
25
26
27
28
29
30
31
32
33
34
35
36
37
38
38
40
41
42
43
44
45
46
47
48
49
50
51
52
53
54
55
56
57
58
59
60
61
62
63
64
65
66
67
68
69
70
71
72
73
74
75
76
77
78
79
80
81
82
83
84
85
Area?
End?
End?
See
p.56.
Label
Paragraph
60
Additional Functions
Lista del menú "Estilo" (Español)
El ajuste predeterminado se indica mediante Negrita .
Menú
Primera
opción
Segunda opción
Estilo
Vertical
Activar
Vertical
Puede definir la
orientación de
los caracteres.
See
p.69.
Desactivar
Líneas
Igual
Igual
Puede definir el
mismo tamaño
de texto para
cada línea.
See
p.71.
Formato
automático
Puede indicar
que el tamaño
del texto de
cada línea se
muestre como
una
combinación de
pictografías.
See
p.71.
(Formato automático)
1 línea
2 líneas
3 líneas
1 línea
1a
1b
1c
1d
2a
2b
2c
2d
2e
2f
2g
2h
2 líneas
3 líneas
3a
3b
3c
3d
3e
3f
3g
3h
3i
3j
3k
4 líneas
4 líneas
4a
4b
4c
4d
4e
5-8 líneas
Additional Functions
61
Menú
Primera
opción
Segunda opción
Estilo
Diseño
Izq.
Diseño
Puede definir la
alineación de los
caracteres de
cada línea.
See
p.72.
Centro
Der.
Marco
Desactivar
Tabla
Puede crear
etiquetas de
tabla que
parezcan
pictografías.
See
p.72.
Tabla
62
Additional Functions
01
02
03
04
Menú
Primera
opción
Segunda opción
Estilo
01
02
03
04
05
06
07
08
09
10
11
12
13
14
15
16
17
18
19
20
21
22
23
24
25
26
27
28
29
30
31
32
33
34
35
36
37
38
38
40
41
42
43
44
45
46
47
48
49
50
51
52
53
54
55
56
57
58
59
60
61
62
63
64
65
66
67
68
69
70
71
72
73
74
75
76
77
78
79
80
81
82
83
84
85
¿área?
¿Fin?
¿Fin?
See
p.55.
Etiqueta
Párrafo
Additional Functions
63
List of "Mode" Menu (English)
The default setting is indicated by Bold .
Menu
First option
Second option
Mode
Font
SansSerif
SansS. HG
Font
You can set the
text font.
See
p.55.
SansS. ST
Roman
US Roman
CL Roman
Gothic
BoldGothic
BR
Mincho
Gyosho
Reisho
CB
Script PL
Decorate
Decorate
You can
decorate the
text.
See
p.56.
Decorate1
O.Line
Decorate2
Italic
Normal
Normal
Shadow
Bold
S+O
I+B
Exp./Red.
Small1
Small2
Exp./Red.
You can expand
(reduce) the text
size in relation to
the base
character.
See
p.55.
Reduce
Normal
Border/Art
C.Line
Border/Art
You can set
underline,
surrounding
borders, art, etc.
See
p.55.
Off
Border
Round
Art
B.Art
R.Art
64
Expand
Additional Functions
U.Line
Menu
First option
Second option
Mode
Space
None
Space
You can adjust the
inter-character
spacing.
"Proportional = On"
sets the characters
proportionally,
whereas
"Proportional = Off"
sets the characters to
full size.
See
p.34.
Narrow
On
Normal
Off
End?
Area?
End?
See
p.55.
Proportional
Wide
Label
Character
Line
Paragraph
Additional Functions
65
Lista del menú "Modo" (Español)
El ajuste predeterminado se indica mediante Negrita .
Menú
Primera opción
Segunda opción
Modo
Fuente
Tipo
Fuente
Puede definir la
fuente del texto.
See
p.55.
SansSerif
SansS. HG
SansS. ST
Roman
US Roman
CL Roman
Gothic
BoldGothic
BR
Mincho
Gyosho
Reisho
CB
Script PL
Decorar1
Decorar2
Decorar
Decorar
Puede decorar
el texto.
See
p.56.
Conto.
Itálic
Normal
Normal
Sombra
Negri.
S+C
I+N
Ampl./red.
Pequ.1
Pequ.2
Ampl./red.
Puede ampliar
(reducir) el
tamaño del texto
de acuerdo con
el carácter de
base.
See
p.55.
Reduc.
Normal
Borde/arte
L.cor.
Subra.
Borde/arte
Puede definir
subrayados,
bordes,
sombreados,
etc.
See
p.55.
66
Ampli
Desac.
Borde
Redon.
Arte
ArteB.
ArteR.
Additional Functions
Menú
Primera opción
Segunda opción
Modo
Espacio
Ninguna
Espacio
Puede ajustar el
espaciado entre
caracteres.
"Proporcional =
Activar" ajusta los
caracteres de
manera proporcional,
mientras que
"Proporcional =
Desactivar" ajusta los
caracteres a tamaño
completo.
See
p.34.
Estrecho
Activar
Normal
Desactivar
¿Fin?
¿área?
¿Fin?
See
p.55.
Proporcional
Ancho
Etiqueta
Carácter
Línea
Párrafo
Additional Functions
67
Function description (Length)
● Length
Sets the lengths of the label to be printed.
After setting the length, select the position of the characters on the label. Check the position
using the displayed pictographs.
8mm Video
Left
Center
Right
Length
Mini DV
8mm Video
VHS
Set the length of the label between 1.0" and 15.0" using
numbers.
Length
1.4
1.5 "
1.6
When selecting a set length according to usage of the label, the length of the label is set
automatically. It is recommended that you use the tapes shown in the following table
"Recommended tape width".
Usage
Length
Cassette
MD
Mini DV
8mm Video
VHS
3.5FD
CD Case
Binder
3.7"
2.2"
1.6"
2.8"
5.5"
2.8"
4.3"
7.9"
Recommended
tape width
209
204
209
209
218
218,224
204
212
x If the text does not fit on the set length, a message reading "Text Long!" will be displayed.
It is not possible to print at this time. Reduce the number of characters or make the
characters smaller using the line spacing setting or the expand/reduce setting.
x The length set using the Length function is a guide. It does not correspond to the exact
length of the printed label.
68
Additional Functions
Function description (Style)
● Vertical
The orientation of the label can be changed to vertical or horizontal by sentence or
paragraph.
Horizontal label
Vertical label
1
Press
2
Select "Vertical" and press
Style
Vertical
Lines
3
5
.
Select "On" or "Off" and press
.
The function menu screen will be
displayed again.
Select "On" to enter the text vertically.
Select "Off" to enter the text horizontally.
.
Set the effective area.
Set the effective area when the
orientation of the label is changed.
Set the effective area using the
and
key and press
.
Once the effective area has been set,
the text screen is shown again.
See
"Effective area and the
position of the cursor" (p.54).
Area?
Label
Paragraph
When using vertical orientation, the vertical
indicator also lights up.
Vertical
On
Off
4
X.X
in
1
Press
or
to select
"End?" and press
.
Style
Frame
End?
Additional Functions
69
REFERENCE
Printing two-digit numbers vertically
The two-digit setting handles double figured numbers as one character.
Select the "Double Figure" setting to align and print dates, house numbers of
addresses, etc. tidily when using the vertical orientation.
Ex. : Enter "06 Diary".
1
2
Change the label orientation
(horizontal/vertical) using steps
1 - 5 indicated on the previous
page, and select "Vertical".
Symbol-B
DoubleFigure
4
Select "00" from the menu and
press
.
DoubleFigure
0010
In this case the position of the 10 is
"00" so select "00".
The 00 option menu will be displayed.
00 – 09
00 01
70
"06" is displayed at the position of the
cursor.
6
Select "DoubleFigure" and press
.
Registered two-digit numbers will be
displayed.
Additional Functions
Select "06" from the "00" position
menu and press
.
00 – 09
04 05 06 07
Press
.
The Symbol-B menu will be displayed.
Symbol-B
Seasons
3
5
Enter text continuously.
x To stop the process press
,
or
. This takes you back to the
previous step. Repeating this procedure
brings you back to the text enter screen.
x To enter two-digit numbers press
and choose "DoubleFigure". Figures
entered in the text screen will not be
handled as double figure numbers.
x When using Sans serif or Roman font,
the configuration of ordinary numbers
and that of two-digit numbers differs.
● Lines
Changes the size of the texts.
Set the text size using "Equal" or "Auto format".
Equal
Sets a equal text size for each line.
(default)
0.5" tape
0.7" tape
Auto
format
Selects the text size of each line (line spacing) from preset
combinations (semi auto).
See
"Auto fomat" (p.71)
Auto format (1 to 8 lines)
Select text size from the options. Check the layout and the
balance of the characters for each line using the displayed
pictographs.
Auto format (1 line)
Selecting
1a/
1b/
depending on the tape width:
1c/
1 Line
1a
1b
1c
1d will print characters of the following size
Print sample
Text size
[pt]
Tape
width
224
H
[48]
U
[38]
G
[26]
L
[19]
M
[13]
S
[10]
1a
1b
1c
1d
-
-
218
-
1a
1b
1c
1d
-
-
212
-
-
1a
1b
1c
1d
-
209
-
-
-
1a
1b
1c
1d
206
-
-
-
-
1a
1b
204
-
-
-
-
-
-
P
[6]
-
1c, 1d
1a, 1b,
1c, 1d
Additional Functions
71
x The auto format is represented using pictographs.
x The text size of each line differs depending on the width of the tape and can be checked
on the text size indicator.
x If the number of set lines and the number of lines input differs, "Equal" will be used to
print.
● Layout
When using several lines, sets the "Layout" of each line.
Left (default)
Aligns the head of the lines.
Center
Aligns the center of each line.
Right
Aligns the end of the lines.
● Frame
Surrounds the text (paragraph) with frames or inserts tables.
Off (default)
No frame or table is inserted.
Table
Surrounds the text (paragraph) with a frame and inserts a
horizontal separation line in between the lines.
When setting the same table in several paragraphs,
inserts a separation line between the tables.
Check the type of table using the displayed pictographs.
72
Additional Functions
Table
01
02
03
To insert vertical lines into a table, press
and select "Mark" -
.
A vertical line is insertied in the table.
Insert
Paragraph 1
in the text enter screen.
Paragraph 2
Press
+
to start a new line,
and enter text in paragraph 2.
Frame
Inserts a frame around the text (paragraph).
Check the type of frame by looking at the displayed
pictographs. Enter the two-digit number next to each
frame to select the frame to apply.
1 Cov e r
A
2 1 1 3 0 -U
Frame
01
02
03
Additional Functions
73
Function description (Mode)
● Font
Selects the font of the text.
Font
SansSerif
SansS. HG
SansSerif
SansS. HG
SansS. ST
Roman
US Roman
CL Roman
Gothic
BoldGothic
74
Additional Functions
BR
Mincho
Gyosho
Reisyo
CB
Script PL *
* : To reduce the character spacing like the sample label above, select "
See
"List of "Mode" Menu" (p.64).
" - "None" - "On".
Additional Functions
75
● Decorate
Selects the text decoration. "Decorate1" and "Decorate2" can be combined.
Decorate1
Decorate2
O. Line
Normal
Shadow
S+O
Italic
Normal
Bold
I+B
The default setting is indicated by Bold .
Normal & Italic
Normal & Bold
Normal & I + B
O. Line & Normal
Shadow & Normal
S + O & Normal
O. Line & Italic
Shadow & Bold
S+O&I+B
Characters may be distorted due to character size or a high number of strokes.
76
Additional Functions
● Exp./Red.
The base character size of each line (line spacing) depends on the tape width, number of
lines, and the text size set under the style. "Exp./Red." sets the size of the character in
relation with the base character.
Normal (default)
Small2
Small1
Reduce
Expand
Sets the text size to base character size.
One size smaller than the base character.
Two size smaller than the base character.
0.75 times the horizontal length of the base character.
1.5 times the horizontal length of the base character.
x Characters are bottom-aligned (aligned at the baseline of the letters) when creating a
horizontal label. Characters are center-aligned (aligned in the center) when creating a
vertical label.
x The baselines of Mincho, Gyosho, and Reisho fonts differ from that of alphanumeric
character fonts and these fonts are threfore not be aligned.
x Selecting "Small1" or "Small2" may have no effect if the size of the characters is already
small.
x The size of the base character of each line can be changed using the style setting.
See
"Lines" (p.45).
x Characters may be distorted due to effects, character size, or a high number of strokes.
x When large characters cannot be used, for example when using fine tapes, selecting
"Expand" will make the characters look slightly larger and create a clearer label.
● Border/Art
Selects the frame, underline, or borders. Check the
selected "Border/Art" using the displayed pictograph.
Border/Art
Off
A Border
Round
Additional Functions
77
● Space
Sets the inter-character spacing.
None
Narrow
Normal
Wide
Then, select the proportional from "On" or "Off".
On
Alphanumeric character spacing is adjusted proportionally and appealingly to make labels
look better.
Off
The proportional function is canceled. Alphanumeric characters (including one-byte spaces)
are handled as two-byte characters. Select "Off" to align the characters of different lines neatly.
Setting "Space"
x Selecting "Narrow", may have no effect on characters that are pre-designed minutely.
x When creating a logo with attached expanded characters, selecting "Narrow" will print a
label with perfectly attached characters.
See
"Using the User’s Symbols" (p.95).
x You can create eye-catching labels by decreasing the inter-character spacing of large
characters or increasing the inter-character spacing of small characters.
78
Additional Functions
Recalling a Previously Designed
Label (Form)
Some forms such as name labels, video labels, etc. are pre-stored in the LABEL
PRINTER PRO. Special design labels, which you cannot create using File, Style or
Mode function, are also ready for use as fixed forms.
Ex. : 8 mm video label (sample form)
Ex. : 2.4" tab label (fixed form)
Creating a label
To use a form follow the steps below:
1
Select a form.
2
Press
(= Form) while holding down
The "Form" Menu will be displayed.
3
Select "SampleForm" or "Fixed Form".
Use
or
to select the menu that includes the form you want ("SampleForm" or
.
"Fixed Form") and press
Each menu is selected and their option screen will be displayed.
Form
SampleForm
Fixed Form
.
SampleForm
Binder
Price Tag
Additional Functions
79
4
Select the form.
Use
or
to select the form and press
.
If the fixed form is used for tabs or cables, choose the length of the label.
X.X
in
Form
Mini DV
8mm Video
VHS
1
1
2
The Global Travel
Date: XX/XX/2010
Tr a v e
⁄ 2010
When recalling a form, the text in the text enter screen is cleared. Save necessary text in a
file before recalling a form.
See
"Saving a file" (p.91).
To cancel label setting process press
or
. This takes you back to the previous step.
Repeating this procedure allows you to go back to the text enter screen.
5
Enter text.
When using a form, the description of the designed form is displayed on the text enter
screen. The form is preset as seen below, delete characters or numbers to change the
description of the form or character.
Ex. :
The Global Travel
Date: XX/XX/2010
For fixed forms, the text enter screen will be displayed. Move the cursor behind the input
guide (right side), enter the texts as in the normal text screen.
Length 2.4"
Front [
Back [
Length 2.4"
Entering texts
stomer
When using a fixed form that uses several lines press
to move the cursor to the
next line.
Press
on the "Front" line, to automatically copy the description of the "Front" line
to the "Back" line.
80
Additional Functions
x To cancel a fixed form process, press
or
. This takes you back to the previous
step.
x You can check the Length, Style, Mode settings with the indicators.
x The Length, Style, Mode set for sample forms can be changed but the functions that can
be set in fixed form are limited.
See
"Fixed forms" (p.83).
6
Print the label.
See
"5. Printing label" (p.37).
After printing a fixed form, the fixed form screen will be displayed again. To go back to the
text enter screen, press
several times until the text screen is displayed.
Additional Functions
81
List of "Form/Fixed Form" menus
The default setting is indicated by Bold .
Menu
First option
Second option
Form
SampleForm
Binder
Form
A variety of labels can be
easily designed by
entering texts or numbers
in pre-designed forms.
See
p.83.
Price Tag
Furniture
CD Case
3.5FD
VHS
8mm Video
Mini DV
MD
Cassette
DAT
Caution
Warning
Message
Birthday
Name&Adrs
Congratul.
Fixed Form
Tab
Fixed Form
This function allows you
to design special labels
that cannot be created
using the normal text
enter screen.
See
p.87.
Length
0.7"
1.1"
2.4"
3.2"
4.4"
Cable
Cable
1.0"
2.0"
82
Additional Functions
Sample forms
Sample form
■ Binder ......... Perfect for title labels for binders. (Recommended tape-width:212)
Paragraph 1
Paragraph 2
■ Price tag ..... Perfect for price tags. (Recommended tape-width: 218 or 224)
Paragraph 1 only
■ Furniture ..... Perfect for equipment management lists.
(Recommended tape-width: 218 or 244)
Paragraph 1
Paragraph 2
■ CD Case ..... Perfect for CD case labels. (Recommended tape-width:204)
Symbol B: Mark
Paragraph 1 only
Additional Functions
83
■ 3.5 FD .........Perfect for FD and MO labels. (Recommended tape-width:218 or 224)
Paragraph 1
Paragraph 2
■ VHS............. Perfect for VHS video tapes. (Recommended tape-width: 218)
Paragraph 1
Paragraph 2
■ 8mm Video.. Perfect for 8mm video labels. (Recommended tape-width:209)
Paragraph 1
Paragraph 2
■ Mini DV........ Perfect for mini DV (digital video) labels. (Recommended tape-width: 209)
Paragraph 1 only
■ MD .............. Perfect for MD title labels. (Recommended tape-width: 204)
Paragraph 1 only
■ Casette/
DAT ........ Perfect for music tapes and DAT title labels.
(Recommended tape-width: 209)
Paragraph 1 only
84
Additional Functions
■ Caution ....... Perfect for reminder and warning signs. (Recommended tape-width: 209-224)
Paragraph 1
Paragraph 2
■ Warning ...... Perfect for prohibition signs. (Recommended tape-width: 209 - 224)
Paragraph 1
Paragraph 2
■ Message ..... Perfect for eye-catching messages. (Recommended tape-width:209 - 224)
Paragraph 1
Paragraph 2
■ Birthday ...... Perfect for birthday celebration signs. (Recommended tape-width: 209 - 224)
Paragraph 1 only
■ Name&Adrs ... Perfect for addresses and name signs.
(Recommended tape-width: 209 - 224)
Paragraph 1
Paragraph 2
Additional Functions
85
■ Congratul..... Perfect for celebration labels. (Recommended tape-width: 209 - 224 )
Paragraph 1 only
86
Additional Functions
Fixed form
x When recalling a fixed form, the text in the text enter screen is cleared. Save necessary
text in a file before recalling a special Symbol.
See
"Saving a file" (p.91).
x "Front [","Back [", and "Text [" contained in text screen are guides and are not printed on
the label.
x Text created in fixed form cannot be saved.
When editing fixed forms, hold down
and press
(= Delete) to delete all the text.
■ Tab................... Perfect for horizontal indexes.
Print sample (width = 0.9", length = 2.4")
Text
Front:
Customer data: A-E
Back:
Customer data: A-E
Functions that can be set
Number of lines
that can be
entered
Input
conditions Number of
characters that
can be entered
All the mode functions
2 lines
27 characters per line
0.7" 4 characters per line
1.1" 8 characters per line
Number of characters that can
be printed
2.4" 17 characters per line
3.2" 23 characters per line
4.4" 27 characters per line
Additional Functions
87
x The number of characters that can be printed represents the number of characters that
can be printed when no mode is set. The number of characters that can be printed
changes once styles such as "Decorate" or "Exp./Red", etc. are set. The number of
printable characters also changes when proportional alphanumeric characters are
included in the text. However, the number of characters that you can enter is up to 27.
x Selecting "None" for the "Space" prints the characters with "Center" layout.
x If the text does not fit in the set length due to a large number of characters, a message
reading "Text Long!" will be displayed. Press a key other than
or
to stop
the printing and reduce the number of characters or the size of the characters using
"Exp./Red". Press
or
to cancel the set length and print the label.
x This machine cannot print fixed forms on 204 or 206 tapes.
Press
on the "Front" line to automatically copy the contents of the "Front" line to
the "Back" line.
■ Cables .............. Especially designed for cable sign labels. Suitable for 224 tapes.
Print sample ( 224 tape (width), length = 1.0")
Text
Functions that can be set
5F, Main building
Input
conditions
Print
conditions
88
Additional Functions
All the mode functions
Number of lines that
can be entered
1 lines
Number of
characters that can
be entered
20 characters per line
Number of lines that
can be printed
1 lines
(when using 224 tape)
Number of
characters that can
be printed
1.0" 10 characters per line
2.0" 20 characters per line
The number of printable characters shows the number of printable characters when no
mode has been set. The number of printable characters changes once styles such as
"Decorate" or "Exp./Red" etc. are set. The number of printable characters also changes
when proportional alphanumeric characters are included in the text. However, the number
of characters that you can enter is up to 27.
If the text does not fit in the set length due to a large number of characters, "Text Long!" will
be displayed. Press a key other than
or
to stop the printing and reduce the
number of characters or the size of the characters using "Exp./Red". Press
or
to cancel the set length and print the label.
Additional Functions
89
Recalling/Saving Text
Text can be saved using the
Using the
key.
key
To save the created text or data, press
and select the function displayed in the menu.
List of "File" Menu (The default setting is indicated by Bold .)
Menu
File
First option
Function
Reference page
Store
Use a file name to save the created text.
See
p.91.
Recall
Recalls the saved text.
See
p.92.
Delete
Deletes the saved text.
See
p.93.
Copy
Copies the saved text to another file.
See
p.94.
About "File"
The File function allow you to recall, change and print saved text. The File function
also allow you to save the text format, style, and mode settings of the label.
Store... Saves the text.
File 3
Input text
File 2
File 1
Name:
Address:
Phone:
Recall... Recalls the file.
File 5
File 4
File 3
File 2
File 1
File
File 7
File 6
File 4
File 3
File 2
File 1
6
Input text
File 5
Name:
Address:
Phone:
Delete... Deletes the saved file.
File functions also include "Copy" which copies the saved text to another file.
90
Additional Functions
Saving a file
Saves text into a file. Select a file number from the file number 01 - 99 (99 files).
1
Press
4
2
Select "Store", and press
.
.
Store
File
The "Store" menu will be displayed.
Use
or
to
select a document number and
press
.
Store
File
02
1 L A V E L
2 PRO
Store
Recall
3
Check the information to be saved
and press
.
"Execute" is displayed, then the screen
will return to the text screen after
saving.
Do not unplug the AC adapter or the
batteries when the message reading
"Execute" is shown. File information may
be damaged.
02
x Press
or
to cancel the process. This will take you back to the previous
step. Repeating this procedure allows you to go back to the text screen.
x If there is no available space to save the data an error message reading "Memory Full!'
will be displayed. Please delete unneeded files in this case.
x This machine can save a total character count of approximately 5,000 characters (up to
99 files). However, saving a lot of symbols will reduce the number of files that can be
saved.
x Only text files from the text screen can be saved. Text files created using fixed forms
cannot be saved.
Additional Functions
91
Recalling a files
Recalls the saved text on the text screen. Files can be loaded using "Replace" or
"Connect". If "Replace" is selected, the current content of the text enter screen will be
deleted and replaced with the text of the loaded file. If "Connect" is selected, a new
paragraph with the loaded text will appear immediately after the paragraph containing
the cursor. However, if the cursor is positioned on the line head icon of the first line in
paragraph 1, a new paragraph with the loaded text will appear before the paragraph
containing the cursor.
1
Press
5
2
Select "Recall", and press
.
Replace
Connect
The confirmation will be displayed.
Use
or
to
select the text to be loaded and
press
.
Recall?
02
1 L A V E L
2 PRO
4
Check the information and press
. Use
to
confirm the text.
Recall?
02
1 L A V E L
2 PRO
The loading information selection
screen will be displayed.
92
.
Rep./Con.
File
Store
Recall
Delete
3
Select "Replace" or "Connect" and
press
.
Additional Functions
The saved text is loaded and the text
screen will be displayed.
x If "Replace" is selected, the current
content of the text enter screen will be
deleted, it cannot be restored by pressing
. Before selecting "Replace", make
sure you have saved any necessary text
as a file.
x When loading a file with "Connect", the
maximum text length may be exceeded.
Text beyond the maximum length will be
automatically deleted.
Press
or
to cancel the process.
This will take you back to the previous
step. Repeating this procedure allows you
to go back to the text enter screen.
Deleting a file
Files are deleted one by one at a time.
1
Press
4
2
Select "Delete", and press
.
.
Check the information and press
.
Use
to confirm the text.
Delete?
File
Recall
Delete
Copy
02
1 L A V E L
2 PRO
The re-confirmation screen will appear.
3
Use
or
to
select the text to be deleted and
press
.
Delete?
5
Press
.
Delete?
02
02
1 L A V E L
2 PRO
The delete confirmation screen will be
displayed.
A message reading "Execute" appears.
Once the file has been deleted the text
enter screen will be displayed again.
x After you have deleted a file, it cannot be
restored with the
key.
x You can cancel the process by pressing
or
. This will take you back to
the previous step. Repeating this
procedure allows you to go back to the
text enter screen.
Additional Functions
93
Copying a file
Copies a stored file to a file with a different number.
1
Press
2
Select "Copy", and press
5
.
.
Copy to
File
Delete
Copy
3
Use
or
to
select the text to be copied and
press
.
Copyfrom 02
1 L A V E L
2 PRO
The copy confirmation screen will be
displayed.
4
Check the information and press
.
Use
to confirm the text.
Copyfrom 02
1 L A V E L
2 PRO
The destination file screen will be
displayed.
94
Additional Functions
Use
or
to
select the destination file number
and press
.
File
03
The copy confirmation screen will be
displayed.
6
Check the save information and
press
.
Copy OK?
01
02
A message reading "Execute" will be
displayed. Once the file has been
copied the text enter screen will be
displayed again.
x You can cancel the process by pressing
or
. This will take you back to
the previous step. Repeating this
procedure allows you to go back to the
text enter screen.
x Even when a file is copied the original
file remains.
Using User's Symbols
Saving marks and company logos that you have designed yourself, or external
characters and symbols as user's symbols allows you to insert and print them.
User's symbols are square. Horizontally long logos are divided and stored as several
user's symbols, setting "Narrow" under "Mode" prints the logo attached.
Dividing a user's symbol into two characters and
saving it (Inter-character spacing "Normal").
Inter-character spacing "Narrow".
Up to four user's symbols can be stored.
How to create user's symbols
When saving a user's symbol, create letter-shape data for each of the four sizes 16/24/32/48
dots. This is so that the different letter sizes print beautifully.
However, to avoid having to create the user's symbol from the beginning, entering the 16-dot
data first allows the machine to automatically enlarge the user's symbol to 24/32/48 dots. You
can then revise the design.
Additional Functions
95
Screen mode and drawing method
Creating a user's symbol is similar to filling a bitmap. Fill in the dots of the drawing area that
will be displayed on the screen to resemble the bitmap.
Screen mode (Example: 16 dots)
16×16
1Rvrs
2 On
3 Off
Cursor position
(Horizontal x Vertical)
Menu screen area
Drawing area
16 x 16 dots
Drawing method (Select using the menu screen area)
Use
/
/
to select a drawing method. Select an option among 1 dot filling "Rvrs",
block filling "On", or block filling "Off (= Delete)".
Menu
Drawing method
Menu
1 Press
Rvrs To fill the dot one by one.
To fill a large block with black.
On
96
Additional Functions
.
In the menu, "1 Rvrs" is highlighted.
2 Move the cursor to the dot to be filled
using
.
.
3 Press
The square where the cursor is
positioned is filled with black. Pressing
again fills the square white.
1 Press
.
In the menu, "2 On" is highlighted.
2 Move the cursor to one corner of the
area to be filled using
.
.
3 Press
Move the cursor to the diagonally
opposite corner of the area to be filled
using
.
. The area delimited using
4 Press
2 and 4 is filled with black.
Menu
Drawing method
To fill a wide block with white
(=Delete).
Off
Menu
1 Press
.
In the menu, "3 Off" is highlighted.
2 Move the cursor to one corner of the area
to be filled using
.
.
3 Press
Move the cursor to the diagonally
opposite corner of the area to be filled
using
.
. The area that was
4 Press
delimited using 2 and 4 is filled with
white.
Additional Functions
97
Creating and saving user's symbols
" as user's symbol "2".
Ex. : Saving "
1
Press
6
2
Select "User's Symbol", and press
.
.
24×24
1Rvrs
2 On
3 Off
X.X
in
Symbol-B
User'sSymbol
3
Select "Register" and press
.
7
X.X
in
User'sSymbol
1
Line
Register
The drawing area and the user's symbol
number are displayed.
4
Select "2" as the store number and
press
.
1 Line
5
Regs
2
Drawing the 16-dot data.
Use
to draw.
See
"Screen mode and drawing
method" (p.96).
16×16
1Rvrs
2 On
3 Off
98
Additional Functions
Once the 16-dot symbol has been
drawn press
.
The 16-dot data is automatically
enlarged to design 24/32/48-dot data.
Revise 24/32/48-dot data.
You can revise the enlarged data using
the same procedure as in 5 . Press
to move to the next size drawing.
If you do not revise the data for the 24 to
48-dot symbol, the symbols may not print
satisfactorily depending on their size.
8
Once the 48-dot symbol have been
drawn, press
.
A message reading "Execute" will be
displayed. Once the character has been
stored, the text enter screen will be
displayed again.
You can cancel the process by pressing
or
. This will take you back to the
previous step. Repeating this procedure
allows you to go back to the text enter
screen.
Modifying user's symbols
Loading a user's symbol
Ex. : Modifying the 48-dot data for the
user's symbol "2".
Inserts a saved user's symbol.
1
Press
2
Select "User's Symbol", and press
.
3
Select "Modify" and press
.
.
X.X
in
User'sSymbol
1
Line
Modify
1
Move the cursor to the position
where you want the user's symbol.
2
Press
3
Select "User's Symbol" and press
.
4
Select "Recall" and press
5
Select the user's symbol to be
recalled and press
.
.
.
The user's symbol numbers are
displayed.
4
Select the user's symbol "2" and
press
.
1 Line
5
Mod
2
Press
until the 48-dot
drawing is displayed.
1 Line
Call
2
You can cancel the process by pressing
or
. This will take you back to the
previous step. Repeating this procedure
allows you to go back to the text enter
screen.
48×48
1Rvrs
2 On
3 Off
6
Modify the 48-dot data.
See
"Screen mode and drawing
method" (p.96).
7
Press
.
A message reading "Execute" will be
displayed. Once the character has been
modified, the text enter screen will be
displayed again.
Additional Functions
99
Copying a user's symbol
Copies a user's symbol to a different user's symbol number.
1
Press
6
2
Select "User's Symbol", and press
.
3
Select "Copy" and press
.
.
X.X
in
User'sSymbol
1
Line
Copy
4
1 Line
from
2
to
3
A message reading "Execute" will be
displayed. Once the character has been
copied the text enter screen will be
displayed again.
Select the original number of the
user's symbol and press
.
1 Line
5
Check the information and press
.
Copy
from
2
Select the destination number of the
user's symbol and press
.
1 Line
Copy
to
3
The copy information confirmation
screen will be displayed.
100 Additional Functions
You can cancel the process by pressing
or
. This will take you back to the
previous step. Repeating this procedure
allows you to go back to the text enter
screen.
Deleting a user's symbol
Copies a user's symbol to a different user's symbol number.
1
Press
2
Select "User's Symbol", and press
.
3
Select "Delete" and press
.
.
X.X
in
User'sSymbol
1
Line
Delete
4
Select the original number of the
user's symbol and press
.
1 Line
After you have deleted a user's symbol, it
cannot be restored with the
key.
Always double check before you delete the
symbol.
x You can cancel the process by pressing
or
. This will take you back to
the previous step. Repeating this
procedure allows you to go back to the
text enter screen.
x Deleted user's symbols that have been
inserted in the text will be printed blank.
Del
2
The delete information confirmation
screen will be displayed.
5
Check the information and press
.
1 Line
Del
2
A message reading "Execute" will be
displayed. Once the character has been
deleted, the text enter screen will be
displayed again.
Additional Functions
101
Creating and registering a user's symbol from a
reference symbol
Creating a user's symbol using a reference character or symbol supported by this
machine.
● Registering a reference character
Recall the text character (symbol) and
modify the 16-dot character.
The modified 16-dot character is
automatically enlarged and creates the
user's symbol (24
32
48 dots).
● Modifying a reference character
To create a user's symbol recall the text
character (symbol) and modify the text
characters (symbol) for each of the 16/
24/32/48-dot sizes.
The basic operation are the same as for "Registering a user's symbol"/"Modifying a user's
symbol" but to register a reference character/modify a reference character you first need to
insert the reference character (symbol) to be saved or modified in the text enter screen.
Ex. : Drawing mustaches on "
1
of "Symbol-B" under "Living Thing" to obtain "
Input the reference character (symbol) and
move the cursor right behind it (right side).
".
X.X
in
1
x Sequence numbers, bar codes, editing symbols, one-byte space cannot be used as
reference characters for user's symbols.
x Only characters that are on the left side of the cursor on the text enter screen can be
used as reference characters.
2
Press
3
Select "User's Symbol", and press
4
Select "Ref.Register" or "Ref Modify" and
press
.
.
.
X.X
in
User'sSymbol
1
Line
Ref.Register
102 Additional Functions
5
Select the user's symbol number to be
registered and press
.
1 Line
6
Modify the data.
Modify the data based on the 16-dot reference
character that will be displayed. Press
to
display the next size revision screen.
See
"Screen mode and drawing method"
(p.96).
7
Press
once the 48-dot drawing is
complete.
A message reading "Execute" will be displayed.
Once the character has registered the text enter
screen will be displayed again.
To cancel the process press
or
drawn for other sizes will be lost.
Ref.
Regs
3
16 ×16
1Rvrs
2 On
3 Off
. If the process is cancelled the user's symbol data
Additional Functions
103
Printing Sequence Numbers and
Bar Codes
Hold down
and press
numbers and bar codes.
(= Sequence) or
(=Bar Code) to insert sequence
Creating a label with a sequence number
The default setting is indicated by Bold .
Menu
Sequence
First option
Value
Sequence
You can create
a label with a
sequence
number.
See
p.105.
Second option
Repetition
1 time
2 times
3 times
4 times
5 times
10 times
104 Additional Functions
Third option
Fourth option
Printing sequence numbers
To create multiple labels with same texts and different numbers or characters, use the
"Sequence" feature described below. The device automatically increases the numbers
or characters every time it prints a label.
To print sequence numbers set the initial value and the number of repetitions (1, 2, 3, 4, 5, 10
times). The number of repetitions sets the number of times the same number will be used.
Ex. : Creating 2 labels each numbered 4, 5, 6...
1
Align the cursor with the location
for the sequence number.
Up to two-digit numbers and one character
can be used as initial values.
1L i s t
4
2
Press
(= Sequence) while
holding down
.
The "Value" screen will be displayed.
3
Input "4" in "Value" and press
.
Sequence
Value
Select "2 times" for "Repetition"
and press
.
Repetition
1 time
2 times
3 times
The text enter screen will be displayed
again and the sequence number
(sequence number icon N + value area
"4") will be displayed at the cursor
position.
4
X.X
in
nt List 4
1L i s t
N4
Additional Functions
105
5
Press
.
The first label "4" is printed.
6
Press
.
"Repetition" is set to "2 times" so the second label "4" is printed.
After the labels were printed, the number in the value area increases to "5".
7
Press
.
The first label "5" is printed.
The above process is repeated subsequently.
x Only numbers 0-9 or 00-99 and letters A-Z or a-z can be used as initial sequence
number. Decimals and minus symbols cannot be used.
x Numbers increase by one 1, 2, 3, 4, ... up to 99 (or 01, 02, 03, 04, ... up to 99). Letters
follow the alphabetical order A (a), B, (b), C (c), D (d).
x A single text can have up to three sequence numbers and bar codes in total.
x To change the sequence number or repetition number, move the cursor to immediately
after the sequence number and press
+
(=Sequence). The "Seqence" menu
will be displayed. The setting method is the same as the input procedure.
x To delete sequence number, move the cursor to immediately after the sequence number
(right side) and press
.
x Length, Style and Mode functions can be set for sequence number (sequence number
icon N + value area) in the same way as for standard characters.
x If a text with sequence number is continuously printed out "Sequence" labels can be
printed several times. See
"Prints the same label continuously (Repeat)" (p.111)
106 Additional Functions
Creating a label with a bar code
The default setting is indicated by Bold .
Menu
Bar Cord
First option
Second option
CODE128
Third option
Fourth option
Width
Bar Code
CODE 39
You can create
labels with bar ITF
cords.
See
p.108. CODABAR
Small
Medium
(CODE 39, ITF, (CODE 39, ITF,
CODABAR)
CODABAR)
Large
Ratio
Check Digit
UPC-A
2.0
On
UPC-B
2.5
Off
3.5
Bar code printing
Prints various standard bar codes.
Standard printable bar codes and settings item menu
Standard
Width
Ratio
Small/ Medium /Large
2.0/ 2.5 /3.0
Check Digit
On/ Off
-
-
CODE128, UPC-A,
UPC-E
Code 39 , ITF,
CODABAR
The default setting is indicated by Bold .
: Can be set
- : Cannot be set
Width : The full width of the bar code
Ratio :The ratio of narrow bars to bold bars
Check Digit : Check digit on/off
When creating bar codes, be sure to follow the rules applied to the bar codes.
Additional Functions
107
Ex. : Printing an "ITF" bar code (Width = Large, Ratio = 3.0, C/D on)
1
5
Press
(= Bar Code) while
holding down
.
Select "On" and press
.
Check Digit
2
Select "ITF" and press
.
On
Off
Bar Code
CODE 39
ITF
CODABAR
The bar code number input screen will
be displayed.
6
The "Width" menu will be displayed.
3
Select "Large" and press
.
Width
Medium
Large
The "Ratio" menu will be displayed.
4
Select "3.0" and press
Ratio
2.5
3.0
The "Check Digit" menu will be
displayed.
108 Additional Functions
.
Enter the bar code number using
the character keys.
ITF
5
C/D
1234567890
The number will be displayed.
The check digit is automatically
displayed in the shaded field in the right
upper corner. The digit numbers that
can be entered depend on the type of
bar code.
7
Press
.
The text enter screen will be displayed
again. The bar code mark "
" will be
displayed in the position of the cursor.
8
Press
.
The bar code label is printed.
X.X
in
1
x A single document can have up to three sequence numbers and bar codes combined.
x Bar codes contain considerable data, and use up a lot of memory when saved in files.
x To change the bar code number or the type of bar code, move the cursor to immediately
after (right side) the bar code mark "
" and press
+
(= Bar Code). The "Bar
code" menu will be displayed. Next, repeat the above process.
x To modify a bar code number, go to the bar code number enter screen, delete the
previously entered bar code number and enter the new bar code number.
x To delete a bar code, move the cursor to immediately after the bar code mark "
" (right
side) and press
.
x Style and Mode functions can be set for bar code marks in the same way as for standard
characters but will be shown as follows:
Settings that will be shown on bar code marks
Style
Frame, Table
Mode
Border/Art
x Always make sure that the bar codes are read correctly by a bar code reader before they
are used. If they are not read correctly by the bar code reader adjust the "Width" or
"Ratio" and check again.
x To print bar codes, it is recommended that you use a tape with a white background and
black characters as they are easily read by bar code readers.
x The digits that can be entered vary according to the type of bar code. ITF and CODABAR
allow 1 to 19.
x ITF bar codes only support even digit numbers. When entering even digit numbers with
Check Digit setting set to "On" or when inputting odd digit numbers with Check Digit
setting set to "Off", the spare code "0" is automatically input in the first row.
x The Check Digit of UPC-E is not displayed on the bar code number input screen or in the
bar code number.
x CODABAR cannot be read by the bar code reader unless one of "A, B, C, D" are input at
the beginning and the end of the code.
x The length of the bar code (bar area) and the length of the numbers is not always the
same. This does not affect their usability.
Additional Functions
109
Extra Print Functions
(Repeat, Enlarge)
Pressing
allows you to set special printing functions such as continuous and
enlarged printing.
List of "Extra Print" menu
The default setting is indicated by Bold .
Menu
First option
Second option
Extra Print
Repeat
Prints the same
label continuously.
See
p.111.
Repeat
Enlarge
Prints an enlarged
label.
See
p.112.
Enlarge
Until Stop
Off
X
X
X
X
2
3
**
100
Off
2 times
2/2
1/2
1/2
3 times
3/3
1/3
1/3
1/3
4 times
4/4
1/4
1/4
1/4
1/4
Autocut
Sets the autocut
function to on/off.
See
p.116.
Autocut
On
Off
Excute?
110 Additional Functions
Prints the same label continuously (Repeat)
Prints a specified number of identical labels continuously.
Ex. : Printing the same label 3 times continuously
1
Enter the text and press
.
The" Extra Print" menu will be
displayed.
2
Select "Repeat" and press
4
.
Select "Execute?" and press
.
Extra Print
Autocut
Execute?
Extra Print
Repeat
Enlarge
3
Select "X3" and press
Printing starts. Once the first label has
been printed, the tape is cut off, the
same procedure is repeated for the
second and third labels.
.
The "Extra Print" menu will be displayed
again.
Repeat
× 2
× 3
× 4
x You can cancel the process by pressing
or
. This will take you back to the
previous step. Repeating this procedure allows you to go back to the text enter screen.
x Selecting "Until Stop" from the "Repeat" menu allows you to print up to 100 labels
continuously. To stop printing, press any key.
x If the specified number of labels exceeds the tape length 52.5 feet, the labels cannot be
printed. Decrease the number of labels or decrease the number of characters to shorten
the length of the label.
x When printing text with sequence numbers continuously, printing will be in accordance
with the settings made in sequence number.
For example, when printing a label with an initial sequence number "1", number of repeat
times is 1, with an initial sequence number "3" labels will be continuously printed in
batches of 3.
Additional Functions
111
x Extra print only starts once "Execute?" has been selected under the "Extra Print" menu.
Press
for normal printing.
x When using the continuous printing function remove labels from the printer to prevent
them from piling up and blocking the label eject slot . Labels that are left to pile up at the
label field may be cut again.
x Even if the tape ends before the print job is complete, the set number of labels will be
printed and cut. To prevent the tape being cut if the tape ends before the print job is
complete, press
to abort the print job.
To create a label that is wider than the width of the
tape (Enlarge)
Enlarged printing enlarges the label 2,3,4 times, and divides the label into sections to
be printed so that you can create a label that is bigger than the width of the tape.
Assemble the completed label before using it.
"Enlarge 2 times 2" prints a label in a set of two sections; upper and lower and
"Enlarge 3 times 3" prints a label in a set of three sections; upper, middle and lower.
Once the size has been set, select "1/2" and "1/3" to print only one relevant section of
the set.
● Types of enlarged printing (Sample: 0.5" tape)
prints normally.
2 times
2/2
Enlarges 2 times
1/2
1/2
112 Additional Functions
3 times
3/3
Enlarges 3 times
1/3
1/3
1/3
4 times
4/4
Enlarges 4 times
1/4
1/4
1/4
1/4
Additional Functions
113
Ex. : Enlarging a label 3 times and printing it.
1
2
Once the text is entered press
The "Extra Print" menu will be
displayed.
.
Select "Enlarge" and press
.
5
.
Extra Print
Autocut
Execute?
Extra Print
Repeat
Enlarge
Autocut
The 3 sections of the label set are
printed.
6
The "Enlarge" menu will be displayed.
3
Select "3 times" and press
Assemble the tape.
.
Size
Up
Enlarge
2 times
3 times
4 times
The "Enlarge 3" menu will be displayed.
4
Select "Execute?" and press
Select "3/3" and press
.
"3/3" is selected and the "Extra Print"
menu will be displayed again.
Enlarge3
3⁄3
1⁄3
114 Additional Functions
Cut off the edges with a cutter and
assemble the letters.
x You can cancel the process by pressing
or
. This will take you back to the
previous step. Repeating this procedure allows you to go back to the text enter screen.
x When assembling a label that was created using "Enlarge", the label may not align
completely.
x If you want to print a long text using the "Enlarge" function you may not be able to print a
label longer than 52.5 feet. Reduce the number of characters or divide the text into two.
x "Enlarge" enlarges normal printing text 2, 3, 4 times. Enlarged printing prints out the print
data at the specified enlargement ratio. The specified length is increased 2, 3, 4 times.
x The tape length displayed on the screen is the length at normal printing. When printing
using "Enlarged" a label 2, 3, 4 times the length of the displayed length will be printed.
Enlarge
Tape Width
Tape Length
Amount of used tape
2 times
2X
2X
4X
3 times
3X
3X
9X
4 times
4X
4X
16X
For example, when printing using "Enlarge 3 times", compared with the normal print size
using
, both length and width are increased 3 times. Therefore, about 9 times the
length of tape is used.
Extra print can only be executed by selecting "Execute?" from the "Extra Print" menu.
Pressing
will execute normal printing.
REFERENCE
Colorful Enlarge 3 times 3
Let's create a colorful label using same width tape of different colors for the upper middle
and lower sections of "Enlarge 3 times 3". Using tape of different colors may result in
somewhat changing the length of the label. When changing the tape cartridge, make sure
you forward the tape after setting it.
Additional Functions
115
Turning "Autocut" Off to Print
This machine automatically cuts off the label after printing it. However, it is possible to
turn off feature.
Turning "Autocut" off
1
Press
(= Extra Print) .
The" Extra Print" menu will be
displayed.
2
Select "Autocut" and press
.
Extra Print
Enlarge
Autocut
Execute?
"Autocut" will be displayed.
3
Select "Off" using
and press
.
or
4
Select "Execute?" using
and press
.
or
Extra Print
Autocut
Execute?
Printing starts.
Once the print job is complete, printing
stops but the label is not cut. Remove
the cartridge and cut the tape using
scissors or such. If you do not use the
autocut function, repeat the above
procedure after each label.
Autocut
On
Off
x For labels that are not automatically cut, remove the cartridge from the machine, leave
0.1" of the tape on the cartridge and cut the label straight using scissors available on the
market.
x Even when autocut is turned off, you can cut the tape using "Feed & Cut" from the "Feed/
Cut" menu. See
"5. Feeding the tape" (p.30)
116 Additional Functions
Setting Default Settings
Default settings for items such as "Font" and "Space" can be changed.
The following functions can be set using
,
and
.
Key functions
Key
Functions that can be set
Length
Length
Style
Vertical, Lines, Layout, Frame/Table
Mode
Font, Decorate, Exp./Red., Border/Art, Space
Selecting a function displays the item menu list. The selected item is the default setting. If you
often use different "Font", etc. to the one specified in the factory setting (default) you can
change the factory settings so that you do not need to change the settings using
,
and
each time you create a text.
If the default settings are changed, the label will automatically reflect the changes. For
example setting the "Vertical/Horizontal" default setting to "Vertical text orientation" will result
in all labels being written vertically.
However, it is always possible to restore the factory settings.
x See pages "List of "Length" Menu" (p.57), "List of "Style" Menu" (p.58), "List of "Mode"
Menu" (p.64) to see the factory settings of each function.
x Deleting all the text using
,
, and
will restore the default settings.
x Data saved in a file will reflect the settings at the time of the saving.
Delete all the text before changing the default settings.
See
"Deleting all the text" (p.44)
Additional Functions
117
List of "Condition" menu
Pressing
while holding down
(= Condition ) allows you to change the
default settings for screen display units and the display language. (The default
setting is indicated by Bold ).
Menu
First option
Second option
Condition
inch: cm
cm
inch: cm
Sets the unit displayed on
the display.
See
p.119.
inch
Prompt
English
Prompt
Sets the language
displayed on the display.
See
p.120.
Spanish
Density
-3
Density
Sets the print density.
See
p.121.
:
0
:
+3
AllDefault
Execute?
AllDefault
Restores the factory
default settings.
See
p.122.
Setting
Length
Setting
Sets the default settings.
See
p.123.
Vertical
Lines
Layout
Frame
Font
Decorate
Exp./Red.
Border/Art
Space
End?
118 Additional Functions
Sets the various settings.
Setting procedures are the
same as that of "Style" or
"Mode".
Setting the Display Units
You can set the display units to inches or centimeters.
1
Press
(=Condition) while holding down
.
The "Condition" menu will be displayed.
2
Select "inch:cm" and press
"inch:cm" menu will be displayed.
.
3
Select the unit using
or
.
The display unit has been set.
and press
Condition
inch:cm
Prompt
inch:cm
inch
cm
To cancel the setting process press
to the text enter screen.
or
. Repeating this procedure brings you back
Additional Functions
119
Setting the Display Language
You can change the display language to English or Spanish.
1
Press
(=Condition) while holding down
.
The "Condition" menu will be displayed.
2
Select "Prompt" and press
"Prompt" menu will be displayed.
3
Select the language using
press
.
The display language is set.
.
or
Condition
inch:cm
Prompt
Density
and
Prompt
English
Spanish
To cancel the setting process press
to the text enter screen.
120 Additional Functions
or
. Repeating this procedure brings you back
Adjusting the Print Density
Print density is adjustable in seven levels. Adjust the printing density if you find that
the printing is too light or dark. Usually use "Normal".
1
Press
(=Condition) while holding down
.
The "Condition" menu will be displayed.
2
Select "Density" and press
"Density" menu will be displayed.
3
Adjust the density using
press
.
The density is adjusted.
.
or
Condition
Prompt
Density
AllDefault
and
Density
+2
+3
x This machine is equipped with a temperature sensor, the print density is automatically
adjusted to match the printing head.
x Setting density to another setting than "Normal" consumes more electricity and can
result in distorted characters being printed. Very rarely label characters may peel off,
exercise caution.
x Printing density settings are not initialized when the machine is turned off. Use this
procedure to correct settings or initialize the machine.
See
"Resetting LABEL PRINTER PRO" (p.124)
Additional Functions
121
Restoring the default settings to the factory settings
Restores changed settings to the factory settings.
1
Delete all the text by pressing
(= Delete) while holding down
Delete all text before changing default settings. See
.
"Deleting all the text" (p.44)
2
Press
3
Select "AllDefault" and press
4
Select "Execute?" and press
.
Initial factory settings are restored as default settings.
(= Condition) while holding down
.
.
Condition
Density
AllDefault
Setting
AllDefault
Execute?
To cancel the setting process press
to the text enter screen.
122 Additional Functions
or
. Repeating this procedure brings you back
Changing default settings
1
Delete all the text by pressing
(= Delete) while holding down
Delete all text before changing default settings. See
2
Press
3
Select "Setting" and press
4
Select the item you want to change and press
.
5
Select the option you want to set as default
setting and press
.
Set each item using the same method as the one used
to set the File, Mode, etc.
See
"Improving the Appearance of the Label"
(p.54)
6
(= Condition) while holding down
.
"Deleting all the text" (p.44)
.
.
Condition
AllDefault
Setting
Once you have changed all the items you
wanted to change, select "End?" from the
"Setting" menu and press
.
The default settings are changed and the text enter
screen will be displayed again.
Setting
Frame
Font
Decorate
Font
SansSerif
SansS. HG
Setting
Space
End?
Additional Functions
123
Resetting LABEL PRINTER PRO
x This machine is an electronic device and therefore may sometimes stop working as a
result of static electricity or other causes.
x If the display is distorted and the machine has stopped responding, the ON/OFF key
does not work, reset the machine through the following procedure.
x After resetting you will be able to use the machine as usual. However, occasionally, even
after resetting the machine may not respond. In this case bring the machine back to your
dealer to be repaired. Resetting, repairs, checks will delete all the saved data, such as
file data and user's symbol data. This data cannot be restored.
Reset
Resetting restores the factory settings.
Before resetting your device, refer to the table below for the items to be deleted.
Function
Content
Text entered on the
display
Reset
Restore
default
setting
Delete all
Delete fixed
forms
—*1
Text entered in
fixed forms
—
Input status and
CapsLock status
—
—
—
"Graphic" setting
—
—
—
File
—
—
—
User’s symbol
—
—
—
Print density
—
—
—
Setting Display level
—
—
—
—
—
Entry
Data
Various set values
: Restores the factory settings.
— : Set conditions remain.
*1 : Be sure to delete all the text before performing "AllDefault".
124 Additional Functions
Resetting
1
Press
and turn the power off.
If the machine does not turn off when pressing
, unplug the AC adapter and remove the
batteries. Plug the AC Adapter again or install the batteries and press
again. Power is
restored. Reset the machine using procedure 1 .
2
Press
while holding down
.
A message reading "Reset?" blinks.
and
Reset?
x To abort resetting process press any key except for
.
x Please be noted that the saved files, user’s symbols, and various data will be deleted
once you reset the device.
3
Press
.
"Reset" will be displayed. Once the machine is reseted the selected length unit will be
displayed, the text enter screen appears.
Additional Functions
125
126 Additional Functions
Appendix
List of Menus (English)
Refer to the reference pages for details.
Button
+
Feature
Reference page
Feed/Cut
P.30
Extra Print
P.110
File
P.90
Form
P.79
Symbol A
P.130
Symbol B
P.131
+
Sequence
P.105
+
Bar Code
P.107
Length
P.57
Style
P.58
Mode
P.64
+
Condition
P.119
+
Delete
P.49
+
128 Appendix
Lista de menús (Español)
Consulte las páginas de referencia para obtener información adicional.
Botón
+
Página de
referencia
Característica
Avance/corte
P.30
Impr. extra
P.110
Archivo
P.90
Forma
P.79
Símbolos A
P.132
Símbolos B
P.133
+
Secuencia
P.105
+
CódigoBarras
P.107
Longitud
P.57
Estilo
P.61
Modo
P.66
+
Condición
P.119
+
Borrar
P.49
+
Appendix
129
List of "Symbol A/Symbol B" menus (English)
Press
or
to enter symbols. The default setting is indicated by Bold .
Menu
Symbol A
Public Signs
Shop
Construction
Hospital
Europe
LatinAmerica
Greek
Number
Parenthesis
Arrows
Units
Math
ANSI
Bio-Chemical
Electrical
Misc
Environment
Packages
Warnings
130 Appendix
First option
Select the symbol.
Menu
Symbol B
User’s Symbol
First option
Register
Modify
Recall
Copy
Delete
Ref.Register
Ref.Modify
Abbreviation
Select the symbol.
Mark
DoubleFigure
You can enter 2digit numbers.
See
p.70.
DoubleFigure
Select the number.
Work
Select the symbol.
Sports
Video
Music
LivingThing
Vehicles
Foods
Schedule
Life
Seasons
Family
Appendix
131
Lista de los menús "Símbolos A/Símbolos B" (Español)
Pulse
o
para introducir símbolos.
El ajuste predeterminado se indica mediante Negrita .
Menú
Símbolos A
Señales
Tienda
Construcción
Hospital
Europa
Latinoaméri.
Griego
Números
Paréntesis
Flechas
Unidades
Matemáticas
ANSI
Bio-Química
Eléctrico
Vario
Ambiente
Paquetes
Advertencia
132 Appendix
Primera opción
Seleccione el símbolo.
Menú
Símbolos B
UsuarioSímb.
Primera opción
Almacena
Retoque
Recuperar
Copiar
Borrar
Ref.Almacena
Ref.Retoque
Abreviatura
Seleccione el símbolo.
Marca
Doble Cifras
Puede introducir
números de 2
dígitos.
See
p.70.
Doble Cifras
Seleccione el número.
Trabajo
Seleccione el símbolo.
Deporte
Vídeo
Música
Ser Viviente
Vehículo
Alimentos
Horario
Vida
Estación
Familia
Appendix
133
List of "Feed" menu
Hold down the
key and press
(=Feed & Cut) to feed or feed & cut the tape.
The default setting is indicated by Bold .
Menu
Feed/Cut
Feed/Cut
You can feed the
tape.
See
p.30.
Feed
Feed/Cut
Cut
List of "Delete" menu
Hold down the
key and press
(=Delete) to delete the text or the paragraph.
The default setting is indicated by Bold .
Menu
Delete
Delete
You can delete the
text or the
paragraph.
See
p.43.
134 Appendix
All
Paragraph
Messages On the Display
When an error message appears
Sample screens shown below may vary depending on the display pattern.
See
"Switching display [Graphic]" (p.22).
Error message
Change
Batteries
Close Cover!
Cause and Remedy
The batteries have run out. Turn the power off and replace all the
batteries with new AA alkaline batteries. Also, make sure that the
batteries are inserted with correct polarity. It is recommended that
you use the AC adapter that comes with the product as much as
possible.
See
"Connecting the AC adapter" (p.24).
See
"Installing the batteries " (p.25).
This message appears when you open the top cover while the
power is on. LABEL PRINTER PRO automatically turns off after
showing this message. Close the top cover and turn the power on
to use the device again.
No Tape!
The tape cartridge is not installed or not installed correctly.
Turn the power off and reinstall the tape cartridge correctly.
See
"Installing tape cartridges" (p.27).
Over Heat!
The printhead is overheated due to the continuous printing.
Turn the power off, remove the tape cartridge, and leave the device
until it cools down.
Line Over!
The device cannot print the label or display the print image as the
installed tape cartridge is not wide enough for the entered text.
Press any key to return to the text enter screen, then install the
wider tape cartridge or delete some lines.
See
"Maximum number of lines" (p.45).
Appendix
135
Error message
Cause and Remedy
Sequence and
BCR Max 3
The total number of sequence numbers and bar codes used per
one label is limited to three. Press any key to return to the text
enter screen.
See
"Printing Sequence Numbers and Bar Codes" (p.104).
Extra Print
Impossible!
Text Long!
Go?
Memory Full!
No File!
136 Appendix
The length of the tape exceeds the printable limit (52.5 feet) due to
"Enlarge" and/or "Repeat" settings.
Press any key to return to the text enter screen, and change the
"Enlarge" and/or "Repeat" settings.
See
"Extra Print Functions (Repeat, Enlarge)" (p.110).
The text you entered is too long too fit within the specified length.
Press any key to return to the text enter screen and perform the
following remedies:
• Delete some characters
• Reduce the font size
You can also press
or
to continue printing or
previewing regardless of the set length.
See
"Length" (p.68).
The memory for registering files is full. In order to register new files,
press any key to return to the text enter screen, and delete
unnecessary files.
See
"Deleting a file" (p.93).
You have attempted to recall, delete, or copy files when there is no
file saved on the device. Press any key to return to the text enter
screen.
See
"Saving a file" (p.91).
Problems and Solutions
The device does not
operate normally
Keyboard does not
operate
LABEL PRINTER PRO is a electronics
device and may rarely malfunctions due to
static electricity or other causes.
If the display is distorted, if you cannot turn
on/off the power, or a similar malfunction
occurs, you need to initialize the device.
See
"Resetting LABEL PRINTER
PRO" (p.124).
● Is "PC Link" displayed on the screen?
Nothing appears on the
display even after
pressing
Display turns off
unexpectedly
● Is the AC adapter connected firmly?
The AC adapter should be connected both
to the device and the electrical outlet firmly.
● Are the batteries installed with correct
polarity?
The device does not turn on when the
batteries are installed with its
and
terminals reversed. Make sure to install the
batteries correctly.
● Are you using the dedicated AC
adapter?
Use of the AC adapter not bundled with the
LABEL PRINTER PRO may overheat or
damage the circuit of the device.
When connected to a computer,
commands through the computer have
higher priority than that of the keyboard.
Press
to cancel the PC Link to
activate the keyboard.
● Is auto power-off active?
If there is no activity for approx. five
minutes, the LABEL PRINTER PRO
automatically shuts down in order to save
battery power (auto power-off).
● Is the top cover opened?
When the top cover is opened, a built-in
protection circuit turns the power off.
● Did you make any mistakes?
Display turns out for a moment when you
make a mistake in key operations.
● Have the batteries run out?
The device may not turn on when the
batteries are running low. Replace them
with new batteries.
● Is the display level appropriate?
The text on the display may become
invisible depending on the display level.
Adjust the display level to the most
comfortable eye level.
See
"Adjusting Display Level" (p.20).
Appendix
137
Nothing is printed when
pressing
● Is text entered?
Nothing is printed when there is no text in
the text enter screen or in a fixed form.
● Is PeelGuardTM operating?
You cannot print while the PeelGuardTM is
operating.
● Is the tape cartridge installed
correctly?
You cannot print when there is no
remaining tape in the tape cartridge or
when the top cover is not closed properly.
Install a tape cartridge and close the top
cover firmly.
Text is not printed
properly
● Is the tape cartridge installed
correctly?
Remove the tape cartridge and reinstall it
again following the correct procedure.
See
"Installing tape cartridges" (p.27).
● Is the printhead free from dirt?
Printing becomes faint when dirt or dust
adheres to the printhead. Rub the
printhead with a cotton swab moistened
with medical alcohol (ethanol) available in
the market.
See
"Cleaning LABEL PRINTER
PRO" (p.140).
● Has the batteries run out?
When the batteries are running out,
"Change Batteries" appears on the display.
Replace all the batteries with new AA
alkaline batteries immediately or connect
the AC adapter that comes with the device,
otherwise the LABEL PRINTER PRO may
turn off in the middle of the operation or
during printing.
The printed label is not
cut automatically
● Is the auto-cutter feature disabled?
The printed label is not cut automatically
when the auto-cutter feature is disabled.
See
"Turning "Autocut" Off to
Print" (p.116).
● Is the blade worn out?
When you use the PeelGuardTM over the
long term, the blade of the PeelGuardTM
becomes blunt. To replace the blade,
consult the local dealer or our customer
center. Replacement is performed at your
expense.
Printing stops in the
middle of the text
● Is the tape remaining in the tape
cartridge?
If the tape in the tape cartridge has run
out, replace the cartridge with a new one.
See
"Installing tape cartridges" (p.27).
● Has the batteries run out?
A faint streaking
138 Appendix
When the batteries are running out,
"Change Batteries" appears on the display.
Replace all the batteries with new AA
alkaline batteries immediately or connect
the AC adapter that comes with the device,
otherwise the LABEL PRINTER PRO may
turn off in the middle of the operation or
during printing.
PeelGuardTM does not
work properly
Contents of files are
gone
● Is printing in progress?
● Has the built-in battery expired?
PeelGuardTM
does not operate during
printing.
● Is the label fully inserted?
Make sure to align the label against the
PeelGuardTM guide and insert the label as
far as it will go.
See
"Rounding off the corners"
(p.50).
● Is the tray full of paper dust?
Remove the PeelGuardTM tray and clear
the paper dust.
See
"Cleaning PeelGuardTM" (p.51).
● Trying to trim 204" or 206 tape?
PeelGuardTM does not support 204 or 206
tape.
● Trying to trim unsupported tape?
Be sure to use the tapes supported by the
LABEL PRINTER PRO.
See
"Rounding Off the Corners"
(p.50).
● Is the blade worn out?
When you use the PeelGuardTM over the
long term, the blade of the PeelGuardTM
becomes blunt. To replace the blade,
consult the local dealer or our customer
center. Replacement is performed at your
expense.
LABEL PRINTER PRO contains a lithium
battery to save texts, files, and use's
symbols. See the sticker on the backside
of the main unit as a guide for the timing
and replace the lithium battery. To replace
the battery, consult the local dealer or our
customer center. Replacement is
performed at your expense.
● Has the device initialized?
Once you initialize your LABEL PRINTER
PRO, the saved data such as files and
user's symbols are cleared.
See
"Resetting LABEL PRINTER
PRO" (p.124).
● Did you disconnect the AC adapter or
remove the batteries during operation?
Do not disconnect the AC adapter or
remove the batteries when "Execute",
"Wait", or "Printing" is displayed on the
screen, or the saved data such as files and
user's symbols will be cleared.
You cannot attach labels
● Is the backing sheet removed?
Peel off the backing sheet of the adhesive
tape to attach.
See
"Attaching label" (p.38).
● Are you attaching labels to clean and
flat surface?
Labels may peel off easily or not adhere
well when attached to oily, dusty, or rough
surfaces.
If the problem is not solved after checking
the items described above, consult the
local dealer or our customer center.
Appendix
139
Cleaning LABEL PRINTER PRO
■ To remove dirt and dust from the exterior
Use a soft and dry cloth to wipe off. If the exterior is extremely dirty, use a cloth wrung out of
water. Never use chemical dusters, agents, or solvents such as benzine, thinner, or alcohol.
■ When the printing becomes faint
Printing becomes faint when dirt or dust
adheres to the printhead. Rub the printhead
with a cotton swab moistened with medical
alcohol (ethanol) available in the market.
A faint streaking
140 Appendix
List of Characters
Key layout
Character table
Press each key to enter the character in the "Upper case" column. Hold down the
key and press each key to enter the characters in the "Lower case" column.
Key
1
2
3
4
5
6
7
8
9
0
=
'
Q
W
E
R
T
Y
U
I
O
P
[
]
Character
Upper case Lower case
1
!
2
@
3
#
4
$
5
%
6
^
7
&
8
9
(
0
)
_
=
+
'
"
q
Q
w
W
e
E
r
R
t
T
y
Y
u
U
i
I
o
O
p
P
[
{
]
}
Key
A
S
D
F
G
H
J
K
L
:
;
\
Z
X
C
V
B
N
M
,
.
/
•
Character
Upper case Lower case
a
A
s
S
d
D
f
F
g
G
h
H
j
J
k
K
l
L
:
:
;
;
\
|
z
Z
x
X
c
C
v
V
b
B
n
N
m
M
,
<
.
>
/
?
•
•
Appendix
141
Specifications
■ Input
Input device
Keyboard (72 keys)
Character keys 48, function keys 23
■ Display
Display panel
Character display
Display level
Indicators
LED
Dot matrix STN LCD
16 dot x 16 dot x 6 column x 4 line
-5 - Normal - +5 (11 levels)
26
1
■ Storage
Document memory
Internal files
About 175 characters (with limited backup)
Variable-length data
About 5,000 characters/max. 99 files
■ Fonts
Internal fonts
SansSerif
SansS. HG
SansS. ST
Roman
US Rpman
CL Roman
Gothic
BoldGothic
BR
Mincho
Gyosho
Reisho
CB
Script PL
■ Printing
Printing method
Print density
Head type
Tape width detect
Tape cartridge
Cutter
PeelGuardTM
142 Appendix
Thermal transfer PRO printing
-3 - Normal - +3 (7 levels)
Thin film thermal head (180 dpi, 128 dot)
Detects P tape standard holes (7 types)
Compliant with P tape standard
One-time tape cartridge that prevents reversal and slack
Wear-resistant PRO mechanism
204,206,209,212,218, 224
Auto-cutter with the mechanism to remove electricity
Rounds off the corners automatically (0.12" in radius)
Sensor equipped
■ Print functions
Seven character sizes, 49 types (17 sizes and 121 types when enlarged printing included).
Length
Style
Mode
Rpt. Enl.
Num./BCR
Print density
Display density
Saved data
Design forms
Fixed forms
Extra print
Size 1
Size 2
Size 3
Size 4
Size 5
Size 6
Size 7
Length
Vertical
Lines
16 x 16 dot
24 x 24 dot
32 x 32 dot
48 x 48 dot
64 x 64 dot
96 x 96 dot
120 x 120 dot
1.0-15.0" (3.9-40.0cm)
Horizontal or vertical text orientation
Equal, 1Line (1a-1d), 2Lines (2a-2h), 3Lines (3a3k), 4Lines (4a-4e), 5-8Lines
Layout
Left, Center, Right
Frame
Off, Table 01-04, frame 01-06
Font
SansSerif, SansS. HG, SansS. ST, Roman,
US Roman, CL Roman, Gothic, BoldGothic, BR,
Mincho, Gyosho, Reisyo, CB, Script PL
Decorate1 Out Line, Normal, Shadow, Shadow + Out Line
Decorate2 Italic, Bold, Normal, Italic + Bold
Exp./Red. Small1, Small2, Reduce, Normal, Expand
Border/Art C.Line, U.Line, Off, Border, Round, Art, B.Art,
R.Art
Space
None, Narrow, Normal, Wide
Repeat, Enlarge, Auto-cut (On/Off)
Seq.Number (increment direction, Addition Number, Repeat
Number of times, alphanumeric support)
Bar Code
(6 types: CODE128, CODE 39, ITF, CODABAR,
UPC-A, UPC-E)
-3, -2, -1, 0, +1, +2, +3
-5, -4, -3, -2, -1, 0, +1, +2, +3, +4, +5
(with Light and Dark keys)
Length, Style, Mode
17 forms (templates)
2 forms
Enlarge, Repeat
Appendix
143
■ Power supply, other
Main power
Sub battery
Power switch
Auto power-off
Dimensions and weight
Available items
AC 120 V (Bundled AC adapter must be used)
AA alkaline batteries x 6, built-in lithium battery CR2032 to
save data
Button
After about 5 minutes with no operations
(Disabled when creating/editing user's symbols)
About 7.9" W x 8.1" D x 2.5" H
About 1.9 lb. (excluding batteries and tape cartridge)
AC adapter or Hard Plastic Carrying Case
Replacement LABEL PRINTER PRO User’s Manual
■ Environmental conditions
Temperature
Humidity
144 Appendix
(Operating)
(Storage)
(Operating)
(Storage)
41 to 95 ºF (5 to 35 ºC)
15 to 130 ºF (-10 to 55 ºC)
30% to 80% (no condensation)
20% to 80% (no condensation)
Part Number
Description
Accessories
LSAD3
Adapter for K-Sun LABEL PRINTER PRO
LSCSS-11
Black Carrying Case
Shrink Tube Cartridge (96”) for use with shrink tube models
203STBW
203STBY
205STBW
205STBR
205STBY
208STBW
208STBY
210STBW
211STBW
211STBR
211STBY
Black on White 1/8”
Black on Yellow 1/8”
Black on White 3/16”
Black on Red 3/16”
Black on Yellow 3/16”
Black on White 1/4”
Black on Yellow 1/4”
Black on White 3/8”
Black on White 1/2”
Black on Red 1/2”
Black on Yellow 1/2”
Industrial Labeling Tape, 1/6” (4mm) 26’ each
204BW
Black on White
Industrial Labeling Tape, 1/4” (6mm) 26’ each
206BC
206BW
206BY
206WB
206BG
206BB
206BR
Black on Clear
Black on White
Black on Yellow
White on Black
Black on Green
Black on Blue
Black on Red
Industrial Labeling Tape, 3/8” (9mm) 26’ each
209BC
209BW
209BY
209WB
209BG
209BB
209BR
Black on Clear
Black on White
Black on Yellow
White on Black
Black on Green
Black on Blue
Black on Red
Part Number
Description
Industrial Labeling Tape, 1/2” (12mm) 26’ each
212BC
212BW
212BY
212WB
212BB
212BR
212BG
212WR
212WG
212WL
212GC
212WC
212GB
212RA
Black on Clear
Black on White
Black on Yellow
White on Black
Black on Blue
Black on Red
Black on Green
White on Red
White on Green
White on Blue
Gold on Clear
White on Clear
Gold on Black
Black on White - Removable Adhesive
Specialty Tape, 3/4” (18mm) 13’ 10” each
218WPO
218WPR
218SPV
218SPG
218CGS
Black on Oakwood Grain
White on Rosewood Grain
Black on Valence Marble
White on Granite Stone
White on Sunset
Specialty Tape, 3/4” (18mm) 5’ 8” each
218HLF
218RFR
Black on Holographic
Black on Reflective Red
Fluorescent Tape, 3/4” (18mm) 16’ each
218FR
218FP
218FO
218FY
218FG
Black on Fluorescent Red
Black on Fluorescent Pink
Black on Fluorescent Orange
Black on Fluorescent Yellow
Black on Fluorescent Green
Part Number
Description
Industrial Labeling Tape, 3/4” (18mm) 26’ each
218BC
218RC
218WC
218BW
218BY
218RW
218WB
218BX
218BB
218BR
218BO
218BG
218BV
218WR
218WO
218WG
218WL
218WX
218BLW
218BTM
218SM
Black on Clear
Red on Clear
White on Clear
Black on White
Black on Yellow
Red on White
White on Black
Black on Gray
Black on Blue
Black on Red
Black on Orange
Black on Green
Black on Violet
White on Red
White on Orange
White on Green
White on Blue
White on Gray
Blue on White
Black on Translucent Matte
Black on Silver Matte - 16’ 4”
Industrial Labeling Tape, 1” (24mm) 26’ each
224BC
224BW
224BY
224WB
224BB
224BR
224BG
224WR
224WO
224WG
224WL
Black on Clear
Black on White
Black on Yellow
White on Black
Black on Blue
Black on Red
Black on Green
White on Red
White on Orange
White on Green
White on Blue
Industrial Labeling Tape, 1” (24mm) 26’ each
224SL
1/4” Black on White - 3/4” Clear Tail
)NFORMATIONABOUT3HRINK4UBE
&ORUSEWITHMODELSTHATCANACCOMMODATESHRINKTUBE
3HRINK4UBEn)NFORMATIONDEEMEDRELIABLEBUTNOTGUARANTEED3EEMANUFACTURES
SPECIlCATIONSHEETFORFURTHERINFORMATION4ESTFORYOURAPPLICATIONS
3HRINK4UBE#ARTRIDGES
)NTERNAL
$IAMETERAS
3UPPLIED
MMMIN
2ANGEOF
7IRE
$IAMETERIN
2ANGEOF
7IRE
$IAMETER
MM
0ART.O
)NK#OLOR
4UBE#OLOR
34"7
",!#+
7()4%
v
34"9
",!#+
9%,,/7
v
34"2
",!#+
2%$
v
34"9
",!#+
9%,,/7
v
34"7
",!#+
7()4%
v
34"7
",!#+
7()4%
v
34"9
",!#+
9%,,/7
v
34"7
",!#+
7()4%
v
34"2
",!#+
2%$
v
34"9
",!#+
9%,,/7
v
34"7
",!#+
7()4%
v
3HRINKAGE2ATE
4EMPERATURE2ANGE
#OMPLIANCE3TANDARDS
ORMOREINDIAMETERLESSINLENGTH
#
5,3TANDARD2ATED4EMPERATURE#
2ATED6OLTAGE6&LAME2ESISTANCE'RADE67
s!LTHOUGHTHETUBEISMADEOFINSULATINGMATERIALSPOLYOLElNITDOESNOTMEET
THESTANDARDSSETFORINSULATEDTUBECONSTRUCTION$ONOTUSETHETUBEINLOCATIONS
WHEREWITHSTANDVOLTAGECAPABILITYISREQUIRED
5SER0RECAUTIONS
s0RINTSMAYAPPEARDISTORTEDDUETOSPECIALSURFACEMATERIALS
s0RINTSMAYBECOMEDIMINISHEDIFTHESURFACEOFTHETUBEISSCRATCHEDORWIPED
WITHPAINTTHINNERETC
s!VOIDEXPOSURETODIRECTSUNLIGHTORTHEOUTDOORS
s5SEANINDUSTRIALDYERWHENPERFORMINGTHEHEATSHRINKINGPROCESSINORDERTO
ACHIEVEPROPERSHRINKAGELEVELS$ONOTUSESOLDERINGIRONSCIGARETTELIGHTERSAN
OPENmAMEORHOMEHAIRDRYERS
CONTINUEDk
CONTINUEDUSERPRECAUTIONS
s7HENTHETUBESHRINKSTHEPRINTEDCHARACTERSMAYBECOMEDISTORTEDANDDIFlCULT
TOREAD0RINTEDBARCODESMAYALSOBECOMEUNDECIPHERABLE
s5SECAUTIONWHENHANDLINGINDUSTRIALDRYERUNITS
s$ONOTAPPLYHEATTOANYSURFACEFORANEXTENDEDPERIODOFTIMEEVENWHENTHE
OPERATINGTEMPERATUREISWITHINTHERECOMMENDEDRANGE
s4HISPRODUCTISNOTINTENDEDFORUSEONANYPERSONORANIMALORFORVANDALIZING
PUBLICORPRIVATEPROPERTY
s!VOIDSTORINGTHISPRODUCTINPLACESWITHHIGHTEMPERATURESORHUMIDITY$ONOT
EXPOSETHISPRODUCTTODIRECTSUNLIGHTORDUSTPARTICLES&ORBESTRESULTSUSETHIS
PRODUCTIMMEDIATELYAFTERITISREMOVEDFROMITSPACKAGING
0REPARATION
0RINTONTHEHEATSHRINKAGETUBE
3ETTHECARTRIDGEINTHEUNIT
&EEDTHETAPEANDCUTTHETUBE
%NTERCHARACTERSANDPRINT
3URFACE-OUNTING
0LACETHETUBEOVERTHEWIREORCABLE
"LOWHOTAIRACROSSTHETUBEUSINGAN
INDUSTRIALDRYERTOSHRINKTHETUBE
7HENTHETUBElTSSNUGLYAGAINSTTHE
SURFACETHESHRINKINGPROCESSISlNISHED
$/./4/6%2(%!44(%3(2).+45"%-!4%2)!,
/NLYUSEDRYERSTHATMEETINDUSTRIALSTANDARDSDURINGTHEHEATSHRINKINGPROCESS
$ONOTUSESOLDERINGIRONSCIGARETTELIGHTERSANOPENmAMEORCONSUMERDRYING
APPLIANCESHAIRDRYERSETCTOAVOIDTHEACCIDENTALIGNITIONOFAlRE
4AKESUFlCIENTPRECAUTIONSWHILEOPERATINGINDUSTRIALDRYERUNITS
#OLORINGOFTHETUBEMAYBEALTEREDCHARACTERSMAYDISAPPEARANDSURFACES
MAYBEDAMAGEDORDISCOLOREDDEPENDINGONTHECONSTRUCTIONOFTHESURFACE
THEENVIRONMENTALCONDITIONSANDTHECONDITIONSDURINGADHESION0LEASESELECT
ANUNNOTICEABLELOCATIONFORTESTINGTHEACTUALRESULTSOFTHEPRODUCTPRIORTOUSE
!VOIDSURFACESTHATDONOTPROVIDESUFlCIENTHEATRESISTANCE(EATSHRINKINGCAN
DAMAGESURFACESTHATARENOTCONDUCIVETOHIGHTEMPERATURES
!VOIDDIRECTCONTACTWITHTHETUBESDURINGORIMMEDIATELYAFTERSHRINKINGTO
PREVENTINJURIES
./4%3
Printed on Recycled Paper
M201_11/2010