1
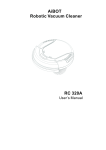
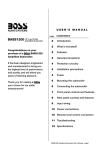
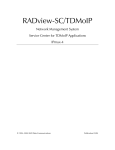
Robot vacuum cleaner
User manual
SR10J50✴✴✴ Series
• Beforeoperatingthisunit,pleasereadtheinstructionscarefully.
• Forindooruseonly.
Installation
Installation
Powerofthechargermustbeonatalltimes.
Powerlamp
(Red)
Installitinaplacewithout
obstaclesanddangeroffalling.
About0.5m
Installation
About0.5m
About1m
NOTE
• Installthechargerinaplacewherethefloorandwallarelevel.
• Installthechargeralongthegrainofwoodenfloors.
• Ifthepowerswitchisoff,therobotvacuumcleanerwillnotchargeevenifitisdocked
onthecharger.
• Alwaysturnonthepowerofthecharger.
–Ifpowerisnotsuppliedtothecharger,therobotvacuumcleanercannotfinditand
cannotautomaticallyrecharge.
–Iftherobotvacuumcleanerisleftdetachedfromthecharger,thebatterywilldrain
naturally.
• Iftherobotvacuumcleanerisinenergy-savingmode,powerwillnotcomeonevenif
thepowerswitchisturnedoffandthenon.PressandholdtheStart/Stopbuttononthe
robotvacuumcleaner.
12
Accessories
Batteries
[AAAtype(Option)]
Usermanual
Sparefilter(Option)
Cleaningbrush
Virtualguard(Option)
Installation
Remotecontrol(Option)
13
Charging
Ittakesapproximately120 minutestocompletelychargewhenchargingforthefirsttime
afterpurchaseandcanbeusedforapproximately90minutes.
Charginglampduringcharging(green)
Installation
WARNING
Ratedinputvoltageofthis
productis220-240V~.
1 Turn on the power switch on the
bottom.
Youmustturnonthepowerswitchtoturn
ontherobotvacuumcleaner.
2 Manually charge the robot vacuum
cleaner by placing it on the charger.
Makesurethechargepinsoftherobot
vacuumcleanerandthechargerisaligned.
3 Check the charging status.
“
”willturnonaccordingtocharging
progressand“FULL”willturnonwhen
chargingiscomplete.
14
Automatic charging
Whenthebatteryindicatorblinksduring
cleaning,therobotvacuumcleanerwill
returntothechargertochargeitself
automatically.
Installation
Recharge
Youcancommandtherobotvacuum
cleanertorechargeatthechargerwhileit
isincleaningprocess.
Low battery (Lo)
Manuallychargetherobotvacuumcleaner
byplacingitonthecharger.
Steps to take if recharging is not being executed.
Check the installation status of the charger when:
• thechargerislocatedinaplacewheretherobotvacuumcleanercannoteasilyaccess.
• distancebetweenthechargerandrobotvacuumcleanerisover5mapart.
–Itmaytakealongtimefortherobotvacuumcleanertoreturntothechargerfor
recharging.
Manually charge the robot vacuum cleaner when:
• thechargerislocatedinacorner.
• batteryisfullyexhausted.
• therobotvacuumcleanerisstuckbyobstacles(furnitureetc.).
• therobotvacuumcleanercan’tclimbthresholdnearcharge.(Heightofthethreshold
thattherobotvacuumcleanercanclimb:about1.5cmandbelow)
• whenthebatteryindicatorblinksand“Lo”isdisplayed.
• whentherobotvacuumcleanerissetonSpotcleanorManualcleanmode.
15
Installing the virtual guard (Optional)
InfraredrayfromtheVirtualguardwillrestricttherobotvacuumcleanerfrom
approachingcertainareas.
Virtualguard
Installation
.5 m
m2
u
im
Min
Thedistanceofvirtualwallis2.5 matminimumandmaydifferdependingon
surroundingsandmovementstatusoftherobotvacuumcleaner.
Powerlamp(Red)willblink.
1 Press the Power button to turn it on.
2 Install the Virtual guard where you
want to restrict the robot vacuum
cleaner’s entrance.
Makesurethatthedistancesensoris
facinginthedesireddirectionyouwant
tocreateainvisiblebarrier(whichwill
restricttherobotvacuumcleaner’s
approach).
16
13
Part name of the virtual guard
Powerbutton
Robotvacuumcleanerdetectionsensor
Powerlamp
Poweron:Redlampblinks
Poweroff:Lampisoff
Installation
Distancedetectionsensor(Infraredray
sensor)
Batterycover
Inserting batteries
Batteries for the Virtual guard must be purchased separately.
1 Open the battery cover of the Virtual
guard by pressing the locking tab
and lift it up.
2 Insert the batteries (D type) as
shown in the illustration (check the
+, - polarity).
3 Insert the tip of the cover into the
slot and push the other end to close
the battery cover.
17
Operations
Using the robot vacuum cleaner
Youmustturnonthepowerswitchbeforeusingtherobotvacuumcleaner.
Turning the power on/off
Turnon/offthepowerswitchon
thebottomoftherobotvacuum
cleaner.
WARNING
• Whentherobotvacuum
cleanerisnotusedfor
10 minutes,powerwillturn
offautomatically.
Operations
Using auto clean mode
Therobotvacuumcleanermovesand
cleansautomaticallyuntilitcleansan
entirespaceonce.
❇ Stopcleaning:Pressthe
shortly
button
Using the cleaningmodes
Youcanselectthedesiredcleaningmode.
Recharge
Youcancommandtherobotvacuum
cleanertorechargeatthecharger
automaticallywhileitisincleaning
process.
Setting schedule
Youcansetorcancelon-timeordaily
schedule.
❇ Referto“Settingtheschedule”.
18
Selecting cleaning mode
Cleaning mode
How to select
Displayed icon
Pressonce
Autoclean
Presstwice
Spotclean
Press3times
Maxclean
Operations
Press4times
Manualclean
❇ Directioncontrolcanbedoneonlybythe
remotecontrol.
Press5times
Edgeclean
❇ Whentherobotvacuumcleanerisbeingcharged,youcanonlyselecttheAutoclean,Maxcleanor
Edgecleanmode.
19
Cleaning method for each mode
Auto clean
Spot clean
Cleansalocalized
areaintensely.It
canbeusedtoclean
breadorcookie
crumbs.
Max clean
Manual clean
Cleansuntilthe
batteryisdepleted.
Youcanmovethe
robotvacuumcleaner
withtheremote
controltocleanthe
desiredspot.
Operations
Edge clean
Cleansthecornersby
reachingtothemas
closeaspossible.
20
About1.5m
Cleansautomatically
untilanentirespace
iscleanedonce.
About1.5m
05 Point cleaning
OnlyavailablewithAtyperemotecontrol
40cm
You can use the remote control to point
and clean the desired spot while the
robot vacuum cleaner is in cleaning
process.
• Pointtheredlightonthefloorwithin
40 cmaroundtherobotvacuum
cleaner’slocation.
• PressandholdthePointcleaningbutton
tomovetheredlighttothedesiredspot.
Thetherobotvacuumcleanerwillfollow
thelightwhilecleaning.
Operating distance of the remote control
Operations
Height of the
remote control
Heightofthe
remotecontrol
Operating
distance
0.5m
1m
1.5m
About About About
1.5m
2m
2.5m
Operatingdistance
Inserting batteries
Openthebatterycoverbyliftingitupwhilepressingthelockingtabandinsertthe
batteriesasshownintheillustration.Then,closethecoveruntilitclicksintoplace.
24
Name of each part
01
04
Top
05
01
02
03
04
05
06
07
08
02
03
05
06
06
07
08
01
04
02
02
01
01
03
06
09
07
08
Bottom
01
02
03
04
05
06
07
08
09
Cliffsensor
Sidebrush
Chargepin
Roller
Drivingwheel
Batterycover
Powerbrush
Powerbrushcover
Powerswitch
Operations
05
QuickEmptycover(Option)
Dustbinbutton
Dustbin
Displaypanel
Remotecontrolsensor
Obstaclesensor
Virtualguardsensor(Option)
Bumpersensor
Display panel
01
03
02
04
09
05 06 07 08
11
12
10
13
01
02
03
04
05
06
07
08
09
10
11
12
13
Start/Stopbutton
Numberdisplay
Dailyschedule
One-timeschedule
Autoclean
Spotclean
Maxclean
Manualclean
Batteryindicator
Recharging
Cleaningmodebutton
Schedulebutton
Rechargebutton
25
Maintenance
Cleaning and maintaining
Youmustturnoffthepowerswitchbeforecleaningtherobotvacuumcleaner.
Cleaning the dustbin
Cleanthedustbinifthere’stoomuchdustinthedustbin.
2 Open the
dustbin cover
3 Remove the
filter from the
dustbin
4 Remove dust in
the dustbin and
the filter
5 Wash the
dustbin and the
filter
6 Reassemble the
filter into the
dustbin
7 Close the
dustbin cover
8 Reinsert the
dustbin into the
robot vacuum
cleaner
Maintenance
1 Remove the
dustbin
27
Emptying the dustbin (Quick Empty)
UsetheQuickEmptycoverforemptyingthedustbineasily.
1 Open the Quick
Empty cover
2 Remove dust
in the dustbin
with a vacuum
cleaner
3 Close the Quick
Empty cover
Cleaning the driving wheel
L
I ON
L
F
L
R
OOF
R
OOF
R
L
I ON
L
F
L
2 Use a blunt rod
or tweezers
to remove the
foreign matters
R
R
L
Maintenance
L
1 Put a soft cloth
on the floor and
place the robot
vacuum cleaner
upside-down
R
Cleaning the sensors and the camera
Lightlywipewithsoftcloth.
Camera
Frontsensor
window
28
Cliffsensorwindow
Rearsensor
window
Cleaning the power brush
1 Remove the
dustbin
2 Remove the
power brush
cover
3 Remove the
power brush
4 Clean the power
brush
5 Reassemble the
power brush
6 Reassemble the
power brush
cover
Maintenance
29
Cleaning the side brush
Cleanthesidebrushifthere’sforeignmatteronthebrush.
1 Dip soft cloth
into warm water
R
R
R
2 Wrap the
side brushes
with the cloth
for about
10 seconds and
then wipe it
Ifhairorstringiscaughtbetweenthemainunitandthesidebrush,followthebelow
steps.
1 Remove the side
brushes
2 Clean the side
brushes
R
R
R
R
R
R
L
R
Maintenance
3 Reassemble the
side brushes
R
R
30