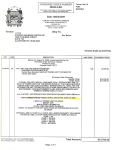
1
Textura Timberline Integration Manual
Version 2.2
July 21, 2008
This user manual contains confidential information of Textura, LLC and is protected by all applicable patents,
copyright, trademark trade secret and similar intellectual property laws. Neither this document nor any of the
information contained in this document may be reproduced or disclosed to any person under any
circumstances without the express written permission of Textura, LLC. Copyright 2006. All rights reserved.
Textura, LLC. Processes and technologies described in this document have US and Global Patents Pending.
Textura Timberline Integration Manual, V2.2
2
Textura, Confidential
Table of Contents
1. Overview ................................................................................................................................................................................. 6 Description .......................................................................................................................................................................... 6
Textura-Timberline Workflow............................................................................................................................................ 6 Textura Billing Process ....................................................................................................................................................... 7 A. Commitments/Subcontracts Change Orders .................................................................................................................. 7 B. AP Invoices ................................................................................................................................................................... 7 C. Insurance/Legal Documents .......................................................................................................................................... 7 D. Accounts Payable .......................................................................................................................................................... 8
2. Textura – Timberline File Locations and Custom Reports................................................................................................ 9 Introduction......................................................................................................................................................................... 9 A. File Locations................................................................................................................................................................. 9 B. Adding Custom Reports to Report Menus ................................................................................................................... 12 C. Updating Custom Reports ............................................................................................................................................ 14 D. Changing Print File Location ....................................................................................................................................... 16 3.Identifying your Accounting Package in Textura .............................................................................................................. 19 4. Export and Import Commitments/Commitment Change Orders ................................................................................... 21 Introduction....................................................................................................................................................................... 21 A. Export Commitments from Timberline ........................................................................................................................ 21 B. Export Commitment/Subcontract Change Orders ........................................................................................................ 22 Introduction .................................................................................................................................................................. 22 I. Timberline, version 9.1 or less ................................................................................................................................. 22 II. Timberline, version 9.2 or greater ............................................................................................................................ 22 III. Timberline default for PJ/JC Change Orders .......................................................................................................... 22 IV. Export JC Change Orders ....................................................................................................................................... 23 V. Export PJ Change Orders ........................................................................................................................................ 24 C. Import Commitments into Textura ............................................................................................................................... 25 D. Import Subcontract Change Orders into Textura ......................................................................................................... 30 5. Export and Import Owner/Prime Contract Change Orders ........................................................................................... 32 Introduction....................................................................................................................................................................... 32 A. Export Owner/Prime Contract Change Orders from Timberline ................................................................................. 32 B. Import Owner/Prime Contract Change Orders into Textura ........................................................................................ 33 6. Export and Import Legal Documents and Requirements (Insurance Expiration Dates) .............................................. 37 Introduction....................................................................................................................................................................... 37 A. Export Legal Documents and Requirements from Timberline .................................................................................... 37 B. Import Legal Documents and Requirements into Textura ........................................................................................... 38 I. Overview .................................................................................................................................................................. 38 II. Importing Legal Documents and Requirements ...................................................................................................... 38 7. Export and Import Textura Subcontractor Invoices ........................................................................................................ 42 Introduction....................................................................................................................................................................... 42 A. Export invoices from Textura ...................................................................................................................................... 42 B. Import Invoices Into Timberline .................................................................................................................................. 43 C. Ask Name Setting for Invoices .................................................................................................................................... 45 Textura Timberline Integration Manual, V2.2
3
Textura, Confidential
8. Recording Invoices (Draws) completed in Textura into Timberline ............................................................................... 48 Introduction....................................................................................................................................................................... 48 A. Recording Invoices (Draws) using the Accounts Receivable Application ................................................................... 48 I. Use Contacts ............................................................................................................................................................. 49 II. Quick Bill ................................................................................................................................................................ 49 B. Enter Cash Receipts using the Accounts Receivable Application................................................................................ 50 C.Billing Retainage Using the Accounts Receivable Application .................................................................................... 51 D. Recording Invoices (Draws) using the Job Cost Application ...................................................................................... 52 I. Enter Billings ............................................................................................................................................................ 52 II. Enter Cash Receipts ................................................................................................................................................. 52 9. Recording Subcontractor/Vendor Payouts in Timberline ............................................................................................... 53 Introduction....................................................................................................................................................................... 53 A. Print the Textura ACH Release report ......................................................................................................................... 53 B. Pay Joint Check Vendors ............................................................................................................................................. 56 I. Print Checks.............................................................................................................................................................. 59 II. Print a Joint Check Custom Design ......................................................................................................................... 59 C. Paying Manual Checks ................................................................................................................................................. 60 I. Select Invoices to Pay ............................................................................................................................................... 60 II. Print Checks ............................................................................................................................................................ 60 D. Recording Paid Retainage and Paid Invoices from the ACH Release Notice .............................................................. 61 I. Select Retainage Invoices ......................................................................................................................................... 61 II. Select Invoices to Pay ............................................................................................................................................. 62 III. Print Checks ........................................................................................................................................................... 63 Appendix A:Textura – Timberline Initial Interface Setup .................................................................................................. 64 Introduction....................................................................................................................................................................... 64 A. Global Settings ............................................................................................................................................................. 64 I. General .................................................................................................................................................................... 65 Accounting Methods ............................................................................................................................................... 65 Accrual Method ...................................................................................................................................................... 65 Cash Method ........................................................................................................................................................... 65 Both......................................................................................................................................................................... 66 Timberline GL Account Retrieval Hierarchy.......................................................................................................... 66 Assign Batch Name.................................................................................................................................................. 67 II. Verifying field descriptions ..................................................................................................................................... 68 III. Custom Fields ........................................................................................................................................................ 68 B. Application Settings ..................................................................................................................................................... 68 I. AP Settings............................................................................................................................................................... 68 Bank Account Use Method ...................................................................................................................................... 68 Lien Waiver Accumulation Method ........................................................................................................................ 71 Invoice Selection Order ........................................................................................................................................... 71 II. CM Settings ............................................................................................................................................................ 72 ACH Bank Account Setup (Optional) .................................................................................................................... 72 III. AR/JC Settings ...................................................................................................................................................... 74 Using Accounts Receivable ................................................................................................................................... 74 Verify Billing Settings ........................................................................................................................................... 74 Verify Billing Method ............................................................................................................................................ 75 Using Job Cost to enter Receivables ...................................................................................................................... 77 IV. Timberline Operator Security ................................................................................................................................ 78 Textura Timberline Integration Manual, V2.2
4
Textura, Confidential
Terminology
Since you can change some field descriptions in Timberline, this manual uses the Timberline default descriptions.
If you changed any of these standard field names and need to identify the default description, select File, Data
Folder Settings, Custom Descriptions, and scroll to respective Timberline Field Types.
Textura
Timberline Field Type
Timberline (default Description)
Subcontractor
AP Vendor
Vendor
Retention (Subcontractor)
AP Retainage
Retainage
Prime Contract Change Order(hidden/visible)
CN Change Order
Owner Change Order (billable)
Prime Contract Change Order(hidden/visible)
JC Change Order
Owner Change Order (billable)
Prime Contract Change Order(hidden/visible)
PJ Change Order
Owner Change Order (billable)
Account Code
JC Commitment
Commitment
Contract Components
Commitment Items
Subcontract Item Number
Commitment Item Number
Subcontract Change Order (hid/vis)
JC Commitment CO
Commitment CO
Subcontract Amount
Committed Amount
Scheduled Value
Scheduled Value
Phase Code
CN Item
Textura Timberline Integration Manual, V2.2
(Contract/AIA) Item
5
Textura, Confidential
1. Overview
Description
This manual is a guide for setting up the interface between Textura and Timberline and processing the related
workflow in Timberline. It is not intended to be a complete guide for Timberline. For more information regarding
Timberline, please see the Timberline documentation.
Textura-Timberline Workflow
Integrate Textura’s services with Timberline to optimize your payment process. The interface points are:
•
Commitments: Export commitments/subcontracts and change orders from Timberline to Textura.
•
Prime Contract Change Orders: Export Prime Contract Change orders from Timberline to Textura.
•
Invoice entry: Export a file containing the subcontractor invoice information for a draw and import the
invoice details into the Timberline accounting system.
•
Legal document validation: Export required legal document data from Timberline to Textura.
•
Payment entry: Record subcontractor/vendor payouts in Timberline.
Textura Timberline Integration Manual, V2.2
6
Textura, Confidential
Textura Billing Process
A. Commitments/Subcontracts Change Orders
Enter Commitments/Subcontracts in Timberline and export them to Textura. Commitments/Subcontracts may
have multiple item distributions between extras, cost codes, and categories.
Enter approved commitment/subcontract change orders in Timberline and export them to Textura. Only approved
subcontract change orders are exported to Textura. Textura will accept all new change orders and reject duplicate
or previously exported change orders.
Note: Do not change the Commitment or Subcontract Change Order number after importing.
B. AP Invoices
Vendors/subcontractors will enter invoices in Textura. After the invoices are approved by the general contractor
in Textura, they are imported into Timberline. Imported records with duplicate invoice numbers (invoice number
already exists for a vendor) will be rejected by Timberline.
C. Insurance/Legal Documents
Insurance effective dates, expiration dates, and policy numbers for Auto Insurance, General Liability Insurance,
Umbrella Insurance, and Worker’s Compensation Insurance may be exported from Timberline to Textura. During
the export priority for the source of insurance information can be selected from the following choices:
Textura Timberline Integration Manual, V2.2
7
Textura, Confidential
Select
Information Retrieved from
Latest expiration date
The date for each type of insurance on the commitment/subcontract
record will be compared to the date on the vendor record. Information
from the record with the latest date per type of insurance will be
exported.
Commitment/subcontract record
The information will be taken from the commitment/subcontract
record if the information is available, otherwise it will be taken from
the vendor record if it is available.
Vendor record
The information will be taken from the vendor record if it is
available, otherwise, it is taken from the subcontract record.
D. Accounts Payable
After ACH payments have been disbursed in Textura, Textura’s Payment report (ACH Release Report Summary)
is available for export. This is compared to the expected payment report in Timberline. If necessary, any
discrepancies between the two systems are manually resolved. A “mock check” run is executed in Timberline in
order to record the invoices as paid. These “mock checks” are printed to a file or on blank paper.
Textura Timberline Integration Manual, V2.2
8
Textura, Confidential
2. Textura – Timberline File Locations and
Custom Reports
Introduction
Note: If the initial setup has already been performed, please skip to Updating Custom Reports Section (Sec. C).
Note: Please see Appendix A for Application and Global Settings for Accounting Methods, Batch Name, and
Custom Descriptions
Before using Textura with Timberline, there are initial setup procedures and considerations. These include
verifying or changing settings previously selected in Timberline and adding custom reports to the Timberline
menu. This section addresses File Location Settings and custom reports.
A. File Locations
Each company or data folder can store data files, design files and print files in various locations. In addition to the
folders currently set up for Timberline data, you will need to create folders for the following:
•
Importing data into Timberline
•
Exporting data to Textura
•
Textura custom reports
I. Create folders for importing and exporting data
•
On the root drive of the workstation that will be performing the imports, create the following
folders:
•
C:\TEXTURA\Import into Timberline
•
C:\TEXTURA\Export to Textura
•
If multiple stations will be performing imports, the folders could be set up on the network drive.
II. Copying custom reports
•
To copy custom reports for the interface,
•
Create a folder on the network drive.
•
For example: T:\Accounting\Textura Custom Reports (replace T:\Accounting with the directory
location of your Timberline files).
•
Copy the Textura Custom Report designs to the T:\Accounting\Textura Custom Reports folder.
III. Verifying current locations and editing import locations
•
To view current settings and add import locations,
•
From any main menu click File, Data Folder Settings, and then select File locations.
•
If a data folder location field is blank, files are stored in the company data folder listed in the
header of the File Location screen. To verify the location if the full location is not visible, click OK
to close screen, then click File and select Open Data Folder.
Textura Timberline Integration Manual, V2.2
9
Textura, Confidential
•
•
Select the data folder and click OK.
The system displays the File Locations dialog box.
Note: If any of the Ask Name boxes are checked, the user will be prompted for a file name each time the
particular transaction is run.
Textura Timberline Integration Manual, V2.2
10
Textura, Confidential
If the “Ask Name” setting for the AP Invoice file is checked: (Also see Sec C Ask Name setting for
Invoices on pg 45)
The user will be prompted to select or create a new AP invoice file
IV. Printouts
This is the default location for all print files generated in Timberline other than exports to Textura. If blank,
standard Timberline printouts are stored in the company data folder, unless changed during printing.
Exports to Textura are stored in the C:\TEXTURA\Export to Textura folder.
Note:
See Section D for details on changing the print file location.
Textura Timberline Integration Manual, V2.2
11
Textura, Confidential
V. Reports
Custom reports for the Textura Timberline interface are stored in the T:\Accounting\Textura Custom
Report folder. (Replace T:\Accounting with the directory location of your Timberline files.) All other custom
Timberline reports are stored:
If…
Then designs are stored in the…
•
Blank
Company data folder.
•
Standard Timberline
\Report folder (subdirectory of Timberline files and programs folder.)
VI. Imports
Invoice files that are exported from Textura and imported into Timberline AP are stored in the Data
Folder.
Note: It is recommended that a Textura Data Folder be created on the root drive of the Timberline Network Drive
(or local station C: drive.) For example: T:\Textura\Import into Timberline.
B. Adding Custom Reports to Report Menus
Add export reports to your Timberline Accounts Payable Report menu. These reports allow export
files to be created in a format that is compatible with Textura.
1.
Under the Timberline Reports heading, click the Timberline Interface Production Reports link
on the Textura Interfaces Resource website:
https://www.texturallc.com/importexport/
2.
Save the zip file in your designated Textura folder.
3.
Unzip the reports by double clicking on the zip folder and select extract all.
4.
Extract all reports to your Textura folder
5.
From the AP main menu, click Reports, Report Manager, and then select New.
Textura Timberline Integration Manual, V2.2
12
Textura, Confidential
6.
Type the Report name.
7.
Type the Menu group (TEXTURA).
8.
Select the Source TS report design.
9.
Click the File name field and then click List.
The system displays the List Report Designs dialog.
10.
Select T:\Accounting\TEXTURA Custom Reports from the Look in drop-down.
11.
Select the corresponding report design.
12.
Click Open and then OK.
Textura Timberline Integration Manual, V2.2
13
Textura, Confidential
Repeat steps 5-12 to add the following Custom Reports:
Report Name
Menu Group
File Name
Export Commitments
TEXTURA
T:\Accounting\TEXTURA\TEXTURA Export all Commitments
Export JC Change Orders
TEXTURA
T:\Accounting\TEXTURA\TEXTURA Export JC co
Export PJ Change Orders
TEXTURA
T:\Accounting\TEXTURA\TEXTURA Export PJ co
Export Prime JC Contract CO
TEXTURA
T:\Accounting\TEXTURA\TEXTURA Export Prime JC Contract
Export Prime PJ Contract CO
TEXTURA
T:\Accounting\TEXTURA\TEXTURA Export Prime PJ Contract
Export Legal Documents
TEXTURA
T:\Accounting\TEXTURA\TEXTURA Export Legal Documents
13.
After adding all six reports, click Close to exit the Report Manager.
NOTE: Depending on where change orders are entered (either JC or PJ), user may elect to only add the JC
reports and not the PJ or vice versa. There is no consequence to adding both.
C. Updating Custom Reports
From time to time, the custom reports may be updated. Your Textura contact will inform you of a
change and will instruct you to install the latest report(s).
Save the updated reports on your network drive and replace the existing report design.
To replace an existing report:
1.
From the AP menu, select Reports, Reports Manager, then select the TEXTURA report to be
updated and click Change:
Textura Timberline Integration Manual, V2.2
14
Textura, Confidential
2.
Click in the File Name field and select List:
3.
Select the updated report:
4.
Click OK
Repeat steps 1-4 until all necessary reports are updated.
Textura Timberline Integration Manual, V2.2
15
Textura, Confidential
D. Changing Print File Location
The Timberline reports default to a print file location at C:\Export to Textura folder. If this location does not exist,
an error message is received when clicking the start button to export the file:
To avoid this error, the report design needs to be updated
1. From the TS Main screen, click Applications, Report Designer
Textura Timberline Integration Manual, V2.2
16
Textura, Confidential
2. Open the Textura report design by clicking File, Open Design and browse for the report
3. Click File, Page Setup, and then Print Options
Textura Timberline Integration Manual, V2.2
17
Textura, Confidential
4. Click the Select File button:
5. Browse to the Export to Textura folder and click Save:
Repeat above steps for all Textura Reports. This update process will only need to be performed
once.
NOTE: It is not necessary to change the Report Design if user opts not to. The reports will still run. The user will
need to browse to the desired output location for the exports each time the reports are run.
Textura Timberline Integration Manual, V2.2
18
Textura, Confidential
3.Identifying your Accounting Package in
Textura
Setting up Your Accounting Package
The Textura Administrator must identify the Accounting Package (interface) that is used when the
Organization is set up in Textura.
1. When an Organization is invited to join a project on Textura, the Edit Organization link is displayed on
the main home page. Click this link.
The system displays the Edit Organization page.
2. Verify the correct accounting package is selected.
If your Accounting Package is not set up on the Edit Org screen, contact your Textura System Administrator
and they will be able to assign your Accounting Package.
Textura Timberline Integration Manual, V2.2
19
Textura, Confidential
3. When creating a project, type your Timberline job number (without punctuation) in the Internal Project
Number field.
These fields must match between systems in order for the interface to work properly, as Internal Project
Number is one of the unique identifiers for the interface.
Textura Timberline Integration Manual, V2.2
20
Textura, Confidential
4. Export and Import
Commitments/Commitment Change Orders
Introduction
Commitments and commitment change orders are entered in Timberline and exported to Textura. Textura will
accept all commitments new to Textura. If a commitment is updated in Timberline and currently in an
incomplete status in Textura, the commitment will be updated. If the commitment is already in a complete
status in Textura, the record will be rejected as a duplicate.
Timberline will only export approved commitment change orders. Duplicate change orders will be rejected in
Textura.
Note: It is recommended that when exporting from Timberline, to use a file naming convention that includes
the date the file has been exported. If there is an issue with the export, the file is easily identified by the
date.
A. Export Commitments from Timberline
•
•
•
1. From the AP main menu, click Reports, Textura, and select Export Commitments.
2. Select jobs by entering job numbers in the Job No. fields and click Ranges to select ranges of
commitments/subcontracts.
•
Commitments/Items that have been committed, but not invoiced, will be exported.
•
If you wish to export all commitments, including those that have invoiced, check the Export all
Commitments box.
•
If you wish to export $0 Commitments and/or PO’s, check the Export $0 commitments and/or
Export PO’s boxes respectively.
Note: Because Commitments can be changed in Timberline until they are invoiced or have an approved
change order, do not make any changes to committed costs once they are complete in Textura. Any
subsequent changes must be made in Timberline through Approved Change Orders.
If you are just starting to use Textura and would like to set up jobs already in progress in Timberline, click
Export all Commitments. This will export all commitments whether or not they have been invoiced.
Textura Timberline Integration Manual, V2.2
21
Textura, Confidential
3.
Click OK.
B. Export Commitment/Subcontract Change Orders
Introduction
Export approved change orders prior to initiating a draw to allow subcontractors to invoice against the most
current revised budget totals.
To export Subcontract Contract Change Orders from Timberline,
I. Timberline, version 9.1 or less
Use Export JC change orders for all jobs.
II. Timberline, version 9.2 or greater
If…
Then use…
Change orders are handled by JC.
Export JC change orders
Change orders are handled by Project Management.
Export PJ change orders
III. Timberline default for PJ/JC Change Orders
To verify whether PJ or JC is the source for change orders on a specific job,
1. From the PJ main menu, click Setup and select Jobs.
2. The system displays the Job Setup screen.
3. Type the Job number.
4. Click the Change Management tab. If the Use PJ Change Management box is checked, the default
location is PJ. If unchecked, the change orders are created in JC.
Textura Timberline Integration Manual, V2.2
22
Textura, Confidential
IV. Export JC Change Orders
To export JC Change Orders:
1. From the AP main menu, click Reports, Textura, and then select Export JC Change Orders.
2. Select jobs by typing job numbers in the Job No. fields or click Ranges to select ranges of
commitments/subcontracts. If blank, change orders for all jobs are exported.
•
Check the Export $0 C/O if you wish to export $0 change orders. If unchecked, only nonzero change
orders are exported.
•
Check the Export PO C/O box if you wish to export PO change orders. If unchecked, only subcontract
change orders are exported.
3. Click Start
Textura Timberline Integration Manual, V2.2
23
Textura, Confidential
V. Export PJ Change Orders
To export PJ Change Orders:
1. From the AP main menu, click Reports, Textura, and then select Export PJ Change Orders.
2. Select jobs by tying job numbers in the Job No. fields. If blank, change orders for all jobs are exported.
3. Select Ranges to export change orders for specific commitments.
4. Check the Export $0 C/O box if you wish to export $0 change orders. If unchecked, only nonzero
change orders are exported.
5. Check the Export PO C/O box if you wish to export PO change orders. If unchecked, only subcontract
change orders are exported.
6. Click Start
Note: If you have some jobs that use PJ as the entry point for Commitment Change Orders, and some that
use JC as the entry point, you will need to run both exports.
Textura Timberline Integration Manual, V2.2
24
Textura, Confidential
C. Import Commitments into Textura
Note: * This is available at an Organization-Wide Level see Organization-Wide Documentation
The file that is exported from Timberline and imported into Textura contains subcontracts (called commitments
in Timberline).
When Textura receives a commitment that has already been imported or created, Textura attempts to update
the existing commitment and contract components (as identified by Commitment Number and Vendor Number).
If the commitment is in an incomplete state, it will be updated; otherwise, it will be rejected as a duplicate.
To import commitments into Textura,
1.
From the Project Home Page, click the Interfaces menu and select Import Accounting Information.
.
2.
The system displays the Import Accounting Information page. Click the Subcontracts and
Subcontract Change Orders radio button.
Textura Timberline Integration Manual, V2.2
25
Textura, Confidential
3.
Click Browse to locate the CSV file you want to import.
4.
Click Import CSV File.
The system displays the Status page notifying you that the commitments have been imported.
.
5.
To view the Subcontracts added to the project, click the SoV/Subcontracts menu on the project home
page and select Subcontract List.
Textura Timberline Integration Manual, V2.2
26
Textura, Confidential
The system displays the Subcontract Listing page with incomplete subcontracts.
Subcontracts will be imported as incomplete if the Timberline Vendor ID has not been previously assigned to a
Textura Organization and the GC’s SoV is more than one line. Otherwise they are imported as complete.
To complete the subcontracts,
•
6. Click the Contract Number link for each Incomplete Subcontract.
The system displays the Contract Maintenance page.
•
7. Click Edit Settings.
Note: The Subcontract Item # is fed from Timberline on import. NEVER manually adjust the item number
unless you are adding a new component. Please see step 10 below. .
8.
Type in the Subcontractor’s Company Name and select Find. Select the proper Organization, and the
grey box above will auto-populate:
Textura Timberline Integration Manual, V2.2
27
Textura, Confidential
Note: You will only need to assign a subcontractor for a particular Vendor ID once. Textura will store the
association between the Vendor ID and the subcontractor.
This is an accounting vendor ID and
is stored automatically. This may be
used for reference to assign an org
in Textura.
At the bottom of the screen is the contract component.
9.
Click the find button to populate Phase Code and Description and select Save Changes (Top of
screen):
If the GC’s SoV is only one line, the Phase Code will automatically be assigned.
10.
If adding additional contract components in Textura for billing purposes, the interfaced component
amount must be allocated to the new components and the Subcontract Item# fields must match the
original component’s information exactly.
Textura Timberline Integration Manual, V2.2
28
Textura, Confidential
11.
The system displays the Status message notifying you that Changes to the contract have been saved
and the contract is complete:
12.
To complete another subcontract, click the “To return to the subcontract listing, click here link”
13.
Repeat steps 6 through 11 for each incomplete subcontract.
14.
When finished, return to your Project Home Page.
Textura Timberline Integration Manual, V2.2
29
Textura, Confidential
D. Import Subcontract Change Orders into Textura
Note: * This is available at an Organization-Wide Level see Organization-Wide Documentation
If the import file contains a Subcontract Change Order that already exists in Textura, Textura will reject the
import record as a duplicate.
To import Subcontract Contract Change Orders into Textura,
1.
From the Project Home Page, click the Interfaces menu and select Import Accounting Information.
The system displays the Import Accounting Information page.
2.
Click the Subcontracts and Subcontractor Change Orders radio button.
3.
Click Browse to locate the CSV file you want to import.
4.
Click Import CSV File.
Textura Timberline Integration Manual, V2.2
30
Textura, Confidential
5. The system displays the Status page notifying you that Subcontract Change Orders have been imported.
6. Return to the Project Home Page and you can view the imported Subcontract Contract Change Orders.
The Subcontractor will need to allocate the Change Order(s). There is no further action for the General
Contractor.
Textura Timberline Integration Manual, V2.2
31
Textura, Confidential
5. Export and Import Owner/Prime Contract
Change Orders
Introduction
Only approved owner change orders will be exported.
In Textura, change orders can be visible or hidden. The interface does not distinguish between hidden and
visible change orders. All change orders are visible.
Note: A visible change order revises the total price of the Contract, with the adjustment appearing as a change
order on the AIA G702 form.
Note: A hidden change order can also adjust the total price of the contract, but the adjustment is not displayed
as a change order on the AIA G702; instead, the Original Contract Sum is adjusted.
A. Export Owner/Prime Contract Change Orders from Timberline
To export Owner/Prime Contract Change Orders from Timberline,
1.
From the PJ or JC main menu (depending on where you enter Change Orders), click Reports,
Textura, and select Export Owner/Prime Contract Change Orders.
2.
Select the Range(s) of jobs.
3.
Click Start.
Textura Timberline Integration Manual, V2.2
32
Textura, Confidential
B. Import Owner/Prime Contract Change Orders into Textura
Note: * This is available at an Organization-Wide Level see Organization-Wide Documentation
If the import file contains an Owner Change Order that already exists in Textura, Textura will reject the record
as a duplicate.
To import Owner/Prime Contract Change Orders into Textura,
1.
From the Project Home Page, click the Interfaces menu and select Import Accounting Information.
The system displays the Import Accounting Information page.
2.
Click the Prime Contract Change Orders radio button.
3.
Click Browse to locate the CSV file you want to import.
4.
Click Import CSV File.
The system displays the Status page notifying you that Prime Contract Change Orders have been
created.
Textura Timberline Integration Manual, V2.2
33
Textura, Confidential
Return to the Project Home Page and you can view the imported Prime Contract Change Orders.
Textura Timberline Integration Manual, V2.2
34
Textura, Confidential
5.
Click on the Show Prime Contract Change Orders link.
Note: Notice that the SoV/Subcontracts menu is red, notifying you that you now have unallocated Change
Orders.
6.
Click the red SoV/Subcontracts menu and select Edit Schedule of Values (Unallocated Change
Orders).
Textura Timberline Integration Manual, V2.2
35
Textura, Confidential
The system displays the Edit Schedule of Values page
7.
Allocate the change order to the appropriate line(s) for each change order that was imported.
8.
Click Save Changes.
The system displays a Status page notifying you that the budget for General Construction has been
saved.
9.
To allocate additional imported Prime Contract Change orders, click the link that states “To edit the
budget again, click here.”
Repeat steps 5 – 8 until all lines have been allocated.
When finished, return to your Project Home Page.
Textura Timberline Integration Manual, V2.2
36
Textura, Confidential
6. Export and Import Legal Documents and
Requirements (Insurance Expiration Dates)
Introduction
Insurance effective dates, expiration dates, and policy numbers can be for exported from Timberline to Textura
for all compliance documents including the following four types of insurance:
•
Auto Insurance
•
General Liability Insurance
•
Umbrella Insurance, and
•
Worker’s Compensation Insurance
During the export, priority for the source of insurance information can be selected from the following choices:
If you select…
Latest expiration
Then the…
Date for each type of insurance on the commitment/subcontract record will be compared to the date on the
vendor record. Information from the record with the latest date per type of insurance will be exported.
Commitment record
Information will be taken from the commitment/subcontract record if the information is available,
otherwise it is taken from the vendor record.
Vendor record
Information will be taken from the vendor record if it is available, otherwise from the subcontract record.
A. Export Legal Documents and Requirements from Timberline
Legal requirements data is exported from Timberline and imported to Textura. Using the tracked information,
Textura will conditionally withhold payment and alert the subcontractor of missing documents or the status of a
document when the invoice invitation is emailed.
1. From the AP main menu, click Reports, Textura, and select Export Legal Documents.
2. Select the Range(s) of jobs. If blank legal documents for all commitments are exported.
Textura Timberline Integration Manual, V2.2
37
Textura, Confidential
3. Check the lnsurance and checklist information
4. Click Start.
B. Import Legal Documents and Requirements into Textura
Note: *This is available at an Organization-Wide Level see Organization-Wide Documentation
I. Overview
Each time the import is run; all status data for each subcontractor relative to the compliance documents stored
in Timberline will be refreshed with the data in the import file. The status for each legal document is as follows:
•
If there is no information regarding the insurance type for the subcontractor, the status is set to “Not
Received.”
•
If there is an existing record for the insurance type for the subcontractor that has a status of “Not
Applicable,” the status will remain at “Not Applicable.”
•
If information is supplied for a particular insurance type for a subcontractor, the status is set to
“Received.”
•
The first time a project is included in the import file, Textura will automatically add the compliance
document requirements exported out of Timberline to that project .Enforcement will be set to “Advise
Only” for all requirements and “Track Expiration” will be turned on only if there are expiration dates in
the export file.
II. Importing Legal Documents and Requirements
To import Legal Documents and Requirements into Textura,
1.
From the Project Home Page, click the Interfaces menu and select Import Accounting Information.
The system displays the Import Accounting Information page.
2.
Click the Legal Documents and Requirements radio button.
Textura Timberline Integration Manual, V2.2
38
Textura, Confidential
3.
Click Browse to locate the CSV file you want to import.
4.
Click Import CSV File.
The system displays the Status page notifying you that legal documents and requirements have been imported
To verify legal documents were imported,
1.
From the Project Home Page, click the Compliance menu and select View Document Status.
The system displays the Legal Document Status page, which identifies the imported legal documents and their
status.
Textura Timberline Integration Manual, V2.2
39
Textura, Confidential
2.
Click the Subcontractor link to view the document detail.
The system displays the Legal Document View page listing the documents that were imported for the
subcontractor. The Status, ID #, and dates are populated with the import information.
Textura Timberline Integration Manual, V2.2
40
Textura, Confidential
3.
To edit legal document requirements, return to the Legal Document Status page and click Edit Legal
Document Requirements.
Add Additional Requirements by clicking the Add Requirement button.
Delete requirements by checking the Delete box to the right of each requirement and click the Delete
Selected Requirements button.
4.
When finished, return to your Project Home Page.
Textura Timberline Integration Manual, V2.2
41
Textura, Confidential
7.Export and Import Textura Subcontractor
Invoices
Introduction
Vendors/subcontractors will enter invoices in Textura. After they are approved in Textura, invoices are imported
into Timberline. Imported records with duplicate invoice numbers (invoice number already exists for a vendor)
are rejected by Timberline.
A. Export invoices from Textura
To export invoices from Textura,
1.
From the Project Home Page, click to open a draw.
The system displays the Draw Home Page.
2.
Click Export Subcontractor Invoices under the Interfaces heading.
Textura Timberline Integration Manual, V2.2
42
Textura, Confidential
The system displays the Generate Invoice page.
3.
Click Generate Invoice File.
The system displays the Invoice Report page showing the Vendor, Invoice Number, Date and Amount
contained in the invoice export file.
4.
Click the Download CSV File button.
5
Click Save to Disk and then OK
B. Import Invoices Into Timberline
Textura Timberline Integration Manual, V2.2
43
Textura, Confidential
To alleviate the need to re-enter invoices into Timberline, a file containing the subcontractor invoice information
for a draw is imported into Timberline.
1.
From the AP main menu, click Tools and select Import Invoices.
2.
To import a file, click … to browse and select the following:
•
Files of type: All
•
Select import file.
3.
Click Start.
4.
Review the import invoice journal to verify all invoices were imported.
5.
Post Invoices.
Note: Even if you are set to post invoices automatically (from the AP main menu, click File, Data Folder
Settings, AP Settings, Post and Interface Settings, Accounts Payable Posting Setting, and select
Automatic) imported invoices must be posted.
To post invoices,
6.
From the AP main menu, select Tasks, Post Invoices, and click Start. Select a specified batch by
clicking the Ranges button
Textura Timberline Integration Manual, V2.2
44
Textura, Confidential
This creates the same entries for Job Cost and General Ledger as if you were posting invoices entered
through AP, and clicking Tasks and Enter Invoices.
7.
Print any standard reports you use after entering invoices (for example, Committed Cost Status).
C. Ask Name Setting for Invoices
1. If “Ask Name” for the AP Invoice file (File, Data Folder Settings, File Locations) is checked,
Then the user is prompted to select a new api file when importing invoices.
Textura Timberline Integration Manual, V2.2
45
Textura, Confidential
2. Select the default” new” file or create an additional file by typing in a different file name. Click open.
3. If “Include historical invoice file in verification (AP, File, AP Settings) is selected then there is also be
prompt to select a history file.
4. Click an existing file and then click open. (Or if you do not have a history file yet, click cancel.)
Textura Timberline Integration Manual, V2.2
46
Textura, Confidential
5. Click … to browse and select a file to import. (Files of type: select All. Select file to import.)
6.
Click start.
7. Review the import journal to verify all invoices were imported. Post invoices.
Textura Timberline Integration Manual, V2.2
47
Textura, Confidential
8. Recording Invoices (Draws) completed in
Textura into Timberline
Introduction
If you are using the Timberline Accounts Receivable application for this data folder, AR invoices must be
manually entered in Timberline Accounts Receivable. If you are not using the Timberline Accounts Receivable
application, AR invoices can be manually entered in Job Cost. Follow your standard procedure for entering
invoices and cash receipts in Timberline or follow these guidelines.
A. Recording Invoices (Draws) using the Accounts Receivable
Application
1.
From the AR main menu, click Tasks, Enter Invoices, and select Contract/Job View.
If Job Type
Then…
Use Contacts
1.
Type the Customer and Contract Number, Invoice, Draw, Invoice Date, Amount, and
Retainage Held in the top grid, as well as any additional information needed.
2.
In the lower grid, or distribution screen, type the following information:
−
Amount Type
−
Contract Item
−
Amount
−
Retainage Held
−
Reference
−
Description
−
Due Date
Note: For many companies it is sufficient to enter the Amount Type as Total Billed
and use just one Contract Item. If you require more detail, see your Timberline
documentation.
Quick Bill
3.
Click Finish.
4.
Type any additional invoices/draws in batch.
5.
Click Finish and then Start.
1 .Type the Customer, Invoice, Draw, Invoice Date, Amount, and Retainage Held in the top
grid.
2.
In the lower grid, or distribution screen, type the following information:
Amount Type
−
Job, Extra (and if applicable the cost code)
Amount
−
Retainage Held.
3.
Click Finish. Enter any additional invoices/draws in batch.
4.
Click Finish and then Start.
Textura Timberline Integration Manual, V2.2
48
Textura, Confidential
I. Use Contacts
II. Quick Bill
Textura Timberline Integration Manual, V2.2
49
Textura, Confidential
B. Enter Cash Receipts using the Accounts Receivable
Application
Cash receipts are entered the same way you entered them for previous jobs and projects. There are no
differences between entering cash for Textura jobs and entering cash for jobs prior to Textura.
1.
From the AR main menu, click Tasks, Enter Cash Receipts, and select Contract/Job view.
2.
Enter deposit information and click OK.
3.
Type the Customer, check number, and Amount in the grid and select the correct invoice for payment
in the open item grid.
4.
Click OK and continue entering any additional checks in the deposit batch.
5.
Click Finish.
6.
Click Start.
Textura Timberline Integration Manual, V2.2
50
Textura, Confidential
C.Billing Retainage Using the Accounts Receivable Application
Bill Retainage the same way that you would with any previous Timberline job.
1.
From AR main menu, click Tasks, and select Bill Retainage.
2.
Type the billing information and click Bill.
3.
Click Finish.
4.
Click Start.
Textura Timberline Integration Manual, V2.2
51
Textura, Confidential
D. Recording Invoices (Draws) using the Job Cost Application
If this data folder is not using the Accounts Receivable application then entering invoices (draws), cash receipts,
and billing retainage will be done the same as jobs done prior to Textura. There is no change to the data entry
process.
From the JC main menu, click Tasks, Enter Billings or Enter Cash Receipts.
I. Enter Billings
II. Enter Cash Receipts
Textura Timberline Integration Manual, V2.2
52
Textura, Confidential
9. Recording Subcontractor/Vendor Payouts in
Timberline
Introduction
The following is a guideline for recording the payment of invoices paid via ACH (managed by Textura) and for
cutting actual checks in Timberline for “Joint Vendor Checks” and “Manual Checks.”
Note: If applicable, you can use your existing method for selecting invoices for payment.
The Textura ACH Release report will contain two types of information:
•
Invoices managed through Textura and require the Timberline user to record them as paid in
Timberline.
•
Invoices not paid through Textura that require an actual check printed from Timberline. Invoices not
paid through Textura are the exception and they include “Joint Vendor Checks” (where the
subcontractor’s subcontractor is not in the Textura system) and Textura “Manual Checks”
(vendors/subcontractors not being paid through Textura ACH release.)
A. Print the Textura ACH Release report
This report will list any Joint Check Vendors, Manual Checks, Retainage invoices paid, and the total of ACH
dollars released. This report is available after funds have been disbursed in Textura
•
A Joint Vendor is a subcontractor to the main subcontractor.
•
The General Contractor directly pays the Joint Vendor as part of the main subcontractor’s
committed dollars rather than the main subcontractor paying the Joint Vendor.
•
Normally in Timberline, the subcontractor’s name is added as a joint payee to the invoice record or
invoice distribution record when selecting invoices for payment.
•
Both names of the main subcontractor and their subcontractor will print on the Timberline check
with the main subcontractor’s address. If you want both names to print on the check with the main
Joint Vendor address, follow your normal procedures for joint vendor checks. If you prefer to print
only the subcontractor (and not the main subcontractor) on the check, follow the procedure in this
manual for “Paying Joint Vendor Checks from the ACH Release Notice.”
•
Manual Checks are subcontractor invoices that are not paid through Textura ACH payments. The
GC must pay these Manual Checks through an actual check run in Timberline.
•
Lien Waivers are processed through Textura. (For projects not using Textura, see your Timberline
documentation.)
Textura Timberline Integration Manual, V2.2
53
Textura, Confidential
To create the Reconciliation (ACH) Release Report Summary,
1.
From the Draw Home Page, click the Export Payments Report link under the Interfaces section.
2.
Click on the Generate Payment Report button
Textura Timberline Integration Manual, V2.2
54
Textura, Confidential
The system displays the Reconciliation (ACH Release) Report Summary.
The Invoices Paid Summary amount
displays the total invoice amount that
was disbursed via ACH in Textura.
Textura Timberline Integration Manual, V2.2
55
Textura LLC, Confidential
B. Pay Joint Check Vendors
If the ACH Release notice contains any Joint Vendors, pay them first. This is an actual check printed in
Timberline. After selecting the invoices to be paid with a joint check and entering the joint payee information, print
the checks using either special check stock or standard stock.
I. Select Invoices to Pay,
1.
From the AP main menu, click Tasks, Select Invoices to Pay, and select On-screen
list.
The system displays the Select Invoices to Pay – Selection Criteria dialog.
2.
Click Vendor for the Selection List Order.
3.
Click Conditions.
The system displays the Add a Condition dialog.
4.
Select the Job Field, Equal to Operator, type the job number Value, and click OK.
The system displays the Condition Selection dialog.
Textura Timberline Integration Manual, V2.2
56
Textura LLC, Confidential
5.
Click Add.
The system displays the Add Condition dialog.
6.
Select the AND radio button and select the Draw Field, Less or equal to Operator, type the draw
number Value, and click OK
This will include invoices entered for a previous draw, but not approved for payment in time for
the previous draw.
The system displays the Select Invoices to Pay – Selection Criteria dialog.
7.
Click Ranges and select the original vendors/subcontractors.
8.
Click Start.
9.
Verify that no other invoices are selected for payment by clicking Other, Show Totals, and then
OK.
If…
Then…
net to pay does not equal zero,
•
either pay the selected invoices first before running the joint
vendor check procedure, or
•
Click Other, Exclude all, and then OK to temporarily unselect
them.
•
This step is important in tying your Timberline totals to your
Textura ACH Release report.
Textura Timberline Integration Manual, V2.2
57
Textura LLC, Confidential
Using the custom check design,
avoid paying invoices that are not joint vendor checks during this
check run
10.
Highlight the first invoice of the original vendor/subcontractor to be paid as a joint check and click
Pay to pay in full or click Partial to make a partial payment.
11.
Type the partial payment amount in Pay now and click OK.
12.
Click Detail on.
13.
Click Move to Detail.
14
Scroll to the right and type the name of the Joint Vendor to the original subcontractor under Joint
Check.
15.
Under Payment memo (scroll to the left if necessary), type the address of the Joint Vendor
receiving the check.
If the subcontractor is also in the Timberline system, type the Timberline vendor number (the joint
check program will look up the address from the vendor record.)
If you leave the Payment memo field blank, then no address will print on the custom joint check.
16.
Repeat steps 10 – 15 for all joint checks.
17.
After all joint checks have been selected, click Other and Show Totals and compare the Net to
Pay with the Textura ACH Released report subtotal for joint checks.
18.
If the totals match, click OK, OK, and then Close.
If the totals do not match, compare the ACH Release report to vendor/invoices selected and
make any necessary corrections.
Textura Timberline Integration Manual, V2.2
58
Textura LLC, Confidential
19.
You may need to exit the select invoices program and print the Invoices Selected for Payment
Report. From the AP menu, click Reports, Invoice Registers, and select Invoices Selected for
Payment.
I. Print Checks
To print checks,
1.
From the AP main menu, click Tasks and select Print Checks.
2.
Type the main bank’s Bank Account.
3.
Type the Starting check number.
4.
Type the Check date.
5.
Select the Output for Checks.
6.
Click Printer Setup.
7.
Check Print to File.
8.
Click OK.
II. Print a Joint Check Custom Design
To print a Joint Check Custom Design,
1.
Load the check stock in the printer.
2.
Click Reports, Textura (menu), and select Print Joint Checks.
3.
Type the range of check numbers.
4.
Click Start.
Textura Timberline Integration Manual, V2.2
59
Textura LLC, Confidential
C. Paying Manual Checks
If the ACH Release notice contains any Textura Manual Checks, pay those next.
Note: These are payments to vendors who will not be receiving an ACH payment. Instead they must be paid with
an actual computer check printed from Timberline.
I. Select Invoices to Pay
To select invoices to pay,
1.
From the AP main menu, click Tasks, Select Invoices to Pay, and select On-screen list.
2.
Click Vendor for the Selection List Order.
3.
Click Conditions.
The system displays the Add a Condition dialog.
4.
Select the Job Field, Equal to Operator, type the job number Value, and click OK.
The system displays the Condition Selection dialog.
5.
Click Add.
The system displays the Add Condition dialog.
6.
Select the AND radio button and select the Draw Field, Less or equal to Operator, type the
current draw number Value, and click OK.
This will include invoices entered for a previous draw, but not approved for payment in time for
the previous draw.
The system displays the Select Invoices to Pay – Selection Criteria dialog.
7.
Click Ranges and select the manual check vendors/subcontractors.
8.
Click Start.
9.
Highlight the first invoice of the vendor/subcontractor to be paid as a Textura Manual check and
click Pay.
10.
Repeat for all Textura Manual checks.
11.
After all Textura Manual checks have been selected, click Other and Show Totals and compare
the Net to Pay with the Textura ACH Release report subtotal for Textura Manual checks.
12.
If the totals match, click OK, OK, and then Close. If the totals do not match compare the detail
report to vendor/invoices selected and make any necessary changes.
II. Print Checks
To print checks,
1.
Load the check stock in the printer.
2.
From the AP main menu, click Tasks and select Print Checks.
3.
Type the main bank’s Bank Account.
4.
Type the Starting check number.
Textura Timberline Integration Manual, V2.2
60
Textura LLC, Confidential
5.
Type the Check date.
6.
Click Start.
D. Recording Paid Retainage and Paid Invoices from the ACH
Release Notice
The invoices and retainage to be paid through Textura via ACH payments must be recorded as paid in
Timberline. This is done through a check run where the checks are sent to a print file or printed on blank paper.
Note: These are not real checks and should not be printed on check stock.
If the ACH Release Notice contains any retainage releases, select them first.
Retainage on regular checks can be paid on the same check run as payments for the net invoice, but must be
selected separately under Select Invoices for Payment.
I. Select Retainage Invoices
1.
From the AP main menu, click Tasks, Select Invoices to Pay, and select On-screen list.
The Select Invoices to Pay – Selection Criteria dialog is displayed.
2.
To select Retainage invoices to pay,
If this is
Then
an early release of retainage prior to the final bill for
1.
Click Vendor for the Selection List Order.
2.
Select the Retainage Invoices Only checkbox.
3.
Click Conditions.
The system displays the Add a Condition dialog.
4.
Select the Job Field, Equal to Operator, type the job number
Value, and click OK.
5.
The system displays the Condition Selection dialog.
6.
Click Add.
7.
The system displays the Add Condition dialog.
8.
Select the AND radio button and select the Draw Field, Less or
equal to Operator, type the draw number Value, and click OK
This will include invoices entered for a previous draw,
but not approved for payment in time for the previous draw.
The system displays the Select Invoices to Pay –
Selection Criteria dialog.
9.
Click Ranges and select the vendors
10. Click Start.
Textura Timberline Integration Manual, V2.2
61
Textura LLC, Confidential
If this is
Then
the final bill and you want to include all or most
11. Click Job for the Selection List Order and Retainage
Invoices Only checkbox.
retainage
12. Click Conditions.
13. The system displays the Add a Condition dialog.
14. Select the Draw Field, Less or equal to Operator, type the
current draw number, and click OK.
The system displays the Condition Selection dialog.
15. Click Add.
16. The system displays the Select Invoices to Pay – Selection
Criteria dialog.
17. Click Ranges and select the Job.
18. The system displays the Select Invoices to Pay – Selection
Criteria dialog.
19. Select the Automatically include invoices for payment
checkbox.
20. Click Start.
3.
Pay or unpay vendor/invoices as needed.
4.
Compare ACH Release Report totals.
5.
Click Other, Show Totals, and then OK.
6.
Verify that the Pay Now total matches the RETAINAGE RELEASE total from the Textura ACH
Release report. If it does not match, make necessary corrections and compare again.
II. Select Invoices to Pay
To select invoices to pay,
1.
From the AP main menu, click Tasks, Select Invoices to Pay, and select On-screen list.
2.
Click Job for the Selection List Order.
3.
Click Conditions.
The system displays the Add a Condition dialog.
4.
Select the Draw Field, Less or equal to Operator, type the current draw number, and
click OK.
The system displays the Select Invoices to Pay – Selection Criteria dialog.
5.
Click Ranges and select the Job.
The system displays the Select Invoices to Pay – Selection Criteria dialog.
6.
Select the Automatically include invoices for payment checkbox.
7.
Click Start.
8.
Pay or unpay vendor/invoices as needed.
9.
Compare ACH Release Report totals.
10.
Click Other, Show Totals, and then OK.
Textura Timberline Integration Manual, V2.2
62
Textura LLC, Confidential
11.
Verify that the Pay Now total matches the combined total of Invoices and Released Retainage
from the Textura ACH Release Report. If it does not match, print the Timberline Invoices Selected
for Payment Report if necessary, make changes and compare again.
III. Print Checks
To perform a Mock Check run and record the payment to be made via ACH,
1.
From the AP main menu, click Tasks and select Print Checks.
2.
Select ACH Bank (if using a separate bank for ACH transactions, otherwise select appropriate
bank account), Starting check number, and Check date.
3.
If you are sending checks to a print file, click Printer Setup and check Send to Print File.
Note: If you are not sending the checks to a print file, make sure that you print them on plain paper, not check
stock.
4.
Click Start.
Textura Timberline Integration Manual, V2.2
63
Textura LLC, Confidential
Appendix A:Textura – Timberline Initial Interface
Setup
Introduction
Before using Textura with Timberline, there are initial setup procedures and considerations. These include
verifying or changing settings previously selected in Timberline. Settings that affect the overall setup of Timberline
are called global settings. Settings that affect particular application (AP, CM, JC, etc.) functions are called
application settings. This section will explain how these settings control the outcome of the interface and where
appropriate, will make recommendations for ease of processing.
A. Global Settings
Global Settings include Accounting Methods, Batch Name, File Locations, and Custom Descriptions. Accounting
Methods and Batch Name settings determine some of the screens that will be visible during import invoices and
the entries that will be made in General Ledger. File locations determine where various files are stored and if
there will be multiple files of the same type. Custom descriptions allow you to change some of the Timberline
default descriptions and attributes of standard fields. This manual uses Timberline standard descriptions. If you
have customized any of your descriptions, you may need to refer back to the Timberline Field Type for
clarification.
Note: If Timberline operator security is being used, it is important to log on to Timberline as a user with the
security status of unlimited (privileged operator) when performing the initial set up. If any of the menu
paths are grayed out or not visible, then the operator probably lacks the security to perform the task or
function.
Textura Timberline Integration Manual, V2.2
64
Textura LLC, Confidential
I. General
Accounting Methods
The accounting method selected in Timberline determines the general ledger entries created when you import
invoices into Timberline from Textura. During the import, Timberline creates the same cash and/or accrual entries
that it would have created had the invoice been entered through AP, Tasks, and Enter Invoices.
To verify the accounting method,
1.
2.
From any main menu click File, Data Folder Settings, and then select General.
•
Accounting Method
•
Accrual (default)
•
Cash, or
•
Both
Click OK.
Accrual Method
Under the Accrual Method, the import and post invoice process creates the General Ledger entries debiting the
“expense/work in process account” based on the retrieval hierarchy and crediting the AP/Retainage accounts.
Recording paid invoices or printing checks creates the debit entry to the AP/Retainage accounts and the credit
entry to the Cash Account.
Cash Method
Under the Cash Method, recording paid invoices or printing checks creates the General Ledger debit for the
“expense/work in progress account” and the credit for the Cash Account. The system does not create General
Ledger entries during import invoices.
To view the AP/Retainage Accounts, from the AP main menu, click File, Data Folder Settings, AP Settings, and
select GL Entries.
To view the Cash Account, from the CM main menu, click Setup, Bank Accounts, and select the AP Bank
Account, GL Cash Account tab.
Textura Timberline Integration Manual, V2.2
65
Textura LLC, Confidential
Both
If Both is selected, Timberline creates and maintains two sets of entries, one for accrual and one for cash.
Note: It is not advisable to change the accounting method once processing in Timberline has begun. This is a
point of reference only.
Timberline GL Account Retrieval Hierarchy
GL expense/work in progress retrieval hierarchy
1st Retrieval Location
1. From the JC main menu, click File, Data Folder Settings, JC Settings, GL Entry, and select Cost Account
Retrieval Method.
Textura Timberline Integration Manual, V2.2
66
Textura LLC, Confidential
2nd Retrieval Location
2. From the AP main menu, click Setup, Vendors, Terms & Defaults, and select GL debit account.
Note: If you are not setting up expense/work in progress accounts in job cost, make sure that each
subcontractor/vendor has a default GL debit account set up in the Vendor record on the Terms and
Defaults tab. If an account number is not retrieved during import invoices, the invoice will be rejected. For
more information regarding the account retrieval hierarchy, see the Timberline documentation.
Assign Batch Name
To assign batch names, from any main menu click File, Data Folder Settings, and then select General.
If set to Manual, you will be prompted for Batch number, description, and date when you import invoices in AP.
Settings under Batch Control Totals do not affect prompts when importing invoices.
Note: It is recommended that if you assign batches manually, preface each batch number with “TEX” to quickly
and easily identify imports from Textura.
Textura Timberline Integration Manual, V2.2
67
Textura LLC, Confidential
II. Verifying field descriptions
Since you can change some field descriptions in Timberline, this manual uses the Timberline default descriptions.
If you changed any of these standard field names and need to identify the default description, select File, Data
Folder Settings, Custom Descriptions, and scroll through Timberline Field Types.
Note: The AP Invoice number is limited to 15 characters. If an invoice entered in Textura is greater than 15
characters, Textura will truncate and export the last 15 characters.
III. Custom Fields
1. From any main menu, click File, Data Folder Settings, and select Custom Fields.
2. Custom fields set up in Timberline will not affect Textura. Textura does not use Timberline custom fields.
B. Application Settings
I. AP Settings
To assign AP Settings, from the AP main menu, click File, Data Folder Settings, AP Settings, and then
select Check Settings.
Bank Account Use Method
1.
On the AP Settings – Check Settings dialog, click Operator specifies for the entire check run.
Textura Timberline Integration Manual, V2.2
68
Textura LLC, Confidential
Note: Use this option if vendors will be paid through a title company for some jobs and user wishes to keep title
company payments in a separate bank account in CM (Cash Management)
Note: Use this option if user is paying from their bank account and they would like to keep ACH payments in a
separate bank account from the actual checks.
Under this option, a bank is not assigned at the invoice distribution level; therefore, select the bank when
you print checks.
Note: If you use MICR; do not click Operator specifies for the entire check run.
2.
If using MICR, on the AP Settings – Check Settings dialog, click System automatically assigns per
distribution.
Under this option,
•
The bank is assigned to the invoice distribution when the invoice is entered manually in Timberline
(Tasks, Enter Invoices) or when invoices are imported from Textura.
•
Timberline looks up the bank account
•
From the Job record (from the JC main menu, click Setup, Jobs, AP and GL tab, and then select the
AP Bank),
3. If using prefixes from the GL prefix level (from the GL main menu, click Setup, Prefix/Base, ”prefix name,” and
then click Fiscal Settings, AP Bank),
Textura Timberline Integration Manual, V2.2
69
Textura LLC, Confidential
•
From the AP default bank (from the AP main menu, click File, Data Folder Settings, AP Settings,
and then click Check Settings, Default bank account).
•
When you print checks, only invoices assigned to the Bank Account selected on the Print ChecksPrint Selection window will be paid.
4. If you use MICR and want separate bank accounts for ACH payments, perform either of the following
options:
•
Method one: Change the bank account in the job record:
Before importing invoices from Textura, change it to ACH bank.
After importing invoices from Textura, change it back to Check Bank.
•
Method two: Change the bank account use method:
Prior to recording ACH payments, change it to Operator specifies for entire check run.
After recording the ACH payments, change it back to System automatically assigns per distribution.
Textura Timberline Integration Manual, V2.2
70
Textura LLC, Confidential
Lien Waiver Accumulation Method
All Lien Waivers for Textura projects can be printed through Textura. To print Timberline Lien Waivers for non
Textura projects, see your Timberline documentation.
Invoice Selection Order
1.
From the AP main menu, click File, Data Folder Settings, AP Settings, Orders, and then select Invoice
Selection.
2.
Select Job from either of the two drop-down lists (preferably the first). This will make it easier to select
invoices when you record ACH payments.
Textura Timberline Integration Manual, V2.2
71
Textura LLC, Confidential
II. CM Settings
ACH Bank Account Setup (Optional)
If using a separate bank account for ACH payments, set up an additional bank account in CM.
1. From the CM main menu, click Setup, Setup Assistant, Setup Bank Accounts, and then select the
Bank Account and click
(the asterisk button).
Textura Timberline Integration Manual, V2.2
72
Textura LLC, Confidential
2.
3.
At a minimum, perform the following:
•
select the AP Check Format (General tab),
•
type the General Cash Account number (GL Cash Accounts tab), and
•
Check Accounts Payable (GL Cash Accounts tab).
Continue with step 4 “Select Bank Account” through step 7 “Go Live.”
Textura Timberline Integration Manual, V2.2
73
Textura LLC, Confidential
III. AR/JC Settings
Using Accounts Receivable
If you are using the Timberline Accounts Receivable application for this data folder, you must assign a default
Billing Method. You can select the same method for all jobs or select a different method for each job when
creating the job. The entry level determines how much detail will be entered for “Quick Bill” jobs. You can enter
invoices as a summary to the overall job or enter invoices at a cost code level.
Verify Billing Settings
To view your default settings for Entry level and Billing Method,
1.
From the JC main menu, click File, Data Folder Settings, JC Settings, and then click Billing.
The system displays the Default Billing Settings dialog.
Note: Once you save a job, you cannot easily change the default Billing Method or the default Entry level. See
Timberline Documentation for more information.
Textura Timberline Integration Manual, V2.2
74
Textura LLC, Confidential
Verify Billing Method
To view the billing method of a job,
•
1. On the JC main menu click Setup and select Jobs.
The system displays the Job Setup dialog.
•
2. Type the Job number.
•
3. Click Save and click the Billing Info tab.
Note: The billing method is selected when the job is first set up and is not easily changed. For more information
click Help, Help Topics, Index, Billing Method, “changing the billing method.”
Textura Timberline Integration Manual, V2.2
75
Textura LLC, Confidential
Select the Billing Method:
If you…
select Use Contracts,
Then…
The contract and at least one contract item must be set up in the
ne Contract Application and linked to the job.
1. From the Contract main menu, click File and select New
Contract.
2. Select Active and type the new contract number.
select Use Quick Bill,
are entering only the total amount of the
The draw information is entered in Accounts Receivable using the Job
and depending on the Entry level, cost code, rather than the Contract and
Item.
Either method will work.
completed in Textura,
Note: If you are entering line item detail, see your Timberline documentation for more information.
Textura Timberline Integration Manual, V2.2
76
Textura LLC, Confidential
Using Job Cost to enter Receivables
If you are using the Job Cost application to record draws and cash receipts, then the defaults selected on the
Billing tab apply to all jobs. You cannot change the selections once you save a job. When entering draws and
cash receipts, you must enter the job information. Contract and contract item information are not available.
To view your default settings for Entry level and Billing Method, from the JC main menu, click File, Data Folder
Settings, JC Settings, and then click Billing.
Using Textura will not change your billing workflow. Enter draws, cash receipts, and hold/bill retainage the same
as you would any other accounts receivable item in Job Cost.
Note: From the JC main menu, click Tasks, Enter billing or Enter Cash Receipts. If you are using the Timberline
Accounts Receivable application, these menu items will not be visible.
Textura Timberline Integration Manual, V2.2
77
Textura LLC, Confidential
IV. Timberline Operator Security
If Timberline operator security is being used and the operators (or groups) who will be performing the exports and
imports do not have security status of unlimited (privileged operator), then add the exports and imports to their
permission list.
1.
From the AP menu, click Tools, Security, and the select Tasks (operators/groups).
The system displays the Task Security (Operators/Groups) dialog.
2.
Select the Operator ID and click Set Permissions or click Groups.
The system displays the Set Security permissions dialog.
Textura Timberline Integration Manual, V2.2
78
Textura LLC, Confidential
1. If the Operator (or Group) will be importing invoices from Textura, select Import Invoices from the Tools
section.
If the Operator (or Group will
Then from the…
Select…
importing invoices from Textura
Tools section
Import Invoices.
exporting invoices from Timberline
Reports section
Export Commitments
Export JC Change Orders
Export PJ Change Orders
Export Prime Contract JC CO
Export Prime PJ Change Orders
Export Legal Documents
Joint Check Form
Verify JC cost Account
Verify Vendor Default Acct
4.
Click Exit.
The system displays the Task Security (Operators/Groups) dialog again.
5.
Modify permissions for all operators/groups that will be needing access and then click Exit.
Textura Timberline Integration Manual, V2.2
79
Textura LLC, Confidential
Index
Accounting Methods, 65
Accrual Method, 65
Cash Method, 65
Accounting Package, 19
Edit Organization, 19
Setting up, 19
ACH Bank Account Setup, 72
AP Invoice Ask Name settings
Imports, 12
Printouts, 11
Reports, 12
AP Settings
Bank Account Use Method, 68
Invoice Selection Order, 71
Lien Waiver Accumulation Method, 71
Application Settings, 68
AR/JC Settings, 74
CM Settings, 72
Custom Reports to Report Menus, 12
AR/JC Settings, 74
Billing Method, 75
Billing Settings, 74
Job Cost to enter Receivables, 77
Using Accounts Receivable, 74
Assign Batch Name, 67
Bank Account Use Method, 68
Billing Method, 75
Billing Retainage, 51
Billing Settings, 74
Cash Receipts, 50
Change Orders, 22, 32
CM Settings, 72
ACH Bank Account Setup, 72
Commitments, 21
Export, 21
Import, 25
Copying custom reports, 9
Create folders for importing and exporting
data, 9
Custom Fields, 68
Custom Reports to Report Menus, 12
Edit Organization, 19
Enter Cash Receipts, 50
Export and Import Legal Documents and
Requirements, 37
Export Commitment/Subcontract Change
Orders
Timberline default, 22
Timberline Version 9.1 or less, 22
Timberline Version 9.2 or greater, 22
Export Commitments, 21
Export invoices, 42
Export Payments Report, 42
Reconciliation (ACH Release) Report
Summary, 42
Export JC change orders, 22
Export JC Change Orders, 23
Export Legal Documents and Requirements,
37
Export Owner/Prime Contract Change
Orders from Timberline, 32
Export Payments Report link, 54
Export PJ change orders, 22
Export PJ Change Orders, 24
File Locations, 9
Copying custom reports, 9
Create folders for importing and exporting
data, 9
Verifying current locations and editing import
locations, 9
GL expense/work in progress retrieval
hierarchy, 66
Global Settings, 64
Import Commitments, 21, 25
Import invoices, 44, 47
Import Legal Documents and Requirements,
38
Imports, 12
Initial Interface Setup, 9, 64
Invoice Selection Order, 71
Joint Check Vendors, 56
Legal Documents and Requirements, 37
Export, 37
Import, 38
Introduction, 37
Overview, 38
Lien Waiver Accumulation Method, 71
Textura Timberline Integration Manual, V2.2
80
Textura LLC, Confidential
Overivew
Insurance/Legal Documents, 8
Overview, 6
Accounts Payable, 8
Commitments/Subcontracts, 7
Textura-Timberline Workflow, 6
Owner Contract Change Orders, 22, 32
Owner/Prime Contract Change Orders, 22,
32
Export, 32
Import, 30, 33
Paying Manual Checks, 60
Prime Contract Change Orders, 22, 32
Print a Joint Check Custom Design, 59
Print the Textura ACH Release report, 53
Printouts, 11
Reconciliation (ACH Release) Report
Summary, 55
Recording Invoices (Draws), 48, 52
Recording Paid Retainage and Paid Invoices,
61
Recording subcontractor/vendor payouts, 53
Reports, 12
Selecting invoices to pay for any Joint Check
Vendors, 56
Subcontractor Invoices
Introduction, 42
Terminology, 5
Textura ACH Release report, 53
Textura Billing Process, 7
Textura-Timberline Workflow
Textura Billing Process, 7
Timberline GL Account Retrieval Hierarchy,
66
Timberline Operator Security, 78
Timberline, version 9.1 or less, 22
Export JC change orders, 22
Timberline, version 9.2 or greater, 22
Export JC change orders, 22
Export PJ change orders, 22
Using Accounts Receivable, 74
Using Job Cost to enter Receivables, 77
Verifying current locations and editing
import locations, 9
Verifying field descriptions, 68
Textura Timberline Integration Manual, V2.2
81
Textura LLC, Confidential