1
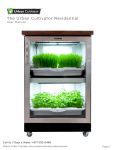
The U rban Cultivator Residential
Use r M a n ual
Call Us 7 Days A Week
Watch Our Online Tutorials
Toll Free 1.877.352.0490
www.urbancultivator.net/videomanual
Page 1
Please read the information inside this Instruction Booklet carefully and keep it
as a reference manual.
These symbols are used to highlight important information:
Warnings!
Information and best practices.
Environmental information.
If you are unclear about any aspect of information within please contact Urban Cultivator using [email protected] or telephone our toll free number +1 877 352 0490 available
seven days a week.
Call Us 7 Days A Week
Watch Our Online Tutorials
Toll Free 1.877.352.0490
www.urbancultivator.net/videomanual
Page 2
Safety Precautions . . . . . . . . . . . . . . . . . . . . . . . . . . . . . . . . . . . . . . . . 4
Child Safety . . . . . . . . . . . . . . . . . . . . . . . . . . . . . . . . . . . . . . . . . . . . . . . . . . . . . . 4
Safety Precautions In Daily Use . . . . . . . . . . . . . . . . . . . . . . . . . . . . . . . . . . . . .
4
Disposal . . . . . . . . . . . . . . . . . . . . . . . . . . . . . . . . . .. . . . . . . . . . . . . . . . . . . . . . . . 5
Installation Instructions . . . . . . . . . . . . . . . . . . . . . . . . . . . . . . . . . . . .6
Your Environment . . . . . . . . . . . . . . . . . . . . . . . . . . . . . . . . . . . . . . . . . . . . . . . . . 6
Built In . . . . . . . . . . . . . . . . . . . . . . . . . . . . . . . . . . . . . . . . . . . . . . . . . . . . . . . . . . . 6
City Hook-Up Option . . . . . . . . . . . . . . . . . . . . . . . . . . . . . . . . . . . . . . . . . . . . . .
6
Stand Alone Option . . . . . . . . . . . . . . . . . . . . . . . . . . . . . . . . . . . . . . . . . . . . . . .
7
Installing The Lights And Glass Panels . . . . . . . . . . . . . . . . . . . . . . . . . . . . . . . 7
Electrical Connection . . . . . . . . . . . . . . . . . . . . . . . . . . . . . . . . . . . . . . . . . . . . . . 8
Unpacking . . . . . . . . . . . . . . . . . . . . . . . . . . . . . . . . . . . . . . . . . . . . . . . .9
Hardware & Accessories . . . . . . . . . . . . . . . . . . . . . . . . . . . . . . . . . . . . . . . . . . . .
9
Describing Your Urban Cultivator Residential . . . . . . . . . . . . . . . . .10
How Does The Urban Cultivator Residential Work . . . . . . . . . . . . . . . . . . . . . 10
The Grow Trays . . . . . . . . . . . . . . . . . . . . . . . . . . . . . . . . . . . . . . . . . . . . . . . . . . .
11
The Removable Lighting Shelf . . . . . . . . . . . . . . . . . . . . . . . . . . . . . . . . . . . . . . 12
The Control Panel . . . . . . . . . . . . . . . . . . . . . . . . . . . . . . . . . . . . . . . . . . . . . . . . . 13
Your First Grow . . . . . . . . . . . . . . . . . . . . . . . . . . . . . . . . . . . . . . . . . . 14
Setting Up Your Growing Preferences . . . . . . . . . . . . . . . . . . . . . . . . . . . . . . . 14
Planting Your First Herbs And Microgreens . . . . . . . . . . . . . . . . . . . . . . . . . . 15
Mixing Nutrients . . . . . . . . . . . . . . . . . . . . . . . . . . . . . . . . . . . . . . . . . . . . . . . . . . 15
Nutrient Feeding Table . . . . . . . . . . . . . . . . . . . . . . . . . . . . . . . . . . . . . . . . . . . .
16
Top Ten Growing Tips . . . . . . . . . . . . . . . . . . . . . . . . . . . . . . . . . . . . . . . . . . . . .
17
Planting, Growing & Cultivation Table . . . . . . . . . . . . . . . . . . . . . . . . . . . . . . .
18
Maintenance . . . . . . . . . . . . . . . . . . . . . . . . . . . . . . . . . . . . . . . . . . . . . 19
Cleaning The Grow Trays . . . . . . . . . . . . . . . . . . . . . . . . . . . . . . . . . . . . . . . . . . 19
Cleaning The Reservoir In Stand Alone Mode . . . . . . . . . . . . . . . . . . . . . . . . 19
Cleaning The Pipes In Stand Alone Mode . . . . . . . . . . . . . . . . . . . . . . . . . . . .
19
Cleaning The Reservoir In City Hook Up Mode . . . . . . . . . . . . . . . . . . . . . . . 20
Cleaning The Pipes In City Hook Up Mode . . . . . . . . . . . . . . . . . . . . . . . . . . . 20
Cleaning The Counter Top . . . . . . . . . . . . . . . . . . . . . . . . . . . . . . . . . . . . . . . . . 20
Replacing The Grow Lights . . . . . . . . . . . . . . . . . . . . . . . . . . . . . . . . . . . . . . . . 21
Technical Specifications . . . . . . . . . . . . . . . . . . . . . . . . . . . . . . . . . . . .22
External Dimensions . . . . . . . . . . . . . . . . . . . . . . . . . . . . . . . . . . . . . . . . . . . . . . 22
Process & Instrumentation Diagram . . . . . . . . . . . . . . . . . . . . . . . . . . . . . . . .
23
Service And Spare Parts . . . . . . . . . . . . . . . . . . . . . . . . . . . . . . . . . . . 24
Customer Care . . . . . . . . . . . . . . . . . . . . . . . . . . . . . . . . . . . . . . . . . . .
24
Standard Guarantee Conditions . . . . . . . . . . . . . . . . . . . . . . . . . . . . 24
Call Us 7 Days A Week
Watch Our Online Tutorials
Toll Free 1.877.352.0490
www.urbancultivator.net/videomanual
Page 3
Safety Precautions
Urban Cultivator cares about your plants and safety. We want you to be familiar with the following safety
instructions.
It is important that this instruction manual remain with the Urban Cultivator Residential appliance so that
new owners can also learn about the product and relevant safety precautions.
You must carefully read through this instruction manual before installing and using the Urban Cultivator
Residential.
If you are unclear about any aspect of information within please contact Urban Cultivator using support@
urbancultivator.net or telephone our toll free number +1 877 352 0490 available seven days a week.
Child Safety
• This appliance is designed to be operated by adults.
• Keep all packaging materials away from children and please dispose of them in a responsible manner.
• The water from your Urban Cultivator Residential is not for drinking. Biological residues may still be
present and could be harmful.
• Keep your Seeds, Nutrients and Growing Mediums in a safe, dry storage area that is well away from
children.
The Cultivator’s Control Panel has a Child Safety Lock. Refer to the Control Panel Table for
more information.
Safety Precautions In Daily Use
Contaminated items and/ or garbage must not be present in the Urban Cultivator Residential.
• Always keep the door closed.
• Do not remove the grow trays or lighting shelf when the machine is watering or providing light. Refer
to the Control Panel (Page 13) table for instructions on controlling the watering & lighting schedules.
• Only use products that have been designed to be used with the Urban Cultivator Residential.
• Ensure that the Urban Cultivator Residential door is always closed to avoid injury when not removing
or replacing the Grow Trays and Light Shelf inside.
• Do not sit or stand on the open door.
• Always unplug the power cord from the outlet and disconnect the water mains when not in use.
• The Urban Cultivator Residential must be serviced by a licensed professional.
• Only use genuine spare parts from Urban Cultivator or that have been CSA and or UA approved.
Using unauthorized components void your warranty.
• Any attempts to fix the Urban Cultivator Residential without an authorised professional can be
dangerous.
Call Us 7 Days A Week
Watch Our Online Tutorials
Toll Free 1.877.352.0490
www.urbancultivator.net/videomanual
Page 4
Whenever you take a Grow Tray out be careful of standing water. It can take up to ten
minutes for the Grow Tray to drain after a watering cycle.
Please secure the Cultivator to the building structure using the strap and fixing provided. See
below.
Affix Straps To Top Body Screws
Attach To Wall
Disposal
•
•
•
•
Dispose of all packaging material correctly.
All packaging can be recycled.
Cardboard material is made from recycled paper and should be recycled.
Should you cease to use your Urban Cultivator Residential please understand that many of its components can be recycled.
• You must take this unit to a recycling centre for disposal.
Call Us 7 Days A Week
Watch Our Online Tutorials
Toll Free 1.877.352.0490
www.urbancultivator.net/videomanual
Page 5
Up
Unpacking
Carefully open the product packaging and gently remove the Urban Cultivator Residential. We recommend
two people to remove the unit.
Hardware & Accessories
Please check that all the components for your Urban Cultivator Residential are accounted for and that
none have been damaged in shipping. Please refer to the Checklist provided.
Com p o ne nt Na me s
Fragil e Co m po nents
1. Counter Top
2 . Do o r
3 . H u m i di ty Do m e s ( x 4 )
4. Top & Bottom Grow Tray &
G r o w F l a t s (x 4 )
5 . C o n s u m a bl e s ( o p t i o n a l s e e d s ,
s o i l , n u t r i e n t s , st i c k y s t r i p s)
6 . R e m o v a bl e L i g h t S h e l f
7 . R e s er v o i r Acc e ss
8 . F r o n t Gr i l l
9 . Saf et y L a t c h e s ( x 4 )
1 0 . C o n tr o l Pa n e l
1 1 . Saf et y Wa l l S t r a p s
Grow L i ghts ( x8) ( x4 sp a re)
Gl a ss Pa nel & Thumb S crews ( 2)
R efer to I ns talling The Lights And Glas s
Panels s ec tion.
1
2
10
9
For C i t y Wa t e r H o o k U p s
Braided City Hose & City Drain Hose
For Sta n d Al o n e
O p ti o n a l Dr ai n H o s e W i t h V a l v e &
M ou n t i n g C l i pt
6
5
7
8
3
11
T
4
B
Check the Urban Cultivator Residential for any shipping damage. Never connect or start growing
with a damaged machine. Please contact us on our toll free number +1 877 352 0490 or e mail
[email protected] if your Urban Cultivator Residential is damaged.
Call Us 7 Days A Week
Watch Our Online Tutorials
Toll Free 1.877.352.0490
www.urbancultivator.net/videomanual
Page 6
Installation Instructions
All plumbing work required to install the Urban Cultivator Residential should be done by a certified
professional (applicable for City Water Hook Up only).
Remove all the product packaging before positioning the Urban Cultivator Residential. The City Hook
Up version needs to be five feet from the city water connection and the drain pipe should be no higher
than two feet from ground level. Both versions, the City Hook Up and Stand Alone need a 120V power
outlet to plug into.
Your Environment
The Urban Cultivator Residential has been designed to work inside your home. Ideally the ambient room
temperature should be 55 to 90 degrees Fahrenheit (13 to 32 degrees Celsius), and relative humidity
between 30% to 60%.
Built In
The Urban Cultivator Residential has been designed to fit under a North American kitchen counter top
or work surface as a single cupboard unit. It can slide between other cupboards and only requires one
opening at the front. No vent openings are required however you need to allow the water fill and drain
hose as well as the power supply cable to pass through from the rear of the unit. Ensure that your Urban
Cultivator Residential is levelled. Refer to the External Dimensions diagram towards the back of the
manual.
The Urban Cultivator Residential is available with lockable castor wheels or adjustable feet
so you can adjust its height.
City Hook-Up Option
The Urban Cultivator Residential should be connected to cold water from your city mains supply located
within five feet from the Cultivator. The unit also needs to be connected to your city drain that should be
no higher than two feet from ground level.
The water inlet hose is located at the rear of the unit and comes with a 3/8 inch hose connection.
Connect the valve from your Urban Cultivator Residential to your city water line which should supply
a water pressure of around 90psi for the Urban Cultivator Residential to be able to fill and drain its
Reservoir effectively.
Pipes which have not been in regular use should be cleaned with running water before
connecting the Urban Cultivator Residential.
Call Us 7 Days A Week
Watch Our Online Tutorials
Toll Free 1.877.352.0490
www.urbancultivator.net/videomanual
Page 7
Make sure that the water inlet hose is not twisted, crushed, entangled or leaking in any way. Do
not use connection hoses that have been used previously by other appliances.
The water intake connection is equipped with a safety mechanism that prevents any water
from entering the drinking water supply.
Stand Alone Option
If you’ve set up your Cultivator as a stand alone island, you will have to re-fill and drain it manually
whenever the
button turns on. Use the Drain Hose to drain the water out of the reservoir and the
Mounting Clip to help locate the drain hose into a bucket or sink. Use a pot or small bucket to re-fill the
Reservoir which has a 10 litre capacity.
Installing The Lights And Glass Panels
The twelve Grow Lights and two protective Glass Panels are fragile and have been packed separately
to ensure that they don’t get damaged in transport. You need to locate four Grow Lights each into their
holders at the top of the unit and the Removable Light Shelf. Align either end of the Grow Lights to their
holders and gently twist the Grow Light to lock it in position. Once these have been locked in place take
the Glass Panel and use the provided thumb screw to lock the Glass in place. The thumb screw is located
right in the middle of the Glass Panel. Please refer to the diagram overleaf for more information (refer to
diagram on next page).
Your Urban Cultivator Residential comes with twelve Grow Lights four of which are spare
bulbs.
Call Us 7 Days A Week
Watch Our Online Tutorials
Toll Free 1.877.352.0490
www.urbancultivator.net/videomanual
Page 8
Urban Cultivator Residential
Component Names
1. Thumb Screw
2. Twist & Pull To Release
Turn clockwise to tighten and anticlockwise to loosen and release
the glass light cover.
Turn bulb clockwise or anticlockwise a 1/4 turn to release or
lock in the grow light.
Electrical Connection
The Urban Cultivator Residential must be grounded (earthed). Urban Cultivator does not accept any
responsibilty should this safety measure not be followed.
Electricity can be dangerous and an unsafe plug inserted into a power socket could result in a
serious safety hazard. Do not connect the Urban Cultivator Residential via an extension cable.
Ensure that the plug is still accessible after the Urban Cultivator Residential has been installed.
If you need to replace the electrical cable call us toll free on +1 877 352 0490 or e mail
[email protected].
Call Us 7 Days A Week
Watch Our Online Tutorials
Toll Free 1.877.352.0490
www.urbancultivator.net/videomanual
Page 9
Describing Your Urban Cultivator Residential
How Does The Urban Cultivator Residential Work
The Urban Cultivator Residential provides a self-contained growing environment for herbs and greens.
Lights imitate the sun’s rays and an irrigation system delivers water and/ or nutrients from the reservoir
to the plants. The automated system provides everything for the plants at the correct times and measures
to ensure your herbs and greens will sprout and continue to grow all year round.
Co m p o n en t Nam es
1. Water In, Out and Electricity Co n n e c tions
2. Reservoir Sends & Rec e i v e s
Water To & From Each G r ow Tr a y
3. Plants Use Their Roots To Grow I n T h e
Grow Tray’s
4. Lights Shine Down On Ea c h
Grow Level
5. Air Chambers Keep Temperatu re s At
Ambient Room Temperature
4
3
4
2
5
1
If you’ve connected your Cultivator to the city plumbing it will automatically re-fill and drain
the water once per week. If you’ve set up your Cultivator as a stand alone island, you will have
to re-fill and drain it manually whenever the
button turns on (once per week).
Call Us 7 Days A Week
Watch Our Online Tutorials
Toll Free 1.877.352.0490
www.urbancultivator.net/videomanual
Page 10
The Grow Trays
Your Urban Cultivator Residential comes with two growing levels referred to as the Top and Bottom
Grow Trays. Both tray levels are removable to provide easy access for cultivating crops, cleaning and
maintenance. Be careful when removing the trays as they may be heavy and unevenly balanced. We recommend putting them on your kitchen counter with the back of the tray towards the sink where they
can be safely and easily accessed when you are working with your plants.
You can remove either one of the trays by unlocking the safety latches and gently pulling on the handle
to slide the trays out of the box.
To continue growing herbs and greens the trays must be returned into their original position. Ensure
that the top grow tray
is placed back into the top rails and the bottom grow tray
into the bottom rails. You can do this by sliding the uppermost edge of the grow tray in-between the tray guide
rails. Make sure that the tray handle is facing towards you so that the coupler valves at the rear align
themselves correctly. Finally make sure that you drop all the Safety Latches back into the lock position.
These are positioned left and right of the grow trays.
T
B
Please be careful when removing the trays as they could be unbalanced, heavy and may contain
residual water.
• If you remove a Grow Tray for more than two days turn off its Watering Schedule. Refer to the
Control Panel table.
• The Bottom Grow Tray receives water an hour after the Top Grow Tray. Both trays take about ten
minutes to drain.
• Filters located at the back of the Grow Trays catch sediment and should be rinsed out with clean
water every week.
• The Cultivator will continue to water according to the Watering Cycle. If the trays are removed when
watering, ensure that the plant receive the water that they have missed.
Call Us 7 Days A Week
Watch Our Online Tutorials
Toll Free 1.877.352.0490
www.urbancultivator.net/videomanual
Page 11
The Control Panel
The Control Panel enables you to control the Cultivator’s functions and allows the Cultivator to
communicate watering, humidity and nutrient data back to you. Below is an illustration and table describing
each function and their corresponding options.
S afet y Lo ck
Ho l d bo th butto ns to gether for 3 secon d to u n loc k th e Control Pa n el.
The Control Panel will lock after 60 seconds of inactivity.
L E D St at u s
I n d i cato r s
Ti m e
Temperature
Fac to r y d ef a u lt i s 8 a m
0 1 : 4 6 : 2 9 PM 6 5 ° F
2 4 /0 2 /2 0 1 1
Date
50%RH
R elative Humid it y
R es er vo i r Water Level
aut oscrolls
On / O ff
Tur ns th e K i tc h en Cu lti vator on a n d off.
L igh t in g C y c le s
1 2 ho u r s o n, 1 2 ho u r o ff.
M atc h a ligh tin g c yc le to a list o f he r bs ,
m ic r o- gr e e n s a n d le ttu c e s.
1 8 ho u r s o n 6 ho u r s o ff (Factory default. Starts 8am)
Al ways o n.
S e t D a t e & C lo c k
Set Temp C/F
Me n u H e a din gs
K ee p pr e ssin g th e me n u bu tton a nd
s cr oll th r ou gh a ll th e me n u op tions
A city water connection fully automates plant
watering and reservoir water levels.
S e t L ig h t s T im e
S e le c t w h a t t im e t o t u r n o n t h e lig h t s .
S e t W a t e r O n T im e
S e t R e c y c le R a t e
S e t Mo d e
Control how long to water your plants for.
Factory default is 4 minutes.
Control how often to drain & fill the reservoir.
Factory default is 7 days.
S e le c t b e t w e e n s t a n d a lo n e & c it y w a t e r s e t u p s .
Refer to Installation Instruction for details.
U r b a n C u lt iv a t o r
T h is d is p la y s y o u r p r o g r a m v e r s io n
S c ro l l i n g
S el ec t bet ween s ub -menus.
Confir m S elec tion
Fo r al l avail abl e o ptio ns, pres s enter to con fir m you r selec ti on .
To p Water i n g Cyc l e
Factory setting.
S el ec t w hen yo u wo ul d l ik e to water you r pla nts i n
t he to p grow tray.
A lw a y s o f f .
S el ec t w hen yo u wo ul d l ik e to water you r pla nts i n
t he bo tto m grow tray.
R ec ycle R eser voir
S el ec t w hen yo u want to drai n & fill you r reser voi r.
Thi s i s a 7 day co untdow n.
Ma n u a l C y c le im m e d ia t e ly w a t e r s y o u r p la n t s i n
a d d it io n t o y o u r s e le c t e d w a t e r in g c y c le .
B o t to m Water i n g Cyc l e
Ad d N u t r i ent s
O n c e in 2 , 3 o r 4 d a y s .
T w ic e p e r d a y .
Once per day.
D rai n R e s e r vo i r
Yes or No
The L ED l i g ht t u r ns o n o nce t he co u ntd ow n has e nd e d.
Yo u can s e t t he co u ntd aow n fo r a m ax i m u m o f 1 0 d ays.
Call Us 7 Days A Week
Watch Our Online Tutorials
Toll Free 1.877.352.0490
www.urbancultivator.net/videomanual
Page 12
Your First Grow
Setting Up Your Growing Preferences
Now that you’ve installed the Cultivator, understand how it works and are able to control it, you’ll want
to set up the Cultivator’s computer system using the Control Panel before Growing Herbs & Greens.
• Release the Safety Lock
• Press the Power button
and turn your Cultivator on.
• Press the Menu button
and scroll through each of the Menu Headings setting your preferences
as you go along (see previous page “Menu Headings”). Here’s an ordered list of these preferences:
The Cultivator waters when the lights come on.
The Bottom Grow Tray waters one hour after the Top Grow Tray.
Call Us 7 Days A Week
Watch Our Online Tutorials
Toll Free 1.877.352.0490
www.urbancultivator.net/videomanual
Page 13
Planting Your First Herbs And Microgreens
• Unlock the safety latches, remove both grow trays and place them on a table so it’s easier to work
with.
• Place green screen or tray filter on the bottom of tray before you put dirt in. this is to ensure that no
dirt gets into the reservoir causing any blockages.
• Mix approximately six parts soil to one part water until the lumps are gone.
• Fill the Grow Inserts 1/2 to 3/4 full and level the soil without patting it down.
• Sprinkle your seeds into the top layer of the soil with an even amount of space between the seeds.
Refer to the Planting, Growing And Cultivation table (Page 17) for detailed information.
• Slide the Grow Trays back into the Cultivator ensuring that all the Safety Latches have clicked into
place.
• Press the
button and run a Manual Watering Cycle. Press the
button and run a Manual
Watering Cycle.
• Place the Humidity Domes with the air vents closed for two days onto the Grow Trays.
• Use the Control Panel to customise settings however the Cultivator’s default Lighting Cycles and
Watering Schedules are appropriate for growing all the herbs and microgreens listed on our Planting,
Growing & Cultivation table (Page 17).
• Close the Cultivator’s door.
• After two days remove the Humidity Domes and wipe away the condensed water. If there is an
established growth open the Humidity Dome’s air vents and put them back onto the Grow Trays for
one more day before removing the Domes for the remainder of the plants growing life (This may vary
slightly between plant varieties but this is a good average).
You will be working with water and soil which can be messy so make sure your in an appropriate
location.
Use the Humidity Domes and their adjustable air vents for germinating seeds. The domes
increases temperature and humidity levels inside to help germinate the seeds.
Grow larger plants from the Bottom Grow Tray by removing the Light Shelf and Top Grow
Tray.
Mixing Nutrients
• Remove the Bottom Grow Tray to access the Reservoir.
• Add the correct amount of Nutrients into the Reservoir. Refer to the Nutrient Feeding Table for
more information.
• Insert the Lower Grow Tray back into position ensuring that all the safety latches have clicked into
place before closing the door.
• The Urban Cultivator Residential will automatically mix the nutrients and draw the water
along with the added nutrients from the Reservoir during its next scheduled water cycle.
•
Call Us 7 Days A Week
Watch Our Online Tutorials
Toll Free 1.877.352.0490
www.urbancultivator.net/videomanual
Page 14
Add your chosen Grow Nutrients into the Reservoir. Make sure to follow the directions on the
back of your chosen product. The Urban Cultivator Residential holds 10 litres of water inside
its Reservoir.
Add nutrients to fresh water only. In City Water Mode press the
button to drain and fill
your Reservoir with fresh water. In Stand Alone Mode use the supplied Drain Hose to drain the
Reservoir and manually fill it back up again
Only add nutrients after at least one week of seed germination.
Nutrient Feeding Table
Week 1
Do n ’ t add n u tri ents
Week 2
A d d 2 cc’s / ml ’s p er l i t re
40 cc ’s
Week 3 And Ongoing
Ad d 4 cc’ s / ml ’ s p er l i tre
80 cc’s
Call Us 7 Days A Week
Watch Our Online Tutorials
Toll Free 1.877.352.0490
www.urbancultivator.net/videomanual
Page 15
Top Ten Growing Tips
R o o m T em per a tur e And Humid ity
K ee p yo ur ro om temper ature between 55F - 90F (13C - 32C and hum idity lev els between 30% 60%.
K eep Ev ery th ing Cle a n
K ee p yo ur g rowing envir onment clean. Clean y our Res erv oir and Grow Tray s ev ery m onth and
r i nse o u t the fi lter inside the Reser voir and Grow Tray 's .
Do n ’ t Ov erwa te r
D o n't o verw ater especially at the beginning of the plants lif e as it m ay bring on m ould and
m i l d ew. W e have factory set the watering lev els f or once ev ery 4 day s but this will v ary d epending
on w ha t yo u r ambient temper ature and hum idity is . The goal is to hav e the plant want wa t er
be fo re yo u w ater but not to dry out
Hu m i dity D o me s He lp Ge r mina te Pla nt s
Use the H umidity Domes to incr ease tem perature and hum idity in the Grow Tray s when ger m inat ing se e d s. Keep the Domes on for the firs t two day s af ter the s eeds hav e been planted w it h t he
ai r ven ts cl o s ed.
Us e P ro per s oil or p a d s.
We hi g hl y re commend the soil brands Suns hine #4 or Prem iere HP. You can us e other m e dium s,
s u c h as o u r S ur e to Grow white pads or green s creens but we hav e f ound better res ults w it h so il.
Do n ’ t A dd T o o Muc h Nutr ie nts
Overfee d i ng can cause damage to the plants lis ted in our Planting, Growing & Cultiv ation T able.
Fo l l o w the N utr ient Feeding Table (P age 16). Mos t quick growing m icro greens (1-2 week s) do n't
r eq ui re an y nutr ients. only longer growing greens (herbs , arugula, etc) require nutrients and
s h o ul d o nl y be added after week 1 or 2 at the earlies t.
R es tart A fter Four te e n We e ks
M o st o f the herbs and micr ogr eens list ed in our Planting, Growing & Cultiv ation Table s ho uld be
r e- so wn an d r eplanted after a maximum of f ourteen weeks .
K eep pH L ev els B e tw e e n 5 - 7
Ba l a n c i n g yo ur pH level at 5 is smart as it will increas e throughout the week.
So w S eeds A Little He a vy And Thin Out Yo ung Pla nt s
P l uc k o u t yo ung plants to allow other s to grow and fill out. This is a great way to enjoy yo ur
Cul ti va to r E very Day
Us e H y dro g en Pe r oxid e
If yo u ac c i d entally keep your humidity dom es on too long or ov erwater and dev elop unwa nt ed
ba c te ri a, yo u can spr ay with Hydrogen Peroxide and water (30% HP – 1 Gal water). Only spr ay t he
s o i l a n d n o t the plants as this can caus e y our plants to rot in on them s elv es
L ov e Y o u r P l a nts
Ta ke ti me an d car e with your plants. Look at them , pick them up (f or weight. If its light, w at er ) .
Cal l U s T o l l Fr ee, S even Days A Week and check out www.urbancultiv ator.net/v ideom anuals
Call Us 7 Days A Week
Watch Our Online Tutorials
Toll Free 1.877.352.0490
www.urbancultivator.net/videomanual
Page 16
Planting, Growing & Cultivation Table
H e rbs & Microgreens
Amaranth
A rugula
Ba sil
B ean Tendrils
C hamomile
C hives
C hoi Sum
C ilantro
Dill
L emon Balm Seeds
Let tuces
M arjoram
Mint
M izuna
M ustard Greens
N asturtium
O r e gano
Pa c Choi
Pa rsley
Pe a Tendrils
R osemary
Sa ge
Sh iso
Shungiko
So rrel
Spearmint
Sp inach
T hyme
Tarragon
Tatsoi
Watercress
Wheatgrass
S eeds
C u l ti v a te
Ideal pH
1 8 to 1 1 6
1 8 to 1 1 6
1 8 to 1 1 6
2 -8
1 -6
10
1 -4
2 -1 0
1 -1 0
2 -8
2 -8
2 -1 0
2 -1 2
1 -5
2 -1 2
2 -8
1 -8
1 -6
2 -1 2
2 -1 2
2 -1 0
2 -1 0
1 -4
2 -1 2
2 -1 2
1 2 -8
1 -8
2 -1 0
2 -1 0
2 -1 2
2 -1 2
2 -1 2
1 -6
2 -1 0
1 -7
6
6.5
6.5
6.5
6.5
7
5.5
7.5
6
6.5
6.5
7
6.5
6
7
7
5.5
6.5
6.5
6.5
7
6
6
6
7
6.5
7
6.5
6.5
6.5
6.5
6.5
(Cups)
1 to 1 1 2
1 8 to 1 1 6
1 8 to 1 4
1 8 to 1 1 6
1 4 to 1 8
1 8 to 1 1 6
1 8 to 1 1 6
1 4 to 1 1 6
1 1 6 to 1 3 2
1 1 6 to 1 3 2
1 8 to 1 1 6
1 8 to 1 1 6
1 2 to
1
1 1 6 to 1 3 2
1 8 to 1 1 6
1 8 to 1 1 6
1 1 2 to 2
1 1 6 to 1 3 2
1 1 6 to 1 3 2
1 8 to 1 1 6
1 8 to 1 1 6
1 1 6 to 1 3 2
1 1 6 to 1 3 2
1 2 to 1 1 2
1 1 6 to 1 3 2
1 1 6 to 1 3 2
1 8 to 1 1 6
1 4 to 1 8
1 to 1 1 2
(We e k s )
T h e C u lt iva t o r’s
d e f a u lt L ig h t in g
C ycle a n d Wa t e rin g Sch e d u le a re
a p p ro p ria t e f o r
g ro w in g a ll t h e
h e rb s a n d micro g re e n s list e d
h e re .
As yo u b e c o me
mo re e xp e ri e n c e d
yo u ’ l l wa n t to b e g i n
c u sto mi si n g yo u r
g ro wi n g c o n d i ti o n s
u si n g th e Co n tro l
P a n e l to c o n tro l th e
Cu l ti va to r’s a u to ma te d fe a tu re s.
Fill the Grow I ns ert s half way t o t hre e -q u a rt e rs f u ll w it h
your chosen P lant ing Soil or Sure To G ro w Pa d s.
Water once every three days.
Keep lights o n f or eight een hours an d o ff f o r six.
The above is a recommendation only. Flats can be sown heavier or thinner.
You can sow heavy then thin out as the plants grow by plucking out patches allowing the other
greens to fill out.
Call Us 7 Days A Week
Watch Our Online Tutorials
Toll Free 1.877.352.0490
www.urbancultivator.net/videomanual
Page 17
Maintenance
Cleaning The Grow Trays
Clean your grow trays between each harvest however you should immediately clean mould or unwanted
organic matter.
Do not use any chemically damaging or unhealthy cleaning products such as bleach. Using
chemical cleaning products may be toxic and could potentially erode the Grow Trays. You can
use 30% Hydrogen Peroxide to clean the reservoir and water lines (5 tsp per gallon). Read all
warning labels on the Hydrogen Peroxide labels.
You should rinse out the filter at the rear of your Grow Trays on a weekly basis.
Cleaning The Reservoir In Stand Alone Mode
• Release the Safety Latches and remove the both Grow Tray’s.
• Press the
button and select Yes to drain the reservoir.
• Re-fill the Reservoir with clean water and add your preferred cleaning agent (please follow the
guidelines on the rear of the agent’s packaging. The Cultivator’s Reservoir holds 10 litres of water).
• Press the
button and select Yes to drain the reservoir.
If you wipe clean the Reservoir do not knock the pumps, mis-align the Pipes and in particular
the Pressure Sensor that detects the water level located at the top towards the front of the
Cultivator.
Cleaning The Pipes In Stand Alone Mode
• Fill your Reservoir with clean fresh water and add your preferred cleaning agent following the guidelines
on the rear of the agent’s packaging. The Cultivator’s Reservoir holds 10 litres of water.
• Insert the Grow Tray’s and lock all the Safety Latches.
• Run a Manual Cycle (watering) to the Top
and Bottom
Grow Tray’s.
• Press the
button and select Yes to drain the reservoir.
• Re-fill the Reservoir with clean water and drain one more time ensuring that there is no residual
cleaning product.
We recommend using a non-chlorine bleach purchased from a reputable environmentally
conscience company. Please follow the quantity guidelines on its packaging.
Call Us 7 Days A Week
Watch Our Online Tutorials
Toll Free 1.877.352.0490
www.urbancultivator.net/videomanual
Page 18
Draining the reservoir sends water down and out from the Drain Hose. Ensure that
drained water from the hose goes into an appropriate vessel such as a bucket. Water
from your Urban Cultivator Residential is not for drinking. Biological residues may still
be present and could be harmful.
Cleaning The Reservoir In City Hook Up Mode
• Press the
button and select Yes to drain the reservoir.
• Add your preferred cleaning agent following the guidelines on the rear of the agent’s packaging for 5
litres of water.
• Press the
button and select Yes to drain the reservoir.
If you wipe clean the Reservoir do not knock the pumps, mis-align the Pipes and in particular
the Pressure Sensor that detects the water level located at the top towards the front of the
Cultivator.
In City Water Mode the Cultivator will fill and drain your Reservoir with 5 litres of water
twice. This takes about 15 minutes.
Cleaning The Pipes In City Hook Up Mode
• Insert the Grow Tray’s and lock the Safety Latches.
• Add your preferred cleaning agent following the guidelines on the rear of the agent’s packaging for 5
litres of water.
• Run two Manual Cycle’s (watering) for the Top
• Press the
and Bottom
Grow Tray’s.
button and select Yes to drain the reservoir.
Cleaning The Counter Top
Use soapy water or commonly available kitchen counter top cleaners. Do not let moisture stand on the
surface.
This counter top is otherwise known as a “Butchers Block”. The finish is formulated to repel
most household solvents such as detergents and alcohol. Stains will normally be on the surface
of the finish and can be removed with finger nail polish remover or bleach.
Call Us 7 Days A Week
Watch Our Online Tutorials
Toll Free 1.877.352.0490
www.urbancultivator.net/videomanual
Page 19
Replacing The Grow Lights
•
•
•
•
•
Press the
button and turn off the Urban Cultivator Residential.
Unscrew the thumb screw whilst supporting the glass sheet with your free hand so that it doesn’t fall.
Gently twist the Grow Light a quarter turn and remove it from its holder.
Insert a new Grow Light.
Replace the glass window and ensure it is secured safely with the thumb screw.
Unplug the Urban Cultivator Residential from the main power supply.
Ensure that the light bulbs are cool before handling them with your hands.
Unplug the power chord for the Removable Light Shelf before changing the Lights.
Call Us 7 Days A Week
Watch Our Online Tutorials
Toll Free 1.877.352.0490
www.urbancultivator.net/videomanual
Page 20
Technical Specifications
External Dimensions
Call Us 7 Days A Week
Watch Our Online Tutorials
Toll Free 1.877.352.0490
www.urbancultivator.net/videomanual
Page 21
Process & Instrumentation Diagram
Call Us 7 Days A Week
Watch Our Online Tutorials
Toll Free 1.877.352.0490
www.urbancultivator.net/videomanual
Page 22
Service And Spare Parts
Please call our toll free number +1 877 352 0490 or e mail [email protected] if you think there
is a problem with you Urban Cultivator Residential.
Customer Care
In the event that your Urban Cultivator Residential requires service, or you wish to purchase plant supplies
and spare parts please call us toll free on +1 877 352 0490 or e mail [email protected].
Please provide the following information when you are calling to arrange for an engineer or return of
goods:
• Your name, address, zip number or postal code.
• Your contact telephone number and best time to be reached.
• Clear and concise details of the problem.
• The model and serial number of the appliance can be found on the back of the product and by scrolling
to the last
option.
• The purchase date and name of the sales representative who sold you the Urban Cultivator Residential.
Standard Guarantee Conditions
Urban Cultivator Limited guarantee that if within 12 months of the date of purchase this Urban Cultivator
Residential appliance or any part thereof is proved to be defective due to faulty workmanship or materials,
we will, at our option repair or replace the same FREE OF CHARGE for labour, materials or carriage on
condition that:
• The Urban Cultivator Residential has been correctly installed and used only on the electricity supply
stated on the rating plate.
• The Urban Cultivator Residential has been used in accordance to the manufacturer’s instructions.
• The Urban Cultivator Residential has not been tampered with by any person not authorised by us.
• All service work under this guarantee must be authorised by Urban Cultivator.
• Any appliance or defective component shall become the property of Urban Cultivator.
• This guarantee is in addition to your statutory and other legal rights.
Call Us 7 Days A Week
Watch Our Online Tutorials
Toll Free 1.877.352.0490
www.urbancultivator.net/videomanual
Page 23


![[U2.04.04] Notice d`utilisation du contact](http://vs1.manualzilla.com/store/data/006386513_1-3ff795ef61ec5d23149d6d36bfda261a-150x150.png)