1
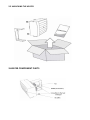
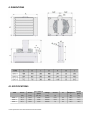
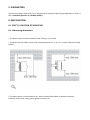
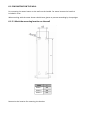
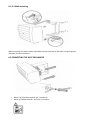
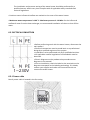
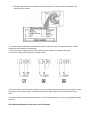
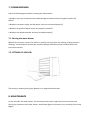
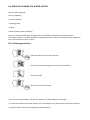
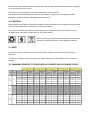
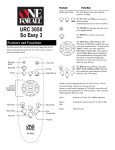
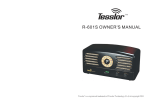
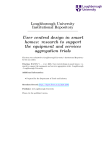
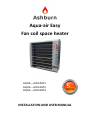
Aqua‐air Easy Fan coil space heater AQUA – AIR EASY1 AQUA – AIR EASY2 AQUA – AIR EASY3 INSTALLATION AND USER MANUAL 1. BEFORE STARTING For better orientation in this manual symbols are used. The following table contains a graphic description and meaning: This operation manual contains important information regarding the installation of the water heater. Before mounting read the instructions carefully and act accordingly. The manufacturer reserves the right to make changes without notice in the technical documentation to make. Keep the operation manual for future reference. 2. UNPACKING 2.1 INSPECTION OF DELIVERY At the time of delivery, please check that the product is not defective. If the packaging is damaged or wet notify the supplier in writing detailing any damage. Notify the supplier and a company courier / forwarding about the situation write down a damage protocol. It is necessary to implement any claim arising in transport. Check whether the ordered product type agrees with the supplied. If you have the goods delivered conform to the contract (different model, color, etc.,), please do not unpack it, but immediately notify the supplier. After unpacking, check if the water heater and other parts are included. If in doubt, take it to the supplier. Do not install a damaged water heater! If the water heater will not be unpacked immediately, should be stored in a dry place with a temperature of +5 ° C to +35 ° C. 2.2 UNPACKING THE HEATER 3.HEATER COMPONENT PARTS 4. DIMENTIONS 4.1 SPECIFICATIONS TYPE Power Airflow The ratitional speed [kW] [m3/h] [per min.] [V/Hz] [A] EASY 1 21,8 1610 1395 230/50 EASY 2 35,2 2523 1380 EASY 3 69,3 4434 1350 * Sound pressure level measured 5m from the heater. Voltage Current Weight gross IP Weight net [kg] [kg] 0,45 54 20,4 21,7 230/50 0,82 54 26,2 27,5 230/50 1,2 54 35,5 36,6 5. PARAMETERS The heat exchanger made of Cu / Al is designed for a maximum operating temperature of +100 ° C and a maximum pressure of 1.6 MPa (16 Bar). 6. INSTALLATION 6.1 SELECT A LOCATION OF MOUNTING 6.1‐1 Mounting dimensions • The water heater can be mounted on the ceiling or on the wall. • The device can be used in rooms with a temperature of +5 ° C to +35 ° C and a relative humidity of 90%. • The water heater is not suitable for air, which contains flammable or explosive mixtures, chemical, steam, dust, soot, grease, germs or toxins, etc. 6.1‐2 MOUNTING ON THE WALL For mounting the water heater on the wall use the handle. For water heaters the handle is included in a set. When working with the water heater should wear gloves to prevent wounding by sharp edges. 6.1‐2.1 Mark the mounting location on the wall TYPE I EASY 1 365 EASY 2 465 EASY 3 615 Determine the location for mounting the bracket. 6.1‐2.2 Wall mounting When mounting the water heater should be securely fastened to the wall! Use good quality materials for the installation! 6.2 CONNECTING THE HEAT EXCHANGER (EASY 1 & 2) Flexible hoses G 3/4” connection (EASY 3) Flexible hoses G 1 and 1/8” connection The installation and pressure testing of the water heater should be performed by a qualified person, which every time complies with all applicable safety standards and national regulations. • Positions water inflow and outflow are marked on the cover of the water heater. • Maximum water temperature is 100 ° C. Maximum pressure is 1.6 MPa. On the inflow and outflow of water from the heat exchanger, we recommend installation of valves to shut off the water. 6.3 ELECTRICAL CONNECTION • Before performing work with the water heater, disconnect the main power! • Electrical connections must be made basis on a professional design by a qualified engineer of the project. • Installation can be performed only by a qualified electrician. • All applicable national regulations and standards must be observed. • Electric diagrams on the product take precedence over diagrams in the manual! • Prior to installation, check the label on the terminals on the diagram corresponds to the labeling technology. If in doubt, contact your supplier and under no circumstances do not connect the water heater. 6.3‐1 Power cable Box of power cable is located in the fan casing. Electrical parameters are located on the manufacturer's plate, which is located on the housing of the heater. • The water heater should be connected by means of system TN‐S, this means that the neutral conductor must always be connected. • The entire power supply system must contain a main switch, to separate all power. • An electric safety class of the water heater: IP54. • Phase of input current of water heater must be connected by a switch that corresponds to a type and power of the water heater. The distance between separated contacts must have at least 3mm. • The water heater should be connected so it can be separated only by using a single power supply element. The minimum dimension of the power cord: 3x1,5mm2 7. COMMISSIONING Check the following points before starting the water heater: • Whether any tools or objects which could damage this device weren't forgotten within the device? • Whether the power supply and hot water inlets are connected properly? • Whether all guards of water heater are properly installed? • Whether the speed controller has been installed properly? 7.1 Starting the water heater When first turned on, check if the device is working correctly (fans are moving, heating system is working). You should also check other possible settings and features that are described in the instruction manual. 7.2 SETTINGS OF AIRFLOW The setting is made by placing the plaques in an appropriate direction. 8. MAINTENANCE In case of repair the water heater, first disconnect the power supply the device must be cool! During any operation with water heater, should wear gloves to prevent injury resulting from sharp edges! 8.1 REGULAR CLEANING THE WATER HEATER Service items required: •10 mm Spanner • Vacuum cleaner • Cleaning cloth • Duster • Mild cleanser (water and soap) Service is recommended after 500 hours of use and before and after the heating season. If the water heater is not been used for prolonged periods of time, we recommend you operate it every 6 months for at least an hour. 8.1‐1 Cleaning procedure 1) Remove the fan from the enclosure. 2) Clean the heat exchanger and inside of the machine. 3) Clean the fan. 4) Insert the fan back inside. • Do not use compressed air, chemicals, solvents, or sharp objects for cleaning. • To clean the inside of the water heater use a soft duster or dry paint brush and vacuum cleaner. • Check for leaks at the heat exchangers and connections. 8.2 REGULAR CHECKING THE WATER HEATER It is recommended to service the water heater after 500 hours of use or before and after the heating season. ‐ Check whether the heat exchanger is dirty. ‐ Check the fan (especially the operation of the fan and condition (noise) of the bearing) ‐ Check for leaks at the heat exchangers and connections. ‐ Look for any damages (especially the fan casing) ‐ Check tightness of screw connections, especially with the handles 9. TROUBLESHOOTING In case of repair the water heater, first disconnect the power supply and the device must be cool! During any operation with water heater, should wear gloves to prevent injury resulting from sharp edges! If there are concerns that you have not the required skills, do not make repairs to the unit itself, but consult an appropriate expert! If the problem cannot be identified or if the device has to be repaired, then you should contact an authorized service agent! 10. REPAIRS 10.1 IF A PROBLEM CANT BE REPAIRED YOURSELF If you can't solve a problem by yourself, contact your supplier. To solve a problem, please prepare the following information: ‐ Model ‐ Serial number ‐ Operating time ‐ Accessories fitted ‐ Mounting location ‐ Mounting conditions (including electrical) ‐ The exact description of the problem and list of all steps which have been taken to remedy it. Service and repairs within warranty or after warranty will be made by the manufacturer, supplier or an authorized service center. If the repair is contracted you must add a description of the problem. You should also add mounting location and the model as it appears on the appliance label. Questions should be sent to: [email protected] 10.2 DISPOSAL Before disposing the device should be unusable. Used equipment may include parts which can be recycled. They should be handed over to a recycling station. The device should be returned to a special point where the parts can be processed for reuse. Unusable parts should be thrown away to the public landfill. When disposing all materials should adhere to the national directives connected with the waste disposal practices. 11. NOTE In order to properly and safely use the water heater, read all instructions. All rules must be followed. If anything is unclear or have any questions, please contact our sales department or technical support. 12. SUMMARY RELATIVE TO TEMPERATURE OF WATER ON THE POWER SUPPLY. The water temperature in the heat exancher: 90/70 °C Type Aqua Air EASY 1 Aqua Air EASY 2 Aqua Air EASY 3 Airflow 1610 2523 4434 The water temperature in the heat exancher: 80/60 °C The water temperature in the heat exancher: 70/50 °C The water temperature in the heat exancher: 60/40 °C The water temperature in the heat exancher: 45/35 °C Air inlet temperature [°C] Heating power [kW ] Temperature of output air [°C] Heating power [kW ] Temperature of output air [°C] Heating power [kW ] Temperature of output air [°C] Heating power [kW ] Temperature of output air [°C] Heating power [kW ] Temperature of output air [°C] -10 25,3 32,1 22,1 26,7 18,9 21,4 15,6 16,0 13,6 12,7 -5 23,5 34,9 20,3 29,5 17,2 24,1 13,9 18,7 12,0 15,3 0 21,8 37,6 18,6 32,2 15,5 26,8 12,3 21,3 10,4 18,0 10 18,4 43,0 15,4 37,5 12,3 32,1 9,2 26,5 7,3 23,1 15 16,8 45,6 13,8 40,1 10,8 34,6 7,7 29,0 5,8 25,7 -10 40,8 33,3 35,7 28,0 30,7 22,6 25,6 17,2 22,1 13,5 -5 37,9 36,1 33,0 30,7 28,0 25,3 22,9 19,8 19,5 16,1 0 35,2 38,8 30,3 33,4 25,3 27,9 20,4 22,5 17,0 18,7 10 29,9 44,1 25,0 38,6 20,2 33,1 15,4 27,6 12,1 23,8 15 27,3 46,7 22,5 41,2 17,8 35,7 12,9 30,0 9,7 26,3 -10 80,5 38,7 70,5 32,6 60,4 26,5 50,2 20,4 43,5 16,3 -5 74,8 41,1 65,0 35,0 55,0 28,9 45,0 22,7 38,3 18,6 0 69,3 43,5 59,6 37,4 49,8 31,2 39,9 25,0 33,3 20,9 10 58,7 48,2 49,2 42,0 39,7 35,8 30,0 29,5 23,6 25,3 15 53,6 50,4 44,2 44,3 34,7 38,0 25,2 31,7 18,9 27,5 13. WARRANTY Ashburn import and distribute the Aqua Air range of heaters in the UK and provide a five year warranty on the appliance. Should there be a failure of the heat exchanger or motor within five years, a replacement appliance will be provided free of charge. Damage or corrosion to the casing is not covered by this warranty. Before a replacement is dispatched we must recieve the faulty original unit for inspection. Return delivery costs will be your responsibility. Before returning a faulty heater please arrange delivery with us. Our address for returns and correspondence is: Ashburn Stoves LTD Unit 10 Victoria Mill Earby Lancashire BB18 6UX 01282 841500