1
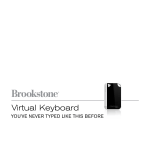
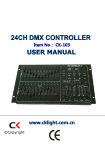
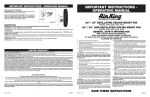
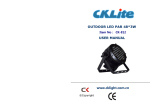
HL100 User Manual HL100 Fingerprint Lock User Manual Version: 1.0 About This Manual This manual introduces the fingerprint lock interface and menu operations for the HL100. For the fingerprint lock installation, see the installation manual. HL100 User Manual Thank you for purchasing the ZKbiolock HL100 fingerprint deadbolt. Please read the documentation carefully before installation & use. The manual details all installation procedures and operation steps. Manufacturer, dealers and distributors of the ZKbiolock HL100 will not be responsible for any damages caused by incorrect installation or mishandling of the lock. Any such damages will void manufacturer ’s warranty. Due to the constant upda te of products , the company cannot guarantee consistency of the a ctual product and the information in this document, or any dispute caused by the difference between the a ctual techni cal para meters of the product a nd the i nformation in this document. HL100 User Manual IMPORTANT NOTICE – read before programming and installing: 1. Keep your fingers clean when using this product. 2. In the sta te of new l ock (fa ctory setting), the lock can be unlocked wi th any fi ngerprint. 3. User mus t fi rst change defaul t master passcode (98989) when lock is installed to be a ble to enroll any users. 4. User must ha ve registered a t least one administra tor user before enrolling an ordi nary us er. 5. You ca n use the same user ID # to enroll a fingerprint a nd PIN per person. 6. When opening the door, i f the lock beeps an alarm and the indi cator light flashes, i t's i ndicating the l ock is in insufficient voltage level. Pl ease change the batteries. 7. Lock operations ha ve a s tand-by (idle) time limi t of 10 seconds ; lock will shut off a fter 10 s econds of no a ctivity 8. This product can sa ve 100 users, among whi ch 5 a re administra tor users (Code: 995-999), a nd other 95 a re ordinary users (Code: 900-994). 9. The dirt on the surfa ce of fingerprint collection window ma y a ffect the normal us e. Therefore please keep i t clean. 10. Do not clean the lock s urfa ce with corrosive substances , or else the protection la yer ma y be damaged and thus influence the gl oss of the lock surfa ce. Therefore pl ease cl ean the lock surface periodically with furniture polish wax (e.g. Pledge). 11. If the latch bol t fails to dra w ba ck and forth freel y, or the door cannot be closed normall y due to the distortion of the door, please adjus t the strike plate's pos ition. 12. When the fingerprint and password fails to work, use the mechani cal key to open the door; please keep the mechanical key i n a proper place. 13. You can press and hol d “0” a t any time in management mode to exi t, no i nformation will be saved. HL100 User Manual Table of Contents 1 Instruction for Use ................................................................... - 1 1.1 Introduction to Fingerprint Lock Functions........................ - 1 1.2 Front and Rear Views ..................................................... - 2 1.3 Precautions................................................................... - 4 1.4 User Privileges............................................................... - 4 1.5 Finger Placement........................................................... - 5 2. The Basic Operation ................................................................ - 6 2.1 Change Master Pass Code (MPC) ..................................... - 6 2.2 Enroll an Administrator................................................... - 7 2.2.1 Enroll a Fingerprint Administrator User ................... - 7 2.2.2 Enroll a PIN Administrator User .............................. - 8 2.3 Enroll an Ordinary User .................................................. - 9 2.3.1 Enroll a Fingerprint Ordinary User .......................... - 9 2.3.2 Enroll a PIN Ordinary User ................................... - 10 2.4 User Verification .......................................................... - 10 2.4.1 The Fingerprint Verification ................................. - 11 2.4.2 The PIN Verification............................................ - 11 2.5 Delete User ................................................................. - 12 2.5.1 Delete a user ..................................................... - 12 2.5.2 Delete All Ordinary Users .................................... - 12 2.6 Enable / Disable a User ................................................. - 13 2.7 Reset Lock to Factory Default Settings ............................ - 14 3 Conventions on Other Functions ............................................. - 15 3.1 Routine Operation Indications ....................................... - 15 3.2 Initialization Lock ......................................................... - 16 3.3 Unlock the Non-lock Status Alarm .................................. - 17 3.4 Automatic Program Exit and System Power-off ................ - 17 - HL100 User Manual 3.5 Use Description of External Power ................................. - 17 3.6 Unlock With an Emergency Mechanical Key .................... - 19 3.7 Battery Low Voltage Protection ..................................... - 20 4. Appendix............................................................................. - 21 4.1 The Parameter Table .................................................... - 21 - HL100 User Manual 1 Instruction for Use 1.1 Introduction to Fingerprint Lock Functions 1. By leveraging the perfect combina tion of biometri cs and cryptography, our fingerprint bol t ensures securi ty through the fingerprint and PIN unl ocking feature. 2. Use the keypad to finish all relevant operations a ccording to the signals of the buzzer and indi cati on lights . You ca n simpl y use our fingerprint locks wi th ease after following the operation instructions. 3. Support settings of classified pri vileges for adminis tra tors and ordina ry us ers. 4. Supports deletion of all or s pecified registration data. 5. Fingerprint verifi ca tion module and PIN registra tion; 1:N is used for the PIN, a nd each PIN i s unique. 6. Supports a temporary connection with a back-up battery. 7. Supports a generation of l ow-pressure alarms. 8. Non-lock Sta tus Alarm Function: A non -lock sta tus is when the lock bolt does not pop out normally caused by mechani cal breakdown or failure in closing the door after users pass the veri fi cation and open the door. In this si tua tion, the buzzer will make a short, sha rp ala rm sound whi ch will last one minute unless the alarm is removed by manuall y locking or unl ocking the bolt. -1- HL100 User Manual 1.2 Front and Rear Views 1.Fingerprint Collector 2.Start key, LED Status indicator 3. Number keys 4. Key Hole 5. Emergency Power Interface 6. Battery cover 7. Screw Holes 8. Handle ①Fingerprint Collector: You can onl y collect or ma tch fingerpri nts by placing your fi nger(s) on the fi ngerprint sensor when the light in the fingerprint sensor window goes on; otherwise nothing happens when you pla ce your finger(s) on the fi ngerprint sensor. ②Start key /LED Status indicator: This key can be used to sta rt the fingerprint lock. Press and hold this key on the ini tial interfa ce to enter the verify s ta te of Ma na gement Mode. -2- HL100 User Manual ③Number keys: Us ed to i nput PIN or user ID. ④Key Hole: You ca n use the included mechanical key for emergency door opening. ⑤Emergency power interface: External ba ttery ba ckup connector to be used wi th a 9-vol t battery when i nternal batteries do not operate. LED Backlight Indicators: The LED Ba cklight Indicators changes to three colors: Red, Green and Blue. The general rule: Successful = 1 Long Beep / LED Flashes Green. Failed = 2 Short Beeps / LED Flashes Red. Verify State: Green LED flashes every s econd. Management Mode: Keypa d flashes blue LED every s econd. All lock functions should return as above, i f not, please conta ct your local dea ler/distributor or vi sit our website at www.ZKbiolock.com. -3- HL100 User Manual 1.3 Precautions 1. User mus t change Master Pass Code (MPC) when they 1s t install the Lock. See Cha nge MPC section. User mus t ha ve at least one administra tor user registered before adding any ordina ry users . If you don't change the MPC, you can't use any functi on. If you don't register an Administrator, you ca n't a dd a n ordinary us er. 2. Do not remove ba tteries when matching, enrolling or deleting fingerprints ; the sudden power-down may resul t in loss of data . Pri or to removing ba tteries, make s ure the fingerprint lock is not i n working state. 3. It is recommended to repla ce the fingerpri nt lock ba tteries a t least once every si x months to a void damaging the ci rcui t due to the battery leakage or corrosion. Do not us e batteries with poor quality. 1.4 User Privileges The user pri vileges a re classified into two types : Adminis trator users and Ordina ry us ers. Administrator (Admin): Refers to users who ha ve access to all opera tions like s ettings and enrolling user. Ordinary user: Refers to all users other than the administra tors . Ordina ry users onl y ha ve a ccess to the fingerprint matching a nd unlocking functions. -4- HL100 User Manual 1.5 Finger Placement Recommended finger usage: The index fi nger, middle finger or the ring finger is recommended; the thumb and little finger a re not recommended (because they a re us ually cl umsy when pressing on the fingerprint collection s creen). 1. Proper finger placement The finger must be flat to the surface and centered on the fingerprint sensor. 2. Improper finger placement Not flat to the surface Off-center Slanting Off-center Please enroll and veri fy your fingerprint by using the proper finger pla cement mode. We shall not be held a ccountable fo r any consequences a rising out of the degradati on in veri fica tion performance due to improper user opera tions . We res erve the ri ght of final i nterpretation a nd revision of this document. -5- HL100 User Manual 2. The Basic Operation 2.1 Change Master Pass Code (MPC) Notice: (1) User mus t change Master Pass Code when they 1st install the lock, otherwise you ca n't register administrator. (2) User must have registered a t least one adminis trator user before enrolling ordi nary us er. (3) Al l l ock operations have an operation ti me limit of 10 s econds. To cha nge MPC, fol low the procedures s hown: 1. Press key to sta rt lock, whi ch will then enter the Verify State. The LED fl a shes green light. 2. Press and hold the key until you hear 1 long beep and the Green LED turns off, and then the keypad flashes blue. Input the defaul t MPC "98989", a nd then press 3. key to enter the Ma nagement Mode. Pres s "5" key on the l ock and enter the new 5 di git MPC, then press the key to confi rm. Enter the new MPC once again then press the confi rm. Once you hea r 1 long beep and the ha ve s uccessfully changed the MPC code. -6- key to key flashes green, you HL100 User Manual 2.2 Enroll an Administrator The lock has two kinds of users : Administra tor User and Ordina ry User. If the fi ngerprint lock has no administra tor, then you can’t enroll ordina ry users. You must a t l east enroll one a dministrator before enrolling a ny ordinary us ers. To enroll an administrator, enter management mode by following below: 1. Pres s key to s ta rt lock, a nd then enter the Verify State. 2. Press and hold the key until you hea r 1 long beep, enter the 5 di git MPC, a nd then press 3. key to enter the Ma nagement Mode. Pres s "9" on the l ock to enter the Enroll Administrator Mode. The next step is to enroll fingerprint and password for administrator. 2.2.1 Enroll an Administrator User Fingerprint Note: Steps 1-3 are above. 4. After you enter the Enroll Admi nistrator Mode, enter a 3 di git user ID, and then press key to confirm. Note: The administrator User's ID must between "995" and "999". 5. Press finger in the s canner a rea properl y (For detail, please see 1.5 Fi nger Pla cement), and repea t i t three times , until you hea r one long beep and LED fl a shes Green. Note: During the fi ngerprint s canning process, if the bol t successfull y collected the fi ngerprints , the key will flash green. If not, you can continue to place the -7- HL100 User Manual fi nger, s o that the lock s uccessfully collects a fingerprint 3 ti mes. Note: (1) If Fingerprint lock fails to register. It will gi ve 2 short beeps and the LED will fl a sh red. If you failed to register, you can try a gain for two more time. (2) If it registers successfull y, i t will automati call y exi t the Enroll Adminis trator Mode. (3) Pres s and hold "0" key to exit a nytime. (4) If you wa nt to enroll more administrator users, then repeat steps 1-5. 2.2.2 Enroll an Administrator User PIN Note: Steps 1-3 are same as before (2.2) 4. After you enter the Enroll Administra tor Mode, enter the 3 digi t user ID, pres s 5. key to confirm. Enter a 4 digi t user PIN and press key to confi rm, and then enter the same 4 di git user PIN once again and press key to confi rm, until you hear one long beep and LED flashes green (If it fails to register – i t wi ll gi ve 2 s hort beeps and LED will flash red). Note: (1) If Pass code does not match i t will fail registra tion. In this case you will need to fol low step 1 to 5 a gain. (2) If s uccessful, it will automatically exit the Enroll Administrator Mode. (3) Pres s and hold "0" key to exit a nytime. (4) If you wa nt to enroll more administrator users, then repeat the step 1-5. -8- HL100 User Manual 2.3 Enroll an Ordinary User Note: You must change the MPC and enroll an administra tor user fi rst; otherwise you ca n't enroll any ordinary users. 2.3.1 Enroll a Fingerprint Ordinary User 1. Pres s key to s tart the l ock a nd enter the Verify State. 2. There a re two methods to enter the Ma nagement Mode: (1) Press and hold the MPC, a nd then press key until you hear 1 long beep, enter the 5-di git key to enter the Ma nagement Mode. OR (2) Veri fy the regis tered adminis trator's PIN or fingerprint (please see 2.4 User Veri fi cation) to enter the Ma nagement Mode. 3. Pres s "1" to enter the Enroll Ordinary User's Fingerprint Mode. 4. Input a 3 di git User ID, then press key to confirm. Note: The ordinary users' ID must between "001" and "994". 5. Pla ce finger in the scanner area properl y (For detail , please see 1.5 Finger Pla cement), and repeat i t three times , until you hea r one long beep and LED flashes green. Note: (1) If Fingerprint lock fails to register. It will gi ve 2 short beeps and the LED will fl a sh red. If you failed to register, you can try a gain for two more time. (2) If it registers successfull y, i t will automati call y exi t the Enroll Adminis trator Mode. (3) Pres s and hold "0" key to exit a nytime. (4) If you wa nt to enroll more administrator users, then repeat steps 1-5. -9- HL100 User Manual 2.3.2 Enroll an Ordinary User PIN 1. Pres s key to s ta rt the lock a nd enter the Verify State. 2. Enter the Ma nagement Mode, please see step 2 in 2.3.1 Enroll a Fingerprint Ordi nary User. 3. Pres s "2" on the l ock to enter the Enroll Ordinary User's PIN Mode. 4. Input a 3 di git User ID, a nd press key to confirm. Note: The ordinary users' ID must between "001" and "994". 5. Input a 4 digi t user PIN, press PIN once again and press key to confi rm. Enter the same 4 digi t user key to confi rm until you hear one long beep and the LED flashes green. The keypad’s blue LED will turn off. If i t fails to register - it wi l l give 2 s hort beeps a nd the LED will flash red. Note: (1) If Pass code does not match i t will fail registra tion. In this case you will need to fol low step 1 to 5 a gain. (2) If s uccessful, it will automatically exit the Enroll Administrator Mode. (3) Pres s and hold "0" key to exit a nytime. (4) If you wa nt to enroll more administrator users, then repeat the step 1-5. - 10 - HL100 User Manual 2.4 User Verification The us ers ca n user fingerprint or PIN verification to unlock. 2.4.1 Fingerprint Verification 1. Press key to s ta rt the l ock and enter the Verify State. The Fingerprint Collector i s i n a ctive state. 2. Press finger in the fingerprint s canner a rea properl y (For detail, please see 1.5 Fi nger Placement), until you hear one l ong beep. (1) If veri fication i s successful, the buzzer will give a long beep and unlock, the key will flash green for 3 seconds , the fingerpri nt s canner will fl a sh green for 5 s econds. (2) If veri fi cation failed, the buzzer will gi ve two short beeps , the key will flash red for 3 seconds, a nd then the green LED will flash. The user ca n us e fingerprint to verify a gain until verification i s successful. 2.4.2 PIN Verification 1. Pres s key to s ta rt the lock a nd enter the Verify State. 2. Input the programmed 4-digit PIN and press key to confirm. (1) If veri fication i s successful, the buzzer will give a long beep and unlock, the key will flash green for 3 seconds , the fingerpri nt s canner will fl a sh green for 5 s econds. (2) If veri fi cation failed, the buzzer will gi ve two short beeps , the key will flash red for 3 seconds, a nd then the green LED will flash. The user ca n us e PIN to verify a gain until verification i s successful. Note: After successful veri fica tion, the l ock is unlocked. To lock, press - 11 - HL100 User Manual key to l ock and power off. 2.5 Delete User 2.5.1 Delete a user 1. Pres s key to s ta rt the lock a nd enter the Verify State. 2. Enter the Ma nagement Mode, please see step 2 in 2.3.1 Enroll a Fingerprint Ordi nary User. 3. Pres s "3" on the l ock to enter Delete User Mode. 4. Input the User's ID whi ch you want to delete, and then press confi rm. Input the user ID again, and press gi ve a l ong beep, a nd the key to key to confi rm. The buzzer will key wi ll flash green. 5. After deleting the user, you ca n resta rt the fingerprint lock a nd veri fy the deleted us er's fingerprints or password again to check whether the user is deleted for s ure. Notice: The a dministrator ca n't delete i tself and the last a dministrator. 2.5.2 Delete All Ordinary Users 1. Pres s key to s ta rt the lock a nd enter the Verify State. 2. Enter the Ma nagement Mode, please see step 2 in 2.3.1 Enroll a Fingerprint Ordi nary User. 3. Pres s "6" on the l ock to enter Delete All Ordinary Users Mode. 4. Input "000" a nd press key to confirm, then i nput "000" a gain and press - 12 - HL100 User Manual key to confi rm. The buzzer will gi ve a long beep, the key will flash green. Notice: The operation can onl y delete ordina ry users . If you want to delete admi nistrators, you must reset the s ys tem, for detail, please see 2.7 Reset Lock to Fa ctory Default Settings. 2.6 Enable / Disable a User 1. Pres s key to s ta rt the lock a nd enter the Verify State. 2. Enter the Ma nagement Mode, please see step 2 in 2.3.1 Enroll a Fingerprint Ordi nary User. 3. Pres s "4" on the l ock to enter Enable/Disable User Mode. 4. Input the user ID whi ch you want to enable or disable, press confi rm, input the user ID again and press gi ve a l ong beep a nd the key to confi rm. The buzzer will key wi ll flash green. Notice: (1) You ca n only enable or disable ordinary users. (2) The di sabled user can't verify operations (unlock). - 13 - key to HL100 User Manual 2.7 Reset Lock to Factory Default Settings 1. Pres s key to s ta rt the lock a nd enter the Verify State. 2. Enter the Ma nagement Mode, please see step 2 in 2.3.1 Enroll a Fingerprint Ordi nary User. 3. Pres s "7" on the l ock to enter Reset Settings Mode. 4. Input "0000" a nd press key to confirm, input "0000" a gain and press key to confirm. The buzzer will gi ve a long beep and the key flashes green light, and then reset the lock's s ettings to factory default. Note: After resetting the lock's settings , the MPC will reset to "98989" (The fa ctory defaul t MPC), a nd delete all users in the lock, including the administra tor a nd ordinary users, automatically entering demo mode. - 14 - HL100 User Manual 3 Conventions on Other Functions 3.1 Routine Operation Indicators Successful user operation: The buzzer sounds once and the green LED indica tor will l i ght up for 3 s econds. Failed user operation: The buzzer sounds short tone twi ce and the red LED i ndicator is s olid on for 3 s econds. Verify State: Green LED flashes. Management Mode: Keypa d will flash blue LED and green LED will turn off. Warning Indication: The buzzer beeps fi ve times i ntermittently. Note: You can onl y enter numbers , such as PIN’s , user ID’s or master pass code when the keypad i s flashing blue. - 15 - HL100 User Manual 3.2 Initialization Lock In case you ever forget the master pass code or any other setting’s informa tion and you a re not allowed to a ccess or change the settings, you can use the Ini tialization key to res et the lock. Use the s crewdri ver to take down the s crews in the ba ck of the lock cover, then press the Ini tialization Key to reset the lock (reset the lock to fa ctory default s ettings). Shown next: Initialization Key - 16 - HL100 User Manual 3.3 Unlock the Non-lock Status Alarm The non-lock sta tus ala rm occurs when the l ock detects that the bol t isn’t properl y turned and latched, which ca n be fixed i n the following two ways: 1. Press the button and the machine will lock automati call y. The alarm will sound continuousl y until the non -lock s tatus is removed after the latch is properl y turned for the bolt to be locked securely. 2. Lock it using the mechani cal key or by turning the la tch inside. The alarm will be s wi tched off a fter the proper l ocking i s done. 3.4 Automatic Program Exit and System Power-off The Fingerprint Lock powers off automati call y upon successful matching and unl ocking. The Fingerprint Lock powers off automa ticall y when the suppl y vol tage is too l ow. The Fingerprint Lock powers off automa ticall y if there is no keys troke wi thin 10 s econds on the initial i nterface. After successful veri fi cation, press key to sta rt the lock, and then press this key to unl ock a nd power off. 3.5 Use Description of External Power The Fingerprint Lock supports tempora ry use of external DC power for fingerprint or password ma tching and unlocking, but when connected wi th an external ba ttery, the fingerprint l ock cannot provide such s pecial functions as enrollment, deletion a nd s etting, s o as to prevent data loss as a result of power i nstability. - 17 - HL100 User Manual As shown i n the fi gure below, connect a 6V ba ttery to the two a ccess points a t the bottom of the fingerprint l ock, regardless of polarity. Emergency Power Interface Emergency Power If you power off a Fingerprint Lock wi thout closing the lock duri ng the use of external power, the lock cylinder will not a utoma ti cally return to its ori ginal position. The Fingerprint Lock remains in unlock s ta te. To sol ve this problem, you can replace the ba ttery a nd then open the l ock to have the lock cyl inder i n position. - 18 - HL100 User Manual 3.6 Unlock With an Emergency Mechanical Key You can open the door using an emergency mechani cal key i n case the electronic component does not operate. ① Us e your fi ngernails or a hard chip to take down the l ock cover. ② Ins ert the emergency key i nto the keyhole and rotate 90º to unlock. ① ② Note: Please use the key provided wi th the devi ce. After unlocking , please repl ace the lock cover. - 19 - HL100 User Manual 3.7 Battery Low Voltage Protection When the battery is low, there are alarm signals to wa rn users to change the ba ttery as follows: 1. When the ba ttery vol tage is lower than 4.8V, the buzzer will make a short sha rp sound fi ve ti mes when sta rting the ma chi ne. Users can unlock it normally but will not be a ble to enter the administrative mode. 2. When the ba ttery vol tage is lower than 4.5V, the buzzer will make a short sha rp s ound five ti mes, and then the machine will be switched off automatically. Note: When the low-volta ge ala rm occurs, please change the battery in time to a void an impa ct on the fingerprint lock. Avoid losing da ta caused by instable power suppl y (It is suggested to change the battery i mmediatel y when the ba ttery vol ta ge is lower than 4.8V). - 20 - HL100 User Manual 4. Appendix 4.1 The Parameter Table HL100 ba sic function parameters a re shown below: Item Des cription Power DC 6V Capacity 100 us ers(100 fingerprints) Collector Opti cal Fi ngerprint Collector Algorithm Version 10.0 LED Three colors (red, green, blue) instructions - 21 - HL100 User Manual HL100 – Warranty Information HL100 comes with a five year mechanical and finish warranty and one year electronics warranty to the original residential user of ZKbiolock™ against defects in material and workmanship as long as the original user occupies the residential premises upon which the product was originally installed. This warranty only applies to Original user of the product. This warranty is not transferable. This warranty DOES NOT COVER: any cost including, but not limited to, such cost for removal and reinstallation of the product freight and shipping charges/expenses required to return product to ZKbiolock™ direct sunlight, scratches; abrasions; deterioration due to the use of paints, cleaners, solvents or other chemicals; abuse; misuse; or product(s) used in commercial/common area application used for the purpose they are not designed or intended which have been improperly stored, installed, maintained or operated which has been subjected to alteration, misuse, abuse, negligence and accident which has been subjected to improper temperature, humidity or other environmental conditions - 22 - HL100 User Manual Support: Contact the ZKbiolock HL100 distributor/dealer that you purchased the lock from. Or Go to: www.zkbiolock.net - 23 -