1
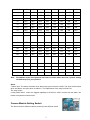
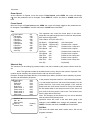
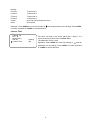
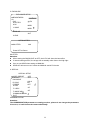
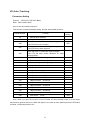
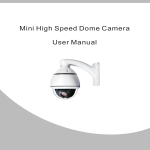
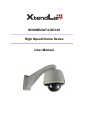
SDOMEOAT2-SD310 --------------------------------------------------------------------- High Speed Dome Series --------------------------------------------------------------------- User Manual CONTENTS I Before Installing ………………………………….………….………… 2 II Key Features ……………………………………………………. …… 2 III Environmental requirement ………………………………………… 2 IV Dome setting Instruction …………………………………………… 2 Camera ID Setting…………………………………………………………………. 4 Camera Module Setting…………………………………………………………. . 5 V Basic High Speed Dome Operation ………………………………… 6 OSD Operation………………………………………………………………. …… 7 Enter OSD …………………………………………………………………………. . 7 Menu function instructions……………………………………………………… 7 Camera Exposure…………………………………………………………………. 7 White Balance……………………………………………………………………… 8 Privacy Mask ……………………………………………………………………… 9 Others of the Camera menu………………………………………………………. 9 Camera Mode………………………………………………………. . ……………… 9 Zoom Speed ……………………………………………………………………… 10 Focus Speed ……………………………………………………………………… 10 Pan…………………………………………………………………………………… 10 Shortcut Key………………………………………………………………………… 10 Leisure Time ……………………………………………………………………… VI High Speed Dome Camera Menu…………………………………… 11 12 VII Auto-Tracking ............................................................................... 15 VII Analysis on Common Malfunctions and Maintenance… 16 I Before Installing Installation should be carried out only by qualified personnel and in accordance with any wiring regulations in force at the time. Please read this instruction and warnings before installing. Do not attempt to service or repair the speed domes as opening or removing covers may expose dangerous voltages or other hazards. Refer all servicing to qualified service personnel. Adequate protection against lightning strikes and power surges must be installed to prevent damage to the speed dome. II Key Features 360º Panning, speed is 0.1º-300º/s. Auto flip 180º 128 presets, the accuracy of preset is less than 0.1º 4 dynamic privacy zones (SONY Camera Module) Auto cruise by preset, the leisure time is 1s-250s. Image freeze while panning Manifold of scan, scan speed could be set from 1º/s to 80º/s Left limit and right limit scan. 7 alarm input and 2 relay output. Easy fixing configuration 24V power supply built in Static proof and thunder proof design III Environmental requirement: Operation Temperature: -40-+60 Humidity: <90% Air pressure: 86-106Kpa Power supply: AC24V/2.5A, 50/60Hz IV Dome setting Bracket Configure 2 Setting Attention: Adequate protection against high speed dome falling and damage when installing. The dome should be hang setting, and please avoid up side down. Please install the dome at the low humidity condition and keep it sealing for avoiding any damage to dome. Please set the power switch correct. Ceiling mount Wall mount Communication PCB Open Up the PCB PCB Locker DIP table of Communication PCB board Note: The PCB can be locked by the PCB locker as the picture showed, and it can be turned over when do the setting works as below (Please turn the locker to the housing side to open it): The system setting Switch SW1 Camera ID SW2 Alarm connector 8P Short connector RS485 communication 2P AC24V power supply AUX 4P 3 1、 Power supply and communication cable: AC24V AC24V RS485 2、Video output: Alarm signal Alarm Relay Output “AUX1” Alarm Relay Output “AUX2 Alarm Input GND Alarm input signal: l -7 AL1、AL2、AL3、AL4…AL7:Alarm input. The switch setting SW1 ON=1 OFF=0 Protocol setting DIP Switch 1 2 3 Baud rate setting 4 SW1234=0000 Description (PELCO-D/PELCO-P Auto identify) 5 6 SW5,6= 00=2400 01=4800 10=9600 11=19200 Alarm Alarm mode 7 8 1=Alarm 1=Always short circuit. enable (Alarm while open) 0=Alarm 0=Always open circuit. disable (Alarm while short) Note:PELCOD、 PELCOP could be identifying automatically. On and off is the corresponding switch position. Camera ID Setting: SW2 switch: address DIP table CAM ID 1 2 3 4 5 6 7 8 1 OFF OFF OFF OFF OFF OFF OFF OFF 2 OFF OFF OFF OFF OFF OFF OFF ON 3 OFF OFF OFF OFF OFF OFF ON OFF 4 OFF OFF OFF OFF OFF OFF ON ON 5 OFF OFF OFF OFF OFF ON OFF OFF 6 OFF OFF OFF OFF OFF ON OFF ON 7 OFF OFF OFF OFF OFF ON ON OFF 8 OFF OFF OFF OFF OFF ON ON ON 4 CAM ID 1 2 3 4 5 6 7 8 9 OFF OFF OFF OFF ON OFF OFF OFF 10 OFF OFF OFF OFF ON OFF OFF ON 11 OFF OFF OFF OFF ON OFF ON OFF 12 OFF OFF OFF OFF ON OFF ON ON 13 OFF OFF OFF OFF ON ON OFF OFF 14 OFF OFF OFF OFF ON ON OFF ON 15 OFF OFF OFF OFF ON ON ON OFF 16 OFF OFF OFF OFF ON ON ON ON 128 OFF ON ON ON ON ON ON ON 129 ON OFF OFF OFF OFF OFF OFF OFF 130 ON OFF OFF OFF OFF OFF OFF ON 131 ON OFF OFF OFF OFF OFF ON OFF 132 ON OFF OFF OFF OFF OFF ON ON 252 ON ON ON ON ON OFF ON ON 253 ON ON ON ON ON ON OFF OFF 254 ON ON ON ON ON ON OFF ON 255 ON ON ON ON ON ON ON OFF ∶ ∶ ∶ ∶ ∶ ∶ Note:The address of the some protocol are from 0, and the others are from 1, please setting the address(±1) as your protocol. Alarm 7 alarm input. The dome will alarm when alarm input port connect the GND. The AUX will be closed when has alarm, and open when no alarm in. The capacitance of the relay is AC24V/1A. The relay output: 2 relay switch AUX1, AUX2, the biggest capability is AC24V/1A. AUX1 connect with the alarm, the master or keyboard controls AUX2. Camera Module Setting Switch The dome can be fit different camera, and they have different switch 5 Camera Switch 1 Switch 2 Switch 3 Switch 4 DIP-1 DIP-2 DIP-3 DIP-4 SONY OFF OFF OFF OFF HITACHI OFF OFF ON OFF LG OFF ON OFF OFF CNB-200L OFF ON ON OFF CNB-M1560 OFF ON ON ON ON OFF OFF OFF SAMSUNG(SDM300/SDM330 ) Note: Please make sure the camera parameters are correct or the camera cannot work or cannot work well. If this, please enter the camera menu and restore factory settings first, then setting the parameters as request. V Basic high speed dome operation When power on, the version, protocol, baud rate and ID will display on the monitor, and the dome will automatic self-check both the vertical and level then display the specs of camera. Example: High Speed Dome Ver:1 00 PELCO D P 2400 ID:001 Tile reference OK Pan reference OK SONY FCB-EX480CP The operation by keyboard controller Function Control Level / Vertical Joystick left, right / up and down OSD Confirm OPEN Cancel and Back CLOSE OSD Display Call 95 preset Original Position Call 34 preset Level Scan Call 99 preset Auto Flip Call 33 preset Level Scan Limit Point Left limit: call 92 preset Right limit: call 93 preset Call preset scan 1 Call 81 preset Call preset scan 2 Call 82 preset Call preset scan 3 Call 83 preset Call preset scan 4 Call 84 preset 6 Function Control Camera mode 1 Call 100 preset Camera mode 2 Call 101 preset Camera mode 3 Call 102 preset 4 Privacy mask, only fit to SONY480, SONY980 and SONY1000 camera. Level area increase: FAR Privacy Mask Level area reduce: NEAR Vertical area increase: TELE Vertical area reduce: WIDE OSD Operation Enter OSD Please call the number 95 preset to display the OSD on the screen. At figures the current item, figures the enabled item, and the ► after the item which have submenu. You can change the item state when it has been enabled. Please press OPEN key to enter or confirm and CLOSE key to back or cancel, and the key UP and DOWN control the cursor up and down. Menu function instructions Call the number 95 preset to enter the OSD, and you could set the shortcut key to display the OSD. Main Menu Camera ► Pan ► Shortcut Key Self act Leisure Time Nothing 030 Camera OSD (SONY) Camera ► Press Key Open to enter the camera menu. Exposure ► White Balance ► Privacy ► Other ► Camera Model ► Zoom Speed Focus Speed 005 001 Camera Exposure Exp Mode Shutter speed Iris Gain Bright Back Light Slow Shutter Auto 006 016 001 016 Off Off Exposure ►Press OPEN key to enter the camera exposure submenu. Exposure operation 1, How to change the exposure Exp Mode press OPEN key, enable Exp Mode, then operate up and down by the joystick, the parameters are: Auto, Manual, Shutter, Iris and bright 7 2, Confirm Exposure. Exp Mode press OPEN key, select effect, the menu change to 3, Cancel Exposure Exp Mode Exp Mode press CLOSE to cancel the Exposure mode change, the menu change to Exp Mode Back the main camera menu Exp Mode press CLOSE key to cancel the last menu. Other operation of Exposure Menu Exp Mode, control the joystick up or down to let the up and down, press OPEN key to enable the item, then go on control up and down with joystick, and press OPEN key to confirm, the cursor will change to . White Balance The dome has the function of Manual White Balance and Auto White Balance. Exposure ► White Balance ► Privacy ► Other ► Camera Model ► Zoom Speed Focus Speed 005 001 White Balance► press OPEN key, enter the White Balance submenu, then change the parameter, WB Mode Auto R Gain 214(0-255) B Gain 175(0-255) White Balance Mode operation: 1、 WB Mode R Gain B Gain Auto 210 175 WB Mode R Gain B Gain Auto 210 175 WB Mode R Gain B Gain Auto 210 175 WB Mode 2、 At WB Mode, press OPEN key to enable the Exp Mode menu, then it will change to WB Mode, control the joystick to change the parameter which order is: Auto, Manual, ATW, OPW, Outdoor and Indoor. R Gain 3, R Gain At WB Mode, operate the joystick down let the cursor come to R Gain, press OPER key to enter the menu. Then operate the joystick up (increase) and down (reduce) the R Gain. The homologous parameter is 0-255. Press OPEN key to confirm and back or press CLOSE to cancel and back. 4, B Gain At WB Mode operate the joystick to control the cursor come to B Gain, press OPEN key to enter the B Gain setting, joystick up and down to increase and reduce the parameter which from 0-255. Press OPEN key to confirm and back or press CLOSE to cancel and back. 8 Privacy Mask Exposure ► White Balance ► Privacy ► Other ► Camera Model ► Zoom Speed Focus Speed 005 001 At Exposure ► operate the joystick to let the cursor come to Privacy press OPEN to enter the submenu, then set the parameter. There are 4 privacy masks, which have the same operation 1. How to set privacy mask? At the submenu of the Privacy, press OPEN key to enter the adjust image, adjust the privacy zone by OPEN (confirm), CLOSE(cancel), FAR (level increase), NEAR (level reduce), TELE(vertical increase), WIDE (vertical reduce). Then press OPEN key to confirm and back. Privacy1 Privacy2 Privacy3 Privacy4 2 . How to clear privacy mask? a, Restart the speed dome, all of the privacy mask will be cleared. b, Enter the menu of the Privacy mask, press OPEN key to enter and press CLOSE to clear the privacy mask you want to clear. Others of the Camera menu Digital Zoom Auto ICR ICR Display On Off Off Off Press OPEN key to enable the submenu, operate joystick to change the states of ON and OFF. Press OPEN to confirm and back and CLOSE to cancel and back. Camera Mode Exposure ► White Balance ► Privacy ► Other ► Camera Model ► Zoom Speed Focus Speed Camera Mode setting menu: 005 001 Press OPEN to enter the menu. Camera Mode Save: Normal Day Night Camera Mode Exec: Normal Day Night There are three save mode under the Camera Mode Save menu, move the cursor to the mode going to be change, press OPEN the cursor will change to , the setting will be saved and it will back to after 1 second. The three items under Camera Mode Exec is opposite the three modes above. Move the cursor to the mode you want to call and press OPEN to confirm and back. The saved mode could be called by the shortcut preset: Normal---call 100 preset; Day --- call 101 preset; Night --- call 9 102 preset Zoom Speed At the submenu of Exposal, move the cursor to Zoom Speed, press OPEN, the cursor will change to , then the parameter can be changed. Press OPEN to confirm and back or CLOSE cancel and back. Focus Speed Move the cursor to Focus Speed, press OPEN, the cursor will change to , then the parameter can be changed. Press OPEN to confirm and back or CLOSE cancel and back. Pan Home place AS speed PS1 Speed PS1 time PS2 Speed PS2 time PS3 Speed PS3 time PS4 Speed PS4 time Auto Flip Off 060 120 005 120 005 120 005 120 005 On This operation can control the home place of the dome, adjust the auto panning speed and 4 cruise line with presets, also the auto flip function. Home Place OFF (001-032, OFF) AS Speed PS1 Speed PS1 Time PS2 Speed PS2Time PS3 Speed PS3 Time PS4 Speed PS4 Time Auto Flip 060(000-080) 120(100-120) 005(5-120) ) 120 005 120 005 120 005 Auto Pan speed Presets cruise 1 speed Presets cruise 1 stop time. Presets cruise 2 speed Presets cruise 2 stop time. Presets cruise 3 speed Presets cruise 3 stop time. Presets cruise 4 speed Presets cruise 4 stop time. On(On/Off) Shortcut Key The functions can be setting by presets number, and can be called by the preset number which be set. Note: The right side number is the default short cut key, they are the number of presets. The number can be saved by new shortcut but the old one will not be cancel. Example: Change the number 095 into 16 that after Open Menu, the Menu can be called by 16 preset, and also can be called by 95 preset. Open Menu Auto Flip Reference Left Limit Right Limit Preset scan 1 Preset scan 2 Preset scan 3 Preset scan 4 Auto Scan 095 033 034 092 093 081 082 083 084 099 Camera ► Pan ► Shortcut Key Self act Leisure Time Nothing 030 In the presets, the preset scan line 1 will cruise from presets 1-8, and preset scan line 2 will cruise from presets 9-16, the preset scan line 3 will cruise from presets 17-24, and the preset scan line 4 will cruise from 25-32. Every line will back the first preset when it met the point never be set, and it will quit cruise if the first preset is not be set. The function Auto Scan is right and left limit scan. Note: The changing of the shortcut key can not be identical with the shortcut key already have. Operation: Move the cursor to the item which going to be changed, press OPEN, then change the parameter, press OPEN to confirm and back or CLOSE cancel and back. Self Act. The dome will check itself when electric and it will act the program automatic. 10 Nothing P Scan 1 P Scan 2 P Scan 3 P Scan 4 A Scan Home Preset scan 1 Preset scan 2 Preset scan 3 Preset scan 4 Auto scan (left and right limit scan Home place Operation: Press OPEN the cursor will change to , and the parameter can be change. Press OPEN to confirm and back or CLOSE to cancel and back. Leisure Time Camera ► Pan ► Shortcut Key Self act Leisure Time Nothing 030 The dome will back to the home place after a while if it is moved manually, and the time is Leisure Time The parameter is from 1-240. Operation: Press OPEN the cursor will change to , and the parameter can be change. Press OPEN to confirm and back or CLOSE to cancel and back. 11 VI High speed dome camera menu Control OPEN NEAR Confirm (SET) Control the cursor Up/Right to change the parameter ► Currently menu(You can change the parameter only when at the currently menu) Which have submenu, and press OPEN key to enter 12 JOYSTICK FAR Cursor Up/ Down Control the cursor Down/ Left to change the parameter Enter the Camera menu: MAIN SETUP ►CAM TITLE WHITE BAL BACKLIGHT MOTION DET FOCUS EXPOSURE SPECIAL RESET EXIT ON ATW OFF OFF 1. CAM TITLE CAM TITLE ABCDEFGHIJKLMNO PQRSTUVWXYZabcd efghijklmnopqrs tuvwxyz01234567 89 ( )<>-/#! ?, . ← ___ → CLR __ POS __ END __ ATW SETUP ►MODE SEL OUTDOOR Press SET to Return WDR SETUP ►WDR LIMIT MIDDLE Press SET to Return MOTION DETECTION ►SENSITIVITY 50 Press SET to Return. _ 2, WHITE BAL Please chose AWC-SET mold when at these situations below: The scenes have high COLOR TEMP things, for example the sky or setting sun. Caliginous scenes. The camera in the direction of the fluorescent lamp. 3, BACKLIGHT Attention: If the SHUTTER setting is MANUAL, the WDR function can not use. Please pay attention to the brightness of the monitor when setting the parameter. Add WDR may induce abnormity. Please do not use WDR when in these condition: abnormally color appears; ripple showed at the bright part. 4, MOTION DET Attention: Please make sure if the camera could work normally after every adjust This function wills not working if the bright light coruscates. The other function will carry out more time if this function opens 13 5. EXPOSURE EXPOSURE SETUP ►BRIGHTNESS 50 IRIS SHUTTER AGC . AUTO --MIDD L SSNR MIDD L SENS-UP AUT O END SET SHUTTER ►SHUTTER 1/60 Press SET to Return SHUTTER: Attention: When setting the BACKLIGHT as OFF, the A.FLK will show the best effect. If camera setting as ESC, the image will not steadily when face to the high light. Can not use WDR when setting as MANUAL. SEND-UP will can not use if under the MANUAL and A.FLK mode. 6. SPECIAL SPECIAL SETUP ►USER PRESET PRIVACY DAY/NIGHT R SYNC FREEZE H-REV OFF OFF COLO INT OFF OF F V-REV OF F IMAGE ADJ COMMUNICATION EXIT COMMUNICATION Attention: The COMMUNICATION parameter are setting previous, please do not change the parameters if not sure, or it will induce the camera abnormally. 14 VII Auto-Tracking Parameters Setting Protocol :PELCO-D / PELCO-P Baud Rate:2400 / 4800 / 9600 How to use auto-tracking function? This function is closed as default setting, and the setting table as below: Preset Number Function 35 Start-up Auto Tracking 36 Stop Auto Tracking Default Setting YES 230 when the state of untrackable objects happen the PTZ will move to Preset 1 231 when the state of untrackable objects happen the PTZ will not track anymore 232 when the state of untrackable objects happen the PTZ will keep motion detection on other moving object 233 The sensitivity of tracking:Low 234 The sensitivity of tracking:Medium 235 The sensitivity of tracking:High 236 Object Size: Small 237 Object Size: Medium 238 Object Size: Large 239 Object lost time:5 Second 240 Object lost time:10 Second 241 Object lost time:15 Second 242 Object lost time:20 Second 243 Object lost time:25 Second 244 Object lost time:30 Second 245 Object lost time:35 Second 246 Object lost time:40 Second 247 Auto Zoom:Open 248 Auto Zoom: Close YES YES YES YES YES Note: When you open the function of AUTO ZOOM, the lens will keep zoom in as the object move and not good at zoom out. When the object is too close to track, please just let the PTZ back to Preset 1 at the best position of it. 15 VIII Analysis on Common Malfunctions and Maintenance If there is any problem at your operation, please work through the logical steps below to determine and rectify the problem. Symptom How to solve the problems? No self-test 1 .Check the power supply and make sure if fuse is blow out or not 2. Make sure the adaptor of speed dome is specifically designed for use with this speed dome and verify that the input of speed dome inside is approximately AC24V. 3. Make sure the power pin on communication board is fixed but not loose. No Picture 1. Check the PCB to make sure the red power LED is lit. If the power LED is lit, check the BNC crip connection is correctly made at both the PCB end and the monitor /DVR /matrix end. 2. Check that the PSU is correctly connected and make sure the camera module match this speed dome. Self-test abnormal 1. Check the connection between camera module and PTZ. 2. Make sure that the DIP of speed dome setting is correct. Suggestion: check the camera module and confirm the DIP setting and then restart speed dome. No PTZ control 1. Check the power on self test screen to ensure that the protocol, ID and baud rate are as expected. 2. If the settings match, you should check the polarity of the communication RS485 connections, both on the control equipment and the speed dome. 3. Check that the control equipment setting is available and if it is compatible with the speed dome and is configured to match the speed dome setting correctly. 4. Check the address switch setting is answer for host which you controlling (some of host address is 1 but camera address is 0 and vice versa. Make sure if the wire on communication board is fixed. Work normally for close distance controlling but not available for long distance 1. The output drive of RS485 converter beyond their ability. 2. If the transport distance is over 1200M, then you need add a RS485 repeaters or signal amplifier. 3. Make sure that the short circuit pin of 120Ohm resistance connect correctly. 16