1
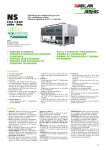
Artisan Technology Group is your source for quality
new and certified-used/pre-owned equipment
• FAST SHIPPING AND
DELIVERY
• TENS OF THOUSANDS OF
IN-STOCK ITEMS
• EQUIPMENT DEMOS
• HUNDREDS OF
MANUFACTURERS
SUPPORTED
• LEASING/MONTHLY
RENTALS
• ITAR CERTIFIED
SECURE ASSET SOLUTIONS
SERVICE CENTER REPAIRS
Experienced engineers and technicians on staff
at our full-service, in-house repair center
WE BUY USED EQUIPMENT
Sell your excess, underutilized, and idle used equipment
We also offer credit for buy-backs and trade-ins
www.artisantg.com/WeBuyEquipment
InstraView REMOTE INSPECTION
LOOKING FOR MORE INFORMATION?
Visit us on the web at www.artisantg.com for more
information on price quotations, drivers, technical
specifications, manuals, and documentation
SM
Remotely inspect equipment before purchasing with
our interactive website at www.instraview.com
Contact us: (888) 88-SOURCE | [email protected] | www.artisantg.com
ABI PRISM® 377 DNA Sequencer
XL Upgrade
User’s Manual
Artisan Technology Group - Quality Instrumentation ... Guaranteed | (888) 88-SOURCE | www.artisantg.com
© Copyright 2000, Applied Biosystems
For Research Use Only. Not for use in diagnostic procedures.
ABI PRISM and its Design, Applied Biosystems, Aquapore, AmpliCover, Anitron, Biobytes, Brownlee, FastPhoramidite,
GeneScan, Genotyper, HLP, INHERIT, Masterpiece, MicroAmp, MicroCoat, MPLC, NEWGUARD, ONESTEP, OPC, PCRMATE, Phosphalink, POLYPORE, Precipitette, ProBlott, PROCISE, ProFocus, ProSort, ProSpin, SeqEd, Sequence Navigator,
SPHERI5, SPHERI10, StockMarks, Stretch, Synergy, SynthAssist, and VeloSep are registered trademarks of PE Corporation or its
subsidiaries in the U.S. and certain other countries.
ABI, AutoAssembler, BaseSprinter, BigDye, CATALYST, GeneAssist, LV40, MatchMaker, PDQ, POP, POP-4, POP-6, Primer
Express, and ProSorb are trademarks of PE Corporation or its subsidiaries in the U.S. and certain other countries.
AmpErase, AmpliTaq, AmpliTaq Gold, EnviroAmp, GeneAmp, and TaqMan are registered trademarks of Roche Molecular
Systems, Inc.
Centricon is a registered trademark of W. R. Grace and Co.
Centri-Sep is a trademark of Princeton Separations, Inc.
Long Ranger is a trademark of The FMC Corporation.
AppleScript, Power Macintosh and Macintosh are registered trademarks of Apple, Inc.
pGEM is a registered trademark of Promega Corporation.
All other trademarks are the sole property of their respective owners.
Artisan Technology Group - Quality Instrumentation ... Guaranteed | (888) 88-SOURCE | www.artisantg.com
Contents
ABI PRISM 377 XL Upgrade Overview. . . . . . . . . . . . . . . . . . . . . . . . . . . . . . .1
About This Manual . . . . . . . . . . . . . . . . . . . . . . . . . . . . . . . . . . . . . . . . .1
Upgrade Overview . . . . . . . . . . . . . . . . . . . . . . . . . . . . . . . . . . . . . . . . .1
Safety Information . . . . . . . . . . . . . . . . . . . . . . . . . . . . . . . . . . . . . . . . . . . . . . .2
Site Preparation and Safety Guide . . . . . . . . . . . . . . . . . . . . . . . . . . . . .2
Ergonomic Hazard . . . . . . . . . . . . . . . . . . . . . . . . . . . . . . . . . . . . . . . . .2
Loading Volumes . . . . . . . . . . . . . . . . . . . . . . . . . . . . . . . . . . . . . . . . . . . . . . . .3
Loading References . . . . . . . . . . . . . . . . . . . . . . . . . . . . . . . . . . . . . . . .3
Tips on Loading Small Volumes . . . . . . . . . . . . . . . . . . . . . . . . . . . . . . .3
Loading Volumes for Sequencing . . . . . . . . . . . . . . . . . . . . . . . . . . . . . .3
Loading Volumes for GeneScan . . . . . . . . . . . . . . . . . . . . . . . . . . . . . . .4
Lanes, Combs, and Run Modes . . . . . . . . . . . . . . . . . . . . . . . . . . . . . . . . . . . . .5
Lanes, Combs, and Run Modes Table. . . . . . . . . . . . . . . . . . . . . . . . . . .5
Silanizing Agent. . . . . . . . . . . . . . . . . . . . . . . . . . . . . . . . . . . . . . . . . . . . . . . . .6
Silanizing Agent for Preparing Gels . . . . . . . . . . . . . . . . . . . . . . . . . . . .6
Software . . . . . . . . . . . . . . . . . . . . . . . . . . . . . . . . . . . . . . . . . . . . . . . . . . . . . . .7
Collection Software . . . . . . . . . . . . . . . . . . . . . . . . . . . . . . . . . . . . . . . .7
GeneScan Analysis . . . . . . . . . . . . . . . . . . . . . . . . . . . . . . . . . . . . . . . . .7
Sequence Analysis . . . . . . . . . . . . . . . . . . . . . . . . . . . . . . . . . . . . . . . . .7
Preference File . . . . . . . . . . . . . . . . . . . . . . . . . . . . . . . . . . . . . . . . . . . .7
Sequencing and GeneScan Run Windows . . . . . . . . . . . . . . . . . . . . . . .7
Error Alert Message . . . . . . . . . . . . . . . . . . . . . . . . . . . . . . . . . . . . . . . .8
CCD Pixel Position Value . . . . . . . . . . . . . . . . . . . . . . . . . . . . . . . . . . . . . . . . .9
CCD Pixel Position Overview . . . . . . . . . . . . . . . . . . . . . . . . . . . . . . . .9
Locating the CCD Pixel Position Label . . . . . . . . . . . . . . . . . . . . . . . . .9
Entering the Correct CCD Pixel Position Value . . . . . . . . . . . . . . . . . .10
Using Calibration File Make. . . . . . . . . . . . . . . . . . . . . . . . . . . . . . . . .11
i
Artisan Technology Group - Quality Instrumentation ... Guaranteed | (888) 88-SOURCE | www.artisantg.com
Entering the Serial Number . . . . . . . . . . . . . . . . . . . . . . . . . . . . . . . . . 11
Using Calibration File Send . . . . . . . . . . . . . . . . . . . . . . . . . . . . . . . . . 12
Module Files . . . . . . . . . . . . . . . . . . . . . . . . . . . . . . . . . . . . . . . . . . . . . . . . . . 13
Unused Module Folder. . . . . . . . . . . . . . . . . . . . . . . . . . . . . . . . . . . . . 13
Collection 2.5 Module Files. . . . . . . . . . . . . . . . . . . . . . . . . . . . . . . . . 13
Firmware . . . . . . . . . . . . . . . . . . . . . . . . . . . . . . . . . . . . . . . . . . . . . . . . . . . . . 15
Position-Based Integration Scheme . . . . . . . . . . . . . . . . . . . . . . . . . . . 15
Resetting the Instrument . . . . . . . . . . . . . . . . . . . . . . . . . . . . . . . . . . . 15
Performing a Total Reset . . . . . . . . . . . . . . . . . . . . . . . . . . . . . . . . . . . 15
ii
Artisan Technology Group - Quality Instrumentation ... Guaranteed | (888) 88-SOURCE | www.artisantg.com
ABI PRISM 377 XL Upgrade Overview
About This This manual describes the ABI PRISM® 377 DNA Sequencer
Manual enhancements included in the XL upgrade. Be sure to place this
manual in your ABI PRISM 377 DNA Sequencer User’s Manual.
Upgrade Overview With the XL upgrade, the primary enhancement to the ABI PRISM 377
DNA Sequencer is the increase in the number of samples that can be
analyzed simultaneously. This increased throughput was made possible
by re-engineering the instrument and software to acquire more data as
the laser scans across the gel.
XL-Specific Combs
This upgrade also includes new combs specifically designed for
upgraded instruments. These combs are 48- and 64-well shark’s-tooth
and 50- and 66-well square-tooth combs. Other ABI PRISM 377 combs
may be used.
1
Artisan Technology Group - Quality Instrumentation ... Guaranteed | (888) 88-SOURCE | www.artisantg.com
Safety Information
Site Preparation The ABI PRISM 377 Site Preparation and Safety Guide includes
and Safety Guide important safety information that should be read by all users before they
operate the instrument. Topics covered in the guide include:
♦
An explanation of the safety labels affixed to the instrument
♦
Laser safety, including hazards and safe-operation requirements
♦
Chemical safety, including a waste profile and Material Data Safety
Sheets for the chemicals commonly used with the instrument
We strongly recommend that this guide be kept readily available for
reference at all times.
Ergonomic Hazard ! WARNING ! ERGONOMIC HAZARD. Performing loading activities
may increase the risk of developing cumulative trauma disorders
(repetitive motion or repetitive strain injuries), which include but are not
limited to: tendonitis, tenosynovitis, epicondylitis, strains, and/or sprains.
To reduce the risk of these disorders, the following recommendations
have been developed to decrease awkward posture, repetitive motion,
excessive force, static muscle loading, and soft tissue contact.
♦
Use an automated multi-channel pipet loader.
♦
Locate the instrument on a variable or predetermined-height
worktable or lab bench.
♦
Use a stable stool or stepladder.
♦
Install adequate lighting in the appropriate area to facilitate loading.
♦
Ensure adequate front access to the instrument while performing
loading activities.
2
Artisan Technology Group - Quality Instrumentation ... Guaranteed | (888) 88-SOURCE | www.artisantg.com
Loading Volumes
Loading The new combs require smaller loading volumes. For more information,
References refer to:
♦
The loading volume tables in this manual
♦
The ABI PRISM 377 DNA Sequencing GeneScan Chemistry Guide
(P/N 4303188)
♦
The Automated DNA Sequencing Chemistry Guide (P/N 4305080)
Tips on Loading Loading the small volumes required by the ABI PRISM 377 XL upgrade
Small Volumes is easier if you use a gel-loading syringe, such as a multiplexed loader
of four or eight syringes arrayed to match the XL upgrade well spacing.
An alternative is an adjustable volume pipet with 0.17-mm gel loading
tips. Volumes below 1.0 µL may be difficult to load with a pipet.
For best resolution, loading volumes should be smaller when using the
12-cm separation distance. Loading volumes of 0.5 µL are acceptable.
You may find it possible and advantageous to use even smaller
volumes.
Loading Volumes Use the following table to determine resuspension and loading volumes
for Sequencing for sequencing based on the comb configuration used.
Comb Configuration (No. of Wells)
Resuspension
vol.a
Loading vol. (µL)
(µL)
24/36 Wells
48 Wells
64 Wells
6–9
2–4
2–4
1.5
0.5–1.0
0.5–1.0
a. 5:1 Deionized formamide to 50 mg blue dextran/mL 25 mM EDTA
! WARNING ! CHEMICAL HAZARD. Formamide is a known
teratogen. It can cause birth defects. Wash thoroughly after handling
formamide. Wear appropriate protective eyewear, clothing, and gloves.
Obtain a copy of the MSDS from the manufacturer. Wash thoroughly after
handling formamide.
3
Artisan Technology Group - Quality Instrumentation ... Guaranteed | (888) 88-SOURCE | www.artisantg.com
Loading Volumes Use the following table to determine component and loading volumes
for GeneScan for GeneScan based on the comb configuration used.
Comb Configuration (No. of Wells)
24/34 Wells
50 Wells
66 Wells
2.5
2.5
2.5
50 mg Blue dextran/mL
25 mM EDTA
(P/N 402055) (µL)
0.5
0.5
0.5
Size standarda (µL)
0.5
0.5
0.5
DNA (µL)
1.5
1.5
1.5
Loading vol. (µL)
1.5
1.0–1.5
0.5–1.0
Deionized formamide
(µL)
a. If the peak heights fall below 50 fluorescent units, increase the concentration by doubling
the volume of the size standard in the cocktail.
4
Artisan Technology Group - Quality Instrumentation ... Guaranteed | (888) 88-SOURCE | www.artisantg.com
Lanes, Combs, and Run Modes
Lanes, Combs, and The number of lanes, the types of combs used, and the corresponding
Run Modes Table run modes are shown in the following table.
Lanes
Comba
Run Mode
24
Shark’s-tooth
Full Scan
24
Square-tooth
Full Scan
32
Shark’s-tooth
Full Scan
34
Square-tooth
Full Scan
36
Shark’s-tooth
Full Scan
36
Square-tooth
Full Scan
48
Shark’s-tooth
XL Scan
50
Square-tooth
XL Scan
64
Shark’s-tooth
XL Scan
66
Square-tooth
XL Scan
a. Well spacing for the XL combs is 9 mm on center to accommodate multichannel
pipettes.
IMPORTANT
For 48, 50, 64, and 66 lanes, you must use XL Scan Run mode.
5
Artisan Technology Group - Quality Instrumentation ... Guaranteed | (888) 88-SOURCE | www.artisantg.com
Silanizing Agent
Silanizing Agent Purpose
for Preparing Gels When using a square-tooth comb, silate the unnotched glass plate in
the well area to facilitate loading samples. Use a silanizing agent such
as g -methacryloxypropyltrimethoxysilane (Sigma P/N M6514) to bind
the gel to the glass.
Procedure
Perform the following procedure every time a new gel is poured.
! WARNING ! CHEMICAL HAZARD. Silanizing agents are irritating to
the eyes, respiratory system, and skin. Always work in a fume hood.
Obtain a copy of the MSDS from the manufacturer. Wear appropriate
protective eyewear, clothing, and gloves.
To apply a silanizing agent and remove a gel after a run:
Step
Action
1
Wash the unnotched glass plate in detergent and distilled water.
Rinse well in distilled water then air dry.
2
Apply a small amount of silanizing agent to a cotton swab and
spread it across the top 3–5 cm of the unnotched glass plate.
3
Allow the agent to dry thoroughly.
4
Assemble the plates for the run as usual.
5
Remove the gel from the silated area with 0.1 N HCl or 0.1 N
NaOH, or scrape off gently.
6
Artisan Technology Group - Quality Instrumentation ... Guaranteed | (888) 88-SOURCE | www.artisantg.com
Software
Collection The current collection software is version 2.5.
Software
GeneScan Analysis The current GeneScan Analysis software is version 3.1 with
GSGelTracker.
Sequence Analysis The current Sequence Analysis software is version 3.3 with
SAGelTracker.
Preference File Define default values in the new software following the procedures
described under “Setting Preferences” in the ABI PRISM 377 DNA
Sequencer User Manual.
The default values you define for Sequencing or GeneScan run
modules and sample sheets are maintained in the Preference file.
Sequencing and The Sequencing and GeneScan Run windows now include the Run
GeneScan Run Mode pulldown menu, as shown below. You can now choose either Full
Windows Scan (standard with the ABI PRISM 377) or XL Scan (with the upgrade).
See “Lanes, Combs, and Run Modes Table” on page 5.
Run
Mode
pulldown
menu
7
Artisan Technology Group - Quality Instrumentation ... Guaranteed | (888) 88-SOURCE | www.artisantg.com
Error Alert The following error message has been added to alert you of a possible
Message problem with the heat-transfer plate thermisters.
This message may appear when you open data collection and start a
plate check, a pre-run, or a run if one of the thermisters is not
functioning.
If this message appears, schedule a service call to troubleshoot the
thermister and continue to operate the instrument as usual.
8
Artisan Technology Group - Quality Instrumentation ... Guaranteed | (888) 88-SOURCE | www.artisantg.com
CCD Pixel Position Value
CCD Pixel Position The instrument is shipped with the correct CCD pixel position value in
Overview memory. When a run is started, the software checks for a value greater
than zero. If the value is lost from memory, an error message is
displayed at the beginning of the run as shown below.
The CCD pixel position value may become corrupted as the result of a
power surge or failure. If this occurs, you must find the correct value and
enter it as described in the following procedures before starting a run.
Locating the CCD The correct CCD pixel position value is written on a white label on the
Pixel Position CCD camera. It is visible from the front through the opening below the
Label rear heat-transfer plate, as shown below.
Rear heat-transfer plate
CCD camera with pixel
position label visible here
9
Artisan Technology Group - Quality Instrumentation ... Guaranteed | (888) 88-SOURCE | www.artisantg.com
Note
The following procedure requires the use of a flashlight.
To locate the CCD pixel position value on the label:
Step
Action
1
Open the front door of the instrument.
2
Shine a light through the opening below the rear heat-transfer plate
to view the white label on the CCD camera.
3
Record the value from the white label.
4
If you cannot find the label, call technical support.
Entering the To enter the correct CCD pixel position value in the calibration file:
Correct CCD Pixel
Step
Action
Position Value
1
Turn power on to the instrument.
2
Select Manual Control from the Window menu.
3
Open the Fxn Name pulldown menu.
4
Select the CCD Pixel Position function.
The current pixel position value is displayed.
5
Compare the displayed value with the value on the white label.
If the pixel position is...
Then...
the same as the value on the
white label
Stop here.
different than the value on the
white label
a.
Select the text box and
type the correct CCD
pixel position value.
b.
Click Execute.
10
Artisan Technology Group - Quality Instrumentation ... Guaranteed | (888) 88-SOURCE | www.artisantg.com
Using Calibration IMPORTANT You must have the correct CCD pixel position value in
File Make instrument memory before using the Calibration File Make or Send functions.
Use the Calibration File Make function from the Manual Control Window
to create the ABI 377XL Calibration file and store the CCD pixel position
value and instrument serial number in it.
When created, the file is named ABI 377XL Calibration and is placed in
the Preferences folder inside the System folder. To read, edit, or print
the Calibration file, use the SimpleText application.
Creating a Calibration File
To create a Calibration file with Calibration File Make:
Step
Action
1
Turn on power to the instrument.
2
Select Manual Control from the Window menu.
3
Open the Fxn Name pulldown menu.
4
Select Calibration File Make.
5
Click Execute.
Entering the Serial To enter the instrument serial number in the calibration file:
Number
Step
Action
1
Make a note of the serial number from the back of the instrument.
2
Open the System Folder and the Preferences Folder inside the
System Folder.
3
Open the ABI 377XL Calibration file.
4
Using SimpleText, type the instrument serial number or name (up to
eight characters) by replacing the question marks.
5
Select Save from the File menu.
6
Close the ABI 377XL Calibration File window.
7
Quit the SimpleText program.
11
Artisan Technology Group - Quality Instrumentation ... Guaranteed | (888) 88-SOURCE | www.artisantg.com
Using Calibration IMPORTANT You must have the correct CCD pixel position value in
File Send instrument memory before using the Calibration File Make or Send functions.
After creating a Calibration file, use Calibration File Send from the
Manual Control window to send the instrument’s serial number (or
name) and CCD pixel position value to the instrument. These values will
be displayed in the Collection Log window.
The serial number (or name) is transferred into all sample files created
by the instrument. It can be viewed in the annotative view of the sample
file. This is useful for identifying instruments, particularly if you operate
more than one instrument.
To transfer a Calibration file with Calibration File Send:
Step
Action
1
Turn on power to the instrument.
2
Select Manual Control from the Window menu.
3
Open the Fxn Name pulldown.
4
Select Calibration File Send.
5
Click Execute.
12
Artisan Technology Group - Quality Instrumentation ... Guaranteed | (888) 88-SOURCE | www.artisantg.com
Module Files
Unused Module Move all of the module files that you do not intend to use from the
Folder Modules folder into the Unused Modules folder.
Collection 2.5 The following table lists the module files in Collection Software v. 2.5.
Module Files
a
2.5 Collection Module Files
377XL Modules
Chiller Modules
GS PR 12A-1200
GS PR 12A-1200 CHILLER
GS PR 12A-2400
GS PR 12A-2400 CHILLER
GS PR 12C-1200
GS PR 12C-1200 CHILLER
GS PR 12C-2400
GS PR 12C-2400 CHILLER
GS PR 12D-1200
GS PR 12D-1200 CHILLER
GS PR 12D-2400
GS PR 12D-2400 CHILLER
GS PR 12F-1200
GS PR 12F-1200 CHILLER
GS PR 12F-2400
GS PR 12F-2400 CHILLER
GS PR 36A-1200
GS PR 36A-1200 CHILLER
GS PR 36A-2400
GS PR 36A-2400 CHILLER
GS PR 36C-1200
GS PR 36C-1200 CHILLER
GS PR 36C-2400
GS PR 36C-2400 CHILLER
GS PR 36D-1200
GS PR 36D-1200 CHILLER
GS PR 36D-2400
GS PR 36D-2400 CHILLER
GS PR 36F-1200
GS PR 36F-1200 CHILLER
GS PR 36F-2400
GS PR 36F-2400 CHILLER
GS Run 12A-1200
GS Run 12A-1200 CHILLER
GS Run 12A-2400
GS Run 12A-2400 CHILLER
GS Run 12C-1200
GS Run 12C-1200 CHILLER
GS Run 12C-2400
GS Run 12C-2400 CHILLER
GS Run 12D-1200
GS Run 12D-1200 CHILLER
GS Run 12D-2400
GS Run 12D-2400 CHILLER
GS Run 12F-1200
GS Run 12F-1200 CHILLER
GS Run 12F-2400
GS Run 12F-2400 CHILLER
GS Run 2140V A CHILLER
GS Run 2140V C CHILLER
13
Artisan Technology Group - Quality Instrumentation ... Guaranteed | (888) 88-SOURCE | www.artisantg.com
2.5 Collection Module Filesa (continued)
377XL Modules
Chiller Modules
GS Run 2140V D CHILLER
GS Run 2140V F CHILLER
GS Run 36A-1200
GS Run 36A-1200 CHILLER
GS Run 36A-2400
GS Run 36A-2400 CHILLER
GS Run 36C-1200
GS Run 36C-1200 CHILLER
GS Run 36C-2400
GS Run 36C-2400 CHILLER
GS Run 36D-1200
GS Run 36D-1200 CHILLER
GS Run 36D-2400
GS Run 36D-2400 CHILLER
GS Run 36F-1200
GS Run 36F-1200 CHILLER
GS Run 36F-2400
GS Run 36F-2400 CHILLER
GS Run 60W A CHILLER
GS Run 60W C CHILLER
GS Run 60W D CHILLER
GS Run 60W F CHILLER
Plate Check A
Plate Check A CHILLER
Plate Check C
Plate Check C CHILLER
Plate Check D
Plate Check D CHILLER
Plate Check E
Plate Check E CHILLER
Plate Check F
Plate Check F CHILLER
Seq PR 36A-1200
Seq PR 36A-1200 CHILLER
Seq PR 36A-2400
Seq PR 36A-2400 CHILLER
Seq PR 36E-1200
Seq PR 36E-1200 CHILLER
Seq PR 36E-2400
Seq PR 36E-2400 CHILLER
Seq PR 48A-1200
Seq PR 48A-1200 CHILLER
Seq PR 48E-1200
Seq PR 48E-1200 CHILLER
Seq Run 36A-1200
Seq Run 36A-1200 CHILLER
Seq Run 36A-2400
Seq Run 36A-2400 CHILLER
Seq Run 36E-1200
Seq Run 36E-1200 CHILLER
Seq Run 36E-2400
Seq Run 36E-2400 CHILLER
Seq Run 48A-1200
Seq Run 48A-1200 CHILLER
Seq Run 48E-1200
Seq Run 48E-1200 CHILLER
a. PR = Prerun; Seq = Sequencing; GS = GeneScan
14
Artisan Technology Group - Quality Instrumentation ... Guaranteed | (888) 88-SOURCE | www.artisantg.com
Firmware
Position-Based Due to the increased demand for positional accuracy of the detection
Integration optics, a new integration scheme is used. Previously, a given time was
Scheme given to each channel, before reading the CCD camera and switching to
the next channel. This release of firmware uses position-based CCD
integration, where predetermined stage positions determine when to
switch.
Resetting the Reset the instrument under the following situations.
Instrument
Reset the instrument
when...
To reset, perform a...
new firmware version
has been downloaded.
single reset. Press the
reset button once.
Resetting is
necessary because...
the running TPU code
needs to be
reinitialized.
IMPORTANT Failure
to reset the instrument
will cause a lockup.
the instrument does
not respond to
commands or it
responds
inappropriately.
total reset. Follow the
procedure that follows.
the firmware image
may be corrupted.
Performing a Total To perform a total reset:
Reset
Step
Action
1
Using the eraser end of a pencil or similar object, press the red
reset button on the back of the instrument twice in rapid
succession.
2
Quit the data collection software.
15
Artisan Technology Group - Quality Instrumentation ... Guaranteed | (888) 88-SOURCE | www.artisantg.com
Step
3
Action
Launch the data collection software.
The firmware is automatically downloaded to the instrument. This
will take 60–90 seconds.
4
In response to this prompt, quit and then relaunch the data
collection software.
5
Check the CCD pixel position value as follows:
a.
Open the Window menu and select Manual Control.
b.
Open the Fxn Name menu and select CCD Pixel Position
Value.
The value is displayed in the Value box. If it matches the value on
the instrument, it is OK. If it does not match, correct the value.
16
Artisan Technology Group - Quality Instrumentation ... Guaranteed | (888) 88-SOURCE | www.artisantg.com
Index
loading samples, square-tooth comb
C
Calibration file
creating a 11
transferring 12
Calibration File Make 11
Calibration File Send 12
CCD pixel position value 9
checking 10
entering in Calibration file
finding the 9
collection software 7
combs 1
M
module files
10
position-based integration scheme
preference file 7
15
R
resetting the instrument 15
resolution, loading volumes for best
Run modes 5
Run windows 7
15
3
S
G
GeneScan Analysis software
GeneScan load volumes 4
I
integration scheme
13
P
F
firmware
6
15
L
load volumes 3
for best resolution
GeneScan 4
sequencing 3
7
Sequence Analysis software 7
sequencing load volumes 3
serial number
entering in Calibration file 11
silanizing agent, applying 6
small volumes, loading 3
T
3
temperature error 8
total reset, performing a
15
Index-17
Artisan Technology Group - Quality Instrumentation ... Guaranteed | (888) 88-SOURCE | www.artisantg.com
Index-18
Artisan Technology Group - Quality Instrumentation ... Guaranteed | (888) 88-SOURCE | www.artisantg.com
Artisan Technology Group - Quality Instrumentation ... Guaranteed | (888) 88-SOURCE | www.artisantg.com
Worldwide Sales Offices
Applied Biosystems vast distribution and
service network, composed of highly trained
support and applications personnel, reaches
into 150 countries on six continents. For
international office locations, please call our
local office or refer to our web site at
www.appliedbiosystems.com.
Headquarters
850 Lincoln Centre Drive
Foster City, CA 94404 USA
Phone: +1 650.638.5800
Toll Free: +1 800.345.5224
Fax: +1 650.638.5884
Technical Support
For technical support:
Toll Free: +1 800.831.6844 ext 23
Fax: +1 650.638.5891
www.appliedbiosystems.com
PE Corporation is committed to providing
the world’s leading technology and
information for life scientists. PE Corporation
consists of the Applied Biosystems and
Celera Genomics businesses.
Printed in the USA, 09/2000
Part Number 904412C
Artisan Technology Group - Quality Instrumentation ... Guaranteed | (888) 88-SOURCE | www.artisantg.com
Artisan Technology Group is your source for quality
new and certified-used/pre-owned equipment
• FAST SHIPPING AND
DELIVERY
• TENS OF THOUSANDS OF
IN-STOCK ITEMS
• EQUIPMENT DEMOS
• HUNDREDS OF
MANUFACTURERS
SUPPORTED
• LEASING/MONTHLY
RENTALS
• ITAR CERTIFIED
SECURE ASSET SOLUTIONS
SERVICE CENTER REPAIRS
Experienced engineers and technicians on staff
at our full-service, in-house repair center
WE BUY USED EQUIPMENT
Sell your excess, underutilized, and idle used equipment
We also offer credit for buy-backs and trade-ins
www.artisantg.com/WeBuyEquipment
InstraView REMOTE INSPECTION
LOOKING FOR MORE INFORMATION?
Visit us on the web at www.artisantg.com for more
information on price quotations, drivers, technical
specifications, manuals, and documentation
SM
Remotely inspect equipment before purchasing with
our interactive website at www.instraview.com
Contact us: (888) 88-SOURCE | [email protected] | www.artisantg.com