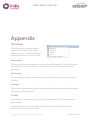
1
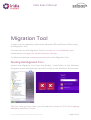
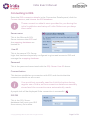
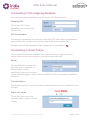
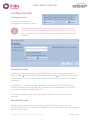
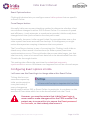
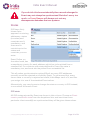
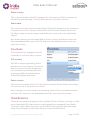
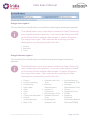
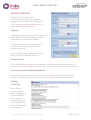
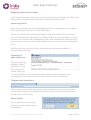
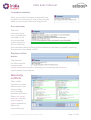
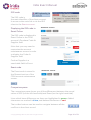
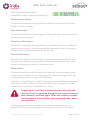
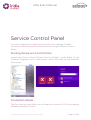
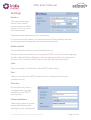
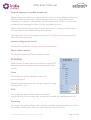
Iridia Exact Manual Introduction Exact Online Accountancy’s real-time visibility of your clients’ key financial information provides detailed insight that improves practice efficiency, enabling you to deliver quality services and generate higher fees. If you’re also using IRIS Accountancy Suite for your compliance work then Iridia will continue to improve practice efficiency, by intelligently synchronising your client and contact lists in IRIS Accountancy Suite to Exact Online Accountancy. What is Iridia? Iridia is an app for Exact Online that intelligently synchronises your client and contact list in IRIS Accountancy Suite to Exact Online. Synchronise IRIS clients of type Person, Business and Trust to Exact Online. Changed client and contact data Synchronise IRIS internal contacts of type Existing Contact and Other Person to Exact Online. For existing Contacts in IRIS, synchronise existing client address to address fields in Exact Online. Check for changes Synchronises only the records which have changed in either system, using smart caching to monitor changes. Store IRIS client code in Exact Online. © Copyright Bridge 360 LLP, 2014-2015. All rights reserved Client and contact lists Page 1 of 31 Iridia Exact Manual Iridia compatibility IRIS IRIS Accountancy Suite 11.8.0 or above, with: Practice Management suite, desktop edition. Exact Exact Online UK subscription for: Accounting Accountancy Wholesale Distribution Manufacturing Time and Billing CRM Back-office Client workstations — Windows Vista/7/8/8.1/10. Application server — Windows Server 2008/2008 R2/2012/2012 R2 Database server — Microsoft SQL Server 2008 R2/2012/2014 Context-sensitive F1 help — Adobe Reader 8 or above Iridia prerequisites Your Exact implementation partner will: Require access to your SQL Server system administrator password for the IRIS database instance. Check your system meets the minimum requirements to ensure a successful implementation. Discuss planning and implementing Iridia in your organisation in a managed way. As part of the planning discuss your data-cleansing strategy and how this is to be managed. Recommend that you nominate a suitable member of your organisation to be responsible for managing and resolving synchronisation conflicts. © Copyright Bridge 360 LLP, 2014-2015. All rights reserved Page 2 of 31 Iridia Exact Manual Contents Introduction What is Iridia? Iridia compatibility Iridia prerequisites Contents Migration Tool Starting the Migration Tool Connecting to IRIS Connecting to the mapping database Connecting to Exact Online Activating Iridia Running Iridia in demo mode Configuring Iridia Configuring Exact options in Iridia States Countries Classifications Synchronisation Resolving conflicts Service Control Panel Starting the Service Control Panel Connection details Settings Schedule Iridia Service Service control manager Scheduled synchronisations Email notifications Logs 1 1 2 2 3 4 4 5 6 6 7 8 9 11 12 13 13 15 17 21 21 21 22 24 26 26 27 27 29 Appendix 30 Info menu 30 © Copyright Bridge 360 LLP, 2014-2015. All rights reserved Page 3 of 31 Iridia Exact Manual Migration Tool In Iridia you can manually synchronise between IRIS and Exact Online using the Migration Tool. You can also use the Migration Tool to connect to your databases, and conveniently manage your synchronisation settings. Conflicts can also be reviewed and resolved in the Migration Tool. Starting the Migration Tool Launch the Migration Tool from the Bridge³ | Iridia folder of the Windows Programs menu. Alternatively, search for Iridia on the Windows Start screen. The first time you start Iridia, you will need to connect to IRIS, the mapping database, and Exact Online. © Copyright Bridge 360 LLP, 2014-2015. All rights reserved Page 4 of 31 Iridia Exact Manual Connecting to IRIS Enter the IRIS connection details in the Connection Details panel, click the Connect button, and choose the IRIS database. These connection details were provided to you during the initial installation and setup of Iridia. Make sure you keep them safe! Server name This is the Microsoft SQL Server instance that IRIS and the mapping database are hosted on. User ID This is the secure SQL Server login that has been especially configured to give read access to IRIS and manage the mapping database. Password This is the password associated with the SQL Server User ID above. Connect button This button establishes a connection with IRIS, and checks that the connection details are all correct. You would not normally need to click this button during regular use of Iridia, as the connection details are securely stored and the connections are automatically made. A purple tick will be displayed if the connection is successful. IRIS DB This is the SQL Server database that hosts your IRIS Accountancy Suite data. © Copyright Bridge 360 LLP, 2014-2015. All rights reserved Page 5 of 31 Iridia Exact Manual Connecting to the mapping database Choose the mapping database, and click the IRIS Done button. Mapping DB This is the SQL Server database that stores Iridia information. IRIS Done button This button establishes a connection with the IRIS and mapping databases, and verifies they contain accountancy and Iridia data, respectively. A purple tick will be displayed if the connection is successful. Connecting to Exact Online Choose the Exact server and click the Connect button. Log in to Exact online, then choose the company to synchronise with IRIS. Server Choose the Exact server you normally use to connect to Exact Online. Iridia is specifically set up to connect to the United Kingdom server, because IRIS is a UK accounting compliance platform. Connect button This button connects to Exact Online, and prepares a secure channel for you to log in. Exact user name This is the user name you normally use to login to Exact Online. © Copyright Bridge 360 LLP, 2014-2015. All rights reserved Page 6 of 31 Iridia Exact Manual Exact password This is the password associated with the Exact user name. Login button This button validates your user name and password, and connects to Exact Online. Company This is the Exact Online company you want to synchronise to IRIS. Normally it would be your main Exact data set. After Iridia has synchronised once the Exact company will be locked, to prevent accidently copying data to the wrong place. A purple tick will be displayed after choosing the company. Three purple ticks indicate that the connection is complete! If not already licenced, you may be asked to enter your Iridia activation key. Activating Iridia The activation screen displays your IRIS and Exact Online registration details, and allows you to enter a Bridge³ licence key for Iridia. © Copyright Bridge 360 LLP, 2014-2015. All rights reserved Page 7 of 31 Iridia Exact Manual Licensee name This is the company name registered in your IRIS system. IRIS customer number This unique number forms part of your IRIS subscription details. Exact name This is the company name registered in your Exact Online subscription. Exact ID This unique number forms part of your Exact Online subscription details. No licence key? Click here to arrange purchase If you don’t have your licence key to hand, this link sends an email requesting a copy. If you are considering a subscription of Iridia from a trial version, the email provides us with details to complete your subscription. Your licence key Your unique activation details, in five blocks of five letters separated by dashes. You can type this or paste it in. If the key matches your IRIS and Exact details, you will see a purple tick and the Confirm button can be clicked. Confirm button Click the button to store your activation details and enable full operation of Iridia. You can now go on to configure Iridia, do a manual synchronisation, or review any outstanding conflicts. Running Iridia in demo mode If you are not able to enter activation details right now, click the close button. Iridia will run in demo mode, synchronising only the first client. © Copyright Bridge 360 LLP, 2014-2015. All rights reserved Page 8 of 31 Iridia Exact Manual Configuring Iridia Configure button This button opens the configuration options screen. These options govern how the Migration Tool operates. Apart from the Resolve Conflicts Manually tick box, they also govern how scheduled unattended synchronisations behave. Include IRIS codes A wildcard pattern governing which IRIS client codes are synchronised to Exact Online. ? represents a single character, while * represents any number of characters. You may have used wildcards like this to search for files on a computer. A wildcard of * means include everything. A wildcard of AB?00? means include anything starting with AB, followed by one character, followed by two zeroes, then one final character. For other examples, see http://goo.gl/6NrBEn or many other internet sources. Exclude IRIS codes Another wildcard pattern, governing which IRIS client codes are not synchronised to Exact Online. It is applied after codes have been included by Include IRIS codes. © Copyright Bridge 360 LLP, 2014-2015. All rights reserved Page 9 of 31 Iridia Exact Manual For example, including A* and excluding ?D* will sync just those codes in the ranges A0 to AC and AE to AZ (assuming your codes are all alphanumeric). Leaving this box blank will result in nothing being excluded—which can often be what you need. Use regular expressions instead of wildcards? Regular expression are an advanced but standardised way of specifying matching patterns, which come in very useful when you synchronise a highly-specific or complicated set clients. They are the subject of whole books by themselves, and you are not expected to learn how to write them! But please do let Bridge³ or your implementation partner know what your synchronisation requirements are, and we will help you achieve them. When this box is ticked, both the Include IRIS codes and Exclude IRIS codes boxes must contain regular expressions (starting with ^ and ending with $). If you want to find out more about writing regular expressions (also known as regex), http://goo.gl/4dCYc3 is a good place to start. Resolve conflicts manually? When this box is ticked, any client which is found to have different details in IRIS and Exact Online won’t automatically have the current IRIS details copied over to Exact. Instead they will be marked as a conflict, and can be reviewed and managed on the conflict resolution screen. Clients which are being created for the first time, or which are identical in IRIS and Exact, are unaffected by this setting. The scheduled automatic synchronisation uses a separate Require Approval of Update Exceptions setting, to allow for more flexibility. Show conflict XML (debug mode)? Ticking this box makes the conflict resolution screen display the IRIS and Exact client records in XML format, instead of formatted text. Sometimes this setting can help with troubleshooting problems, but you won’t normally need to activate it. © Copyright Bridge 360 LLP, 2014-2015. All rights reserved Page 10 of 31 Iridia Exact Manual Exact Options button Clicking this button lets you configure some Iridia options that are specific to Exact Online. Force Resync button Normally Iridia uses a smart checking method to determine whether client records have changed in either IRIS or Exact Online. For reasons of speed and efficiency, it only attempts to synchronise records it thinks really have changed since the synchronisation was last performed. Occasionally, however, Iridia can get fooled, for example when one or the other system has been restored from backup. If this happens you might notice discrepancies creeping in between the two systems. The Force Resync button is way of correcting this. Clicking it tells Iridia to check every client record it knows about (in either system) next time synchronisation occurs. This could make the process take longer, just that one time only, since a lot more Exact data has to be downloaded from the Cloud to do thorough checks. This setting also effects the next time the scheduled automatic synchronisation occurs. Whichever one happens first will be a forced resync. Configuring Exact options in Iridia I will never use this Exact login to change data within Exact Online Ticking this box can sometimes speed up Iridia synchronisation runs, particularly if many changes are being made in either IRIS or Exact Online. In particular, it cuts down on the amount of Exact data which has to be downloaded from the Cloud. However, you must be certain that Iridia’s Exact login is never used to make changes within the CRM module! The easiest way to ensure this is to secure the Exact password for that user, so that nobody else knows it. © Copyright Bridge 360 LLP, 2014-2015. All rights reserved Page 11 of 31 Iridia Exact Manual If you do tick this box accidentally then records changed in Exact may not always be synchronised. But don’t worry too much—a Force Resync will always sort out any discrepancies between the two systems. States IRIS has a fairly laissez-faire approach to storing addresses—states (counties) and countries aren’t mandatory, and there are no restrictions to the states and countries you can enter. Exact Online, on the other hand, has a mandatory country for each address, which has to be picked from a standard list. For countries with states defined in Exact, the state is mandatory too, and must also be picked from a standard list. This all makes synchronisation quite difficult, as many IRIS addresses normally would be rejected as invalid by Exact. To get around this, every time a state or country is rejected as invalid, Iridia keeps track of it, and lets you assign it to one of the standard Exact values. Alternatively, you can choose to change the state or country in IRIS instead, to one which will match Exact. IRIS state All IRIS states rejected by Exact are shown in this column. Choose an Exact country and Exact state from the dropdown lists, and next time those particular client record(s) are synchronised they will be given these values. © Copyright Bridge 360 LLP, 2014-2015. All rights reserved Page 12 of 31 Iridia Exact Manual Exact country This column contains the ISO standard list of countries. Pick the country to which this state belongs. This will filter the list in the next column. Exact state This column contains all the states Exact Online will accept for the country in the previous column. Some countries like the UK and Australia have a full list. Many other countries have none defined, so this is the only selectable option. Any states where you have specified an Exact country and Exact state will be remembered when you click OK, and won’t be displayed next time you open this screen. Countries IRIS countries are mapped to exact countries in a similar way to states. IRIS country All IRIS counties rejected by Exact are shown in this column. Choose an Exact country from the dropdown list, and next time those particular client record(s) are synchronised they will be given this value. Exact country This column contains all the ISO standard countries Exact Online will accept for the country in the previous column. Any countries you have chosen a matching value will be remembered when you click OK, and won’t be displayed next time you open this screen. Classifications There are no general-purpose custom fields in Exact Online, currently, so the most important IRIS client data is synchronised into standard Exact fields. Two very useful fields, however, are the IRIS client type and business type. Iridia can optionally synchronise these to Exact classifications. © Copyright Bridge 360 LLP, 2014-2015. All rights reserved Page 13 of 31 Iridia Exact Manual Assign client type to Choose the Exact classification in which the client types have been entered. The classification may have been created in Exact Online by your implementation partner. You can create them yourself in the Exact Online master data screen. Create a Property for every client type. The code can be anything, but the description must exactly match this list: Person Business Trust Assign business type to Choose the Exact classification in which the business types have been entered. The classification may have been created in Exact Online by your implementation partner. You can create them yourself in the Exact Online master data screen. Create a Property for every client type. The code can be anything, but the description must exactly match this list: Person Limited company Partnership Sole trader Other Trust LLP Charity incorporated Charity Unincorporated Bare Trust Unauthorised Unit Trust Estate in Administration Interest in Possession Discretionary Trust Disabled Persons Trust Employment Related Trust © Copyright Bridge 360 LLP, 2014-2015. All rights reserved Accumulation or Maintenance Trust Heritage Maintenance Fund Charity Charitable Trust FURBs Employer Financed Retirement Benefit Scheme (EFRBS) Page 14 of 31 Iridia Exact Manual Synchronisation At the heart of Iridia is the synchronisation process, whether triggered manually in the Migration Tool, or scheduled automatically by the Iridia Windows service. Migrate The Migrate button manually starts the Iridia synchronisation process, which proceeds in a number of stages. The progress log, progress bar and status bar keep you updated how things are going. At any time during syncing, the abort button safely stops the process. Licence check If the Iridia activation key is not present then the synchronisation lets you know you it is operating in demo mode, and only process one client record. Connecting and validating databases Iridia always needs to connect to IRIS, the mapping database and Exact Online, and the progress log tells you if there have been any problems. Getting client lists Iridia checks which records have changed in IRIS and Exact since the last synchronisation, and marks them for more detailed investigation. © Copyright Bridge 360 LLP, 2014-2015. All rights reserved Page 15 of 31 Iridia Exact Manual Mapping clients and contacts Iridia checks whether previously synced records have changed the IRIS code linking them together, and attempts to delink any duplicates. Importing clients Each record suspected to have changed will be investigated in more detail, by comparing the versions in IRIS and Exact. This is the main time-consuming stage of synchronisation, so how long it takes will depend on the scale of changes. The first synchronisation is likely to take much longer than subsequent ones, and infrequently scheduling of the automatic sync process will probably need to look at more records each time. Additionally, the exclusive Exact login setting can have an effect on synchronisation times. Summary of each client sync The progress log displays a short summary of the IRIS and Exact codes, the type of client, whether it has changed, and whether synchronisation was successful (or the client was marked for later conflict resolution). Progress and status bars The progress and status bars give you an indication of how far along the synchronisation process has got, and how many client records have been modified in Exact Online. Abort button At any time during syncing, the abort button safely stops the process. © Copyright Bridge 360 LLP, 2014-2015. All rights reserved Page 16 of 31 Iridia Exact Manual Completion statistics After every client has been processed, the log shows a summary of how many records were synchronised, and how long it took. Error summary The error summary gives you a cumulative reminder of all the unresolved synchronisation errors Iridia has encountered. Most of these will be validation problems, typically requiring the record to be edited in IRIS. Resolve conflicts button The Resolve Conflicts button launches the conflict resolution screen, allowing you to manage and resolve synchronisation problems. Resolving conflicts The conflict resolution screen allows you to see where client records differ between IRIS and Exact in a visual manner, and lets you accept or reject updates to Exact in a controlled way. © Copyright Bridge 360 LLP, 2014-2015. All rights reserved Page 17 of 31 Iridia Exact Manual IRIS code The IRIS code is the main identifier of the client account. It serves as the main link to tie the IRIS client to the Exact account. Displaying the IRIS code in Exact Online The IRIS code is displayed in Exact Online in the CRM account’s Purchase Code At Supplier field. Note that you may need to customise the account maintenance screen in order to display the Code At Supplier field. Code at Supplier is a searchable field in Exact. Exact code The Exact code is stored in the General section of the CRM account maintenance screen. Comparison pane The comparison pane shows you all the differences between the record values in IRIS (on the left hand side) and Exact (on the right hand side). Lines which have differences on them are highlighted in green. Added characters are marked in blue, and deleted characters in red. The toolbar buttons can be used to navigate between all the conflicts in the client record. © Copyright Bridge 360 LLP, 2014-2015. All rights reserved Page 18 of 31 Iridia Exact Manual The third pane shows a direct comparison of the currently selected line. Previous client button This button cycles back through all of the clients currently shown on the conflict resolution screen. Next client button This button cycles forward through all of the clients currently shown on the conflict resolution screen. Previous conflict button This button cycles back through all of the outstanding conflicts. Unlike the previous client button, it skips accepted and rejected records, and wraps round to the end when it reaches the beginning. Next conflict button This button cycles forward through all of the outstanding conflicts. Unlike the next client button, it skips accepted and rejected records, and wraps round to the beginning when it reaches the end. Reject button Clicking this button marks the conflict as resolved, without changing the current values in Exact. It won’t be flagged up as a conflict again until the record changes further in either IRIS or Exact. Typically, you would reject a conflict if there was a trivial difference between two values in IRIS or Exact, or if the IRIS record was wrong but you didn’t currently have information available to correct it. Triggering a Force Resync causes all previously rejected records to be re-compared during the next synchronisation, and marked as conflicts again. Often this is what you want, but be aware of this possibility before making heavy use of this workflow. Clicking the button on an accepted or unresolved record marks it as rejected. Clicking it on a rejected record converts it back to unresolved. © Copyright Bridge 360 LLP, 2014-2015. All rights reserved Page 19 of 31 Iridia Exact Manual Rejections get applied when the conflict resolution screen is closed. Until then, you can use the navigation buttons to reconsider your decision. Accept button Clicking this button approves the current values of the IRIS record for updating to Exact when the conflict resolution screen is closed. Until then, you can use the navigation buttons to reconsider your decision. Clicking the button on a rejected or unresolved record marks it as accepted. Clicking it on an accepted record converts it back to unresolved. Essentially, accepting a conflicted client record treats it the same as if the resolve conflicts manually/require approval of update exceptions settings were not ticked. Accepted records are still subject to validation and potential synchronisation failure when the conflict resolution screen is closed. If this occurs, any errors or warnings are displayed on the conflict errors screen. Review pane As well as the navigation and resolution buttons, the review pane shows which conflict record you are currently managing, plus a summary of the accepted, rejected and outstanding conflicts. Progress and status bars Committing conflicts can take a while, so at any point after closing the form you can monitor progress, and also stop the update with the abort button. Conflict errors screen Any validation errors and update problems are displayed after the conflict resolution screen has been closed, along with an error summary. © Copyright Bridge 360 LLP, 2014-2015. All rights reserved Page 20 of 31 Iridia Exact Manual Service Control Panel You can configure the scheduling and notification settings of Iridia’s automatic scheduled synchronisation feature, using the Service Control Panel. Starting the Service Control Panel Launch the Service Control Panel from the Bridge³ | Iridia folder of the Windows Programs menu. Alternatively, search for Iridia on the Windows Start screen. Connection details The first time you start Iridia, you will need to connect to IRIS, the mapping database, and Exact Online. © Copyright Bridge 360 LLP, 2014-2015. All rights reserved Page 21 of 31 Iridia Exact Manual Settings Email to This optional setting allows you to send synchronisation status reports to one or more email addresses. Separate email addresses with a semicolon. If you leave this box blank, no status reports will be emailed, and the remaining email settings do not need to be specified. Email method Choose between Network and Pickup Directory. Network connects directly to a designated SMTP server to send outgoing emails, whereas Pickup Directory saves outgoing emails in a designated location, from which an SMTP server can pick up and send them. Host The host name or IP address of the SMTP email server. Port The port number the SMTP email server is configured to receive connections on. Directory A local directory that is configured as a pickup location for the SMTP email server. Advanced button The button opens a screen where additional email settings can be configured. © Copyright Bridge 360 LLP, 2014-2015. All rights reserved Page 22 of 31 Iridia Exact Manual User name Optionally specify the user name associated with the SMTP server login credentials. Password Optionally specify the password associated with the SMTP server login credentials. Domain Optionally specify the name of the domain or realm associated with the SMTP server login credentials. Use SSL Optionally specify whether Secure Sockets Layer (SSL) should be used to access the SMTP mail server. SPN Optionally specify the Service Provider Name (SPN) to use for authentication when using extended protection. The default value is of the form SMTPSVC/<host> where <host> is the hostname of the SMTP mail server. Client domain Optionally specify the client domain name used in the initial SMTP protocol request to the SMTP server. If not set, the localhost name of the local computer sending the request will be used. Send test email button Use this button to send a test email using the current settings configured in the Service Control Panel. This can be useful to troubleshoot any connection or delivery problems, and ensure notifications are correctly set up before scheduling any synchronisations. © Copyright Bridge 360 LLP, 2014-2015. All rights reserved Page 23 of 31 Iridia Exact Manual Require approval of update exceptions When this box is ticked, any client which is found to have different details in IRIS and Exact Online won’t automatically have the current IRIS details copied over to Exact. Instead they will be marked as a conflict, and can be reviewed and managed on the conflict resolution screen. Clients which are being created for the first time, or which are identical in IRIS and Exact, are unaffected by this setting. The Migration Tool uses a separate Resolve Conflicts Manually setting, to allow for more flexibility. Import configuration button This button opens the configuration options screen. Exact options button This button opens the Exact options screen. Schedule Specify exactly when and how often you want IRIS data to be automatically synchronised with Exact Online. None Choosing this option disables automatic synchronisation. Manual synchronisation can still be triggered using the Migration Tool. Daily Choosing this option allows you to schedule synchronisation once every day, seven days a week, at a designated time. Recurring Choosing this option allows you to freely schedule synchronisation on one or more days of the week, every so often during a block of time. © Copyright Bridge 360 LLP, 2014-2015. All rights reserved Page 24 of 31 Iridia Exact Manual At The time of day to start a daily synchronisation. The start of the period of time for a recurring synchronisation. To The end of the period of time for a recurring synchronisation. Every (min) How often a recurring synchronisation will occur between the start and end times. © Copyright Bridge 360 LLP, 2014-2015. All rights reserved Page 25 of 31 Iridia Exact Manual Iridia Service The Iridia service runs on a Windows server (or a designated workstation), and performs automatic scheduled synchronisations. Results are emailed to designated recipients, who can review the contents or resolve conflicts. The service is automatically started after Iridia installation, and on Windows startup. It can also be started and stopped on demand. Service control manager The Microsoft Management Console (MMC) Services Snap-in lets you view and configure properties for services running on the system. You can disable, start, stop or restart services; configure authentication and fault tolerance. Starting and stopping the Iridia service Highlight the Iridia service, and click the start and start and stop the service. © Copyright Bridge 360 LLP, 2014-2015. All rights reserved stop toolbar buttons to Page 26 of 31 Iridia Exact Manual Log on as The Iridia service runs under the Local System account. It doesn’t need to interact with the desktop. Scheduled synchronisations The Iridia service starts an automatic synchronisation at the times scheduled by the Service Control Panel. The process is essentially the same as the manual synchronisation performed by the Migration Tool. The results are captured in log files, and optionally emailed to designated recipients. Email notifications From address The email is sent from [email protected]. This address is not monitored for replies. © Copyright Bridge 360 LLP, 2014-2015. All rights reserved Page 27 of 31 Iridia Exact Manual Notification emails can occasionally be mishandled as spam by your email server. If this happens, whitelist [email protected] or add it to your address book. Subject The email subject will be Iridia - Import Succeeded (n Conflicts) or Iridia Import FAILED. You may use this pattern to set up inbox filters. Synchronisation summary A shortened form of the synchronisation results appears in the body of the email. Detailed synchronisation log The full synchronisation results are attached to the email in a text file. Resolve conflicts link Click on the Resolve Outstanding Conflicts link in the email to open the conflict resolution screen. This only works if you have the Migration Tool installed on your computer. If you don’t, you can install it by clicking on the upgrade/install link in the email. Upgrading/installing Iridia The email contains a link to download the Iridia installer. If a new version of Iridia is available, the email contains a link to download an installer to upgrade Iridia to the latest version. You may need administrator privileges on your computer to install or upgrade Iridia. You may also need configuration details from your Exact implementation partner to set up your database connections. © Copyright Bridge 360 LLP, 2014-2015. All rights reserved Page 28 of 31 Iridia Exact Manual Logs Service log Each time the Iridia service is started or stopped, and each time a scheduled synchronisation is triggered, it is recorded in a log file located at: C:\ProgramData\Bridge\Iridia\IridiaService.log Scheduler log Each time the synchronisation schedule is changed, the new details are recorded in a log file located at: C:\ProgramData\Bridge\Iridia\IridiaScheduler.log Import logs Each time a scheduled synchronisation completes, the results are recorded in a new log file located in the following directory: C:\ProgramData\Bridge\Iridia\ImportLogs © Copyright Bridge 360 LLP, 2014-2015. All rights reserved Page 29 of 31 Iridia Exact Manual Appendix Info menu The Info menu is located at the bottom left hand corner of the Migration Tool, conflict resolution screen and Service Control Panel. About Iridia This screen shows the version of Iridia currently installed. Your implementation partner may ask you for this information while troubleshooting any problems. Version log This screen lists major changes and bug fixes included in each new version of Iridia. Licences This screen shows details and licences of all the open source and third-party software included in Iridia. F1 help Choosing this menu option, or typing F1 anywhere in Iridia will open this help manual. To get detailed context-specific help, click on a particular box, field or button before hitting the F1 key. © Copyright Bridge 360 LLP, 2014-2015. All rights reserved Page 30 of 31 Iridia Exact Manual F1 help requires Adobe Reader to be installed on your computer. The latest version can be downloaded from https://get.adobe.com/uk/reader/ Always reopen help topics In order to jump to a particular help topic when you hit F1, Adobe Reader needs to close and reopen the help document. While this is can be a useful feature, we recognise it is not always desirable, so you can turn off the behaviour by unticking this menu item. When unticked, Adobe Reader will remain open, but may not always jump to the expected section when you hit the F1 key. © Copyright Bridge 360 LLP, 2014-2015. All rights reserved Page 31 of 31