1
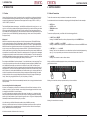
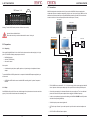
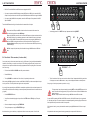
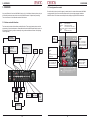
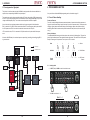
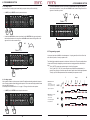
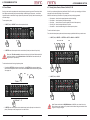
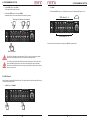
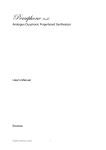
VERS. 1.0
OWNERS MANUAL
ANALOGUE BASSLINE SYNTHESIZER
TRANSP A SHUFFLE B SWING RST
SAFETY INSTRUCTIONS
Before using MAGMA, please follow the instructions for use of the instrument as this will
warrant proper operation of the instrument. Due to the fact that these instructions touch
on product liability, we recommend you reading them carefully. Any claim for defect will
be rejected if one or more of the topics have not been observed. Ignoring the instructions can eventually void warranty.
• RISK OF ELECTRIC SHOCK! DO NOT OPEN OR MODIFY MAGMA.
• Never place heavy objects such as beer crates, trucks, or mothers-in-law on the
instrument.
• Before moving place with MAGMA, make sure the unit is disconnected from other
devices (external controllers, mixers etc.). If not, watch for cables and other pitfalls. Funny films can be uploaded to the internet.
• Transport the instrument carefully, never let it drop or be rude to it. Make sure that,
during transport and while in use, the instrument is properly supported (no pizza
cartons or king-size buckets of chicken-wings) and cannot fall or slip from your
(possibly greasy) fingers – people might get injured and, even worse, sue you for
this.
• TO REDUCE THE RISK OF ELECTRIC SHOCK, DO NOT REMOVE COVER
(OR BACK). NO USER-SERVICEABLE PARTS INSIDE.
• Never use the instrument in the immediate proximity of interfering electronic devices (e.g. computers and monitors, power supplies, speakers, flux compensators,
or hadron colliders) since this might cause MAGMA to behave erratically – and
may result in corrupted memory data as well.
• The instrument may only be operated at the voltage noted on the power input on
the rear panel. Before plugging in MAGMA, always check for the correct voltage.
Before using MAGMA in a foreign country, check whether the mains voltage is
compatible with the unit.
• Before cleaning MAGMA, make sure the unit has been unplugged.
Use a soft, dry cloth only to clean MAGMA. Never use any liquids, abrasive cleaners or cleaners containing solvents such as alcohol, terpentine, or other spirits
(such as Scotch Single Malts in cask strength).
• When MAGMA is not in use, disconnect the power supply from the power outlet.
This will save energy (and keep your electric bill within reason).
• The instrument is to be shipped in the original packaging only. Any instruments
shipped to us for return, exchange, repairs covered under warranty, update or examination must be in their original packaging! Any other deliveries will be rejected.
Therefore, you should keep the original packaging and this user documentation –
if only as a doorstop.
• REFER SERVICING TO QUALIFIED SERVICE PERSONNEL ONLY.
• Never attempt to repair MAGMA on your own. Never open the casing. For technical support, please get in touch with Eowave.
• The instrument is not to be operated outdoors (never ever!) but in dry, closed
rooms only. Never use the instrument in a moist or wet environment or near flammable materials.
• No liquids or conductive materials must get into the instrument. If this happens to
be the case, the instrument is to be disconnected from mains power immediately
and examined, cleaned, and eventually repaired by a qualified person (that would
be us).
• Never expose the instrument to temperatures above +50 °C or below -10 °C.
Before powering up, the instrument should have a temperature of at least +10 °C.
Do not place the instrument in direct sun light. Do not install the instrument near
heat sources such as radiators, open fire places, or thermo-nuclear testing sites
(or power plants that would employ people like Homer Simpson).
• The instrument may only be used for the purpose described in this operating manual. Due to safety reasons, the instrument is never to be used for purposes other
than musical (e. g. disintegrating neighbours, bending the space-time continuum,
impressing girls etc.).
• When using the instrument in Germany, ACHTUNG: the appropriate VDE standards are to be obeyed. The following standards are of special and utmost importance: DIN VDE 0100 (Teil 300/11.85, Teil 410/11.83, Teil 481/10.87), DIN VDE
0532 (Teil 1/03.82), DIN VDE 0550 (Teil 1/12.69), DIN VDE 0551 (05.72), DIN
VDE 0551e (06.75), DIN VDE 0700 (Teil 1/02.81, Teil 207/10.82), DIN VDE 0711
(Teil 500/10.89), DIN VDE 0860 (05.89), DIN VDE 0869 (01.85). VDE papers can
be obtained from the VDE-Verlag GmbH, Berlin. German readers will know where
to turn to, all others do not really need to bother.
• Keep the top of the instrument clear in order to warrant proper ventilation, otherwise the instrument may overheat and malfunction.
2
3
WELCOME TO THE
VERS 1.0
OWNERS MANUAL
ANALOGUE BASSLINE SYNTHESIZER
TRANSP A SHUFFLE B SWING RST
CONTENT
5. SOUND GENERATION
34
5.1. Sound Generation Overview
34
5.2. Oscillator (VCO) / Mixer 36
5.3. Filter (VCF)37
5.4. Amplifier (VCA)
38
5.6. Envelope section
38
5.7. LFOs39
1. INTRODUCTION
6
1.1. Preface 6
2. GETTING STARTED
7
2.1. Manual Conventions
7
2.2. Preparations 8
2.3. Connections
9
2.4. Check it out / First encounter
10
6. MIDI FUNCTIONS41
6.1. MIDI Connections
41
6.2. MIDI Clock Sync
41
6.3. Real-time Transposition
42
6.4. MIDI Controller processing
42
6.5. Program change processing
42
6.6. Sending out sequencer notes
42
3. OVERVIEW12
3.1. Software controlled functions
12
3.2. Sound generation controls
13
3.3. Sound generation / Signalpath 14
4. PROGRAMMING SECTION 4.2. Programming a preset
4.3. Saving Presets
4.4. Save Patterns
4.5. Clearing Notes, Presets, Patterns
4.6. Transpose Menu 4.7. Clock Divider
4.8. Chaining Patterns
4.9. MIDI Channel
4
7. APPENDIX43
15
17
25
26
27
28
30
31
32
5
1. INTRODUCTION
2. GETTING STARTED
1. INTRODUCTION
2. GETTING STARTED
1.1. Preface
2.1. Manual Conventions
„Magma (from Greek μάγμα „mixture“) is a mixture of molten or semi-fluid rock, volatiles and solids that is
to be found beneath the surface of Mother Earth (peace, man!). Magma is a complex substance, fluid at
excessively high temperatures. Temperatures of most magmas are in the range of 700°C to 1300°C (or
1300°F to 2400°F). Hot stuff, this.
To make this manual most clearly to understand, we made some conventions:
That‘s what Wikipedia knows about magma… Your MAGMA is not fluid and a bit less hot (you can – and
ought to – touch it with your hands without being harmed) but hopefully, your music will become even hotter
(there you go again!) and fluid with the little help of this very machine you have just purchased. Eowave
says THANK YOU, and congratulations on your excellent taste in electronic music equipment! Now you are
the owner of your own bit of MAGMA! Enjoy exploring and playing it. And no, we will not call you Mother
Earth (peace, man!).
What‘s this?
MAGMA is a monophonic analogue synthesizer with a built-in step sequencer, USB and MIDI interface.
Its entire sound generation is made up of 100 percent of authentic analogue artistry. Only its modulation
sources, the on-board sequencer, and the USB / MIDI interface use – of course – digital component parts.
MAGMA is housed in a rugged black sheet-metal case. Only high-quality potentiometers (often referred to
as pot, in case you were wondering where the shrooms are hidden…) with solid metal shafts have been
used for endless hours of joyful tweaking. Each pot has been mounted firmly to the chassis. MAGMA looks
as beautiful as it sounds and is made for extensive live tweaking sessions. You will have all the advantages
of analogue sound-generation as well as direct access to all crucial parameters. The built-in sequencer makes MAGMA independent from other external sequencers or computers – of course it is easy to tie MAGMA
up to a computer or any other MIDI-equipped gear, should you feel so inclined.
Control elements that have to be tweaked, are always tagged in bold capital letters like these examples:
•
•
•
•
SHIFT button
CUTOFF control
TEMPO/VAL encoder
LFO LED
To execute a specific procedure, you will find a list of instructions tagged like this:
• Hit SHIFT (hold) + PRESET
Meaning: Hit the SHIFT button first, and keep it depressed while you hit the PRESET button.
• Hit STEP 1 + hit STEP 5 + turn CUTOFF
Meaning: Hit STEP 1 button first (please!), then hit STEP 5 button, and then turn the CUTOFF control.
• Hit BUTTON X or turn VALUE
Meaning: There is a choice between two or more alternatives to perform the described programming
step, e.g. it is up to you whether you use buttons or the value encoder to select a function.
• Hit ENTER
Meaning: Hit the encoder in order to confirm a function.
Even though we call MAGMA a ”bass-line synthesiser”, it is not limited to bass (or lines) exclusively. There
is a lot more sonic potential you will encounter while studying this manual and exploring MAGMA. Soundwise, MAGMA will instantly make you hark back to the sounds of the early 1980s. Its sound-engine is
inspired by Roland´s famous SH series of synthesisers which also featured mixable waveforms and an onboard sequencer. To this formula we have added contemporary controls and an on-board memory loaded
with 256 presets. Yet, the idea behind MAGMA was not to make another copy of a vintage synthesiser, but
to build a new synthesiser which marries the best of today‘s analogue and digital technology. We wanted
to build a synthesiser with a very special timbral footprint that would conjure up images of something like
”earthy”, warm, thick, glurpy (thanks, Robert R.!), and „fat“ (without „ph“, fellows!).
SWING RST
A SHUFFLE
Mostly you will find some additional graphics to TRANSP
show
youB the
necessary programming steps. These
graphics will look like this:
MAGMA is made in France. All units were assembled by hand and, bien sur, lovingly checked and tuned to
specs by Eowave.
Meaning: Hit a button first, and keep it depressed while you hit a second button.
One more thing: Read this fascinating manual!
We knew it, user manuals are your first choice in literature, and „War and Peace“ has become a bit of an
old hat to you, hasn´t it? Hey, that is fantastic – we are talking the same language here! And that is not only
the language in which William S. wrote his Sonnets.
If you are in doubt about the entertaining qualities of this manual – how dare you! –, please bear in mind
that its thorough study will eventually turn out to be quite useful, as it will highly increase the entertaining
qualities of your new synthesizer as well. So please do yourself - and us - a big favour: Read (and possibly
understand) this awesome manual! Bless you for your efforts!
In the first section you will find all information needed to hook up MAGMA to your setup.
After that, you will find a brief overview of its functions. Synthesiser experts may use this as a quick-start
guide. You should not skip the complete description of the entire „functions“ section in the next chapter,
though - MAGMA hides some interesting features.
A little less conversation, a little more action – here we go...
6
+
hold
Select up to 8 patterns to be chained
+
+
+
TRANSP A SHUFFLE B SWING RST
Meaning: Hit several buttons successively.
hold
Select Sub Bank
7
2. GETTING STARTED
2. GETTING STARTED
2.3. Connections
MIDI channel 1 – 8
move
TRANSP A SHUFFLE B SWING RST
MAGMA is designed as a stand-alone device. All you need to use MAGMA is the power-supply and a
suitable audio system or a headphone respectively (a little love can´t do any harm, either). Make use of the
additional connection terminals and you will expand MAGMA‘s potential a great deal.The connections are
located on the far side of the control panel (that would be the back panel, of course).
Mixer / Amplifier
MIDI-Keyboard
Meaning: Turn the VALUE encoder
(to select 9
a function
MIDI channel
– 16 / enter a value).
Important hints are labelled like this:
Please make sure that you read and understand this manual – thank you!
MIDI In
External Audiosource
Computer
Power-Outlet
9VDC
2.2. Preparations
Wallward
2.2.1. Unpacking
When gently lifting MAGMA out of its box for the first time, please make sure that everything is in its right
place. You will find the following component parts in the box:
• MAGMA Synthesizer
• wall-wart (15VAC/800mA)
• this owners´ manual
Audio Out
USB
Audio In
ANALOGUE BASSLINE SYNTHESIZER
Also required:
• A suitable audio system (mixer, amplifier, speaker, or keyboard amp) or a headphone with monoadaptor.
To connect MAGMA to a MIDI-keyboard and / or computer with suitable MIDI sequencer application, you
will also need:
• A USB cable or MIDI cable to connect a suitable MIDI controlling device / keyboard / computer to
MAGMA.
2.2.2. Setup
• DC IN: MAGMA uses an external DC - 15 V - 0,8 A power supply. Use the power supply provided with
the unit. Important: Use this power adaptor only or an equivalent one with exactly the same specs!
Use MAGMA in a flat position. Please use a suitable support. Used pizza cartons or beer crates won‘t do a
proper job. Yes, this advice has become a bit redundant by now…
• Connect the power supply to the instrument first and to the power outlet next. There is no dedicated
power switch. As soon as the power adaptor has been plugged in, MAGMA will power up.
• In order to save speakers and ear-drums from blowing, turn MAGMA‘s VOLUME control fully counterclockwise before powering MAGMA up.
• IN: Audio input to process external signals with.
• OUT: Audio output. Connect it to your audio system´s input. Can also be used as a headphone output.
• USB: For MIDI via USB and firmware updates.
8
9
2. GETTING STARTED
2. GETTING STARTED
TRANSP A SHUFFLE B SWING RST
• MIDI IN: To control MAGMA from MIDI devices not equipped with USB.
• If you want to synchronise MAGMA with an external MIDI device via MIDI clock, connect the MIDI
output of the respective device to the MIDI input of MAGMA and send a MIDI-clock signal to MAGMA.
• If you want to play MAGMA from a keyboard, connect the MIDI output of the keyboard to the MIDI
input of MAGMA.
+
The default MIDI channel setting is #1 and should not be messed with at this point.
hold
Please note that USB port and MIDI sockets should not be connected at the same time.
One short but important note about MIDI loops:
When using MAGMA in connection with a software MIDI sequencer, please make sure that the
MIDI-through function of your software sequencer has been disabled, at least on the channel
that is used by MAGMA. Otherwise, MIDI data (sequencer notes) output by MAGMA are fed
back into MAGMA, causing data overflow and thus erratic behaviour. Especially users of
Steinberg Cubase should keep an eye on this, since Cubase causes a MIDI loop when using
its default settings.
• You already guessed it - hit SHIFT and keep it depressed while hitting PRESET.
+
or
+
move
Pattern 1 – 8
MAGMA´s tempo dial (value knob) will be disabled as long as MAGMA receives MIDI clock
data.
TRANSP A SHUFFLE B SWING RST
2.4. Check it out / First encounter (of a closer kind)
You are pretty curious to hear some sounds now, aren´t you? Because of your (perfectly understandable)
impatience, we will first go on a quick tour at this point. The following section will teach you how to load
some presets, run sequences and tweak some pre-programmed sounds. Everything else will be covered
later. Here we go:
Subbank 1 – 8
• First turn down MAGMA‘s VOLUME control fully counter-clockwise.
hold
• Power MAGMA up.
• Turn up VOLUME to a suitable level. When it hurts, it is probably a tad too much.
When running MAGMA together with a mixer, turn MAGMA‘s VOLUME up to the max and adjust the input
level on your mixer. This will yield the best signal-to-noise ratio possible.
As you might have guessed by now, MAGMA is a monophonic synthesiser with an on-board sequencer. So
what could be more obvious than checking out some sequencer patterns and listen to the sounds. Here we
go (again):
• Hit the START/STOP button.
• You will hear the machine playing and you will see the STEP buttons / LEDs light up. Pretty nice,
huh?
• Choose an adequate tempo by moving TEMPO/VAL.
• To stop the sequencer, simply hit START/STOP again.
Now that we have got your attention, you might want to listen to some more presets. Go on like this:
10
• Then hit one button of the lower row to select a sub-bank. Keep it depressed while hitting one button
of the upper row or use the VAL encoder – now you have changed sub-banks as well as presets.
Have your go at it and try out presets as you desire – enjoy!
To change tempo, leave the preset mode by pressing SHIFT and hitting NOTE (because in this
mode, the encoder will change presets). Now you are back in note mode and the VAL encoder
adjusts the tempo.
MAGMA´s tempo dial will be disabled as long as MAGMA receives MIDI clock data.
Connect a MIDI keyboard to MAGMA via MIDI DIN connection. Set the MIDI channel of your keyboard to
#1. Now play some keys. The current sequence is transposed depending on the keys played. Please note
that keyboard velocity controls the volume of the sequence.
While a preset is active, you may also tweak the sounds by turning MAGMAs knobs. Feel free to experiment.
All explanations about sound generation and programming the sequencer will follow later on.
11
3. OVERVIEW
3. OVERVIEW
3. OVERVIEW
3.2. Sound generation controls
Here you will find a brief overview of MAGMA´s functions. Yes, it is all hidden in these two pictures, but you
will most likely need some more advice to unveil all of MAGMA´s secrets. So please keep on reading!
There is much more to it then half-molten and semi-fluid rocks etc.
But before this, let‘s have a look at the upper (or central) section. It contains all the controls of MAGMA´s
sound generation. Most of the controls have direct access to just one single parameter, labelled on
MAGMA´s surface. The buttons access multiple functions, displayed by specific LED combinations.
3.1. Software controlled functions
VCO (with Suboscillator)
• TUNE:
global / detune SUB
• OCTAVE:
8 settings for VCO / SUB
• PW:
manual, mod-amt for LFO1 / ENV2
• SYNC / PWM: 6 settings for PWM and VCO/SUB-sync
• GLIDE:
time
• LFO:
mod-amt for LFO1 (pitch)
The lower section contains all the software-controlled functions. These control presets, patterns, and the
programming of the on-board sequencer. Some additional functions like MIDI channel selection are also to
be found here. All function groups are accessed by using certain combinations of buttons. We will plunge
into this right away...
VCA
• VOLUME
modulation from
ENV1 / Velocity
SEQUENCE
PROGRAMMING
TRANSPOSE
NOTE-Menu
• set steps
• set notes
• set note length
• transpose current sequence
• running direction
• multiple/single trigger
• glide
• LFO MIDI-clock-sync
M1 M2 M3
3 Mod-Tracks
• set steps
• set parameter values
ANALOGUE BASSLINE SYNTHESIZER
SHUFFLE
function
SWING
function
M DEST
• select mod-destinations
for M1, M2, M3
Waveform Mixer
• SAW
• SQUARE
• SUB
• NOISE
individual LFO2 mod-amounts
for all waveforms
ENVELOPES 1 - 3
• ENV 1: VCA (ADSR)
• ENV 2: VCF (ADSR)
• ENV 3: Pitch (AD)
inverse-function for ENV 2, 3
LFOs 1 + 2
• LFO 1: to VCO, VCF, PWM
• LFO 2: to waveform mixer
8 waveforms at 3 modes each
TRANSP A SHUFFLE B SWING RST
Load
Presets
Save
Presets
Load
Patterns
Select
Bank
Save
Patterns
Chain
Patterns
MIDI channel
selection
Randomise
presets / notes
CLEAR
• presets
• notes
• shuffle
• M1 to M3
MEMORY
MANAGEMENT
12
VCF (24dB lowpass)
• CUTOFF
• RESO
• LFO: mod-amt LFO1
• ENV: mod-amt ENV2
• KEYB: mod-amt KB-track
external input gain setting
on backside
13
3. OVERVIEW
4. PROGRAMMING SECTION
3.3. Sound generation / Signalpath
4. PROGRAMMING SECTION
This is what is to be found under the hood of MAGMA´s sound generation. All sections are labelled in a
specific colour, corresponding to MAGMA´s front-panel layout.
Here you will learn all about MAGMAs programming section, introduced on page 12.
The sound sources are the voltage-controlled oscillator (VCO) and a sub-oscillator (SUB), phase-synced to
the VCO. They put their waveforms into the mixer and further into the voltage-controlled filter (VCF) and the
voltage-controlled amplifier (VCA). There is also an external input fed into the filter / amplifier.
Have a look at the three envelope generators and the way they are connected to their destinations:
ENV 1 controls the VCA, ENV 2 can be inverted and controls VCFs cutoff frequency and the pulse-width of
the VCO square-wave. ENV 3 can also be inverted and is connected to the VCO pitch.
LFO 2 controls the mixer, LFO 1 is connected to VCO pitch as well as to the pulse-width of the squarewave.
At least we find MIDI data (or the on-board sequencer respectively), controlling pitch and triggering ENV 1
to generate notes.
4.1. Preset / Pattern Handling
Presets and Patterns
First of all, we should distinguish between presets and patterns. A preset contains all the sequencer settings plus a specific sound setting. A pattern consists only out of the sequencer setting. That means, when
changing a preset, pattern and sound will change. When changing a pattern, the sequencer will play
something different but the sound currently selected remains the same (the sound, not necessarily the
song…).
Memory Architecture
To understand MAGMA´s memory architecture, please have a look at the following figure. There are four
banks of eight sub-banks each. Each sub-bank contains eight presets. This makes a total of 256 presets.
Exactly the same goes for the patterns. That´s quite a lot of fun to be had.
Bank
=> 4 Banks
1
2
3
4
1 – 8
1 – 8
1 – 8
1 – 8
=> 32 Sub Banks
1 – 8 ... 1 – 8
...
...
1 – 8 ... 1 – 8
=> 256 Presets /
Patterns
Audiosignal
Modulation / Control
LFO 1
ENV 3
(AD)
ENV 2
(ADSR)
Sub Bank
ENV 1
(ADSR)
Preset /
Pattern
LFO 2
Inv
MIDI
Note
Inv
PWM
VCO
Sync
SUB
WAVEFORM-MIXER
Pitch
MIDI
Velocity
4.1.1. Loading a bank
• Hit SHIFT (hold) + BANK to enter the bank select menu
TRANSP A SHUFFLE B SWING RST
VCF
VCA
OUT
+
hold
• Turn VAL to select bank 1 – 4.
EXT. IN
Bank 1 – 4
move
TRANSP A SHUFFLE B SWING RST
14
15
4. PROGRAMMING SECTION
4. PROGRAMMING SECTION
4.1.2. Loading a preset
As mentioned above, loading a preset means loading a sequence with a specific sound setting.
• Hit and hold a BUTTON in the lower row (sub bank) and a BUTTON in the upper row (pattern) to
select sub-bank and pattern. You may also use the VALUE encoder instead of hitting a button in the
upper row. Convenience, you know.
• Hit SHIFT (hold) + PRESET to enter the preset select menu.
+
TRANSP A SHUFFLE B SWING RST
or
+
move
Pattern 1 – 8
TRANSP A SHUFFLE B SWING RST
+
hold
• Hit and hold a BUTTON in the lower row (sub bank) and hit a BUTTON in the upper row (preset) to
select sub-bank and preset. You may also use the VALUE encoder instead of hitting a button in the
upper row if this is more convenient for you.
+
or
+
Subbank 1 – 8
hold
move
Preset 1 – 8
4.2. Programming a preset
TRANSP A SHUFFLE B SWING RST
Subbank 1 – 8
hold
4.1.3. Loading a pattern
When a pattern is loaded, only the sequence is loaded. The audible sound setting matches the last preset
active. Changing a pattern means changing just the sequence. The current sound setting remains the same
(the sound, but not the song…).
If necessary, select a bank at first. See 4.1.1. on page 15. Then go on like this to select a pattern:
Let‘s have a closer look at MAGMA´s on-board sequencer – it is pretty powerful, and it is lots of fun. And,
with a little bit of practice, it is easy to operate as well.
The following figure explains the sequencer´s architecture: It has four tracks. They run in parallel and have
16 steps each. Each step is displayed by a button that can be set and programmed to contain different
data:
• Track 1 (”NOTE”) contains notes and note-length. It is the ”actual” sequence.
• Track 2, 3 and 4 (”M1”, ”M2”, ”M3”) can be assigned to any of MAGMA´s sound parameters (i. e.
controls). Every single one of the active steps can contain a specific value of the assigned parameter.
This way, up to three different parameters can be automated by the sequencer at a time.
1
NOTE Track contains
• audible steps
• note (note number + octave)
• note length (chained steps)
NOTE
”Plays” the sequence.
• Hit SHIFT (hold) + PATTERN to enter the pattern select menu.
TRANSP A SHUFFLE B SWING RST
Steps
M1
MOD Tracks 1 - 3 contain
• modulation steps
• parameter value
Control their assigned
sound parameter.
M2
M3
+
hold
16
17
16
4. PROGRAMMING SECTION
4. PROGRAMMING SECTION
This is how to program the four sequencer tracks:
Note: We start programming from an empty preset. Maybe it is necessary to make room for a
new preset first. In this case, please refer to page 27, section 4.5., ”Clearing notes, presets...”.
• Hit an already active STEP (hold) + another successive STEP. Now you have created one single
longer note. By using odd step numbers, you can program dotted notes.
hold
4.2.1. Setting notes / steps
Obviously, it makes sense to start with track 1, the note track. It is up to you, if you program the sequence
while the Sequencer is stopped or running.
+
•
• Hit SHIFT (hold) + NOTE to enter the note track.
TRANSP A SHUFFLE B SWING RST
+
TRANSP A SHUFFLE B SWING RST
hold
hold
• Hit STEPs to enable / disable step(s). Active step(s) light up.
+
+
+
TRANSP A SHUFFLE B SWING RST
+
4.2.3. Note pitch
By default, each note set in an empty sequence is pitched at C. To program different notes (i. e. melodies or
something more adventurous), please
• Hit a STEP (hold) + turn the VALUE encoder.
Select Step No.
Select Note
hold
upper LED shows selected note
+
move
white ”keys” displayed
black ”keys” not displayed
+
+
Please note: When editing an existing preset / pattern, it is necessary to enter note track first to
enable / disable steps and / or access the following programming steps 4.2.2. ”note length” and
4.2.3. ”note pitch”.
TRANSP A SHUFFLE B SWING RST
4.2.2. Note length
Each step creates a note which means the sequence is divided into 16 1/16 notes. 1/16 is the shortest
available note-length and the default setting for a step. It is easy to program longer notes:
Let‘s assume you have already entered the note track and set some steps for a wonderful sequence (see
above). Now you want to vary note length and note pitches.
lower LED shows selected octave
As long as a step button is depressed, the upper row of steps becomes a one-octave ”keyboard” showing
18
19
4. PROGRAMMING SECTION
4. PROGRAMMING SECTION
all the ”white keys”. By turning the VALUE encoder, you select a note. To access the ”black keys”, simply
observe the LED readout when turning the value encoder: A dark LED between two illuminated steps (e.g.
between ”C” and ”D”) means, a ”sharp C”/”C#” is programmed.
When turning the value encoder a bit further, you may notice that the LED in the lower row also changes.
The lower row displays the octave setting of the selected note.
Carry on programming all desired notes in the same way until you have created a nice sequence. Rest
assured that, if it pleases you, it will please us (and others) as well.
4.2.4. Mod tracks
We mentioned this at the beginning of this section: The three other tracks provide control over MAGMA´s
sound parameters. They dynamically change value settings of assigned parameters. To program these
tracks, please
• Hit SHIFT (hold) + M DEST to enter the mod destination function.
• Hit a STEP to select it and keep it depressed while moving the desired PARAMETER knob.
This value will be stored in the selected step.
Hit more steps and program alternative parameter values into them.
ParameterValue
+
+
+
hold
hold
+
hold
TRANSP A SHUFFLE B SWING RST
TRANSP A SHUFFLE B SWING RST
hold
hold
hold
+
+
• Hit START/STOP to start the sequencer.
TRANSP A SHUFFLE B SWING RST
To program another mod track, please
• Hit again SHIFT (hold) + M DEST to assign a new modulation destination (see above).
• Hit M2 to select the second mod track.
• Hit M1 to select the desired mod track.
+
TRANSP A SHUFFLE B SWING RST
20
TRANSP A SHUFFLE B SWING RST
21
4. PROGRAMMING SECTION
4. PROGRAMMING SECTION
• Hit a STEP to select it and keep it depressed while moving the desired PARAMETER knob.
This value will be stored in the selected step (see above).
• Hit more steps and program alternative parameter values into them (see above).
Perform the same procedure to program parameter values into mod track 3.
Please note that the selected steps on each mod track do not have to comply with the steps,
selected in the note track. All four tracks may have completely different step settings.
Please also note that some parameters can also be controlled by the LFOs. The amount are
added, which may cause unexpected or undesired changes in sound. Please consider this
when setting mod track values and / or disable the LFO(s). The LFOs are explained in section
5.7. on page 39.
In the example above, the note track now runs from step 1 to step 8. Step 9 is not the last
played step but the ”turning point”.
4.2.6. Swing
To add a more ”groovy“ feel to a preset / pattern, you can dial in a swing amount for the sequence MAGMA
is running. This means that steps 1, 5, 9 and 13 are delayed or accelerated by a certain factor. To program
a swing factor, please
• Hit SHIFT (hold) + SWING to enter the swing function.
+
4.2.5. Track Length
A track does not necessarily have to have a length of 16 steps. Each track (note, M1, M2, M3) can have
individual step counts from 1 to 16 steps. In order to shorten a track, you have to define its last step. Let‘s
pretend you want the note track to have only 8 steps:
TRANSP A SHUFFLE B SWING RST
• Hit SHIFT (hold) + NOTE to enter the note track (the same goes for mod tracks M1 - M3).
or
+
+
or
+
or
+
hold
• Turn VALUE to select the swing amount.
The two illuminated central LEDs indicate ”no swing”. Shifting the LED to the left accelerates the
”swing” steps gradually, shifting it to the right delays the steps progressively.
TRANSP A SHUFFLE B SWING RST
Select Swing factor
+
move
upper LED row shows Shuffle amount
more early
hold
• Hit a STEP (hold) + hit ENTER.
New Track Length
+
no swing
more delay
TRANSP A SHUFFLE B SWING RST
TRANSP A SHUFFLE B SWING RST
4.2.7. Shuffle
To provide an even more ”groovy“ feel to a preset / pattern, MAGMA can also provide a shuffle amount
for individual steps of the sequence. In contrast to the swing function, individual steps can have individual
acceleration or delay values. To program shuffle amounts, please turn the page and...
hold
22
23
4. PROGRAMMING SECTION
4. PROGRAMMING SECTION
4.3. Saving Presets
• Hit SHIFT (hold) + SHUFFLE to enter the shuffle function.
You want to save your new creation, we presume? That is rather easy to do:
+
• Hit SHIFT (hold) + SAVE PRST to enter the save preset function.
TRANSP A SHUFFLE B SWING RST
TRANSP A SHUFFLE B SWING RST
+
hold
hold
• Hit ENTER to save the new preset to the current location.
• Hit a STEP (hold) + move VALUE to select a step and its shuffle amount.
Again, the two illuminated central LEDs mean ”no shuffle”. Shifting the LED to the left accelerates the
selected step gradually, shifting it to the right delays the selected step progressively.
Select Shuffle factor
Select Note
hold
+
TRANSP A SHUFFLE B SWING RST
move
upper LED row shows Shuffle amount
more early
no shuffle
more delay
TRANSP A SHUFFLE B SWING RST
Please note: This will overwrite the preset previously stored in this place! Make sure that this
is really your intention – there is NO undo function on MAGMA! If you accidentally erase one
preset, just remember the old saying, „All things must pass.“
To select another location for storing the preset, please
• Hit and hold a BUTTON in the lower row (sub-bank) + hit a BUTTON in the upper row (preset) to
select sub-bank and preset location. You can also use the VALUE encoder instead of hitting a button
in the upper row.
+
Please note that swing settings overwrite a shuffle setting.
or
+
move
Preset 1 – 8
At this point you may know all the steps necessary to programming cool, rocking sequences with your
MAGMA. Enjoy yourself!
TRANSP A SHUFFLE B SWING RST
Subbank 1 – 8
hold
• Hit ENTER (value encoder) to save the new preset to the selected memory location.
24
25
4. PROGRAMMING SECTION
4. PROGRAMMING SECTION
4.4. Save Patterns
4.5. Clearing Notes, Presets, Patterns, Shuffle, M1 - M3
Saving you new creation as a pattern works exactly the same way as saving a preset. Please keep in mind
that a pattern contains nothing but the notes (and swing / shuffle settings) of a sequence – no sound settings and therefore no mod tracks. Saving a preset as a pattern works in principle, but this means losing the
mod track settings.
Not all of your creations might have had your Master‘s Touch. Do not fear, you can easily get rid of them
and make room for what really brings out your musical wit.
MAGMA´s clear function gives access to every aspect you have previously programmed:
To save a pattern, please
• Hit SHIFT (hold) + SAVE PAT to enter the save pattern function.
TRANSP A SHUFFLE B SWING RST
•
•
•
•
•
Clear presets:
Clear pattern:
Clear notes:
Clear M1 - M3:
Clear shuffle:
clears the entire preset (sequencer and sound settings)
clears the pattern (all sequencer settings)
clears the notes of a preset or pattern (note track of the sequencer)
clears the selected mod track of a preset
clears the shuffle settings of the selected preset or pattern.
To use the clear function, please
First, select the desired preset, pattern and, where necessary, any additional function you want to erase.
• Hit SHIFT (hold) + PRESET or PATTERN or NOTE or M1-M3 or SHUFFLE
+
+
hold
or or or
• Hit ENTER to save the new pattern to the current location (this step is not shown in the picture).
or
TRANSP A SHUFFLE B SWING RST
Please note: This will overwrite the pattern previously stored in this place! Make sure that this
is really your intention – there is NO undo function on MAGMA! Have we mentioned the „All
things must pass“ quote already?
To select another location for storing the pattern, please
• Hit and hold a BUTTON in the lower row (sub-bank) + hit a BUTTON in the upper row (pattern) to
select sub-bank and pattern location. You can also use the VALUE encoder instead of hitting a button
in the upper row.
or
+
+
move
hold
+
or
• Hit SHIFT (hold) + CLEAR
TRANSP A SHUFFLE B SWING RST
Pattern 1 – 8
TRANSP A SHUFFLE B SWING RST
+
hold
Subbank 1 – 8
hold
• Hit ENTER to save the new pattern to the selected memory location (this step is not shown in the
picture). Please kep in mind, that again, here is no undo function.
26
Again: Please note that there is NO UNDO function on MAGMA – once cleared, there is no
way to retrieve a preset, pattern etc.! So please think twice before hitting the clear button! Once
it is gone, it will be gone for good.
27
4. PROGRAMMING SECTION
4. PROGRAMMING SECTION
4.6. Transpose Menu
4.6.1. Transpose Function
The transpose menu not only offers a function to transpose the current preset / pattern in semitones, it
also opens up a second function level which accesses some real-time processing functions of the preset /
pattern currently selected.
After entering the transpose menu, the transpose function is active. Simply turn the VALUE encoder to
transpose the preset / pattern sequence in semitones.
The display of the selected transpose interval works exactly as in the note menu when programming a
sequence – please refer to page 19:
The upper row of LEDs turns into a ”one-octave keyboard”. To access the ”black keys”, simply observe the
LEDs when turning the value encoder: A dark LED between two illuminated steps (e.g. between ”C” and
”D”) means, a ”sharp C / C#” is programmed.
When tweaking the value encoder a bit further, you may notice that the LEDs in the lower row also change.
The lower row displays the octave setting of the transposition.
To enter the transpose menu, please
• Hit SHIFT (hold) + TRANSPOSE
+
TRANSP A SHUFFLE B SWING RST
This setting will not be stored as a part of a preset or pattern but will remain in memory after powering
MAGMA down.
You can simply transpose a preset or pattern in real time, either via MIDI notes transmitted
from a MIDI keyboard connected, or via another MIDI controller device of your choice. Please
note that the velocity data transmitted by your MIDI device will directly affect the volume of the
current sequence.
4.6.2. Single / Multi Trigger
hold
Now most buttons have been assigned to a second layer of functions, according to the following figure.
VAL transposes current sequence
upper LED row shows selected note
lower LED row shows selected octave
Hit PRESET to toggle between single and multiple triggering when receiving MIDI notes from an external
MIDI device.
Every incoming MIDI note-on command will trigger a note. • Multi Trigger (PRESET LED off):
(default setting).
• Single Trigger (PRESET LED on):
New notes will be triggered only after MAGMA has received a MIDI-note off command.
This setting will be stored as a part of a preset or pattern.
4.6.3. Glide on / off
TRANSP A SHUFFLE B SWING RST
Hit PATTERN to toggle between glide function on / off.
• Glide on (PATTERN LED on): The pitch of every new note played slides up or down from the note played previously.
• Glide off (PATTERN LED off): Only notes played legato (via external MIDI device) will slide (default setting).
Use the GLIDE knob to adjust the slide time.
This setting will be stored as a part of a preset or pattern.
SHIFT + TRANSP accesses 2nd function level for lower buttons
PRESET toggles single/multi trigger
RANDOM randomises current sequence
running direction back and forth
PATTERN toggles glide on/off
SAVE PRST toggles LFO sync on/off
running direction backwards
running direction forwards
28
4.6.4. LFO Sync
Hit SAVE PRST to toggle between LFO sync on / off.
• LFO sync on (SAVE PRST LED on): Both LFOs are synced to the clock of MAGMA´s on-board sequencer. If MAGMA receives an external MIDI clock signal, his clock will become the time-base for MAGMA´s sequencer and / or the LFOs.
Turning the SPEED knob will change the LFO-speed stepwise in
fractions of musical note durations.
• LFO sync off (SAVE PRST LED off): Both of MAGMA´s LFOs run independently.
This setting will be stored as a part of a preset or pattern.
29
4. PROGRAMMING SECTION
4. PROGRAMMING SECTION
4.6.5. Sequencer Running Direction
• Hit SHIFT (hold) + PLAY (hold) + VALUE
Hitting one of the buttons labelled , ,
determines the direction in which the current preset / pattern
will run.
(LED on): Sequencer is running forwards from left to right (default setting).
•
Hit the (start) button repeatedly to start the sequence on step 1. You may use this in real time as a performance feature.
•
(LED on): Sequencer is running backwards.
•
(LED on): Sequencer is running back and forth like a pendulum. First and last step are only played once.
• Turning VALUE will light up LED 1 to 16, displaying the corresponding tempo fraction for the selected
track.
+
hold
1/1
1/2
1/3
1/4
1/5
1/6
1/7
1/8
+
move
TRANSP A SHUFFLE B SWING RST
4.6.6. Random Sequence
Hit RANDOM to randomise the sequence. The results will differ, depending on whether you were in preset
or pattern mode before using the random function:
• Randomising out of pattern mode will randomise the steps and note pitches.
• Randomising out of preset mode will randomise the steps, note pitch, and the values of the current
setting of MAGMA´s sound generation.
Hitting
,
or
will ”restore” the sequence to its original state. If you want to keep the result of the
randomisation, please store it as pattern or preset. Without storing, the randomised sequence will be lost
after changing to a new preset / pattern, or after powering MAGMA down. You will find all about the store
functions on pages 25, 26.
1/9
1/10
1/11 1/12 1/13
1/14
hold
This setting will be stored as part of a preset / pattern.
4.8. Chaining Patterns
4.7. Clock Divider
The four sequencer tracks can run at different tempo ratios. For each track, you can select a clock divider
which can be a value from 1 to 16. Each value corresponds to a fraction of the master clock tempo (tempo
setting of the internal sequencer or an external MIDI clock). This will allow you to create complex sounding
sequences with just a bit of programming effort.
In pattern mode, you can easily daisy-chain two or more patterns from one sub bank to form a longer
”composition”.
• Hit SHIFT (hold) + PATTERN
This will enter pattern mode.
To select different tempo ratios, please
TRANSP A SHUFFLE B SWING RST
• Hit SHIFT (hold) + NOTE or M1 or M2 or M3 to select a track.
or
+
1/15 1/16
+
or
+
or
+
+
hold
TRANSP A SHUFFLE B SWING RST
hold
30
31
4. PROGRAMMING SECTION
4. PROGRAMMING SECTION
• Hit lower STEP (hold) + upper STEP
This will load the first preset of the chain.
• Turn VALUE
• Hit first upper STEP (hold) + more upper STEPS.
All selected patterns in the current sub-bank will be played in sequence.
Select up to 8 patterns to be chained
+
+
+
The illuminated LED on steps 1 to 16 indicates the number of the selected MIDI channel 1 to 16.
MIDI channel 1 – 8
move
TRANSP A SHUFFLE B SWING RST
TRANSP A SHUFFLE B SWING RST
MIDI channel 9 – 16
Please note that this setting is kept in memory while MAGMA is powered down.
hold
Select Sub Bank
This function is designed as a real-time feature. There is no way to store chains of patterns.
Please note that only patterns from the same sub-bank can be daisy-chained.
You should not chain patterns with different clock divider settings active. Under some circumstances, MAGMA might get confused. You cannot cause damage this way, but unwanted
effects and erratic behaviour might ensue. Always a good thing when experienced five minutes
before a live show on TV.
4.9. MIDI Channel
Use this function to select MAGMA´s MIDI channel. This setting defines the input and output MIDI channel.
To select a MIDI cannel, please
• Hit SHIFT (hold) + CHANNEL
TRANSP A SHUFFLE B SWING RST
+
hold
32
33
5. SOUND GENERATION
5. SOUND GENERATION
5. SOUND GENERATION
This is what‘s to be found under the hood of MAGMA´s sound generation. All sections are labelled in a specific colour, corresponding to MAGMA´s front-panel layout.
MAGMA sports a fully-fledged monophonic synthesiser with fully analogue signal path – best suited for
powerful synthesiser hook-lines, melodies, and bass. The best way for MAGMA to unfold its sonic potential
lies in conjunction with its on-board sequencer. Playing MAGMA via an external MIDI device will also yield
great results, though.
Now that you have successfully managed MAGMA´s menu-based functions, you will easily get your teeth
into the synthesiser section.
Audiosignal
Modulation / Control
LFO 1
ENV 3
(AD)
5.1. Sound Generation Overview
ENV 2
(ADSR)
ENV 1
(ADSR)
LFO 2
The following two figures will briefly display all sections and functions of MAGMA´s sound generation. More
detailed explanations will follow, please be patient. Please do not forget to carry on reading since the panel
has some interesting secrets to hide.
VCO (with Suboscillator)
• TUNE:
global / detune SUB
• OCTAVE:
8 settings for VCO / SUB
• PW:
manual, mod-amt for LFO1 / ENV2
• SYNC / PWM: 6 settings for PWM and VCO/SUB-sync
• GLIDE:
time
• LFO:
mod-amt for LFO1 (pitch)
MIDI
Note
Inv
Pitch
PWM
VCO
Sync
SUB
MIDI
Velocity
WAVEFORM-MIXER
Most – but not all – of the pots (there, we said it again!) have direct access to just one single parameter,
labelled on MAGMA´s control panel. The buttons have several settings, displayed by specific LED combinations.
Inv
VCF
VCA
OUT
EXT. IN
VCA
• VOLUME
modulation from
ENV1 / Velocity
ANALOGUE BASSLINE SYNTHESIZER
Waveform Mixer
• SAW
• SQUARE
• SUB
• NOISE
individual LFO2 mod-amounts
for all waveforms
VCF (24dB lowpass)
• CUTOFF
• RESO
• LFO: mod-amt LFO1
• ENV: mod-amt ENV2
• KEYB: mod-amt KB-track
external input gain setting
on backside
ENVELOPES 1 - 3
• ENV 1: VCA (ADSR)
• ENV 2: VCF (ADSR)
• ENV 3: Pitch (AD)
inverse-function for ENV 2, 3
LFOs 1 + 2
• LFO 1: to VCO, VCF, PWM
• LFO 2: to waveform mixer
8 waveforms at 3 modes each
34
The sound sources comprise the voltage-controlled oscillator (VCO) and a sub-oscillator (SUB), phasesynced to the VCO. They both send their waveforms into the, also voltage-controlled mixer and further on
into the voltage controlled filter (VCF) as well as the voltage-controlled amplifier (VCA). There is also an
external input fed into the filter/amplifier section (for processing external signals, more about this later).
Have a look at the three envelope generators and the way they are connected to their destinations:
ENV 1 controls the VCA, ENV 2 can be inverted and controls VCFs cutoff frequency and the pulse-width of
the VCO square-wave. ENV 3 can also be inverted and is connected to the VCO pitch.
LFO 2 controls the mixer, LFO 1 is connected to VCO pitch as well as to the pulse-width of the squarewave.
At least we find MIDI data (or the on-board sequencer respectively), controlling pitch and triggering ENV 1
to generate notes.
35
5. SOUND GENERATION
5. SOUND GENERATION
5.2. Oscillator (VCO) / Mixer
SYNC / PWM:
Manual (PW Knob)
The VCO is MAGMA´s main signal source. It provides the basic waveforms to the module next in line, the
mixer. The VCO section is endowed with a sub oscillator which derives its output from the VCO´s squarewave. A closer look at all the controls will explain the functions of both VCO and mixer.
LFO 1
5.2.1. Mixer
The mixer is the output stage of MAGMA´s oscillator. All
signals provided by the VCO are summed together into one
audio-signal. It has four WAVEFORM knobs:
: Level of SAW wave signal.
: Level of SQUARE wave signal.
: Level of SUB oscillator signal.
: Level of the NOISE signal.
Cranking up all four signals fully will cause saturation and
distortion. This can be very useful to fatten up MAGMA´s
sound. If you want a clean sound, we recommend you keeping the level knobs below the 3 o‘clock setting.
All four signal levels can be individually modulated by
LFO 2.
Hit SHIFT and keep it depressed while moving one of the
WAVEFORM knobs as this will apply a specific modulation
depth to the selected waveform level.
5.2.2. VCO
TUNE :
Global tune. Tunes the VCO and the sub-oscillator within the range of one semitone. Hitting SHIFT and
moving the TUNE knob, detunes the sub-oscillator. The tune setting will not be stored as part of a preset.
OCTAVE:
Controls the octave setting of both the VCO and the sub oscillator.
The three LEDs around the octave button display the octave setting of
the VCO.
The LED in the central button displays the octave setting of the suboscillator, depending on the setting of the VCO.
+2
Octaves
+1
Octave
+3
Octaves
Hit the OCTAVE button eight times to cycle through all possible
settings.
OFF: SUB-Osc. -1 Octave
ON: SUB-Osc. -2 Octave
PW:
Controls the PULSE-WIDTH of the square-wave manually from 50% to 95%.
When the pulse-width of the square-wave is modulated (see below), this knob controls the modulation
depth applied by LFO 1 or ENV 2.
36
ENV 2
Sync ON / OFF
This button has two related functions. Firstly, it synchronises the
sub-oscillator to the VCO which will result in interesting timbres when
changing (or modulating) the pitch of the VCO.
Secondly, it selects the modulation source for the pulse-width modulation (PWM) of the square-wave (LFO 1 or ENV2).
The three LEDs around the sync button display the PWM source. The
LED in the button displays the state of the oscillator-sync function.
Hit the button six times to cycle through all possible settings.
GLIDE:
Adjusts the glide time when the glide function is active. Please refer to section 4.6.3. on page 29 how to
enable / disable the glide function.
LFO:
Adjusts the modulation depth of LFO 1, modulating VCO pitch.
5.3. Filter (VCF)
MAGMA´s filter is a classic 24 dB / four-pole low-pass design with resonance and great sonic potential.
Let‘s have a closer look at it:
CUTOFF:
Adjusts the cutoff frequency. When turned fully counter-clockwise, there
might be no signal audible (no-pass, so to speak…).
RESO:
Adjusts the resonance intensity of the filter. Higher settings will cause the
filter to self-oscillate which results in feedback. Please handle the resonance pot (here it is again!) with care – feedback might reach excessive
levels, depending on the cutoff frequency setting. Do not blow your tweeters or your ear-drums!
The lower three knobs are used to modulate the filter cutoff frequency:
LFO:
Adjusts the modulation depth of LFO 1 modulating the VCF cutoff
frequency.
ENV:
Adjusts the modulation depth of envelope 2 modulating the VCF cutoff
frequency.
Pressing SHIFT while moving the ENV knob will yield an inverted
modulation curve.
KEYB:
Adjusts the keyboard tracking value of the VCF frequency. Keyboard
tracking makes higher notes sound increasingly brighter.
You can run an external audio signal (e.g. a drum machine) into MAGMA´s filter for processing sound.
Connect this signal (line level) to the Input socket on MAGMA´s rear panel. Adjust the input level with the
trimmer found next to the input socket.
Please note that the external signal has to have line level. The signal is fed directly into the filter input, thus
it will only be attenuated, not amplified. Please also note, that the VCA has to be opened by a triggered
ENV 1. Otherwise no signal is ”passed through” to the output.
37
5. SOUND GENERATION
5. SOUND GENERATION
5.4. Amplifier (VCA)
5.7. LFOs
The VCA has only one single control – the VOLUME knob. It adjusts the output level of
MAGMA´s audio output. Its setting is not saved as part of a preset.
MAGMA provides you with two LFOs (Low Frequency Oscillators) for even more complex modulation madness. Both LFOs generate several waveforms and can be synced to
MAGMA´s on-board sequencer / MIDI clock. Both LFOs have identical features but different modulation targets.
Dynamic level control is achieved by envelope 1 and MIDI velocity data.
•
•
5.6. Envelope section (ENV)
MAGMA is equipped with three envelope generators for modulation tasks. Envelopes 1 and 2 are fully-featured ADSR types, envelope 3 is of a more basic AD variety. Please refer to the following two figures to get
an idea of what the envelope parameters are about.
Level
Level
LFO 1 modulates VCO pitch, VCF cut-off and PW (pulse-width of the VCO
square wave).
LFO 2 modulates the levels of the four oscillator waveforms (mixer).
Since all LFO functions are controlled by just one single button and a bunch of LEDs,
please read the following section carefully.
LFO 1 / LFO 2 access
By default, you have direct access to LFO 1. Keep SHIFT depressed while performing any further LFO
adjustments, controlling LFO 2. Releasing SHIFT routes the controls back to LFO 1.
LFO Waveforms
Saw Down
Sustain
Level
Attack
Time
Decay
Time
Release
Time
Attack
Time
Time
Decay
Time
Time
Square
Saw Up
The three envelopes are connected to different functions:
When having a closer look at the LEDs around the LFO
button, you will notice little symbols on each one – if not, we
advise you to go and see your optician (no pun intended)…
Each LED represents one of the eight waveforms available.
• Envelope 1 controls the VCA, that is, the signal level.
• Envelope 2 controls VCF cut-off frequency, that is, the brightness of the sound as well as the
pulswidth of the VCO square wave.
• Envelope 3 controls VCO pitch.
Triangle
Random
Staircase Up
Digital Noise
Staircase Down
The envelope controls are:
•
A: Attack time
(envelope 1, 2, 3)
•
D: Decay time
(envelope 1, 2, 3)
•
S: Sustain level
(envelope 1, 2)
•
R: Release time
(envelope 1, 2)
To connect each envelope with the ADSR controls, hit the ENV button up to
three times.
LFO Speed
LFO Mode
Both LFOs can operate in three different modes:
• Normal: The LFO oscillates constantly at a given rate.
• Reset: The LFO starts its cycle with each new note-on command (internal sequencer or MIDI).
• One shot: The LFO starts its cycle with each new note-on command but performs just one single
cycle – just like a ”mini envelope”.
An ”active” ENV 3 (Pitch) is displayed by illuminated VCF and VCA LEDs.
When ENV 3 is active, the S knob controls the modulation depth of ENV
3 modulating the VCO pitch. Pressing SHIFT while moving the S knob will
yield an inverted modulation response.
The LED in the button will light up as soon as MAGMA generates a trigger
signal from the on-board sequencer or receives external MIDI data.
38
Active Waveform
One LED: Normal Mode
Two LEDs: Reset Mode
39
Three LEDs: One Shot Mode
5. SOUND GENERATION
6. MIDI FUNCTIONS
All eight waveforms can operate in all of the three modes, which results in a total of 24 different settings
possible. The 24 settings the LFO can adopt (as well as the eight LEDs) is illustrated in the figure on page
39. Clockwise, the first illuminated LED always shows the active waveform, other LEDs inform you about
the current mode.
To select the desired waveform and mode, hit the LFO button repeatedly – in an extreme case up to 24
times.
6. MIDI FUNCTIONS
LFO Speed
Turn the SPEED pot (oops, we said it again…) to adjust the LFO rate. The value ranges from approx. 10
seconds per cycle to 290 Hz.
Since the LFOs can run at audio frequency, you can create interesting timbres when modulating VCO pitch
or VCF cut-off frequency.
MAGMA´s MIDI interface boasts the following features:
LFO Sync
Both LFOs can be synced to the clock of MAGMA´s on-board sequencer or incoming MIDI clock data respectively. If MAGMA receives an external MIDI clock signal, this clock becomes the time-base for MAGMA´s
sequencer and / or the LFOs. (MAGMA´s tempo dial (VALUE knob) will be disabled as long as MAGMA
receives MIDI clock data.)
Please keep in mind that the LFOs can behave a bit differently, depending on whether they are
tempo-synced or not. If tempo-synced, the speed cannot be altered continuously but in fractions
of musical note durations.
When running in sync, the LFOs have a speed range different from the one they have when running independently. The LFOs clock divider allows for a speed range from 4 bars / cycle to 1/32
note / cycle.
LFO sync on / off is a hidden function in the TRANSPOSE menu. To access this function, please
• Hit SHIFT (hold) + TRANSPOSE to enter the transpose menu.
+
MAGMA is designed to do a great job as stand-alone device. Still, you may team up MAGMA with some
suitable companions from time to time. In order to ensure a proper communication with the outside world,
MAGMA is equipped with a MIDI interface.
•
•
•
•
•
•
USB port for MIDI in / out; DIN socket for MIDI-In.
MIDI clock sync of MAGMA´s on-board sequencer and / or MAGMA´s two LFOs.
Real-time transposition and velocity control of current sequence via MIDI notes.
MAGMA processes MIDI controller data on the input and output side.
Bank-select and program-change processing
Sending out sequencer notes
6.1. MIDI Connections
How to connect MAGMA with other MIDI devices is covered in section 2.3. ”Connections” on page 9, 10.
Avoid MIDI Loops!
Please note that USB and MIDI connections should not be
made at the same time.
Please also make sure to avoid MIDI loops. A MIDI loop will
occur when MAGMA is connected to a MIDI device via USB
while the MIDI device‘s MIDI-through function is enabled.
Please make sure to disable MIDI-through on the software
sequencer, controller device etc. in question.
Especially Steinberg Cubase users should keep this in mind
since Cubase is set to MIDI-through by default.
MIDI
THROUGH
USB
ANALOGUE BASSLINE SYNTHESIZER
TRANSP A SHUFFLE B SWING RST
6.2. MIDI Clock Sync
hold
• Hit SAVE PRST to toggle between LFO sync on / off.
TRANSP A SHUFFLE B SWING RST
MAGMA´s on-board sequencer as well as its two LFOs can be synced to an incoming MIDI clock signal.
As soon as MAGMA receives a MIDI clock signal at its USB port or DIN socket, the internal sequencer will
automatically be tied to the MIDI clock. MAGMA´s tempo dial (value knob) will be disabled as long as
MAGMA receives MIDI clock data.
Please note that MIDI clock is not channel-related MIDI data.
Please do not send any MIDI time-code signals to MAGMA. MAGMA is not designed to process
this type of data.
To sync MAGMA´s two LFOs to MIDI clock, simply apply a MIDI clock signal to MAGMA and enable the
LFO sync function. Please refer to section 5.7. ”LFOs” on page 39.
40
41
6. MIDI FUNCTIONS
7. APPENDIX
6.3. Real-time Transposition of Sequence
Terms of warrenty
In preset or pattern mode, incoming midi notes will transpose the current sequence.
MAGMA also processes incoming velocity values. They directly control the volume of the sequence currently active.
EOWAVE LIMITED WARRANTY and standard legal disclaimer.
Thank you for purchasing Eowave product. The following terms and conditions apply:
The sequence currently active may also be processed using pitch and mod wheels of a MIDI controller
device connected.
6.4. MIDI Controller Processing
MAGMA sends and processes incoming MIDI controller data. This way, all functions listed below can be
remote-controlled by a MIDI controller device or MIDI sequencer. On the other hand, knob tweaking performed on MAGMA can be recorded into a MIDI sequencer as well.
MAGMA´s MIDI controller processing is always active and thus does not have to be enabled or disabled.
CUT 1
SUB_DETUNE 2
RES 3
ATT1 4
DEC1 5
SUS1 6
REL1 7
ATT2 8
DEC2 9
SUS2 10
REL2 11
PWM 12
PW 13
SAW 14
NOISE 15
SQR 16
SUB 17
KB_VCF 18
LFO_SPEED 19
GLIDE 20
LFO_VC0 21
LFO_VCF 22
ENV_VCF 23
LFO_TYP 24
OCTAVE 25
ATT3 26
DEC3 27
ENV3_VCO 28
LFO2_SPEED 29
LFO2_TYP 30
LFO2_SAW 31
LFO2_NOISE 32
LFO2_SQR 33
LFO2_SUB 34
VEL_VCA 35
VEL_FILTER 36
VEL_RES 37
SEQ1_DEST 38
SEQ2_DEST 39
SEQ3_DEST 40
MODWHEEL 41
PB_RANGE 42
LFO_SYNC 43 (*)
SEQ1_DIV
44
SEQ2_DIV 45
SEQ3_DIV 46
VOL 110
TUNE 111
(*) affects also glide mode and note trig
1. Warranty period is for one year from the date of purchase with a proof of purchase submitted. Warranty covers electrical failure of electronic components, except in cases explained below.
2. Operating instructions must be followed. MAGMA must not have been damaged as a result of misuse, neglect,
accident, destruction, improper electrical voltages or currents, repair, alteration or maintenance by any person or party
other than our own service facility or an authorized service center, use of replacement parts or modification of the
product in any way.
3. Obligations of Eowave shall be limited to repair or replacement with same or similar unit. To obtain repairs under
this warranty, present the product and proof of purchase to Eowave service center, transportation charges prepaid.
When returning the product for repair, please pack it very carefully, preferably using the original packaging materials.
Please include an explanatory note.
CE norm & FCC information
1. Important notice: do not modify this unit! This product, when installed as indicated in the instructions contained in
this manual, is compatible with the CE norm & FCC requirements
2. Important! When connecting this product to accessories and/or another product, use only high quality .shielded
cables. Cables supplied with this product must be used. Follow all installation instructions. Failure to follow instructions
could void your FCC authorisation to use this product in the USA.
Note: this product has been tested and found to comply with the requirements listed in FCC Regulations, Part 15 for
Class B digital devices & in The European Standard EN 50081-1 on Electromagnetic Compatibility - Generic emission
standard on residential, commercial and light industry. Compliance with these requirements provides a reasonable
level of assurance that the use of this product in a residential environment will not result in harmful interference with
other electronic devices.
Disposal
This device complies to the EU guidelines and is manufactured RoHS conform without the use of led, mercury, cadmium and chrome. Still, this device is special waste and disposal in household waste is not permitted.
For disposal, please contact your dealer or: Eowave – La Cure – 58110 Tintury – France
Eowave Team
6.5. Program change processing
MAGMA receives bank select and program change data. Use bank select commands #1 to #4 to access
the four preset or pattern banks. Use program change commands #1 to #64 to access the 64 presets / patterns in the bank currently selected.
6.6. Sending out sequencer notes
MAGMA´s on-board sequencer transmits the notes programmed into a preset or pattern. Note numbers
(pitch) and durations are transmitted. This way, you can record a sequence into an external MIDI sequencer.
As pointed out earlier – please make sure to avoid MIDI loops!
MAGMA has been designed and developed by Marc Sirguy.
Graphic design: Philipp Roller
Design and export: Emmanuelle Gallin.
Imprint
Owners Manual by Matthias Fuchs / VISOPHON, Berlin, Germany
English version tweaked and adjusted by Stephen Parsick / doombient music, Bielefeld, Germany
Copying, distribution or any commercial use in any way is prohibited and needs the written permission by the manufacturer.
Specifications subject to change without notice.
Although the content of this owners manual has been thoroughly checked for errors, Eowave cannot guarantee that it
is error-free throughout. Eowave cannot be held liable for any misleading or incorrect information within this guide.
All rights reserved © 2012 Eowave
42
43