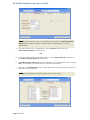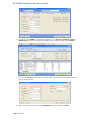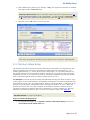
1
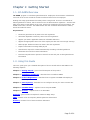
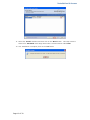
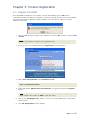
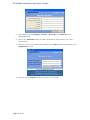
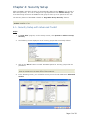
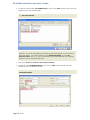
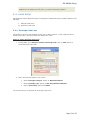
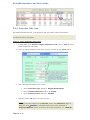
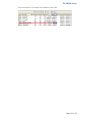
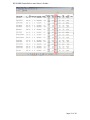
EZ-GARN
Installation and User’s Guide
Copyright
Copyright
©
1992-2007 Employee Based Systems, LLC. All rights reserved.
Portions of the software described in this document copyright © Employee Based Systems,
Inc., a wholly owned subsidiary of Employee Based Systems, Inc. All rights reserved.
Information in this document is subject to change without notice. The software described in
this document is furnished under a license agreement or non-disclosure agreement. The
software may be used or copied only in accordance with the terms of those agreements. No
part of this publication may be reproduced, stored in a retrieval system or transmitted in any
form or any means electronic or mechanical, including photocopying and recording for any
purpose other than the purchaser’s personal user without written permission of Employee
Based Systems.
Employee Based Systems
7991 Shaffer Parkway, Suite 202
Littleton, CO 80127
U.S.A.
http://www.getebs.com
Trademarks
EZ-GARN®, EZ-Wage & Tax®, EZ-ACH®, EZ-Track®, EZ-Web Time Sheet®, EZ-Web Punch®,
EZ-Tele Punch®, EZ-Scheduler®, EZ-Integrate®, EZ-401K®, EZ-Archive®, EZ-GARN®, EZPositive Pay®, EZ-Reciprocity®, EZ-ACH(Header)®, EZ-Time Import®, EZ-FOXPACK®, EZ-Tip®,
EZ-Wage & Tax®, EZ-GL® and EZ-Expat® are registered trademarks of Employee Based
Systems, LLC. Other brands and their products are trademarks or registered trademarks of
their respective holders and should be noted as such.
Software License Agreement
IMPORTANT - READ CAREFULLY: This Software License Agreement for EZ-GARN is a legally binding agreement
between you and Employee Based Systems, L.L.C. (“EBS”) and supersedes any purchase order placed by you. All of the
terms and conditions applicable to your rights and EBS’ rights are set forth in the attached computer software and this
agreement. By opening, installing, copying, or otherwise using this software, you agree to accept this agreement and
agree to be bound by the terms of this agreement. If you do not agree to the terms of this agreement, you may not use
or copy the software, and you should promptly contact EBS for instructions on returning the unused product for a refund
or credit. By opening the diskette package for this program or using this program, you acknowledge that you have
received and read this Software License Agreement (the “Agreement”), and that you agree to be bound by it.
LICENSE: By acquiring this software license, you are granted a nontransferable non-exclusive license (the “License”) to
use the enclosed program and all enhancements, modifications, and updates to the program and all related written
materials (the “Software”) on a single computer, at a single location, solely in accordance with this agreement. You may
make a single back-up copy of the software for archival purposes.
OWNERSHIP: EBS owns the software and all trade secrets, copyrights, patents and other intellectual property rights
therein, which you agree to preserve. This software is protected by copyright laws and international copyright treaties, as
well as intellectual property laws and treaties. YOU MAY NOT, AND YOU MAY NOT PERMIT OTHERS TO, MODIFY,
DISASSEMBLE, REVERSE, DECOMPILE, OR OTHERWISE DERIVE SOURCE CODE FROM THE SOFTWARE; RENT, LEASE, OR
DISTRIBUTE THE SOFTWARE, ANY COPY, OR ANY RELATED WRITTEN MATERIALS, IN WHOLE OR PART; REVISE,
ENGINEER THE SOFTWARE; OR USE THE SOFTWARE IN ANY MANNER THAT INFRINGES THE INTELLECTUAL PROPERTY
OR OTHER RIGHTS OF ANOTHER PARTY; EXCEPT AS EXPRESSLY PERMITTED IN THE LICENSE AGREEMENT. FAILURE TO
COMPLY WITH THE TERMS OF THIS AGREEMENT MAY SUBJECT YOU TO CIVIL DAMAGES, REASONABLE ATTORNEYS’
FEES, AND MAY BE A SERIOUS CRIME.
TERM: You may terminate the license at any time by destroying the software together with the authorized backup copy.
This agreement is automatically terminated if you violate any portion of the Agreement or do not pay the initial license
fee when it becomes due. You agree upon any such termination to destroy the software together with all copies. Upon
termination, there will be no refund of monies paid by you.
LIMITED WARRANTY AND DISCLAIMERS OF WARRANTY: EBS warrants that (a) the software will perform
substantially in accordance with the written material, and (b) the software shall be free of defects that prevent you from
loading the software onto your computer for a period of sixty (60) days from date of purchase. The sole obligation of EBS
and your sole remedy under this Limited Warranty is replacement of any defective software, provided that you give EBS
written notice of the defect within the sixty (60) day period.
EBS does not warrant that the operation of the Software will be uninterrupted or error free or that the Software will
operate or function properly on your computer. EBS makes no representations or warranties whatsoever as to the date it
will deliver any Software updates to you. You assume the risk that the Software will not be available when you need it.
You assume the sole responsibility for the selection of the Software for your purposes. You understand and agree that (1)
you are solely responsible for the content, calculation, and accuracy of all reports and documents prepared in whole or in
part by using the Software; (2) using the Software does not relieve you of any professional obligation concerning the
preparation and review of such reports and documents (3) you do not rely upon EBS or the Software for any advice or
guidance regarding compliance with federal and state laws or the appropriate tax treatment of items reflected on such
reports or documents; and (4) you will review any calculations made by using the Software and satisfy yourself that
those calculations are correct.
THE SOFTWARE AND RELATED MATERIALS ARE PROVIDED “AS IS” WITHOUT WARRANTY OF ANY KIND, EITHER EXPRESS
OR IMPLIED, INCLUDING WARRANTIES OF MERCHANTABILITY OR FITNESS FOR ANY PARTICULAR PURPOSE OR ANY
OTHER STATUTORY OR COMMON LAW WARRANTIES. NO WARRANTY IS MADE REGARDING THE PERFORMANCE OF THE
SOFTWARE OR THE RESULTS THAT MAY BE OBTAINED BY USING THE SOFTWARE, THE ENTIRE RISK AS TO THE
INSTALLATION, USE, QUALITY, AND PERFORMANCE OF THE SOFTWARE IS WITH YOU. Some states do not allow the
limitation or exclusion of implied warranties, so the above limitation or exclusion may not apply to you. This warranty
gives you specific legal rights and you may also have other rights that vary from state to state. This disclaimer of
warranties and the limitation of liability below shall not be modified, diminished or affected by and no obligation or
liability will arise or grow out of the rendering of technical, programming, or other advice or service or the provision of
support for the Software by EBS. LIABILITY, LIMITATIONS AND EXCLUSIVE REMEDIES: EBS’ entire liability to you and
your exclusive remedy shall be the replacement of any defective diskette, as set forth above. IN NO EVENT WILL EBS BE
LIABLE TO YOU FOR ANY DIRECT, INDIRECT, SPECIAL, INCIDENTAL OR CONSEQUENTIAL DAMAGES (INCLUDING BUT
NOT LIMITED TO LOST REVENUES, DATA, PROFITS OR SAVINGS) ARISING OUT OF THE USE OF OR INABILITY TO USE
THE SOFTWARE OR ANY DELAY IN THE DELIVERY OF THE SOFTWARE, EVEN IF EBS IS APPRISED OF THE POSSIBILITY
OF SUCH DAMAGES OR OF ANY CLAIM BY ANY OTHER PARTY. IN NO EVENT SHALL THE LIABILITY OF EBS ARISING
FROM YOUR USE OR INABILITY TO USE THE SOFTWARE EXCEED THE FEE PAID BY YOU FOR THIS LICENSE. The
remedies available to you against EBS are exclusive. Some states do not allow the limitation or exclusion of liability for
incidental or consequential damages so the above limitation or exclusion may not apply to you.
GENERAL: This Agreement will insure the benefit of EBS, its successors and assigns and will be construed under the laws
of the State of Colorado, except for the body of laws dealing with conflict of laws. The Agreement supersedes any prior
agreements between the parties regarding the same subject matter. If any provision of the Agreement is deemed invalid
by a court of competent jurisdiction, such provisions shall be enforced to the maximum extent permitted and the
remainder will remain in full force.
Contents
Chapter 1: Getting Started ......................................................................................5
1.1- EZ-GARN Overview ......................................................................................................5
1.2- Using this Guide ..........................................................................................................5
Chapter 2: Installation & Access .............................................................................6
2.1- System Requirements...................................................................................................6
2.2- Install EZ-GARN...........................................................................................................7
Chapter 3: Product Registration ............................................................................11
3.1- Register EZ-GARN ...................................................................................................... 11
Chapter 4: Security Setup .....................................................................................13
4.1- Security Setup with Advanced Toolkit............................................................................ 13
4.2- Security Setup without Advanced Toolkit ....................................................................... 14
Chapter 5: EZ-GARN Setup ....................................................................................17
5.1- Setup of Deduction Codes ........................................................................................... 17
5.2- Setup for Garnishment Arrears..................................................................................... 19
5.3- Minimum Wage Setup................................................................................................. 21
5.4- Loans Setup .............................................................................................................. 23
5.4.1- Earnings Code Loan ............................................................................................ 23
5.4.2- Deduction Code Loan .......................................................................................... 24
Chapter 6: Process ................................................................................................26
6.1- Steps to process EZ-GARN .......................................................................................... 26
Appendix:..............................................................................................................28
FAQ's.....................................................................................................................29
Glossary ................................................................................................................30
Chapter 1: Getting Started
1.1- EZ-GARN Overview
'EZ-GARN' program re-calculates garnishments for employees whose amount scheduled to
come out of the check exceed the maximum allowed amount for the employee.
Dealing with wage garnishments has always been a tough task. There are a multitude of
federal guidelines to follow, which could turn into an administrative nightmare. And the laws
differ from state to state based on the type, which only complicates payroll processing. EZGARN comes with a solution. EZ-GARN comes with the "Automate Garnishment" feature,
which has made life easier.
Key Features:
•
Prioritizes garnishments by state rules and regulations
•
Calculates disposable income by state rules and regulations
•
Applies your state's applicable maximum allowable deduction
•
Applies the appropriate state rules if the employees does not have enough earnings
•
Makes proper deductions based on state rules and regulations
•
Imports information into Sage Abra payroll
•
Garnishment output file created automatically according to federal guidelines
•
Eliminates the need for manual calculations
•
Produces comprehensive reports to show all current and year-to date garnishment
information
1.2- Using this Guide
This user guide gives you a detailed description of how to install and use EZ-GARN in the
following chapters:
Chapter 1: ‘Getting Started’- gives a brief description of the product
Chapter 2: ‘Installation and Access’- describes how to install EZ-GARN
Chapter 3: ‘Product Registration’- describes how to register EZ-GARN with Employee
Based Systems
Chapter 4: ‘Security Setup’- describes how to configure security for users to access EZGARN
Chapter 5: ‘EZ-GARN Setup’- explains how to setup EZ-GARN
Chapter 6: ‘Process’ - explains how to run EZ-GARN
Appendix: gives contains examples for Minimum Wage setup
FAQs: contains a list of Frequently Asked Questions and Answers
Glossary: contains a list of terms and their definitions
Page 5 of 30
Chapter 2: Installation & Access
2.1- System Requirements
Before you install ‘EZ-GARN’ in Sage Abra application, you need to see whether your system
has the following requirements:
1.
Sage Abra software version 7.X: The EZ-GARN application is installed inside Sage
Abra and can be installed from any workstation that runs Abra or has Abra installed.
This makes it simple for the end-user to install any of the ‘EZ applications’ from
‘Employee Based Systems’
Note: The only requirement is that no user should be inside Abra at the time
of install.
2.
Installation Requirements for Workstation Configuration:
•
Microsoft® Windows 2000 or Windows XP Professional and Sage Abra HRMS
•
Pentium processor 266MHz or higher
Recommended: 400MHz or higher
•
RAM 128MB
Recommended: 256MB or higher
3.
•
500MB of hard disk space
•
SVGA color monitor
•
100Mbps network card for network installations (10Mbps minimum)
•
Internet access using Internet Explorer Version 5.0 or higher
Installation Requirements for Program and Database Server Configuration:
•
Windows 2000 Server, Windows Server 2003 or Novell NetWare 6.5 or higher
•
Pentium or Pentium PRO processor 1.3 GHz or higher
Recommended: 2 GHz or higher
•
RAM 256 MB
Recommended: 512MB or higher
•
4+ GB hard disk
Recommended: 8 GB hard disk
•
100Mbps network card, data hub and cabling
•
CD-ROM drive plus 3.5” disk drive
•
SVGA color monitor
•
Streaming tape or other backup device
•
Uninterruptible Power Supply (UPS)
Page 6 of 30
EZ-GARN Installation and User’s Guide
4.
Compatible Networks:
•
Novell Netware 6.5 or higher
•
Microsoft Networks
•
Microsoft Windows Terminal Server
Note: The above configuration recommendations are guidelines. Actual memory and
hard drive requirements may vary based on the number of simultaneously running
applications, simultaneous network users and amount of data being processed. You
should periodically monitor and optimize Sage Abra workstation, server and network
resource utilization using operating system utilities.
2.2- Install EZ-GARN
1.
Double click on the ‘Installation Executable’ that is provided either through the
download page from http://www.getebs.com/ website or from your CD
2.
EZ-GARN installation wizard pops-up, click on ‘OK’ button to continue
3.
Click on ‘Setup’ button to continue
4.
Next, ‘EBS Products Install’ screen appears
Page 7 of 30
Installation & Access
Following information is displayed under this screen:
Field Label
Install/Update
Field Descriptions
If ‘EZ-GARN’ is a new install, this option will read ‘Install’.
If ‘EZ-GARN’ is already installed, the label displays as ‘Update’
Live Data
Select this option to work with Live or Real Time Data.
Sample
Select this option to work with Sample data.
Uninstall
Select ‘Uninstall’, if the product is already installed and you
wish to remove it from your system.
5.
Once you select the check boxes labeled ‘Install/Update’, ‘Live Data’ and ‘Sample
Data’, then click the ‘Next’ button to continue
6.
‘EBS License Agreement’ dialog box appears
7.
Select the checkbox to accept the ‘License Agreement’, then click on the ‘Next’
button
Note: To read the Software License Agreement in detail, refer the ‘Software
License’ page of the EZ-GARN User Manual.
8.
If you have Sage Abra ‘Advanced Toolkit’, the following screen is displayed
Page 8 of 30
EZ-GARN Installation and User’s Guide
Following is the information displayed under this screen:
Field Label
9.
Field Descriptions
Product
Product Name - 'EZ-GARN'.
Category
Tells you under which Abra product the task is installed, once
it is inside Sage Abra.
Section
Indicates what type of activity the task is.
Step
This column shows how the step name appears in Sage Abra
task menu (if applicable).
Option Name
This column shows how the task name (‘Calc Garn
Adjustments’) appears in the Sage Abra ‘Activity Center’.
Select the ‘Install’ checkbox and click on the ‘Next’ button
Note: You will get this screen if you have the ‘Advanced Toolkit’ installed. If
you do not have the Advanced Toolkit installed, you can still access EZ-GARN
under EBS Programs Quick Launch option. For more information on the
Advanced Toolkit, please contact your Abra reseller.
10. Once you click on the ‘Next’ button, ‘Quick Launch’ toolbar dialog box is displayed
Page 9 of 30
Installation & Access
11. Select the ‘Install’ checkbox and then click on the ‘Next’ button. This step creates a
shortcut for 'EZ-GARN' inside Sage Abra under a selection button called ‘EBS’
12. Your installation is complete, click on the ‘OK’ button
Page 10 of 30
Chapter 3: Product Registration
3.1- Register EZ-GARN
Once EZ-GARN is installed in your system, you are automatically given a 30 day full
evaluation program period for your software. During this period, whenever you use EZ-GARN
the following message is displayed, asking whether you would like to register or not the
product at that time.
1.
Click on ‘Yes' button to register your software or click the ‘No’ button to use the 'Trial
Version'
Note: EZ-GARN will no longer function after the trial period expires. Please contact
‘EBS’ or your reseller to receive your registration key.
2.
Once you click on the ‘Yes’ button, the ‘Registration’ screen appears
3.
Enter ‘Abra Serial Number’ and ‘Installation Code’
Note: To view Abra Serial Number and Installation Code, go to Help>>About
Abra >>Installed Products.
4.
Enter appropriate ‘EBS Product Serial Number’ to register and click the ‘Register’
button
Note: To get the product serial number for the EZ-GARN application, you may
either contact your reseller or ‘EBS’ at 303-991-3500.
5.
Click on the ‘Get Register No’. button to send an e-mail to EBS to get your product
serial number
6.
The ‘Get Registration’ screen appears
Page 11 of 30
EZ-GARN Installation and User’s Guide
7.
Enter details of your ‘Company’, ‘Contact’, ‘Phone No’ and ‘Email ID’ in the
appropriate fields
8.
Click on the ‘Send Mail’ button, an EBS representative will get back to you with a
serial number
9.
Once you receive your product serial number, enter ‘EBS’ product serial number in the
‘Registration’ screen
10. Now click on the ‘Register’ button to register your software
Page 12 of 30
Chapter 4: Security Setup
After EZ-GARN is installed, all tasks are automatically added to the ‘Master’ User Group in
Abra Group Security. If a user is assigned to a group different from ‘Master Group’, you
must then assign access to EZ-GARN for that group to show up as an option for the user.
The Security feature of EZ-GARN is based on ‘Sage Abra Group Security’ feature.
Note: Security setup for EZ-GARN depends on whether Sage Abra has ‘Advanced
Toolkit’ installed or not.
4.1- Security Setup with Advanced Toolkit
Steps:
1.
In ‘Sage Abra’ program, on the Activity Center; click System>> Rules>>Group
Security
2.
The following screen displays a list of security groups that are already defined
3.
Click on the ‘More’ button to install 'EZ-GARN' option for security groups that are
predefined
Note: To add additional security groups, click on the ‘Add’ button and follow the
steps as explained in the Sage Abra Training Manual.
4.
In the following screen, you will define security access for EZ-GARN with ‘Advanced
Toolkit’
Page 13 of 30
EZ-GARN Installation and User’s Guide
5.
Select relevant information in this screen
Employer
Appropriate
company (in
this example
as ‘EBS’)
6.
Product
‘Payroll’
option
Activity
‘Process’
option
Task
Step
‘Calc Garn
Adjustments’
option
‘Calc Garn
Adjustments’
option
Click on the ‘Apply’ button and then the ‘OK’ button to finish the task
Now, the user who belongs to selected ‘Security Group’ can access EZ-GARN with Advanced
Toolkit under Payroll>> Process>>Calc Garn Adjustments
4.2- Security Setup without Advanced Toolkit
Steps:
1.
In ‘Sage Abra’ program, on the Activity Center; click System>> Rules>>Group
Security
2.
The following screen displays a list of security groups that are already defined
3.
Click on the ‘More’ button to install 'EZ-GARN' option for security groups that are
predefined
Note: To add additional security groups, click on the ‘Add’ button and follow the
steps as explained in the Sage Abra Training Manual.
4.
In the following screen, you will define security access for EZ-GARN without
‘Advanced Toolkit’
Page 14 of 30
Security Setup
5.
Select relevant information in this screen
Employer
Appropriate
company (in
this example
as ‘EBS’)
6.
Product
‘Payroll’
option
Activity
‘Process’
option
Task
Step
‘Run Trial
Payroll’
option
‘Run Trial
Payroll’
option
Note: For ‘EZTip’ users,
select ‘Tip
Trial Close’
option.
Click on the ‘Apply’ button and then the ‘OK’ button to finish the task
Now, the user who belongs to the selected ‘Security Group’ can access EZ-GARN without
Advanced Toolkit under Payroll>>Process>>Run Trial Payroll
7.
In the following screen, you will define 'Quick Launch' option for 'EZ-GARN'
Note: ‘N/A’ is selected for Quick Launch option.
Page 15 of 30
EZ-GARN Installation and User’s Guide
8.
Select relevant information in this screen
Employer
‘N/A’ option
9.
Product
‘System’
option
Activity
‘Quick
Launch’
option
Task
‘EBS’ option
Step
‘EZ-Garn’
option
Click on the ‘Apply’ button and then the ‘OK’ button to finish the task
Now, the user who belongs to the selected ‘Security Group’ can access EZ-GARN under ‘EBS’
programs quick launch tool bar.
Page 16 of 30
Chapter 5: EZ-GARN Setup
5.1- Setup of Deduction Codes
Garnishments are set-up as a 'Deduction Code'. There are two types of Garnishments:
1.
Credit Garnishments
2.
Child Support
As a general rule, EZ-GARN calculates Credit Garnishments and Child Support based on the
Federal Law guidelines; 25% for Credit Garnishments and 50% for Child Support.
State Specific Rules:
1.
For Illinois, the max Credit garn rate is 15% of Disposable Earnings or 45% minimum
wage
2.
For Ohio, if multiple garnishments come out of the check, the program averages the
amounts based on original percentages
Note: If your state specific rules are not defined in this manual, please contact your
Reseller or EBS about specific setup.
Steps to set-up Garnishment Code:
1.
In Sage Abra program, go to Payroll>>Rules>> Deduction Codes; select
appropriate ‘Deduction Code’ and click on the 'More' button
2.
In the following screen, select 'Creditor Garnishment' option from the 'Deduction
Type' dropdown list
3.
Select ‘No’ option for ‘Automatic Allocation’ field to setup a garnishment code
3.
Click on 'Employer Match' tab to indicate whether deduction code is 'Child Support'
or 'Credit Garnishment'
Page 17 of 30
EZ-GARN Installation and User’s Guide
Note: ‘Not Linked’ option must be selected in ‘HR Benefit Code’ field, before
you setup a garnishment code. The garnishment program uses ‘Dollar/Percent
Match’ field to indicate whether deduction code is ‘Child Support’ or ‘Credit
Garnishment’.
4.
If the garnishment is for ‘Child Support’, select ‘Amount’ option from the
‘Dollar/Percent Match’ dropdown list
OR
5.
If the garnishment is for ‘Credit Garnishment’, select ‘Annual Amount’ option from
the ‘Dollar/Percent Match’ dropdown list
6.
In ‘Employer Max. Contrib’ field, enter maximum % of Disposable Pay (for example:
215), the employee can contribute for a particular garnishment
7.
Now click on ‘Earnings Basis’ tab to select appropriate ‘Earnings Code’ for which the
garnishment is being set for
Note: When you set up a new Garnishment code, you need to define for which
Earnings and Deductions, the garnishment code is being set for.
Page 18 of 30
EZ-GARN Setup
8.
Select appropriate ‘Earnings Code’ from ‘Selected Earnings’ list box and click on
‘Apply’ and ‘OK’ buttons to complete the setup
5.2- Setup for Garnishment Arrears
Specific restrictions apply to court orders for child support or alimony. The garnishment law
allows up to 50 percent of a worker's disposable earnings to be garnished for these purposes,
if the worker is supporting another spouse or child, or up to 60 percent, if the worker is not.
An additional 5 percent may be garnished for support payments more than l2 weeks in
arrears.
To setup arrears, you need to define a new tax code called ‘GARN’ in the Tax Code system.
Note: This code needs to be linked to a State that does not require state income tax
withholding. This is only for setup and State defined has no effect on payroll processing.
Below is a list of states that do not require state income tax withholding:
1.
Alaska
2.
Florida
3.
Nevada
4.
New Hampshire
5.
South Dakota
6.
Tennessee
7.
Texas
8.
Washington
9.
Wyoming
Steps to setup Garnishment Arrears:
1.
In Sage Abra program, go to Payroll>>Rules>>Tax Codes. To setup the new tax
code 'GARN', click on the 'Add' button and follow the same steps explained in Sage
Abra Training Manual
Note: You must enter the code exactly as shown in the screenshot below, i.e.
‘GARN’. Remember that you need to set the first tax code as ‘GARN’. The
remaining codes set for garnishment arrears must begin with the term ‘GAR’, for
example: GAR1, GAR2, etc.
2.
Select tax code ‘GARN’, click on the ‘More’ button and select ‘No’ option for
‘Automatic Allocation’ field to setup garnishment arrears
Page 19 of 30
EZ-GARN Installation and User’s Guide
2.
To add tax code ‘GARN’ to a particular employee, go to Payroll>>Details>>Tax>>
Withholdings and select appropriate employee (for example: Employee ID:10001)
3.
Click on the ‘Detail’ button next to the ‘GARN’ tax code and enter relevant information
in the following screen
4.
Enter override value for Arrears in ‘Exemptions’ field (for example: ‘60%’)
Page 20 of 30
EZ-GARN Setup
5.
Enter additional tax amount (for example: ‘215’) the employee authorizes to withhold
each pay period in ‘Extra Tax’ field
Note: The value in ‘Extra Tax’ field must be the same as the one entered for
‘Employer Max Contrib’ field in ‘Deduction Codes’ setup screen (Refer section 5.1Setup of Deduction Codes for more information). If value entered in ‘Extra Tax’ field
is ‘∅’ (null), then it defaults to all garnishment codes with ‘∅’ value automatically.
6.
Now click on the 'OK’ button to finish the task
Note: If no override value is put in or the employee does not have the ‘GARN’ tax
code, then the program calculates at the maximum limit of 50% for 'Child Support'.
5.3- Minimum Wage Setup
The Federal Law sets the maximum amount that may be garnished in any workweek or pay
period, regardless of the number of garnishment orders received by the employer. For
ordinary garnishments (i.e., those not for support, bankruptcy, or any state or federal tax),
the weekly amount may not exceed the lesser of two figures: 25 percent of the employee's
disposable earnings, or the amount by which an employee's disposable earnings are greater
than 30 times the federal minimum wage (currently $5.15 an hour).
For Example: If the pay period is weekly and disposable earnings are $154.50 ($5.15 X 30)
or less, there can be no garnishment. If disposable earnings are more than $154.50 but less
than $206.00 ($5.15 X 40), the amount above $154.50 can be garnished. A maximum of 25
percent can be garnished, if disposable income earnings are $206.00 or more. When pay
periods cover more than one week, multiples of the weekly restrictions must be used to
calculate the maximum amounts that may be garnished. For more examples on ‘Amounts
Subject to Garnishment based on the $ 5.15 an hour minimum wage’, refer Appendix
Note: To setup Minimum Wage for Garnishment you need to add a custom table called
'EZ-GARN SETUP’ to custom code tables.
Steps for Minimum Wage setup:
1.
In ‘Sage Abra’ program, go to System>>Rules>>Enterprise Setup and click on
‘User Defined Code Table Titles’ tab
Page 21 of 30
EZ-GARN Installation and User’s Guide
2.
To add the custom table ‘EZ-GARN SETUP’, click on the ‘Add’ button and go into that
detailed screen and add this table
Note: You must enter the custom table exactly as shown in the screenshot below,
i.e. ‘EZ-GARN SETUP’.
Note: EZ-GARN calculates garnishments based on the Federal Minimum Wage
guideline. If you want EZ-GARN to calculate garnishments based on this minimum
wage calculation, you need to add the code ‘MINIMUM WAGE’ in the ‘UserDefined Codes’ screen. If you do not add this code, EZ-GARN will only calculate
based on 25% of disposable earnings.
3.
Now, go to Payroll>>Rules>>User Defined Codes
4.
To add the code ‘MINIMUM WAGE’, click on the ‘Add’ button and go into that
detailed screen and define this code
Note: You must enter the code exactly as shown in the screenshot below, i.e.
‘MINIMUM WAGE’.
Page 22 of 30
EZ-GARN Setup
Note: If the Federal law changes the Minimum Wage value ($ 5.15), then EZGARN does not update the new value, you need to manually update it.
5.4- Loans Setup
EZ-GARN also tracks payback of loans. It adjusts the LOAN owed to the company based on the
following:
I.
Earnings Code Loan
II. Deduction Code Loan
5.4.1- Earnings Code Loan
Calculation is based on the employees YTD (year to date) amount. If the employee has an
amount paid YTD, it then pays back and reduces the value.
Steps to setup ‘Earnings Code Loan’:
1.
In Sage Abra, go to Payroll>>Rules>>Earnings Code, click on ‘Add’ button to
create 'Earnings Code Loan’
2.
Enter relevant information in this screen
•
Select ‘Earnings Category’ option as ‘Reimbursements’
•
Select ‘Earnings Type’ option as ‘Not Pay (Reimbursements)’
•
Select ‘Unit of Pay’ option as ‘LOANS’
The screen below is an example for 'Earnings Code Loan':
Page 23 of 30
EZ-GARN Installation and User’s Guide
5.4.2- Deduction Code Loan
EZ-GARN calculates the loan, if the employee has any balance owed in Deductions.
Note: Standard Deduction amount must be 0.0015. This is the setting done in EZ-GARN
by which the loan is calculated.
Steps to setup ‘Deduction Code Loan’:
1.
In Sage Abra, go to Payroll>>Rules>>Deduction Code, click on ‘Add’ button to
create 'Deduction Code Loan’
2.
Once you add a ‘Deduction Code Loan’, select it and click on the ‘More’ button
2.
Enter relevant information in this screen
3.
•
Select ‘Deduction Type’ option as ‘Regular Withholdings’
•
Select ‘Standard Deduction’ option as ‘0.0015’
•
Select ‘Deduction Goal’ option as ‘100,000’
Now click on the ‘OK’ button to finish the task
Note: If the Deduction Goal=100,000, EZ-GARN calculates deduction loans
based on the value entered in the ‘Amount’ field in the ‘Deductions’ page. If
Deduction Goal ≠100,000, it calculates based on the value displayed in
‘Employee Balance’ column as show in the screen shot below, i.e., ‘8500.00’.
Page 24 of 30
EZ-GARN Setup
The screen below is an example for 'Deduction Code Loan':
Page 25 of 30
Chapter 6: Process
6.1- Steps to process EZ-GARN
1.
Once you finish setup for EZ-GARN, go to Payroll>>Processes>>Run Trial Payroll
to run the ‘Trial Payroll’ process; the following screen is displayed
2.
Click on the ‘OK’ button to reprocess ‘Trial Payroll Process’
3.
selection button and select 'EZOnce the ‘Trial Payroll Process’ is over, click on
GARN' to calculate correct Garnishment adjustments
Note: If you have the Advanced Toolkit installed in Sage Abra, you can select
'EZ-GARN' program to calculate correct Garnishment adjustments in
Payroll>>Process>>Calc Garn Adjustments.
4.
EZ-GARN identifies whether it is a ‘Credit Garnishment’ or ‘Child Support’ for those
employees that have these codes
2.
It calculates the correct Wage Base based on the ‘Earnings Basis’ mentioned
3.
It calculates the % of Garn by taking amount /wage base. If this amount is greater
than the max. allowed for the employee, it then limits the amount to maximum
allowable
4.
Report: After calculating Garnishment Adjustment, EZ-GARN generates an audit
report as shown below:
Note: This report is only for employees whose amount has changed (‘NEW AMT’
column).
Page 26 of 30
EZ-GARN Installation and User’s Guide
Page 27 of 30
Appendix:
Examples of Amounts subject to Garnishment based on the $5.15 an hour Minimum
Wage:
The following examples illustrate the statutory tests for determining the amounts subject to
garnishment.
1.
An employee's gross earnings in a particular week are $235.00. After deductions
required by law, the disposable earnings are $205.00. In this week $50.50 may be
garnished, since only the amount over $154.50 may be garnished where the
disposable earnings are $206.00 or less. The employee would be paid $154.50
2.
An employee's gross earnings in a particular workweek are $240.00. After deductions
required by law, the disposable earnings are $210.00. In this week 25 percent of the
disposable earnings may be garnished. ($210.00 X 25% = $52.50) The employee
would be paid $157.50
3.
A garnishment order is received after the second work day of the week. It requires a
garnishment based on wages earned up to that day be withheld. The employee is paid
$60.00 a day. Since less than $154.50 has been earned, no garnishment is permitted.
However, if another garnishment is received when the workweek is complete, or in
states where continuing garnishments are issued, the employer will withhold on the
basis of the earnings for the entire week
4.
An employee paid every other week has disposable earnings of $400.00 for the first
week and $40.00 for the second week of the pay period, for a total of $440.00. In a
biweekly pay period, when disposable earnings are above $412.00 for the pay period
25% may be garnished. It does not matter that the disposable earnings in the second
week are less than $154.50 - 25% of the $440.00 ($110.00) is subject to garnishment
5.
An employee on a $320.00 weekly draw against commissions has disposable earnings
each week of $285.00. Commissions paid monthly, total $2,000.00 for July after
deductions required by law. Each draw and the balance due at the monthly settlement
are separately subject to the law's restrictions. Thus, 25% ($71.25 in this example) of
each draw may be garnished. At the end of the month, the $1,140.00 previously
drawn is subtracted from the $2,000.00 settlement figure, and 25% of the balance
may be garnished. In this example, the garnish amount is $215.00
6.
Pursuant to a garnishment order (with priority) for child support an employer
withholds $90.00 a week from the wages of an employee who has disposable earnings
of $240.00 a week. A garnishment order for the collection of a defaulted student loan
is also served. The limit for normal garnishments of 25% applies to the debt for the
outstanding student loan. Under the formula for normal garnishments, a maximum of
$60.00 (25% of $240.00) is garnishable. The $90.00 support payments may be
withheld, because the normal restrictions do not apply to court orders for support. No
withholding for the defaulted student loan may be made, because the amount already
withheld is more than the amount that may be withheld for normal garnishments.
Additional withholdings could be made to collect support, delinquent federal or state
taxes and certain bankruptcy court ordered payments
Page 28 of 30
FAQ's
The following are some of the more common questions.
1.
Is the interface installed on the server or just on the client computers?
EZ-GARN is installed inside Sage Abra and can be installed from any workstation that runs
Abra or has Abra installed. This was designed to make it simple for the end user to install
our applications. Only requirement is that no users can be inside Abra at the time of the
install. Please refer to Installation and Access -To install EZ-GARN install instructions.
Page 29 of 30
Glossary
A
Activity Centre - The Activity Center provides access to all activities and includes the same
options as the main menu.
Arrears - An unpaid, overdue debt or an unfulfilled obligation.
D
Drop-Down List - A special kind of field within a screen that, when clicked, displays a
number of option from which to choose
E
EZ-GARN - A software product developed by Employee Based Systems, which reduces the
amount of time spent calculating garnishments for employees
F
Federal Law - Federal law is the body of law created by the federal government of a nation.
L
List Box - A dialog box that displays a multi-column list of items from which you can select.
P
Payroll - Payroll is one of a series of accounting transactions dealing with the process of
paying employees for services rendered, after processing of the various requirements for
withholding of money from the employee for payment of withholding payroll taxes, insurance
premiums, employee benefits, garnishments, and other deductions
Process - A process changes or creates information pertaining to a group of employees. A
process involves one step or a series of steps that lead to the completion of a task.
S
Sage Abra - Payroll Integration application.
Security Group - A security group is a collection of one or more users with the same access
rights
T
Trial period - A trial version of a software or any product that is valid only for a specific
period or time.
W
Wage Garnishment - Any legal or equitable procedure through which some portion of a
person’s earnings is required to be withheld by an employer for the payment of a debt.
Page 30 of 30