Transcript
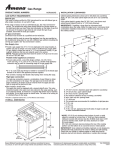
P: 07 3208 4625
E: [email protected]
W: www.aquapulsespas.com.au
A: Unit 2 /3333 Pacific Hwy
Slacks Creek Qld 4127
NOOSA LUXURY START-UP INSTRUCTIONS
1.
Remove the cabinet panels from underneath the spas touch pad.
2.
Remove both filters from the spa (see page 22 in your user manual).
Place a hose in the filter box to fill the spa with water (see page 20 in your user manual).
(Remove the fittings from your hose to prevent them falling into the spas plumbing).
As the spa is filling with water check all barrel unions inside the cabinet for any leaks as it is possible
for these fitting to have worked their way loose in transport. The barrel unions are the fitting which
connect the pumps to the plumbing.
Also set your two main diverters on the spa to the centre so that both sides of the spas plumbing
will fill up with water. The main diverters are the largest handles on the top side of your spa.
Fill the spa until the water level covers the top of the highest jet.
(The six shoulder jets in your spa are not to be under the water level)
Note: Do not leave your spa exposed to the sun with-out water in it and the hardcover on, this will
cause the spa to delaminate and is not covered under warranty (this can happen within a 30 minute
period if it is a hot enough day). It is extremely important that you fill your spa with water and fit the
hardcover as soon as the spa is put outside even if your electrician is not coming straight away.
3.
Have a qualified electrician connect the spa to power. The power supply your electrician
needs to connect is 32Amp Single Phase with the appropriate sized RCD in your houses metre box.
The wiring diagram can be found on page 15 of your user manual. The panels to remove from the
spa to find the electrical connection point will be the panels directly underneath the digital touch pad
on the spa.
Your electrician can drill a hole anywhere through the fibreglass base to pull the electrical cable
through. Just make sure that the area behind where they drill is clear of any spa parts inside the
cabinet.
Once the spa has power connected to it and it is filled with water turn the power on. Never turn the
spa on if you do not have it filled with water. The spa will go through a self-check mode where you
will see a series of numbers appearing on the screen, wait until the spa enters Priming Mode PR
will appear on the touch pad screen. Once you have seen PR on the screen press Jets 1, you
should now have water movement within the spa. Now press jets 2/3 this button you need to press
twice to turn both pumps on, you should now have all three sides of the spa running. Wait 5 minutes
then press Jets 1 & Jets 2/3 to turn all the pumps off.
4.
Your spa has an inbuilt Aroma Therapy stick, it is the smallest plastic fitting on the topside of
the spa. You will need to unscrew the stick from the spa and remove the plastic transport cover by
unscrewing the blue cap and sliding the opaque cover off to expose the scented stick inside, screw
the blue cap back onto the aroma stick leaving the opaque cover off. Reinstall the stick back into
the spa, turning the handle to the right works the aroma scent when you have the air blower turned
on. Turning the handle to the left will turn off the aroma scent off.
5.
Go to page 23 in your user manual and follow the instructions to set the time of day. Then
set your desired temperature and make sure that the spa is in Standard Mode.
6.
Go to your chemical instructions and balance the spas water.