1
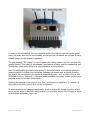
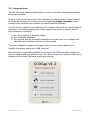
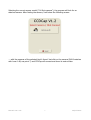
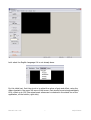
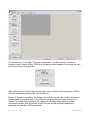
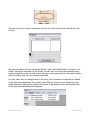
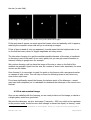
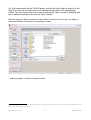
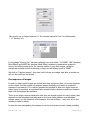
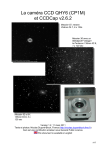
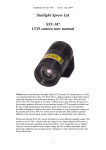
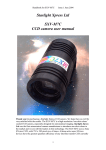
Luna 0.4B user’s manual.
You have just purchased a Luna Camera, thank you very much for choosing a Lunático
product. Lunático Astronomía hopes the camera will fulfil your expectations.
Manual Luna 0.4 B
1
08/junio/2007
INDEX
1. – Introduction
2. – Contents
3. – Installation
3.1- Driver and software installation
3.2- Connecting to the computer and telescope
3.3- Image at home
4. – First images (CCDCap)
4.1- Focusing
4.2- First astronomic image
5. – Other programs
6. – Specifications
7. – Getting the most of your camera
7.1 Software
7.2 Refrigeration and humidity
7.3 Gain and “offset” adjusting
8. – Common problems and solutions
Manual Luna 0.4 B
2
08/junio/2007
1.- Introduction
Please note: before connecting the camera to your computer, you should install the
software, as explained on point 3.1.
Your camera is a highly specialized device designed for astronomical photography. Thanks
to its high sensitivity, the camera is able to take high quality images of every kind of
astronomical objects, even if by its size it’s specially well suited to image galaxies,
planetary nebulae and other not very extended objects.
With its low cost, and as it includes an autoguider port, it is also a very good option to
autoguide your mount; the high sensitivity of the camera will make finding suitable stars a
really simple task, as they will available in almost every field of view.
2.- Contents
Along with the camera, you should have received:
- An USB 2.0 cable (to connect the camera to the computer)
- A flat autoguider cable ( “ST4” compatible, RJ12)
- A car lighter adaptor (TEC power supply)
- A T to 1 ¼” adapter
- A CD-ROM with the software and this handbook
- The warning “Read before use”
- A tight case for the camera and its accessories (except if you have bought it as a
part of a set with another camera, if so, there will be only one case, bigger, for the whole
set)
If you find something is missing, please contact Lunático Astronomía as soon as
possible.
3.- Installation
3.1.- Driver and software installation
The software needed to operate the camera is included in the CD ROM (for Microsoft
Windows). If the installation program does not start automatically after the CD is inserted,
please browse the disc and launch the “Luna0.4b-Install” program.
The installation program will guide you through the rest of the process.
3.2 – Connecting to the computer and telescope
The cables should be connected as explained below:
Manual Luna 0.4 B
3
08/junio/2007
In order to use the camera, the only essential cable is the USB (it must be a good quality
cable, full rated, such as the one included; too long or too thin cables are not able to carry
enough power for the camera to operate).
The plug labelled “TEC supply” is used to power the cooling system (12v DC, less than 2A,
positive inside). This supply is not needed if the camera is being used for autoguiding, but
is extremely useful when using it for long exposures as main camera.
Last, the autoguiding port allows the camera to send corrections to the mount during an
imaging session. It will be thus connected, between the camera and an identical plug in
the mount (for mounts with non-standard autoguiding ports – such as Vixen mounts with
SkySensor 2000, or Takahashi – there are readily available converters; please contact your
personal dealer or Lunático Astronomía).
Coupling the camera to the scope is very easy: just thread the supplied 1 ¼” adaptor in
the camera, and then insert it as if it were an eyepiece.
To avoid problems and damaged equipment, all wires and cables should be driven all the
way from the scope to the floor, using twisters or some other means. Don’t forget to allow
for the scope movement, focus, etc.
Manual Luna 0.4 B
4
08/junio/2007
3.3 – Image at home
The very first image should be taken indoors in order to test the communication between
camera and computer.
To do so, we’ll connect the camera to the computer as explained before, neither needing
to couple the telescope nor the cooling or the autoguiding (please remember: before
connecting the camera to the computer you should install the software).
The first time the camera is connected to the PC, Windows will inform us it has detected a
new device. The actual messages may change slightly from version to version, but the
basic procedure is as follows:
a) No, do not connect to Windows Update
b) Yes - Automatic installation
c) Yes, proceed with the Automatic installation even if the driver is not signed or the
Microsoft Logo Compliance test has not been passed.
This driver installation procedure will happen twice, as there are two devices to be
installed (the camera itself and the USB controller)
Once the driver is successfully installed, we can launch the CCDCap program selecting it
from the desktop where we will find a new icon. When it starts up, a window similar to the
following will be shown (the actual version may change):
Manual Luna 0.4 B
5
08/junio/2007
Selecting the correct camera model (“0.4 Mpix camera”), the program will look for an
attached camera. After finding the camera, it will show the following screen:
... with the cameras of the selected kind it found. Just click on the camera (QHY6 matches
with Luna 0.4B, see point 7) and CCDCap will connect and show its main screen.
Manual Luna 0.4 B
6
08/junio/2007
Let’s select the English Language if it is not already done.
For this initial test, first thing to do is to adjust the values of gain and offset, using the
sliders located in the upper left zone of the screen. Gain should be set at approximately
80%, offset up to 120 (the actual exact values can be checked in the status line of the
application, at the bottom, right side).
Manual Luna 0.4 B
7
08/junio/2007
On the side bar, on the option “Preview configuration” we slide the bar to select an
exposure time of about 100ms. CCDCap is constantly taking images of this length as long
as we don’t press “Stop preview”
We should not worry if the image we see has a lower resolution than expected; CCDCap
will have selected a binning mode (see further on).
Being not focused on anything, the image will be totally blurred. We should now focus in
checking that the image shown in the window changes as we cover and uncover the
camera. In normal light conditions, the image will be totally white with the camera
uncovered and dark with it covered, but for this you should previously disable the
automatic contrast that CCDCap provides.
Manual Luna 0.4 B
8
08/junio/2007
We click on the icon where a histogram is shown (the one further down the left bar) and
we see:
We must uncheck the boxes “Histogram Stretch” and “Auto Black/White”, as shown in the
image. Having the histogram on the screen, we can use it to confirm the communication
camera-computer, as the red lines in the histogram must move left with the camera totally
dark and totally right with the camera illuminated.
It is very likely than the image shown is too noisy; this is because it is selected by default
in the high speed download. If we click on the “Options” menu and we disable the high
speed download, although the result will continue to be basically noise, the artifacts due
to the high speed download will disappear.
Manual Luna 0.4 B
9
08/junio/2007
After this point , we have for sure that the camera and the computer communicate
correctly and we can start taking astronomical images.
4.- First astronomical images (CCDCap)
This section is specially written for people with no previous experience with CCD cameras,
so it could be too detailed for advanced users.
Please note, if we are going to use a different computer from the one we made the first
indoors images with, we must install the camera software before connecting it.
First turn on the PC and uncover the telescope, then couple the camera to the eyepiece
holder. Connect everything and set correctly the cables and finally point to the sky.
4.1 Focusing
Reaching focus can be difficult and frustrating for the first time, but once you have
managed to do it once, it will be much easier to do it again; we may even need an
extender (2” male to 2” female for example), mostly in today’s compact refractors. In
Newton telescopes, the most common problem is normally the opposite, we need the
focuser to be shorter (a 2” low profile adaptor may be helpful).
Fortunately almost all telescope models currently for sale are designed and engineered to
work with CCD cameras and we’ll be able to find an adaptor combination which will allow
us to focus.
For this first time, it is highly recommended to point the telescope to a very bright star
(magnitude 2 or less) – you can also point to an area rich in stars, any nebulosity point in
the Milky Way can be very suitable.
Depending on the size of the CCD chip and telescope focal length, using a “flip- mirror”
system can be advisable to make sure that the star is in the camera field of view.
In most of cases a well aligned finder may be enough. It is also a good idea not to use
narrow band filters until we find it easy to work with the camera.
The eyepieces focus point is further out the focuser travel than the CCD cameras. So, as a
start point, we should place the focuser about 1” further inside the point we would focus
with an eyepiece.
Then we will start up CCDCap, select our camera and the program will automatically
download images in preview mode , which is the most suitable to focus. For higher
security we can select an exposure time of 500 ms and now, with the histogram tool we
can check “high contrast”.
If everything is right, we will see on the screen a circular spot on the unfocused image of
Manual Luna 0.4 B
10
08/junio/2007
the star (or star field).
In this image we are getting closer to the focus point (from left to right)
If the spot doesn’t appear, we must move the focuser, slow and patiently, until it appears,
watching the computer screen that will go on showing us images.
If lots of stars instead of only one appeared, it would mean that the brightest star is not
on the field but many others of bigger magnitude are being shown.
The idea when focusing is to get the smallest possible diameter of the stars; a handbook
on focusing is out of the reach of our user’s guide, but you can get some information in
internet, looking in google.com for example.
We continue focusing until we have the image of the star or stars on the field of the
smallest size possible. Apart from the size, the number of stars is also important, the more
we can see the better.
Once focused, it is convenient to mark the point on the focuser with a permanent marker
or measure it with a ruler. This will help us focus the following times as we’ll start very
close to the right focus.
If we have significantly moved the focuser, the balance point of the telescope – mount
may have been misplaced, so it is advisable to rebalance the telescope in the mount once
focused.
4.2 First astronomical image
Once we are satisfied with the focusing, we are ready to take our first image; a nebula or
a bright galaxy could be a good start.
We point the telescope, we do a test image (5 seconds – 5000 ms, which is the maximum
in the preview mode, should be more than enough to detect the object) in binning1 mode
1
“Binnig” is the name of the combination of several pixels. “Binnig 1x1” means that every physical pixel of
Manual Luna 0.4 B
11
08/junio/2007
2x2 (the image shown will be 376x291 pixels), and we will verify that the object is in the
field (if it is not, we are facing one of the hardest troubles than a CCD photographer
suffers. The only way to solve it is to apply a well aligned “goto” system (if available) and
lots of patience (specially if we have no “goto” system)
With the object on field, we centre it (slow motion controls on the mount), we select a
name and a folder for the file we are going to create:
…and we program 1 minute of exposure time:
the camera will be read and shown individually, in “binning 2x2” every group of 4 in the camera will show only
one in the final image and so on.
Manual Luna 0.4 B
12
08/junio/2007
(Be careful, not to forget selecting “s” for seconds instead of “ms” for milliseconds)
.... in “binning”1x1:
In this image “binning 2x2” has been selected; we must select “1x1 NVBE”. VBE (Venetian
Blind Effect) and NVBE (No Venetian Blind Effect) activate or deactivate a system to
remove the effect produced for the camera reading in very fast images; except in
exceptional occasions such as planetary images we will always work in “NVBE”
We click on “Capture images”, this time it will only be one image, and after a minute we
will see the result on the screen.
First sequence of images.
In order to obtain good images we should take long exposures (that, of course, depends
on the object, but the number of amateur images exceeding one night of combined
exposure is increasing!). It is neither possible not practical to take one single image of
many hours of exposure, so we should take several shorter exposures and then combine
them with the appropriate software.
There is not single recipe to determine how long we should expose for every object, that
depends on the telescope focal ratio and on the noise (light pollution and electronic
camera noise), on the sensitivity of the camera, the use of filters... and, over all, on the
results we want to obtain.
In case we have autoguiding the exposures can be as long as we want, always avoiding
Manual Luna 0.4 B
13
08/junio/2007
them to be blurred (“saturated” in digital words)
Up until you became an expert it is worthwhile to work with images of 1 or 2 minutes; If
we combine them later the results will be surprising. A slightly more sophisticated method
consists on taking an image of, for example,1 minute, check the values of the interesting
pixels (the nucleus in a galaxy, the brightest zone in nebulae) holding your mouse cursor
over them and calculating the exposure time approximately.
In case the galaxy nucleus has got pixels with 5000 ADUs (value), with a camera of 65535
pixels (16bit) just as ours, we could expose the film 6 or 7 times that length without
burning the nucleus.
Though simple this is a rather practical and useful approach to start. Experience and
practise will show you the best way to act.
Very long exposures are risky in any case, as an accidental hit in the mount, a guiding
failure or a plane passing over the image... all are common problems that can make our
effort useless. It is recommended to do exposures of such a length that removing one
doesn’t mean to have lost a clear night.
Everyone has his own preferences depending on his mount, the brightness of the sky etc.
We recommend to start with “short” exposures (1 or 2 minutes) and increase them as we
control the equipment. With 5, 10 or 15 minute exposures you can obtain outstanding
results.
The process to program these exposures is the same one that we followed for 1 minute
shots, increasing the number of images (“count”). The images will be recorded in the disk,
in the selected folder and with the chosen name followed by the sequence number. If the
name was, for example, “M51- test”, the created files will be: “M51- test_00001.FIT”,
“M51-test_00002.FIT” and so on.
5.- Other software
The CCDCap software enclosed in this camera, though friendly and easy to use does
neither include tools for further processing of the images nor guiding utilities.
The plugin modules for Maxim DL and AstroArt 4.0 are included with the camera, so if you
are an user of this programs you can employ them with the Luna 0.4 camera to guide,
capture, process … They are in the folder “plugins” of the CD ROM.
There are many programs for processing images, some of them freely available in internet.
DeepSkyStacker and Iris may be the most popular and with both of them you can combine
and process the images you took with this camera.
You can also download free autoguiding software; we already found out news about this
camera’s support in guidemaster software
Manual Luna 0.4 B
14
08/junio/2007
6.- Specifications
•Efective
•Pixel
pixels: 752*582, 440kpixels
size: 6.5um*6.25um
•Quantum
efficiency: 65% at 580nm
•Exposure
times: 1/1000sec to 10000sec
•16
bit AD Conversor (0-65535 ADU)
•TE
cooling, -30C below ambient, power requirements < 2A
•USB
2.0 High speed
•Download
•Binning
speeds, 600kpixel/s (normal) 6Mpixel/s (fast) preview and live video mode.
1x1, 2x2
•Standard
•Readout
autoguiding port (6 pin RJ12)
noise: 7 to 10 e-/sec at 600kpixel/s
•Anti-Blooming
•Gain
•T2
(-115dB)
0.5e-/ADU to 0.1e-/ADU
thread (M42x0.75)
•Filter
thread (M28.5x0.5)
•Size:
60*60*45mm
7.- Making the most of your Luna 0.4 B
7.1 Software
This camera official software is supplied by Astrosoft (Belgium) from its website:
www.astrsoft.be
Astrosoft also has a support forum and so does Lunático Astronomía (there is a link from
www.lunatico.es) and we will publish new versions of our software and will review our
handbooks.
Luna 0.4 B has been designed and manufactured (according to the specifications agreed
between Lunático and the manufacturer) by QHY Astronomy. It is convenient to know the
manufacturer name for the camera, which is QHY6, in case you require other software or
go searching for more information in internet.
7.2 Refrigeration and humidity
Manual Luna 0.4 B
15
08/junio/2007
The cooling system makes the camera to be (usually) under 0ºC. In order to avoid a frost
film on the sensor, it incorporates a tight body and a “cold finger”. Only in cases of
extreme humidity, the camera can show humidity problems, in that case, please, follow
these steps:
1. Cut off the cooling power supply
2. Insert, in the purpose made hole (with a black rubber lid on the side of the
camera) a bag of drying “silica gel”, put carefully the lid back.
3. Wait for two hours until humidity has been absorbed
Because this means to abandon the photographic session, we recommend you to insert
the drying in order to avoid any trouble.; we want to insist nevertheless, that this is only
necessary in cases of extreme humidity and with the cooling connected.
In case you needed to open the camera, please contact us before doing it.
7.3 Gain and “offset” adjusting
This adjusting is only necessary or recommendable if you are going to take long exposure
images with the camera. Using it for autoguiding makes the adjusting irrelevant.
In the last case, it is enough to select a gain and an offset high enough as to detect stars
that are suitable for guiding.
Every CCD sensor is slightly different. The Luna 4.0 B camera allows the user to adjust,
with the help of the software, the gain (similar to the ISO in traditional cameras) and the
offset (an energy level added to the signals read of the camera). Although this supposes
an extra work, there is only necessary to make an adjusting for camera and binning mode,
2 in our case (one for 1x1 binning and another for 2x2). In fact, being 1x1 the mode with
the biggest resolution, it would be enough in 90% of cases, to adjust 1x1 and let these
values fixed.
The gain entails the most subjective part; the bigger it be the more amplified the signal
will be - but so will the noise. We recommend to begin with the maximum gain and reduce
it step by step in case we think there is too much noise.
In order to adjust the gain, we will cover totally the sensor avoiding the light to enter and
we will allow the CCDCap to download images (with short exposure times, 100ms or less,
the adjusting will be easier). Always using the slow download mode.
With the chosen gain, we adjust the offset until we get pixel values closer to 0 but always
over it, this way we wont waste the dynamic range (possible pixel values) of the camera.
In case the gain varies, whatever the reason be, we should adjust the offset again in order
to have an optimal behaviour.
8.- Common problems and solutions
Manual Luna 0.4 B
16
08/junio/2007
PROBLEM
POSIBLE REASON
SOLUTION
The image shown is
completely black
The contrast or the gain
and the offset are wrong
Select high contrast in the
histogram. If the trouble
continues, adjust the gain and
offset values. (see section 7.3)
The image is very noisy
Several
Probably the download mode is
fast, disabling it the quality will
highly increase. If not, adjust the
gain and offset values. (7.3)
The computer doesn’t
recognize the camera
Low quality USB cable.
Change the cable for the one
supplied for the camera.
The CCDCap program
stops answering.
Several
Disconnect the camera from the
computer (only unplug the USB
cable) and close the program.
Connect the camera again and
restart the program.
The images shown by
Zoom or binning
the CCDCap are smaller
that expected.
Make sure that the 2x2 binning is
not selected and that the image
shows a 100% resolution.
When activating the
cooling the images are
dirty with strange
patterns.
Remove the humidity in the way
explained in section 7.2
Humidity condensation.
If you have any trouble not included in this short guide or if you want to get some advice
or to make any suggestions, please contact us trough Lunático Astronomía forum in yahoo
groups (the forum is called LunaticoAstronomia). There is a link in our website
(www.lunatico.es) to contact easily the forum.
Enjoy your camera!
Manual Luna 0.4 B
17
08/junio/2007