1
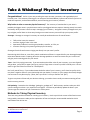
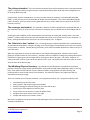
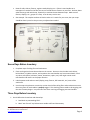
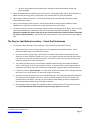
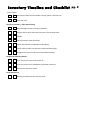
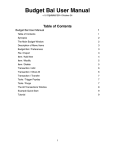
Table of Contents
Take A WhizBang! Physical Inventory .................................................. 1 Methods for Taking Physical Inventory .......................................................................... 1 The yellow pad method .............................................................................................. 2 The scavenger hunt method ....................................................................................... 2 The “little bit at a time” method ................................................................................ 2 The WhizBang! Physical Inventory ............................................................................. 2 Step‐by‐Step to a WhizBang! Physical Inventory ................................. 3 Two/Three Weeks Before Inventory .............................................................................. 3 Ten Days Before Inventory ............................................................................................. 3 Seven Days Before Inventory ......................................................................................... 4 Three Days Before Inventory .......................................................................................... 4 The Day (or two) Before Inventory – Count the Stockrooms ......................................... 5 How to Count at Inventory ............................................................................................. 7 Tips to Consider for the Day of Inventory ...................................................................... 8 The Day of Inventory ...................................................................................................... 8 Counting Begins .............................................................................................................. 9 Compiling the Inventory Results .................................................................................... 9 Review the Process ....................................................................................................... 10 Inventory Timeline and Checklist ....................................................... 11 Sample Inventory Sheet ..................................................................... 13 Analyzing Your Shortage Results ........................................................ 15 Using the Templates ..................................................................................................... 17 © Copyright 2010, WhizBang! Training
Ph: 616-842-4237 Fax: 616-842-2977
www.whizbangtraining.com
Page i Take A WhizBang! Physical Inventory
Congratulations! You’re on your way to taking the most accurate, systematic, and organized physical inventory ever. This Inventory Counting Kit is an excerpt of the Retail Mastery System and will show you how to make the important, and sometimes difficult, task of counting your inventory a breeze.
Why bother to take an accurate physical inventory? The inventory of merchandise in your store is probably the biggest asset in your business as well as your biggest business expense. Knowing exactly how much and exactly what you own is the first step in managing your inventory. And great inventory management is your key to higher profits! Here are three ways having an accurate inventory count will help you improve profits. Shortage – Shortage or overage in inventory can usually be attributed to one of several factors: • Theft, either internal or external • Incorrect ringing of sales in the store • Paperwork problems in receiving merchandise, transfers, or RTVs, etc. • Incorrect counting or key‐entering of the physical inventory Shortages from theft and incorrect ringing eat directly into your store’s profits. Determining which factor or, more likely, which combination of factors is responsible for your shortage/overage takes some detective work. Knowing where the shortage problems are and how severe they are in each area will give you the starting point for your search. Taxes – Don’t risk paying extra taxes. If you overestimate the dollar value of your inventory, your cost‐of‐goods will go down, your profit (on paper!) will go up, and you’ll pay taxes on income you didn’t actually earn. No one wants to give Uncle Sam more than he is actually due! Don’t sell yourself short. If you underestimate the dollar value of your inventory, you’ll show less profit, which may have a negative effect on your relationship with your banker, investors, or your spouse who always thought the store was a crazy idea anyway. (“Dear, don’t you think it’s time you found a ‘real’ job?”) To get a true picture of how well your business is doing, you need to have a totally accurate accounting of how much inventory you own. POS updating – Remember the old adage “garbage in, garbage out?” Bad inventory numbers make your POS system nothing more than a very expensive cash register. You have to periodically update the data in your system to get the most out of your investment in a POS system. Methods for Taking Physical Inventory
There are many possible methods for counting your inventory. Here’s a quick look at some of the favorite ones being used by storeowners today and an explanation of how and why the recommended method in this kit works better than all the rest.
© Copyright 2010, WhizBang! Training
Ph: 616-842-4237 Fax: 616-842-2977
www.whizbangtraining.com
Page 1 The yellow pad method – This is the favorite method of most retailers who don’t have a computerized POS system. Using this method, you give everyone a yellow pad and have them attack the store writing down a list of all the products they find. Unfortunately, with this method there is no way to ensure that all the inventory is counted ONCE and ONLY ONCE. It’s way too easy to miss merchandise or double count merchandise. This is the method Bob originally used in his stores, and if you want to hear a good business story, ask him about the very last time he ever did inventory this way! The scavenger hunt method – This method is a favorite of retailers who do have a computerized POS. In this method you print out a list of all the inventory the computer says you should have on hand and go look for it. Sounds good, but in addition to the same problems you have with the yellow pad method, there is one more problem. It doesn’t take into account any merchandise that may be on your floor but not in your computer. In theory, nothing should be on the floor that’s not in the computer, but… it happens. The “little bit at a time” method – This is a strategy that gets combined with both of the methods above and compounds the problem! Using this strategy, your inventory gets counted a little bit at a time over a period of days, weeks, or months. One day during store hours you’ll count the sweater department, and the next you’ll count the shoes. While this might work to correct on‐hand counts in your POS for buying purposes, it doesn’t work at all for getting an accurate total of all your inventory. And that is what you need for creating an accurate profit and loss statement, for figuring out your shortage, and for starting your open to buy plan. You need a “snapshot” of exactly how much inventory you own at one specific point in time. You should count the entire store all at once, after the close of the business day. The WhizBang! Physical Inventory – The method we have developed is a combination of the best practices used by very large retailers and refined for use by small and mid‐sized independent retailers. The “big boys” have spent literally hundreds of years, millions of dollars, and a gazillion man‐hours learning and perfecting how to count a wide variety of merchandise. The stakes for them are very high and so they’ve worked very hard to get it right. There’s no need for you to reinvent the wheel – we’ve figured it all out for you. Using this method you will: • systematically map out your store • clean, organize, and correctly tag all merchandise • develop a strategy for efficiently using all your sales staff to help • count all your merchandise once and only once • ensure counts are correct with a system of double checks • complete a full count of your store in one night • compile and analyze your inventory results We’ve also included lots of the tips and tricks learned along the way to help make the process run even more smoothly and efficiently. © Copyright 2010, WhizBang! Training
Ph: 616-842-4237 Fax: 616-842-2977
www.whizbangtraining.com
Page 2 Step-by-Step to a WhizBang! Physical
Inventory
All the steps for taking a completely accurate physical inventory are laid out below in step‐by‐step fashion. This outline approach should make it simple for you to get great results. 1. We strongly recommend that you first listen to the audio recording while looking at the report to get an overview of the system. 2. Read through this entire report carefully and make sure you understand all the procedures. 3. Try taking your first inventory exactly as it’s laid out in the system. We’ve had lots of clients tell us they’ve tried to cut corners, but just had to go back to the manual and do it all over! Certainly, you may find things particular to your store that can be added or modified, but take your first one “by the book.” 4. Customize the forms to fit your store. 5. START!! Two/Three Weeks Before Inventory
1. Post a sign alerting crew about inventory date. All employees are expected to take part on inventory day. This should be a mandatory event. Ten Days Before Inventory
1. Post the inventory schedule. Be sure to let everyone know what their assignment is for the day, i.e., working the floor, counting the stockrooms, etc. 2. Begin creating floor plan maps of all areas that contain retail merchandise. Be sure to include selling floor, stockroom, windows, displays, ceilings, office area (if it contains retail merchandise), and any off‐
site locations that are used for storing merchandise. •
Use manila folders and pencil for maps. Any changes in maps can be easily made if they are drawn in pencil. Manila folders work very well for maps because they are durable, plentiful, and can be used to hold the inventory sheets for that section of the floor after they are pulled. •
Break up the floor into small manageable sections and draw one map for each section. Usually the sections will correspond to the way the floor is merchandised (e.g., one map for the stockroom, one map for sportswear, one map for shoes and one map for accessories). Be very careful to include all areas of the store in your maps – holds, sends, alterations, repairs, windows, stockrooms, ceilings, any area that contains retail merchandise. See sample floor plan attached. •
Give each map a name and number (e.g., Map #1 Shoe Stockroom, Map #2 Little Stockroom). Write the name and number on the front of the map and on the tab of the manila folder. © Copyright 2010, WhizBang! Training
Ph: 616-842-4237 Fax: 616-842-2977
www.whizbangtraining.com
Page 3 •
Draw all walls, shelves, fixtures, register stands, displays, etc. If there is merchandise on a mannequin or stacked on the floor, be sure to include them as fixtures on your floor. Be clear about what fixtures go with which map, especially in transitional areas between maps. Make sure all fixtures, displays, etc., get put on a map. It can be easy to miss one! •
See example. The samples are done in black marker so it is easier for you to see, but your maps should be done in pencil so they are easy to adjust when needed. Seven Days Before Inventory
1. Complete maps of selling floor and stockrooms. 2. Clean and organize the stockroom down to the corners. Be sure to check under stock shelves, behind desks, in hidden crannies, and anywhere else merchandise may have accumulated. Check any other area (office, hold area, closets, alterations, repairs, etc.) that might contain retail merchandise and move it to the proper location. 3. Label separate retail and non‐retail (display props, fixtures, POP materials, etc.) areas of the stockroom. 4. Use the maps to implement a section‐by‐section check of the selling floor and stockroom to ensure that every piece of merchandise is properly tagged. This checking process needs to be ongoing until the time inventory begins. Use particular care when receiving and tagging new merchandise. Three Days Before Inventory
1. Get all defectives cleared out and cleaned up. a. Send back any outstanding RTV’s. b. Mark “out of stock” any broken items unable to RTV and throw away. © Copyright 2010, WhizBang! Training
Ph: 616-842-4237 Fax: 616-842-2977
www.whizbangtraining.com
Page 4 c. All other merchandise (anything waiting for resolution) should be identified, sorted, and properly tagged. 2. Clean and organize the selling floor down to the corners. Check again under shelves, behind fixtures, in hidden crannies, dressing rooms, and anywhere else merchandise may have accumulated. 3. Clean register stand to the corners. Throw away old materials, lost and found stuff, and any other clutter behind the counter. 4. Copy or print enough inventory sheets. Use the sample blank inventory sheet provided as a data download or on your data CD and print it or copy the blank sheet in this report. 5. Number the sheets in pen in the “Inventory Sheet #” blank at the top right of the sheet. Start at 1 (one) and continue numbering in sequential order until all the sheets have been numbered. It is very important to number the sheets in this way so you can ensure that all the sheets have been accounted for at the end of the inventory. You will fill in the “Map #” blank as you lay the sheets for each mapped area. The Day (or two) Before Inventory – Count the Stockrooms
1. Lay inventory sheets for maps in the stockroom. Here is how to lay sheets for inventory. • Always start at one corner of a map and move in an organized and systematic fashion. Top to bottom and left to right is a tried‐and‐true system. •
You can lay sheets in groups (e.g., two sheets for a section of five shelves in the stockroom, ten sheets for an entire clearance rounder, etc.) or in a very specific manner (one sheet for each of the five shelves in the section of stockroom shelves, one sheet for each arm of a four way fixture, two sheets for each shelf on a floor fixture, etc.). •
The number of sheets you lay on each fixture should be determined by the number of different styles on the fixture, not by the total number of items. A clearance fixture with a large number of single styles will take up many more sheets than a fixture with a large number of only a few styles. •
Lay plenty of sheets. Do not skimp!! It is much easier to have extra sheets with nothing counted on them than to run out of sheets in an area on the night of inventory. •
Record the location of each sheet on the corresponding map. Also record the appropriate Map # on the sheets that you lay down in that area. List all the sheets located in the area of a map on the outside of the manila folder. This way you’ll know which sheets belong to the area designated in that map and exactly where they are located on the floor. •
See examples on the next page. The samples are done in black marker so it is easier for you to see, but your maps should be done in pencil so they are easy to adjust when needed. © Copyright 2010, WhizBang! Training
Ph: 616-842-4237 Fax: 616-842-2977
www.whizbangtraining.com
Page 5 Map Samples:
2. Count and seal off any areas of the stockroom or off‐site storage areas where access will not be needed until after inventory. Do not touch any merchandise after it has been counted. A physical barrier like strips of tape or signs is a good reminder not to touch the counted merchandise. 3. Complete all cleaning, sorting, and tagging projects. 4. All merchandise received in the few days before inventory must be properly entered into the computer book stock, tagged, and merchandised on the floor or put in the stockroom. Make any last‐minute © Copyright 2010, WhizBang! Training
Ph: 616-842-4237 Fax: 616-842-2977
www.whizbangtraining.com
Page 6 adjustments to inventory maps necessary because of new receivings. 5. The manager should gather all materials needed for the actual counting the following night. Develop a plan for what order the store will be counted in and who will be assigned to count in each area. The better the plan, the more smoothly the counting will go. How to Count at Inventory
Use this same technique when counting the evening of inventory. •
Use a pencil only and be sure to WRITE LEGIBLY. This is critical for the accuracy of data entry at the end of the process. Determine acceptable number styles (e.g., no crossed sevens, no fancy ones, no curlicue numbers of any kind). •
Fill in a brief product description, the style number, and total quantity counted in that area. If you need more information – like department code or classification – for entering the data into the computer or spreadsheet, adjust the inventory sheet template and fill in all the additional required information. •
Be sure to fill out the inventory sheet correctly and completely. Accuracy is critical! •
A manager should check each person’s first sheet for correctness and legibility before s/he goes on to finish counting. It’s much easier to find out after one sheet that someone doesn’t quite have the hang of it and get the problem corrected than find out at the end of the night! Also the manager should be sure to check for legibility and correct number formation (no ones that look likes sevens for example). •
Do not write inventory information on the back or bottom of the sheet. Only use the lines given. It’s OK to make small notes to yourself or tally marks in the right margins, but be sure that all actual inventory information is accurately entered on the lined area of the sheet. •
If you run out of lines on an inventory sheet, move on to the next sheet. If you run out of sheets in the area you are counting, ask a manager for more sheets. Do not take sheets from another area. •
Check the tag of each item counted. o
Do not assume similar items all have the same tag or are the same item. For example, items that are the same style but different size may have different SKU numbers. o
Do not assume items are correctly tagged. If they are incorrectly tagged, retag and count correctly. •
Counting can be done individually or in two‐person teams. Individual counting is best for most areas as it cuts down on chatting and is the fastest. Two‐person teams work well in very complicated areas with lots of little items or where lots of reorganization has to take place. Two‐person teams also work well for training first‐time counters. •
If there is a mistake on a line, don’t erase the line. Cross out the incorrect line and write it correctly on the bottom of the sheet. •
Count the merchandise in an organized, systematic way so that it is easy for the recounters to check the first count. •
Do a 20‐50% recount. Counters should not recount their original area. Additional recounts can be done in any given area, up to a 100% recount, if the second count reveals a problem with the first count. © Copyright 2010, WhizBang! Training
Ph: 616-842-4237 Fax: 616-842-2977
www.whizbangtraining.com
Page 7 •
Counters and recounters should initial each sheet as they are completed. •
Managers should do a 10% executive check on a random sample of merchandise. Tips to Consider for the Day of Inventory
TIP #1: Count the most difficult areas first while everyone’s mind is still fresh. TIP #2: Try to group your counters so that entire maps can be completely counted and second counted before they move on to another section of maps. That way you can pull sheets and check them for accuracy and completeness while the counters move on to another section of maps. If you spread out all the counters, you’ll have all the work of pulling the maps and checking the sheets to do at the very end of the night, all by yourself after all the employees have gone. Tip #3: Don’t plan on the manager counting. The manager should be running the inventory, delegating tasks, assigning counting areas, addressing problem merchandise, making tickets for items missing tags, pulling sheets as each map is complete, checking sheets for completeness and accuracy, etc. Tip #4: Plan on a break about two thirds of the way through the counting. This could include drinks and snacks, even a whole meal (pizza or subs are excellent) depending on how long you will be counting and the time of day. The break is important to give everyone some mental breathing room; but also understand that your crew will become less productive and less focused after the break. They will begin to zip through things just to get home. (See TIP #1!!!) The Day of Inventory
1) Any receivings that come in the day of inventory may be dealt with in two ways. a. If the receiving is entered into the computer stock that day, it must be counted for inventory. b. If the receiving is not entered into the computer stock that day, it should not be counted in inventory. Boxes should remain sealed and be labeled “Do Not Count.” 2) Continue counting stockroom and seal off areas as they are completed. When the stockroom is completed, pull completed sheets and put them in manila folder maps. Put completed maps in a safe place – perhaps the manager’s desk – until the sheets are needed. 3) Lay sheets on the selling floor prior to store closing. Use the same method as described in the section about laying sheets in the stockroom. 4) Close to the time of store closing, pull any moveable floor fixtures to the stockroom, count, and seal. The more you can count ahead of time, the sooner your evening will end. 5) Do a last‐minute sweep of any areas that may have accumulated merchandise during the day – fitting rooms, alterations, repairs, holds, defectives, manager’s desk, counter area, etc. Your goal is to have all retail merchandise in its proper place on the floor so it’s not missed in the counting process. 6) Determine who will do the day’s closing activities like counting down the bank and processing credit cards. This should probably be someone who worked during the day who isn’t going to stay for the counting. © Copyright 2010, WhizBang! Training
Ph: 616-842-4237 Fax: 616-842-2977
www.whizbangtraining.com
Page 8 Counting Begins
1) Hold a brief staff meeting prior to beginning counting the floor. Stress to the employees the importance of this job and make sure they have come prepared to work. Other areas to cover in the meeting include: a. How to count at inventory (see directions in the previous section). Review this carefully with all employees, even if they have counted before. b. NO MUSIC. NO EXCESS TALKING. NO FOOD OR DRINKS. This may seem harsh, but these small distractions can absolutely affect concentration and, therefore, the accuracy of your counts. c. Leave inventory sheets in their place. Do not take them to a manager if you have a question; get a manager to come to you. d. Don’t guess; ask if you aren’t sure about something. 2) Assign each employee an area to count. 3) COUNT. Don’t forget to check each counter’s first completed sheet for accuracy. 4) Pull inventory sheets as maps are completed. a. Check each line of each sheet for legibility, completeness, and accuracy. As hard as people try, mistakes do get made, quantities aren’t entered, or style numbers are forgotten. It is much easier to correct mistakes and check on errors while the person who did the counting is still there and the job is still fresh in the mind. b. Check the sheets associated with each map and make sure they are all there, in sequential order. If some are missing, refer to the map and look around to find them. 5) After all merchandise has been counted, make sure the selling floor is ready for the start of business the following day. 6) When all counting, straightening, and any other necessary work has been done, the employees can go home. Usually, you won’t need all the employees to stay until the very end. Let the ones who started their shifts first go home first. Compiling the Inventory Results
Now that you have an accurate count of all the merchandise in your store on the inventory sheets, you must turn that data into useful information. This process will be different for each company depending on the POS system you are using, whether you are tracking inventory by store, or whether you are just using a cash register with no perpetual inventory tracking. 1) If you are using a computerized POS with inventory tracking, refer to the user’s manual or call your tech support to find out how to enter your new physical inventory counts. Be sure to follow the procedure for this operation carefully, or all the hard work you’ve put in to ensure an accurate count will have been for nothing!! TIP #1: Most of the time this process is primarily a key entering job. This is an area where it is very easy to make mistakes – entering 120 items instead of 12 items can significantly affect your inventory results! Have two people work on the key entering process, one to type, and one to watch the inventory sheet and computer screen for errors. © Copyright 2010, WhizBang! Training
Ph: 616-842-4237 Fax: 616-842-2977
www.whizbangtraining.com
Page 9 TIP #2: If you need to do the key entering before the start of business the next day, you can do the key entry the night of inventory as each map is completed and reviewed while the rest of the store is being counted. Assign two people the night of inventory for this job. TIP #3: If your system lets you review the result before updating or overwriting your old inventory with the new numbers, do it!! A surprising number of mistakes slip through the cracks, and this is a great opportunity to catch and correct them. TIP #4: If possible, make a backup of your old inventory file before overwriting or updating your inventory with the new numbers. 2) If you are using a cash register with no inventory tracking system, the best way to compile your physical inventory data is by creating a spreadsheet. You can use as much or as little detail as you need or want on the spreadsheet. And with a spreadsheet you can sort your information by department, style #, department group, etc. This is helpful in figuring out how much inventory you own in each category for inventory management purposes. TIP #1 applies in this situation, too! 3) If you simply want a total inventory dollar value for accounting purposes and don’t plan to do any further analysis, the fastest method may be to just add up the dollar totals for each inventory sheet, and then add the totals together to get a company grand total. Be careful adding as it would be easy to make mistakes during this process. Check out TIP #1. 4) Once the data has been compiled into useful information, you need to analyze what the information means and how you can use it to improve your business in the future. Feel free to use the templates we provide as a starting point for your own customized analysis. The provided templates and samples will give you an idea of what your results may look like. Review the Process
The day after the inventory process, you should review how well the process worked. Make notes about what worked, what didn’t, and how you can improve for the next inventory. Put all the notes in a file along with your store maps, this procedure, and your inventory results. Be sure to look at them again the next time you do inventory! © Copyright 2010, WhizBang! Training
Ph: 616-842-4237 Fax: 616-842-2977
www.whizbangtraining.com
Page 10 Inventory Timeline and Checklist
started completed Two Weeks Before Inventory Inventory date set and posted. Inventory schedule posted. Maps drawn. The Week Before Inventory Stockroom cleaned and organized. All defective merchandise properly tagged or sent for RTV. All merchandise in stockroom checked for tags. Selling floor cleaned and organized. All merchandise on the selling floor checked for tags. Two to Three Days Before Inventory Copy and number inventory sheets. Lay inventory sheets in the stockroom. Count stockroom and seal off counted areas. The Day Before Inventory Gather all materials needed for the day of inventory. Determine plan for counting on inventory day. Complete all cleaning, sorting, and tagging projects. Make sure all new receivings are properly handled. The Day of Inventory – Before Store Closing Complete stockroom count and pull inventory sheets. Pull moveable fixtures from floor to stockroom and count. Lay inventory sheets on the selling floor.
Inventory Timeline and Checklist
started completed Last‐minute sweep for merchandise in fitting rooms, hold areas, etc. Close the store. The Day of Inventory – After Store Closing Staff meeting to review inventory procedures. Assign areas to count and review everyone’s first counted sheet. COUNT. Pull all inventory sheets from floor. Check each sheet for completeness and legibility. Count sheets to make sure that every sheet has been pulled. Straighten the store for the start of the next business day. Compile the Inventory Results Enter the counts into the POS system or.... Enter the counts into a spreadsheet to get total inventory $. Analyze your inventory results. Recap and Review Meeting to review how the inventory went. pg. 2
Sample Inventory Sheet
Gertrude’s Shoes
Inventory Sheet # 84 (COMPLETED SAMPLE)
Map: stockroom #1
Description
Style #
Sonia loafer ‐ blue – size 6 Sonia loafer – blue – size 7 Sonia loafer – brown – size 6 Quantity
1579
1692
1581
Price
2 59.99
1 59.99
3 59.99
1 59.99
2 59.99
3 74.99
4 74.99
Sonia loafer – brown – size 8 1585
Sonia loafer – brown – size 7 1580 Danielle pump – black – size 6 1211 Danielle pump – black – size 7 1200 Danielle pump – black – size 8 1231 1 74.99
Counted by___John Smith______
Recounted by__RDN______
Print and use the blank sheet on the following page or customize using the downloadable form.
Inventory Sheet
Map: ___________________
Inventory Sheet # ___________________
Description
Style #
Quantity
Price
Counted by________________________
Recounted by______________________
Analyzing Your Shortage Results
Analyzing your shortage results is a very important step in the physical inventory process. Good analysis will alert you to problems you may have in certain departments or stores. Shortage or overage in inventory can usually be attributed to one of several factors: • Theft, either internal or external • Paperwork problems in receiving merchandise, transfers, or RTVs, etc. • Incorrect ringing of sales in the store • Incorrect counting or key‐entering of the physical inventory Determining which factor or, more likely, which combination of factors is responsible for the shortage/overage takes some detective work. Knowing where the problems are and how severe they are in each area will give you the starting point for your search. The first step is to determine your inventory shortage (the dollar or unit amount less than you think you have in your store – sometimes called “shrink”) or overage (the dollar or unit amount more than you think you have in your store). The sample inventory results for Gertrude’s Shoes that follow will give you an idea of how your results might look. You can use the template spreadsheets in this kit to help you determine your own shortage results. They can be customized to the needs and size of your store, but you will need to know how to use Excel. Following are two templates for you to use. • “Inventory Results Analysis by Department – TEMPLATE” will allow you to calculate your shortage/overage by department and for the total store in dollars, as a % of sales, and units. • “Inventory Results Analysis By Store – TEMPLATE” will let your calculate total shortage/overage for multiple stores. © Copyright 2010, WhizBang! Training
Ph: 616-842-4237 Fax: 616-842-2977
www.whizbangtraining.com
Page 15 Here’s completed samples to give you an idea of what your final results might look like: SAMPLE - GERTRUDE'S SHOE STORE
Physical Inventory Shortage Results
Dollar Results by Department
DEPARTMENT NAME
Women's Better Dress Shoes
Women's Moderate Dress
Shoes
Women's Casual Shoes
Women's Athletic Shoes
Women's Sandals
Women's Boots
Women's Shoe Accessories
WOMEN'S SHOES TOTAL
DEPARTMENT NAME
Men's Dress Shoes
Men's Casual Shoes
Men's Athletic Shoes
Men's Boots
Shoe Accessories
MEN'S SHOES TOTAL
DEPARTMENT NAME
Infant Shoes
Kid's Dress Shoes
Kid's Casual Shoes
Kid's Athletic Shoes
Kid's Boots
Kid's Shoe Accessories
KID'S SHOES TOTAL
STORE TOTAL
BOOK STOCK
$
$1,396.00
PHYS. STOCK$
$1,285.00
SHORTAGE $
$111.00
$
SHORTAGE
AS A %
SALES
2.17%
$2,421.00
$3,268.00
$1,074.00
$256.00
$1,750.00
$869.00
$11,034.00
$2,156.00
$3,401.00
$972.00
$281.00
$1,726.00
$832.00
$10,653.00
$265.00
-$133.00
$102.00
-$25.00
$24.00
$37.00
$381.00
3.21%
-1.39%
3.10%
-2.59%
0.56%
3.70%
1.17%
$8,249.00
$9,562.00
$3,287.00
$964.00
$4,251.00
$1,000.00
$32,436.00
SHORTAGE $
$314.00
-$204.00
$515.00
$157.00
$28.00
$810.00
$
SHORTAGE
AS A %
SALES
6.34%
-3.69%
8.33%
4.45%
1.30%
3.63%
SALES
$4,954.00
$5,523.00
$6,179.00
$3,526.00
$2,155.00
$22,337.00
SHORTAGE $
-$28.00
$8.00
$123.00
$43.00
$53.00
$27.00
$226.00
$
SHORTAGE
AS A %
SALES
-1.16%
0.20%
2.39%
1.04%
4.41%
4.19%
1.29%
SALES
$2,405.00
$3,959.00
$5,146.00
$4,125.00
$1,203.00
$645.00
$17,483.00
$27,592.00 $26,175.00 $1,417.00
1.96%
$72,256.00
BOOK STOCK
$
$1,598.00
$2,365.00
$3,128.00
$1,276.00
$723.00
$9,090.00
BOOK STOCK
$
$956.00
$1,129.00
$2,584.00
$1,788.00
$655.00
$356.00
$7,468.00
PHYS. STOCK$
$1,284.00
$2,569.00
$2,613.00
$1,119.00
$695.00
$8,280.00
PHYS. STOCK$
$984.00
$1,121.00
$2,461.00
$1,745.00
$602.00
$329.00
$7,242.00
SALES
$5,123.00
© Copyright 2010, WhizBang! Training
Ph: 616-842-4237 Fax: 616-842-2977
www.whizbangtraining.com
Page 16 Using the Templates
1. Open the Excel file “Inventory Results Analysis by Department – TEMPLATE” on the downloadable file list or data disc that came with this kit. 2. Click on the tab on the bottom of the worksheet that says “Dept. Shortage Results by $” if that page isn’t on your screen. The title of the page is PHYSICAL INVENTORY RESULTS ANALYSIS ‐ DOLLAR RESULTS BY DEPARTMENT. 3. Enter your own department names and department group names by replacing the generic names in the cells. Check out the sample results for Gertrude’s Shoes if you’re not quite sure how this should look. Delete any unused rows or department groups. Add rows if needed, making sure that the formulas are correct. 4. When you’re happy with the layout of the departments, I strongly recommend you “save as” a blank template for your store. That way you won’t have to do step 3 over again the next time you want to analyze your inventory results. 5. In the column labeled “Book Stock $” enter the dollar amount of inventory for each department that you thought you had on hand at the end of the day of inventory. You’ll probably need to get this number from your POS before you overwrite with the new inventory counts. 6. In the column labeled “Phys. Stock $” enter the dollar amount of inventory that you physically counted for each department. You’ll probably get this number from your POS immediately after you enter the new inventory counts. 7. The column “Shortage $” will calculate the shortage dollars for each department. A negative shortage result means there was an overage in that department. Overages are always a result of paperwork or counting errors. Overages incorrectly inflate your profits on your Profit and Loss Statement and will cause you to pay unnecessary taxes. 8. In the column labeled “Sales” enter the total dollar sales for each department starting the day after the last inventory until the close of the business day for the current inventory. Enter the dates in the cell above the word “Sales” so you’ll have a record of what time period this inventory covers. 9. The column labeled “Shortage as a % of Sales” will calculate exactly that – the shortage or overage expressed as a percentage of sales for the time period. This is a very important number because it allows you to easily compare your shortage results in large departments to results in small departments. It also lets you compare your results to other stores in your industry or geographic area. Ask your trade group for statistics. 10. The “Total” lines should automatically calculate the shortage/overage for the entire department group or store. If it doesn’t look right, check that you haven’t messed up the formulas during your formatting in step 3. 11. “Save As” inventory results for the time period. 12. Using the same concepts, you can enter the appropriate data into the other worksheets to get analysis in units and by store. These basic templates can be adjusted to get customized analysis if you are adept at using Microsoft Excel. © Copyright 2010, WhizBang! Training
Ph: 616-842-4237 Fax: 616-842-2977
www.whizbangtraining.com
Page 17 You’re on Your Way! With accurate inventory numbers and shortage analysis in hand, you can now work toward better control over your stock levels, reducing theft, and eliminating paperwork problems. For more information on Inventory Management and 10 other critical retail skills check out the complete Retail Mastery System! Bob and Susan Negen
233 Washington Ave #213 Grand Haven, MI 49417 Phone: 616‐842‐4237 Fax: 616‐842‐2977 E‐mail: [email protected] Web: www.whizbangtraining.com
© Copyright 2010, WhizBang! Training
Ph: 616-842-4237 Fax: 616-842-2977
www.whizbangtraining.com
Page 18