1
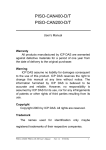
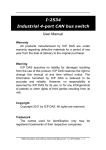
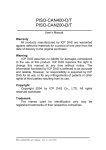
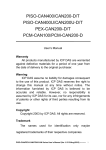
NAPOPC.CAN DA Server
User’s Manual
Warranty
All products manufactured by ICP DAS are warranted
against defective materials for a period of one year from the
date of delivery to the original purchaser.
Warning
ICP DAS assumes no liability for damages consequent
to the use of this product. ICP DAS reserves the right to
change this manual at any time without notice. The
information furnished by ICP DAS is believed to be accurate
and reliable. However, no responsibility is assumed by ICP
DAS for its use, or for any infringements of patents or other
rights of third parties resulting from its use.
Copyright
Copyright 2010 by ICP DAS Co., LTD. All rights
reserved worldwide.
Trademark
The names used for identification only may be
registered trademarks of their respective companies.
NAPOPC.CAN DA Server User’s Manual (V 2.1)
2010/08/10
1
Revision & Hardware
Revision
Version
Date
Author
Description
2.1
2010/08/10
Johney
Support VxCAN v2.0
2.0
2009/12/24
Johney
Support Virtual CAN Technique
1.0
2009/7/20
T.H.
Release version
Hardware
Version
Supported Hardware
2.1
1. PISO-CAN 200/400
2. PISO-CAN 200U/400U
3. PEX-CAN 200i
4. I-7530(A)
5. I-7530-FT
6. I-7540D
7. I-7565
8. I-7565-H1/H2
2.0
1. PISO-CAN 200/400
2. PISO-CAN 200U/400U
3. PISO-CAN 200E
4. I-7530(A)
5. I-7540D
6. I-7565
1.0
1. PISO-CAN 200/400
2. PISO-CAN 200U/400U
3. PISO-CAN 200E
NAPOPC.CAN DA Server User’s Manual (V 2.1)
2010/08/10
2
Contents
1.
GENERAL INFORMATION .................................................................................4
1.1 NAPOPC.CAN INTRODUCTION .................................................................................4
1.2 SOFTWARE INSTALLATION OF NAPOPC.CAN DA SERVER ..........................................5
1.3 NAPOPC.CAN DA SERVER INTERFACE INTRODUCTION .............................................9
1.3.1 Screen Features – File......................................................................................9
1.3.2 Screen Features – Add ....................................................................................12
1.3.3 Screen Features – Edit....................................................................................15
1.3.4 Screen Features – View ..................................................................................21
1.3.5 Screen Features – Help...................................................................................21
2.
CAN DATA ITEM DESCRIPTION ....................................................................23
2.1
3.
ANALYSIS OF CAN MESSAGE FORMAT ..................................................................23
QUICK START......................................................................................................26
3.1 OPERATIONAL GUIDELINES FOR THE INITIAL .............................................................26
3.2 CONNECT TO NAPOPC.CAN DA SERVER ................................................................28
3.2.1 FactorySoft OPC Client Program ..................................................................28
3.2.2 InduSoft ...........................................................................................................29
4.
ERROR MESSAGE...............................................................................................36
NAPOPC.CAN DA Server User’s Manual (V 2.1)
2010/08/10
3
1. General Information
1.1 NAPOPC.CAN Introduction
NAPOPC.CAN supports OPC server for the virtual CAN port. Users just
plug the CAN card or the CAN converter in the IPC and make some simple
configuration in the friendly interface of NAPOPC.CAN, and they can apply any
software(iFix, InduSoft, Citect, LabView…) which supports OPC protocol to
communication with CAN devices by ICPDAS CAN card and converter.
Therefore, users can easily to achieve different CAN application through a
variety of CAN bus product lines of ICPDAS by NAPOPC.CAN.
Figure 1.1 Application structure of the NAPOPC.CAN DA Server
NAPOPC.CAN DA Server User’s Manual (V 2.1)
2010/08/10
4
1.2 Software Installation of NAPOPC.CAN DA Server
The software Installation for NAPOPC.CAN DA Server is demonstrated in
the following descriptions. After finishing the procedure, the software, demos
and manual will be in your PC.
The software of NAPOPC.CAN DA Server can be used in Windows 2000 /
XP environments. For these Windows operation systems, the recommended
installation procedure is given as follows:
Step 1: You can get the Installing software “NAPOPC.CANServer2.0.exe”
from the“CD:\fieldbus_cd\can\pci\pisocan200_400\CAN_OPC_Server\NAPOPC.CANServer2.0.exe”
or you can download it from
http://ftp.icpdas.com/pub/cd/fieldbus_cd/can/pci/pisocan200_400/can_opc_server/napopc.canserver1.0.exe
Step 2: Please double-click “NAPOPC.CANServer2.0.exe” to run the setup.
Step 3: The first screenshot of setup is shown as follows, please press “Next”
button to continue the process.
NAPOPC.CAN DA Server User’s Manual (V 2.1)
2010/08/10
5
Step 4: After confirm the Installation path, please press “Next” button.
Step 5: Please press “Install” button. The setup process will start.
Step 6: The setup process is running.
NAPOPC.CAN DA Server User’s Manual (V 2.1)
2010/08/10
6
Step 7: When finishing the setup process of NAPOPC.CAN DA Server, it will
automatically install the OPC Data Access 2.0 Components
software.
Step 8: Please press “Next” button to start setup process.
Step 9: Please press “Finish” button to finish the setup process.
The installing folder is in the following directory:
“C:\ICPDAS\ICP DAS OPC Suite\NAPOPC.CAN”
NAPOPC.CAN DA Server User’s Manual (V 2.1)
2010/08/10
7
Step 10: Launch the OPC server from the start menu [Start]-[Programs][ICPDAS]-[IPC DAS OPC Suite]-[NAPOPC.CAN].
The program files picture is shown as follows.
NAPOPC.CAN DA Server User’s Manual (V 2.1)
2010/08/10
8
1.3 NAPOPC.CAN DA Server Interface Introduction
Figure 1.1 Software main screen
1.3.1 Screen Features – File
All configuration settings can be saved into configuration file by clicking
the "File/ Save” or "File/ Save As …” menu item. The OPC server will
automatically load the last configuration file with every launch.
NAPOPC.CAN DA Server User’s Manual (V 2.1)
2010/08/10
9
1. New
Clean current project and create a new project
2. Open
Load old NAPOPC.CAN project.
Select the project file you want, and then open.
NAPOPC.CAN DA Server User’s Manual (V 2.1)
2010/08/10
10
3. Save
Save current NAPOPC.CAN project
4. Save As…
Save NAPOPC.CAN project as a new one
Give a new file name, and then save.
NAPOPC.CAN DA Server User’s Manual (V 2.1)
2010/08/10
11
5. Exit
Click on the "File/ Exit " menu item or the “Exit” Toolbar to exit the
NAPOPC.CAN DA Server.
If some OPC clients are connecting to this server, it will show this warning
message box to remind user to disconnect the OCP clients before closing
the server.
1.3.2 Screen Features – Add
1. New Device
Create new device in NAPOPC.CAN DA Server
NAPOPC.CAN DA Server User’s Manual (V 2.1)
2010/08/10
12
VxCAN Port:
Selecting the CAN port which is shown in the table.
Acceptance Code:
Define Acceptance Code.
Acceptance Mask:
Define Acceptance Mask.
Baud Rate:
The Baud Rate combo box has eight kinds of baud rate, 10K, 20K, 50K,
125K, 250K, 500K, 800K, and 1M. (This version is not supported “User
Define” baud rate)
NAPOPC.CAN DA Server User’s Manual (V 2.1)
2010/08/10
13
2. New Group
Create new group in NAPOPC.CAN DA Server
(This version is not supported)
3. New Tag
Create new tag in the NAPOPC.CAN DA Server
Name:
Any "Tag Name" may be used, but avoid names with spaces or
punctuation such as “|!.,”. The clients will use the "Device Name" and
"Tags" to access its value. Hence the "Tag Name" cannot be a duplicate
of another tag in the same group.
NAPOPC.CAN DA Server User’s Manual (V 2.1)
2010/08/10
14
Description:
Users can specify the description text for this tag. This can be blank.
Type:
To specify the command to be used for this tag, it can select “CAN_In” or
“CAN_Out” to define the CAN Port type.
Type
Description
CAN_In
OPC server has received from the CAN network
data stored in this data item. The data can only be
read
CAN_Out
Client sends the data to write in this data item, OPC
server put this data item which extracted from the
data sent to the CAN network, the client can not
read data from this data item.
VxCAN Port No.:
Indicating the VxCAN port number which the user is setting.
1.3.3 Screen Features – Edit
1. Cut
Cut the tag in NAPOPC.CAN DA Server
NAPOPC.CAN DA Server User’s Manual (V 2.1)
2010/08/10
15
2. Copy
Copy the Tag in NAPOPC.CAN DA Server
3. Paste
Paste the Tag in NAPOPC.CAN DA Server
4. Delete
NAPOPC.CAN DA Server User’s Manual (V 2.1)
2010/08/10
16
Delete the Device / Group / Tag in NAPOPC.CAN DA Server
5. Properties
Clicking the “Properties" menu item or double click the Device or Tag to
edit the Device’s or Tag’s properties in NAPOPC.CAN DA Server
NAPOPC.CAN DA Server User’s Manual (V 2.1)
2010/08/10
17
Configure CAN Device (for the detail, refer to “1.3.2”)
Configure CAN Tag (for the detail, refer to “1.3.2”)
NAPOPC.CAN DA Server User’s Manual (V 2.1)
2010/08/10
18
CAN message transmission and reception dialog
CAN Transmission Function
CAN Reception Function
We provide a friendly CAN bus dialog to allow users to send/receive the
CAN messages to/from CAN network easily. This dialog can test CAN devices
on the CAN network. It supplies several functions, such as sending CAN
messages, receiving CAN messages, storing CAN messages, and so forth.
The operation features will show as follows.
Add:
Users can key in the CAN message into the text boxes above the
transmission list, then click “add” button to insert this CAN message into
the transmission list.
Modify:
To modify the content of some CAN message in the transmission list,
select this CAN messages in the transmission list firstly. Then, this CAN
message information will be shown in the text boxes above the
transmission list. Users can modify the CAN message in these text boxes
directly. Finally, click “Modify” button to save the modification in the
transmission list.
NAPOPC.CAN DA Server User’s Manual (V 2.1)
2010/08/10
19
Delete:
If some CAN message in the transmission list is useless, users can select
it and click ”Delete” button to delete this CAN message from the
transmission list.
Send:
After users select one CAN message from the transmission list, click
“Send” button to send this CAN message once from the selected CAN
port.
Receive:
Click this button to receive the CAN message from the specific CAN port.
Clear:
Click this button to clear all CAN messages shown in the reception list.
Goto Last:
Click this button to show the last received CAN message.
Scrolling:
The reception list is always scrolled automatically to the last received CAN
message.
NAPOPC.CAN DA Server User’s Manual (V 2.1)
2010/08/10
20
1.3.4 Screen Features – View
Monitor:
Use the "Monitor" function to see values of tags by checking the "View/
Monitor" menu item. Uncheck the item to stop monitoring.
Status Bar:
To show or not show the Status Bar
Tool Bar:
To show or not show the Tool Bar
1.3.5 Screen Features – Help
User’s Manual / Help:
Click on the "Help/User's Manual" menu item or the “Help” Toolbar refer to
the user’s manual.
NAPOPC.CAN DA Server User’s Manual (V 2.1)
2010/08/10
21
ICP DAS Online:
Click on the "Help/ ICP DAS Online" menu item or the “Wed” Toolbar to
browse our web.
Mail to ICP DAS:
Click on the "Help/ Mail ICP DAS" menu item or the “Mail” Toolbar to
contact us by Outlook Express.
About NAPOPC.CAN DA Server:
Click on the "Help/ About NAPOPC.CAN DA Server" menu item or the
About Toolbar to see the "About NAPOPC.CAN DA Server" dialog box.
NAPOPC.CAN DA Server User’s Manual (V 2.1)
2010/08/10
22
2. CAN Data Item Description
On the server for each device of PCI Interface CAN card and each CAN port,
there are two fixed data types:“CAN_In” and “CAN_Out”.
Type
Description
CAN_In
OPC server has received from the CAN network
data stored in this data item. The data can only be
read
CAN_Out
Client sends the data to write in this data item, OPC
server put this data item which extracted from the
data sent to the CAN network, the client can not
read data from this data item.
Both “CAN_In” and “CAN_Out” are stored as a string format.
2.1 Analysis of CAN message format
This data item will be display at four modes, which represent the meaning
of the following.
Mode
ID
RTR
t
2.0A(11 bit)
0
T
2.0A(11 bit)
1
e
2.0B(29 bit)
0
E
2.0B(29 bit)
1
Four CAN message formats are shown below.
Mode
ID
Dlen
D0
D1
D2
D3
D4
D5
D6
D7
t
7FF(11 bit)
1~8
00
11
22
33
44
55
66
77
T
7FF(11 bit)
1~8
00
11
22
33
44
55
66
77
e
1FFFFFFF(29 bit)
1~8
00
11
22
33
44
55
66
77
E
1FFFFFFF(29 bit)
1~8
00
11
22
33
44
55
66
77
NAPOPC.CAN DA Server User’s Manual (V 2.1)
2010/08/10
23
Example:
t 7FF 8 00 11 22 33 44 55 66 77
Items
t
7FF
Description
Standard frame, Data frame
CAN frame ID
8
CAN data Length
00
CAN Data byte 1
11
CAN Data byte 2
22
CAN Data byte 3
33
CAN Data byte 4
44
CAN Data byte 5
55
CAN Data byte 6
66
CAN Data byte 7
77
CAN Data byte 8
Example:
T 7FF 8
Items
T
7FF
8
Description
Standard frame, Remote frame
CAN frame ID
CAN data Length
Example:
e 1FFFFFFF 8 00 11 22 33 44 55 66 77
Items
e
1FFFFFFF
Description
Extended frame, Data frame
CAN frame ID
8
CAN data Length
00
CAN Data byte 1
11
CAN Data byte 2
22
CAN Data byte 3
33
CAN Data byte 4
44
CAN Data byte 5
55
CAN Data byte 6
66
CAN Data byte 7
77
CAN Data byte 8
NAPOPC.CAN DA Server User’s Manual (V 2.1)
2010/08/10
24
Example:
E 1FFFFFFF 8
Items
E
1FFFFFFF
8
Description
Extended frame, Remote frame
CAN frame ID
CAN data Length
NAPOPC.CAN DA Server User’s Manual (V 2.1)
2010/08/10
25
3. Quick Start
3.1 Operational Guidelines for the initial
Step 1. Install the CAN PCI interface card driver first
http://ftp.icpdas.com/pub/cd/fieldbus_cd/can/pci/pisocan200_400/win2k_xp/setup/piso-can_2k_xp.exe
Step 2. Install the NAPOPC.CAN DA server
http://ftp.icpdas.com/pub/cd/fieldbus_cd/can/pci/pisocan200_400/CAN_OPC_Server/NAPOPC.CANServer2.0.exe
Step 3. Launch the OPC server by executing
"C:\ICPDAS\ ICP DAS OPC Suite\ NAPOPC.CAN\
NAPOPC.CAN.exe".
Step 4. Search Modules. Refer to the "1.3.2 Screen Features – Add – New
Device" to add VxCAN port and configure CAN device.
NAPOPC.CAN DA Server User’s Manual (V 2.1)
2010/08/10
26
Step 5. Add tags for the VxCAN port. Refer to the "1.3.2 Screen
Features – Add – New Tag" for more information.
Step 6. Save the Configuration. Save the configuration by clicking
"File/Save" menu item.
Step 7. Close OPC server. Close NAPOPC.CAN DA server by clicking
"File/Exit" menu item.
Step 8. Connect to NAPOPC.CAN DA server. Users can run the OPC
client program to connect to the OPC server by linking the name
of "NAPOPC.CAN".
Step 9. When an OPC Client connects to "NAPOPC.CAN", the
NAPOPC.CAN DA server will be executed automatically and
minimized to the system tray.
NAPOPC.CAN DA Server User’s Manual (V 2.1)
2010/08/10
27
3.2 Connect to NAPOPC.CAN DA Server
This OPC is defined by the OPC Foundation, so any client program
supporting OPC can connect to the NAPOPC.CAN server.
3.2.1 FactorySoft OPC Client Program
Step 1: Click on the "OPC/ Connect…" menu item.
Step 2: Select the "NAPOPC.CAN (NAPOPC.CAN DA Server)" OPC
server.
Step 3: Click on the "OPC/ Add Item" menu item to add existing tags.
Step 4: Browse the tree list, then double-click on the tag or click the Add
Item button to add.
Step 5: Click on the "Done" button to close.
NAPOPC.CAN DA Server User’s Manual (V 2.1)
2010/08/10
28
Step 6: The window shows the values of selected tags.
3.2.2 InduSoft
Step 1: Before using the InduSoft OPC Client module, you need to install
and configure the NAPOPC.CAN DA server in the machines you
will run it.
NAPOPC.CAN DA Server User’s Manual (V 2.1)
2010/08/10
29
Step 2: Run the InduSoft.
Step 4: In the Studio Workspace window, click the Comm tab, right-click
the OPC folder, and click “Insert”.
NAPOPC.CAN DA Server User’s Manual (V 2.1)
2010/08/10
30
Step 6: Click on the Server Identifier: drop-down menu and select the
“NAPOPC.CAN”, or key in “NAPOPC.CAN”.
The configuration table for OPC has the following entries:
Server Identifier: this field should contain the name of the server you
want to connect to. If the server is installed in the computer, its name
can be selected through the list box.
Disable: this field should contain a tag or a constant. If its value is
different from zero, the communication with the OPC server is disabled.
Update Rate: this field indicates how often the server will update this
group in milliseconds. If it is zero, the server will use the fastest practical
rate.
Tag Name: these fields should contain the tags linked to the server
items.
Item: these fields should contain the name of the server's items
Step 7: In the first cell of the Tag Name column type the tag name created
in database.
NAPOPC.CAN DA Server User’s Manual (V 2.1)
2010/08/10
31
Step 8: Right-click the first cell of the item column and select “OPC
Browser” in the pop-up menu to get the OPC browser window.
Step 9: Double click the PISO-CAN200_0 to appear the CAN Port(tag) in
the tree-view.
NAPOPC.CAN DA Server User’s Manual (V 2.1)
2010/08/10
32
Step 11: Select a tag in the tree-view, and click the “OK” button or double
click the tag to add this one.
Step 12: Repeat the step 7 ~ 11 to add more tags.
Step 13: Creating a Text String for the Input/Output Dynamic. Click the
Text icon on the Object Editing toolbar. Position the crosshairs in
the main.scr. Press the ”#” to display “###” in the gray square..
NAPOPC.CAN DA Server User’s Manual (V 2.1)
2010/08/10
33
Step 14: Double Click the “###” text, it will appear a menu of the Object
Properties window. In the Tag/Expression field type the tag
name you want to link.
Step 15: From the project select status, and then select the “OPC Client
Runtime” in “Execution Tasks” tab. Click on the Startup button
to setup the Startup as Automatic.
NAPOPC.CAN DA Server User’s Manual (V 2.1)
2010/08/10
34
Step 16: Run the program InduSoft OPC Client, after running this program,
a small icon will appear in your system tray, main screen will
show as below.
NAPOPC.CAN DA Server User’s Manual (V 2.1)
2010/08/10
35
4. Error Message
NAPOPC.CAN DA Server may show some error messages below.
It means there are some error status in the system.
Detailed error code is as follows.
Error
Code
Description
Error
Code
Description
1
CAN_DriverError
16
CAN_TransmitBufferLocked
2
CAN_ActiveBoardError
17
CAN_TransmitIncomplete
3
CAN_BoardNumberError
18
CAN_ReceiveBufferEmpty
4
CAN_PortNumberError
19
CAN_DataOverrun
5
CAN_ResetError
20
CAN_ReceiveError
6
CAN_SoftResetError
21
CAN_SoftBufferIsEmpty
7
CAN_InitError
22
CAN_SoftBufferIsFull
8
CAN_ConfigError
23
CAN_TimeOut
9
CAN_SetACRError
24
CAN_InstallIsrError
10
CAN_SetAMRError
11
CAN_SetBaudRateError
12
CAN_EnableRxIrqFailure
13
CAN_DisableRxIrqFailure
14
CAN_InstallIrqFailure
NAPOPC.CAN DA Server User’s Manual (V 2.1)
2010/08/10
36