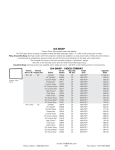
1
TEXTILE, DRY CLEANING, LAUNDROMAT, CLOTHINGALTERATION, SHOE REPAIR INDUSTRY SOFTWARE SOLUTIONS. HOSTING SERVICES, AUTO ASSEMBLY, WEB SERVICES Staying Ahead Of The Curve With CSI POS .Net Platform . Copyright © Computer Systems Int’l, TMS 2.4.4 version User’s Manual, August 2015 1 Corporate Headquarters Computer Systems International Inc. 150 Consumers Road, Suite 406 Toronto, Ontario M2J1P9 Tel: 416-497-0370 Fax:416-497-6760 Toll-Free: 1-888-836-7274 www.computersystemsint.com [email protected] Copyright © 2008, Computer Systems Int’l Inc (CSI). All other trademarks or trade names belong to their respective owners. No part of this manual may be copied, reproduced or duplicated in any way without prior permission of CSI. Information and content in this document is subject to change without notice. Copyright © Computer Systems Int’l, TMS 2.4.4 version User’s Manual, August 2015 2 Table of Contents Before You Begin ...................................... 9 Resources ............................................... 10 Conventions............................................................................................................................. 10 Abbreviations .......................................................................................................................... 10 Screen Design ......................................................................................................................... 10 Operating Modes .................................... 11 Stand-alone .............................................................................................................................. 11 Central Database with Local Client Program ....................................................................... 11 Central Database Using Low Maintenance Terminals ......................................................... 11 Remote Client .......................................................................................................................... 11 Features ................................................................................................................................... 12 Getting Around The System ................. 14 Checkin .................................................... 19 Checkin Function Sequence of Events ................................................................................. 20 Invoice Sample: ....................................................................................................................... 25 Company Logo: ....................................................................................................................... 25 Tag Sample: ............................................................................................................................. 26 Customer Profile ..................................... 33 Customer Marketing................................................................................................................ 37 Customer History .................................................................................................................... 38 Customer Notes....................................................................................................................... 38 Sales Person ............................................................................................................................ 38 Hotel Guest/Wholesale Invoicing .......... 39 Checkout ................................................. 40 Checkout Function Sequence of Events .............................................................................. 40 Copyright © Computer Systems Int’l, TMS 2.4.4 version User’s Manual, August 2015 3 Invoice Utilities ....................................... 42 Invoice Utilities Function Sequence of Events .................................................................... 42 Void ........................................................................................................................................... 42 Void/Refund ............................................................................................................................. 43 Reprint Invoice ........................................................................................................................ 43 Reprint Tag .............................................................................................................................. 43 Update Invoice ......................................................................................................................... 43 Credit/Debit Note .................................................................................................................... 44 Restock .................................................................................................................................... 44 Unpaid Invoices ....................................................................................................................... 44 Checkin/Checkout ................................................................................................................... 44 Location ................................................................................................................................... 44 Trans List ................................................................................................................................. 45 Search ...................................................................................................................................... 46 Merchandise ............................................ 47 Ready ....................................................... 48 Location ................................................................................................................................... 48 Productivity.............................................................................................................................. 49 Production ............................................................................................................................... 49 Free Format Tag ...................................................................................................................... 49 Reports .................................................... 50 End Of Day/Shift Report ......................................................................................................... 52 Transactions Reports ............................................................................................................. 55 Cash Summary Report: ............................................................................................. 56 Sales Report: ............................................................................................................. 57 Payout Report: .......................................................................................................... 58 Receipt Report: ......................................................................................................... 58 Transactions Report: ................................................................................................. 61 Service Summary (Sales) Report: ............................................................................. 61 Receipts Service Summary Report: .......................................................................... 62 Rush Invoices Report: ............................................................................................... 63 Cash Drawer Audit Trail Report: .............................................................................. 64 Quick Invoices Report: ............................................................................................. 64 Coupon Report: ........................................................................................................ 65 Sales Transaction Report: ......................................................................................... 65 Copyright © Computer Systems Int’l, TMS 2.4.4 version User’s Manual, August 2015 4 Cash Reconciliation Report: ..................................................................................... 65 Sales Productivity Report: ........................................................................................ 66 Shift Summary Report: ............................................................................................. 66 Check out Cash Summary Report: ............................................................................ 66 Checked Out Invoices Report: .................................................................................. 67 Sales Productivity Report: ........................................................................................ 68 Credit Card Transactions Report: ............................................................................. 68 Sales Summary Report:............................................................................................. 69 Sales Journal Report: ................................................................................................ 69 Misc Reports: ............................................ 71 Items Reports: ........................................................................................................... 71 Summary of Items by Item Category: ....................................................................... 71 Summary of Items by Service Category: .................................................................. 72 Summary of Items by Department Category: ........................................................... 72 Summary of Items by Customer Smith (Narrow): .................................................... 73 Production Report: .................................................................................................... 74 Zero Pricing Items Report:........................................................................................ 74 Redo Items Report: ................................................................................................... 75 Wash & Fold Report: ................................................................................................ 75 Garment Tracking Report: ........................................................................................ 76 Stock Report: ............................................................................................................ 77 Due Items Report: ..................................................................................................... 77 Due Items report by item .......................................................................................... 78 Over Due Items Report: ............................................................................................ 78 Discrepancy Report:.................................................................................................. 79 Exception Report: ..................................................................................................... 80 Stock Report: ............................................................................................................ 81 Productivity/Alert Reports: ....................................................................................... 82 Price List Reports: ...................................... 82 Customer Reports: .................................... 84 A/R Reports: ............................................................................................................. 85 Time Sheet: .............................................................................................................................. 86 Sales Commission: ..................................... 87 Labels Printing: ......................................... 88 Shipping Labels: ....................................................................................................... 88 Mailing labels............................................................................................................ 88 Conveyor labels ........................................................................................................ 89 Associates Labels: ..................................................................................................... 89 Tracking tags:............................................................................................................ 89 1. Productions Labels ........................................................................................................ 90 Copyright © Computer Systems Int’l, TMS 2.4.4 version User’s Manual, August 2015 5 More Reports ........................................... 90 History Tracking Reports ....................................................................................................... 91 Statement ................................................................................................................................. 93 Marketing ................................................................................................................................. 95 Coupons: ................................................. 97 Loyalty/Rewards Point Program ........... 99 Customer Classification ......................................................................................................... 99 Rewards Point System Settings: ......................................................................................... 100 Schedule and Customer Profile Point System Settings: .................................................. 100 Email Configuration .............................. 101 Misc Functions ...................................... 104 Payout .................................................................................................................................... 104 Adjust Till ............................................................................................................................... 104 Tracking Tag .......................................................................................................................... 105 Permanent Tag ...................................................................................................................... 105 Preprint Invoice ..................................................................................................................... 105 Auto Backup Process ........................................................................................................... 105 RUN STOPS ........................................................................................................................... 106 Support ................................................................................................................................... 106 Laundry Card ......................................................................................................................... 106 Merchandise Tag ................................................................................................................... 106 Gift Card ................................................................................................................................. 106 Wash & Fold .......................................... 107 Wash & Fold End Of Shift/Day Report: ............................................................................... 111 Management .......................................... 113 Functions ............................................... 113 System .................................................................................................................................... 113 System Options ....................................................................................................... 114 Schedules .............................................................................................................................. 118 Schedule Options .................................................................................................... 119 Update Departments ............................................................................................................. 126 Copyright © Computer Systems Int’l, TMS 2.4.4 version User’s Manual, August 2015 6 New Department .................................................................................................................... 126 Add Item/Price ....................................................................................................................... 127 Add Price ................................................................................................................................ 128 Update Items .......................................................................................................................... 129 Prices ...................................................................................................................................... 130 Add New prices....................................................................................................... 130 Update Prices .......................................................................................................... 130 Upcharges .............................................................................................................................. 131 Tax .......................................................................................................................................... 132 Tender Type ........................................................................................................................... 133 Job Classes ........................................................................................................................... 135 Paycode .................................................................................................................................. 138 Store Hours ............................................................................................................................ 138 Tools ....................................................................................................................................... 138 Change Prices.......................................................................................................... 139 Delete Obsolete Transactions ................................................................................. 139 Delete Manifest ....................................................................................................... 140 Delete Inactive customers ....................................................................................... 140 Undo Account Payment .......................................................................................... 140 Merge customers ..................................................................................................... 140 Download new update from internet....................................................................... 140 Financial Charges.................................................................................................... 140 License .................................................................................................................... 141 Backup Database ..................................................................................................... 141 Index Database ........................................................................................................ 141 TMS Config ............................................................................................................ 141 Specials ................................................................................................................... 142 Redeem Points ........................................................................................................ 142 Customer Classification .......................................................................................... 142 Management .......................................... 143 Employees ............................................................................................................................. 143 Conveyors .............................................................................................................................. 144 Wash & Fold ........................................................................................................................... 144 Production ............................................................................................................................. 144 Special Request ..................................................................................................................... 145 Greetings/Conditions ............................................................................................................ 146 Use this option to add your own greetings, special promotion or conditions to be printed on customer’ invoice auto. ..................................................................................... 146 Pole Display message .......................................................................................................... 146 Delivery Settings ................................................................................................................... 146 Copyright © Computer Systems Int’l, TMS 2.4.4 version User’s Manual, August 2015 7 Sales ....................................................................................................................................... 146 Release Form ......................................................................................................................... 146 Email Config .......................................................................................................................... 147 Company Department ........................................................................................................... 148 Inventory ................................................................................................................................ 148 Payroll .................................................... 149 Daily Time Sheet .................................................................................................................... 149 Time Sheet Detail .................................................................................................................. 149 Time Sheet Summary ............................................................................................................ 150 Copyright © Computer Systems Int’l, TMS 2.4.4 version User’s Manual, August 2015 8 Before You Begin Document References Conventions Operating Modes Features B uilt from the ground up, TMS (Textile Management System) is based on the Microsoft .NET framework and tightly integrated with the Microsoft Internet platform. Microsoft. .net is a set of Microsoft software technologies for connecting the world of information, people, systems, and devices. It enables an unprecedented level of software integration through the use of XML Web services: small, discrete, building-block applications that connect to each other—as well as to other, larger applications—via the Internet. TMS is a fully integrated Point Of Sale and BackOffice software solution for Textile, Drycleaning, Alteration, Shoe Repair, Laundromat industry. Its unmatched reliability, remarkable flexibility and unprecedented ease-of-use sets a new benchmark for POS software in today's tough demand service oriented environments. Copyright © Computer Systems Int’l, TMS 2.4.4 version User’s Manual, August 2015 9 Resources CSI provides the following documentation resources for use with TMS.NET. References in this document to “User-Defined” or “Configuration” options are found in the Administration Guide. • Installation Guide —Contains software installation instructions. • User’s Manual —Describes use and operational aspects. Conventions TMS.NET generally conforms to Windows user interface and design conventions. Departure from standard Windows conventions is the result of our efforts to create an effective touch screen user interface. Observe the following when reading the document and using TMS.NET. Abbreviations Throughout this document, references to some screen views have been shortened for the sake of brevity. These views are described later. A/R —Accounts Receivable COF —Credit Card On File PIN —Personal Identification Number Screen Design In TMS.NET all major functions occupy the entire screen with exceptions appearing as dialogs. View —Fills the major portion of the screen and contains most of the display and functionality selections needed. Dialog —A smaller pop-up window that appears over a View. Dialogs are active while displayed, is appearing when acted upon. Tab —Provide multiple selection area within a View or Dialog. Buttons The buttons displayed in TMS.NET are large enough to allow easy selection with a touch screen. Mouse use is greatly enhanced with this larger size button. Be aware of the following button characteristics. Active —A selection button is active when text color is dark. Inactive —A selection button is inactive when text is grayed. Selection Device —References to selecting a displayed choice are relative to touch screen use. Choices can be physically selected with a touch screen, mouse, or available keyboard command. Displayed Lists There are many list views within TMS.NET. Each list contains title column headers that act as sort buttons. Double-clicking on one of these column buttons forces the list to sort in the order of that header type. For example, the Customer Search list displays customers by customer id, Double-clicking on the Customer # header button forces the list to sort all entries by customer number. Copyright © Computer Systems Int’l, TMS 2.4.4 version User’s Manual, August 2015 10 Keyboard Commands Uniquely defined keyboard commands corresponding to touch screen buttons are denoted in the lower right-hand corner of each button. Keyboard commands are shown in this document with brackets “[ ]” Around the key (the touch screen button key does not contain brackets). The following are all examples: • Function Keys —[F1] thru [F12]— The [F1] button to bring up TMS online help manual. The [F2] button can be customized to call your own defined external program. The [F3] button can be customized to call your own defined external program. The [F4] button displays all price schedules menu in checkin screen. The [F5] button allows you to switch to different store in a centralized database with multi stores s The [F8] button always displays system calculator. The [F10] button selects No Sale function, and opens the cash drawer. The [ESC] button always exits from the current view without saving changes. The [END] button always saves the current view. Operating Modes Stand-alone In this mode, the entire computer system is located within each store. A system can be either a single computer or an entire multiple-terminal local area network (LAN). Wide-area networking (WAN) is possible, but not recommended. Databases are local to each store site with data consolidation not practical. Data backups and computer maintenance must be performed at each store site. Central Database with Local Client Program This mode is perfect for those who have centralized data needs with a small or large number of store locations and who need real-time order tracking between stores and head office. Centralized accounts receivable, pricing, promotions, marketing, time clock management, and reporting is made inherently simple in this mode. In this mode client program is installed on each store, and database on the central server. Each store is connected through internet or VPN to the server. We recommend our cloud based hosted solution for this process. Central Database Using Low Maintenance Terminals Data consolidation is accomplished by using low maintenance terminals and high-speed data connections. Each store site is connected to the application hosting data center using Windows Remote Desktop connection to the Windows Terminal Server. Data backups and server maintenance is performed at the data center. This mode is perfect for those who have centralized data needs with a small or large number of store locations and who need real-time order tracking between stores and head office. Centralized accounts receivable, pricing, promotions, marketing, time clock management, and reporting is made inherently simple in this mode. Remote Client Remote client connection is perfect for those who don’t need centralized data with a small or large number of store locations but would like to review reports and make small changes to each Copyright © Computer Systems Int’l, TMS 2.4.4 version User’s Manual, August 2015 11 store through remote connection from home or office. We recommend TeamViewer to be installed on both store and office computer for easy access. http://www.teamviewer.com Features Microsoft .NET technology Microsoft SQL relational database Microsoft Windows 7, 8 and 10 Microsoft Terminal Services client hosting, Scalable to any size operation User Friendly, Organized and Intuitive Touch screen/Mouse Enabled Visual Invoice Intuitive and fluid navigation Easy to learn and use Centralized Database True real-time mode with SQL replication services Nightly data replication Stand-alone mode with Microsoft SQL, MSDE Or SQL Express Remote application hosting Merchandise Sales with SKU & PLU Support Production capacity forecasting Production problem alerts Graphical workflow charting Lost order identification Employee productivity tracking Barcoded item-level tracking Assisted garment assembly Central mark-in function Production efficiency reporting System navigation tabs Function selection buttons Problem order alert display buttons Recent transactions list Scrolling message marquee Customer Management Unlimited number of customers Lookup by name, phone, barcode, etc. Sales, A/R R, preference, HSL history Customer profile indicators Merge/reassign utility Backup & Maintenance utility Visit tracking and history Order Management Unlimited number of orders Quick, Detail, Rack, Pickup steps Add definable process steps Order mark-in Hold function Multiple mark-in formats Intelligent invoice splitting Automatic promised date calculation Barcode printing and scanning Barcoded visual physical inventory Prepayments allowed at mark-in Copyright © Computer Systems Int’l, TMS 2.4.4 version User’s Manual, August 2015 12 Multiple/Partial order pickup Exception Handling One-stop item/order-level editing Split/Redo functions with reasons Void function with reasons Employee Management for Payroll tracking Integrated employee time clock Productivity tracking Production Tracking Management Reporting More than 110 unique reports Optional report writer Cash, check, Credit Card, Gift Certificate,, A/R tender User-definable tender types Credit card on file Step-based automatic payment Flexible Printing Thermal invoice support Order pickup rack pick list Document template editors On Demand printed garment tags Garment Tracking Heat Seal Barcoded System Powerful coupon creation Promotional coupons on invoices Selective coupon Route Management Unlimited number of routes Flexible route assignment Barcoded bag tag printing Manifest printing by stop Internet Connectivity Controlled access to web sites Online customer order status Secured owner sales data Custom web site compatible Finger Printer Reader Digital Scale Interface Laundry Card Support Credit/Debit Card Processing with EMV Capable Terminal using VeriFone Point Credit Card Batch Processing For Credit On File Customers using Payware Connect Laundry Machines Cost Tracking Conveyor Controller Interface Pickup/Delivery App Website Integration for pickup/delivery Email / SMS notification Copyright © Computer Systems Int’l, TMS 2.4.4 version User’s Manual, August 2015 13 Getting Around The System Startup Procedure Main Menu TMS.NET is a robust textile management system uniquely designed for Dry Cleaning, Alteration, Shoe Repair and Textile Industries with unique features and options for each service. TMS.NET has a highly organized user interface made extremely easy to use by the effective implementation of touch screen design. Both mouse and keyboard can be used together as an alternative to the touch screen. Startup Procedure: 1) 2) 3) 4) 5) Turn Monitor and Printer(s) on. Look for the icon called CSI /Textile Management System” on your desktop. Press CSI /Textile Management System icon to start the program. Input your security pin number that has been assigned to you. (Default PIN is 1000), If your system is equipped with Finger Printer/Biometric Reader, simply put your finger on the Biometric reader. To learn more about Biometric reader, please refer to our Installation guide. 6) Touch the OK button. This may take a few minutes to load the data and launch the program. Copyright © Computer Systems Int’l, TMS 2.4.4 version User’s Manual, August 2015 14 7. After successful logon, if your system has been set up with the multi shift option, you will be prompted to start the new shift, if not you will be prompted to open store. Press “Yes” to continue. Please note if No is selected you may not be able to use the system until store/shift is open .. Note: If store was closed accidently, you will not be able to do any transactions until store is opened. To fix this, Go to Reports -> End of day/shift and select Reopen. For additional information read End Of Day reports. 8. A number pad box will appear prompting you to Enter Till Float. Input your Till Float value after you have counted your float and touch the OK Button. Please note the system remembers that last till float you had entered the day before during the cash up of the last shift. 9. A confirmation box appears to make sure the till float and system date/time is correct. Press Yes if it is correct, and No if not, adjust as needed. Copyright © Computer Systems Int’l, TMS 2.4.4 version User’s Manual, August 2015 15 Main Menu (Anchor Page) The main menu is the anchor of the TMS system. From here you are able to quickly access the most common functions of the system and get the status of production. Please note that depending on your job-class, you may not be able to access to some of the features. To activate a desired function, simply touch or click on the relevant button. You may also use the quick short cut number to access the desired functions. (E.g. to access the ready function you may press 6 on your keyboard) If you would like to keep track of employee’s time sheet the Clock In and Clock Out buttons are used for this. Once the Clock In button is pressed, a confirmation slip will be printed on your invoice printer. To make this a mandatory feature, please refer to the management section of the manual. Current TMS Version, Store id, Station id Quick Production status bar, click on the shortcut to get a detailed report Copyright © Computer Systems Int’l, TMS 2.4.4 version User’s Manual, August 2015 16 The following is the summary of the main menu functions: Checkin Checkout Invoice Utilities Merchandise Reports Ready Management Misc Help No-Sale Clock in/Clock out Exit Status Scrolling bar Checkin screen is used to receive customer’s orders and issue detailed or quick invoice tickets and tags. Checkout creen is used to Check-Out customer’s orders and receive payment upon collection. is used to update or correct invoices, reprint invoices or tags and make customer account payments Merchandise function is used to sell products/merchandise to walk-in or regular customers. Report Function is used to balance the till and do the day end store close, create audit trails, create bank deposits and create all other reports that the system has on offer. Function is used to scan production that has been completed, create productivity, production, manifest report, and assign lot tag. function is the gateway to the Back Office System, which contains all management functions and system options Provides interface to Misc functions such as Paidout, tracking tag printing, permanent tag printing, Gift cards, laundry Card, and CSI Help desk, etc. Function provides you with detailed information pertaining to the function you are in. Option is used to open the till without any transaction. The No-Sale option may also be activated by pressing the F10 on the keyboard at any time. Clockin/Clockout functions allow employees to “Clock in” and “Clock out” of for the day using their pin# or fingerprint when they arrive and leave respectively. (Below is a screenshot of the confirmation you will receive when clocking in or out) The Clocking system eliminates the chore of manually tallying the employees’ hours worked by providing management reports to employees that are authorized to this part of the system. Exit to exit the program. at the top of the screen gives you a quick overview of your productivity. To get more detail on each alert, simply touch/click it. If a status is in red, it means you have not reached the production expectation. i.e. Not Ready 199 Copyright © Computer Systems Int’l, TMS 2.4.4 version User’s Manual, August 2015 17 Customer Lookup The Customer lookup screen is used within TMS to lookup customers, add a new customer or update customer profiles within the Check-In, Check-Out and invoice utilities processes. The following method is used to do customer lookup. Through either the on-screen or actual keyboards, enter any one of the following; the customer’s name, phone number, company name or key-tag number. When using the customer’s phone# or name, the system will display a list of customers that match your search criteria as you type; the more you type, the closer the search gets refined. When you have identified the correct customer, ensure it is highlighted and press the OK button. If the system runs out of matching numbers or letters in the phone # or name because there is no such customer that has been registered before, a new customer notification box appears. Select yes to create a new customer if it is one or no to return to the customer search screen if you have made a mistake or would like to check again. For more information on how to create a new customer please refer to the “Creating new customer” section. You may also use the Quick Search option to make sure the correct customer is selected. Simply select the quick search and enter the necessary data. For example if Customer# is selected, only the customer# field is searched. If a customer is inactive, this customer will not show up; to make customer show up again, type a number like 999999999, when prompted “Customer not found”, select Cancel and when the Search Button appears, enter the customer# again, and click on Search Customer. To update customer’s details, simply click on View/Update customer. To recall the last customer, select Recall Last Customer icon. If your system is equipped with Customer Key tag, simply scan the key tag. If you are looking up a customer with Tracking Tag, simply select Tracking Tag option from Quick Search. Then Scan the barcode Tag on the garment; the system will search the database and bring up the customer that matches the tracking Tag#. Copyright © Computer Systems Int’l, TMS 2.4.4 version User’s Manual, August 2015 18 Checkin The Check-In function is the most important function of the system and you should make yourself familiar with every aspect of this process. This process is full of features and options to make the transaction simple and comprehensive. The Check-In process is used to receive customer’s orders and issue detailed or quick invoices; it is also used to print invoices and tags for either regular or delivery customers. Default Price List, and Payment Method from customer profile More options for services, dept, or items Quick Customer History. Total $ Spend to date, Credit Note, Last Visits, Total Visits Etc To get detail of the transaction, click on the shortcut Delivery Route Name, and delivery days for pickup/delivery customer Copyright © Computer Systems Int’l, TMS 2.4.4 version User’s Manual, August 2015 Customer’s Preferences in Red 19 Checkin Function Sequence of Events 1. Select checkin option from the main menu 2. A number pad box will appear prompting you to “Enter Pin Number”. Input your security pin number, and select the OK button. 3. The customer search screen appears on the left hand side. Select the customer as per Customer lookup process. 4. The service options will then display on the right side of the screen. And a blank invoice on the left hand side with customer’s information. Select the desired service type. (Like Dryclean, Laundry, Alteration, etc) 5. Select appropriate department that needs to be done such as Shirt, Pants, Suits, etc) 6. The Items sub-option will appear. Select the appropriate item such as “Skirt” ”. Detail option menu will popup. Select appropriate colors, materials, and patterns. You may add other information on the garment such as Type, Color, Fabric, Starch, Crease etc. If you like to disable the detail screen during this transaction, you may select ‘Don’t Show this next Time’. If you like to permanently disable this feature, read Schedule Settings under Management section. Same Item button is used to mark the same garment for different services. For example if you have a dry clean item that requires Alteration, press Same Item button when doing alteration so the item is not added as a separate item. The system assigns 0 qty when Same Item is used. Customer’s preference in Red Upcharegs Menu Release form on demand Qty option Copyright © Computer Systems Int’l, TMS 2.4.4 version User’s Manual, August 2015 20 7. If up-charge option is enabled in the Schedule, the upcharge menu will pop-up. Select the appropriate option. Note, depending on the upcharge the base price will increase accordingly. Click on the arrow button to see additional upcharges. You may disable printing upcharge price on the invoice and have it added to your base price to avoid customer complain. To do this check Schedule settings under Management. 8. If you like to select certain release form on the fly press Release Form, and select appropriate release form from the menu. To learn more about release from settings, please check management section. 9. If you have more than 1 item of the selected garment, touch the same item again from item menu, select the total items from the detail screen or select Qty icon from checkin screen, and input the quantity number. 10. Continue describing the product using the Service, Dept and items options follow the same procedure as above. Press the Up/Down Red arrow key to see more choices for the Services, Departments, or Items. 11. After you have completed entering all the garment information, if there is a Coupon/Discount to be applied, select the Discount command button and make a selection from the display menu(s). For example to apply a senior discount select coupon, then select Senior Citizen discount and press OK button. To assign a permanent to customer, edit customer profile and assign a discount with expiry date for desire service. 12. If you like to make special notes to the order, select the memo option from command menu. You may type-in your special request or select from pre-typed options. To make you own pre-defined memo, please refer to Management Section. You may add a special request to a customer. To do this edit customer profile and select Special request. If you like an urgent memo to pop-up during customer transaction add this to customer profile. 13. If you would like to make any changes to customer profile, while in the checkin screen press the customer name on the top of the invoice. The customer profile will appear on the screen. Make any require changes, and press OK to save. 14. If the price needs to be adjusted, select the item, and press Price option button, and enter the proper price. Please note, price can’t be lower than the initial price if this option is enabled in the schedule. 15. If the customer is purchasing Product/Merchandise, then select the Scan option. You may scan the UPC, SKU barcode or select the item from the menu. You may scan the barcode at any time during transaction, and the system will auto selects the proper product. If the product needs to be entered manually, select product option from service section, then select appropriate product from the Item menu. 16. Redo option is used to if the garment requires redo. Highlight the item, then press Redo button. Select proper description option from the menu or type-in your own description as to why redo is being done and press OK. 17. Delete option is used to fix mistakes on the invoice details section of the screen while making an invoice. If you want to delete an item prior to the last item, touch the garment detail item you want to delete (which will then be highlighted), then select the Delete button. You will then be put back where you left off to proceed. Copyright © Computer Systems Int’l, TMS 2.4.4 version User’s Manual, August 2015 21 18. If you are done with this invoice and would like to create a new invoice for the same customer, press the New button. Selecting New button, will save the current invoice and starts a new invoice. 19. Select Misc function to access additional command options. a) Select Camera to use the system Camera to take snap shot of the garment in case there is a Stain or Damage to the garment. Please read Installation guide on how to setup Camera. You may add as many pictures as you like to an invoice. b) Select Sales option to assign/select a sales person to the invoice for commission reporting purpose. c) Select Clear option to clear-up all the entries in the current invoice. d) Select Sched option to switch to a different price list. The current price list is selected from the customer default price list. Please note you may also press F4 to select a different price list from checkin screen. e) Select Hold option to put the current invoice on hold in order to server another customer. You may put multi invoices on hold. If there are invoices on hold, your Check in icon from the main menu changes to different color indicating there are invoices on hold to be completed. f) Select Invoice Utility option to lookup another invoice, or make changes to a different invoice. g) Select Checkout command to go to checkout garments for the same customer without leaving the checkin screen. h) Select Main option to return to the main command menu of checkin screen. 20. If for any reason, you need to cancel the order before invoice completion, press Cancel button. 21. To complete the invoice, Press the Done button. Due-date calendar appears. Select and ensure the date/time the customer order will be ready for pick-up. Confirm this with the customer and then press OK. The default date/time is calculated from the item/service table, Delivery Run table if this is a delivery customer or store hours. For additional information, please read Management section. As the date is selected, the system shows the production summary for each service. If a service is exceeding the production capacity in terms of pieces or $value, it changes color to Red. In that case the user may select a different date to avoid production overhead. The pickup time is also calculated as above as might be override by selecting pre-defined time, or typing your own time on the time field. Copyright © Computer Systems Int’l, TMS 2.4.4 version User’s Manual, August 2015 22 In order to speed up the process please note the Due Date option can be disabled in the schedule for users that don’t require such option. If this is a delivery order, a Delivery icon appears at the bottom of due-date menu. You may remove the checkmark to disable the delivery option for this order in case the customer is picking the order. Default due-date is calculated from run, or Service//Item table Delivery option might be removed if delivery Customer is picking up the order Default Pickup time is calculated from Store Hours or item table. You may change this by selecting any other time Production summary is calculated from predefined capacity in Service table and total promised items for that day 22. Pre-Payment screen option will popup if pre-pay option is enabled in the schedule. If this option is disabled select Pre-Pay icon from the icon tray in case customer would like to pre-pay the order. Please note the system can be setup to apply a pre-defined discount for pay-pay orders. To learn more on this feature, please read Management Section. Copyright © Computer Systems Int’l, TMS 2.4.4 version User’s Manual, August 2015 23 23. Select payment type, then amount and press OK button. For additional information on this process please read the Payment Processing Section. 24. If you need to view/update customer profile during transaction, you may press customer’s name on the top left corner of the screen. The system would switch to customer profile. You may update the customer information or may notes to the customer profile. 25. After you have successfully completed the checkin, two copies of the invoice will be printed. Give the customer the 1st copy and retain the 2nd copy with the garment. You may setup the price list schedule to print additional invoices. Please read Management for additional info. 26. Use Q-checkin option to create a quick ticket. Quick ticket function is used to service the customer quickly without entering the price and detail of the garment. Quick tickets have to be detailed before they can be checked out. Select the service and then total items for the service. Press Done, and select the due-date as before. You may use the Memo button to make notes on the quick ticket. Please note you may define in price schedule how many Quick Invoices to be printed. To update the quick invoice please read Invoice Utilities section of the manual. Copyright © Computer Systems Int’l, TMS 2.4.4 version User’s Manual, August 2015 24 Invoice Sample: The following is the sample invoice which is explained in details below. TMS supports any Windows based Thermal printer to print invoice, as well as older Epson TMT88 printer. CSI recommends Epson TMT-88 IV for Invoice printing using Windows Driver provided by Epson. Use the following methis to configure your TMS to print in Windows Mode, if you have an older Epson printer you may use Thermal mode which uses Native Epson command for printing. 1. Start TMS, type 11182000 press config 2. Select Printing, Select your printer from Browse option, and check mark Windows option. 3. If you have an older Epson Thermal printer and you find Windows printing slow, select Thermal mode. The following is a sample of customer copy and store copy. In this example customer has 5 pieces, 2 dryclean, one of the item has alteration and 3 laundry pieces. If you wish you may separate dryclean and laundry invoice auto. For additional information read Schedule options. Total Pieces TotalDryclean Pieces Total Laundry Pieces Invoice# Starch Type Charge/Delivery Customer Delivery Run#/Stop# Copyright © Computer Systems Int’l, TMS 2.4.4 version User’s Manual, August 2015 25 Company Logo: If you are using Windows Invoice Printing format, you may have your company logo printed auto on the top of invoice. Use the following method to add your company logo: 1. Create a jpg file from your company logo file, 2. Rename it to companylogo.jpg 3. Copy companylogo.jpg file into \csi\tms folder. 4. If you find the printer too slow with your logo, make a lower resolution of the file. Note:The current version of TMS does not allow to change the invoice format, however you may change some of the settings like where to print the company address, barcode adverting, etc. To do this go to Management -> system -> system options -> invoice. Tag Sample: TMS supports different tag formats. 3” roll tags on Impact printers are very popular because of the price difference. CSI recommends TMU 220 Printer for 3” Tag Rolls, however Samsung, and Star printers are also supported. TMS can also print 4 1/8” Continues Tags on Okidata 320 Turbo printer. You may configure TMS to print 3” roll tags in Lot format or separate dryclean/ laundry tags. For additional information on how to configure TMS for different tag options read Schedule section in Management. For additional information on Garment tracking or Permanent tags see Tracking Tags sections. The followings are sample paper tags. 1. 3 is total pieces, 2. 2345 is the invoice#. 3. Mon is the due day, and 05:00 is the due time. 4. On the top Customer’s last name, first name is printed, along with item’s price. 5. At the bottom you may have item’s description, and colors 4 1/8” Continues Tag 3” Roll Tag Copyright © Computer Systems Int’l, TMS 2.4.4 version User’s Manual, August 2015 26 Payment Processing TMS very sophisticated payment processing feature that is used during Check-In for Prepayments, at Check-Out or customer account payment using Invoice Utilities. Except for a few minor exceptions, the process remains the same throughout. TMS processes Credit/Debit and Gift Cards through New Verifone Platform Point Services for card present and Web-based Payware Connect for Card On File transactions. Point is a highly configurable web-based payment gateway service that enables credit and debit payments to be processed from TMS with Internet connection using Verifone Vx820 or Vx520 EMV capable terminal. New Point Services takes the guesswork and complexity out of managing multiple payments and payment technologies, while adhering to security and compliance standards and helping merchants prepare for EMV. As a managed-payments solution, Point gives merchants a competitive edge by empowering them to focus on their core business while giving them the flexibility to define and deliver the payment experience that best meets consumer expectations. As a subscription service, Point also alleviates the need for up-front capital investment. The service includes 24x7 support, encrypted gateway transactions, integration for new methods of payment, ongoing EMV maintenance and merchant support and full PCI compliance. One EMV Terminal can be shared with multiple stations. TMS uses Payware Connect to process credit cards on file for batch processing. TMS is validated with Paymentech, First Data North (CardNet); Elavon; and Heartland. Please visit CSI website for additional information and pricing: http://www.computersystemsint.com/Product/Cat/40 If the total payment due is not sufficient, and you have the Partial Payment option enabled under the schedule, the system will allow you to do a partial balance forward. This option is ok during the pre-pay process, but it is not recommended for payments during Check-Out. Please see the Accounts Receivable (A/R) section under Reports additional information on customers with outstanding balances. TMS will alert you during Check-In if customers that do not have charge facilities have outstanding balances. Please refer to Management Section for additional information. When processing a payment follow steps below for each tender type. If a mistake is made during the payment processing, select the payment method from the transaction list and press the Delete button Cash Processing. 1. Select the Cash button. 2. Enter the amount received manually with the number pad or by using the preset amounts provided; you may also select the Exact button if the customer gives you the exact amount. Press OK. The change field gets updated. 3. Press OK again, the Cash Drawer opens, 4. Select whether you would like a receipt to be printed or not when prompted 5. Press OK again Check Processing: 1. Select the Check button. The amount due will be automatically entered into the Current Credit field 2. Enter Check# and Press OK. 3. Press OK again. Copyright © Computer Systems Int’l, TMS 2.4.4 version User’s Manual, August 2015 27 4. Select whether you would like a receipt to be printed or not when prompted 5. Press OK again Deposit Payment Processing: If a deposit required for certain transactions like Wedding Gowns, Leather etc follow steps below in checkin or when updating the invoice: 1. In Check-In, select Pre-Pay 2. Select the tender type like Cash or credit card, 3. Enter the deposit amount into the Current Credit field 4. Press OK 5. Press OK again to process the payment. Note: The system will track the balance and prompt for the payment during Check-Out process. Coupon Processing: You may enable Coupons to be part of your tender Screen in case a customer presents you with a coupon during the Check-Out process to be applied as a tender or part thereof. 1. Select the Coupon button. The total amount due will be automatically entered into the Current Credit field, change this to the value of the coupon 2. Enter the Coupon# and press OK 3. Select the tender type like Cash or credit card to settle the balance due if there is one 4. Enter the outstanding amount and press OK 5. Press OK again 6. Select whether you would like a receipt to be printed or not when prompted 7. Press OK again Note: If the value of a coupon is larger than the invoice total, the system will not allow you to apply the coupon using the discount option. You may configure your system to allow you to selected the coupons from a drop down menu, or simply scan the barcode of the coupon to auto select the desire coupon. For additional info on Coupons setup see this section. Copyright © Computer Systems Int’l, TMS 2.4.4 version User’s Manual, August 2015 28 Credit Note Processing: If you have issued a customer with a credit note, the system will automatically prompt you as to whether you would like to use the credit note. 1. Press YES, the default credit note will be applied and the total amount due will be automatically entered into the Current Credit field 2. Enter Credit Note# and Press OK. 6. Select the tender type like Cash or credit card to settle the balance due if there is one 7. Enter the outstanding amount and press OK 8. Press OK again 8. Select whether you would like a receipt to be printed or not when prompted Press OK again. Debit Card Processing: If the payment type is Debit card and your system is equipped with our online credit authorization program, select Debit from payment type, swipe the card and make sure the card#, expiry date and name appears on proper field, then press OK, If your system is equipped with Debit Pinpad have the customer enter the pin# on the Pinpad and follow the screen. Verifone Pinpad Vx820 Copyright © Computer Systems Int’l, TMS 2.4.4 version User’s Manual, August 2015 29 Credit Card Processing: If the payment type is Credit card and your system is equipped with our online credit authorization program, select Debit from payment type, 1. Swipe the card and make sure that the card#, expiry date and name appear in the proper fields, 2. Press OK 3. Press OK again. 4. Wait for authorization#, and then press OK to finish the transaction. 5. Upon successful authorization, an authorization code will appear on the pop-up screen. 6. Press OK and have the customer sign the authorization receipt. Retain a copy for auditing purpose. 7. Note: If there is a problem with the card, you may manually key-in the card#, expiry date, name and security CVV#; furthermore, should the On-Line Authorization failed message appear, check the error message for the reason as this could be caused by a bad credit card, bad swipe or even a bad connection. House Charge Processing: If the customer’s default payment is set to Charge, the system will not prompt for payment during Pre-Pay or Check-Out. You may however set the prompt for payment for Charge customers under system options for in case a charge customer decides to pay sometimes. During the Check-Out process, a message box will appear, indicating that the charges will be applied to customer’s account. If however the charge customer is paying during Check-In or Check-Out processes, select the tender type and follow the instruction above. If a customer is not a charge customer but would like to pay later, you may select the Charge option. Please note this option could be disabled in system options (Allow partial pay). Once payment is received from a charge customer, follow the steps below to post the payment. 1. Go to Invoice Utilities, 2. Select the customer, 3. Select the Unpaid Invoices icon, 4. Click on the Select all Invoices icon or manually select the invoices that you would like to apply payments to. Note: As invoices are selected, the totals next to the Debit and Credit are updated. 5. Select Account Payment. Copyright © Computer Systems Int’l, TMS 2.4.4 version User’s Manual, August 2015 30 6. Say Yes when prompted whether you are sure you want to pay marked invoices 7. Apply the payment using the relevant payment method as discussed before Note: Should you select all unpaid invoices and the payment received is less than the balance due, the system will automatically apply the payment to the oldest invoices first, working its way to the most current and could result in the last invoice being partially paid depending on the amount received. If you have a customer’s credit Card-on-File, the system will automatically charge the card. If the payment received is more than actual balance, the system will not issue a credit note; to do this, manually select the Credit Note from Invoice Utilities, and issue a credit note. Undo Payment: If for some reason the payment was not applied properly to a charge customer, please follow the steps below to undo the payment. 1. Select Management 2. Select System 3. Select Tools 4. Select Undo Account Payment. 5. Enter the customer’s number 6. Enter the Invoice number that needs to be undone 7. Click on Search 8. Select the Invoice that appears in the windows and select Undo Payment For additional info, please refer to Management Section. Copyright © Computer Systems Int’l, TMS 2.4.4 version User’s Manual, August 2015 31 Point Rewards Program: TMS has a very sophisticated Royalty Point reward system that allows you to define rewards coupon base on collected points. Royalty point system is an excellent marketing tool to encourage customers to keep coming back. System allows different coupons to be printed based on the collected points and customer classification. Customer classification is defined based on collected points, i.e Bronze, Silver, Gold etc. For additional information on how to setup Point and Point Redemption, please read Marketing Section. Credit Card Batch Processing (COF): To process payments for Charge customers who are on Delivery Route schedule, TMS allows you to keep your customer’s credit card on file(COF) and process it automatically at the end of day/month depending on your requirements. To setup customers’ credit card on file, please read the section on Customer Profile. There are two types of COF, daily and Monthly. COF customers are Charge customers except their card is charged at the end of the Day/Month. COF customer’s invoices are usually checked out through Manifest and charges are posted to their account. However if you like you may charge the COF customer through Payment Processing during checkout. System will auto select the card, and will charge the Card On File. Use the following method to charge all COF customers in one easy step. Please note if you don’t see the Batch Processing Icon below, you need to contact CSI to purchase this feature. For Daily COF customers (i.e The ones that Monthly option is not selected in customer profile), go to Reports, End Of Day/Shift report, select Batch Processing. Once prompted to proceed, press Yes. TMS will go through all COF daily customers and process payments for all invoices that have out standing balance regardless of In/Ready/Out status. This process might take few minutes depending on number of transactions and total COF customers. Please be patient and don’t interrupt the process unless there is a problem. Upon successful completion a message appears indicating total customers were processed. For Monthly COF customers (i.e The ones that Monthly option is selected in customer profile), go to Reports, More, Statement, Select COF, Select Date, Check Mark the customers that would like to charge or select All. Create Statement, select Batch Processing. Once prompted to proceed, press Yes. TMS will go through all COF monthly customers and process payments for all invoices that match the statement. This process might take few minutes depending on number of transactions and total COF Monthly customers. Please be patient and don’t interrupt the process unless there is a problem. Upon successful completion a message appears indicating total customers that were processed. To get a detail list of all successful and un-successful transactions, go to Reports -> Transactions report, credit card processing report. You may select Batch processing option to view only those transactions. Copyright © Computer Systems Int’l, TMS 2.4.4 version User’s Manual, August 2015 32 Customer Profile Customer Profile is the place holder for all the customer information regarding name, address, phone number, email, preferences, route delivery setup, applicable discounts, payment method, default price list, credit card info, special request, tax exemption etc. The following steps serve to describe the process of creating and or updating a customer profile. 1. If the customer in not in our database, the program will ask you if you would like to set up a New Customer when you type a letter in the search filed that does not correspond to anything in the customer search table. Touch the YES button. 2. The New Customer Profile Box will open for you to input your customer’s information. Copyright © Computer Systems Int’l, TMS 2.4.4 version User’s Manual, August 2015 33 Basic The following fields are accessible by every associate Customer ID – This is a unique numeric ID created by the system that would be used to look up customers. Note: TMS can allow you to enter your own customer id if for example you have an old database and would like to keep the same customer id’s; to enable this, go to Management, and enable the Enable Assigning Customer ID option in System Options under Associates & Stores 1. 2. First Name – Enter the customer’s first name, this is a mandatory field 3. Last Name – Enter customer’s last name, this is a mandatory field 4. “This is a Company” Checkbox – Checkmark this option if this profile is going to be used as a company. Multiple customers can be linked to the same company name, which will be used for creating statements. 5. “Prompt For Name” Checkbox – Checkmark this option if you don’t want to create customer profiles for temporary customers. E.g. you may setup a profile for hotel guests and enabling this option would prompt you to enter the guest name and room number at the checkin process without creating a customer profile for the hotel guest. See Hotel Guest Section for more info. 6. Company – This is a drop down menu, which will prompt you to select the appropriate company, which was created by using the above option. (“This is a Company” Checkbox) 7. Birth Day – Enter the customer’s birthday, which we be used for marketing purposes. For details check the eMarketing section of the manual. 8. Home Phone – Enter the customer’s primary phone number, which will be used by the system to look up customers. If you have internet connection, you may use the Search option to do reverse lookup using customer’s phone# and find the name, and address. To set up your Search Engine please read System Options under Management. Please use system uses the default phone format that’s setup in system option. 9. Address – Enter the customer’s mailing address 10. City – Default city name is taken from store information. 11. Postal/Zip Code – Customer’s postal/zip code. Note: If you have an internet connection, you may use the Search option to do reverse lookup using postal or zip code to find the city and address. To set up your Search Engine please refer to misc in System Options under Management. 12. Complex – Grouping customers by the complex name. E.g. AT&T Office Building Complex, which will be used for delivery 13. Office Phone – Enter the customer’s office phone number Copyright © Computer Systems Int’l, TMS 2.4.4 version User’s Manual, August 2015 34 14. Dept - This a drop down menu that allows you to select pre-defined department that this customer is working for. This is mostly used for company customers and Hotel Staff. For additional information, please see Management Section. 15. Cell Phone – Enter the customer’s cell phone number 16. Fax – Enter the customer’s fax number 17. Email – Enter the customer’s email address, which will be used for eMarketing and the customer order notification process. Please read eMarketing and Web sections for more details. 18. Driver License – Enter the customer’s driver license number 19. Urgent Memo – A notification message will pop up whenever the customer profile is accessed Details Depending on the associate’s job class, they may be allowed to edit the following fields. For additional information on to enable/disable this option see Management -> Job-Class options. 1. Schedule – The customer default price schedule, which is defined in the schedule table. By Default system uses stores’ default price list which is mostly Retail Price List. For additional information on how to setup different price list, please see Schedules under Management. 2. Credit Limit – The customer’s credit limit is basically used for charge customers. If the customer’s balance exceeds the credit limit, only associates with overwrite credit limit options may process the transaction. For additional information, please see “Job Classes” under Management. 3. Credit – This is the credit assigned to the customer by means of prepaid or credit notes that were issued to the customer for any reason, i.e. claims, royalty systems 4. Payment – Default customer payment method. The system uses this default when the customer is making a payment. E.g. if customer is paying by credit card and wishes to use his credit card for the charges, simply swipe the card and the system would store the information, which would be used for future transactions. If it is a charge customer, simply select the charge option from the dropdown menu. For COD customers, use the default, which is Cash. 5. Credit Card – Customer’s Credit Card number that will be used for automated payment processing 6. Holder – The cardholder’s name, that could be different from customer’s name 7. CVV#--Credit card Verification#, to save you transaction fee for keyed in transaction and batch processing since the card is not swiped. 8. Exp. Date – The credit card expiry date 9. Address/Zip Code – Card Holder’s Billing address to save you transaction fee for keyed in transaction and batch processing since the card is not swiped. Copyright © Computer Systems Int’l, TMS 2.4.4 version User’s Manual, August 2015 35 10. Discount % - Use this field to give special discounts to certain customers. The system uses this discount option for any transaction. You may enter expiry date for this discount and give different discount for different service. 11. Commission% - Use this field to define commission percentages to be assigned to customers. E.g. if a hotel gives 40% commission for each guest transaction, simply enter 40% and the system would create the invoice with the regular price and the 40% commission would be deducted on the statement. 12. Tax Exempt – Checkmark this option if the customer is tax exempted. 13. Exempt # - Some states or provinces require tax exemption numbers for any taxes that are exempted. 14. COF, Monthly – Credit On File, this is mostly used for delivery/charge customers that wish to pay by credit card at the end of the day/month for unpaid invoices. If COF option is set and Monthly option is not set, the system charges the credit card on file automatically through End Of Day Batch Processing Function. If COF and Monthly options are both set, the system will charge the credit card on file during batch processing when creating statements. For additional information please read Payment Processing section. Delivery Request The following fields will be activated if the selected price schedule has the delivery feature option. For additional information on how to setup routes and delivery please read Delivery Section of the Manual. 1. Delivery – Select this option if this is a delivery customer 2. Run Name – Select the appropriate run name from the dropdown menu. For information on setting up the Run ID, see the Delivery Manual. 3. Call Customer – Select this option only if this is not a regular delivery customer. That’s delivery is only scheduled when customer calls in. After the delivery manifest is created, the system would deselect this option. 4. Regular Customer – Select this option if this is a regular delivery customer. 5. Stop – Enter Stop# that will be used fro this customer, You may enter stop# 1, and go to delivery/stop section to assign proper stop#. See the Delivery section under Management for additional information. 6. Address – Customer’s ship to address, if it is different from the mailing address. 7. More – Click on more option to add additional information that will be printed on the manifest. Pickup Location – Enter the pickup location. E.g. front door, back door, garage Pickup Instruction – Enter specific instructions to enter the premises e.g. security codes Not at Home Instruction – Enter specific instruction for the driver if the customer is not at home. E.g. “leave the package by the neighbor” Note – Enter any special notes to the driver. For more information see “delivery instructions”. If customer would like to hold the delivery, check mark Hold Delivery and date. Invoices for Hold Delivery customer will not show on manifest. Copyright © Computer Systems Int’l, TMS 2.4.4 version User’s Manual, August 2015 36 Special Request Crease – Select this option if the customer requires a crease on the garment. Fold – Select this option if the customer requires shirts to be folded or boxed. Starch – Select this option to enable starch preferences. Starch Preferences – Customer’s starch preferences, which will be printed on the invoice. 5. Others – Select the appropriate memo from the dropdown menu or make your own memo. This option will be printed on the invoice. E.g. “Call me when the order is ready” For additional information, see Special Requests under Management. 6. Key Tag – This is a unique bar coded key tag, which is assigned to the customer. The key tags are used for quick identification purposes, which are attached to the customer’s laundry bag or key chain. For additional information or customized orders, please contact your sales rep. To assign a key tag to a customer, simply scan the barcode. 7. "Inactive Customer" Checkbox – To make a customer inactive, simply select this option. Please note if there are out standing invoices for this customer, you can’t make customer inactive. To activate inactive customer see Customer Lookup Section. 1. 2. 3. 4. Customer Marketing Select Marketing tab to view/update marketing section of the customer profile. If your system is configured for Rewards Point system, customer current classification and the total collected points can be viewed. If customer does not wish to receive points simply disable this option. Email Properties – Select this option if you like to use TMS to send email/SMS for eMarketing, Ready Orders, or allow them access their account online using your website. For additional information see eMail Configuration under Management or Contact your Sales rep for additional information for connecting your website to your TMS database. Copyright © Computer Systems Int’l, TMS 2.4.4 version User’s Manual, August 2015 37 Customer History This screen is a snapshot of the customer’s transaction history. It breaks down the transactions by service and amount of money spent per service per month for the selected period. You may change the date range to view older transactions and history. You may use this to review the customer’s transaction history for any claims. This screen may be activated by pressing the “history” tab from the customer profile. Customer Notes Use this screen to make any notes on the customer. The customer notes is a useful tool to make notes on any customer’s complaints, special requests etc. 1. Associate – Click on this option to stamp the associate name as to who is creating the notes. 2. Time Stamp – Click on this option to stamp the date and time of the notes. 3. Print – Click on this option to print the notes. Sales Person Sales Rep. – Select or create the appropriate sales person if you would like to keep track of the sales representatives that relate to this customer. The system uses sales reps to create certain sales or management reports. At the checkin process, you may also assign a sales rep to a transaction. Please see the Checkin section for details. See Management on how to set up a sales person and commission. Copyright © Computer Systems Int’l, TMS 2.4.4 version User’s Manual, August 2015 38 Hotel Guest/Wholesale Invoicing TMS has a build in Hotel Guest and wholesale invoicing feature, designed for ease of use and to save you time. This process makes invoicing much easier as you are not required to create a customer profile for temp hotel guests or wholesale accounts. Note: It is recommended that these customers be on a different price list. To add a new price list, please see Schedules under management. 1) 2) 3) 4) Add a new customer and use the appropriate price list. Enable the Prompt for name option in customer profile Add the commission if there is any to be paid to the Hotel. During the Check-In process, you will be prompted to enter Hotel Guest’s name, room number, employee number, order number, and other information. Simply enter the data and press OK when done. Note: Only the name and room number fields are compulsory and then rest may be completed optionally if needed. Should you need to make any changes to the data after selecting OK, simply click on the information on the invoice screen and the same screen will pop-up and you will be able to make changes. 5) Process the items for this guest as per normal 6) Once done with current guest, press the New button to make an additional invoice for the same hotel but a different guest. Hotel Order# to cross reference Hotel’s Guest Name Hotel’s Guest Room# Copyright © Computer Systems Int’l, TMS 2.4.4 version User’s Manual, August 2015 39 Checkout Checkout is used to check out a customer’s order from the inventory and collect payment if it was not pre-paid. Checkout Function Sequence of Events 1. Select Check-Out option from the main menu 2. Scan the customer’s invoice or type the invoice number in the Invoice# field Note: You can simply select the customer and press OK if you do not have the invoice or would like to check out more than one invoice at this time and the system will retrieve all outstanding invoices pertaining to this customer 3. A list of the invoices will appear on the top right hand-side of the screen and an image of a blank invoice will show on the left hand side. Select the desired invoice that needs to be checked out or press the Select All button to select all the invoices. Note: When an invoice is selected the system will display the details of the selected invoice on the left hand side of the screen; if however all invoice are selected, the system will display the details of the first invoice on the left 4. At this point, all items on the selected invoices will appear under the pickup list. Copyright © Computer Systems Int’l, TMS 2.4.4 version User’s Manual, August 2015 40 Note: If an invoice was a Quick Invoice, the QC field is marked on the Invoice List and cannot be checked out as the system won’t allow a quick invoice to be checked out. 5. The summary of all the selected invoices will display under the Summary Box on the bottom right of your screen. 6. If you would like to unmark an invoice that is not to be checked out at this time, simply select it under the Invoice List. You may also split an order by selecting the Qty field under the pickup list for the items that you would like to split. Let’s say for example that 1 out of 3 Sweaters is not ready, simply enter 2 under Qty for Sweaters and it will drop the one off the check out procedure and you will be prompted to confirm this at the end. Note: You need to enable Partial Check-Out under System options for this. 7. If your system is configured to accept only scanned invoices at Check-Out, the system will not allow invoices to be checked out unless a the proper invoice is produced to be scanned; this option prevents mistakes during Check-Out as it requires every invoice to be present and scanned prior to Check-Out. For additional information, please check System options under Management. 8. You may use the P/U Location button to print a list of invoice and invoice locations for pickup. U can then use this to bring the proper invoices to the front. 9. Press Done, when ready to Check-Out the marked items and select Yes or No when prompted depending on whether you are ready to complete Check-Out or would like to return to the invoice list respectively 10. The payment screen will now appear and complete it as per Payment Processing Note: At this point, you can press Cancel if you would like to go back to the invoice list. Tip: At any given point during the Check-Out procedure, you can press Cancel to take you out of Check-Out and back to the main menu Copyright © Computer Systems Int’l, TMS 2.4.4 version User’s Manual, August 2015 41 Invoice Utilities Invoice Utilities function is used to perform the following functions: 1. Update Invoice. 2. Void/Refund Invoice 3. Search Invoice/item by date, status, tag#, customer name, Location, Service, Description 4. Reprint Invoice, Credit Card Receipt, Tag, Coupon, Tracking Tag, Bag Tag 5. Email Invoice 6. Customer Account Payment 7. Issue Credit/Debit Note 8. Restock Invoice 9. View Transaction History 10. Lookup Location of the items on conveyor Invoice Utilities Function Sequence of Events 1. Select invoice utilities option from the main menu 2. A number pad box will appear prompting you to “Enter Pin Number”. Input your security pin number, and select the OK button. 3. The customer search screen appears on the left hand side. Use the on-screen keyboard to enter customer’s phone number or name. When entering the customer’s phone# / name, you may enter the first few letters or numbers including the area code. The system displays a list of customers that matches your search criteria. When you have the correct customer selected, ensure it is highlighted and press the OK button. Or you may use the invoice# to checkout the customer. Simply press Invoice# box on the left-hand side, then enter invoice#, using on screen number pad box or scan the invoice# barcode of the invoice. 4. A list of the invoices will appear on the right hand-side. The image of the 1st invoice will show-up on the left hand side. Select the desired invoice# from the list by highlighting the invoice, or simply press Select button to highlight all the invoices. To unselect all the invoices, press unselect button. Void Copyright © Computer Systems Int’l, TMS 2.4.4 version User’s Manual, August 2015 42 The following section explains in detail function of each option within invoice utilities. Void/Refund Use this function to void an invoice or refund a pre-pay or paid invoice. Highlight the desire invoice and select Void/Refund function. If Status of invoice is In/out, it will change to Void, and gets added to history transaction for audit purpose. If Invoice is pre-paid or checked-out and paid, Tender Screen will pop-up. Select the desire refund method and press OK. If the customer is getting refunded to credit card, and you are equipped with online credit card processing, simply swipe the card, and press OK, Please note, depending on your job-class and system settings you may not be able to perform this task. See Management section for additional information on how to enable/disable this function. A message appears, “Are you sure to void this invoice”. Press YES to continue. A receipt prints. The Voided receipt must be signed by the Manager and Associate with an explanation. Reprint Invoice Use this function to reprint an invoice, reprint credit card Receipt, Reprint Bag/Dispatch Tag, Email invoice, Tracking Tag or reprint Coupon. Simply highlight desire invoice, and select Reprint button. Reprint Tag Use this function to reprint tags or tag for selected item. To reprint tag for desire item from an invoice, 1st select desire invoice, then highlight the Item from Invoice Screen on the left hand side. If you like to reprint tags for every item, just highlight invoice and select reprint tag. Update Invoice Use Update Invoice function to detail a quick ticket or If you need to make changes to the selected invoice. TMS has a special barcode for Quick ticket that takes you to invoice update auto when scanned in Invoice Utility to save you time. To enable this special barcode, refer to Management -> System options -> Invoice Tab -> Enable ‘Print Store# on Barcode’ Copyright © Computer Systems Int’l, TMS 2.4.4 version User’s Manual, August 2015 43 Credit/Debit Note Use this function to issue, view or void credit/debit notes for the selected customer. Any issued Credit/Debit notes will be used by the system during payment processing auto. You may use credit note to issue a credit for damaged garments. Debit notes can be used to charge the customer for any bad checks or interest charges etc. Simply enter amount and reason for the credit/debit note. To get a report for all credit/debit notes see the Reports Section. Note: To charge customer interest charges for overdue invoices you may go to Management -> System -> tools -> Finance charges. Restock Restock function is used to put an order back into stock if it was checked out by mistake. To do this function you have to have management access Unpaid Invoices Use this function to post payment to your charge customers account. Once Payment is received from Charge customer follow steps below to post payment. Select Unpaid Invoices icon, Click on Mark all Invoices icon or select invoices that you would like to apply payments. You may press unmark icon to remove the check mark. As invoices are marked total Debit/Credit is updated. Select Account Payment (Please note, unpaid invoices icon changes to Account Payment when invoices are selected). Say Yes when prompted to apply payment. Select the date that you like payment to be posted as, then use the payment method as before. Please note, if you select all unpaid invoices, and payment received is less than the balance due, the system will automatically apply payments to the oldest invoices until last invoice. Last invoice might be partial paid depending on the total amount received. If customer has credit card on file (COF), the system will charge the card auto. If Payment received is more than actual balance, the system will issue a credit note. For additional information on Payment Processing see this section. Checkin/Checkout Select Checkin/Checkout to go checkin/checkout orders for the same customers. Location Use Location icon to view the locations of the garments for selected invoice. Please note if location is viewed by staff, it will be recorded into Trans list for audit purpose. You may print the location list by selecting Print Icon. Copyright © Computer Systems Int’l, TMS 2.4.4 version User’s Manual, August 2015 44 Trans List To view the list of the transactions for selected invoice, press Trans list button. Transaction List shows every step of the process that was done on the invoice, like update, location, checkout, productivity, and production. . Copyright © Computer Systems Int’l, TMS 2.4.4 version User’s Manual, August 2015 45 Search Search function is very powerful and useful tool to search/find orders for the selected or all customers base on the following options. You may search orders by Store#, Date Range, Invoice# Range, Invoice Status (i.e In, out, Void), Memorized Invoices, Conveyor Location, Item Description and/or Color, Service (i.e Laundry, Alteration etc), Route Run#, Garment Tracking Tag or Lot Tag, Hotel Guest, Hotel Order#. When search matches your search criteria a list of invoices will shown on the screen. You may simply select the invoice to view the details. Store/Store# Start/End Date Select other stores in multi store operation with central database Start and ending invoice date for search Invoice from/to Enter start/ending invoice range to narrow down your search Memorized Show only memorized transaction, refer to Mat Rental document Location Show all invoices that have been placed on this location Last Name Show only invoices for customers who’s last name matches Description Enter garment description and/or color Same Item Search only items with 0 qty ( Same Item) Services Select a service (e.g Dryclean) from menu to narrow down your search Run# Search only invoices for the selected Run/Delivery route. Garment Tracking# Tag# Show invoices that matches tracking tag# Only for this customer Check mark this option to search invoices only for selected customer Show invoices that matches manual tag#, hotel room, ref# etc. Copyright © Computer Systems Int’l, TMS 2.4.4 version User’s Manual, August 2015 46 Merchandise Merchandise function is used to sell products/merchandise to walk-in or regular customers. . Merchandise Function Sequence of Events 1. Select merchandise option from the main menu 2. Select Walk in or regular customer as before. 3. Select appropriate department that product is classified under such as Zippers, thread, misc, and etc. You may scan the barcode at any time during transaction, and the system will auto select the proper product and will be added to the invoice screen on the lefthand side. 4. The process is the same as checkin screen. Merchandise invoices are checkout auto. If your merchandise items have setup with SKU/PLU, simply scan the barcode on the item. As Merchandise items are sold, they are deducted from Inventory. If total on hand is 0, the system would not allow to sell the item, unless it is allowed in Merchandise setup. 5. To get a list of all items in stock, go to Reports -> Stock Report -> Merchandise report. To make your own PLU/SKU label go to Msic. For additional info on how to setup merchandise items refer to Management section. Copyright © Computer Systems Int’l, TMS 2.4.4 version User’s Manual, August 2015 47 Ready Ready function is a set of different operations grouped in order to assign location to reader invoices, Scan Productivity/Productions, make Delivery Manifest or assign preprinted lot tag to orders. Please note you may use a regular scanner, wireless scanner or PDA to do these processes. Use ‘Read From File’ option if your system is equipped with PDA to collect data. For additional information on supported scanners, refer to Installation manual or visit our website. Location Location process is used to assign conveyor location to orders, change invoice status to ready and send email/SMS to customers that their order is ready for pickup. For additional information on how to setup your email notification, please refer to management section. Simply scan the invoice# barcode, then scan your conveyor#. The image of the scanned invoice will appear on the left-hand side of the screen if the invoice# is valid. If the conveyor id# is valid, the conveyor id# will display on the productivity sub-screen. If there is an error indicator, simply rescan the invoice#. Location# is not mandatory. To disable location# go to Management -> System Options, Invoice Folder and enable ‘Location not required’ Option. If your system is not equipped with scanner, you may select No Scanner option or enable ‘No Scanner’ option in System option -> Invoice Tab. TMS allows you to make your own Conveyor barcode. To print conveyor barcode, go to Reports > label ->Conveyor Barcode. To complete the process, Press Finish button. A dialog box prompts you to print Location list. Press yes to print the report and retain it for audit purpose. Copyright © Computer Systems Int’l, TMS 2.4.4 version User’s Manual, August 2015 48 To get a report of not Ready orders, go to Reports -> Stock Report -> Ready Report. Or select Not Ready on the top banner. The idea is to make Total Not Ready orders close to 0 for the due date/time. If your system is setup for Garment tracking, you may scan the garment tracking id barcode. For additional information refer to Garment Tracking Section of the manual. Productivity Productivity process is used to assign associates who worked on a particular invoice for tracking/productivity purpose. Simply scan the invoice# barcode, then scan your associate id barcode. The image of the scanned invoice will appear on the left-hand side of the screen if the invoice# is valid. To complete the process, Press Finish button. A dialog box prompts you to print Productivity list. Press yes to print the report and retain it for audit purpose. To get Productivity report, go to Reports -> Trans report -> Productivity Report. To view the productivity for selected invoice go to Invoice Utility -> Trans List. Production TMS invoices could be in 3 different status, In, Ready, and Out. When Items are checked in, invoice status is set to ‘IN’, when invoices are processed through Ready function, status is set to ‘Ready’, and finally when invoices are checked out, invoice status is set to ‘Out’. You may skip the ‘Ready’ function and simply checkin/checkout invoices without going through Ready process. Or you may wish to add your own process to have more control on the status of invoices. For example, you may wish to add a process when invoices are sent to Pressing Department, Alteration, Leather Cleaning, etc. Production process is designed to track such steps and can be customized by the user. Follow steps below to make your own production Process. 1. Go to Management -> Management -> Production 2. Select Add, enter production# and Description (i.e 1 Sending to Tailor), 2 Receiving From Tailor, 3 Pressing, 4 Leather Cleaning etc) 3. You may assign only one of the production step to act as Ready function, that’s when this production is done, set the invoice status to ‘Ready’ 4. Go to Reports -> labels -> Production label, and print the production barcode. You may use the narrow option to print on Epson Printer. 5. Go to Ready, select Production, scan the production barcode, and then all invoices that are going to that production. 6. To get a list production status go to Reports -> Misc -> Production report. 7. To view the production process for any invoice, go to invoice utility, select Trans List. Free Format Tag This process is used to assign your manual pre-printed tag to invoices. You may use Invoice Utility, Ref# to locate such tags. Copyright © Computer Systems Int’l, TMS 2.4.4 version User’s Manual, August 2015 49 Copyright © Computer Systems Int’l, TMS 2.4.4 version User’s Manual, August 2015 50 Reports Reports function is used to balance the till, create bank deposits, create audit trail, store closing, marketing, A/R, Labels, and sales analysis report. Depending on your job-class you may not be allowed to select a date range, that’s only today’s report can be run. Most reports allow you to print on the default printer by selecting the Print command Icon from the bottom of the report, or you may print to a different printer by selecting the Print Icon on the top. You may export any reports to Word, PDF, Text or Excel format by selecting the Export icon. Use the Magnifying glass icon to increase the font size for better view, or use the Find icon to search for any text within the report. Select right/left Arrow key to go next page or previous page. Select Email Me Icon to email any reports. To use the email function see the Management section of the manual for additional info on how to setup eMail configuration. Copyright © Computer Systems Int’l, TMS 2.4.4 version User’s Manual, August 2015 51 End Of Day/Shift Report Endo of Day/Shift is one of the most important report that should be done at the end of shift/day to balance the till. You should make sure your staff can balance and have tight control over your cash. If difference is what is not zero, you need to find out the discrepancy. TMS allows multi shifts operation that is you may balance/close the current shift and start a new shift. To configure your system for multi shift operations go to Management -> System tools. When End Of Day/Shift process is done, the system is locked and no more transactions are allowed. If Day/Shift was closed by mistake, manager may reopen store by selecting Reopen Store option (2nd last icon). If you did not close the store for previous day, you may select the date from ‘Select Date’ option to close or view the end of day/shift report. If you wish to enforce your staff to close store go to Management -> System option, and enable ‘Check Store Closing’ Option. 1. Select Reports option from the main menu 2. The End of Day/Shift Report will be highlighted. Press the No Sale button or F10 to Open the drawer. Choose the reason Other from the drop down box or type in "Store Closing". 3. Make sure that the Till Tab is highlighted at the top left hand side of your screen and touch the appropriate sub folder and input and/or verify the totals for each. Remove your float from the register and put aside. (The float that you opened with in the morning will display on this screen next to "Opening Balance.") Count all the cash in your tray. Each time you choose a box to enter the quantity for each denomination of currency a QTY Form will appear. Enter total pennies into the QTY Form and press the OK button on the form, then choose nickels, dimes etc, following the same procedure. Double-check your entries prior to continuing. When you are certain that your entry is correct, choose the big OK button (with the big red check mark on the top portion of the screen. When the Notification! Box appears displaying the message, Are You Sure press YES Copyright © Computer Systems Int’l, TMS 2.4.4 version User’s Manual, August 2015 52 if they are correct. If you don’t wish to enter all denomination, select Lump Sum and enter total money. Check Verify that each of the checks listed are correct and press the OK button. When the Notification! Box appears displaying the message, Are You Sure press YES if they are correct. Credit Card If the credit card totals Visa, M/C Amex etc match the total on the "IN" column on the Till Report screen, press OK on the credit card tab. If there is a difference, review each item listed on the credit card tab. When you have identified the discrepancy correct if possible or report discrepancy to Sales Audit. Now you can press OK on the credit card tab. When the Notification! Box appears displaying the message, Are You Sure press YES if they are correct. Other (Debit Cards and Gift Certificates) Verify that each of the Debit Cards and/or Gift Certificates listed are correct and press the OK button. When the Notification! Box appears displaying the message, Are You Sure press YES if they are correct. TIP: If Turbo was not closed for the previous day, you can still get your daily totals. Check for the current date on the Turbo print-out report. Refund Verify that each of Refunds listed are correct and press the OK button. When the Notification! Box appears displaying the message, Are You Sure press YES if they are correct. Pay Out Verify that each of Pay Outs listed are correct and press the OK button. When the Notification! Box appears displaying the message, Are You Sure press YES if they are correct. When you have verified all the Sub Folder amounts and answered YES to each one you will see a check mark next to each item on the bottom of the form. NOTE: you must go through EACH tab whether you have applicable amounts or not. If the check mark does not appear next to a particular Sub Folder, choose the Sub Folder from the top tab, verify the items listed and press OK. When the last Sub Folder has been confirmed, a NOTIFICATION message box appears stating, "Are you Sure to Close This Station? No more transactions on this station allowed." Choose YES or NO. You will only get an additional message box displaying, "Are you Sure to Close the Store?" if you choose YES. Press YES. A message box will display to confirm that your store has been closed. 4. Prepare your bank deposit slip as per your current store procedure and store the store float in the tray as usual. Remember to leave the cash drawer open. 5. Print the Till Report. Ensure that the Till Report tab is highlighted and press the Print button. Copyright © Computer Systems Int’l, TMS 2.4.4 version User’s Manual, August 2015 53 6. If your system is equipped with Online Credit Card Processing,(like TPI) and you have setup customers with COF, select Batch Processing option to charge all COF customers who have outstanding invoices for today. This process might take few minutes, please don’t interrupt the process. Once this process is complete, a notification box appears on the screen To get a list of all these transactions, go to reports -> Trans Report -> Credit Card Processing report. For additional information on how to setup COF customers refer to Payment Processing section of the manual. 7. Settlement option is no longer required for credit card processing. All Credit Card Processing are set as auto settle by the processor like Paymentech. 8. Once Store/Shift is closed, you will be prompted to Enter Float for the next Day/Shift and will be forced to logout. System uses this as the default float to start the next shift/day. Copyright © Computer Systems Int’l, TMS 2.4.4 version User’s Manual, August 2015 54 Transactions Reports Transactions reports are a set of reports that display transactions report for selected date, customer, delivery run, station, or associates in summary or detailed format. You may filter the report base on the associate, schedule, run or customer. If selected filter is not supported for the report, an error message will display. To run any report simply select the date range, and click on the icon. Each report is explained in detailed below: . Copyright © Computer Systems Int’l, TMS 2.4.4 version User’s Manual, August 2015 55 Cash Summary Report: Cash summary report is a summary of all sales/receipts for the selected dates/customer. This report shows all incoming sales, including taxes, discounts/coupons as well as all receipts though pre-paid, checkout or charge customer account payment. This report may be run for selected Schedule, Associates, or customer. This report may be printed on Narrow printer. 1. 2. 3. 4. 5. 6. 7. 8. 9. 10. Total Sales: Total incoming orders including taxes. Gross Sales: Total Sales – Total Collected taxes Net Sales: Gross Sales – Discounts/Coupon – Commission due. Total Adjustments: All adjustments made to invoices on selected dates for invoices that were issued before. Gross Receipts: Total Receipts including Taxes, Coupons, Credit Notes, and Commissions. Credit Note Received: Total Credit Notes were redeemed. Net Receipts: Total Receipts less Coupons (paid as tender), Credit Notes, Commissions, and paid out. Amount On Hand: Net Receipts - Total collected/paid out. Tender Type: Total of each Tender Type used for Receipts, refund, or paid out. Tax, Environmental Free and Same Day upcharge Total: For Receipts, Refunds, paid out and sales. Copyright © Computer Systems Int’l, TMS 2.4.4 version User’s Manual, August 2015 56 Sales Report: Sales Report displays all invoices that are made through checkin process. It shows the invoice Total, Balance, Payment type (if any), last status, customer# and last associates#/name. This report may be run for selected Associates, or customer. This report may be printed on Narrow printer. Copyright © Computer Systems Int’l, TMS 2.4.4 version User’s Manual, August 2015 57 Payout Report: Payout Report displays all payments that were made through Payout function, under Misc. Receipt Report: Receipts Report displays all invoices that were paid through prepay, checkout and customer account. This is one of the most important reports that should be printed on Wide Report Printer on daily or weekly basis. This report is a consolidated reports that shows drawer balance, prepaid invoices, charge customer account payment, and invoices that were paid through checkout as well as charge customer who were checked out and charged to the account. Copyright © Computer Systems Int’l, TMS 2.4.4 version User’s Manual, August 2015 58 Select next page icon on the top to see the next page/report for all prepaid invoices: Select next page icon on the top to see the next page/report for all invoices that were paid through checkout: Copyright © Computer Systems Int’l, TMS 2.4.4 version User’s Manual, August 2015 59 Select next page icon on the top to see the next page/report for all invoices for charge customers that were not paid and charged to their account: Select next page icon on the top to see the next page/report for all invoices for charge customers that were paid and posted to their account: Copyright © Computer Systems Int’l, TMS 2.4.4 version User’s Manual, August 2015 60 Transactions Report: Transactions Report displays all checkin/checkout transactions done for selected. Copyright © Computer Systems Int’l, TMS 2.4.4 version User’s Manual, August 2015 61 Service Summary (Sales) Report: Service Summary reports shows a summary of all services for checked in invoices with adjustments for the selected period. Adjustments refer to invoices that were issued before, but changed in the selected period. Copyright © Computer Systems Int’l, TMS 2.4.4 version User’s Manual, August 2015 62 Receipts Service Summary Report: You may wish to view your service summary report base on invoices that were paid not just checked in. Rush Invoices Report: Rush Invoices refer to invoices that were checked in and due on the same day. Use this report to find these invoices to make sure they are ready. TMS can be setup to charge extra for same day services. To configure your system for same day upcharge refer to Schedule under Management. Copyright © Computer Systems Int’l, TMS 2.4.4 version User’s Manual, August 2015 63 Cash Drawer Audit Trail Report: Cash Drawer Audit Trail Report is used to find discrepancy in your end of day report when balancing your till. It shows all invoices, payment type and time for the selected station in order. Quick Invoices Report: Quick invoices report shows all quick invoices that are not detailed yet. This report might be selected from the running status banner on the top. Copyright © Computer Systems Int’l, TMS 2.4.4 version User’s Manual, August 2015 64 Coupon Report: Coupon report displays all coupons in detail that used by customers through Discount/Coupon option , it then shows a summary for each service and coupon. For additional info on how to set up coupons see Management. You may select any schedule for this report like Delivery. Sales Transaction Report: The same as Sales Report except it shows all invoices in detail. A customer may be selected for this report. Copyright © Computer Systems Int’l, TMS 2.4.4 version User’s Manual, August 2015 65 Cash Reconciliation Report: This report displays cash reconciliation for all stations/stores into a summary format. It shows Sales/adjustments, discounts/coupons, taxes and receipts for both COD and charge customers. In this example all 3 stores and related stations cash summary are shown. Sales Productivity Report: This is a customized report, not available to all users. Shift Summary Report: Shift summary report shows each shift transaction summary for all services and tender types. It should be used with End Of Shift report to get additional info. . Copyright © Computer Systems Int’l, TMS 2.4.4 version User’s Manual, August 2015 66 Check out Cash Summary Report: The same as cash summary report, except is based on invoices that are checked out. Some customers reports the taxes only on checkout invoices not including inventory invoices. Checked Out Invoices Report: The same as Sales report, except only shows invoices that are checked out and the payment method. Copyright © Computer Systems Int’l, TMS 2.4.4 version User’s Manual, August 2015 67 Sales Productivity Report: Sales productivity shows total of invoices that were done/assigned by certain associates. To run Productivity function go to Ready menu and scan invoices and then associate barcode. You may use this report to find out commission that you may pay your Seamstress for example. Trans List in Invoice Utility displays the detail of this process. Credit Card Transactions Report: This report is used to display all online credit card transactions successful/unsuccessful that has been processed through TMS. It may be used for both Terminal base (i.e transactions done through checkin, checkout and invoice utility) and/or Batch base Processing (i.e Transactions done through End Of Day or Statement for Credit On Card File customers) Copyright © Computer Systems Int’l, TMS 2.4.4 version User’s Manual, August 2015 68 Sales Summary Report: Sales Summary report is used to create a comparison sales report on hourly, daily, monthly and yearly basis and find out the best/worst period. The following is a sample report for a selected date on hourly basis which indicates 2:00 and 3:00PM had the best sales period. Copyright © Computer Systems Int’l, TMS 2.4.4 version User’s Manual, August 2015 69 Sales Journal Report: Sales Journal report is one of the most import reports that should be used on a daily basis to get a summary of sales and transactions. It displays all services sales summary, cost, discounts, taxes etc. It includes total customers served, total new customers, total redo items, voided, refunds etc. This report can run in both Wide and Narrow format. Total updated refers to invoices that have been changed. Negative number indicates under charged prices. To get a detail list of under charged, voids/refunded invoices go to reports -> more -> history tracking report. If you have a franchise operation, Royalty cost can be calculated base on the preset value and cost for alteration operation etc. Total tag reprints can serve as way to control your franchise operation to prevent any dishonesty. Copyright © Computer Systems Int’l, TMS 2.4.4 version User’s Manual, August 2015 70 Misc Reports: Misc Reports are set of reports that can be accessed by Selecting reports -> Misc Report. It includes items, redo, zero price, production, wash & fold, and Garment Tracking Report. Items Reports: Items report is used to sort the incoming orders base on Item, Service, Department, and route delivery. It is used to find out average price per piece and total for each category. Summary of Items by Item Category: Copyright © Computer Systems Int’l, TMS 2.4.4 version User’s Manual, August 2015 71 Summary of Items by Service Category: Summary of Items by Department Category: Copyright © Computer Systems Int’l, TMS 2.4.4 version User’s Manual, August 2015 72 Summary of Items by Customer Smith (Narrow): Copyright © Computer Systems Int’l, TMS 2.4.4 version User’s Manual, August 2015 73 Production Report: This report displays all activates assigned to each order during production process. It is the best method to track status of the orders. Production report can be done by invoice or item. You may go to Invoice Utility, Trans List to get all productions for selected invoices. See production section for more info. Copyright © Computer Systems Int’l, TMS 2.4.4 version User’s Manual, August 2015 74 Zero Pricing Items Report: This report is designed to avoid losing revenue on items that are not priced during checkin process and price to be assigned after job is performed, like Alterations etc. TMS can be configured not to allow users check out any items with $0.00 price. Redo Items Report: Redo items report displays all invoices that are marked as reclean/redo during checkin process. You should check this report periodicity to control your quality and prevent any misuse by staff. Total redo items is also reported in Sales Journal report. Copyright © Computer Systems Int’l, TMS 2.4.4 version User’s Manual, August 2015 75 Wash & Fold Report: Wash & Fold report is used by Laundromat operations to track the cost of each washer & dryer. This report is based on the invoices that are scanned in Wash & Fold function under Misc menu. For additional info on how to setup washer & dryer process/cost refer to Management function. Garment Tracking Report: Garment Tracking report displays all Garment Tracking Items, their usage, status that are processed using Garment Tracking Tags. For additional info on how to setup Garment Tracking and usage please refer to Management Section. Garment Tracking tags are used for Auto Sorting systems, Uniform rental operation, and Hotel Staff Billing, etc. Copyright © Computer Systems Int’l, TMS 2.4.4 version User’s Manual, August 2015 76 Stock Report: Stock report is a set of reports related to Stock, Inventory Tracking, Merchandise, Due, Overdue, Ready invoices. Copyright © Computer Systems Int’l, TMS 2.4.4 version User’s Manual, August 2015 77 Due Items Report: Due Items report displays all items that are due base on item, customer, route, and service, invoice #in narrow or wide format. Use this report to make sure all due items are ready for the selected due date. Select Show only not ready invoices option for this purpose. You may select a customer to see all related due invoices. For example use Select Wide Format By Service Laundry to get a list of all invoices that are due back from your wholesale that cleans the laundry shorts for you. Due Items report by item Over Due Items Report: Overdue Items refers to orders that are long overdue in you inventory, like over 30 days for example. This is a lost cash flow and income. Use this report to find orders and have your staff call these customers to pickup such orders. This report could be sorted by Invoice#, Conveyor Location#, Customer#, In date/Due Date or Customer name. Copyright © Computer Systems Int’l, TMS 2.4.4 version User’s Manual, August 2015 78 Discrepancy Report: Discrepancy report refers to invoices that are not in your physical inventory but still in the system or invoices that are checked out by mistake but are in stock. It is very important to make sure your stock is correct to avoid any revenue lost. Dishonest staff might checkout orders, collect money but not process it through checkout function. Use this process to scan all orders on your conveyor and create the Discrepancy report of what orders are missing. You may use a scanner or PDA like Scanpal to scan invoices. You may stop the process and save the file during scanning process, and restart at a later time. This report can be sorted by Invoice#, customer name or Conveyor location. For this purpose is best to use a wireless scanner. If you have a PDA, please refer to PDA section of the manual on how to use PDA. If you don’t have a scanner then you may use the Stock report or select option Without Scanner and type in the invoice#. To run this process, Select Discrepancy Reports and follow steps below: Use the scanner and scan each invoice on the rack, conveyor, storage etc. As invoices are scanned in, they show up on the Verified Invoices Screen. If you like to take a break during scanning, press Exit, and you will be prompted to save the scanned invoices into a temp file. Upon your return, simply select Read from temp file option. Once you are done, select Create Discrepancy Report to view the report. Copyright © Computer Systems Int’l, TMS 2.4.4 version User’s Manual, August 2015 79 Once you select Create Discrepancy Report the following sample report is created that shows inv#, in-date, customer and location of the order. Any orders that are marked as OUT, it means they are checked out from the system but still in inventory. Use Invoice Utility; Restock option to put these orders back into inventory. All missing invoices should be investigated and find out the reason. You may use Invoice Utility to view Trans list and check who view the invoice location. You may use History Tracking, under Reports -> More to find out all orders that have been canceled during checkout process. Copyright © Computer Systems Int’l, TMS 2.4.4 version User’s Manual, August 2015 80 Exception Report: Exception report is used to display all invoices that are not ready for selected due date. Use this report to make sure all promised items are ready for pickup. This report can be sorted by invoice# or customer#. Stock Report: Stock report displays all items in stock that can be sorted by invoice#, Customer#, or Conveyor#. Select Merchandise items option to display only Merchandise/retail items in stock. Copyright © Computer Systems Int’l, TMS 2.4.4 version User’s Manual, August 2015 81 Productivity/Alert Reports: This is a set of reports used to make sure your production is on time and tight. This report can be accessed by clicking on the running status banner from main screen. To see the report click on View Report option. Promised Today screen shows a summary of your service capacity/promised for the week. If you like to see another date report, just click on the calendar. Over Dues shows all over due invoices, which is the same report in Stock report Screen. Not Ready displays all invoices that are not ready for today, This is the same report as Exception report. Quick Invoices displays all quick invoices that are not detailed yet; This is the same report as Quick Invoices report in Transactions Report. Copyright © Computer Systems Int’l, TMS 2.4.4 version User’s Manual, August 2015 82 Price List Reports: Price list report display all prices for selected schedule and service. It shows price, cost and any special discount. To print a price list, go to Reports and select Price List. To view/print the whole price list, Copyright © Computer Systems Int’l, TMS 2.4.4 version User’s Manual, August 2015 83 Customer Reports: Customer report screen is a set of reports related to customer listings, Credit Notes, sales history, and A/R. Customer Lists –Display all customers sorted by id or customer name for all Customers, Delivery Run, Company or Charge customers Mailing Report –Display all customers including mailing address. Select Email List report if you like to get customer’s email address for all customers or the ones who signed up for Web/Marketing. Credit Note Report –Display all issued/outstanding Credit Notes for all or particular customer. A/R Report –Display all issued/outstanding Credit Notes for all or particular customer. Copyright © Computer Systems Int’l, TMS 2.4.4 version User’s Manual, August 2015 84 A/R Reports: This report displays all A/R for Charge/COD customers. You should make sure to run this report on regular basis to have your A/R under control. COD customers should not have any outstanding balance. Some people consider A/R base on invoices that are checked out, In that case use Checkout option. To get A/R for a particular run select desire run. A/R Detail report show all A/R invoices. A/R Detail > 30 > 60 shows all A/R invoices grouped with > 30 and > 60 days A/R Summary shows all customer with overdue balance grouped in 30-60-90, over 90 days. For security reason all customers’ names are blanked out. Copyright © Computer Systems Int’l, TMS 2.4.4 version User’s Manual, August 2015 85 Time Sheet: Time Sheet function is used to create a report that shows an employee's working hours by selected date. Associates may check their own time sheet any time by selecting Retrieve icon. Total hours are added for each clockin/clockout and shown under Total Hours. If hours are approved by the manager, total approved hours are shown at the bottom of the screen. If an associate did not clockout, will be prompted during next day clockin, Manager may use Management Function -> Payroll to approve, add/update the Time Sheet. TMS can be setup to enforce associates to clockin before using the system. To enhance system’s security you may add Finger Printer Reader for clockin/clockout and logon/logout purpose to prevent associates from using each other’s pin#. For additional information see Management section. Copyright © Computer Systems Int’l, TMS 2.4.4 version User’s Manual, August 2015 86 Sales Commission: Sales Person Commission report displays all transactions for selected Sales Persons with total earned commission. Sales person can be assigned to a customer profile under Notes tab, or during checkin process by selecting, Misc, Sales Icon. Select predefined sales person. Default sales person is selected from Customer Profile if any. For additional information on how to setup Sales Persons refer to Management Section. Commission is calculated only for invoices that are paid. Simply select summary or detail format and the sales person. The following is a sample of Sales Commission Detail Report. The following is a sample of Sales Commission Summary Report. Copyright © Computer Systems Int’l, TMS 2.4.4 version User’s Manual, August 2015 87 Labels Printing: Select Labels printing to print all required barcoded labels. You may use Avery/Dymo label as it is marked on the selected option. Labels can be printed on any Windows Installed Printer with selected Avery or Dymo Labels. The usage of each label is explained below: Shipping Labels: Shipping labels are Avery/Dymo Standard labels used to attach to Laundry Bags for identification purpose. It includes names, address, and barcoded custid# Dymo labels are best for on demand single barcoded labels that be attached to preprinted key tags, or laminated for laundry bags. Mailing labels Mailing labels are used to create address labels for selected customers. Copyright © Computer Systems Int’l, TMS 2.4.4 version User’s Manual, August 2015 88 Conveyor labels are used to label conveyor locations for Ready Scanning purpose. It is recommended to make a label for every 10 slots. For example if you have a conveyor with 1000 slots, make labels from 10 to 1000 on every 10 interval. (i.e your labels would be 10, 20, 30 etc). If labels are too close it might overlap and difficult to scan. Conveyor labels are 4 chars long. Associates Labels: are used for Productivity scanning process. Associate id is a 6 digit label. Tracking tags: Tracking tags are used to speed-up recurring mark-in process. They are heat Seal labels with special garment id# that is linked to customer, item, price, color and upcahrge. Tracking Tags are printed on Zebra 2844 or 3844 Printer on special Thermopatch or Similar tags. For additional information on supplies please visit our website on Heat Seal Labels. Tracking Tags are 8 chars long. You may also use pre-printed barcoded labels for this purpose or use print on demand tracking tag. For additional information refer to Tracking tag section. Tracking tags are mostly used for automated assembly conveyor systems. See Auto Sorting System section of the manual. Copyright © Computer Systems Int’l, TMS 2.4.4 version User’s Manual, August 2015 89 1. Productions Labels are used during production process under Ready function to assign a production step to an order. For additional information refer to Production Process. Select Narrow option to print on Invoice Printer. More Reports Select More to see additional reports on the next screen that can only viewed by Managers or authorized associates. If you don’t wish your staff access these reports disable ‘View Management Report’ in job-class. Copyright © Computer Systems Int’l, TMS 2.4.4 version User’s Manual, August 2015 90 History Tracking Reports TMS tracks sensitive transactional changes for audit purpose. You should check these reports periodically to make sure your operation is under control. You may select an associate if you are checking a particular staff. To get additional info on a selected invoice, go to Invoice Utility, Select Trans List. History Tracking displays the following reports: Voids/Refunds All Voids/Refunded invoices Invoice Updates Any changes made to invoices, in particular undercharges. That’s show all invoices that are not under charged by invoice#, associate, or date. Undercharge can be disabled in Schedule. No Sales Item Location Cash drawer is opened with No Transaction. Associates lookup the location of an invoice, in case there is any issue with the invoice. (i.e not checked out through the system, but missing from inventory) Checkout Canceled not checked out through the system, but missing from inventory Electronic Journal Each transaction is recorded in a text file called Electronic Journal, which is saved in \csi\tms\reports\ Electronic Journal folder by date. This is like a running tape tracks every tranactions. In case there is an issue with any invoice, check the Sales Journal on that particular day. Each Station has its own Sales Journal files. Copyright © Computer Systems Int’l, TMS 2.4.4 version User’s Manual, August 2015 91 Sample of Voids/Refunds: Sample of Invoices undercharged: Sample of Electronic Journal: ********* BEGIN TRANSACTION ********* ------------------------------------STORE: 0001 REGISTER:001 ASSOCIATE: 0000911 TRANSACTION:74 11/12/2007 11:44AM CASHIER: Shift 1 Open ********** END TRANSACTION ********** ********* BEGIN TRANSACTION ********* ------------------------------------STORE: 0001 REGISTER:001 SHIFT: 0000001 CASHIER: StartingBank ASSOCIATE: 0000911 ------------------------------------STARTING BANK AMOUNT: CASH $39.35 TOTAL $39.35 ------------------------------------TRANSACTION:74 11/12/2007 11:44AM ------------------------------------- Copyright © Computer Systems Int’l, TMS 2.4.4 version User’s Manual, August 2015 92 Statement Statement function is to create statement for charge customers, print/email and process online credit card for COF Monthly charge customers. Statement process can be grouped by Route Delivery, Company customers, COF customers. Statement consists of two parts, Left side (Customer copy) and Right side (Return copy). As indicates on the statement customer may tear off the right hand side, mark the invoices being paid and return with payment. Statement paper with perforation can be purchased from any office supplies, or you may use regular blank paper. To run statement follows steps below: 1. Select Start/End date, then select the group of customers you like to run, (i.e Charge Customers, COF, By Run. Charge Customers) 2. Press Create 3. Check Mark the customer or Select All, and Press OK 4. If you are doing Company customers, check mark ‘Exclude Company customers’ as you are making statement only for the company. 5. Statement gets created; you may press Next to View the screen statement, Press Print to print the current statement, Press Print All to print all statements. 6. If customers wish to get their statements emailed, just click on Email Me icon. Customers’ email is taken from the profile, and gets sent. 7. If Statement is for selected COF customers, and you are set for Online Batch processing, select Batch processing Icon (Visa icon). This process might take few minutes depending on how many COF customers were selected. If any of the charges fail, you will be notified. To get a detailed list of the charges, please refer to Transaction report, credit card report. Processed payments get posted to the customer’s account. Rerun the statement for COF customers would reflect the charges. Please note if customer has a credit note, Batch Processing does not deduct this, and process just outstanding balances from invoice. Such credit notes should be applied through Invoice Utility payment processing. Copyright © Computer Systems Int’l, TMS 2.4.4 version User’s Manual, August 2015 93 The following is a sample statement created for charge customer Smith from Nov 1 2008 till Nov 30 2008. Any balance prior to Nov 1 2008 is marked as Balance Forward. Any invoices with balance will show up on the right hand side of the statement. Any credit notes, or payments are reflected on the statement. The bottom of Statement shows a summary of balance for 30, 60, 90 days. If you wish to charge customers late fee charges, go to Management -> System -> Tools -> Bank Charges. Copyright © Computer Systems Int’l, TMS 2.4.4 version User’s Manual, August 2015 94 Marketing Increase your sales automatically and systematically with no additional cost. TMS e-Marketing tools allow you to send emails, or customized letters in no time. • Tracking 1st time customers • Recognize your Most Valuable customers • Get in touch with your Inactive customers that used to be your top customers • Classify your customers based on $value they spend into Platinum, gold and silver category. • Keep track of your customers Birthdays, show them that you care. • Create customized Letters, coupons, email templates to keep your customer coming back. • Send Promotional emails, create address labels, and create mail-merge with Microsoft Word. • Export data to Microsoft Word or Excel for additional reporting or mail merge. Follow steps below to create reports and Labels/emails: 1. Click on the desire icon to create the appropriate report (i.e, Birth Day, 1st Time Customers etc.) 2. Check Mark Create Labels to create Mailing labels for customers that match search criteria if sending Post cards. 3. Check Mark eMail Mode if sending emails. If you are using eMail mode, Email notification program has to be running. System uses the default template and coupons that are defined in your eMail configuration settings. For additional info on how to setup eMail configuration, see Management Function. You may go to Email Report to find details of all emails log history 4. For Inactive customers you may select total days without Transactions. Enter 0 to get all customers if you like to email customers for certain run delivery. Select Sort by run if this is for your route delivery customers. 5. When Creating Most Valuable customers report you may select Wide report format that can be exported to use with 3rd party vendor marketing program. Enter 0 to get all customers sorted from best to worst. Copyright © Computer Systems Int’l, TMS 2.4.4 version User’s Manual, August 2015 95 Shipping Labels that are created can be used for the post cards or customized letters. The following are sample post cards. The following is a wide report format for most valuable customers with one year transactions. The report displays name, address, email, and summary of transactions. Copyright © Computer Systems Int’l, TMS 2.4.4 version User’s Manual, August 2015 96 Coupons: TMS allows you to define your own coupon, with discounts. Track coupons and discounts, and see which one is more productive. • Discount by %, $, or 2 for 1 items • Enable/Disable discount/coupon for a given date • Maximum amount restriction • Prevent multiple discounts • Pre-defined customer discounts with expiry date, for certain services • Control coupons by scanning coupon barcode • Print coupon automatically for 1st time customers • Print coupon automatically for loyalty points system There are two types of coupons 1. Coupons that printed auto on customer’s invoice during checkout process for New Customers, when certain conditions are met, or certain points are collected. 2. Coupons that may be used manually during checkin process or through Coupon Tender Type. From Management Function, select System -> Coupons. 1. Select New Coupon Icon to add a new coupon, or Update to change the existing coupon. 2. Coupon Name –Use a descriptive coupon name 3. Coupon Id: Enter a unique id, that could be scanned during checkin process to auto select the coupon . If you are making your own coupon, you may create a unique barcode and scan it during checkin process. 4. Valid For: Select All if this applies to all services or select the desire service like Dryclean. 5. Valid: Remove active checkmark if coupon is not valid any longer. 6. Coupon Id Mandatory: To be able to track your coupons, enable this option. User can’t select a coupon without scanning. 7. By value: If this coupon is a $value, enable this option. Copyright © Computer Systems Int’l, TMS 2.4.4 version User’s Manual, August 2015 97 8. 9. 10. 11. 12. By percentage: if this coupon is % discount, enable this option and enter % value. Effective Date: The date coupon becomes effective. Valid Before: The date coupon gets expired. Print This Coupon Till: If this coupon gets printed auto, stop printing after this date. Printing Type: Don’t Print, Select this option if you don’t wish this coupon to be printed auto, New Customers, Select this option if you like this to be printed for new customer, Print On Invoice; Select this option if you like this coupon to be printed auto 13. This coupon is valid for orders with min order: Enter a $value if you like this coupon to be applied only to invoices with Min order. 14. This is a Daily Coupon: if you wish this coupon to be printed or applied on certain days select this option and day of the week. 15. Contents: If coupon is to be printed, you may define the body of your coupon using Contents screen as the sample below: Copyright © Computer Systems Int’l, TMS 2.4.4 version User’s Manual, August 2015 98 Loyalty/Rewards Point Program Increase your sales automatically by using TMS Loyalty/Rewards Points System • Define your own loyalty and point system. • Define your own redemption point, and redemption coupon • Print redemption coupons automatically to encourage customers keep coming back. • Classify customers based on the collected points for more rewards. Customer Classification Follow steps below to define the Loyalty Point program: 1. From Management function, select System -> Customer Classification. 2. Use the New icon to add a new level as you wish. Entry level always starts with 0 Point. 3. Enter total points per $ spend for each service. The easiest way is assign 1 point per 1$. If you don’t wish to reward point for Laundry, simply enter 0 for Laundry service. 4. Select Update to save the settings. In this example, Entry level is 0, Silver is 1001, Gold 2001 and Platinum is 5001. Therefore if a customer spends $5000 becomes a Platinum customer, and could qualify for better rewards. See Redeem Points on how to setup Redeem Coupon. 5. Having defined the customer classification for Rewards program, next you have to setup the actual rewards for each class. Copyright © Computer Systems Int’l, TMS 2.4.4 version User’s Manual, August 2015 99 Follow steps below to define the rewards for each customer class. 1. From Management function, select System -> Redeem Points 2. Select Customer class from drop down menu, like Entry Level 3. Enter Total points for this reward. This point value has to be in the range of this class and next class. In example above you may is any value between 0-1000, since next class Silver starts from 1001. 4. Select Coupon from drop down menu that is to be redeemed for this point. 5. You may assign multiple coupons to the same customer class. Rewards Point System Settings: Follow steps below to enable Loyalty Point program, From Management function, select System > System Options -> Marketing 1. Points Feature: Enable this option to activate the Points Rewards Program 2. Reset Point: Enable this option not to reset the points when reward coupon is printed. You should disable this option to allow multi redeem points rewards for different customer class. 3. Customer Classifications: To allow multi customer classifications. 4. Print Redemption Coupon: it is more effective to have redeem coupons printed auto. 5. Include Taxes in Point Calculation: Whether to include taxes in Point calculations. Schedule and Customer Profile Point System Settings: 1. From Management function, select System -> Schedule ->Update Schedule -> Misc 2. Enable Point Feature if you like to have all invoices for the schedule included. 3. In customer profile, select Marketing, Disable point Feature if customer does not wish to collect points. Copyright © Computer Systems Int’l, TMS 2.4.4 version User’s Manual, August 2015 100 Email Configuration Email Configuration is to setup your email server settings, email templates that are used within eMarketing function, Ready Process or any other emails sent through the system. Follow steps below to configure your email server: From Management function -> Select System -> Management -> email Configuration. Email Settings SMTP Server Port Email Address Enter your SMTP email Server, like mai;.computersystemsint.com Your email server port, default is 25 Your email address that will be used when sending emails User Id Password Send Messages Email Address Times to retry Footer Your email server user id Your email server password How often to send emails for Ready orders Your email address that will be used when sending emails How many times to retry sending emails if they fail Enter the default footer that should be added to email. Eg. Yours Truly, Your Dry Cleaners,Inc. John Smith 416-497-0370 [email protected] Contents Birthday Most Active Customer First Time Customers Reports Statements Ready Inactive customers Customer Classifications Invoice Enter your own contents for the emails that are sent through email program. You may attach a Coupon when permitted to the email. Coupons could be any jpg file. Just click on Attach A file, then use the browse option to locate your coupon file, Contents to be used when sending Birthday emails, Contents to be used for Most Active customers. First Time Customers email Contents Contents for any reports. Contends for Statements Contents to be used for Ready notification email that gets sent to customers who sign up to receive email when orders become ready. That’s when invoices are scanned through Ready process. To enable this feature for a customer go to Customer Profile, Marketing, enable Ready options. Contents for inactive customers emails. Contents for Customer Classifications emails. Contends for Invoice email. To email any invoice, go to Invoice Utility, Reprint Invoice, Email Invoice. Copyright © Computer Systems Int’l, TMS 2.4.4 version User’s Manual, August 2015 101 SMS eMail Interface http Interface SMS Message This section is used to define your SMS server, SMS is used to send text Messages to customers who wish to receive SMS through their cell phone when orders become ready. Most SMS servers charge for this service. Enable SMS notification in Customer Profile -> Marketing for Customers who wish to receive SMS. Some SMS server use eMail Interface format to send SMS, and others use Http format. The SMS service can be purchased online. For additional information you may visit http://bulksms.2way.co.za/ or contact your ISP Enable this option if your SMS server uses email interface. Enter the email address of the SMS server Email to SMS allows you to use your email to send SMS messages. Enable this option if your SMS server uses http Interface format. Enter userid and password. Enter the Text Message to be sent in SMS. You may use the palce holder like Time, Date, Invoice#, Cellphone with the text message: Some SMS server require you user id and password to be imbedded in the heading of your text message. e.g Dear Valued Customer Please be advised your invoice# [INVOICEID] is ready for pickup . [Date], [Time] Email Service eMails are sent through CSI emailnotification program which is located in \csi\tms folder. Emails through eMarketing and Ready functions are sent through eMailnotification service every so often that is defined in eMail Settings screen. Other emails sent on demand like reports, invoice don’t use this service. This service has to be installed on the server, then Started. In case you need to stop the service simply Select Stop. You may use Windows Services to view the status of this service. View Log file Click on View Logfile to view the history of emailnotification services. Copyright © Computer Systems Int’l, TMS 2.4.4 version User’s Manual, August 2015 102 Utilities Utilities are used to clean up email notification log files and emails that are ready to be sent. Clean eMail Logfile Delete all records in email log file. Remove All Emails Delete all email records that are saved through Ready and Emarketing program and ready to go out. These does not remove the actual emails from customer profile. Delete all email records for particular Category that are saved through Ready and Emarketing program and ready to go out. Select the desire category like Birthday etc. Delete all email records that are saved through Ready and Emarketing program before the selected date. Remove Emails By Category Remove Emails Before Copyright © Computer Systems Int’l, TMS 2.4.4 version User’s Manual, August 2015 103 Misc Functions Misc is a set of miscellaneous functions grouped under this menu that are explained below: Payout Payout is used to track the daily expenses to make sure your end of day is balanced properly. Use this function to record any expenses such as Staff Meal, Repair, Postage etc. Invoice# Invoice# of the expenses Company Name Total Tender Type Check# Memo The name of the supplier who payout is made to Total Payment including taxes Tender tpe, like cash, Check etc check# that was paid by You may type any text, or select from predefined memo. You may add your own memo in management -> Management -> Greetings Select this to void any previous payout, select the date of payout and then desire payout Void Payout Adjust Till Adjust till is used to Put in/Take out money in the till-total for any reason (i.e invalid Till Float etc). Till adjustment is shown under End Of Day/Shift report. Select Put in/Take out from till option, and total adjustment. Copyright © Computer Systems Int’l, TMS 2.4.4 version User’s Manual, August 2015 104 Tracking Tag Tracking Tag function is used to print tracking tag in advance for selected customer. TMS allows tracking tags to be printed on demand during checkin process, however if you wish you may use this function to preprint such tags. For additional information on Tracking Tag system and its usage please refer to Tracking tag system in manual. 1. Select Customer from Search Screen 2. Select the tracking tag items, by check marking the items. 3. Select Create New Tags. 4. If customer has already Tracking tags, select it from right screen and select reprint. 5. As tags are created, they get printed on the predefined Permanent Tag printer in TMS configuration. 6. If tags were made by mistake select Delete option. Permanent Tag Permanent Tag function is used to print permanent laundry tags for laundry shirts. Permanent tags has customer’s name, and customer# barcode.. Permanent tags are not tracked in the system just used to as an identification purpose. As tags are created, they get printed on the predefined Permanent Tag printer in TMS configuration. Preprint Invoice Preprint Invoice function is used to preprint a set of blank invoices that have invoice#. Preprinted invoices are like Quick tickets with no name that used for drive Through or Pickup/Delivery routes. Write down customer’s name, total pieces and due date on the preprinted invoice, insert it into the laundry bag. Then Go to invoice utility, scan the invoice# and select the proper customer. System will assign the selected customer to the preprinted invoice. Select update to detail the ticket just like Quick ticket. Auto Backup Process Please contact CSI to setup online backup to our cloud servers. Copyright © Computer Systems Int’l, TMS 2.4.4 version User’s Manual, August 2015 105 RUN STOPS This function is used by drivers to sort their stops for a route delivery in proper stops. Please refer to Pickup/Delivery manual on how to setup Run/Stop for route delivery. Support Support page provides tools and links to connect to CSI support staff in case you need technical help or access CSI knowledge base to find answers to technical questions. If you need technical help, and you would like us to access your system, go to Support page, and select proper Help desk. Please make sure our support staff is expecting your support request to accept the invitation. Laundry Card TMS has a special interface with Laundry Cards from Card Concept. Laundry Card function is used to get the balance on the Laundry card. Simply swipe the card Card Concepts manufactures and develops automated systems for the self-service Laundromat industry. LaundryCard™ was developed to act as a back bone to the Totally Automated Store (TAS) concept. LaundryCard™ is a coin replacement system for Coin-Op Laundromats. In a LaundryCard™ store all of the laundry equipment is outfitted with card readers and kiosks (called X-Changers) are installed that dispense 'debit cards' that customers can add value to and start machines. The system maintains the customer’s card balance and allows them to revalue their card with either cash or a credit card. For additional information on Laundry Cards visit www.laundrycard.com Merchandise Tag TMS has support retail sales through merchandise function and allows to scan SKU/PLU to price items auto. You may use this function to make your own PLU barcode tag and use it through the Merchandise sale process. Simply select the item and create the tag for preassigned PLU/SKU for the retail item. Gift Card TMS supports gift cards that are issued by Paymentech through Point or Payware Connect Card Processing. Gift Card function allows you to lookup the balance on the gift card. Simply Swipe the Gift card. For additional information on how to configure TMS for Gift Cards please read Gift Card Processing. Copyright © Computer Systems Int’l, TMS 2.4.4 version User’s Manual, August 2015 106 Wash & Fold Functions Machines Setup TMS has special features designed for Laundromat operations. This section explains in detail all aspects of Laundromat operation and how to setup and track wash & fold process. To get started, go to Management -> Management -> Wash & Fold Select Add to add Washer or Dryer descriptions. This info will be printed on invoice with wash & fold item to help your staff with amount of soap, softener etc to be used for certain machines. Use remove icon to delete or Edit to make changes. To configure system to print this info, go to System -> System options -> Invoice -> Enable print Wash & Fold Chart options. Copyright © Computer Systems Int’l, TMS 2.4.4 version User’s Manual, August 2015 107 Click on Configure Machines to setup the cost of each washer & dryer. Select Add to add a new washer or dryer machine. You may use remove icon to delete or Edit to make changes. Machines cost is used in calculating the cost of each wash & fold load. The assigned numbers should match your actual physical washers & dryers. Wash & Fold Bag Tag TMS can also print a bag label for each wash & fold bag. Follows steps below: 1. Go to Management -> System -. Schedule -> select Proper Schedule 2. Under Tag screen, enable Print Dispatch Tag 3. One this option in enabled, at the end of checkin process you will be prompted for total of bag tag/labels. 4. You may reprint a bag tag by going to invoice utilities, select Reprint Invoice, and select Dispatch Tag. 5. This tags are printed in the invoice printer. Copyright © Computer Systems Int’l, TMS 2.4.4 version User’s Manual, August 2015 108 Setup Items for Wash& Fold 1. 2. 3. 4. 5. You have to configure your items to mark the items for wash & fold. To do this, Go to Management -> System -> Update dept/Items. Select wash & fold item, Select update items. Scroll to the right and enable wash & fold option. It you have a digital scale and you like to interface to the scale, enable Scalable option. Select Save Item changes. To get additional info on how to setup digital scale refer to TMS Installation guide. 6. If you like to add a new item for Wash & Fold, select Add New Item, Enter Item Description. 7. Go to Price Screen, add price. Make sure to select Laundry or proper service for new price. Copyright © Computer Systems Int’l, TMS 2.4.4 version User’s Manual, August 2015 109 Wash & Fold Process Once invoice is created, use the following steps to assign washer & dryer to the invoice: 1. Select Misc function from main Menu. Select Wash & Fold 2. When prompted for Invoice#, scan or enter invoice# 3. Select Washer, and enter washer #. System will auto select the cost of the selected washer. You may add as many as washer for the invoice. Check mark Print option to have the system prints the receipt when ready. Continue the same process for dryer. 4. Press Print to save the transaction and Print the receipt for each Machine. You may attach the receipt to each washer & dryer. 5. Use the same process to update an invoice that was processed before. Copyright © Computer Systems Int’l, TMS 2.4.4 version User’s Manual, August 2015 110 Wash & Fold Report: Having processed wash & Fold invoices through Wash & Fold process as above, use the following reports to get total wash & fold cost and machines used. 1. Go to Reports -> Misc Report 2. Wash & Fold report. Select by invoice, Washer, or dryer option. 3. Use the narrow format if you like to have the report printed on Invoice Printer. Copyright © Computer Systems Int’l, TMS 2.4.4 version User’s Manual, August 2015 111 Wash & Fold End Of Shift/Day Report: Having processed wash & Fold invoices through Wash & Fold process, end of day/shift report displays all washers & dryers cost into the cash folder. 1. Select Reports 2. End of Day/Shift report, select Cash. All invoices and washer & dryers are added into this report to help you balance the till. 3. For additional info on End of Shift/Day report, please review this section of the manual. Copyright © Computer Systems Int’l, TMS 2.4.4 version User’s Manual, August 2015 112 Management Functions System System is a set of functions that only system administrator can access it. You should restrict others in job class function to access this section as it could affect your system settings, process, coupon etc. Copyright © Computer Systems Int’l, TMS 2.4.4 version User’s Manual, August 2015 113 System Options This screen is used to configure the system to enable/disable certain features allow or options, which are explained below in detail. System Control ½” Inch Tag If you don’t use Touch Screen you may enable this option to assign shortcut to menus, items, services, departments through checkin process. Use the short cut code# to access the menu. If this option is enabled, the system would disable any transaction to be entered if the previous day process in not completed. See the End of Day Report in the Reports section. Enable this option if your store has multi shift operation and you like to balance your till and the end of each shift. Enable this option if you like to auto issue a credit note for customers who make payments that exceeds the account balance. Otherwise overpayment is rejected. Credit notes is auto used by the system over next account payment. Change the format to fit your regional phone format settings, which is used through reports. If this is a franchise operation add royalty commission that is used to calculate amount owing to head office when doing Sales Journal report. Use this shortcut to load your favorite program from TMS when F2 is pressed, like Outlook, MS Word etc. Default Are code to be added when adding a new customer, or searching a customer using phone#. Add your own Greeting, advertising to your customer account statement. Make ½” tag when printing tag QWERTY Keyboard Use QWERTY on screen keyboard format instead of A-Z keyboard Tag Paper rolls back This is mostly used on Star/Samsung tag printers to save paper Enable Short Cut for checkin Enable Previous Closing Store Clerk Enable Multi Shifts Put Account Payment, Over payment as credit note Phone Format Royalty Commission F2, F3 Shortcut Default Area Code Greeting On Statement Invoice Allow Updating Previous Invoices Disable this option if you like to disallow your staff changing previous invoices for security reasons. Allow Voiding Previous Invoices Disable this option if you don’t want your staff to void previous invoices. Enable Printing Invoice Detail on Manifest Report Enable Printing Grand Total on Invoice Enable this option if you would like details of the invoice to be printed on the delivery manifest report. Enable Printing Bar Code on Invoice Enable Printing Balance on Invoice Printing Compressed Disable this option if you don’t want the bar code to be printed on the invoice. Enable this option if you would like the Invoice balance to be printed. Enable this option if you would like the customer’s grand total outstanding balance to be printed on the invoice. To save paper, select this option Copyright © Computer Systems Int’l, TMS 2.4.4 version User’s Manual, August 2015 to compress multiple 114 Details colors/upcharge option on the same line of the invoice. Print Schedule Name If you have multi schedules, printing schedule name on invoice might help you during sorting process. Prints larger font on Thermal Format invoice To save paper, enable this option to avoid printing statements with Zero balance. If you don’t wish to print your associates name on invoice, disable this option, That’s print employee number Print Big Font Invoice Print Zero Balance Statement Print Name on Invoice or Report Increase quantity while selecting colors Enabling this option increases the qty of items every time a color is selected during checkin. There are some unknown bugs with this feature and is not recommended. Alert $0 items during checkout Enable this option to alert you for any $0 price items to avoid losing revenue on some items that are to be priced later. You may use $0 report under Misc for this purpose. Print Barcode on Top If you are using Windows Printing format, you may enable this option to have barcode to be printed on the top. Print Wash & Fold Chart Enable this option to print the Wash&fold chart on wash & fold invoice. Refer to Wash & Fold Section for more info. Print Store address at the bottom If you are using Windows Printing format, you may enable this option to have store address o be printed at the bottom. Enable Date Selection .. Enable this option to be prompted for payment date during customer account payment in Invoice Utility. Print Store# on Barcode Next Lot Tag Color This option adds store id on the barcode for those who have multi store operations to avoid scanning wrong invoice during ready or other scanning process. It also adds special barcode to quick ticket, when scanned from invoice utility it bring up invoice update function auto to save time and avoids errors. If you are using Lot Tag, you may override the next Lot tag color Next Lot Tag Number If you are using Lot Tag, you may override the next Lot tag Number Enable Package Order Use this option if you like TMS to auto break your invoice into multi orders if exceeds max items per invoice in schedule. For example setting Max items per invoice to 6, an invoice with 17 pieces would break the invoice to order 1 with 6 pieces, order 2 with 6 pieces and order 3 with 5 pieces. Customer receives one invoice with all pieces. There are some unknown issues with Stock reports when this option is in effect. Allows you to select different change type during payment processing in Tender Screen Allows you to checkout multi invoices during checkout process Enable multi Change Type Enable Multi Invoice Checkout Disable Quick Checkin Set Invoice Status to Out in Manifest Show Coupon List At Enable this option if you don’t like your associates use Quick checkin. Enable this option to auto checkout invoices when manifest is created, Enable this option to show you all predefined coupons in Tender Copyright © Computer Systems Int’l, TMS 2.4.4 version User’s Manual, August 2015 115 Tender Use Store Default Pickup Time as.. Highlight Special Request Items in checkin Location is Not Required For Ready Set Invoice Status to Ready in Production Use Tracking Tag for Ready Process Screen. Use Management -> system -> Store hours to Setup your store hours and default pickup time for each day and enable this option to print on Invoice Pickup time. Customer’s preference on Starch, Folded would make items with this wordings highlighted. Enable this option if you don’t wish to scan location# during Ready Process. Enable this option to make the Invoice Status Ready when processed in Production. This is useful for Alteration and Shoe Repair Process. Enable this option if your system is using Tracking Tag, so that particular item is set to Ready not the entire invoice. This is most used for Garment Rental operation. Associates & Stores Prompt For Security Pin# Conveyor# Validation Enable Security Camera Don’t Return to Main Screen No Scanner Don’t show Scrolling Status Bar Include Customers without Delivery in Manifest Enable Customer Account Payment At The Front Counter Enable Working Stores Enable this option to be prompted for Pin# for every transaction to increase your system security. Enable this option to check the location# against the predefined Conveyor Locations. To set your conveyor locations go to Management -> Management -> Conveyor Enable this option for the system to use the Webcam to take snapshots when No Sale is used or Checkout is canceled. To see the pictures go to Reports -> More -> History Tracking Enable this option to avoid returning to main screen after each checkin/checkout transaction to avoid entering Security pin# Enable this option if your system is not equipped with Scanner to use the keyboard to enter Invoice#/Location# whenever a scanner is required (e.g. Ready, Manifest etc. ) By default TMS shows your current operation status like Not Ready, Quick Invoices scrolling on the top. Use this option to disable this feature as it might speed up your system performance. Use this option to include all Delivery customers in the manifest report even there is nothing to deliver. Enable this option if you want to allow your staff to process payments for your charge customers. This option is usually disabled for stores with central payment processing. This is mostly used for operations with Central Database when associates work on different stores Enable Assigning Customer ID Use this option if you would like to assign your own customer ID to the customer at the time of creating the customer profile. Only Checkout Scanned Invoices To enhance your system security and reduce human error enable this option to force your staff to scan all orders during checkout process. No invoices are checked out without scanning. Enable this option if you like to allow your staff do a partial checkout for items that are not ready. You may use Quick checkout to avoid going through checkout process. This is most used for prepay operations or Delivery Invoices. In this case enable this option so system allows quick checkout for invoices with Balance. Allow Partial Checkout Allow Unpaid Quick Checkout Copyright © Computer Systems Int’l, TMS 2.4.4 version User’s Manual, August 2015 116 Mappoint Integration If your system is equipped and licensed with Microsoft Mappoint program enable this option to allow you sort the delivery customers base on the address auto and create manifest with Delivery Instructions. See Pickup/delivery manual for more info. Marketing Enable Points Feature Enable Customer Classification Reset Points Include Tax in Point Calculation Use this option to enable system royalty point system. Refer to Marketing section for more info. Enable this option if you wish to classify your Royalty Points customers base on the collected points for higher rewards. If you only have one type of Reward Coupon, enable this option to reset the collected points after coupon is printed. By default taxes are not included in Points calculation. Misc Reverse Search Phone# Phone Search Zipcode Search Enable this feature if you like to use the specified website to find additional info using reverse search to find name, address of the person. . Enter the http link of the website you like to use for Reverse Phone lookup. For example 411.com can be used for USA phone numbers. Find out what is the website that provides such reverse phone# lookup for your area. Use this option when adding/updating customer profile The same ad phone search Copyright © Computer Systems Int’l, TMS 2.4.4 version User’s Manual, August 2015 117 Schedules Price List function includes the updating of prices, items, descriptions of items, schedules, as well as, departments. It is very important that you have a good understanding of these concepts in order to fully utilize your system. The TMS system is designed to handle both retail, Hotel and wholesale business. The system allows the manager to set different prices for different customers. For example, if your plant is serving three different depots and a hotel, then you should be able to select the appropriate price schedule for that particular depot or hotel at the time of invoicing. To do this TMS allows you to add your own schedules, departments, and items and select the right one at the time of invoicing or associate a schedule to a customer. Schedule is the top level of our pricing hierarchy. That is, first the schedule must be set up, and then its corresponding departments and items. Your system is pre-configured with standard price list that should contain most of the items that is used in your business, however, you may use the following method to add, copy, update your own price list. Use the following functions to add, copy and update the price schedule. Add New Schedule Use this function to create your own price schedule. Simply name your schedule, such as “retail price list”, “hotel guest price list”, etc. **Please note if your price list is similar to your existing price list, we recommend you use the “Copy From Schedule” function. Copy From Schedule Use this function to create a new schedule by copying from an existing schedule. Simply select this option and a drop down menu would pop up, and select the proper schedule to copy from. Name your new price list and make appropriate changes to the options, which are explained below. Update Schedule Use this function to update an existing schedule. Simply select the proper and make appropriate changes to the options, which are explained below. Copyright © Computer Systems Int’l, TMS 2.4.4 version User’s Manual, August 2015 118 Schedule Options Schedule Active Checkbox Textbox Checkmark this option to inactivate the selected schedule Schedule Name or Description Payment Pre-Pay Option Enable Partial Prepay Pre-Pay Option –PrePay Discount (%) Enable Partial Payment At Checkout Enable Upcharge Same Day Upcharge To enable pre-pay option menu to popup at the end of the checkin screen Enable this option to allow user staff to make Partial prepay during checkin process. Use this option to add a pre-pay discount to transactions that are prepaid. Enable this option if you would like to be able to accept partial payment at checkout Select this option if you would like the upcharge menu to pop up at checkin after an item is selected. If this option is disabled, you may have to select the upcharge option by pressing the upcharge button at the checkin screen Assign a $value or %value to this option if you would like to upcharge same day service automatically. Check mark Percent option if this is % Copyright © Computer Systems Int’l, TMS 2.4.4 version User’s Manual, August 2015 119 Next Day Upcharge upcharge. Assign a dollar ($ or %) value to this option if you would like to upcharge Next day service automatically. Enable Price Adjustment Enable Price Undercharge Enable this option if you would like your staff to be able to adjust the price on an item in a transaction Enable this option if you would like to enable your staff to undercharge the default price of an item. Invoice Options Print Invoice At Checkin Enable this option if you would like the invoice to be printed automatically after checkin. Number of Invoices To Be Printed Enter the default number of invoices to be printed at the checkin screen. The standard default is two copies – one for the customer and one for the store. Print Receipt At Checkout Enable this option if you would like the payment receipt to be printed automatically at checkout. Disable Printing Price On Invoice Select this option if you don’t want the price to be printed on the customer’s copy of the invoice. Not Print Unit Price Enable this feature if you like upcharge price to be added in the base price, otherwise upcharge price is printed. Select this option if you would like the system to automatically separate the laundry invoice and tags on transactions with mixed dryclean/laundry services. The customer will receive one invoice with both dryclean and laundry but the store would receive two invoices – one for drycleaning and one for laundry. Select this option if you do not want the due date to be printed on the invoice. Select this option if you would like the customer address to be printed on the store copy. This is mainly used for the delivery schedules. Separate Laundry Invoices Disable Printing Due Date On Invoice Print Customer Address On Store Copy Record Who Check Out Enable this option if you would like to record the person’s name who picks up the garment without a receipt. Print Invoice At Check Out Enable this option if you would like to be prompted to be able to print invoices at the checkout. Item Weight round up Print Invoice # Bar Code On Store/customer Copy Print Customer # Bar Code On Store/Customer Copy Use this option to round up the total weight of the bag to closet pound if you are equipped with Digital scale for Wash&Fold items. Select this option if you would like to print the invoice number bar code on the store/customer copy. Select this option if you would like to print the customer number bar code on the store/customer copy. Copyright © Computer Systems Int’l, TMS 2.4.4 version User’s Manual, August 2015 120 Total invoices to be printed Prices Tax Inclusive Conveyor Slip on Store copy Enter total invoices to be printed for Quick and regular invoices. Default is 2. This option is used in countries (like South Africa) that by Law prices include taxes, but taxes have to be shown at the bottom of the invoice. Use this feature to have a Conveyor Slip printed on the store copy. Some customers without wireless scanner or for accuracy purpose tear off the conveyor slip after invoices are placed on the conveyor, location is noted on the slip, and then is entered to the system using Ready function. Tag Options Print Tag At Checkin Print Due-Date-1 On Tag Print Barcode On Tag Print Service Initial On Tag Print Price On Tag Print Due-Time On Tag Enable this option if you would like the tag to be printed automatically at checkin. Select this option if you would like to rush your production staff to process garments a day before the due date or promised date. This option is used to print barcode on Epson TMU22o Tag printer. This feature is not recommended for Tracking purpose as barcoded tags are difficult to read after cleaning process. If you are interested in Tracking Tag system refer to this section of the manual. Inactive – Option would be available in the future. Enable this option if you would like the price of the item to be printed on the tag. This option is useful if you would like to control your drop store’s pricing by just viewing the tag. Enable this option if you would like the promised ready time to be printed on the tag. If you provide 1-hour service, this option would be useful at the production process. Print Detail On Tag Enable this option in order to print the details of the item on the tag. Print Extra Tag Select this option if you would like to get an extra tag printed. Extra tag is useful if you have multiple stores. Attaching the extra tag to the invoice would simplify the sorting process. Tag Prefix If you have multiple stores, you may assign a different prefix to different stores and enable this option to print the extra identification character on the tag. This would simplify your sorting process. Print Laundry Tag Disable this option if you don’t want print tags for laundry items. This option is only valid if you have enabled separate laundry invoice. Otherwise you have to go to each laundry items and disable tag at item level. Print Zero Quantity Tag Enable this option if you would like the tag to be printed for multi-service items, which has zero quantity on the second service. E.g. dryclean pants, which needs to be hemmed. The system would print two tags for this service Enabling this option would print different formats of the standard tag, i.e. it would duplicate the same information that is on the left hand side to the right hand side with no due date. Disable Due Date On Tag Enable Permanent Tag Permanent Tags are referred to Heat Seal Tags with customer id barcoded, and mostly used for Laundry shirts for losing prevention. Enable this option to print this tag auto on Zebra Printer. If you are Copyright © Computer Systems Int’l, TMS 2.4.4 version User’s Manual, August 2015 121 interested in Tracking Tag system refer to this section of the manual. Print Extra ID Tag This option is a customized option used for double tagging purpose. Print Dispatch Tag This option is used to print laundry bag tag id on Epson Thermal printer, or if your system is equipped with Zebra printer, print special tags for hotel invoicing purpose. The permanent Tag printer in TMS config has to be setup to Zebra printer if this option is to print Hotel Dispatch Tag. If your system is set for Tracking Tag feature enable this option to be prompted for pre-printed Heat Seal Tracking Tag for new items during checkin process. For additional info refer to Tracking Tag Section of the manual. f your system is set for Tracking Tag feature enable this option to print Heat Seal Tracking Tag for new items during checkin process on Zebra Printer. For additional info refer to Tracking Tag Section of the manual. Enable this option if your system is equipped with Auto Sorting system like HMC, Metal Progetti, White etc. For additional information contact CSI Enable this feature if you are using your manual tags, and would like to track the tags for x-referencing purpose. If this option is enabled, you will be prompted to enter your tag# in free format. The manual tag id is printed on the invoice and recorded in the database for lookup purpose. You may use Ready function, Lot Tag feature to enter your tag# after checkin process. Use Invoice Utility, then ref# to lookup such tag#. Enable this option If you are using your own Lot Tag and would like to be prompted for next lot tag auto. You may go to System options, Invoice Tab, and override Next Lot Color and Next Lot Tag#. TMS can print Lot tag instead of Invoice# based Tag, for those who are interested in Lot Sorting system. Every 100 items user is prompted and next tag sequence is printed. A-Z lot Tag starts at A00, and advances to next sequence auto. You may reset the starting point by overriding the Lot Tag Value. When reaches Z99, the tag resets back to A00 Lot Tag id is selected base on the selected Due Date, that is each due date has it own Lot Tag. Use the schedule to override the next Auto Lot Tag for each day of the week. Pre-Printed Tracking Tag Tracking Tag Auto Sorting System Enable Free Format Tag Enable Manual Lot Tag A-Z Lot Tag Auto Lot Tag Misc Options Due Date Option At Checkin Enable Detail Option Enable Customer Discount Enable 2 for 1 feature Enable Delivery Option Force Invoice Checked Out at Select this option if you would like the due date calendar to pop up automatically at the end of the checkin transaction. Enable this option if you would like to keep track of the colours, patterns and fabrics of the selected item. If this option is not enabled, you may select this option at the checkin screen by pressing the detail option button. If you like to disable discount for certain schedules, disable this option. TMS has 2 for 1 option that is it charges price of one for 2 items if this option is activated. You also have to enable this option at the itme level or Service Level. Enable this option if you would like to provide pickup/delivery service with this price schedule. Enabling this option would allow you to setup “run/stop” for your delivery customers. Enable this option if you would like to bypass the checkout process for your wholesale accounts. Enabling this option would make the system Copyright © Computer Systems Int’l, TMS 2.4.4 version User’s Manual, August 2015 122 Checkin checkout the garments automatically during checkin process. Business Customers Default Schedule Points Feature Applicable Release form for quick invoices Max Items On Invoice or Quick Invoice Inactive - Option would be available in the future. Max Rush Days Use this option to enable Royalty Points system for certain schedules. Set this option to enable Release form for quick invoices. Enter max items per regular/quick invoice if you wish to restrict this. If packaging option is enabled under System options, TMS breaks the orders auto based on max items per invoice into separate order. Setup rush days to number of days that you consider rush, default is 0. This is used to create rush orders report under Reports -> Transaction report. Services This section defines the services that are provided as part of the price schedule and they are displayed at the top level of your price schedule at the checkin screen. There is no limit on the number of services that can be created. The service defines the top level of the price schedule that applies to certain departments and items. If you only have one service, the Service menu does not show up in Checkin screen to speed up the process. Update Services Select services under “Schedule” to update or modify existing services. Add New Service Select Add New Service if you would like to add a new service to your price list. Copyright © Computer Systems Int’l, TMS 2.4.4 version User’s Manual, August 2015 123 Service Options Below is a summary of the options that can be used with the service. Service Abbreviation Active Priority Hours Capacity Permanent Tag Enable 2 For 1 Tracking Tag Tax1,Tax2, Tax3 Split Same Item % Max Discount Release From Enter Service name, like Dryclean Enter the abbreviation of the service that is printed on the invoice, For laundry service make sure it is LAU as this is used to separate dryclean and laundry invoice. Checkmark this box if this is an active service Set the priority of the service to show up on the service screen The default hours for the due date/time to be used for the selected service. Assign the capacity for your production for the service. This capacity is used at the due date on the checkin screen to alert the user if they are exceeding the specified capacity. This reduces overproduction for a selected service. This is used in Alert Reports under Stock report and scroll status banner. Checkmark this box if you would like the permanent tag option to be enabled for this service. Read Tracking Tag for additional info. Enable this option if you would like the items to be priced as 2 for 1. Enable tracking tag option for this service. Read Tracking Tag for additional info. Enable tax option if selected tax is applicable for the service. To setup different tax options go to Tax Service Use this option if you like to have each item on a separate line so that colors and upcharges for each item listed right below proper item. Enter % Max allowable discount on a service to restrict staff of issuing any discounts that exceeds this amount. Link a predefined release form for a selected Service. Release forms get Copyright © Computer Systems Int’l, TMS 2.4.4 version User’s Manual, August 2015 124 Apply Auto Lot Tag Capacity$ Icon printed on the invoice for customers to sign. See Release form for additional info. Enable this option If you are using Lot Tag for certain services like Laundry. Assign the capacity value for your production for the service. This capacity$ is used at the due date on the checkin screen to alert the user if they are exceeding the specified capacity. This reduces overproduction for a selected service. Capacity$ is common for Alteration service. This is used in Alert Reports under Stock report or scroll status banner. Icon folder path and name to be used for the service. Icons are under \csi\tms\icons folder. Departments/Items This section defines the departments that are provided as part of the price schedule and they are displayed at the second level of your price schedule at the checkin screen. There is no limit on the number of departments that can be created. Copyright © Computer Systems Int’l, TMS 2.4.4 version User’s Manual, August 2015 125 Update Departments Department is used to group certain items under one category to speed up the checkin process. Select Departments under “Schedule” to update or modify existing departments. New Department Select New Department if you would like to add a new department to your price list. Copyright © Computer Systems Int’l, TMS 2.4.4 version User’s Manual, August 2015 126 Add Item/Price Follow steps below to create a new Item. 1. Select Add new item to create a new item, 2. Enter the description and enable the options as explained below. 3. Select Add Item. 4. Select Proper Schedule 5. Select Proper Service that item is listed under (i.e Dryclean) 6. Enter the price, and select proper options as explained below; 7. Select Add Price to create a new price for the item. 8. You may repeat step 4-7 if you like to add different prices for the same item under different Schedule or Service. 9. As Items/Prices are added they show up in Price List menu. Item Description Enter the name/description of the item Active Checkmark this box to make the item active to appear on the item list in the checkin screen. Priority Assign a priority value which determines the position of the item in the item menu. 1 is the highest priority. Enable this option if you like to be prompted for a unit option. For example if this is for a Pleated Drapes, and you charge per pleat, enabling unit option you will be prompted for total pleats. Enable this option if you like Detail/Upcharge screen to popup for this item. Enable this option if this is a Tracking/permanent Tag item. See Tracking Tags for more info Enter the number of pieces associated with this item. For example if this Unit Option Detail Option Tracking/Permanent Tag Pieces Of This Item Copyright © Computer Systems Int’l, TMS 2.4.4 version User’s Manual, August 2015 127 UPC/SKU Prompt Price Inventory Option Discount Applicable Release Form Applicable Scalable Gift Card Add Item a 2 PC Suit , make this 2. Enter UPS/SKU barcode if this is a retail item. You can simply scan the barcode during checkin process to auto to select the item. Enable this feature to be prompted for item price, if is not a fixed price. Enable Inventory option is this is a retail inventory item. Use Inventory menu under Management to define total on hand, and reorder point for this item Enable this option if you like to allow manual discount on this item. Enable this option if you like Release Form that is linked with the service for this item be printed auto during checkin process. This option triggers the system to read The Digital Scale during checkin process to calculate the total weight of the item. This is mostly used for Wash & Fold items. Make sure to enable Wash & Fold option. If this item is a Gift Card enable this option and enable Inventory Item. Gift cards are sold as retail items. When sold during checkin process triggers the system to call TPI to activate the gift card. See Gift Card Processing for additional info. Select Add item to create a new item as described above. Add Price Schedule Select the schedule from drop down menu Service Make sure to select proper service that item will show up under, (e.g Dryclean) Price Enter the actual price of the item. Discount% Enter Discount% of this item is discounted Hours Required Enter Total hours required to the service which is used to figure out the due time/date. Select Proper tax option if this item is taxable Tax1, 2 or 3 Applicable Disable Upcharge Cost$/% Prompt Price Disable Tag Add Price Enable this option if this item is not upcharable. Enter your total cost for this item in $ or % to help you figure out the total occurred cost to this service. You may use Sales Journal report to figure out the cost if you are paying someone to do the service, like wholesale Enable this feature to be prompted for item price, if is not a fixed price. Enable this option If you like to disable printing Tag for this item. Select Add price to create a new price list for this item. Copyright © Computer Systems Int’l, TMS 2.4.4 version User’s Manual, August 2015 128 Update Items Update items is used to make changes to the existing item description, options, price or add a new price for the same item under different service or schedule. Follow steps below to update Item. 1. Select proper Department/item form the menu. 2. Select Update item. 3. Make changes to the Description, or options as it was explanted in Add Item. 4. If make changes to the price, select Price, override it and select Save Price Changes. 5. If you are adding a new Price for the same Item under different schedule or Service, select proper schedule/Service, enter price then Select Add Price. Copyright © Computer Systems Int’l, TMS 2.4.4 version User’s Manual, August 2015 129 Prices Prices group is designed to allow you to create a new price, Update existing prices or upcharges. Add New prices Select Add New Price if you like to add a new price for an existing item under different schedule, service or department. Update Prices Select this option if you like to change prices for a particular item under certain department/service. Follow steps below to make such changes. 1. Select Prices 2. Select Proper Schedule (i.e Retail Price) 3. Select Desire Service (i.e Dryclean) 4. Select Desire Department (i.e Coat) 5. Select the price field, and override the existing price. 6. Select Save to save changes. Copyright © Computer Systems Int’l, TMS 2.4.4 version User’s Manual, August 2015 130 Upcharges The Upcharge menu is designed to allow users to charge extra on certain items during checkin process. Upcharge menu is part of the color/detail menu that pops up auto if it is applicable. To enable upcharge go to Management -> system options -> schedule Select upcharge option if you like to update an existing upcharge or add a new upcharge item. If you like to add upcharge to one particular service, department or item select the desire option or select existing upcharge select Add Upcharge. Upcharge can be $value or %. If you like to update an existing upcharge, select the upcharge from the list, scroll to the right and select Applies to. Then select the desire service, department or item. Copyright © Computer Systems Int’l, TMS 2.4.4 version User’s Manual, August 2015 131 Tax Use Tax option to create a new tax schedule. You may add your own tax table that might apply to certain items/services. Please note, once a tax is changed, you may not modify your existing system tax, you have to add a new tax table and apply that to the existing store. Follow steps below to add a new tax schedule: 1. Go to Management and click on System. 2. Select New Tax Settings 3. Enter Tax values as desire. You may add up to three different taxes. Tax3 is usually used as the environmental fee. You may apply this tax as a value and as per invoice. 4. Select Save 5. Select Apply to Store 6. To enable/disable taxes on certain services, please see the Services section. 7. Some States/Provinces require Tax number to be printed on the invoice. Enter your tax number under proper tax option. 8. Some State/provinces require tax1 on top of tax3, in that case enable option tax1 on tax3. 9. If certain items are not tables, go to items menu and disable tax option. 10. Select Next or Previous to view other tax schedules. Copyright © Computer Systems Int’l, TMS 2.4.4 version User’s Manual, August 2015 132 Tender Type Your system is pre-configured with most tender types. You may enable/disable certain tender types that are not used within your operation. To do this, go to Management and click on System. Select Tender Type. TMS supports Online Authorization for Credit/Debit/Gift card using TPI program. TMS also supports Laundry Card using Card Concept for Laundromat operations. For additional information please visit CSI website. The following is the summary of each option: System Authorization Tender Name The name of the tender type (i.e. Visa) Active Disable this option is this tender type is not used within your operation (i.e American Express) Coupon Enable this option If you like to use Coupon as a tender Type and name it Coupon. If you like to be prompted for predefined coupons in coupon table, go to System Options and enable ‘Show Coupon List at Tender’. Credit Card Enable this option if this is a Credit Card (e.g Visa, M/C) Copyright © Computer Systems Int’l, TMS 2.4.4 version User’s Manual, August 2015 133 Debit Card Enable this option if this is a Debit Card (e.g Debit). For systems that are equipped with Debit Pinpad and online authorization this is a must option. Gift Card Enable this option if this is a Gift Card and your system is equipped with online authorization for gift cards. Open Till At Tendering If Cash Drawer is to be opened during the tendering process. Allow Over Pay If over paying is allowed for this tender type, e.g. Cash. If overpaying is not allowed, the only less or exact amounts are allowed. Charge Type This is internal flag used by system for House Charge Tender Type. Is this a Refundable Type This is internal Flag used by system. Allow As Default Payment Type If Yes, it would be set as default tender type when creating customer profiles. If it is mandatory to enter a number when using this type If card information is to be entered when this tender is selected. This is not recommended for security reason. If your system is equipped with online authorization program this is done auto. Enable Online Authorization If this tender is used for an online credit card authorization system. If you are not allowed to activate this option contact CSI to purchase this feature. Processor This is not used any longer, and not required. Merchant Number This is not used any longer, and not required. Debit/Credit TID This is not used any longer, and not required. Copyright © Computer Systems Int’l, TMS 2.4.4 version User’s Manual, August 2015 134 Job Classes Job class defines the authority level for each employee. To set up the different access levels, go to Management and the System drop down menu. Select Job Classes. If you want to update an existing job class, click the name and make the appropriate changes. If you want to create a new job class, click Add New Job Class, Enter Job-class title under Role (i.e Administrator) and enable proper option. You should setup different job-class like Manager, Clerk, etc with different authority level. Job Classes Screen The following is the summary of each option for the job class screen: System Authorization Allow Login from all stores This is used for customers with a multi store operation with a central database. Check mark this option if you like your staff to be able to logon from any stores regarding the working store in their profile. Allow Exiting system Checkmark this box if this employee can exit the system to Windows desktop. For security reason you may want to disable this option. Copyright © Computer Systems Int’l, TMS 2.4.4 version User’s Manual, August 2015 135 Enable Opening cash drawer Checkmark this box if this employee is allowed to open the cash drawer for no sale option. You may get a report of No sales under History Tracking report. Allow Accessing Memorized Trans This option is used for Mat Rental to allow staff to access Memorized Transactions. Enforce To Clock In If you like to track employees time sheet, enable this option to enforce staff to clock in and clock out Login by Pin#/Finger Printer Reader Enable this option to allow staff to use either Pin# or Finger print to access the system. Logon Only by Finger Print If your system is equipped with Finger print/biometric reader enable this option to make your system more secure. That is staff with this job class can only access the system using Finger Print/Biometric reader. Customer/Invoice Authorization Allow Updating customer profile Checkmark this box if this employee is allowed to update the customer profile. Allow Giving Discount to the customer Checkmark this box if this employee is allowed to give discounts to customers. Allow updating customer account payment Checkmark this box if this employee is allowed to update the customer payment method, Tax Exemption etc. Enable updating Invoices Checkmark this box if this employee is allowed to update and make changes to invoices. Enable voiding Invoices Checkmark this box if this job-class is allowed to void invoices. Enable Refunding Invoices Checkmark this box if this job-class is allowed to refund invoices. Allow associate to checkin customer with over Credit Limit Allow Manual Discount Enable this option if this job-class is allowed to checkin a customer who is over their credit limit. Allow Updating customer discount profile Enable Account Payment Checkmark this box if this employee is allowed to update the discount option in customer profile. View Invoices that are checkout This feature is used by some to disallow staff view invoices after being checked out. Why? Enable this feature, If you wish to allow manual $, or % discount to be given by this job-class. Enable this option to allow staff process account payment in Invoice Utilities. Copyright © Computer Systems Int’l, TMS 2.4.4 version User’s Manual, August 2015 136 Allow Restock If invoices are checked out by mistake you may use Restock option under invoice Utility to put it back into inventory. Enable this option to allow restocking. Back Office Authorization Enable using Back Office Management Set this option to allow this job-class to access back office section. Enable modifying system options Checkmark this box if this employee is allowed to modify system options. Enable Creating reports in management Checkmark this box if this employee is allowed to create reports in Management. Enable creating end of day report Enable this option if employee is allowed to Create End of Day reports. Allow redoing End Of Day Enable this option to allow managers to redo/reopen store if store/shift was closed by mistake. Allow selecting dates at reports Checkmark this box if this employee is allowed to select dates on reports otherwise only current date can be selected. Allow editing time sheet Checkmark this box if this employee is allowed to edit the Time Sheet to adjust the hours. Allow viewing time sheet Checkmark this box if this employee is allowed to view the Time Sheet under Reports. Allow approving time sheet Checkmark this box if this is a manager job-class and allowed to approve the Time Sheet to for others. Enable modifying management Checkmark this box if this employee is allowed to access management section of the back office. Enable Reports By Associates Disable this option if you don’t want to allow staff to view each others report. Hide cash At End of Day For security reason you may want to enable this option, that’s staff closing the store/shift without knowing the total on-hand. During end of day process total cash in till is reported, and manager is responsible to balance. This feature is used to prevent staff from manipulating the cash on hand. Copyright © Computer Systems Int’l, TMS 2.4.4 version User’s Manual, August 2015 137 Paycode Paycode is a special customized payroll codes . It is not available for general use. Store Hours Store hours used to calculate the due date/time during Checkin process based on the service and store hours of operation. System uses Pickup time to print the pickup time on Invoice. If store is closed for any day of the week like Sunday simply checkmark Close option. If store is open but there is no Service operation remove Check mark on Service. If there is Holiday like New Year, check mark Close option for the desire day. Tools Tools is a group of back office management functions to help you to do certain tasks that are explained below: Copyright © Computer Systems Int’l, TMS 2.4.4 version User’s Manual, August 2015 138 Change Prices Use Change Prices to adjust prices, apply discounts or setup cost auto for selected Schedule, Service or Department, Follow steps below: 1. Check mark the desire Schedule, Services and Departments. You may select All to check mark all. 2. Enter the $ value or % into Change field. If you like to decrease the price enter negative number (i.e -5%). 3. Select the rounding to option 4. Select by value or % option to increase or decrease the prices. 5. Select Change Price to apply changes. . If you wish to enter cost for selected items, enter the cost % and select Save Cost. If you like to apply certain discount to certain items, check mark the items, enter discount%, and select Save Discount. In the following example, Selected Dryclean, Laundry, Household, adn press only items are increased by 10% and rounded to closed Quarter. Delete Obsolete Transactions TMS uses Microsoft SQL database engine for transactions. There could be performance issues as the database grows. If you feel performance drop on your system, use this tool to delete the obsolete transactions that are no longer required. You should keep 1-2 years transactions for audit purpose, but delete checked out, invoice with no balance transactions to make sure your system is running smooth and error free. Use the following steps to perform this function: 1. Make sure to backup database 1st. 2. Select desire store from Store list (top left) 3. Select the ending date (default is one year) Copyright © Computer Systems Int’l, TMS 2.4.4 version User’s Manual, August 2015 139 4. Check mark delete invoices with balance and/or invoices that are still in (Only if you like to delete old invoices with balance and/or In status ) 5. Enter password 11182000yiyi 6. Select Start to Delete 7. Deleted records are displayed on the status window. 8. Depending on the size of your database this process might takes few hours. Make sure to do this operation after store hours and do not interrupt the process. Delete Manifest Use this function to delete manifest transactions that are saved through Manifest process. Select manifest# from drop down menu. Delete Inactive customers Use this function to delete customers who have not used your services since selected date. Enter password 11182000yiyi to confirm this. Undo Account Payment Use this function to delete undo a payment that was applied to charge customer by mistake. 1. Enter customer# 2. Enter invoice# 3. Select Search 4. Check mark the payment and invoices that was applied to 5. Press Undo Payment Merge customers This feature is used to merge 2customer’s profile and related transactions into one. The system merges transactions; points collected and related preferences into the older customer id. (e.g if two customers 110, and 1202 are selected for merge function, all transactions from customer id# 1202 are merged into customer 110). Download new update from internet If you are on our support program, you may use this link to download the latest update from out website which is always available on the following link which is password protected. Password is sent to customers who are on our support program or their system is still under initial support program. For additional information on CSI support program, please visit our website. When installing new update always start with your server 1st. Once server is updated, stations can download the update auto. Always check the website for latest news and upgrades. http://www.computersystemsint.com/download/tms_update.exe Financial Charges This tool is used to make financial charges like interest on overdue invoices for charge customers auto. Use the following process to make the charges: 1. Select one or more customers from the list or enter customer name, id into the search option and select Search to find the customer. 2. Select All if you like to charge all customers listed in the search screen. 3. Enter memo that will be printed on the statement for the charges (i.e Interest charges) 4. Enter % amount that you like to apply to the invoices that overdue base on select Days. 5. Select Process to make the charges. 6. The final result is shown on the screen, press Print to make a copy for audit purpose. Copyright © Computer Systems Int’l, TMS 2.4.4 version User’s Manual, August 2015 140 Please note, system will create a debit note into customer profile, and will be shown on the statement. License TMS license is required to be renewed once a year. The users get prompted 2 weeks in advance to make sure there is enough time to do this process. Please don’t ignore this warning, and renew your license before it gets expired. You may simply email the registration code, or call your local support to renew your license. This is a required process to make sure we are in touch with our customers at least once a year, prevent illegal copy, and make sure the system is running properly. Use this tool to view your license expiry date, add additional client licenses or renew your license. Backup Database See backup database section under Misc for additional info. Index Database As your database grows, you may find system performance drop in some systems. Use this process to speed up your system and keep your system running properly. TMS Config TMS configuration file is used to configure the Server/Client Computer on how to access TMS database, and the following hardware devices/processes: 1. Invoice, Tag, Tracking Tag, Narrow and Wide report printer. 2. Proxy set up for Credit Card Processing program 3. Debit Pinpad 4. Digital Scale for Laundromat operation 5. Cash Drawer 6. Pole Display 7. Conveyor 8. Camera 9. Transaction Overlay Printer For additional information on how to setup TMS configuration file, see TMS Installation guide. Copyright © Computer Systems Int’l, TMS 2.4.4 version User’s Manual, August 2015 141 Specials Specials tool is used to create a special price for a selected item from a Schedule, Service, and Department within certain period. Use the following process to create such Specials. 1. Click on the Schedule from schedule drop down menu. 2. Click on the desire Service (i.e Dryclean) 3. Click on the Department (i.e Pants) 4. Click on the Item that is on Special 5. Enter The Special Price. 6. Enter the Start/End Date. Please note after Expiry date, the Special item price will be reset back to regular price. 7. Use the item from Special List on the top screen to delete the specials. Redeem Points See eMakreting section for additional info. Customer Classification See eMakreting section for additional info. Copyright © Computer Systems Int’l, TMS 2.4.4 version User’s Manual, August 2015 142 Management Employees To setup employees, go to back office Management -> Management drop down menu. Click on Active Employees and a sub menu opens up. To add a new employee, click on the first item that says Add New Associates. Make sure to assign a proper job class for the employee. Enter the name, address and identification information for the new employee. Click the Save Change button to Add the employee, or the Reset button to clear the form. Select Home Store and Working Store# if you have multi store operation with central database to allow associates to work at particular store. For payroll/time sheet purpose select the Manager from drop down menu Assign a security Pin#, and Confirm pin#. For Associate Id# enter a 6 digits number, if that are less than 6 digits, left pad it with 0. If your system is equipped with Finger Printer/Biometric reader, have associates register their finger using the finger print icon. Staff who have not registered their finger print may do so through login process. Remove Active check mark if this employee is no longer active. Select Inactive Employees if you like to reactivate or view such employee. Copyright © Computer Systems Int’l, TMS 2.4.4 version User’s Manual, August 2015 143 Conveyors Conveyor table is used to configure your conveyor. This setting is used to display the name of the conveyor for the selected Conveyor location during Ready and Checkout process. If your system is setup with Conveyor Controller It is also used to move the appropriate conveyor during checkout process. For additional information on Conveyor Controller please visit CSI website. To validate the conveyor location during Ready function, you may enable option called ‘Conveyor# Validation ‘ in Management -> System option. Name - Lists the name of the conveyor here. From - Lists the start number for the conveyor. To - Lists the end number for the conveyor. Active - Checkmark this box to make the conveyor active. Add New Conveyors To setup a new conveyor, enter the following information: Conveyor - Enter a conveyor name. Start ID - Enter the start number for this conveyor. End ID - Enter the end number for the conveyor. Wash & Fold See Wash & Fold section for additional info. Production See production under Ready process for additional info. Copyright © Computer Systems Int’l, TMS 2.4.4 version User’s Manual, August 2015 144 Special Request You may add your own special request or memo to pop up when adding Memos in checkin, entering Void Reasons during void/refund, opening till during no sale transactions, and Paidout. To do this, go to Management and click on System. Select Management, and click on Special Request. Special Request Screen Special Request Settings Reason For Voiding/Refund Memo in Check Reason For open cash drawer Reason For Paidout Reason For Debit Reason For Financial Charges Enter your own text for any of the following pop-up menus. This memo is used during voiding/refunding process. Use this option to add your own memo when selecting Memo function during checkin process. e.g Shorten 2” Add your own memo when No Sale option is used to open cash drawer. e.g Get Change This memo is used during paidout process. E.g Postage Used when adding credit/debit in Invoice Utility Used when creating financial charges under Management -> system -> tools Copyright © Computer Systems Int’l, TMS 2.4.4 version User’s Manual, August 2015 145 Greetings/Conditions Use this option to add your own greetings, special promotion or conditions to be printed on customer’ invoice auto. Pole Display message If your system is equipped with optional Pole Display, use this option to add your own greetings, special promotion or welcome message. For additional information on supported Pole Displays visit CSI website. Delivery Settings Delivery settings is used to define your route delivery run#/stop#, and sort the customer stop# using Microsoft Mappoint or manually. For additional information see our Pickup/Delivery manual. Sales Sales table is used to keep track of the Sales person that can be assigned to certain customers or invoices during checkin process. Simply Select New Sales, Enter Sales person’s name, address and commission%. To make changes, select the Sales Person name from the list. During checkin process, Select Misc, Sales, and select the sales person from drop down menu, or Go to customer profile, Notes, Sales Person and add the sales Person for the customer. This is used to create reports under Reports -> Sales Commission Report. Copyright © Computer Systems Int’l, TMS 2.4.4 version User’s Manual, August 2015 146 Release Form Release form is used to create your own release form/conditions to be printed auto or on demand on invoice to protect you from a potential claim by customer when certain services /garments are done. Select New Release Form to add your own release form, or select he predefined release form to make any changes. Use Service function under Management -> System to link the release form to particular service. Check mark Release Form Applicable under Items in Management -> System to have release form printed auto when certain items are checked in. Use Release form icon, under Details Screen during check in process to manually select a release form to be printed on invoice. Email Config Email config is used to setup your email settings for email/ eMarketing. See eMakrekting for additional info on how to set up/configure your email server. Copyright © Computer Systems Int’l, TMS 2.4.4 version User’s Manual, August 2015 147 Company Department Company department is used to create a list of related departments that are linked to customer’s profile for hotel type operation. System uses the company department to add additional information on customer’s tracking tag for sorting purpose. To assign a dept to customer, go to customer profile, under Basic options, select Dept, and use the drop down menu. Inventory TMS supports merchandise sell , and tracks your inventory for each store. Use Inventory function to add your inventory items that are defined in Items table. For such items to show up under Inventory make sure the item ‘Stock’ option is checked. To add your inventory, simply select store from the list, and the item from your item list or scan the SKU#, then enter total on hand, and reorder point. If Total On Hand is 0, no sell is allowed, unless ‘Allow Over limit Sell’ option is checked. You may use Reports -> Stock report -> Merchandise report to get your inventory list. You may use Misc -> Merchandise Tags to make your own SKU barcode labels. Copyright © Computer Systems Int’l, TMS 2.4.4 version User’s Manual, August 2015 148 Payroll Payroll is used to view, create and adjust timesheet for employee working hours. Payroll provides the following feature: Daily Time Sheet Daily time sheet is used to create a daily time sheet report for all employees for selected date. It displays clock in/clock out and break hours in summary format. Select the desire date. 1. Select Retrieve. 2. You can only view employees’ timesheet if your job-class is allowed to do so. Time Sheet Detail Time Sheet Detail is used to create a daily detailed time sheet, make adjustments and accept time sheet for all employees on selected date. Usually one week interval. To be able to retrieve the time sheet for other employees, you have to be setup as their manager. To do so go to Employee’s profile and assign manager. Use the following method to adjust a time sheet. 1. Select from/to Date 2. Highlight the employee and select Retrieve 3. Select the time sheet row that you like to adjust by highlighting the row. The row changes to Orange color allowing you to edit the row. 4. Go over the Date, Clock in/Clock out field and make changes. Select Accept to accept and save the time sheet row. As hours are accepted, Total changes to Red color and Approved total is changed. 5. Select Add to add a new row in case staff forgot to clock out. 6. Select Delete if you like to delete a time sheet row that was added by mistake. 7. Select Print to print the time sheet. Copyright © Computer Systems Int’l, TMS 2.4.4 version User’s Manual, August 2015 149 Time Sheet Summary Time Sheet Summary is used to create a summary report for all employees approved/unapproved time sheet during selected period. 1. Select Start/End Date 2. Select Approved if you like to see only approved hours 3. Select un-approved if you like to see only un-approved hours. 4. Select Retrieve to create the report. Copyright © Computer Systems Int’l, TMS 2.4.4 version User’s Manual, August 2015 150