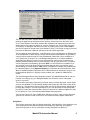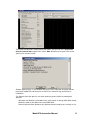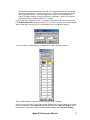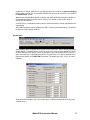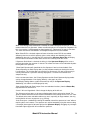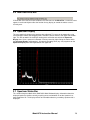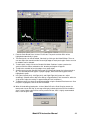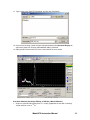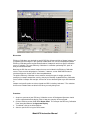
1
Instruction Manual
Model 970
Portable Radiation Spectrum Analyzer
Berkeley Nucleonics Corporation 2955 Kerner Blvd., San Rafael, CA 94901
Phone: 415-453-9955, Fax: 415-453-9956, Email: [email protected], Web: www.berkeleynucleonics.com
Firmware Release
Software Release 2.1.3
Manual Version 1.0
© 2013 All rights reserved.
Printed in U.S.A.
WARRANTY
Berkeley Nucleonics Corporation warrants all instruments, including component parts, to be free from defects in material and workmanship,
under normal use and service for a period of one year. If repairs are required during the warranty period, contact the factory for component
replacement or shipping instructions. Include the serial number of the instrument. This warranty is void if the unit is repaired or altered by
others than those authorized by Berkeley Nucleonics Corporation.
IMPORTANT! PLEASE READ CAREFULLY
NOTIFICATION OF COPYRIGHT
THE FIRMWARE IN THIS DEVICE IS PROTECTED BY COPYRIGHT LAWS AND INTERNATIONAL TREATY. YOU MUST TREAT THE
FIRMWARE LIKE ANY OTHER COPYRIGHTED MATERIAL. COPYRIGHT LAWS PROHIBIT MAKING ADDITIONAL COPIES OF THE
FIRMWARE FOR ANY REASON OTHER THAN SPECIFICALLY DESCRIBED IN THE LICENSE BELOW. YOU MAY NOT COPY THE
WRITTEN MATERIALS ACCOMPANYING THE PRODUCT.
Table of Contents
Table of Contents ..............................................................................................................................i
1
Introduction ................................................................................................................ 1
1.1
Model 970 System Requirements.............................................................................. 1
1.1.1
Model 970 Technical Specification ............................................................................ 1
1.2
Hardware Description and Controls........................................................................... 2
1.2.1
Front Panel ................................................................................................................ 2
1.2.2
Rear Panel ................................................................................................................. 2
1.2.3
Battery Compartment................................................................................................. 3
1.3
Powering the Model 970 ............................................................................................ 3
1.3.1
AC Power Supply....................................................................................................... 3
1.3.2
Charging the Internal NiMH Batteries ........................................................................ 3
1.3.3
Using Alkaline Batteries ............................................................................................. 4
1.3.4
Alternative External Power ........................................................................................ 4
2
General Operation ..................................................................................................... 5
2.1
Initial Start Up ............................................................................................................ 5
3
Functions,Controls, and Displays .............................................................................. 8
3.1
SNAP-MCA Main Window ......................................................................................... 8
3.2
Menu Bar ................................................................................................................... 8
3.3
Button Bar ................................................................................................................ 16
3.4
Hardware Status Bar................................................................................................ 17
3.5
New User Hints Bar ................................................................................................. 18
3.6
Spectrum Display..................................................................................................... 18
3.7
Spectrum Status Bar................................................................................................ 18
3.8
Acquisition Controls and Indicators ......................................................................... 19
3.9
Spectrum Smoothing ............................................................................................... 20
3.10
Button Panel ............................................................................................................ 20
4
Using the Library Editor ........................................................................................... 29
5
Using MCS Mode..................................................................................................... 32
5.1
Menu Bar ................................................................................................................. 32
5.2
MCS Acquisition Controls and Indicators ................................................................ 33
5.3
MCS Analog Panel................................................................................................... 35
6
Procedures............................................................................................................... 36
6.1
Calibrating a Detector with Model 970..................................................................... 36
6.2
Adjust Hardware Settings ........................................................................................ 36
6.2.1
Radiation Source and Detector................................................................................ 36
6.2.2
Input and Polarity ..................................................................................................... 37
6.2.3
High Voltage ............................................................................................................ 37
6.2.4
Threshold ................................................................................................................. 37
6.2.5
Coarse Gain and Fine Gain ..................................................................................... 37
6.2.6
Shaping Time........................................................................................................... 38
6.2.7
Determining Initial Hardware Settings ..................................................................... 38
6.3
Perform Energy Calibration ..................................................................................... 39
6.4
Perform a Shape Calibration ................................................................................... 42
6.5
Create a Regions of Interest (ROI) Set.................................................................... 43
6.6
Performing an Efficiency Calibration........................................................................ 46
6.7
Fine Tuning Hardware Settings ............................................................................... 48
7
Support Programs.................................................................................................... 49
8
Specifications........................................................................................................... 50
Model 970 Instruction Manual
i
Introduction
Thank you for purchasing a Model 970 Portable Multi-Channel Analyzer (MCA). A lot of time and
effort was spent trying to make the Model 970 hardware, software, and this manual, as userfriendly and error-free as possible, but we cannot guarantee that no mistakes or omissions are
present. All software (and manuals, for that matter) are “works-in-progress,” and will be updated
from time to time. These updates will be posted on our website,
http://www.berkeleynucleonics.com, where the most recent versions can be downloaded. There is
also a link to the Model 970 support website under the Help menu.
If you find any errors or omissions or would like additional features in the instrument, please let us
know.
1.1 Model 970 System Requirements
Pentium-II computer with at least 64 MB of ram and available high-speed serial port (16550
UART or higher), running Windows™ 98 or higher. (An available USB port is also acceptable if
USB-to-RS232 adapter is used.) Monitor with resolution of at least 800 by 600 pixels.
This software has been tested on Windows 98, ME, NT, 2000, XP, and Windows 7.
1.1.1
Model 970 Technical Specification
•
Internal 4096 channel successive approximation analog to digital converter.
•
Internal positive High Voltage supply, variable from 0 to 2000V. Negative High Voltage
supply is also available.
•
Model 970 accepts positive, negative, or pre-shaped (positive) pulses. Pulse heights
should not exceed approximately 5 volts.
•
Uses 110VAC or 220VAC to 12V DC adapter (1.25A), or runs on 6 internally recharged
NiMH “AA” batteries. Rechargeable battery life is approximately 4 hours, but will vary
considerably based on the power requirements of the specific detector used. Battery
charging circuitry can be suppressed via a switch in the battery compartment to allow the
use of standard alkaline batteries.
•
± 12V DC power for preamplifiers is available through the 7-pin mini DIN connector. This
connector can also provide +5V DC as well as logical outputs controlled by the software’s
alarm functions.
Model 970 Instruction Manual
1
1.2 Hardware Description and Controls
1.2.1 Front Panel
1. On/Off Switch.
2. Power On LED. Glows red when the Model 970 is powered on.
3. Charge Mode Switch.
Slow Charge: Internal NiMH batteries are recharged using a trickle current which will
fully charge depleted batteries in about 14 hours and safely maintain them at full capacity
indefinitely.
Fast Charge: Internal NiMH batteries are undergoing a fast charge. Batteries will be fully
charged in about three to four hours. Unless a fast charge is required, this switch should
be left in the Slow position to maximize NiMH battery life.
4. Fast Charge Indicator LED. Glows green when Fast charge is in operation. This LED
turns off when the fast charge is complete, indicating that the Charge Mode switch can be
set back to the Slow position.
5. External Power Indicator LED. Glows red when external power is connected,
regardless of whether the 970 is powered on or off.
6. SHV Connector. This provides the High Voltage output only for INPUT2 (i.e., will not
accept a coupled signal).
7. BNC Connector. This provides the signal input only for INPUT2 (i.e., does not carry High
Voltage).
8. Series “C” Connector. This provides High Voltage and accepts coupled signal for
INPUT1.
9. Mini DIN-7 Connector. This provides ±12-volt power if needed for detector preamplifiers.
Also provides + 5 volts as well as logical outputs coupled to ALARM0 and ALARM1 in the
Model SNAP-MCA software.
10. DB9 Connector. Communication port for connecting the 970 with a controlling device
(e.g., computer).
1.2.2 Rear Panel
1. External Power Input. Accepts 12VDC at 1.25A. Input voltage should never exceed
15V, as damage to the Model 970 could result.
2. Fan. The fan runs anytime the 970 is connected to external power. It does not run (and is
not needed) when running on batteries.
Model 970 Instruction Manual
2
1.2.3 Battery Compartment
1. Battery Type Selection Switch.
Recharge position: Allows NiMH batteries to be charged.
Standard position: The battery charging circuitry is disabled so that non-rechargeable
alkaline batteries can be kept in the Model 970 while it is connected to external power
1.3 Powering the Model 970
1.3.1 AC Power Supply
A 110VAC or 220VAC to 12VDC power supply is provided with the Model 970. If you need to
replace this for some reason, make sure the output is regulated 12VDC, capable of delivering at
least 1.25A continuous current. The center pin is positive. Under no circumstances allow greater
than 15VDC (or any AC voltage) into this connector, or damage to the Model 970 will likely result.
1.3.2 Charging the Internal NiMH Batteries
The 970 uses six “AA” 1800 mAh nickel metal hydride (NiMH) batteries. These are charged at
either a slow or fast rate, determined by the position of the Charge Mode Switch. Generally
speaking, it is preferable to charge these at the slow rate whenever possible. When charging for
the first time, use the Slow Charge method. This will help extend the lifetime of the NiMH
batteries. In the slow charge mode, completely drained batteries will be fully charged overnight, or
in approximately 14 hours. In Fast Charge mode, completely drained batteries will be fully
charged in three to four hours.
In order to fast charge the batteries, the Charge Mode Switch must be in the Fast position. If the
position of this switch is changed to Fast while the Model 970 is connected to external power, the
970 must be switched from the Off to the On position, or the External Power connector must be
unplugged from the 970, and plugged back in again in order to initiate the fast charging
sequence. When fast charging, the Fast Charge Indicator LED will glow green and will turn off
when the Model 970 senses that the batteries are fully charged. At the end of the fast charge
sequence, the Model 970 reverts to slow charging to maintain the charge in the batteries. Make
sure to change the Charge Mode Switch to the Slow position to prevent initiating a new fast
charge sequence on batteries that are already fully charged.
A fast charge should never be initiated when the batteries are cold. Allow them to warm up to
near-room temperature before initiating a fast charge sequence to prevent damaging the
batteries.
The NiMH batteries should power the 970 for about four hours. Note however that this figure can
change dramatically based on the current draw of the detector, High Voltage, other Hardware
Settings, ambient temperature, and age and condition of the batteries.
The expected useful lifetime of NiMH batteries under the best of circumstances is about one year.
Do not attempt to charge NiCad batteries in the Model 970. Doing so will damage the
instrument.
There is no problem with using the 970 while charging the batteries.
Model 970 Instruction Manual
3
1.3.3 Using Alkaline Batteries
It is not a problem using non-rechargeable batteries in the Model 970. Remove the four screws
on the Rear Panel and replace the NiMH batteries with AA alkaline batteries. However, you must
be absolutely sure to switch the Battery Type Selection Switch to the Standard position to
bypass the 970’s internal charging circuitry. Failure to do this may result in catastrophic
damage to the Model 970. Switch back to the Recharge position when NiMH batteries are
reinstalled.
1.3.4 Alternative External Power
If the Model 970 is being operated far from an AC power source for extended periods (i.e., longer
than the internal NiMH batteries can support), then it can also be powered from a number of other
external sources. All that is required is that a DC voltage in the range of 12 to 15 volts is provided
to the unit. If the NiMH batteries will be fast charged by this power supply, then at least 1.25A
must be available. If the NiMH batteries will be trickle charged by this power supply, then at least
750mA must be available. If the battery charging circuitry is bypassed, then at least 600mA must
be available.
DC power from most motor vehicles can meet these specifications, and the 970 can be powered
directly by a motor vehicle cigarette lighter adapter.
The center pin of the External Power Input is positive. Incorrectly applying voltage to the Model
970 will likely damage it.
Model 970 Instruction Manual
4
2 General Operation
The Model 970 hardware and SNAP-MCA software are designed to connect the 970 to a
computer as painlessly as possible. The 970 must be connected to a serial port via a serial cable.
The computer must be using Windows 98, Windows 98 SE, Windows ME, Windows 2000,
Windows XP, or Windows 7. The COM port must utilize a 16550 (or higher) high-speed UART;
this is standard on virtually all Pentium (and higher) class motherboards. Alternatively, an RS232-to-USB adapter can be used; just make sure the adapter’s drivers have been properly
installed before trying to use it.
It is not strictly necessary to have the Model 970 connected to start the software. If a 970 is not
found, you will be given the option of starting in Offline Mode. Should you start by doing this,
there won’t be much to see or do with the software other than load previously acquired spectra (a
couple have been included with the installation package).
2.1 Initial Start Up
1.
2.
3.
4.
5.
6.
7.
Load the SNAP-MCA software.
Attach the Model 970 to the computer via the serial connector.
Connect the detector to Input 1 or Input 2.
Plug in and power on the 970.
Start the software. SNAP-MCA searches all COM ports for the 970 automatically.
A detector must be entered before the 970 can be opened. Many of the 970’s calibration
files are tied to the specific 970/detector combination.
Click the OK button.
Model 970 Instruction Manual
5
8.
The Add New Detector window will open and contain some default “generic” data the first
time it is used. If you are in a hurry to try out the 970, you can accept these values by
clicking the Add button. It is recommended, that you take a few moments and fill in the
information for the detector you will be using. All fields must contain information. If you click
the Cancel button, SNAP-MCA will revert to the Select Detector window, which will be
blank. Your only options then will be to either close the application or go back to the Add
New Detector window.
9.
Click the Add button after you have completed entering the information for your detector.
Model 970 Instruction Manual
6
10.
The Select Detector window is now displayed, showing the detector just entered. Click
Use This Detector.
11.
A window showing the serial number of the Model 970 and the number of the COM port
being used is displayed. Click Yes to enable the High Voltage to the displayed value or No
to start SNAP-MCA with the High Voltage turned off. It is recommended that you enable the
High Voltage at this time unless you have some reason to believe that enabling the High
Voltage to the value displayed might damage the detector (e.g., the HV is higher than you
think it should be or you don’t actually have the detector connected yet).
12.
The SNAP-MCA Main Window will now be displayed. At this point, whether the first use
or not, SNAP-MCA may appear to pause for a few moments while it adjusts the 970’s onboard Hardware Settings and while it loads various associated files including the library file,
the last used ROI Set, Energy and Efficiency Calibrations.
Note that field names that are marked with an asterisk cannot be changed or edited once the
detector data have been added. For instance, if after capturing and storing spectra, you
choose to change the Number of Channels, a new detector must be added in order to select
the number of channels to be used.
The "Add New Detector" window can also be selected from the Utility | Detector… menu
discussed on page 10. In the "Base New Detector on" field, you may select an existing
detector set up and make minor edits or you may start from scratch. Your system can have
a number of different detectors or the same detector with a different number of channels.
Placing these parameters in the Add New Detector screen is the only way to change the
number of channels in the Spectrum Display.
Model 970 Instruction Manual
7
3 Functions, Controls, and Displays
3.1 SNAP-MCA Main Window
This window is the starting point for all Model 970 functions. This section describes in general
terms the controls and displays on the main window. Virtually all functions can be performed
using either the mouse or combinations of keystrokes.
3.2 Menu Bar
Essentially all SNAP-MCA functions can be accessed through the Menu Bar, including those
triggered by buttons on the SNAP-MCA Main Window.
File Menu
The first menu item Save Spectrum as File is for saving a displayed spectrum as a 970
spectrum file (*.usf). The next two, Save Spectrum and Load as Background and Save
Spectrum and Load to Static Display, also save the spectrum but additionally load the
spectrum as the Background Spectrum or to the Secondary Spectrum display.
Model 970 Instruction Manual
8
The next two menu items, Capture Screen to Clipboard and Save Spectrum as Graphic,
relate to the graphical representation of the spectrum, referred to in this document as the
Chart. These allow the Chart to be copied to the Clipboard (and subsequently pasted into a
word processing or graphics program) or saved as a graphics file. These relate only to the
Chart exactly as displayed, and do not carry over any other portion of the window. Note: If
you want to capture an image of the entire window, use Alt + Print Screen to copy a picture of
the active window to the clipboard, and then paste into another application.
The next group of three menu items, Load Spectrum to Live, Load Spectrum as Background,
and Load Spectrum to Static Display, concern the loading of Stored Spectra. Any previously
saved spectrum captured using the same 970/detector combination can be reloaded as a
“live” spectrum for re-analysis, or as the Background Spectrum, or to capture additional
Acquisition time. Warning screens may be displayed if the spectrum was acquired using
different Hardware Settings than are currently being used. Any spectrum in the *.usf format
can be displayed in the Secondary Spectrum. Note: If a saved spectrum is loaded to “live,”
any spectrum currently displayed will be lost without warning unless you explicitly save it
before loading the saved spectrum. Note: When a Background is loaded, it will automatically
be subtracted from the visual Spectrum Display until cleared or de-selected from the View
Menu. A loaded Background Spectrum will be subtracted from all subsequent analyses until
the Background Spectrum is explicitly cleared, another one is loaded, or SNAP-MCA is
closed.
The Clear Background menu item completely removes any loaded Background file, not just
from the visual display (e.g., the Background data also will not be used in subsequent
analysis of spectra).
The next three menu items relate to the printing of spectra currently displayed. Printer Setup
accesses the Windows™ Printer Settings dialog to alter paper type and layout, quality of the
printing, etc. Print Spectrum Preview (color) allows the user to view the printer output prior to
printing, adjust margins, etc. before printing the Chart. Print Spectrum Preview (B+W) does
the same, but alters the displayed colors to a black spectrum on a white background in order
to save printer ink. This is the recommended method of printing Charts.
The final menu item, Exit, closes SNAP-MCA. Warnings will occur if the currently displayed
spectrum has not been saved, and the user must confirm that the program should close.
Utility Menu
The first four menu items Start (or Restart) Acquisition, Stop Acquisition, Clear Spectrum, and
Clear Spectrum and Start New Acquisition are for beginning, continuing, and stopping
spectrum Acquisition as well as clearing the currently displayed Live Spectrum.
Model 970 Instruction Manual
9
These items are identical in function to the four buttons along the top of the Acquisition
Controls and Indicators portion of the screen. Note: No warnings are given if the current
spectrum has not been saved!
Detector Status displays a small window displaying current information about the detector
being used, loaded ROI and library files, as well as the state of Energy and Efficiency
Calibrations.
The Detector menu item opens a sub-menu containing various utilities for working with
detectors:
Add allows new detectors to be added in the same manner as during SNAP-MCA startup,
without the need to shut down and re-start SNAP-MCA.
Remove Detector allows deletion of any detector entered except the one currently in use.
Model 970 Instruction Manual
10
Select/Change automatically disables the 970’s HV supply to allow for safe changing of
detectors. A new detector is selected from the list in a manner similar to that performed
during SNAP-MCA startup. Once a new detector has been selected, that detector’s
settings (Hardware Settings, Energy and Efficiency Calibrations, and the last-used ROI
with that detector) are loaded, and the HV is enabled.
If the Disable High Voltage menu item is selected, the 970’s HV will be set to zero volts and
the Hardware Status Bar will display that the HV is off. This menu item will change to Enable
High Voltage and, if selected, will re-set the HV to the last-used Hardware Setting.
Fine Tune opens a window to begin an automatic Fine Gain adjustment routine.
Energy Calibrate opens a window for performing an Energy Calibration.
The next seven menu items (Full Screen through Sample Data Panel) are identical in function
to the seven buttons in the Button Panel on the lower right of the Spectrum Display. Each
of these opens a panel for a specific function along the bottom of the Spectrum Display,
Model 970 Instruction Manual
11
except for Full Screen, which closes any displayed panel and restores the Spectrum Display
to the largest possible size. The functions contained in these panels are discussed in detail in
the Button Panel section.
Multi Channel Scaling Mode disables and hides the SNAP-MCA Main Window, and opens a
new window for performing multi-channel scaling. This function is discussed in detail in
Section 5 of this Manual.
Load ROI Set is a redundant function (from the ROI-based Analysis Panel) repeated here for
convenience.
970 COM Port displays which COM port the 970 is currently connected through. The 970 can
be used on COM 1 through COM 16.
Alarms Menu
Alarm Settings opens a window where various alarms can be set. Alarms will only be active if
Enable Alarms is checked. Alarms can be set for any ROI in the currently loaded ROI Set or
for the overall spectrum. Alarms can be set for either a gross count rate or for an increase in
gross count rate over a specified period of time. Any two alarms can also be attached to the
logical alarm outputs on the Mini DIN-7 connector. The outputs go “high” (+5V) in an alarm
condition.
Show Alarm Window opens the same window that is automatically opened when any alarm
condition occurs.
Model 970 Instruction Manual
12
Misc Menu
This menu item is for special functions that do not easily fit into other categories. All of these
items have been suggested or requested by users.
Collect Multiple Sequential Spectra opens a window where the Model 970 can be told to
collect a fixed number of spectra (or to sample continuously). At the end of each Acquisition,
the spectrum file is saved with a sequential file name. Alternatively (or, additionally), a brief
ROI report can be saved.
Simple ROI Report generates a minimal ROI-based report containing primarily count rate
data for each ROI.
View Spectrum as Spreadsheet first prompts the user to save the spectrum as a .csv file
(comma separated values), then opens the spreadsheet using your computer’s default
application for opening .csv files. In most cases, this application is a spreadsheet program
such as Microsoft Excel.
Save Spectrum on End of Acquisition will, when checked, save the spectrum to a file each
time an acquisition is ended. This occurs when an acquisition is ended by any method. The
files are saved to the “Spectra” subdirectory (located within whatever directory the SNAPMCA software is located). The filename of the spectrum will be based on the date and time
in the format yyyy mm dd hh-nn-ss, where yyyy is the four digit year, mm is the two-digit
month, dd is the two digit day of the month, hh is the two-digit hour in 24-hour format, nn is
the two-digit minutes past the hour, and ss is the two-digit seconds past the minute.
Disable ADC Corrections will, when checked, disable the corrections made in the 970’s
microcontroller to compensate for the analog-to-digital converter’s differential non-linearity.
View Menu
Show New User Hints enables/disables the New User Hints Bar, which displays a sentence
or two briefly describing the function for any display or control the mouse cursor is currently
over. Disabling (i.e., un-checking) this menu item hides the New User Hints Bar, making the
Spectrum Display slightly larger.
Show Hints enables/disables displays of small pop-up windows containing a very brief
description of a control or display when the cursor is over it for longer than one second.
Model 970 Instruction Manual
13
When Show Background Subtracted is checked, the loaded Background Spectrum is visually
removed from the Live Spectrum. It does not affect display of a Live Spectrum. Regardless of
this visual setting, if a Background has been loaded, it is subtracted in all analysis functions.
This menu item will be unavailable if no Background Spectrum has been loaded.
When Show ROIs is checked, regions of interest from the current ROI file are colored
differently than the rest of the spectrum (unless color settings are altered by the user).
Additionally when this is checked, the ROI section of the Spectrum Status Bar will display
the ROI name and number of total counts for the ROI currently under the cursor.
If Spectrum Quick Grow is checked, the left axis of the Spectrum Display will be set to a
minimal value when the spectrum is cleared. This allows the fastest visual indication of peaks
forming within the spectrum.
Show Static Spectrum will show/hide the Live Spectrum if one has been loaded. Save
Current Spectrum to Static Display does just that, without removing or altering the current
Live Spectrum. This function does not save the Live Spectrum in any way, and no analysis
can be performed on a spectrum statically displayed; it is used for visual reference or
comparison only.
In the next two menu items, the Primary Spectrum and the Static Spectrum display modes
can be changed between a line display (default), a bar graph, or pixels.
Grid Display Settings allows a grid to be overlaid (or not) on the Spectrum Display.
Additionally, axis labels can be displayed (or not).
Show Isotope Data and Show Isotope Lines are redundant functions (from the Button Bar)
repeated here for convenience.
Linear Y Axis and Logarithmic Y Axis change the display of the left axis.
The Colors menu item opens a sub-menu allowing most display colors to be altered. The
Reset to Default Colors menu item restores SNAP-MCA visual settings to the “first use” state.
The default colors were selected to reduce eye strain, especially on large monitors, but may
not be ideal for all users or purposes (e.g., printing).
Undo Zoom gives a method for restoring the zoomed state of the spectrum to “none” without
requiring the use of a mouse. The spectrum can only be zoomed by using the mouse to drag
a rectangle (from upper-left to lower-right) on the Spectrum Display. Dragging any rectangle
from lower-right to upper-left will un-zoom the spectrum.
Model 970 Instruction Manual
14
Sound Menu
Three options exist for audible notification to the user that the acquiring of a spectrum has
been completed. First is No Sound, i.e. the Acquisition just stops. In the second, Ring Once
on Acquisition End, a single notification sound (the Windows “default” sound, usually a “ding”)
is made upon completion of an Acquisition.
In the third option, the sound repeats approximately every second until the user explicitly
acknowledges the fact that the Acquisition has completed by clicking the Acknowledged!
button.
Library Menu
Load Library allows the user to load one of the provided photon-emitting isotope libraries, or
one created by the user.
Open Library Editor opens an editor for modifying the 970 library files. Using the Library
Editor is discussed in Section 4 of this manual.
Transfer Menu
These functions allow easy copying of calibration files from one computer to another or to a
disk for transfer. An example would be calibrating a 970/detector combination on a desktop
computer and transferring that data to a laptop for field use. Transfer of these calibration files
onto another computer should be performed using the separate “SNAP-MCA Cal File Xfer”
program provided, while SNAP-MCA is not running. Functionally, this is identical to copying
all of the files contained in the “CalFiles” subdirectory onto a floppy disk.
Help Menu
The Help menu item opens the SNAP-MCA Help file. (Note: The Help file has not yet been
distributed as of SNAP-MCA version 2.0.1)
Model 970 Instruction Manual
15
The 970 Support Website is a hyperlink to (you guessed it!) the 970 Support Website.
The About function opens a window containing information about SNAP-MCA software and
the Model 970 hardware. Version Information simply displays the version number of the
SNAP-MCA software.
3.3 Button Bar
The left two buttons (Fine and MCS) on this portion of the SNAP-MCA Main Window provide
quick access to the Energy Calibration window and the Multi Channel Scaling mode. These
functions are discussed in Section 6.4 and Section 5, respectively, in this manual.
The dropdown menu contains a list of all isotopes in the currently loaded library that are enabled.
Selecting one of these isotopes allows data to be displayed as a table and/or as lines on the
Spectrum Display.
Clicking the Data button opens a window that shows the name and half life of the isotope, as well
as the specific data for all specific energies that are enabled in the library file. This window can be
resized by moving the mouse cursor on an edge until the cursor becomes a double-headed arrow
and dragging until the desired size is achieved. The window can be moved to any convenient
location by clicking the blue bar and dragging. When this window is displayed, the button caption
becomes Hide, and clicking on it (or on the “x” in the upper right corner) will close the window.
The order of the display can be based on energy or yield, ascending or descending. Change this
by clicking on the top of the relevant column. Note: The information in this display can be altered
by using the Library Editor, detailed in Section 4 of this manual.
Model 970 Instruction Manual
16
The Show button will only be enabled if an Energy Calibration has been performed. Clicking the
Show button displays marker lines at the energies where enabled library peaks for the current
isotope should reside. When the marker lines are displayed, the button caption becomes Hide. If
Yield is also selected, the heights of these lines are proportional to the yield for each energy. If an
Efficiency Calibration has been performed, Eff x may be selected. This displays the line heights
proportional to the yield for each energy times the efficiency at that energy times the value in the
box to the immediate right. Selecting Full displays each energy line at the full height of the
spectrum, regardless of yield. Checking Log scales the heights of the energy lines against a
logarithmic axis. Checking Labels displays a small box over each energy line displaying the
energy of that line in keV.
3.4 Hardware Status Bar
This section along the top of the Spectrum Display shows information about the hardware
currently being used by SNAP-MCA. This includes the serial number of the Model 970, the status
of the High Voltage supply (currently on or off), and the serial number and description of the
current detector.
The Power section displays the voltage being supplied to the 970 power supply. This value is
updated during SNAP-MCA startup, and about every minute or two during an Acquisition. If the
voltage drops below 6 V a warning will be displayed, and at 5.5 V a message will be shown that
the battery condition is now critical and batteries should be replaced immediately.
Model 970 Instruction Manual
17
3.5 New User Hints Bar
If Show New User Hints has been enabled in the View menu on the Menu Bar, a sentence or two
appears here that briefly describes the function for any display or control the mouse cursor is
currently over.
3.6 Spectrum Display
This area graphically displays the spectrum data collected. This area can be zoomed by using
and clicking the mouse and “dragging a box” around the area of interest, from upper-left to lowerright. This will not work if the starting or ending points of the box are outside the Spectrum
Display area. Once a spectrum is zoomed, it can be panned by right-clicking the mouse within
the Spectrum Display and dragging it. Un-zoom by dragging a box (any size) anywhere on the
Spectrum Display from lower-right towards the upper-left.
3.7 Spectrum Status Bar
This section along the bottom of the SNAP-MCA Main Window displays information about the
displayed spectrum, whether currently acquiring or not, and whether or not the spectrum has
been loaded to a file. This display reflects no information about any secondary spectrum that is
displayed.
Model 970 Instruction Manual
18
The first group of three boxes (towards the left) reflect data for the individual channel over which
the mouse cursor is located. These are the channel number, the energy associated with that
channel (only if an Energy Calibration has been performed), and the number of counts in that
particular channel. If a Background Spectrum has been loaded, the count displayed will reflect the
Background-subtracted counts if Show Background Subtracted has been selected under the View
menu on the Menu Bar.
The second group of two boxes (in the center) shows data for whatever ROI the cursor is over, if
an ROI Set is loaded and Show ROIs is checked under the View menu. If no ROI Set is loaded,
Show ROIs is not checked, or the cursor is not over an ROI, these boxes will be blank. The first of
these two, displays the name given to the ROI, and the second shows the total (integrated)
number of counts in that ROI. If a Background Spectrum has been loaded, the count displayed
will reflect the Background-subtracted counts if Show Background Subtracted has been selected
under the View menu on the Menu Bar.
The final two boxes (towards the right) display overall data for the spectrum. The first of these two
boxes, displays the total number of counts for the spectrum, and the second box displays an
approximation of the overall count rate based on an average of the last 20 seconds of spectrum
data. The overall count data will not reflect Background subtraction. The overall count rate box
may display misleading data for approximately the first 20 seconds following the start of an
Acquisition.
3.8 Acquisition Controls and Indicators
The four buttons along the top of this section control the Acquisition of spectra. From left to right,
these are Start, Stop, Clear, and Clear and Restart.
The Start button begins an Acquisition. If a spectrum is currently displayed but is not currently
accumulating, the Acquisition will re-start, adding data to the existing spectrum. If a spectrum is
currently accumulating, this button will have no effect.
The Stop button ceases spectrum Acquisition. No data is destroyed, and the Acquisition can be
restarted if desired. This button has no effect if the Acquisition has previously been stopped.
The Clear button erases all data from the spectrum, and resets the elapsed time to zero. If a
spectrum is currently acquiring, Acquisition will stop. No warning is given before data is deleted.
The Clear and Restart button is equivalent to pressing the Clear button followed by the Start
button, and is provided for convenience. Again, no warning is given before data is deleted.
Immediately below these buttons are two status displays. The top one of these will always be
visible, and gives some information about the status of the Model 970. The text of this display
may be:
Model 970 Instruction Manual
19
Spectrum Clear (red background). Indicates that the Spectrum Display contains no data, and
the 970 is not acquiring data.
Acquiring (light green background). Indicates that a spectrum is currently accumulating.
Acquisition Stopped (yellow background). Indicates that the 970 is not currently acquiring data,
but the Spectrum Display contains data.
Spectrum Loaded (yellow background). Indicates that the 970 is not currently acquiring data, but
the Spectrum Display contains data that has been loaded to Live from a file.
The second (and lower) of these displays gives information about the Background Spectrum, and
will only be visible if a Background Spectrum has been loaded. The text of this display may be:
Bkgd Subtracted (green background). Indicates that a Background Spectrum has been loaded
and is currently being subtracted from the visual Spectrum Display. It will also be subtracted
from any spectral analysis performed, including peak searches.
Bkgd Loaded (green background). Indicates that a Background Spectrum has been loaded but is
not being subtracted from the visual Spectrum Display. The Background Spectrum will still be
subtracted from any spectral analysis performed.
Moving downward, the next object is the white Time (sec) input box, with a checkbox immediately
to its left. If the checkbox is checked, the 970 will stop acquiring a spectrum when the total
counting time equals this value. Time units are in seconds. An Acquisition cannot be started or
continued if the checkbox is checked and the Acquisition time equals or exceeds the amount of
time in the input box. Typing in the Time (sec) box will immediately un-check it; pressing Enter on
the keyboard after changing the Time (sec) value will re-check it.
Directly underneath the Time (sec) input box is the white Total Counts input box, with a checkbox
immediately to its left. If the checkbox is checked, the 970 will stop acquiring a spectrum when
the total number of accumulated counts equals this value. An Acquisition cannot be started or
continued if the checkbox is checked and the total accumulated overall counts equals or exceeds
the number of counts in the input box. Typing in the Total Counts box wills immediately un-check
it; pressing Enter on the keyboard after changing the Total Counts value will re-check it.
The final item in this area is the gray Time (sec) box. This displays the total counting time, in
seconds, for the spectrum currently displayed. If a spectrum has been loaded to Live from a file,
this display will reflect the amount of time for which that spectrum was counted.
3.9 Spectrum Smoothing
The photomultiplier tubes used in NaI (Tl) gamma detectors (as well as many others) do not
supply a smooth continuum of energies. This fact is not apparent when the spectrum is displayed
in 256 or 512 channels. SNAP-MCA’s 4096 channels of data can be filtered to give a smoother
representation of the energy continuum.
Try using different values of smoothing to get the “best looking” Spectrum Display. Smoothing is
applied only to the visual display and has no affect whatsoever in performing peak searches and
analysis.
Model 970 Instruction Manual
20
3.10 Button Panel
The Button Panel provides access to the primary “workhorse” functions of SNAP-MCA. Each of
these is described fully below.
Full Screen
This hides all panels and makes the Spectrum Display as large as possible within the
confines of the window borders.
Hardware
This displays the Hardware Panel for adjusting the 970 hardware controls. To adjust other
Hardware Settings, the Allow Edit checkbox must be checked.
High Voltage can be adjusted by either directly entering a number in the High Voltage input
box or by using the up/down buttons immediately to its right. When entering the value
directly, you can use any value between 0 and 2000 V, including decimal values. When using
the up/down buttons, HV is increased/decreased in 1 V increments. After changing the
displayed HV value, the Set HV button will become enabled. Pressing this button will apply
the setting to the 970. If an Acquisition is currently underway, it will automatically pause while
the new setting is applied, then resume using the new setting.
Model 970 Instruction Manual
21
If Ramp HV is not checked, the High Voltage will change as instantaneously as possible. This
is usually fine for most detectors. If needed, Ramp HV can be checked and the detector
supply voltage will always be changed at the rate displayed. This can range from 6 to 219
seconds per 100 volts.
The detector Input and Polarity can be selected from the dropdown menu. INPUT1 is the
series “C” connector where signal and detector supply voltage are carried on the same line.
INPUT2 is the pair of separate connectors for signal and detector supply voltage, BNC and
SHV respectively. If “Shaped Input, Positive Polarity” is selected, either of the inputs can be
used. Note: If a shaped input is used, Coarse and Fine Gain controls will have no effect on
the spectrum input. Also, take care to ensure that shaped pulses are kept in the 0 to 5V
range; an attenuator may be required.
Coarse Gain is adjusted using the Coarse Gain dropdown menu. The Gain ranges are x2, x4,
x15, x35, x125, and x250. Coarse Gain times Fine Gain equals Overall Gain. After changing
the Coarse Gain value, the Set Gain button will become enabled. Pressing this button will
apply the setting to the Model 970. If an Acquisition is currently underway, it will automatically
pause while the new setting is applied then resume using the new setting.
Fine Gain can be adjusted either by clicking on the slider bar or by clicking the arrow keys to
the right and left of the control. The Fine Gain can be adjusted in 255 steps from
(approximately) x0.004 to (approximately) x1, and the approximate Gain value is displayed
immediately above and to the left. Overall Gain (Coarse Gain times Fine Gain) is displayed
immediately above and to the right. After changing the Fine Gain value, the Set Fine button
will become enabled. Pressing this button will apply the setting to the Model 970. If an
Acquisition is currently underway, it will automatically pause while the new setting is applied
then resume using the new setting.
Use the Fine Gain control to perform small “nudges” to compensate for spectrum drift caused
by temperature changes in the detector. If an even smaller shift in Gain is needed, try
adjusting the High Voltage by tiny increments (including decimal values).
Threshold can be adjusted by either directly entering a number in the Threshold input box or
by using the up/down buttons immediately to its right. When entering the value directly, you
can use any whole number between 0 and 2498 mV. When using the up/down buttons,
Threshold is increased/decreased in 1 mV increments. After changing the displayed
Threshold value, the Set Thsh button will become enabled. Pressing this button will apply the
setting to the Model 970. If an Acquisition is currently underway, it will automatically pause
while the new setting is applied then resume using the new setting. Note: High values of Gain
will likely necessitate increasing the Threshold.
Shaping Time can be adjusted using the dropdown menu. Possible values are 0.25, 0.5, 1, 2,
4, 6, 8, and 10 µseconds. For the vast majority of cases, a shaping of 1 µsec is appropriate.
After changing the Shaping Time value, the Set S.T. button will become enabled. Pressing
this button will apply the setting to the Model 970. If an Acquisition is currently underway, it
will automatically pause while the new setting is applied then resume using the new setting.
ROI Panel
This displays the ROI Panel, for creating or adjusting ROIs (Regions of Interest). You will not
be able to open this panel until an Energy Calibration has been performed. The intricacies of
this panel are discussed in detail on the next page.
Model 970 Instruction Manual
22
Current ROI Set Name: displays the filename of the currently loaded ROI Set. If no file is
displayed, then no ROI Set is currently loaded. Note: A small display will appear below
Current ROI Set Name: (not shown in the display above) that flags the fact that the current
ROI Set has been altered but not yet been saved.
The small panel (Drag cursor to) immediately below this normally has Zoom (normal)
checked. This means that clicking and dragging on the spectrum will have the normal effect
of zooming and un-zooming the display. If Set ROI is checked instead, clicking and dragging
in the spectrum will define an ROI. After setting an ROI this way, the panel will revert to Zoom
(normal).
Moving down and to the left is a small gray box displaying the current ROI # with “left” and
“right” arrow buttons. This box displays which specific ROI is being edited within the greater
ROI Set. Click the arrow buttons to change the specific ROI. The currently selected ROI is
shown in fuchsia on the Spectrum Display. To create a new specific ROI, advance the ROI
# to an ROI that does not yet contain data. Up to 50 ROIs may be defined within an ROI Set.
Immediately below the ROI # is the ROI Name input box. Use this section to provide a
descriptive name for each individual ROI within the greater ROI Set. This name becomes the
one displayed in the Spectrum Status Bar, and is also used to identify individual ROIs in any
analysis reports.
Approximately in the middle of the ROI Panel are two radio button controls, Dbl Click to Set
Starting Energy (keV) and Dbl Click to Set Ending Energy (keV). When the ROI Panel is
visible, double clicking on the spectrum will set either the lower or upper bound of an ROI
(depending on which of these controls is selected).
The controls immediately below provide a display of the lower and upper bounds of a specific
ROI. Using the buttons with the single arrow will advance the boundary of the specific ROI up
or down by one channel; the buttons with the double arrow will advance the boundary up or
down by 10 channels. The energy associated with this channel will be updated in the input
box.
The Kill ROI button will completely delete the currently selected specific ROI, without giving
any additional warning.
Load ROI Set opens a dialog box to select an ROI Set. If the current ROI Set has not been
saved since it was last altered, a warning will be displayed and you will be given an
opportunity to save the current ROI Set before continuing. If the ROI Set is not explicitly
saved, all changes will be lost when a new ROI Set is loaded.
The Cancel button will only be enabled when the current ROI Set has been altered or edited
in any way since when it was last saved. Using this function will re-load the current ROI Set
as it was last saved.
The New ROI Set” button clears the current ROI Set from SNAP-MCA (if it has not been
saved, you will be given the opportunity to do this first) so that a new ROI Set can be created.
You will be prompted to first name the ROI Set, which you must do in order to continue.
Model 970 Instruction Manual
23
Efficiency
This displays the Efficiency Calibration Panel. This Efficiency Calibration is based on an ROI
Set, but the same calibration is also used when performing peak-based or library-based
spectrum analyses. An ROI Set, therefore, must be created and/or loaded before this panel is
available. Efficiency Calibrations are unique to specific 970/ROI file/Detector combinations.
Current ROI Set Name: displays the filename of the currently loaded ROI Set. Note: A small
display will appear below Current ROI Set Name: (not shown in the display above) that flags
the fact that the current ROI Set has been altered using the ROI Panel but not yet saved. It is
not recommended that an Efficiency Calibration be performed using an unsaved ROI Set.
If the Allow Edit box is checked, the controls on this panel will be unlocked for editing. If this
box is not checked, the data for the last calibration can be viewed, but not altered.
The arrow buttons will change the currently selected specific ROI within the greater ROI Set
and the data on this panel will reflect only that specific ROI, as will any modifications. The
currently selected ROI will be displayed in fuchsia.
The gray boxes display specific ROI data, including the Efficiency (as a percentage of counts
detected per disintegration), if a calibration has been previously performed.
The Assign ROI as Unknown checkbox allows a specific ROI within an ROI Set to be
designated as one that is not contained in the Efficiency Calibration source being used.
The Associated Nuclide control contains a dropdown list of all enabled nuclides in the current
library. Prior to performing an Efficiency Calibration, a nuclide must be assigned to each
specific ROI within the ROI Set by clicking on one of the items in the list. If the needed
nuclide is not in this list, the library must be edited to enable this nuclide.
The Associated Peak control contains a dropdown list of all enabled peaks (for the nuclide
selected as the associated nuclide) in the current library. Prior to performing an Efficiency
Calibration, one of these peaks must be assigned to each specific ROI within the ROI Set by
clicking on one of the items in the list. If a needed peak or multiplet is not on the list, the
library must be edited to enable or add this peak or multiplet.
Enter the activity of the specific isotope in the Activity input box. This must be performed for
all ROIs within the ROI Set prior to performing an Efficiency Calibration. Use the Units
dropdown list to assign units to the activity. Note: The activity units must be the same for all
activities entered. Changing the units for one specific ROI will change the units assigned to
all other ROIs within the ROI Set.
The ROI Eff. Cal! button performs an Efficiency Calibration by applying the data entered on
the Efficiency Calibration Panel against the currently displayed spectrum. If no data is
contained in the spectrum, or if all the fields are not filled in, errors will be generated and the
Efficiency Calibration will be aborted.
Model 970 Instruction Manual
24
The Cancel button will make any alterations made on the Efficiency Calibration Panel revert
back to the ones used in the most recent Efficiency Calibration.
Every time an Efficiency Calibration is performed, a report is generated and stored in the 970
Cal Files directory. This report can be viewed, printed, or saved by clicking the Report…
button. Note: The contents of the report and use of the report window are discussed in detail
in other portions of this manual.
Peak-Based
This displays the Peak-Based Panel for performing peak searches, and for performing
isotopic identification and peak-based Quantitative Analysis.
Clicking the Find Peaks button causes SNAP-MCA to search the currently displayed
spectrum for identifiable peaks. These will be displayed on the spectrum in green, with a line
indicating the peak centroid. The collection of found peaks acts a bit like a temporary ROI
Set, and the currently selected peak (which will be the leftmost one immediately following a
peak search) will be displayed in fuchsia.
Clicking the Report… button makes SNAP-MCA perform a Qualitative Analysis. If an
Efficiency Calibration has been performed, a Quantitative Analysis will also be preformed.
This will then be displayed on a “report” screen, where it can be viewed, printed, or saved.
Note: The contents of this report and use of the report screen are discussed in detail in other
portions of this manual.
The Clear Peaks button will erase all found peaks. The Make ROI button allows the user to
take a group of found peaks and convert them to an ROI Set.
The Peak Search Sensitivity control affects how “distinct” a peak needs to be before it is
flagged as “found.” If it appears that too many peaks have been identified in a peak search,
try lowering the value of Peak Search Sensitivity. Conversely, if too few peaks have been
identified, raise the value of Peak Search Sensitivity.
Placing a dot associated with one of the four radio buttons will determine which method is
used in identifying the nuclide associated with a peak. The top item will associate a peak with
a nuclide if the library energy is within the stated energy range of the peak’s centroid. The
next item, if selected, will associate a peak with a nuclide if the library energy is within the
stated percentage of the library energy. The third item, if selected, will associate a peak with
a nuclide if the library energy is anywhere within the area of the found peak. The fourth item,
if selected, will associate a peak with a nuclide if the library energy is anywhere within the
FWHM (full width at half maximum) calculated for the found peak.
There has been no computer program ever written that surpasses an experienced human
eye at discriminating whether a given portion of a spectrum represents a peak or not.
Therefore, SNAP-MCA allows the user wide latitude in editing (or ignoring) the results of the
computerized peak search.
Model 970 Instruction Manual
25
If the Allow Edit box is selected, the controls for editing the found peaks are enabled.
When Double Click Adds Peak is selected, double clicking on a portion of the spectrum will
add a “found peak.” This new peak is treated the same as the others found by the
computerized search, and this method of adding “found peaks” may be used instead of, or as
a supplement to, the computerized search.
The arrow buttons below Selected Peak change the currently selected found peak, which is
indicated by the displayed number, and highlighted in fuchsia in the Spectrum Display. Data
that is displayed and edits that are made will apply only to the currently selected found peak.
Values of Left Edge, and Right Edge for the Centroid, can be altered by using the single and
double arrow buttons. The single arrow buttons will move the relevant value up or down the
spectrum by one channel, and the double arrow buttons will move the relevant value up or
down the spectrum by 10 channels. The current value will be displayed (in keV) in the
associated gray box.
Finally, the Kill Peak button will permanently delete the currently selected found peak
(whether found by the computer search or manually assigned).
ROI-Based
This displays the ROI-Based Quantitative Analysis Panel.
Clicking the ROI Analysis button performs an ROI-by-ROI analysis of the currently displayed
spectrum, and calculates the activities for each ROI. A summary of this data is displayed for
each ROI. Change the currently selected ROI (indicated by fuchsia on the Spectrum
Display) by clicking the arrow buttons.
Clicking the Report… button displays the detailed results of the ROI-based Quantitative
Analysis. From the “report” screen, this data can be viewed, printed, or saved. Note: The
contents of this report and the use of the report screen are discussed in detail in other
portions of this manual.
Model 970 Instruction Manual
26
Sample Info
This displays the Sample Data Panel for entering sample descriptions and quantities.
The Sample Description input box allows the entry of a brief description or note. This will be
displayed in all subsequent analyses and generated reports, and saved with the spectrum
file.
If Use Sample Quantity is checked, two controls will be enabled that allow entry of a sample
quantity and the associated units. These values will be saved with the spectrum, and used
and displayed in subsequent analyses.
Eight checkboxes with radiological units are displayed. Any combination of these may be
checked, and activity results in subsequent reports generated will be displayed in all of the
units selected. If none of these are checked, no Quantitative Analysis results will be displayed
in subsequently displayed reports.
The Save Spectrum button performs the same function as if selected under the File Menu. It
is also included here for convenience.
The Clear Fields button deletes the data entered in the Sample Description and Sample
Quantity.
Model 970 Instruction Manual
27
The “Print Preview” or “Report” Screen
This screen is used to display, save, and print all reports generated by SNAP-MCA.
The Print button will send the report to any printer via the Windows operating system. The
report should print exactly as displayed.
The Save button allows the report to be saved as either a rich text file (rtf) or a plain text file
(txt). Both formats can be used with most word processors; saving as an .rtf keeps the look of
the file exactly as it is displayed (i.e., changes in font sizes, bold, tabs).
The up and down arrows are the same as page up and page down keys, which can also be
used.
The “-” and “+” magnifying glasses, along with the slider, allow the size or zoom of the report
display to be changed.
The Return button closes the report window.
Model 970 Instruction Manual
28
4 Using the Library Editor
Two libraries are distributed with SNAP-MCA and SNAP-MCA Full. As a general rule, SNAPMCA is intended for NaI (Tl) detectors, and SNAP-MCA Full is intended for detectors with higher
resolution. Both were created from the same information, contained in “Radioactive Decay Data
Tables” by David C. Kocher, Report DOE/TIC-11026. The data was originally formatted for
computer by Grove Engineering from information provided by RSIC. SNAP-MCA Full contains all
information, while SNAP-MCA has had photons with lower energies and yields that are unlikely to
be seen by NaI (Tl) detectors removed to improve performance. Both libraries contain many
calculated multiplets as an aid. These can, of course, be edited or disabled.
Either library can be edited and saved under a different name, in order to create a new library file.
Isotopes and specific photon energies can be added, edited, or deleted.
The Library Editor can be opened by selecting Open Library Editor… under the Library Menu
from the SNAP-MCA Main Window.
When the Library Editor is opened, there is no Library file initially loaded for editing. Click on the
Open Lib. button and select a library file for editing.
Once a library has been opened, select an individual isotope from the drop down list. All isotopes
in the Library are displayed in the list, and those that are currently enabled are shown with an
asterisk. After an isotope is selected, the screen will update to display that isotope’s information.
Use the Enabled or Disabled radio buttons to determine whether the particular isotope will be
used in the Library. Only enabled isotopes will be available in SNAP-MCA.
Model 970 Instruction Manual
29
Use the Save Lib. button to save the library as it exists, reflecting any changes that have been
made. This can also be used to save the Library under a different name.
The Cancel button can be used to close the Library Editor without saving any changes that have
been made since the previous save. If no changes have been made since the previous save, the
button will read Close.
Check Allow Edit of Nuclide Name and Half Life to allow editing of those values, if needed.
Use the Add Energy button to add a Photon Energy to the currently displayed isotope.
Click on any Photon Energy in the grid and use the Kill Energy button to completely delete that
Photon Energy from the currently displayed isotope.
Use the Add Isotope button to add a new isotope to the current Library. At least one Photon
Energy must be added in order to add the isotope.
Click on the Kill Isotope to completely delete the entire isotope currently displayed from the
Library.
The grid contains a display of each Photon Energy for the currently selected isotope, and each
Photon Energy can be edited here also. The fields are as follows:
Isotope Display of the isotope abbreviation. This should be the same for each displayed photon.
Use Checkboxes that indicate whether that particular photon or energy will be used (assuming
the isotope itself is also enabled).
Model 970 Instruction Manual
30
Pri. This column of radio buttons is used to indicate which energy is designated as the “primary
peak” for the isotope. The primary peak MUST be present in a spectrum (in addition to the
secondary peak) in order to positively identify the isotope and activity will be calculated based in
the primary peak. Therefore, the energy with the highest yield is usually designated as the
primary peak. It is acceptable to designate the same energy as both the primary and secondary
peaks, but the energy must be enabled.
Sec. This column of radio buttons is used to indicate which energy is designated as the
“secondary peak” for the isotope. The secondary peak MUST be present in a spectrum (in
addition to the primary peak) in order to positively identify the isotope. It is acceptable to
designate the same energy as both the primary and secondary peaks, but the energy must be
enabled.
Energy (keV) This column displays each specific energy, in keV, of the currently selected isotope.
Yield (%) This column displays the specific yield (or abundance) of each specific energy,
expressed as a percent (photons per 100 disintegrations at that energy).
Comment This column provides a section for users to enter a comment or note regarding the
particular energy. For example, all multiplets contain “MUL” in the comment field.
Once a Library has been edited and saved, it must be specifically loaded into SNAP-MCA (using
Load Library… under the Library Menu) for the changes to be seen.
Model 970 Instruction Manual
31
5 Using MCS Mode
The Multi Channel Scaling mode is used for the application of watching or recording changes in
count rate over time. An analog meter-style display also shows the current count rate. MCS mode
allows you complete control over how the data is accumulated and displayed.
5.1 Menu Bar
File Menu
The first menu item, Save Chart as csv… saves all the data collected in the current
Acquisition to a comma separated value (csv) file. Csv files can be opened by most
spreadsheet and word processing programs.
The next two menu items (Capture Chart to Clipboard and Save Chart as Graphic…) relate to
the graphical representation of the display. These allow the Chart to be copied to the
Clipboard (and subsequently pasted into a word processing or graphics program), or saved
as a graphics file. These relate only to the Chart exactly as displayed, and do not carry over
to any other portion of the window. Note: If you want to capture an image of the entire
window, use Alt+PrintScreen to copy a picture of the active window to the clipboard, then
paste into another application.
The next two menu items relate to the printing of the Chart currently displayed. Printer
Setup… accesses the Windows printer settings dialog to alter paper type and layout, quality
of the printing, etc. Print Chart as Graphic allows the user to view the printer output, adjust
margins, etc. and print the Chart.
Exit closes the 970 MCS window and returns to the SNAP-MCA main screen.
Model 970 Instruction Manual
32
Utility Menu
The first four menu items Start (or Restart) Acquisition, Stop Acquisition, Clear Spectrum, and
Clear Spectrum and Start New Acquisition are self-explanatory, and their functions are
identical to the four buttons near the upper right of the Chart display.
View Menu
Show New User Hints enables/disables the New User Hints Bar, which displays a sentence
or two briefly describing the function for any display or control the mouse cursor is currently
over. Disabling (i.e., un-checking) this menu item hides the New User Hints Bar, making the
Spectrum Display slightly larger.
Show Hints enables/disables displays of small pop-up windows containing very brief
description of a control or display when the cursor is over it for longer than one second.
The Show Trace as… menu item opens a sub-menu allowing the Chart trace to be displayed
as a line, as points, as a line with points (the default), bars, or as an area graph.
The next three menu items (Chart Background Color…, Chart Trace Color… and Chart
Labels Color… allow the referenced display colors to be altered. The Reset to Default Colors
menu item restores the 970 MCS visual settings to the “first use” state. The default colors
were selected to reduce eyestrain, especially on large monitors, but may not be ideal for all
users or purposes (e.g., printing). Use common sense in applying different colors. For
example, if the Chart Background Color is set to be the same as the Chart Trace Color, the
display will appear blank.
Help Menu
The Help menu item opens the SNAP-MCA Help file. (Note: The Help file has not yet been
distributed as of SNAP-MCA version 2.0.2)
The About… function opens a window containing information about SNAP-MCA and the 970
hardware. Version Information… simply displays the version number of SNAP-MCA software.
5.2 MCS Acquisition Controls and Indicators
The four buttons along the top of this section control the acquiring of spectra. From left to right,
these are Start, Stop, Clear, and Clear and Restart. The functions of these buttons are mostly
self-evident and they are identical to the functions described in Section 3.8.
Model 970 Instruction Manual
33
Immediately below the four buttons is a status display showing the current status of data
acquisition.
Moving downward, the next object is the white Time (sec) input box, with a checkbox immediately
to its left. If the checkbox is checked, the 970 will stop acquiring a spectrum when the total
counting time equals this value. Time units are in seconds. An Acquisition cannot be started or
continued if the checkbox is checked and the Acquisition time equals or exceeds the amount of
time in the input box. Typing in the Time (sec) box will immediately un-check it; pressing Enter on
the keyboard after changing the Time (sec) value will re-check it.
Directly underneath the Time (sec) input box are two displays. The first shows the total elapsed
Time in the data acquisition, and the second shows the Total number of Counts collected.
The next item down is the Dwell Time control. This determines how frequently data is posted on
the Chart, what period of time each data point represents, and the sum of time that each data
point represents. This value can be altered from 1 to 60 seconds. This control can be changed
while an Acquisition is in progress.
Below that is a box labeled Display Data as. The left axis Chart units can be changed between
counts (accumulated in each dwell time period), cpm or cps (averaged over the dwell time
period). This cannot be changed after an Acquisition has been started, or until the Chart is
cleared.
The next set of controls (Scroll Width) affect the bottom axis of the Chart display. If Scroll Width is
checked, then the width of the bottom axis will be the number of seconds displayed in the input
box immediately below. If Scroll Width is not checked, then the width of the bottom axis will reflect
all of the data points collected. Note that performance may suffer if a very large number of data
points (1500 or so) are displayed.
The controls in the next area are the Autosave features. If Autosave Every is checked, then the
accumulated data will be saved to sequential files at a frequency determined by the value in the
box immediately below. If Low Activity Sample is checked in the Utility Menu, you will be able to
choose whether to Autosave just the low activity data (i.e., only non-zero values) or both.
Model 970 Instruction Manual
34
5.3 MCS Analog Panel
This panel displays an analog-style meter movement of the current Acquisition. The settings for
this panel can be altered independently of the Chart display.
If Alarm at: is checked, the analog display will turn red and an audible alarm will sound, if the
count rate exceeds the value contained in the input box. The alarm will reset when the count rate
falls below the alarm level, or when the box is unchecked.
Meter Response Time changes the number of seconds of data over which the analog display is
averaged. Higher values will result in a “smoother” meter action, but slower response to changes
in the count rate. This can be varied between 1 and 60 seconds.
If Autorange is checked, the meter scale will change automatically based on the count rate.
Scale Max changes the base value for the upper limit of the analog display.
The x 1 through x 10,000 radio buttons are scale ranges for the analog display.
Ratemeter units allows the capability to change the analog display between units of counts per
minute (cpm), or counts per second (cps).
Model 970 Instruction Manual
35
6 Procedures
6.1 Calibrating a Detector with Model 970
In order to use the Model 970 with a given detector, the following must be done (in this order):
1. Adjust Hardware Settings.
2. Perform Energy Calibration.
3. Perform a Shape Calibration. Following this step, the 970 is ready to provide Qualitative
Analysis.
4. Create a “Regions of Interest” (ROI) Set. This is in preparation for Efficiency Calibration,
which must be coupled to an ROI Set.
5. Perform Efficiency Calibration. Once an Efficiency Calibration has been performed, the
970 is ready to perform Quantitative Analysis.
6.2 Adjust Hardware Settings
Hardware Settings are used to adjust Input and Polarity, High Voltage (HV), Threshold, Coarse
Gain, Fine Gain, and Shaping Time.
Hardware Settings are unique to each 970 /detector combination. The specific settings are loaded
when a specific detector is selected. If you intend to use the same detector at different Hardware
Settings, you can define separate detectors with different descriptions.
Since the Model 970 was designed to work with essentially any radiation detector (or more
specifically, in the case of SNAP-MCA Full, essentially any gamma detector), the software cannot
make any assumptions regarding the operating characteristics of the detector and therefore
cannot contain automated hardware adjustment. Discovering the appropriate Hardware Settings
for a particular detector is essentially a trial-and-error process. Fortunately, this process is neither
difficult nor time consuming.
The process for determining appropriate Hardware Settings consists of placing a known radiation
source of modest activity in front of the detector, adjusting one or more of the Hardware Settings,
and beginning an Acquisition. Repeat this process until a satisfactory spectrum is achieved. Each
of the components of this process is discussed in slightly more detail below.
6.2.1 Radiation Source and Detector
For most gamma scintillation detectors that will be used with Model 970, an approximately 1 µCi
137
Cs source is probably the best to use in performing the hardware setup. It provides two distinct
peaks; a low-energy multiplet centered around 32.89 keV and a higher energy gamma at 661.65
keV. Another isotope can be used provided that the expected spectrum is known, but the
137
procedures in this manual assume that Cs will be used. Whatever source is used, be cautious
of using one with too great an activity. Many scintillation detectors, especially those originally
designed for hand-held battery powered instruments have a high resistance dynode string (e.g.,
120 MΩ) to minimize the current draw from the HV power supply. Unfortunately, this also has the
effect of causing peaks to shift as a function of the incoming count rate. If you are purchasing a
new detector for use with your 970, it is recommended that a dynode string of about 6 MΩ be
specified. The general thumb rule for spectroscopy is that lower is better, but do not use a
detector with a dynode string less than 4 MΩ. If you are using a detector with a high resistance
dynode string, the best way around this is to perform Energy and Efficiency Calibrations at
approximately the same count rate as the samples you will be analyzing.
Model 970 Instruction Manual
36
6.2.2 Input and Polarity
The 970 has two detector inputs. INPUT 1 is the series “C” connector right next to the DB9 serial
connector. This input has the signal and the High Voltage coupled just as on most hand-held
instruments. If your detector has only one connector, INPUT 1 is the one you should use. If your
detector has two connectors, one for High Voltage and one for the signal, you should use INPUT
2. The SHV connector carries the High Voltage for INPUT 2 and the BNC connector accepts
INPUT 2’s signal. Only one of the inputs should be connected to a detector at any one time.
Most single-connector detectors produce negative pulses, so negative polarity should be chosen.
Many two-connector detectors (especially those with internal preamplifiers) produce positive
pulses, but this cannot be taken for granted. You can either consult the detector manufacturer as
to the pulse polarity or just try both polarities and see which one works.
If your detector requires voltage for an internal preamplifier, the 970 can provide positive and
negative 12 volt DC through the mini DIN-7 connector and the (included) adapter. The pin out of
this adapter follows the NIM standard and should couple directly to the detector.
The 970 can also accept pre-shaped positive pulses through either input. Note: pulses exceeding
about 5V in magnitude (whether positive or negative) will be clipped. If you use this feature, an
attenuator may be required.
6.2.3 High Voltage
If you have past experience with the detector, the voltage at which it was operated is a good
starting point for the 970. This is also often referred to as “Bias Voltage.” Alternatively, you can
check with the detector’s manufacturer for an approximate Bias Voltage or at least a “Not-toexceed” voltage. Failing that, you can just increase the High Voltage to the detector until you get
a decent looking spectrum.
The detector Bias Voltage used for spectroscopy is generally a bit lower than the “plateau”
voltage used in many gross-count instruments.
With scintillation detectors the Bias Voltage also provides Gain, so essentially the same spectrum
can be obtained using a lower Bias Voltage and higher Gain or a higher Bias Voltage and a lower
Gain. If the Bias Voltage is higher than optimal, the spectrum will appear distorted.
6.2.4 Threshold
The Threshold, sometimes called input sensitivity or discrimination, is the minimum pulse height
in millivolts (mV) that will be recorded by 970 as a count. Since the 970 can accept pulses of
either polarity, the Threshold is entered as an absolute value. This can range from 0 to 2047 mV.
Photomultiplier tubes, cables, AC power, and the power supply and other circuitry within the 970
all generate electronic noise that can be erroneously interpreted as counts. This noise tends
towards the low energy region of the spectrum and can be removed by setting the Threshold
sufficiently high to block it. If a large peak occurs toward the left of the spectrum, (i.e., one that
overpowers “real” peaks in the spectrum), the Threshold should be adjusted to a higher value. If
you desire to observe the lower energy portion of the spectrum, the Threshold can be brought
closer to zero until the noise becomes apparent. Changes to the HV or Gain may cause the
location of the noise line to shift, requiring a readjustment of the Threshold. The two highest Gain
ranges will usually require a Threshold to be set in the 100 to 200 mV range unless the detector
is unusually “quiet.”
6.2.5 Coarse Gain and Fine Gain
The Coarse Gain and Fine Gain controls are used to increase the signal from a detector to the
point where it can be displayed usefully as a spectrum. These two controls are used together to
create an overall Gain. The overall Gain is generally the value you should follow.
Model 970 Instruction Manual
37
It is worth mentioning that the Gain settings are arbitrary and not absolute. In other words, if you
put in a pulse of exactly 1000 mV with an overall Gain of x1, the pulse will not necessarily appear
in channel 1000. Similarly, a positive pulse of exactly 1000 mV will not necessarily appear in the
same channel of a negative but otherwise identical pulse. This is normal and is only mentioned
here so no surprise is experienced if you put a pulse generator on the 970. Relative Gain values
are reasonably accurate.
You should avoid using the extreme low end of the Fine Gain control to the extent possible. For
example, you can obtain an overall Gain of x3.391 with a Coarse Gain of x2 and a Fine Gain of
x0.848. You can obtain the nearly the same overall Gain value using a Coarse Gain of x125 and
a Fine Gain of x0.027. The latter settings will produce a distorted spectrum, however. As a
general rule, the lowest Coarse Gain setting possible should be used.
6.2.6 Shaping Time
Shaping Time is usually specific to classes of detectors. Virtually, all common scintillation and
CdZnTe semiconductor detectors use a Shaping Time of 1 µsec. If you are not sure, try various
Shaping Time settings until you get the best looking spectrum. Also, changing the Shaping Time
will usually necessitate changing the Gain settings as well.
6.2.7
Determining Initial Hardware Settings
Prerequisites
This procedure assumes that the detector is attached to the Model 970, the 970 is switched on,
137
SNAP-MCA software has been successfully started, and a Cs of approximately 1 µCi is on the
detector. It is also assumed that the detector to be used is capable of seeing both the 32 and
662 keV peaks.
Discussion
Hardware Settings cannot be adjusted until the Allow Edit box is checked.
Generally speaking, most adjustments to expand the separation between peaks should be
performed using the HV (High Voltage) adjust. Start increasing the Gain only if the peak
separation remains too small even at the maximum HV recommended for the particular detector.
Increase the Gain until the peak separation is slightly wider than desired, and then reduce the HV
as needed. If the peaks are in a good location but appear distorted, try lowering the HV and
increasing the Gain.
Adjust the Threshold lower if too much of the low energy portion of the spectrum is being cut off.
Adjust the Threshold higher if noise is apparent in the lowest regions of the spectrum.
In using the Hardware Setting adjustments, the associated Set button will become enabled,
indicating that the value has been changed from those at which the 970 is currently set. For
example, if you change the HV the Set HV becomes enabled. Clicking the associated Set button
will (1) pause the current Acquisition if one is occurring, (2) set all Hardware Settings that have
been changed, not just the one the particular button is associated with, and (3) restart the
Acquisition (if one had been occurring) with the new settings without clearing the previous
spectrum.
Although it is completely up to the user (and subject to the characteristics of the detector being
used), it has been generally found that adjusting the Hardware Settings such that the 662 keV
peak is at about channel 1200 will give an overall energy range coverage to about 2,300 keV.
Hardware Settings are automatically saved and applied to a specific 970/detector combination
any time a Set button is pressed. If different sets of Hardware Settings are desired for the same
detector, create a “new” detector based on that detector, changing the description to reflect the
different purpose.
Model 970 Instruction Manual
38
Procedure
1. Click on the Hardware button on the 970 Button Panel. This will open the Hardware Settings
Panel along the bottom of the Spectrum Display.
2. Check the Allow Edit check box to enable the Hardware Settings.
3. Ensure that the HV is set to a reasonable value. For relatively new 970 users, Coarse Gain
should be at x2 (the lowest setting) and the Fine Gain should be at x0.500 for an overall Gain
of x1; the Threshold should be at 50 mV.
4. Click the Start Acquisition button to begin counting the source. Allow the source to count long
137
enough to see the relative locations of the two Cs peaks. NOTE: If excessive noise is
clearly visible in the lowest portion of the spectrum, increase the Threshold, clear the
spectrum, then restart the Acquisition. Repeat this process as needed.
5. If no peaks are visible, increase the HV and go back to step 4.
137
6. If both Cs peaks are not visible:
7. If there are very few counts to the right of the visible peak but many to the left (i.e., only the
662 keV peak is visible) and it is towards the right of the Spectrum Display, increase the HV
and go back to step 4.
8. If there are many counts to the right of the visible peak (i.e., only the 32 keV peak is visible
and the 662 keV peak is out of view to the right), decrease the HV and go back to step 4.
9. If there are very few counts to the right of the visible peak but many to the left (i.e., only the
662 keV peak is visible) but the peak is in close to the desired location on the spectrum,
adjust the Threshold closer to zero and go back to step 4.
137
10. If both Cs peaks are visible, but are farther apart than wanted, decrease the HV and go
back to step 4.
137
11. If both Cs peaks are visible, but are closer together than wanted, increase the HV and go
back to step 4.
12. If the HV is at the highest HV recommended by the detector manufacturer (or if it is higher
than you are comfortable with, or is obviously distorting the spectrum), leave the HV where it
is, increase the overall Gain and go back to step 4.
13. When the two peaks are in their optimal locations, uncheck the Allow Edit box.
14. Click the Full Screen button on the Button Panel to close the Hardware Settings Panel and
restore the spectrum to the largest possible viewable area.
Once all the Hardware Settings are finalized, an Energy Calibration can be performed.
6.3 Perform Energy Calibration
Prerequisites
This procedure assumes that the detector is attached to the Model 970, the 970 is switched on,
SNAP-MCA software has been successfully started, a radioactive source of known isotopic
composition is on the detector, and the 970 Hardware Settings have been set appropriately.
Note: The Energy Calibration is unique to each 970/detector combination. The specific Energy
Calibration settings are loaded when a specific detector is selected. If you intend to use the same
detector with different Energy Calibration values (e.g., to account for differing source geometries),
you can define separate detectors with different descriptions.
Model 970 Instruction Manual
39
Discussion
SNAP-MCA uses a linear interpolation between Energy Calibration points. More sophisticated
modeling was not implemented because the wide range of characteristics in the detectors
supported by the 970 makes it impossible to accurately model for all possible energy response. It
was also determined that there were certain advantages to using this method, especially in the
low-energy range. In short, the more data points entered, the more accurate the Energy
Calibration will be. If there is a limited energy region in which you are interested, adding additional
data points in those areas will increase the accuracy in that area without skewing the Energy
Calibration in other regions of the spectrum. Be careful, however, of energies that are
extrapolated very far beyond calibrated points.
If an estimate of the energies for the lowest and/or highest energies on the spectrum (i.e.,
energies at channels 1 and/or 4094) can be made, it is a good idea to enter these as Energy
Calibration points to reduce extrapolation error. Additional Energy Calibration points, up to a total
of 14, can be added or altered at any time during the operation of SNAP-MCA, and will be
reflected in all subsequent analyses. At least two calibration points must be entered to perform an
Energy Calibration.
It is not necessary to stop a spectrum Acquisition to perform or alter an Energy Calibration,
although Acquisition may automatically pause briefly and restart. Calibration points may be
entered in any order; they will be arranged by order of energy when the Enrgy Cal! button is
pressed.
If this step is begun immediately following the Hardware Settings procedure above, and the final
137
Cs spectrum is displayed, that spectrum can be used instead of acquiring a new one (skipping
step 1 below).The spectrum can be zoomed in or out at any point as desired by using the mouse
to drag a box on the Spectrum Display.
Procedure
1. Acquire a spectrum with known peaks. It is usually a good idea to start with a relatively
137
simple spectrum, such as Cs.
2. From the Utility menu, select Energy Calibrate… The Energy Calibration window will appear.
137
If this is the first Energy Calibration for this detector, the energies for the two Cs peaks will
be present. The Energy Calibration window can be moved around the screen by clicking on
the blue bar along the top and dragging it to the desired location.
Model 970 Instruction Manual
40
137
3. Assuming a Cs spectrum is displayed, assign channels to the energies by:
4. Clicking the radio button next to “32.89” keV. The keV box and the channel box to its
immediate right will turn yellow.
5. Move the mouse cursor over the 32.89 keV peak on the Spectrum Display and double click.
A yellow line will appear on the spectrum indicating the location of this Energy Calibration
point, and the channel number will appear in the channel box.
6. If the Energy Calibration point is not in the optimal location, adjust its location by double
clicking in a different location, clicking on the relevant Channel box and entering the desired
channel number using the keyboard, or using the spin buttons to the immediate right of the
relevant “Channel” box to move the data point up or down one channel at a time.
7. Click the radio button next to “661.7” keV. The keV box and the Channel box to its immediate
right will turn yellow.
8. Move the mouse cursor over the 661.7 keV peak on the Spectrum Display and double click.
A yellow line will appear on the spectrum indicating the location of this Energy Calibration
point. Adjust the location of the yellow line as in step 3.c.
9. Click the Enrgy Cal! button. This will perform an Energy Calibration based on the initial two
data points. The Energy Calibration window will remain open. At this point, when the cursor is
moved over the Spectrum Display, the energy associated for the cursor location will be
displayed in the Spectrum Status Bar in addition to the status bar.
10. Acquire additional spectra and add additional Energy Calibration data points as desired.
When finished, click the Close button to hide the Energy Calibration window.
Model 970 Instruction Manual
41
6.4 Perform a Shape Calibration
Prerequisites
This procedure assumes that the detector is attached to the Model 970, the 970 is switched on,
SNAP-MCA software has been successfully started, a radioactive source of known isotopic
composition is on the detector, the 970 Hardware Settings have been set appropriately, and an
Energy Calibration has been performed.
Discussion
For NaI (Tl) detectors, the Full Width at Half Maximum (FWHM) is proportional to the square root
of the centroid energy as is the overall peak area. The Shape Calibration helps determine the
exact multipliers for the FWHM for the specific detector.
Procedure
1. Acquire a spectrum with known peaks. It is usually a good idea to start with a relatively
137
simple spectrum, such as Cs.
2. From the Utility menu, select Shape Calibrate… The Shape Calibration window will appear.
The Shape Calibration window can be moved around the screen by clicking on the blue bar
along the top and dragging it to the desired location.
3. On the Spectrum Display, double click near the center of a well-defined peak. This will put a
red line in the centroid of the peak as well as calculate and display the FWHM multiplier. Two
additional red lines will also be displayed estimating the bounds of the peak area.
4. Use the group of four buttons to adjust the outer red lines to accurately reflect the boundaries
of the peak.
5. Click the Shape Cal button.
The Shape Calibrations are now complete.
Model 970 Instruction Manual
42
6.5 Create a Regions of Interest (ROI) Set
Prerequisites
This procedure assumes that the detector is attached to the Model 970, the 970 is switched on,
SNAP-MCA software has been successfully started, a radioactive source of known isotopic
composition is on the detector, the 970 Hardware Settings have been set appropriately, and an
Energy Calibration has been performed.
Discussion
An ROI Set must be created in order to perform a detector Efficiency Calibration. You will also be
able to use ROI Set later for performing a Quantitative Analysis of a spectrum.
There are two ways to create an ROI Set. In the first method, a spectrum is acquired and the Find
Peaks button is pressed from the Peak-Based Panel, edited as desired, then saved as an ROI
Set. The ROI Set can be further edited from the ROI Panel, including adding or removing specific
ROIs to or from the set. In the second method, ROIs are created from scratch by manually
selecting portions of the spectrum.
ROI Sets are based on energy, not channel. This allows an ROI Set to be used with more than
one detector. The channel locations for the starting and ending points are re-calculated from the
stored energy values each time the ROI Set is loaded and when an Energy Calibration is
performed.
ROIs will be sorted by energy, from lowest to highest, when an Efficiency Calibration is
performed.
Procedure: Creating an ROI Set Using Find Peaks (“Automatic Method”)
1. Acquire a spectrum with known peaks. It is usually a good idea to start with a relatively
137
simple spectrum such as Cs.
2. Click on Peak-Based on the SNAP-MCA Button Panel. This will open the Peak Settings
Panel along the bottom of the Spectrum Display.
Model 970 Instruction Manual
43
3. From the Peak-Based Panel, click on Find Peaks. The peaks and their ROIs will be
highlighted automatically in green.
4. The found peaks can now be edited, if desired, by clicking on the Allow Edit box. The user
can now adjust the centroid and the left and right edges of each peak region. Peaks can also
be added as well as deleted.
5. To add a peak, simply click on the Double Click Adds Peak box. Locate a peak on the
spectrum with the mouse and double click. Another peak region will appear.
6. To adjust the centroid, left or right edges of any peak region:
7. Select a peak using the Selected Peak arrow set. (Default designates the left-most peak as
#1.) The selected peak will appear in purple highlight, while the remaining peaks will be
highlighted in green.
8. Using the Centroid (keV), Left Edge (keV), and Right Edge (keV) arrow sets, adjust
accordingly. (Double arrows adjust the settings in approximately 5 keV increments, while the
single arrows adjust the settings in approximately 0.5 keV increments.)
9. To delete a peak, first select the peak to be deleted using the Selected Peak arrow set. Once
the peak is highlighted, click on the Kill Peak button.
10. When finished editing found peaks, click on Make ROI on the Peak Panel to convert the
found peaks into an ROI Set. A message will display indicating that the ROI Set should be
given a name. Naming the ROI Set can be put off until later, but it is highly recommended
that a name be given now.
Model 970 Instruction Manual
44
11. Type a name in the Save ROI Set dialog, and click the Save button.
12. Once the set has been saved, the panel along the bottom of the Spectrum Display will
switch over to the ROI Panel to allow additional editing, if desired.
13. Editing the ROI Set from the ROI Panel is described in the next section.
Procedure: Manually Creating or Editing an ROI Set (“Manual Method”)
1. Acquire a spectrum with known peaks. It is usually a good idea to start with a relatively
137
simple spectrum such as Cs.
Model 970 Instruction Manual
45
2. Click on ROI Panel on the SNAP-MCA Button Panel. This will open the ROI Edit Settings
Panel along the bottom of the Spectrum Display.
3. To create a new ROI Set, click on the New ROI Set button to assign a file name to the new
set. (If this is not done before the following steps, a “Not Saved!” warning will be displayed as
a reminder. This warning will also be shown any time the ROI as displayed is different from
the saved ROI file.)
4. To create an ROI by dragging on the Spectrum Display:
5. Use the left and right arrow buttons to either select an existing ROI to edit (it will be displayed
on the spectrum in fuchsia) or select a “blank” ROI (input fields will be blank and no fuchsia
will be present on the Spectrum Display).
6. Click on the Set ROI radio button.
7. Use the cursor to locate the edge of the desired region. Click and drag the fuchsia box to
encompass the desired region
8. To create an ROI by double clicking each edge:
9. Use the left and right arrow buttons to either select an existing ROI to edit (it will be displayed
on the spectrum in fuchsia), or select a “blank” ROI (input fields will be blank and no fuchsia
will be present on the Spectrum Display).
10. To set the left edge, check the Double Click to set Starting Energy (keV) radio button. To set
the right edge, check the Double Click to set Ending Energy (keV) radio button.
11. Position the cursor at the suitable location on the Spectrum Display and double click.
12. The energy and associated channel will be displayed in the appropriate boxes on the ROI
Panel.
13. When both edges have been entered, the ROI will be displayed on the spectrum in fuchsia.
14. ROIs can be edited by using the relevant arrow and double arrow keys. Arrows move the
edge of the ROI by a single channel; double arrows move the ROI by ten channels.
15. Type a name for the ROI in the ROI Name box. While it is not strictly required that each ROI
be given a name, it is strongly recommended. Individual ROI names can be up to 24
characters long.
16. Repeat as needed for additional ROIs.
17. You can acquire a new spectrum to add additional ROIs.
18. After editing, don’t forget to save the ROI Set.
You are now ready to perform an Efficiency Calibration
6.6 Performing an Efficiency Calibration
Prerequisites
An Energy Calibration must be completed and an ROI Set loaded before an Efficiency Calibration
can be performed. ROIs will be sorted by energy, from lowest to highest, when an Efficiency
Calibration is performed.
Model 970 Instruction Manual
46
Discussion
Efficiency Calibrations are attached to specific ROI Sets. Known activities of known isotopes are
assigned to specific energies in the spectrum. SNAP-MCA uses a linear interpolation between
Efficiency Calibration points to allow Quantification of isotopes for which no specific calibration
source is available. The same Efficiency Calibration is used when performing ROI, peak, or
library-based Quantification.
Note that the ROI Set can contain isotopes that are not included in the Efficiency Calibration
source. These must be designated as “unknowns,” however, so that SNAP-MCA knows to
calculate efficiencies for these ROIs from interpolated data.
The perfect Efficiency Calibration source matches exactly the type of samples you will be
quantifying in isotopic composition, activity, and physical makeup. A good Efficiency Calibration
source contains isotopes with energies similar to or at least bracketing those you are interested
in.
Isotopes and specific peaks must be assigned to all ROIs including “unknowns.” The selections
for these are limited to those enabled in the library currently being used.
Procedure
1. Acquire a spectrum of your Efficiency Calibration source. A Background Spectrum should
also be subtracted from the display if that is how your samples will be analyzed.
2. Click on Efficiency on the SNAP-MCA Button Panel. This will open the Efficiency Calibration
Panel along the bottom of the Spectrum Display.
3. To calibrate, click on the Allow Edit box.
4. Select a specific ROI using the ROI # arrows.
Model 970 Instruction Manual
47
5.
6.
7.
8.
9.
10.
11.
12.
13.
14.
15.
If the ROI is one contained in the calibration source:
Select the nuclide for the ROI from the Associated Nuclide drop-down list.
Select the peak energy for the ROI from the Associated Peak drop-down list.
Enter the activity of the source being used in the Activity box.
Select the appropriate units from the Units drop-down list. NOTE: The units must be the
same for all isotope activities entered for the calibration!
If the ROI is not contained in the calibration source :
Check the Assign ROI as Unknown box.
Select the nuclide for the ROI from the Associated Nuclide drop-down list.
Select the peak energy for the ROI from the Associated Peak drop-down list.
Click on the ROI Eff. Cal! button.
Click on the Report button to view, save, or print the Efficiency Calibration report. This report
is available any time following the Efficiency Calibration, until replaced by a new Efficiency
Calibration.
6.7 Fine Tuning Hardware Settings
Prerequisites
This procedure assumes that an Energy Calibration has been performed.
Discussion
The Fine Tuning procedure provides an automated way of adjusting the Fine Gain to compensate
for small shifts in the spectrum due to changes in the temperature, etc., of the detector.
This procedure can also be done manually. In many cases, it is quicker to manually adjust the
Fine Gain setting.
Procedure
Click on the Fine button on the Button Bar. A small window will pop up and display an isotope
selection drop-down menu and an energy peak selection drop-down menu. The Hardware
Settings Panel will also open along the bottom of the Spectrum Display, but only the Fine Gain
Adjust (±64) will be active.
1. Select an isotope and an energy peak from the drop-down menus.
2. Click on the Fine Tune button. Note: The corresponding isotope source must be on the
detector in order for Fine Tuning to be successful.
3. A series of Acquisitions will follow until the most accurate Fine Gain adjustment is achieved.
This can take several minutes.
4. A “Fine Gain Adjustment Complete” message will appear when the procedure is done.
Model 970 Instruction Manual
48
7 Support Programs
Several levels of technical support are available for users of the Model 970.
7.1 Factory Technical Support
Berkeley Nucleonics offers fast and efficient support from our headquarters in California, as well
as several satellite offices domestically and abroad. Visit our website at
http://www.berkeleynucleonics.com/ for the support and service center nearest you, or call 800234-7858. Technical support programs range from First Responder end user support to
advanced Health Physics technical assistance.
7.2 Protocol Development
Radiation Detection is a growing field, and many organizations are developing new protocols to
address applications for interdiction of illegal transportation to confirmation of medical treatments.
Conventional applications such as environmental remediation are also faced with new
challenges. To assist in the development of protocols around your application, Berkeley
Nucleonics can offer seasoned Health Physicists to work closely with your team. Contact our
factory to discuss the details of your application. Domestic or International, Classified or NonClassified, we have an on-site support team available to assist.
7.3 Vendor Enhanced Reachback Program
For applications when expedited support and spectroscopic analysis is required, Berkeley
Nucleonics has established an around-the-clock support program available to customers of the
Model 970 Portable Multi-Channel Analyzer. Access to spectroscopists can give your decision
making management team, and your mitigation activities added credibility. Whether you are
considering the event itself, or the documentation requirements that follow, enlist our team of
spectroscopists with an Enhanced Reachback Program.
7.4 State or Federal Agency Support
Several State and Federal agencies are available to support your application. Our
knowledgeable team will assist you in setting up your instruments to automatically condition the
data in formats required by these agencies. Data can be exported automatically, or via electronic
mail, to allow remote experts to analyze the information. A current list of email addresses, phone
numbers, and contact names can be obtained from the factory, at 800-234-7858.
Model 970 Instruction Manual
49
8 Specifications
Preamplifier
Type:
Input:
Output:
Charge Sensitive
Negative Current (anode)
Positive HV supply variable 0 V to 2000 V (0.5 mA)
Negative HV supply also available
Type:
Speed:
4096 channel, 14-bit pipelined
50 MHz
ADC
Pulse Processing
Type:
Shaping:
Gain:
LLD:
ULD:
Zero:
Digital, Trapezoidal Shaping
250 ns to 10 µs
Digital, x1, x2, x4, x15, x35, x125, and x250.
0 to 100 % of full scale digitally adjustable in .006 % intervals
0 to 100 % of full scale digitally adjustable in .006 % intervals
-5 % to + 5 % of full scale, digitally adjustable
Spectrum Conversion
Collection Mode:
Conversion Modes:
Linear – 16384 Channels
Linear – 4096 Channels
System Controller
Processor:
Controls:
I/O:
PPC405 CPU at 50 MHz
SNAP-MCA and SNAP-MCA Full software
RS-232 (16550 UART or higher)
USB port is also acceptable if USB-to-RS232 adapter is used
Input Power
Batteries:
AC:
Motor Vehicle:
Internal, 6 x 1800 mAh NiMH AA batteries
110VAC or 220VAC to 12V DC adapter (1.25A)
12V, 1.25 A if Fast Charge, 750 mA if Slow Charge
Output Power
Logic and Alarms:
+5V, +12V and -12V via Mini DIN-7 connector
Gamma Detector
Crystal:
Bias:
2” x 2" or 3” x 3” NaI; or 1” x 1” or 1.5” x 1.5” CeBr
Integral HV supply from 0 – 2000 V
Actual operating voltage calibrated to each detector
Input 1 – Series “C” connector
Input 2 – SHV connector (supply) and BNC connector (signal)
Connection:
Neutron Detector (if present)
Type:
Moderator:
Discriminator:
6
3
LiI or He
1 cm polypropylene
Digital pulse shape and energy discrimination
Physical
Temperature:
Weight:
Size:
32° - 122°F (0° to 50°C)
391 grams (13.8 oz.)
157 x 90 x 44 mm (6.2 x 3.5 x 1.7in.)
Model 970 Instruction Manual
50