1
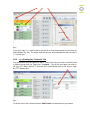
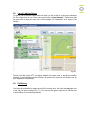
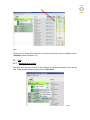
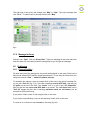
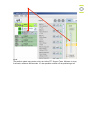
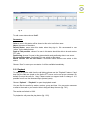
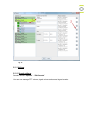
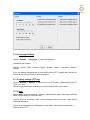
User Manual
Helios PTT Network Management &
Dispatch System for Windows PC
Technical Support:
Tel.: 1 250 762 7540
E-Mail: [email protected]
Version 1.0
Table of Contents 1 Technical Support ............................................................................3 2 User Manual ......................................................................................3 2.1 Install Helios PTT ............................................................................................ 3 2.2 Log-in credentials ........................................................................................... 3 2.3 Group Calls ..................................................................................................... 4 2.3.1 Talking to Group ...................................................................................... 4 2.3.2 Switch Groups ......................................................................................... 4 2.4 1:1 Calls .......................................................................................................... 5 2.4.1 1:1 call using the list of group members .................................................. 5 2.4.2 1:1 call using the “Contacts” List.............................................................. 6 2.5 1:n call / ad-hoc Group ................................................................................... 7 2.6 Call History ..................................................................................................... 7 2.7 Chat ................................................................................................................ 8 2.7.1 Message to one User............................................................................... 8 2.7.2 Message to Group ................................................................................... 9 2.8 Positioning ...................................................................................................... 9 2.8.1 Current Position ....................................................................................... 9 2.8.2 Position History ...................................................................................... 11 2.9 Status definitions .......................................................................................... 11 2.10 Playback ..................................................................................................... 12 2.11 Settings ....................................................................................................... 13 2.11.1 Sound settings ..................................................................................... 13 2.11.2 Language Settings ............................................................................... 14 2.11.3 Hotkey settings (PTT key) ................................................................... 14 2.11.4 View ..................................................................................................... 14 1 Technical Support
E-Mail: [email protected]
2 User Manual
2.1
Install Helios PTT
Download the Helios PTT software for Windows PC here:
http://admin.heliosglobaltech.com/Downloads/Helios_PC.exe
Save this file on your PC and double-click to open it. Follow the installation guide. This
will install the software. An icon “Helios PTT” will be created on your desktop. Doubleclick this icon to start the Helios PTT software. Helios PTT PC Dispatcher requires Java.
If you are not sure if Java is already installed on your PC you may check here:
https://www.java.com/en/download/installed.jsp?detect=jre&try=1
If you have Java already but the installation fails please check your user permissions, try
again as administrator and/or choose another installation folder.
2.2
Log-in credentials
When you start Helios PTT the first time, you have to enter “Name”, “Password” and
“Customer”. You will get this information in Helios PTTs self administration portal:
http://admin.heliosglobaltech.com/Account/LogOn
fig. 1
You don´t have to change anything in the advanced settings: correct values are set as
default settings.
2.3
Group Calls
2.3.1 Talking to Group
To start a group call click the bullhorn symbol and hold it during your announcement (fig.
2/1). The group you joined is displayed in green color and on the top of the list (fig. 2/2).
You may also use the “ctrl”-key of your keyboard. This enables you also to use e.g. a
foot switch to do PTT calls (chapter 2.11.3 shows how to change the ctrl key to any other
key which is suitable for you):
fig. 2
2.3.2 Switch Groups
To switch to a group you never joined before select tab. “Groups” (fig. 3/1). Type the
name of the group (or part of it) you want to join in the search field (fig. 3/2). Do a
double-click on the group you want to join or choose “Join Group” (on the right end of the
screen).
fig. 3
If you already joined this group before just double-click the group name in the list to join
the group (fig. 4):
fig. 4
2.4
1:1 Calls
2.4.1 1:1 call using the list of group members
To start a 1:1 call to a member of the group you joined click on the green earphone (fig.
5/1). This will open the “PTT Session box” (fig. 5/2). Use the bullhorn in this box to talk to
the user and the user will be able to answer. When you finished the 1:1 call press the
red earphone in the box.
fig. 5
If you don´t want a 1:1 session with a user but to do an announcement to a user use the
small bullhorn (fig. 5/3). The single user will get your announcement but will not enter a
1:1 call with you.
2.4.2 1:1 call using the “Contacts” List
You recommend using this option to start 1:1 calls if the user you want to call has joined
a different group than you. Select tab. “Contacts”. Type in the user name you want to
call (fig. 6/1). When Helios PTT finds the user name double-click on the entry to open
the “PTT Session Box”
fig. 6
To save a user in the contact list press “Add Contact” on the bottom of your screen.
2.5
1:n call / ad-hoc Group
To start a call to selected users mark the users you like to talk to in the group members
list. Do a right-click on one of the users and choose “Create Session”. Please note that
you also have to mark your own user, in this example “PC Dispatcher” to be a part of the
session.
fig. 6A
Please note that Helios PTT can adjust whether the users have to accept the session
manually or automatically join the session. By default the users join the session set up
by a dispatcher automatically.
2.6
Call History
You have the possibility to replay the last 20 incoming calls. Just click the play sign next
to the call you want to replay (fig. 7/1). You may use the green earphone to call this user
or the bullhorn to do an announcement:
fig. 7
Please note: to replay calls which are not shown in the history any more please use the
“Playback” feature (chapter 2.10).
2.7
Chat
2.7.1 Message to one User
Select the user you want to write a text message in the group members list on the left
side. Press the right mouse key and choose “Open Chat”:
fig. 8
The right side of the screen will change from “Map” to “Chat”. Type your message and
click “Send”. To switch back to the map click the tab. “Map”.
fig. 9
2.7.2 Message to Group
Switch to tab. “Chat”. Click on “Group Chat”. Type your message in the lower white box
and click send. All users who joined the same group as you will get the message.
2.8
Positioning
2.8.1 Current Position
All users who joined the same group as you will be displayed on the map (if they have a
device with enabled GPS and the proper permissions). To see also the users from your
contact list choose “View” – “show all contacts on map”.
To centralize the map on a user do a single-click on this user in the group´s member list,
e.g. on user “User 03” (fig. 9 (1)). This user is sending current GPS data – that tells you
the globe on the left of the user. The “house” icon, e.g. left of user “PC Dispatcher”
tells you that this user never sent GPS data to our server. The “cell tower icon” next to
“User 02” means that this user is sending positions based on cell towers (not as
accurate as GPS positioning).
If you want to follow a user on the map just click on this user.
If you want to stop following a user on the map do a double click on this user.
To zoom-in or to zoom-out use the scale on the map (fig. 9/2).
fig. 9A
The position update rate can be set by the Helios PTT Support Team. Minimum is every
2 seconds, maximum 999 seconds. It´s also possible to switch off the positioning at all.
2.8.2 Position History
Choose “Options” – “Location Tracking”. This will open two windows. Drag and drop
the relevant user from the left window into the right one to field “UserId” (fig. 10). Enter
the time period you are interested in. Optional you can display User-ID, Alias, Date…
Press “OK” to see the history.
fig. 10
2.9
Status definitions
You have the options to define your own statuses like e.g. “busy” or “vacant”. You can
choose between several colors. The users with this status will be displayed in this color
in the group list and also on the map. You can choose for each status if there should be
incoming and outgoing PTT calls or if they get blocked.
Choose “Options” – “Status definitions”. The following window will open up:
fig. 11
To add a new status choose “Add”.
Parameters:
Color: a user in this status will be shown in this color to all other users
Name: the name of the status.
Default Status: users enter this status when they sign in. We recommend to use
“online” for the default status
Push-to-Talk possible: choose if a user in this status should be able to do and receive
PTT calls.
Positioning: choose if a user in this status should send positioning data to our server
PC can set this status: if activated PCs can switch to this status.
Mobile devices can set this status: if activated mobile devices can switch to this
status.
Choose “Save” to save your new status. It will be available immediately.
2.10 Playback
To replay not just the calls from the call history please use the “Playback” feature. If and
how long the calls are stored on the Helios PTT server can be set up per customer. By
default we store the calls for 1 day. Please contact our support team to change it. It is
possible from 0 to a few thousand days (several years).
Choose “Options” – “Playback” to open the playback mask.
You can filter the results by sender, receiver, group and time. You may enter username
or alias to the mask or you are also able to drag and drop the user (fig. 12/1).
The results are limited to 1000.
To playback a call press the play button (fig. 12/2).
fig. 12
2.11 Settings
2.11.1 Sound settings
Sounds: choose “Options” – “Edit Sounds”
You can now manage PTT volume, signal volume and several signal sounds:
2.11.2 Language Settings
Choose “Options” – “Languages” to switch the language.
Available at the moment:
Chinese, Czech, Dutch, German, English, Spanish, French, Portuguese, Russian,
Turkish.
If you are missing a language get in touch with the Helios PTT support team and we will
provide all the tools you need to do the translation.
2.11.3 Hotkey settings (PTT key)
Choose “Options” – “Hotkeys” to choose your own PTT hotkey. Default hotkey for PTT
is the “Ctrl”- Key.
Please note that this option enables you to use accessories like a feet switch.
2.11.4 View
Select “View” to choose between 3 different map materials (Open Street Map, MS Bing
Maps, Google Maps) or to hide the map.
Choose “show all contacts on map” to see colleagues who are active in other groups
/channels than yours.
Choose if the talking history is displayed or not and also if the history is empty after a
restart of Helios PTT.
Your HELIOS PTT Team will be available for you at any time to
take you further.
Tel.: 1 250 762 7540
Mail: [email protected]