1
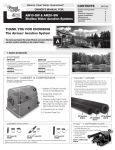
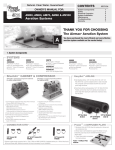
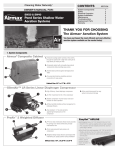
MAINTENANCE SAFETY:
• Always use parts that are supplied or approved by Airmax®. Use of other parts may result
in poor performance and could create a hazardous situation.
• Always unplug the system from the outlet and refer servicing to a qualified electrician
under the following conditions:
1. When the power cord is damaged or frayed.
2. If the compressor is producing unusual noises or odors.
Aeration
KoiAir
™
Water Garden Aeration Kit
REGULAR MAINTENANCE:
INSTALLATION INSTRUCTIONS
Diaphragm Maintenance
Your KoiAir™ compressor will need a maintenance kit (KoiAir™ KA20- Item #510145, KoiAir™
KA40 - Item #510146) every 12–36 months depending on: operating depth, air quality and
operating temperature. If your compressor is operating but there is no air coming out of
the diffusers, you will generally find that it is time to replace your diaphragm.
Membrane Stick Maintenance
No maintenance required. Replace membrane sticks (#510168) if visibly damaged or if
system has poor performance.
Air Filter Cleaning
Unscrew the cover on the back of the compressor to expose the air filter. Remove the
air filter and brush away any dust particles. Air filter should be replaced every 6 months.
(KoiAir™ 1- #510153, KoiAir™ 2- #510149)
PRODUCT WARRANTY:
The KoiAir™ Aeration Kit comes with a 3-Year Limited Warranty. This limited warranty
is extended exclusively to the original purchaser and begins from the date of original
purchase receipt. Membrane sticks, airline and diaphragms are considered wear items
and are not covered by this warranty. Abuse or misuse of this product voids all warranty.
Any sign of water damage inside the unit voids all warranty. For warranty claims, product
must be returned to the original place of purchase with original receipt.
GREAT FOR ALL SEASONS!
SA
FACTIO
TIS
4
Important Information . . . . . . . . . . . . . . . . . . . . .
Winter Operations . . . . . . . . . . . . . . . . . . . . . . . . . .
Getting to Know Your KoiAir™ Aeration Kit . . . . .
Installing Your KoiAir™ Aeration Kit . . . . . . . . . . .
N
SA
N
SA
014_13
Table of Contents:
FACTIO
TIS
GUARANTEED
GUARANTEED
SA
FAC
TIS TI
ON
Airmax®, Inc.
Natural. Clear Water. Guaranteed.™
www.airmaxeco.com
FAC
TIS TI
ON
THANK YOU FOR CHOOSING:
2 Maintenance Safety . . . . . . . . . . . . . . . . . . . . . . . . 4
2 Regular Maintenance . . . . . . . . . . . . . . . . . . . . . . . 4
3 Warranty Information . . . . . . . . . . . . . . . . . . . . . . 4
3
IMPORTANT INFORMATION:
• Never connect to an extension cord. This may result in equipment failure.
• Do not allow anything to rest on the power cord.
• Do not place the unit where people may step on the power cord.
• Never override electrical or mechanical interlock devices.
• Never attempt maintenance functions that are not specified in the user manual.
• Never operate the system if unusual noises or odors are detected. Disconnect the power
cord from the outlet and call for service.
GETTING TO KNOW
YOUR KoiAir™ AERATION SYSTEM:
DANGER:
• Read the operating instructions carefully.
• To reduce the risk of electric shock, connect only to a properly grounded groundingtype receptacle.
• THIS UNIT IS TO BE USED IN A CIRCUIT PROTECTED BY A GROUND FAULT
CIRCUIT INTERRUPTER.
• This unit has not been investigated for use in swimming pool areas.
• Disconnect unit from power source before handling.
• Repair and exchange of cable must be carried through by the supplier/manufacturer.
WINTER OPERATION:
DANGER:
INSTALLING YOUR KoiAir AERATION SYSTEM:
™
Step 1 - Decide on a Location
Decide on a location for the compressor.
It’s important to elevate the compressor a few
inches above ground level, making sure the
compressor is above the pond’s water surface.
If power is not available at the pond’s edge, the
compressor may be located at the power source
and extra airline can be added (up to 100’) to
reach your desired diffuser location. NOTE: It is
recommended that the compressor be covered
and not exposed directly to the elements. This
can be accomplished by purchasing a small
TrueRock™ cover (Item #510330). If you decide to
use your own cover, make sure it will keep water
from coming in direct contact with the compressor and that there is plenty of ventilation.
2
2
C
E
KoiAir™ 2 shown above.
KoiAir™ 1
KoiAir™ 2
A High Efficiency Compressor
KA20:
KA40:
B Control Valve
N/A
Includes control valve
to balance airflow
between both diffusers.
C EasySet™ Weighted Airline
Includes 25’ of
weighted airline.
Includes 50’ of
weighted airline.
D KoiAir™ Weighted Diffuser
(1) KoiAir™ Diffuser
(4’ Max Depth)
(2) KoiAir™ Diffusers
(4’ Max Depth)
E Spring Clamps
(2) Spring Clamps
(2) Spring Clamps
B
(for ponds up to 8,000 gallons)
Operating in freezing conditions on an ice-covered water garden will cause open water
areas, even in freezing conditions. Also, the ice thickness around these open areas will
be much thinner than the ice over the remainder of the pond. Injury or fatality may
result from falling through the ice. Airmax® strongly recommends that this danger of thin
ice around the diffuser site be clearly posted at frequent intervals. Owner assumes all
responsibility for operating KoiAir™ Aeration Kit during winter months.
If you choose to turn off your system for the winter, do the following:
• Unplug the system and remove the diffuser(s), airline(s) and compressor.
• Store in a dry area protected from the elements such as a garage or basement (climate
control recommended).
1
D
A
Step 2 - Connect The Airline
Single Diffuser Systems: Connect the weighted airline to the outlet
on the compressor using the 21/4” rubber connector and included spring
clamps. Connect the other end of the airline to the diffuser. No clamp is
needed on the diffuser end.
Multiple Diffuser Systems: Connect the included 21/4” rubber connector
to the compressor and use one of the clamps to keep it in place. Connect
the bottom of the three-way air manifold to the rubber connector and
clamp it in place. Next, using the weighted airline, measure the distance
from the compressor to the approximate location of your diffuser. Ensure
to add a few feet to compensate for the depth of the pond. Cut the
weighted airline to the appropriate lengths and connect them to the
three-way air manifold as well as the diffusers. No clamps are needed for
airline.
3
Step 3 - Place Your
Diffuser(s) Find a location in
your water garden to place the diffuser. If
you have two diffusers, distribute them
equally throughout the water garden. Do
not exceed the max depth rating of 4’ when
placing your diffusers. Depths in excess of
this rating will greatly reduce airflow to
the diffuser and cause excess strain on the
compressor reducing its life expectancy. In
case of extreme temperatures (hot or cold),
it is recommended to relocate plates from
the deepest points of your pond.
17 Watts @ 115 Volts
(for ponds 8,000 - 16,000 gallons)
35 Watts @ 115 Volts
4
Step 4 - Adjust Your Valves (Systems with
Multiple Diffusers Only)
Adjust three-way air manifold to balance airflow between diffusers, if
desired. It is not necessary to have even airflow between diffusers, nor will
it have any effect on the life expectancy of the compressor. Valve positions
are as follows:
A
B
C
A. Valve Pointing Down: Air Flow comes up from bottom and goes left.
B. Valve Pointing Between Bottom and Right: Air Flow comes up from
bottom and goes left and right.
C. Valve Pointing Right: Air Flow comes up from bottom and goes right.
3