1
O P E R A T I N G
I N S T R U C T I O N S
Version 06/09
MZK-W04NU
Wireless USB Broadband Router
Item-No. 97 21 58
These operating instructions belong with this product. They contain important information for
putting it into service and operating it. This should be noted also when this product is passed
on to a third party.
Therefore look after these operating instructions for future reference!
A list of contents with the corresponding page numbers can be found in the index on page 3.
CONRAD IM INTERNET http://www.conrad.com
Legal notice
These operating instructions are a publication by Conrad Electronic SE, Klaus-Conrad-Str. 1, D-92240 Hirschau
(www.conrad.com).
All rights including translation reserved. Reproduction by any method, e.g. photocopy, microfilming, or the capture in
electronic data processing systems require the prior written approval by the editor. Reprinting, also in part, is prohibited.
These operating instructions represent the technical status at the time of printing. Changes in technology and equipment
reserved.
© Copyright 2009 by Conrad Electronic SE.
01_0609_01/HK
Foreword
Explanation of the signals
In order to let you set up and use this product correctly, please pay attention when reading or browsing
the manual as you see these signals listed below.
Warning/ Danger
Users should read the explanation carefully and understand it completely, otherwise
users might be in danger or even be injured.
Caution/ Be Careful
Remind users to be careful when setting up the product and to avoid damaging the
product or its system programs.
Federal Communication Commission Interference Statement
This equipment has been tested and found to comply with the limits for a Class B digital device, pursuant
to Part 15 of the FCC Rules. These limits are designed to provide reasonable protection against harmful
interference in a residential installation. This equipment generates, uses and can radiate radio frequency energy and, if not installed and used in accordance with the instructions, may cause harmful interference to radio communications. However, there is no guarantee that interference will not occur in a particular installation. If this equipment does cause harmful interference to radio or television reception,
which can be determined by turning the equipment off and on, the user is encouraged to try to correct the
interference by one of the following measures:
-
Reorient or relocate the receiving antenna.
Increase the separation between the equipment and receiver.
Connect the equipment into an outlet on a circuit different from that to which the receiver is connected.
Consult the dealer or an experienced radio/TV technician for help.
FCC Caution: Any changes or modifications not expressly approved by the party responsible for compliance could void the user's authority to operate this equipment.
This device complies with Part 15 of the FCC Rules. Operation is subject to the following two conditions:
(1) This device may not cause harmful interference, and (2) this device must accept any interference
received, including interference that may cause undesired operation.
IMPORTANT NOTE:
FCC Radiation Exposure Statement:
This equipment complies with FCC RF radiation exposure limits set forth for an uncontrolled environment. To maintain compliance with FCC RF exposure compliance requirements, please avoid direct contact to the transmitting antenna during transmitting.
This transmitter must not be co-located or operating in conjunction with any other antenna or transmitter.
2
Table of Contents
FOREWORD ............................................................................................................................................2
CHAPTER1 INTRODUCTION OF MZK-W04NU ....................................................................................5
1. Contents of Package ......................................................................................................................6
2. Product Functions ..........................................................................................................................7
3. How to Set Up MZK-W04NU..........................................................................................................10
CHAPTER2 SETUP & CONFIGURATION ............................................................................................12
1. Client’s Computer Setup ..............................................................................................................12
2. Web Configuration ........................................................................................................................13
3. Switching Language......................................................................................................................15
4. Setup Wizard ..................................................................................................................................16
4.1. Enter Setup Wizard ............................................................................................................16
4.2. Broadband Type & IP Address Info ..................................................................................17
4.2.1. Static IP Address ................................................................................................................17
4.2.2. DHCP....................................................................................................................................18
4.2.3. PPPoE ..................................................................................................................................19
5. Status..............................................................................................................................................20
5.1. System ................................................................................................................................20
5.2. LAN ......................................................................................................................................20
5.3. WAN ....................................................................................................................................20
5.4. Wireless LAN ......................................................................................................................21
6. Management ..................................................................................................................................22
6.1.
6.2.
6.3.
6.4.
6.5.
6.6.
Remote Management..........................................................................................................22
Administrator ......................................................................................................................23
Date & Time ........................................................................................................................24
Firmware Management ......................................................................................................25
Save & Load Settings ........................................................................................................26
Load Default & Reboot ......................................................................................................28
7. LAN ................................................................................................................................................29
8. WAN ................................................................................................................................................30
8.1. Static IP Address ................................................................................................................30
8.2. DHCP....................................................................................................................................31
8.3. PPPoE ..................................................................................................................................32
8.4. PPPoE Unnumbered ..........................................................................................................34
8.5. PPPoE Multisession ..........................................................................................................36
3
CHAPTER3 ADVANCED SETUP & CONFIGURATION........................................................................38
1. Advanced........................................................................................................................................38
1.1. DHCP Server ......................................................................................................................38
1.2. UPnP ....................................................................................................................................40
1.3. Dynamic DNS ......................................................................................................................41
1.4. Static Routing ....................................................................................................................44
1.5. IPv6 Bridge ..........................................................................................................................45
2. Firewall............................................................................................................................................46
2.1. Local Server ........................................................................................................................46
2.2. DMZ ......................................................................................................................................47
2.3. IP Filtering ..........................................................................................................................48
2.4. Firewall Settings ................................................................................................................49
3. Wireless LAN..................................................................................................................................50
3.1. Common Settings ..............................................................................................................51
3.2. Basic Settings ....................................................................................................................52
3.3. Security................................................................................................................................53
3.4. MAC Filtering ......................................................................................................................57
3.5. WDS ....................................................................................................................................58
3.6. WPS......................................................................................................................................59
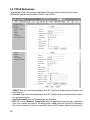
4. USB ................................................................................................................................................60
4.1. USB Device..........................................................................................................................60
4.2. File Server Settings ............................................................................................................63
4.2.1. Basic Settings ....................................................................................................................63
4.2.2. User Settings ......................................................................................................................63
4.3. Bit Torrent............................................................................................................................65
4.4. iTunes Server ......................................................................................................................69
4.5. DLNA Media Server ............................................................................................................70
5. Log ..................................................................................................................................................71
5.2. System Log ........................................................................................................................71
6. Konformitätserklärung (DOC) ......................................................................................................72
4
Chapter1
Introduction of MZK-W04NU
Introduction
Thank you for purchasing Wireless USB Broadband Router MZK-W04NU. This router is a multi-function device which provides shared broadband Internet access for all LAN users, 4-Ports switching
hub for 10/100 Base-T connections and an additional USB port.
MZK-W04NU has embedded with IEEE802.11b/g and 802.11N Draft 2.0 wireless communication standard. All the PCs and network devices, including PDA, mobile phone, game console and other digital
appliances, with wireless functions can surf online wirelessly through MZK-W04NU wireless broadband
router. Cooperate with 802.11N Draft 2.0 wireless adapter, MZK-W04NU can let data transmission rate
up to 300Mbps! It also has the built-in WPS function. All you need to do is to press a button and then you
can easily setup up wireless Internet and security settings. (Only Windows XP and 2000 OS support
WPS function.)
MZK-W04NU incorporates many advanced features, and it was designed to provide sophisticated but easy
to use functions. MZK-W04NU has a built-in Web server, thus you can access its settings through Web
browsers, such as IE, Netscape, Firefox, and so on. You can set up and configure the settings easily and
completely and enjoy the convenience instantly.
MZK-W04NU has an USB port and supports BitTorrent download, iTunes Server, DLNA and NAS functions. With all these features, MZK-W04NU must be the best solution for both beginners and advanced
users.
Special Features
➢ Compatible with IEEE802.11n Draft2.0
It is compatible with the regulation of next generation of high speed wireless LAN IEEE802.11n Draft2.0.
At maximum, 300Mbps throughput can be achieved. It can also build steady connections at isolated
place or blocked dead spot by using multiple antenna.
➢ Support WPS (Wi-Fi protected setup)
You just need to push a button to setup wireless Internet and security setting.
➢ BitTorrent supported
MZK-W04NU supports BitTorrent for efficient file downloading in narrow/broad band. BitTorrent is the
large file distribution system. One of the assets of this BitTorrent is that downloading will be more efficient
and fast as the file become popular and popular.
➢ iTunes Server supported to share the music
MZK-W04NU supports (Only FAT32 format supported) iTunes Server, and all the computer under the
same LAN can share music easily.
5
➢ DLNA (Digital Living Network Alliance)
As long as connect MZK-W04NU to digital multimedia equipment which supports DLNA (Digital Living
Network Alliance), it does not need miscellaneous settlement. It can broadcast the digital contents stored
in NAS easily, and let you easily build your digital home easily.
➢ Serves as NAS with additional hard disks
MZK-W04NU is equipped with one USB 2.0 port, and supports NAS (Network Attached Storage). The
product serves as network storage when a USB hard disk is attached to it, and files in the hard disk can
be shared throughout the network via the router. The product also supports USB flash memory.
➢ 3dBi powerful antenna
The 3dBi antenna increases the connection distance and provides steady connection for wireless LAN.
1. Contents of Package
After purchasing MZK-W04NU Wireless Router from a distributor or an agency, please open the package and check that all the components listed below are included. If there is any item missing or damaged, please contact with the distributor or the agency at once.
•
•
•
•
•
•
MZK-W04NU x 1
3dBi Antenna x 3
User’s Manual x 1
AC Adapter x 1
RJ-45 Cable x 1
CD (with Addons included) x 1
6
If plug the AC adapter which includes in the product package into a socket with different
voltage power supply, it will cause damage and that is not included in warranty.
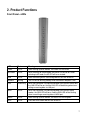
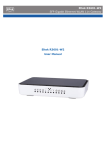
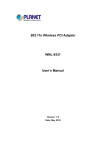
2. Product Functions
Front Panel—LEDs
LEDs
Status
Meaning
Power
On/Off
When starting up MZK-W04NU, the Power LED will be on.
AP/Router
On/Off
When switching to Router mode, the Router LED will be on. When
switching to AP mode, the AP LED will be on instead.
USB
On/Off
When connecting with a USB storage device, the LED will be on.
Wireless
Blinking
The LED will be blinking steadily while the wireless reception is fine.
LAN
On/Blinking
When the connection is established between MZK-W04NU and a host,
the LAN LED will be on. And the LAN LED will be blinking when transmitting or receiving data via LAN port.
WAN
On/Off
When the connection is established between MZK-W04NU and a
modem, the WAN LED will be on. And the WAN LED will be blinking
when transmitting or receiving data via WAN port.
Status
On/Off
When starting up MZK-W04NU, the Status LED will be green.
WPS
On/Off
Press the WPS button and the LED will be on.
7
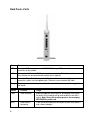
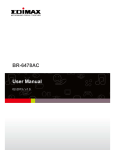
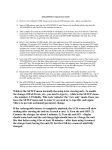
Back Panel—Ports
Ports
Function
USB
Connect a USB storage device with MZK-W04NU through USB port, and then users can
share files on the network.
LAN
Use standard LAN cables (RJ45 connectors) to connect your PCs to these ports.
Any LAN port can be connected with another hub, if required.
WAN
Connect a DSL or Cable Modem to the WAN port and link to the internet. If your modem
came with a cable, use the supplied cable. Otherwise, use a standard LAN cable.
Power
Plug the power cord into this port and the other side of the adaptor should be plugged into
the socket.
Button
Function
Usage
Reset
Reset to default
Press and hold the reset button for 20 seconds, and release
the button. All the settings will be reset to default value after 1
minute. Note: During the resetting process, do not unplug
MZK-W04NU’s power cord.
WPS
Build wireless
connection
Press the button and build a connection between MZK-W04NU
and a station (adapter).
8
Button
Function
Usage
AP/Router
Shift between two
modes
Shift between AP and router modes by switching the switch.
AP (Access Point) Mode: MZK-W04NU’s DHCP server will be
disabled; you will not be able to make WAN settings anymore.
Also, MZK-W04NU’s IP address will be changed to
192.168.1.250.
Router Mode: MZK-W04NU’s DHCP server will be enabled; you
can make WAN settings under this mode. Also, MZK-W04NU’s
IP address will be changed to 192.168.1.1.
9
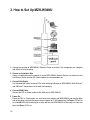
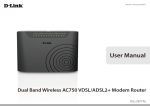
3. How to Set Up MZK-W04NU
1. Unwrap the package of MZK-W04NU Wireless Router and check if the components are complete
and without missing anything.
2. Choose an Installation Site.
Select a suitable place on the network to install MZK-W04NU Wireless Router. And make sure that
the Wireless Router and the DSL/Cable modem are not powered on yet.
3. Connect LAN Cables.
Use standard LAN cables to connect PCs to the switching hub ports on MZK-W04NU. Both 10 Base-T
and 100 Base-T connections can be used simultaneously.
4. Connect WAN Cable.
Connect the DSL or Cable modem to the WAN port on MZK-W04NU.
5. Power On.
Power the DSL or Cable modem on, and connect the adapter with MZK-W04NU and plug the other
side of the power cord into the power socket to power on it. While detecting, the Power LED will be
on, and LAN LEDs will be blinking for a while and then the MZK-W04NU will be ready in a short time
when the Status LED is on.
10
Plug the AC Adapter which comes with MZK-W04NU in a different voltage power supply
will cause damage on MZK-W04NU, and it is not included in warranty.
System Requirements
➢
➢
➢
➢
Windows, Macintosh, or Linux-based Operating System with an installed Ethernet adapter
Network cables. Use standard 10/100 BaseT network (UTP) cables with RJ45 connectors.
TCP/IP protocol must be installed on all PCs.
For Internet Access, an Internet Access account with an ISP, and either of a DSL or Cable modem
(for WAN port usage)
11
Chapter2
Setup & Configuration
1. Client’s Computer Setup
The computers on your LAN need to be set up to cooperate with MZK-W04NU Wireless Router.
Please make sure that your operating system already enabled your interface card on the host and connected to one of the LAN ports on MZK-W04NU through Cat.5 cable. Be sure that LEDs on MZKW04NU are already on and the LED corresponds with the port which you connected. If you switch on
MZK-W04NU for the first time, owing to the default status, it will automatically enable the embedded
DHCP server and start to distribute IP to your host. In addition, the default IP address of MZK-W04NU is
“192.168.1.1.” (Note: if the AP/Router switch has been switched to AP mode, MZK-W04NU’s IP
address will be 192.168.1.250.) If your operating system is Windows 98/2000/XP, you may be able to
use command of “ipconfig” to inquire whether you have the correct IP address or not. If you are using
Linux/Unix-Like system, you can use “ifconfig” to check your NIC (Network Interface Card) address.
The instructions are as follows:
• Windows98
1. Click “Start ➞ Programs ➞ MS-DOS” or “Start ➞ Run…” and type in “command.exe” and then
press enter.
2. “MS-DOS” window will appear.
3. Type “ipconfig” after the command of “c:>” and then press enter.
4. MS-DOS will appear your NIC address in the window, please take notice of the value of “IP Address”
and “Default Gateway.”
5. The value of “Default Gateway” is the IP address of MZK-W04NU.
• Windows2000/XP
1. Please make sure that you do have the authority to access as an “Administrator” or you are already
one of the “System Administrators.”
2. Click “Start ➞ Programs ➞ Accessories ➞ Command Prompt” or “Start ➞ Run…,” and then
type in “cmd.exe” and press enter.
3. It will appear a “MS-DOS” window.
4. Type “ipconfig” after the command of “c:>” and then press enter.
5. MS-DOS will appear your NIC address in the window, please take notice of the value of “IP Address”
and “Default Gateway.”
6. The value of “Default Gateway” is the IP address of MZK-W04NU.
If you can get “IP Address” and “Gateway,” normally, it means that you may use web browser to configure MZK-W04NU. Type your destination—“http://192.168.1.1” (default IP Address of MZK-W04NU)
(Note: if the AP/Router switch has been switched to AP mode, MZK-W04NU’s IP address will be
192.168.1.250.) on the Address Bar in the web browser. If you have changed the default IP Address of
MZK-W04NU, please type in the new address on the address bar.
12
2. Web Configuration
The MZK-W04NU Wireless Router contains an HTTP server. This enables you to connect the router, and
configure it by using your web browser.
Before attempting to configure MZK-W04NU Wireless Router, please ensure that your PC can establish
a physical connection to the Wireless Router. The PC and the MZK-W04NU Wireless Router must be
directly connected with each other (using the LAN ports on MZK-W04NU) or on the same LAN segment.
Besides, the MZK-W04NU Wireless Router must be set up and powered on.
The MZK-W04NU Wireless Router's default IP Address is “192.168.1.1.” (Note: if the AP/Router
switch has been switched to AP mode, MZK-W04NU’s IP address will be 192.168.1.250.) If the IP
address has already used by another device, the other device must be turned OFF until MZK-W04NU is
allocated a new IP Address.
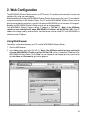
Using Web Browser
To establish a connection between your PC and the MZK-W04NU Wireless Router:
1. Start the WEB browser.
2. In the Address box, enter http://192.168.1.1 (Note: if the AP/Router switch has been switched to
AP mode, MZK-W04NU’s IP address will be 192.168.1.250.) which is the default IP Address of the
MZK-W04NU Wireless Router. Press “Enter” on your keyboard, and the pop-up will ask you to enter
the User Name and Password to get into the program.
13
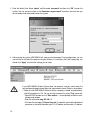
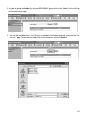
3. Enter the default User Name “admin” and Password “password” and then click “OK” to enter the
system. You can also put a check in the “Remember my password” check box, and next time you
do not need to enter password to enter the system.
4. After entering the system, MZK-W04NU will show you the homepage. During configuration, you can
use the tabs on the top of the page to navigate. Besides, it is necessary that, after configuring, you
should click “Apply” to enable the settings you’ve made.
14
If your MZK-W04NU Wireless Router does not response, and you cannot enter the
web configuration page, please follow the steps below to check if there is any problem:
1. Make sure that MZK-W04NU Wireless Router is properly installed and powered on,
and LAN connection is O.K. You can test the connection by using “Ping” command:
• Open MS-DOS window or click “Start ➞ Run…” on the desktop to show the command prompt window.
• Enter the command: ping 192.168.1.1
• If it shows the message of “Request time out,” the problem can be either disorder of
connection, or the conflict between your PC’s IP address and the router’s IP address.
2. If your PC uses static IP address, the IP address must between in the range of
192.168.1.2~192.168.1.254, in order not to occupy the MZK-W04NU’s default IP
address “192.168.1.1.” In addition, the subnet mask must be “255.255.255.0.” To
know more details of your PC and Internet connection, please check the TCP/IP settings on your PC.
3. You have to make sure that your PC and MZK-W04NU are on the same segment.
4. Note: if the AP/Router switch has been switched to AP mode, MZK-W04NU’s IP
address will be 192.168.1.250.
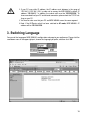
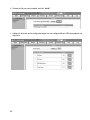
3. Switching Language
You can set the language of MZK-W04NU’s configuration web page to your preference. Please click the
scroll-down menu in the upper-right part, choose the language you prefer, and then click “OK”.
15
4. Setup Wizard
After you login the configuration utility, you can click “Setup Wizard” on the upper left of the page to start
setting up MZK-W04NU. You can finish setting up the router and begin to connect Internet just through a
few simple and easy steps. Please follow the instructions below to set up MZK-W04NU.
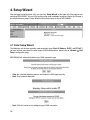
4.1. Enter Setup Wizard
The followings are the most common used connection types: Static IP Address, DHCP, and PPPoE. If
you want to know more about the other types of WAN configurations, please refer to “Network ➞ LAN
Setup” configuration page.
MZK-W04NU will automatically detect your WAN connection type.
• Skip: the automatic detection process and choose the WAN type manually.
• Next: Start automatic detection.
• Next: Click this button to start configuring your WAN connection.
16
4.2. Broadband Type & IP Address Info
Please set up your WAN connection mode accordingly.
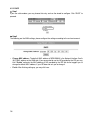
4.2.1. Static IP Address
➢ Step 1
If you have already had a Static IP address, you can choose this entry and use the wizard to configure.
Click “Static IP Address” to proceed.
➢ Step 2
The following are the WAN settings; please configure the settings according to the real environment.
•
•
•
•
•
IP address: Enter the IP address provided by your ISP.
Subnet Mask: Enter the Subnet Mask address provided by your ISP.
Default Gateway: Enter the Default Gateway address provided by your ISP.
DNS address: Enter the DNS IP address provided by your ISP.
Finish: After finishing setting up, you may click here.
17
4.2.2. DHCP
➢ Step1
If you use cable modem, you may choose this entry and use the wizard to configure. Click “DHCP” to
proceed.
➢ Step2
The following are the WAN settings; please configure the settings according to the real environment.
• Change MAC address: The default MAC address of MZK-W04NU is the Network Interface Card’s
(NIC) MAC address on the WAN side. If you were asked to use the NIC provided by the ISP, you may
click “Enable” and enter the MAC address of NIC provided by the ISP. We do not suggest you to
change the default MAC address, if your ISP does not ask you to change it.
• Finish: After finishing setting up, you may click here.
18
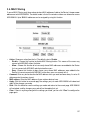
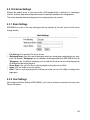
4.2.3. PPPoE
➢ Step1
If you use PPPoE, you may choose this entry and use the wizard to configure. Click “PPPoE ” to proceed.
➢ Step2
The following are the WAN settings; please configure the settings according to the real environment.
• USER ID: Enter the User Name provided by your ISP. (The ID must be alphanumeric characters and
case sensitive.)
• Password: Enter the Password provided by your ISP. (The password must be alphanumeric characters and case sensitive.)
• Confirm Password: Enter the Password again for verification.
• Finish: After finishing setting up, you may click here.
19
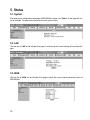
5. Status
5.1. System
After entering the configuration homepage of MZK-W04NU, please click “Status” on the upper left corner of the page. This page shows the general current system status.
5.2. LAN
Click the link of “LAN” on the left side of the page, it will show you the current settings of Local Area Network.
5.3. WAN
Click the link of “WAN” on the left side of the page to check the current Internet connection status of
MZK-W04NU.
20
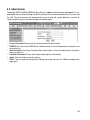
5.4. Wireless LAN
Click the link of “Wireless LAN” on the left side of the page to check the current WLAN settings of MZKW04NU.
• Refresh: Press this button and refresh the webpage.
21
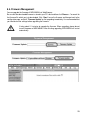
6. Management
You can configure many things through Management functions, such as
• Remote Management
• Password
• Time Zone and NTP (Network Time Protocol)
• Firmware Update
• Save & Load Settings
• Load Default & Reboot
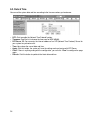
6.1. Remote Management
MZK-W04NU Wireless Router can be managed by any PC from your LAN. If the router has connected to
the Internet, the administrator can also configure it via the Internet. Owing to the security, however, you
should have a static IP before performing remote management.
• Remote Management: Click the check box to enable remote management function.
• Management host IP: Enter the IP address of the remote management interface.
• Port: Enter the connection port number for Remote Management. The default value is 80. The
changes you made here will be applied after MZK-W04NU rebooting itself.
• Reply ping: Ping is a common and useful tool to know the connection status of a specified remote
network device, but some malicious intruder will try to fill your network bandwidth with a lot of PING
request data packet, to make your internet connection become very slow, even unusable. Check this
box and the router will reply all inbound PING request, and when you activate this function, not only
you but all the users will be able to ping your router from Internet.
• Apply: Click this button to save the settings.
• Clear: If there is anything wrong with the settings you made, you can click “Clear” to configure the
page again.
22
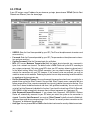
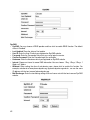
6.2. Administrator
The default USER ID of MZK-W04NU Wireless Router is “admin” and Password is “password.” It is recommended that you should change the default password to have better protection over the router and
the LAN. You must memorize the password set by you to enter the system; otherwise, you have to
restore the whole systems and then configure the settings again.
• Current Password: Please enter the current password of administration.
• USER ID: Enter the current USER ID of the administration. (It has to be alphanumeric characters and
case-sensitive.)
• New Password: Enter a new Password of the administration. (It has to be alphanumeric characters
and case-sensitive.)
• Confirmed Password: Please enter the password again for confirmation.
• Apply: Click this button to save the settings.
• Clear: If there is anything wrong with the settings you made, you can click “Clear” to configure the
page again.
23
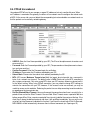
6.3. Date & Time
You can set the system date and time according to the time zone where you locate now.
• NTP: Click to enable the Network Time Protocol function.
• Timezone: Scroll the list to choose the time zone for MZK-W04NU.
• NTP Server 1/2: You can enter the Internet address of an NTP(Network Time Protocol) Server for
your system to synchronize with.
• Time: Here shows the current date and time.
• Apply: Click this button, the system will save the settings and synchronize with NTP Server.
• Clear: If there is anything wrong with the configuration, you can click “Clear” to configure the page
again.
• Refresh: Click this button to update to the latest date and time.
24
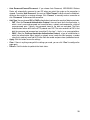
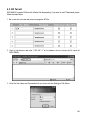
6.4. Firmware Management
You can upgrade the firmware of MZK-W04NU via Web Browser.
Be sure that the downloaded firmware is stored in your PC’s disk and then click “Browse…” to search for
the firmware file which you just downloaded. Click “Open” to use the firmware and then go back to the
configuration page, and click “Firmware Update” to start upgrading immediately. It is recommended that
you should save the settings before upgrading the firmware.
It takes about 2~3 minutes to upgrade the firmware. When upgrading, please do not
turn off the power of MZK-W04NU. After finishing upgrading, MZK-W04NU will restart
automatically.
25
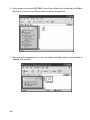
6.5. Save & Load Settings
Before upgrading, you can use this function to save current system settings or upload the previous settings after upgrading the firmware.
➢ Save Settings to file
You may click “Save Settings to file” button to save current system settings to your local disk. (The format will be “*.bin” file)
➢ Restore Settings
Make sure the saved system setting file is in the local host disk and then click “Browse…” to search for
the saved system setting file. Click “Open” to select the system setting file that you want and then click
“Load Settings from file” to start restore the settings.
26
27
6.6. Load Default & Reboot
➢ Load Default
Click “Load Default” and then the system will restart to the factory default value afterward. After successfully restoring, the system will automatically go back to the homepage.
➢ Reboot
Go to the “Load Default & Reboot” configuration page, and then click “Reboot” to restart the system. It
may take some time to complete the process, please don’t turn off the power of the router before the
process is completed.
28
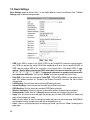
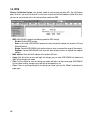
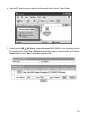
7. LAN Setup
On the LAN Network Settings page (Network -> LAN Setup), you can set up LAN IP address; moreover,
you can enable DHCP Server function to assign IP addresses to users on the LAN.
DHCP stands for Dynamic Host Control Protocol. MZK-W04NU Wireless Router has a built-in DHCP
server which can automatically assign an IP address to those computers/devices on the LAN/private network. If you enable DHCP server, the client device will obtain an IP address automatically. Whenever you
turn on the computer, the client device will automatically load the proper TCP/IP settings from MZKW04NU. The DHCP server will allocate an unused IP address from the IP address pool to the requesting
computer, but you must specify the beginning and ending address of the IP address pool.
LAN IP
• IP address: Here is the IP address of the LAN side of MZK-W04NU. It is usually the default gateway
of the client’s PC. The default IP address is “192.168.1.1”.
• Subnet Mask: The Subnet Mask of the LAN side of MZK-W04NU is “255.255.255.0”.
DHCP Server
• DHCP Server: Click to “Enabled” the DHCP server of MZK-W04NU.
• Start Address/End Address: Please enter the first and the last IP addresses which MZK-W04NU
distribute IP addresses to. The IP addresses in this range can get assigned IP addresses from MZKW04NU. (However, all the PCs on the same LAN should use the same subnet mask.)
• Apply: Click this button to save the settings.
• Clear: If there is anything wrong with the settings you made, you can click “Clear” to configure the
page again.
Note: if the AP/Router switch has been switched to AP mode, MZK-W04NU’s IP address will be
192.168.1.250, DHCP will be disabled, and you will not be able to make any changes to the WAN
connection.
29
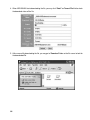
8. WAN Network
In the WAN Network settings (Network -> WAN Setup), MZK-W04NU Wireless Router provides many
kinds of access. You can configure the WAN side according to the real environment.
8.1. Static IP Address
If you do not need to make a dial-up connection, and your ISP provides you a static IP address, please
choose “Static IP Address”.
•
•
•
•
IP Address: Enter the IP address provided by your ISP.
Subnet Mask: Enter the Subnet Mask address provided by your ISP.
Default Gateway: Enter the Gateway address provided by your ISP.
DNS Server 1/2: Enter the DNS Server’s address provided by your ISP. Enter the second DNS
address, however, this is option and you may leave it blank.
• Apply: Click this button to save the settings.
• Clear: If there is anything wrong with the settings you made, you can click “Clear” to configure the
page again.
30
8.2. DHCP
If you automatically get the IP address from your ISP or use the Cable Modem, please choose “DHCP”.
• MAC address: The default MAC address of MZK-W04NU is the Network Interface Card’s (NIC) MAC
address on the WAN side. If you were asked to use the NIC provided by the ISP, you may click
“Enable” and enter the MAC address of NIC provided by the ISP. We do not suggest you to change
the default MAC address, if your ISP does not ask you to change it.
• Apply: Click this button to save the settings.
• Clear: If there is anything wrong with the settings you made, you can click “Clear” to configure the
page again.
31
8.3. PPPoE
If your ISP assigns a new IP address for you whenever you login, please choose “PPPoE (Point to Point
Protocol over Ethernet)” from the above page.
• USER ID: Enter the User Name provided by your ISP. (The ID must be alphanumeric characters and
case sensitive.)
• Password: Enter the Password provided by your ISP. (The password must be alphanumeric characters and case sensitive.)
• Confirm Password: Enter the Password again for verification.
• MTU: MTU means Maximum Transmission Unit, the largest physical packet size, measured in
bytes, that a network can transmit. The default value is 1454. Please set up the MTU according to
your system environment. Only enter a new MTU when your ISP requires, otherwise, please leave it
as the default setting. When using PPPoE connection, you may need to change MTU settings to
maintain the connection with your ISP, however, if the incorrect value was entered, you may be
unable to access certain websites. Reducing the packet size can help connecting to certain websites
or speeding up the transmission rate.
• Dial-On-Demand/Silent Timeout: You may disconnect the connection when there is no activity for a
period of time and set the Silent Timeout in the next field. Silent Timeout means a period of idle time
before you go offline. Enter a maximum period of time (minute) to define the maximum idle time. If the
silent time is above the defined maximum idle time, it will go offline immediately. You can set the value to be 0 or Auto Reconnect to disable this function. If you check the check box of Dial-On-Demand,
MZK-W04NU will dial automatically whenever there’s Internet movement (ex. Opening an IE).
• Auto Reconnect/Connect/Disconnect: If you choose Auto Reconnect, MZK-W04NU Wireless
Router will automatically reconnect to your ISP when you restart the system or the connection is
stopped. To enable “Auto Reconnect” you must set “Silent Timeout” to be 0 or leave the field blank;
otherwise there might be a warning message. Click “Connect” to manually make a connection or click
“Disconnect” to disconnect the connection.
• Auth Type: You may choose PAP or CHAP authentication to enhance the security of data transmission.
32
• PAP –Short for Password Authentication Protocol, the most basic form of authentication, in
which a user's name and password are transmitted over a network and compared to a table of
name-password pairs. Typically, the passwords stored in the table are encrypted. The Basic
Authentication feature built into the HTTP protocol uses PAP. The main weakness of PAP is that
both the username and password are transmitted "in the clear" -- that is, in an unencrypted form.
• CHAP –Short for Challenge Handshake Authentication Protocol, a type of authentication in
which the authentication agent (typically a network server) sends the client program a random
value that is used only once and an ID value. Both the sender and peer share a predefined secret.
• Apply: Click this button to save the settings.
• Clear: If there is anything wrong with the settings you made, you can click “Clear” to configure the
page again.
• Refresh: Click this button to update to the latest status.
33
8.4. PPPoE Unnumbered
Unnumbered PPPoE can let you manage a range of IP addresses but only need to dial once. When
an IP address is received at the gateway, the driver will use network mask to configure the subnet mask
of ASIC. At the server side, you must delete the corresponding hot route and add a new network route so
that the packets can be correctly routed to gateway.
• USER ID: Enter the User Name provided by your ISP. (The ID must be alphanumeric characters and
case sensitive.)
• Password: Enter the Password provided by your ISP. (The password must be alphanumeric characters and case sensitive.)
• Confirm Password: Enter the Password again for verification.
• IP Address: Please enter the IP address provided by your ISP.
• Subnet Mask: Please enter the subnet mask address provided by the ISP.
• MTU: MTU means Maximum Transmission Unit, the largest physical packet size, measured in
bytes, that a network can transmit. The default value is 1454. Please set up the MTU according to
your system environment. Only enter a new MTU when your ISP requires, otherwise, please leave it
as the default setting. When using PPPoE connection, you may need to change MTU settings to
maintain the connection with your ISP, however, if the incorrect value was entered, you may be
unable to access certain websites. Reducing the packet size can help connecting to certain websites
or speeding up the transmission rate.
• Dial-On-Demand/Silent Timeout: You may disconnect the connection when there is no activity for a
period of time and set the Silent Timeout in the next field. Silent Timeout means a period of idle time
before you go offline. Enter a maximum period of time (minute) to define the maximum idle time. If the
silent time is above the defined maximum idle time, it will go offline immediately. You can set the value to be 0 or Auto Reconnect to disable this function. If you check the check box of Dial-On-Demand,
MZK-W04NU will dial automatically whenever there’s Internet movement (ex. Opening an IE).
34
• Auto Reconnect/Connect/Disconnect: If you choose Auto Reconnect, MZK-W04NU Wireless
Router will automatically reconnect to your ISP when you restart the system or the connection is
stopped. To enable “Auto Reconnect” you must set “Silent Timeout” to be 0 or leave the field blank;
otherwise there might be a warning message. Click “Connect” to manually make a connection or
click “Disconnect” to disconnect the connection.
• Auth Type: You may choose PAP or CHAP authentication to enhance the security of data transmission.
• PAP –Short for Password Authentication Protocol, the most basic form of authentication, in
which a user's name and password are transmitted over a network and compared to a table of
name-password pairs. Typically, the passwords stored in the table are encrypted. The Basic
Authentication feature built into the HTTP protocol uses PAP. The main weakness of PAP is that
both the username and password are transmitted "in the clear" -- that is, in an unencrypted form.
• CHAP –Short for Challenge Handshake Authentication Protocol, a type of authentication in
which the authentication agent (typically a network server) sends the client program a random
value that is used only once and an ID value. Both the sender and peer share a predefined secret.
• Apply: Click this button to save the settings.
• Clear: If there is anything wrong with the settings you made, you can click “Clear” to configure the
page again.
• Refresh: Click this button to update to the latest status.
35
8.5. PPPoE Multisession
Using Multiple PPPoE, you can login to the different ISP concurrently and connect to the Internet.
MZK-W04NU provides two connections: PPPoE 1 and PPPoE 2.
• USER ID: Enter the User Name provided by your ISP. (The ID must be alphanumeric characters and
case sensitive.)
• Password: Enter the Password provided by your ISP. (The password must be alphanumeric characters and case sensitive.)
• Confirm Password: Enter the Password again for verification.
• MTU: MTU means Maximum Transmission Unit, the largest physical packet size, measured in
bytes, that a network can transmit. The default value is 1454. Please set up the MTU according to
your system environment. Only enter a new MTU when your ISP requires, otherwise, please leave it
36
•
•
•
•
•
•
•
as the default setting. When using PPPoE connection, you may need to change MTU settings to
maintain the connection with your ISP, however, if the incorrect value was entered, you may be
unable to access certain websites. Reducing the packet size can help connecting to certain websites
or speeding up the transmission rate.
Dial-On-Demand/Silent Timeout: You may disconnect the connection when there is no activity for a
period of time and set the Silent Timeout in the next field. Silent Timeout means a period of idle time
before you go offline. Enter a maximum period of time (minute) to define the maximum idle time. If the
silent time is above the defined maximum idle time, it will go offline immediately. You can set the value to be 0 or Auto Reconnect to disable this function. If you check the check box of Dial-On-Demand,
MZK-W04NU will dial automatically whenever there’s Internet movement (ex. Opening an IE).
Auto Reconnect/Connect/Disconnect: If you choose Auto Reconnect, MZK-W04NU Wireless
Router will automatically reconnect to your ISP when you restart the system or the connection is
stopped. To enable “Auto Reconnect” you must set “Silent Timeout” to be 0 or leave the field blank;
otherwise there might be a warning message. Click “Connect” to manually make a connection or
click “Disconnect” to disconnect the connection.
Auth Type: You may choose PAP or CHAP authentication to enhance the security of data transmission.
• PAP –Short for Password Authentication Protocol, the most basic form of authentication, in
which a user's name and password are transmitted over a network and compared to a table of
name-password pairs. Typically, the passwords stored in the table are encrypted. The Basic
Authentication feature built into the HTTP protocol uses PAP. The main weakness of PAP is that
both the username and password are transmitted "in the clear" -- that is, in an unencrypted form.
• CHAP –Short for Challenge Handshake Authentication Protocol, a type of authentication in
which the authentication agent (typically a network server) sends the client program a random
value that is used only once and an ID value. Both the sender and peer share a predefined secret.
Network 1~4: When using NAPT LAN type, you may do the following settings.
• Disable: Choose this to disable the function.
• IP Address: Please enter the range of IP addresses provided by your ISP.
• Domain Name: You can set a domain name as the transmission rule. For example, entering
“conrad.com.tw” in this column, it means the packets which use conrad.com.tw as destination
will be delivered through this segment.
Apply: Click this button to save the settings.
Clear: If there is anything wrong with the settings you made, you can click “Clear” to configure the
page again.
Refresh: Click this button to update to the latest status.
37
Chapter3
Advanced Setup & Configuration
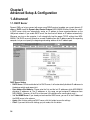
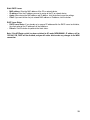
1. Advanced
1.1. DHCP Server
Dynamic DNS can let you connect with one or more DDNS services to update your current dynamic IP
address. DHCP stands for Dynamic Host Control Protocol. MZK-W04NU Wireless Router has a builtin DHCP server which can automatically assign an IP address to those computers/devices on the
LAN/private network. If you enable DHCP server, the client host will obtain an IP address automatically.
Whenever you turn on the computer, it will automatically load the proper TCP/IP settings from MZKW04NU. The DHCP server will allocate an unused IP address from the IP address pool to the requesting
computer, but you must specify the beginning and ending address of the IP address pool.
DHCP Server Setting
• DHCP Server: Click to enable the built-in DHCP server, it will automatically distribute IP addresses to
the devices which send request to it.
• Start Address/End Address: Please enter the first and the last IP addresses which MZK-W04NU
distribute IP addresses to. The IP addresses in this range can get assigned IP addresses from
MZK-W04NU. (However, all the PCs on the same LAN should use the same subnet mask.)
• 1st/ 2nd WINS Server: If you already set and need the WINS server, you can fill in the IP address of
the WINS server in the columns.
• Apply: After finishing setting up DHCP server, click this button to save the settings.
• Clear: If you want to clear the settings you just made, click this button.
38
Static DHCP Leases
• MAC address: Enter the MAC address of the PC or network device.
• IP address: Enter the IP address you want to assign to the PC or network device.
• Apply: After entering the MAC address and IP address, click this button to save the settings.
• Clear: If you want to clear the just entered MAC address or IP address, click this button.
DHCP Lease Status
• DHCP Lease Status: If you already set a range of IP addressed for the DHCP server to distribute,
the clients who get the IP addresses will be listed here.
• Refresh: Click this button to update to the latest status.
Note: if the AP/Router switch has been switched to AP mode, MZK-W04NU’s IP address will be
192.168.1.250, DHCP will be disabled, and you will not be able to make any changes to the WAN
connection.
39
1.2. UPnP
If your Windows Operating System supports UPnP service, when you enable the UPnP service and the
MZK-W04NU Wireless Router is connecting with the computer, the task bar will show the icon of MZKW04NU to inform you that a new device is found and inquire you whether if you want to set a shortcut on
the desktop.
• Enable: If your operating system supports this function, you may check to enable it.
• Apply: Click this button to save the settings.
• Clear: If there is anything wrong with the settings you made, you can click “Clear” to configure the
page again.
40
1.3. Dynamic DNS
Dynamic DNS can let you connect with one or more DDNS services to update your current dynamic IP
address. To make a WEB server publicly accessible on the Internet, a static global IP address needs to
be assigned to MZK-W04NU. Even when there is an always-on connection, however, disconnection
does occur and the IP address may dynamically change after reconnection. When Dynamic DNS is
enabled, the IP address of the product is reported to a Dynamic DNS server at regular intervals so that it
can use the same static host name even after IP has changed.
MZK-W04NU supports www.dyndns.org, cybergate.planex.co.jp and MyDNS.jp Dynamic DNS services.
www.dyndns.org, cybergate.planex.co.jp and MyDNS.jp are free services. Before enabling DDNS configuration on the product, be sure to access either of the former websites and register your user name,
password, host name, and so on.
CyberGate -DDNS• CyberGate –DDNS-: You may choose a DDNS provider and then click to enable DDNS function. The
default status is Disabled.
• Last Updated: Show the status of last update.
• Subdomain: Enter the sub-domain which you registered on CyberGate website.
• Domain: Select the Domain Name which you registered.
• Password: Enter the Password or Key which you use to login the service.
• Confirm Password: Enter the Password again for verification.
• Interval: Choose an interval to renew DNS information. You can choose: 1 Day, 3 Days, 5 Days, 1
Week, or 2 Weeks.
• Off Line: Click to be off-line.
41
DynDNS
• DynDNS: You may choose a DDNS provider and then click to enable DDNS function. The default
status is Disabled.
• Last Updated: Show the status of last update.
• User ID: Enter the User ID which you registered on DynDNS website.
• Password: Enter the Password or Key which you use to login the service.
• Confirm Password: Enter the Password again for verification.
• Hostname: Enter the Hostname which you registered on DynDNS website.
• Interval: Choose an interval to renew DNS information. You can choose: 1 Day, 3 Days, 5 Days, 1
Week, or 2 Weeks.
• Wildcard: When setting the alias of sub-domain name, please click to enable this function. For
example, sub-domain of www.planex.dyndns.org, ftp.planex.dyndns.org and etc., can use the same
IP address with the host name of planex.dyndns.org.
• Mail Exchanger: Enter the transferring setting of the mail server set with the host name on DynDNS
website.
42
MyDNS.JP
• MyDNS.JP: You may choose a DDNS provider and then click to enable DDNS function. The default
status is Disabled.
• Last Updated: Show the status of last update.
• User ID: Enter the User ID which you registered on MyDNS.JP website.
• Password: Enter the Password or Key which you use to login the service.
• Confirm Password: Enter the Password again for verification.
• Hostname: Enter the Hostname which you registered on DynDNS website.
• Interval: Choose an interval to renew DNS information. You can choose: 1 Day, 3 Days, 5 Days,
1 Week, or 2 Weeks.
• Apply: Click this button to save the settings.
• Clear: If there is anything wrong with the settings you made, you can click “Clear” to configure the
page again.
43
1.4. Static Routing
This section describes how to manually add routing information.
• Destination IP/Netmask: Enter the IP address of packet destination and Netmask of packet destination.
• Gateway: Enter the address of the first gateway through which the target network is reached.
• Metric: Enter the hop count number (the number of gateways used between the product and target
network).
• Interface: Select the interface for which static routing is configured.
• Enable: Put a check in the check box to enable each route.
• Apply: Click this button to save the settings.
• Clear: If there is anything wrong with the settings you made, you can click “Clear” to configure the
page again.
44
1.5. IPv6 Bridge
MZK-W04NU supports IPv6 Bridge function, which can connect between LAN and WAN in Data. By
using this function, you can connect to computers on your network through PPPoE connection.
*As for IPv6 clients setting, please refer to OS manual.
• Enable: Click to enabledIPv6 Bridge function.
• Apply: Click this button to save the settings.
• Clear: If there is anything wrong with the settings you made, you can click “Clear” to configure the
page again.
45
2. Firewall
MZK-W04NU has three kinds of firewall functions which are Local Server, DMZ, and IP Filtering.
2.1. Local Server
Local Server configuration is used to i) make a server on LAN publicly accessible via the Internet and ii)
access applications including online games and chat programs. Some services and applications used on
the Internet have been already registered in the product to simplify Local Server configuration. You may
set 32 sets of servers.
•
•
•
•
•
•
•
46
Protocol: Select to use “TCP” or “UDP” protocol.
WAN Port Range: Enter the source port number for the service or application.
Server IP: Enter the IP address of the PC that serves as local server.
Server Port Range: Enter the destination port number for the service or application.
Enable: Put a check in the check box to enable each server.
Apply: Click this button to save the settings.
Clear: If there is anything wrong with the settings you made, you can click “Clear” to configure the
page again.
2.2. DMZ
If your computer cannot use Internet applications or cannot provide services to remote users when
applying MZK-W04NU at the same time, you can let the host which wants to access to the Internet using
DMZ function. Enter the host’s LAN IP address to enable this function, but be aware that one MZKW04NU can only correspond to a single DMZ host.
• Enable DMZ: Check this box to enable DMZ function, uncheck this box to disable DMZ function.
• Client PC IP address: Please enter the private IP address that the Internet IP address will be
mapped to.
• Apply: Click this button to save the settings.
• Clear: If there is anything wrong with the settings you made, you can click “Clear” to configure the
page again.
Adding a client host to DMZ might expose it to a variety of danger such as virus or
worm attacks because of unrestricted Internet access; therefore, only use this option
as the last means. Besides, before using DMZ function, you should update the up-todate settings of security system and virus signatures on the host.
47
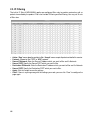
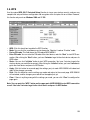
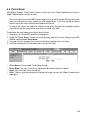
2.3. IP Filtering
The built-in IP filter of MZK-W04NU applies pre-configured filter rules to packets received as well as
packets transmitted by the product. Filter rules include IP filtering and Port filtering. You may set 32 sets
of filter rules.
•
•
•
•
•
•
•
•
48
Action: “Drop” means drop the packets to filter. “Accept” means accept all packets related to this session.
Protocol: Choose to filter “TCP” or “UDP” protocol.
Source IP/Netmask: Enter the Source IP address which you want to filter and it’s Netmask.
Source PORT: Specify the Source PORT which you want to filter.
Destination IP/Netmask: Enter the Destination IP address which you want to filter and it’s Netmask
Source PORT: Specify the Destination PORT which you want to filter.
Apply: Click this button to save the settings.
Clear: If there is anything wrong with the settings you made, you can click “Clear” to configure the
page again
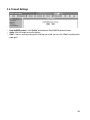
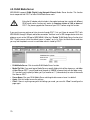
2.4. Firewall Settings
• Drop NetBIOS packets: Click “Enable” and enable the Drop NetBIOS packets function.
• Apply: Click this button to save the settings.
• Clear: If there is anything wrong with the settings you made, you can click “Clear” to configure the
page again.
49
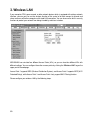
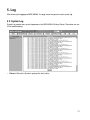
3. Wireless LAN
If your computer, PDA, game console, or other network devices which is equipped with wireless network
interface, you can you can use the wireless function of this router to let them connect to Internet and
share resources with other computers with wired-LAN connection. You can also use the built-in security
functions to protect your network from being intruded by malicious intruders.
MZK-W04NU can simulate four different Access Points (APs), so you can have four different APs with
different settings. You can configure these four access points by clicking the “Wireless LAN” tag on the
upper part of the webpage.
Access Point 1 supports WDS (Wireless Distribution System), and Access Point 2 supports WPS (Wi-Fi
Protected Setup), while Access Point 3 and Access Point 4 only support MAC Filtering function.
Please configure your wireless LAN by the following steps.
50
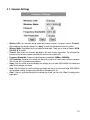
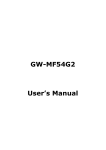
3.1. Common Settings
• Wireless LAN: Click the check box to enable the Wireless function. The default value is “Enabled”.
After modifying the settings, please click “Apply” to save the settings and restart the system.
• Wireless Mode: Scroll down the list to choose a band width. There are six kinds of modes: B/G/N,
G/N, B/G, B, G, and N.
• Channel: Here shows the channels provided by the local wireless connection. The setting of the
channels of the wireless network should be the same as the wireless APs.
• Frequency Bandwidth: Choose a kind of frequency bandwidth: 20MHz or 20/40MHz.
• 11G Protection: Enabling this setting will reduce the chance of radio signal collisions between
802.11b and 802.11g wireless access points.
• Apply: Click this button to save and apply the settings you just made. MZK-W04NU will reboot and
apply all the changes you made.
• Save: Click this button to save the settings you made and returns to the current page. MZK-W04NU
will not reboot, and the changes you made will not be applied just yet.
• Clear: If there is anything wrong with the settings you made, you can click “Clear” to configure the
page again.
51
3.2. Basic Settings
Basic Settings pages for Access Point 1~4 are slightly different. Here we use Access Point 1’s Basic
Settings page as demonstrating example.
• SSID: Every SSID is unique in the WLAN (SSID can be 16-digitASCII characters and case-sensitive). SSID can prevent two nearby WLAN from combining to be one. You can give BLW-54MF an
SSID, and only whose SSID is the same with it can connect with it. The default SSID is “conraduser”. Notice: When entering your SSID, please don't use special characters such as "@",
"#", "$", "%", "^", "&", "*", "(", and ")". Using special characters or symbols could cause wireless connection difficulties. You can click “Enable” check box to enable the Access Point.
• Hide SSID: If you check the check box of “Hide SSID,” SSID of MZK-W04NU will not appear on the
other PC’s wireless network list. Therefore, the Wireless Router/AP can block the users without
authentication.
• LAN Blocking: Click the check box to enable LAN Blocking function.
• Internet Blocking: Click the check box to enable Internet Blocking function.
• SSID Blocking: Click the check box to enable SSID Blocking function.
• Wireless Separating: Enable this function to discard the packets between wireless adapters.
• Authentication: Please refer to 3.3 Security below and setup your wireless LAN securities.
• Apply: Click this button to save and apply the settings you just made. MZK-W04NU will reboot and
apply all the changes you made.
• Save: Click this button to save the settings you made and returns to the current page. MZK-W04NU
will not reboot, and the changes you made will not be applied just yet.
• Clear: If there is anything wrong with the settings you made, you can click “Clear” to configure the
page again.
52
3.3. Security
In this page, you can configure the security of your wireless network. Selecting different method can
make different levels of security. However, no matter what kind of authentication or encryption you use to
prevent data packets from being eavesdropped by people without authentication, it may cause decrease
of the data throughput of the wireless connection.
Authentication and Encryption
There are several kinds of authentication of MZK-W04NU wireless Router. After selecting the authentication mode, it has to cooperate with the encryption type. The settings of authentication on the destination network must be the same with MZK-W04NU.
Open System –If enabling this mode, there is no need authentication to access AP or wireless NIC.
Pre-Shared Key –Only those who are sharing the same key with the AP can connect with it.
WEP –WEP is short for Wired Equivalent Privacy, a security protocol for WLANs defined in the 802.11b
standard. WEP is designed to provide the same level of security as that of a wired LAN. WEP aims to
provide security by encrypting data over radio waves so that it is protected as it transmitted from one end
point to another. There are two kinds of WEP encryption: 64 bit and 128 bit. 64 bit needs 10 hex characters to be the key and 128 bit needs 26 hex characters.
WPA – is short for Wi-Fi Protected Access. It was designed to improve upon the security features of
WEP. The technology is designed to work with existing Wi-Fi products that have been enabled with WEP.
Through the data encryption, access control and authentication, it provides better protection over data
transmission. WPA uses 128-digit keys to ensure the wireless network privacy and security.
WPA2 – is short for Wi-Fi Protected Access 2. It is the follow on security method to WPA for wireless networks that provides stronger data protection and network access control. It provides enterprise and consumer Wi-Fi users with a high level of assurance that only authorized users can access their wireless
networks. There are two versions of WPA2: WPA2-Personal, and WPA2- Enterprise. WPA2-Personal
protects unauthorized network access by utilizing a set-up password. WPA2-Enterprise verifies network
users through a server. WPA2 is backward compatible with WPA.
WPA-PSK – is short for Wi-Fi Protected Access-Pre-Shared Key. WPA-PSK uses the same encryption
way with WPA, and the only difference between them is that WPA-PSK recreates a simple shared key,
instead of using the user’s certification.
TKIP – is short for Temporal Key Integrity Protocol. TKIP scrambles the keys using a hashing algorithm and, by adding an integrity-checking feature, ensures that the keys haven’t been tampered with.
AES – is short for Advanced Encryption Standard. AES is a symmetric 128-bit block data encryption
technique. It has a fixed block size of 128-bits and a key size of 128, 192, or 256-bits.
Pass Phrase – Pass Phrase also named Shared Secret which is used only when enabling WPA-PSK
authentication. A passphrase is a string of characters longer than the usual password (which is typically
from four to 16 characters long) that is used in creating a digital signature (an encoded signature that
proves to someone that it was really you who sent a message) or in an encryption or a decryption of a
message. It is applicable only when you select WPA-PSK authentication. You will need to enter an 8~63
characters password to start the encryption process, which will generate four WEP keys automatically.
53
RADIUS – is short for Remote Authentication Dial-In User Service, an authentication and accounting
system used by many Internet Service Providers (ISPs). RADIUS setup is used to set up additional parameters for authorizing wireless clients through RADIUS server. The RADIUS setup is required when you
select to use Open System with 802.1x or WPA authentication.
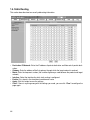
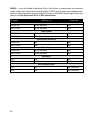
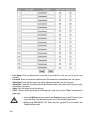
Encryption
WEP Key 1~4
Passphrase
Open System or Shared Key
WEP64 (bit)
10 hex characters
Null
WEP128 (bit)
26 hex characters
Null
Open System
WEP64 (bit)
10 hex characters
Null
WEP128 (bit)
26 hex characters
Null
WEP64 (bit)
Null
WEP128 (bit)
Null
Open System with 802.1x
Null
Null
Shared Key
WEP64 (bit)
10 hex characters
Null
WEP128 (bit)
26 hex characters
Null
TKIP
Null
Null
AES
Null
Null
TKIP
Null
8-63 characters
AES
Null
8-63 characters
WPA/WPA2
WPA-PSK/WPA2-PSK
54
• Authentication: There are 10 kinds of authentication types? Open System or Shared Key, Open
System, Open System with 802.1x, Shared Key, WPA, WPAPSK, WPA2, WPA2PSK, WPAWPA2,
WPAPSK/WPA2PSK.
• Encryption: There are four types of encryption settings, please set the key depending on the real
environment. According to the type and length, there are four Key types:
• 64-bit – Enter 10-digit Hex values or 5-digit ASCII values as the encryption keys. For example:
“0123456aef” or “Guest.”
• 128-bit – Enter 26-digit Hex values or 13-digit ASCII values as the encryption keys. For example:
“01234567890123456789abcdef” or “administrator.”
• TKIP – It is short for Temporal Key Integrity Protocol. TKIP scrambles the key using a hashing
algorithm and, by adding an integrity-checking feature, ensures that the keys haven’t been tampered with.
• AES – Short for Advanced Encryption Standard, a symmetric 128-bit block data encryption
technique. It works at multiple network layers simultaneously and has a fixed block size of 128bits and a key size of 128, 192, or 256-bits.
• Pass Phrase: It’s also named Shared Secret which is used only when enabling WPA-PSK/WPA2PSKauthentication. A passphrase is a string of characters longer than the usual password (which is
typically from four to 16 characters long) that is used in creating a digital signature (an encoded signature that proves to someone that it was really you who sent a message) or in an encryption or a
decryption of a message. It is applicable only when you select WPA-PSK authentication. You will
need to enter an 8~63 characters password to start the encryption process, which will generate four
WEP keys automatically.
55
• Default Key: You can enter four WEP keys and select one of them as default key. Then the router
can receive any packets encrypted by one of the four keys. Only the key you select it in the "Default
key" will take effect.
• WEP Key 1~4: The WEP keys are used to encrypt data transmitted in the wireless network. Fill the
text box by following the rules below. 64-bit WEP: input 10-digit Hex values (in the "A-F", "a-f" and "09" range) or 5-digit ASCII character as the encryption keys. 128-bit WEP: input 26-digit Hex values (in
the "A-F", "a-f" and "0-9" range) or 13-digit ASCII characters as the encryption keys.
• RADIUS Server IP: Please input the IP address of your RADIUS authentication server here.
• RADIUS Port: Please input the port number of your RADIUS authentication server here. Default setting is 1812.
• RADIUS Pass Phrase: Please input the password of your RADIUS authentication server here.
• Apply: Click this button to save and apply the settings you just made. MZK-W04NU will reboot and
apply all the changes you made.
• Save: Click this button to save the settings you made and returns to the current page. MZK-W04NU
will not reboot, and the changes you made will not be applied just yet.
• Clear: If there is anything wrong with the settings you made, you can click “Clear” to configure the
page again.
56
3.4. MAC Filtering
If you set MAC Filtering, only those whose wireless MAC addresses listed on the Device List can or cannot connect with MZK-W04NU. The default mode is that all the wireless stations are allowed to access
MZK-W04NU. Up to 20 MAC addresses can be assigned by using this function.
• Action: Choose an action from the list. The default value is Disable.
• Disable – Choose this function to disable MAC filtering function. This means all the users may
connect with MZK-04G without limitation.
• Allow – Choose this function to let users only whose MAC addresses were added to the Device
List can connect with MZK-04G and eliminate other users.
• Deny –Choose this function to deny those users whose MAC addresses were added to the
Device List cannot connect with MZK-04G, while other users can connect with it.
• Comment: Enter any text to describe the MAC address which you want to allow or deny. It can be 16
alphanumerical characters at most.
• MAC address: Enter the MAC address of your wireless devices here.
• Apply: Click this button to save and apply the settings you just made. MZK-W04NU will reboot and
apply all the changes you made.
• Save: Click this button to save the settings you made and returns to the current page. MZK-W04NU
will not reboot, and the changes you made will not be applied just yet.
• Clear: If there is anything wrong with the settings you made, you can click “Clear” to configure the
page again.
57
3.5. WDS
Wireless Distribution System uses wireless media to communicate with other APs, like the Ethernet
does. To do this, you must set these APs in the same channel and set MAC address of other APs which
you want to communicate with in the table and then enable the WDS.
• WDS: MZK-W04NU supports the following mode for WDS settings.
• Disable: Disable WDS function.
• Root: In this mode, MZK-W04NU becomes the only connection between the wireless LAN and
Ethernet/Internet.
• Bridge: Connect MZK-W04NU with another wireless router, to expand the range of the network.
• Repeater: Connect MZK-W04NU with up to four other wireless routers, to expand the scope of
network.
• MAC address: Enter the MAC address of the wireless AP here.
• Apply: Click this button to save and apply the settings you just made. MZK-W04NU will reboot and
apply all the changes you made.
• Save: Click this button to save the settings you made and returns to the current page. MZK-W04NU
will not reboot, and the changes you made will not be applied just yet.
• Clear: If there is anything wrong with the settings you made, you can click “Clear” to configure the
page again.
58
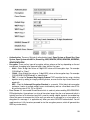
3.6. WPS
Use the unique WPS (Wi-Fi Protected Setup) function to insure your wireless security, and you may
complete the setup of wireless configuration and encryption within a simple click on a button. However,
this function only works on Windows 2000 and XP OS.
•
•
•
•
•
•
•
•
WPS: Click this check box to enable the WPS function.
Mode: You can click the scroll-down menu to choose the “Registrar” mode or “Enrollee” mode.
Device PIN code: This field shows the PIN code of MZK-W04NU.
Enter PIN code: You can enter the PIN code of the client device, and click “Start” to start WPS connection. After clicking the “Start” button, you have 2 minutes to get to the client device and press its
WPS button.
Status: You can click “Initialize” button to start WPS connection. You have 2 minutes to go to the
wireless device you would like to connect. After clicking the “Initialize” button, you have 2 minutes to
get to the client device and press its WPS button.
Apply: Click this button to save and apply the settings you just made. MZK-W04NU will reboot and
apply all the changes you made.
Save: Click this button to save the settings you made and returns to the current page. MZK-W04NU
will not reboot, and the changes you made will not be applied just yet.
Clear: If there is anything wrong with the settings you made, you can click “Clear” to configure the
page again.
Note: You can push the “WPS” button on the upper part of MZK-W04NU to start WPS connection
as well. You have 2 minutes to get to the client device and press its WPS button.
59
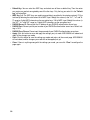
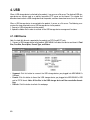
4. USB
When a USB storage device is attached to the product, it can serve as a file server. The attached USB storage device can also be used as a publicly accessible HTTP server on the Internet. This chapter first
describes how to attach a USB storage device to the product, and then shows how to use it as a file server.
When a USB storage device is connected to the product, it serves as a file server. The following summarizes the steps required to use a USB storage device via the product.
1. Connect a USB storage device to the product
2. Upload the Addon files in order to activate all the USB storage device management functions.
4.1. USB Device
Note: the hard disk formats supported by the product are FAT32 and EXT3 only.
1. Connect a USB storage device to the product, MZK-W04NU will detect the device and show its Total
Size, Free Size, Description, Format Type, and Status.
• Unmount: Click this button to unmount the USB storage device you plugged into MZK-W04NU’s
USB port.
• Format: Click this button to format the USB storage device you plugged into MZK-W04NU’s USB
port to FAT32 format. Note: All the files in the USB storage device will be erased after formatting.
• Refresh: Click this button to refresh this webpage.
60
2. In order to upload the Addon files for your MZK-W04NU, please click on the “Addons” on the left side
of the configuration page.
5. You can find the Addon files in the CD which is provided in the product package, and those files’ format are “*.pkg”. Please copy the Addon files to your computer, and click “Browse”.
61
6. Choose the file you want to upload, and click “Install”.
7. Addons will be shown on the configuration page. You can configure different USB storage device settings here.
62
4.2. File Server Settings
Although the product serves as a file serve when a USB storage device is attached to it, a workgroup
and user accounts need to be configured to access the partitions created on the storage device.
This section describes how to configure/create a workgroup and a user account.
4.2.1. Basic Settings
MZK-W04NU must be in the same workgroup with the computer to let users access the file server
through network.
• File Sharing: Click to enable File Server function.
• Workgroup Name: Enter the name of workgroup which has already been configured on your computer. For example, “Workgroup” on your computer, the Workgroup Name on MZK-W04NU must be
“Workgroup”, too. If a different workgroup name is used, the file server icon will not be displayed on
My Network window of the computer.
• Server Name: Give your File Server a distinguishable name or leave it as default.
• Apply: Click this button to save the settings.
• Clear: If there is anything wrong with the settings you made, you can click “Clear” to configure the
page again.
4.2.2. User Settings
After configure the Basic Settings of MZK-W04NU, you’ll have to create user accounts to let users share
files on the network.
63
• User Name: Enter an alphanumeric name and its case-sensitive. You can set 16 sets of user
accounts.
• Password: Enter a case-sensitive alphanumeric Password which correspond to the User Name.
• Allow Read: Users with this permission will be allowed to read data from the file server.
• Allow Write: Users with this permission will be allowed to both i) write data to the file server and ii)
delete data in the server.
• Apply: Click this button to save the settings.
• Clear: If there is anything wrong with the settings you made, you can click “Clear” to configure the
page again.
64
1. Users with Write permission need to have Read permission as well. Be sure to have
users with either i) Read permission only or ii) Read and Write permissions.
2. Before using MZK-W04NU’s Bit Torrent function, you MUST set an account with
Read/Write permission.
4.3. Bit Torrent
MZK-W04NU supports BitTorrent for efficient file downloading. If you want to use BT download, please
follow the steps below:
1. Set a user who can read and write to manage the BT files.
2. Open a web browser and enter “\\192.168.1.1” on the address column to enter the file server of
MZK-W04NU.
3. Enter the User Name and Password which you set on the User Settings of File Server.
65
4. After entering the file server of MZK-W04NU, you will see a folder which is named after the USB port.
Double click on the icon of the USB port which connects the storage device.
5. After entering the storage device, first, you have to add a new folder, and then name the folder as
“Torrent” (case-sensitive).
66
6. Copy the BT seed file on your hard disk and then paste the file into the “Torrent” folder.
7. Go back to the “USB ➞ Bit Torrent” configuration page of MZK-W04NU. If you successfully put the
BT seed file into the Torrent folder, Bit Torrent configuration page will show the details of BT seed on
Torrent File List. Click “Start” to begin downloading the file.
67
8. When MZK-W04NU starts downloading the file, you may click “Detail” on Torrent File List to check
the download status of the file.
9. After successfully downloading the file, you may go to “Download” folder on the file server to look for
the downloaded file.
68
4.4. iTunes Server
MZK-W04NU supports iTunes Server function to share the music. (Please download the iTunes on
Apple's Website before using this function.)
• Once saving the music to the HDD Enclosure and put it to the router through USB port, other computers can also enjoy the music saved in the USB storage device. In this way, you do not need to
save the music you want to listen on each computer one by one.
• As long as you connect the iPod to the USB port of the router, the router will immediately enables
users which are on the same LAN to enjoy the music saved in the iPod.
Please follow the steps below to use iTunes Server function:
1. Save the music into the USB connection storage device.
2. Enable the “iTunes Server” function on the configuration page of the router. And give your MZKW04NU a distinguishable Server Name.
3. Using the iTunes on computer, the router will automatically add the music to its library.
4. And all you need to do now is to choose the music you like to play.
•
•
•
•
iTunes Server: Click to enable iTunes Server function.
Server Name: Give your iTunes Server a distinguishable name or leave it as default.
Apply: Click this button to save the settings.
Clear: If there is anything wrong with the settings you made, you can click “Clear” to configure the
page again.
69
4.5. DLNA Media Server
MZK-W04NU supports DLNA (Digital Living Network Alliance) Media Server function. This function
has to cooperate with PS3™ to make DLNA Media Server work.
If plug the AC adapter which includes in the product package into a socket with different
DLNA media server function only works on firmware version of 1.80 or above of
PS3™. So, please upgrade the firmware of your PS3™ before using this function.
If you want to see any pictures or listen to music through PS3™, first, you’ll have to connect PS3™ with
MZK-W04NU through LAN port and build a connection. And then insert a USB storage device which has
photos or music on the USB port of MZK-W04NU. After that, “Enable” DLNA Media Server function to let
PS3™ find the server (which the default name is “router”) on its list. Enter the Media Server and then
you may find the photos or music in each folder which is sorted by PS3™.
• DLNA Media Server: Click to enable DLNA Media Server function.
• Media File Path: If you want to give Media Server a specific folder which will be shown as a sub-folder
of User Files on PS3™, you will need to set the path as “/XXXX” (a forward slash with the folder name).
Or if you don’t want to specify a folder, you’ll just need to set “/” (a forward slash) to make all the media
files show on PS3™.
• Server Name: Give your DLNA Media Server a distinguishable name or leave it as default.
• Apply: Click this button to save the settings.
• Clear: If there is anything wrong with the settings you made, you can click “Clear” to configure the
page again.
70
5. Log
After entering the Log page of MZK-W04NU, this page shows the general current system log.
5.2. System Log
System Log records every events happened on the MZK-W04NU Wireless Router. These data are useful for troubleshooting.
• Refresh: Refresh the System Log to get the latest status.
71
6. Declaration of conformity (DOC)
We, Conrad Electronic, Klaus-Conrad-Strasse 1, D-92240 Hirschau, Germany, hereby declare that this
product complies with the fundamental requirements and the other relevant provisions of Directive
1999/5/EC.
☞
72
The declaration of conformity of this product is available at www.conrad.com
73
74
75