1
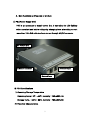
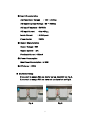
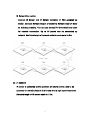
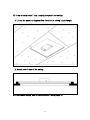
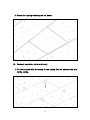
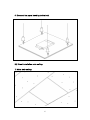
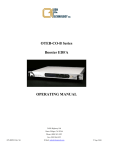
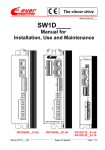
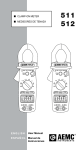
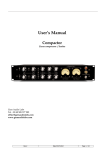
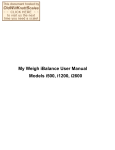
USER MANUAL
LED Lighting Panel
Advantages of
LED Lighting Panel
Energy Saving
Long Lifespan
Consume less electric
8 times longer than
power caused by high
LED
energy efficiency
fluorescent fixtures
Lighting
Panel
Eco-Friendly
High Quality &
High Value
Submit to environ-politics
Realizing high Ra(over 80)
(WEEE, RoHS etc)
Slim & Solid design
* Ra : Rendering Index Average
Well-being Lighting
No UV light, No glaring
2
TABLE OF CONTENTS
1. SPECIFICATIONS ---------------------------------------4
- PRODUCT STANDARD
- BASIC COMPONENTS
- OPTION COMPONENTS
2. MAIN FUCTIONS AND FEATURES OF PRODUCT -----------------5
3. INSTALLATION PROCEDURE ---------------------------10~16
- AC WIRE CONNECTION ---------------------------------10
- SEPARATING PSU FROM THE PANEL-----------------------10
- INSTALLATION WITH T-BAR BURYING AT THE CEILING ---------12
- PENDANT INSTALLATION (WIRE WITH HOOK) ---------------- 13
- DIRECT INSTALLATION ONTO CEILING ----------------------15
4. NOTICE FOR USE --------------------------------------17
5. TROUBLES SHOOTING -----------------------------------18
6. WARRANTY CARD --------------------------------------19
7. MEMO ---------------------------------------------- 20
3
1. SPECIFICATIONS
<PRODUCT STANDARD>
Model
Name
Dimension
(mm x mm)
Luminous
Flux
300S-LED LP
600S-LED LP
1200S-LED LP
1200W-LED LP
300 X 300
595 X 595
1200 X 300
1200 X 450
1350 Lms
5400 Lms
5400 Lms
5760 Lms
18W
72W
72W
72W
Power(W)
Color
Temp.(K)
3500
5500
3500
5500
3500
5500
3500
5500
*Specifications of products are subjected to change without notice.
Input power AC 100~240V, 50~60Hz
<BASIC COMPONENTS>
LED Panel
PSU
User Manual
(WITH WARRANTY SHEET)
<OPTIONAL COMPONENTS>
Remote Controller
IR Sensor
4
2. Main functions and features of product
(1) PSU(Power Supply Unit)
PSU is an apparatus to supply power that is operating the LED lighting
with a constant and stable voltage by changing from alternating current
more than 100~240 volts to direct current through AC/DC converter.
AC Voltage input
IR Sensor Connector
Network Output
Network Input
■ PSU Specifications
1) Operating/Storage Temperature
Operating Temp.: 0℃ ~45℃, Humidity : 75%±20% RH
Storage Temp.: -40℃~ 85℃, Humidity : 75%±20% RH
2) Electrical Characteristics
5
① Input Characteristics
AC Rated Input Voltage
: 100 ~ 240Vac
AC Operating Input Voltage : 90 ~ 254Vac
AC Input Frequency : 50/60Hz
AC Input Current
: Max <2Arms
Inrush Current
: < 60A peak
Power Factor
: >90%
② Output Characteristics
Output Voltage : 54V
Output Current : 1.5A
Feedback Current : 180mA
③ Power Consumption
Max Power Consumption : < 90W
④ Efficiency : < 80%
■ Dip Switch Setup
If you want to assign PSU as master set up dipswitch as Fig.A.
If you want to assign PSU as slave set up dipswitch as Fig.B.
Fig.A
Fig.B
6
■ Network Connection
Connect IR Sensor into IR Sensor connector of PSU assigned as
Master. Connect Network Output of Master to Network Input of Slave
as following drawing. You can use normal RJ 4p4c telephone cable
for network connection. Up to 10 panels can be connected by
network. Maximum length of network cable for each panel is 5m.
(2) IR SENSOR
IR sensor is controlled by the operation of remote control, able to be
operated in a certain distance in the room with a high-speed response.
Standard length of IR sensor cable is 1.5m.
7
■ Install IR sensor into PSU
In case of Master, IR Sensor must be mounted as following picture.(In case
of Slave, do NOT mount IR Sensor)
8
(3) Remote Controller
There are Dimming and ON/OFF function in the remote control unit that
can adjust the brightness of lighting adapting to the weather and
preventing the fatigue of eyes.
Key function
①Power On/Off
②Dimming Up
③Dimming Down
④Brightness
⑤Brightness
⑥Brightness
⑦Brightness
⑧Brightness
⑨Brightness
⑩Brightness
level 100%
level 40%
level 50%
level 60%
level 70%
level 80%
level 90%
Remote controller working distance : 7m away from the IR sensor
of LED panel
Remote controller working angle : ±30 degree
Install battery is included.
9
3. INSTALLATION PROCEDURE
(1) AC WIRE CONNECTION
1)The power supply to PSU of all Phoenix LED panels is free voltage
covering AC100 to 240volts 50/60Hz
2)Wiring has to be done while the main power is off.
3)Wiring Procedure
Ground Line
AC Line
(2) Separating PSU from the panel
When you want to install the PSU(Power Supply Unit) and the LED
Lighting panel separately, PSU can be connected with panel by a lead
wire line between the two, and especially, it has the big advantage of
creating the elegant design utilizing the narrow space efficiently.
1) Separate the PSU and panel as following pictures
2) Make connecting lead wire lines and connect PSU and panel.
10
11
(3) How to install with T-bar, burying the panel into ceiling
1) Lift up the panel to diagonal line direction of ceiling’s quadrangle.
2) Mount onto T-bar of the ceiling.
※ PSU(Power Supply Unit) Line connection refers page 10.
12
3) Check the lighting switching on the power.
(4) Pendant Installation (wire with hook)
1) Fix the buttress with the screw to the ceiling that will connect the wire
to the ceiling.
13
2) Connect by driving the buttress and wire.
3) Joint Eye Bolt to connecting holes of the rear side of Panel.
14
4) Connect the panel hooking to the bolt.
(5) Direct Installation onto ceiling
1) Make hole ceiling
15
2) Wiring
3) Use screws and mount panel onto the ceiling.
16
4. NOTICE FOR USE
※ You are asked to read this user manual with the pictures before
you start to use this product
(1) Do not dismantle the product at your own discretion.
- This product requires accuracy to handle and if you dismantle at
your own discretion, it may create other malfunctions.
(2) Refrain from cleaning the panel with water.
- The water cleaning can cause the failure to the electronic
components and power supply unit if the product is soaked
with water.
(3) This product is free voltage AC 100 ~240 volts.
(4) If the product is damaged, do not use it at all. Please contact the
company you bought the product.
(5) Before using the product, eliminate the coating protection vinyl
and sticker on the lighting panel and clean with a soft and clean
piece of cloth.
(6) When you need go out for a long time turning on light,
- Set the dimming to the minimum or
- Turn off the light and
- Plug out from the socket.
(7) Do not shock the product or spray water.
17
5. TROUBLE SHOOTINGS
* Do you have any trouble?
Troubles
Check points
Check if AC power line is properly
connected or if power is switched
off.
Does not turn on light.
-Check batteries inside the remote
controller and polarity of
Remote controller unit does not
batteries.
work.
- Check if Phoenix is turned on or
not.
- Check location of IR sensor and
its connection
- Check Dip S/W
- Check IR sensor connection to
master
Network does not work
- Check connection of network
cables
- Turn off the power and turn on
Flickering of the light
again in 3 minutes.
- If same phenomena occur, then
call agencies.
* Please request after service if the trouble is not solved even with the
above trouble shootings. Your own repair work or dismantling of the
product may cause an electric shock. Please advise your agency following
information when you ask after service.
- Model name, Place and date of your purchase
-
Your name, address, telephone number
Detail the failure exactly.
18