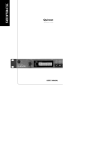
1
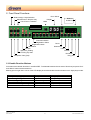
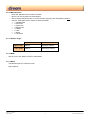
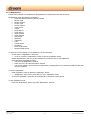
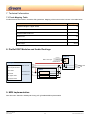
5704PiaRef User's Manual Digital Piano Reference V0.50 1. Making connections .................................................................................................................................................. 3 1.1 Pedal Inputs (J18) Pinout ............................................................................................................................. 3 2. Front Panel Functions............................................................................................................................................... 4 Play_Start .................................................................................................................................................4 2.1 Double Function Buttons .............................................................................................................................. 4 2.2 Functions ...................................................................................................................................................... 5 2.2.1 Instrument Select.............................................................................................................................5 2.2.2 Split ..................................................................................................................................................5 2.2.3 Transposet.......................................................................................................................................5 2.2.4 Tuning ..............................................................................................................................................5 2.2.5 Reverb .............................................................................................................................................5 2.2.6 Chorus .............................................................................................................................................6 2.2.7 Touch Curve ....................................................................................................................................6 2.2.8 Demo ...............................................................................................................................................6 2.2.9 Metronome ......................................................................................................................................6 2.2.10 Manual Drums ...............................................................................................................................7 2.2.11 Sliders assign ................................................................................................................................7 2.2.12 BPM ...............................................................................................................................................7 2.2.13 Menu ..............................................................................................................................................7 2.2.14 Registrations..................................................................................................................................8 2.3 Song – Recorder........................................................................................................................................... 9 2.3.1 Rec Mode ........................................................................................................................................9 2.3.2 Play Start .........................................................................................................................................9 2.3.3 Track A ............................................................................................................................................9 2.3.4 Track B ............................................................................................................................................9 3. Root Menu .............................................................................................................................................................. 10 3.1 SD Menu ..................................................................................................................................................... 10 3.1.1 Select one File ...............................................................................................................................10 3.1.2 Play File .........................................................................................................................................10 3.1.3 Save Song to SD ...........................................................................................................................10 3.1.4 Load Song from SD .......................................................................................................................11 3.1.5 Delete SD File ...............................................................................................................................11 3.2 Recorder Menu ........................................................................................................................................... 12 3.2.1 Song Select ...................................................................................................................................12 3.2.2 Track Pair Select ...........................................................................................................................12 3.3 Function Menu ............................................................................................................................................ 12 3.3.1 Lower Octave Shift ........................................................................................................................12 3.3.2 Temperament ................................................................................................................................12 3.3.3 Root Note ......................................................................................................................................12 3.3.4 Audio Input ....................................................................................................................................13 3.4 MIDI Menu .................................................................................................................................................. 13 3.4.1 Transmit channel ...........................................................................................................................13 3.4.2 Local Control On/Off ......................................................................................................................13 3.4.3 Program Change On/Off................................................................................................................13 3.4.4 Piano Mode On/Off ........................................................................................................................13 PiaRef - User's Manual Rev 21/10/15 1 © 2014-2015 Dream S.A.S. 4. Examples ................................................................................................................................................................ 14 4.1 Recorder Example ...................................................................................................................................... 14 4.1.1 Select song 2 .................................................................................................................................14 4.1.2 Record drum track (optional) .........................................................................................................14 4.1.3 Record track 1 ...............................................................................................................................14 4.1.4 Play track 1 + Drums .....................................................................................................................14 4.1.5 Record track 2 ...............................................................................................................................14 4.1.6 Play track 1 and 2 + Drums ...........................................................................................................14 4.1.7 Record track 3 ...............................................................................................................................14 4.1.8 Play track 1, 2 and 3 + Drums .......................................................................................................15 4.1.9 Delete song 2: ...............................................................................................................................15 5. Optional Functions .................................................................................................................................................. 15 5.1 Style Player................................................................................................................................................. 15 6. Feature Table.......................................................................................................................................................... 16 7. Technical Information ............................................................................................................................................. 17 7.1 Track Mapping Table .................................................................................................................................. 17 8. Pia-Ref DSP Modules and Audio Routings ............................................................................................................ 17 9. MIDI Implementation ............................................................................................................................................... 17 PiaRef - User's Manual Rev 21/10/15 2 © 2014-2015 Dream S.A.S. 1. Making connections Connect the Front panel to the main board Connect the main board to a FATAR TP40 keyboard Connect The main board to pedal (see table below for pinout) Connect the main board audio outputs to line level inputs of a mixer, a stereo sound system… Connect the main board to 12V/1A DC power supply (- to tip , +to ring ) 1.1 Pedal Inputs (J18) Pinout Pin # Function Description 1 Pedal Ground Reference Ground for pedal inputs 2 Forte (Sustain) 4-level Half-pedal 3 Sostenuto On/Off pedal 4 Una Corda (Soft) On/Off pedal All Pedals are fully ON when connected to Pedal Ground and OFF when open. PiaRef - User's Manual Rev 21/10/15 3 © 2014-2015 Dream S.A.S. 2. Front Panel Functions Plus / Minus Sliders assign / Style Selection Manual Drums / Rhythm Only Touch Curve / Variation Balance Brilliance Display Menu Instrument Select / Registration Select Registration Mode Demo Metronome Track A Modulation Reverb Track B Split /Intro_Ending Tune / Fill IN_Key Start Rec Mode Play_Start Transpose / Start_Stop 2.1 Double Function Buttons Six buttons have double functions in 5704PIA-REF. To alternate between the two sets of functions just press “Plus” and “Minus” buttons at the same time. Blinking point in right down corner of the LED display shows that double functions buttons are In Style player mode. Button Transpose / Start_Stop Split / Intro_Ending Sliders Assign / Style Selection Tune / Fill In_Key Start Manual Drums / Rhythm Only Touch Curve / Variation Default Function Transpose Split Sliders Assign Tuning Manual Drums Touch Curve Alternate Function Start_Stop Intro_Ending Style Selection Fill In_Key Start Rhythm Only Variation PiaRef - User's Manual Rev 21/10/15 4 © 2014-2015 Dream S.A.S. 2.2 Functions This chapter describes the various mapped features. 2.2.1 Instrument Select 1: Studio Grand Piano 3: Electric Piano 1 5: Harpsichord 7: Strings 2: Concert Grand Piano 4: Electric Piano 2 6: Vibes 8: Choir Layer (Dual) mode is available by simultaneously pressing two “Instrument Select” buttons. 2.2.2 Split Press the “Split” button to activate Split function. “Split” LED will turn on. If Dual mode is activated: First selected sound in previous Dual mode is played on right of the split point (Upper sound). Second selected sound in previous Dual mode is played on left of the split point (Lower sound). It is transposed one octave up. If not in Dual mode: Current selected sound is played on right of the split point (Upper sound) Strings sound is played on left of the split point (Lower sound). It is transposed one octave up. Default split point is G2 (MIDI note #55). Split point can be changed: Press and hold the “Split” button, then press a key on the keyboard. The pressed key becomes the lower note for the Upper sound. 2.2.3 Transposet Global transpose is available in the range (-12,+12 semitones) Press and hold the “Transpose” button, then press the “Plus” or “Minus” button to specify the desired transposition value. The “Transpose” LED will turn on, indicating that the transpose function has been activated. The current transpose setting will be shown in the display. To cancel transpose, select value “0” or press again the “Transpose” button. “Transpose” LED will turn off. Transposition value is memorised until power off. To recall memorized transposition, press the “Transpose” button. “Transpose” LED will turn on. 2.2.4 Tuning Global tuning is available in the range (427.0, 453.0Hz) - Press “Tuning” button. The “Tuning” LED will turn on. Default value is 440.0Hz. Display shows “40.0” - Use the “Plus” or “Minus” button to specify the desired tuning value. Display is “27.0” ~ “53.0”. Steps are 0.5Hz. - Press “Tuning” button to quit. 2.2.5 Reverb Press the “Reverb” button to step through the reverb presets OFF / Room1 / Room2 / Hall / Plate Press and hold “Reverb” button, then press “Plus” or “Minus” to adjust reverb depth in the range 1-20 PiaRef - User's Manual Rev 21/10/15 5 © 2014-2015 Dream S.A.S. 2.2.6 Chorus Press the “Chorus” button to step through the chorus presets OFF / Chorus1 / Chorus2 / Short Delay Press and hold “Chorus” button, then press “Plus” or “Minus” to adjust chorus depth in the range 1-20 2.2.7 Touch Curve For each instrument, the following touch curves can be selected: Soft / Medium / Hard / Constant Velocity (default = 64) - Press the “Touch Curve” button. The “Touch Curve” LED will turn on. Default value for current selected instrument will be displayed: “S F t” message for Soft curve, “M E d” for Medium curve, “H r d” for Hard curve and “C S t” for Constant curve - Press the “Touch Curve” button again for exit. The value for the constant velocity can be set: - While constant curve is selected, hold the “Touch Curve“ button pressed until the display shows the current constant dynamic value. - Use the “Plus“ and “Minus” buttons for adjusting the constant dynamic in the range 0-127 2.2.8 Demo Press the “Demo” button to activate Demo-Menu. if Registration-Menu or Drum-Menu is open it will be closed Use the “Instrument-Select” buttons to select a Demo-Song 2.2.9 Metronome Press the “Metronome” button to start/stop the metronome Press and hold the “Metronome” button, then use “Plus” or “Minus” to select signature. PiaRef - User's Manual Rev 21/10/15 6 © 2014-2015 Dream S.A.S. 2.2.10 Manual Drums Press the “Manual Drums” button to activate Drums can now be played on the keyboard Drums will be recorded to track 10 in the recorder, ignoring Track-A/B-Setting (see 2.3 ) Use the “Instrument-Select” buttons to select a Drumkit 1: Standard Set 2: Room Set 3: Power Set 4: Electric Set 5: TR808 6: Jazz 7: Brush 8: Orchestra 2.2.11 Sliders assign Led Off Led On Upper Slider Balance GM-Player Volume Lower Slider Brilliance Metronome Volume 2.2.12 BPM Use the “Plus” and “Minus” buttons to select BPM 2.2.13 Menu This Buttons opens or closes the menu. See Chapter 3. PiaRef - User's Manual Rev 21/10/15 7 © 2014-2015 Dream S.A.S. 2.2.14 Registrations Presets can be stored in 8 Registrations. Registrations are memorized even after power off. Registrations retain the following parameters: Press the “Manual Drums” button to activate Reverb Type Reverb Volume Chorus Type Chorus Volume Touch Curve Tempo Upper Sound Lower Sound Upper Volume Lower Volume Split On/Off Split point Transpose Tune Temperament Root Note Lower Octave Shift Damper Pedal Assign To save your current setting in one registration, do the next steps: Check that the “Registration” LED is off. If it is On, press the “Registration” button to quit the registration mode. Adjust all parameters until you get the setting that you want to save in one registration Press and hold “Registration” button. The last used Registration will blink. Press one of the 8 “Instrument select” buttons. The current setting is now stored in the registration corresponding to the “Instrument Select” button that you have pressed. To recall a registration: Enter registration mode by pressing “registration” button. “Registration” LED is On to show that you are in registration mode. To recall a registration, just press the corresponding “Instrument” select button. To exit registration mode: Press the “Registration” button to get the “Registration” LED Off PiaRef - User's Manual Rev 21/10/15 8 © 2014-2015 Dream S.A.S. 2.3 Song – Recorder A 2-Track, 3-song sequencer is implemented in the PiaRef. Also see Recorder Menu and Recorder Example 2.3.1 Rec Mode Should be pressed before starting a track record. Then, track to be recorded can be selected. Allow to stop the track record. 2.3.2 Play Start Start playing the selected recorded song Stop playing the selected recorded song 2.3.3 Track A Selects the first Track for recording. Mutes previously recorded Track A when recording or during playback. 2.3.4 Track B Selects the second Track for recording. Mutes previously recorded Track B when recording or during playback. PiaRef - User's Manual Rev 21/10/15 9 © 2014-2015 Dream S.A.S. 3. Root Menu The Root menu can be reached by pressing the “Menu” button. The current menu page can be selected with “Plus” and “Minus” Pressing the “Menu” button again will exit the menu. 3.1 SD Menu General information: PIA-DK firmware support SDCard with FAT16 (up to 4 GByte) or FAT32 file systems. Only Standard MIDIFile in format 0 (or format 1 with 1 track) are supported. SD functions can be accessed by pressing on the 'Menu' button and scroll through the menus with 'Plus' and 'Minus' until the display shows “S d.C”. Then following functions can be used: 3.1.1 Select one File Scroll across SDCard MIDIFiles and select one file. Press the first ”Instrument select” button. Display toggles between “F i l ” and “S.x x ” or “r.x x”, or “F.x x ” if one SD that contains Standard MIDIFiles (SMF) is inserted in SDMMC socket. If no SD inserted or SD without SMF, display will toggle between “F i l ” and “- - - “. Use “Plus” and “Minus” buttons to select the SMF that you want to play, to load or to delete. SMF created with the piano recorder (Piano Song) and with name in format : “SONGxx.MID” be displayed in format “S.x x ”. xx is the value of the 2 digits in name. Example: “SONG56.MID” will be displayed as “S.5 6 ”. SMF created with the piano recorder (Piano Song) and with name not in format : “SONGxx.MID” be displayed in format “r.x x ”. xx is the value of the index of the song in the SD directory. Example: Piano song “MyRecord.MID” will be displayed as “r.0 1 ” if it is referenced at the index 1 of the SD directory. If name of SMF was not created with the piano recorder, display will be “F.x x ”. xx is the value of the index of the song in the SD directory. Example: “PRELUDE.MID” can be displayed as “F.0 2 ” if it is referenced at the index 2 of the SD directory. 3.1.2 Play File When in SD Select File mode you can play directly from SD the File that is currently displayed. For that, simply press the “Play Start” button 3.1.3 Save Song to SD Save the current sequencer Song to SD in SMF format. This menu can be reached only if unlocked SD that contains SMF is inserted Press the second ”Instrument select” button. Display toggles between “S A.F ” and “S.x x”. xx is automatically set to the next upper value of the current highest Piano Song index Press “Plus” button. Display shows “S u r ”. Press again “Plus” button to confirm your choice or “Minus” to abort. If confirmed, Song will be saved on SD with name SONGxx.MID. Display shows “ E n d ”. If aborted Song is not saved and display shows “ A b o “ PiaRef - User's Manual Rev 21/10/15 10 © 2014-2015 Dream S.A.S. 3.1.4 Load Song from SD Load File from SD to internal memory. Press the fourth ”Instrument select” button. Display toggles between “L d.F ” and the currently selected file name. Press “Plus” button. Display shows “S u r ”. Press again “Plus” button to confirm your choice or “Minus” to abort. If confirmed, the latest Piano Song that was selected with SD Select function is loaded to currently selected song of sequencer. If aborted Song is not loaded and display shows “ A b o “ If file is not a Piano Song, load operation will b and display will show “E r r ”. 3.1.5 Delete SD File Delete File of SD. This menu can be reached only if unlocked SD that contain SMF is inserted - Press the fourth “Instrument select” button. Display toggles between “d l.F ” and “Y E S ” - Pressing the “Plus” button now, will delete the latest SMF that was selected with SD Scroll function - Pressing the “Minus” button will cancel the Delete operation and escape from SD Functions. PiaRef - User's Manual Rev 21/10/15 11 © 2014-2015 Dream S.A.S. 3.2 Recorder Menu Recorder-Menu can be accessed by pressing on the 'Menu' button and scroll through the menus with 'Plus' and 'Minus' until the display shows “r E C ”. 3.2.1 Song Select Press the first “Instrument Select” button. Display shows “S n.1 ”. Song #1 is selected Use “Plus” and “Minus” to select another Song 3.2.2 Track Pair Select Press the second “Instrument Select” button. Display toggles between “t r.P " and “0 - 1 ”. Use “Plus” and “Minus” buttons to select track pair 0-1 or 2-3. 3.3 Function Menu Advanced functions can be accessed by pressing on the 'Menu' button and scroll through the menus with 'Plus' and 'Minus' until the display shows “F n c”. 3.3.1 Lower Octave Shift Octave shift for the lower sound. Press the first ”Instrument select” button. Display toggles between “L.O.S " and “ “Minus” buttons to select the octave shift in range“0-2”. 1 ”. Use “Plus” and 3.3.2 Temperament Press and hold the third “Instrument Select” button. Display shows “t M P ” Use “Plus” and “Minus” to select Temperament Following Temperaments are available: “E q U ” : Equal “P y t ” : Pythagorean “M A J ” : Pure Major “M I n ” : Pure Minor “M E n”: Mean Tone “M S 3” Werckmeister III “b G 3 ”: Kirnberger III 3.3.3 Root Note Root note should be specified for temperaments others than the Equal one. Press the fourth ”Instrument select” button. Display toggles between “r t.n " and “ C ”. It means that root not for is currently selected temperament is C. Use “Plus” and “Minus” buttons to select another root note. “ C ‘ “ in display means C#. PiaRef - User's Manual Rev 21/10/15 12 © 2014-2015 Dream S.A.S. 3.3.4 Audio Input 5704PIA-FK has a stereo audio input that can be used with different settings. Press the fifth ”Instrument select” button. Display toggles between “A.i n " and “ O F F ”. Audio in is disabled. Use “Plus” and “Minus” buttons to switch between settings: “ L.I n ”. Line in config. Audio In Left mixed in Output Left without Reverb and Audio In Right mixed in Output Right without Reverb “ M c.1 ”. Mike input config 1. Audio In Left mixed in Output Left and Output Right with low send to Reverb. Audio In Right is Off. “ M c.2 ”. Mike input config 2. Audio In Left mixed in Output Left and Output Right with medium send to Reverb. Audio In Right is Off. “ M c.3 ”. Mike input config 3. Audio In Left mixed in Output Left and Output Right with high send to Reverb. Audio In Right is Off. 3.4 MIDI Menu Midi parameters can be configured by pressing repetitively on the “Set” button until the display shows “M i d ”. Then following parameters can be adjusted: 3.4.1 Transmit channel Transmit channel is MIDI transmit channel for keyboard upper notes. Keyboard lower/dual notes will be transmitted on next greater channel. Press the first ”Instrument select” button. Display toggles between “t r.C ” and “ 1 ”. Use “Plus” and “Minus” buttons to select the Midi transmit channel in range“1-16” 3.4.2 Local Control On/Off Local Control On/Off function allows connecting or not the Sound engine to Keyboard. If Local Control is On keyboard can play sound engine and send notes info to MIDI out. If Local Control is Off keyboard is not connected to sound engine but it continues to send notes info to MIDI out. Press the second “Instrument select” button. Display toggles between “L c l " and “O n ”. Use “Plus” and “Minus” buttons to set the Local control to “O n ” or “O f f ” 3.4.3 Program Change On/Off Program Change On/Off function decides if Program Change are received and transmitted by piano board-. Press the third “Instrument select” button. Display toggles between “P G.C ” and “O n ”. Use “Plus” and “Minus” buttons to set value to “O n ” or “O f f ” 3.4.4 Piano Mode On/Off Piano Mode On/Off decides how the MIDI In will be played: If Piano Mode is on, only Note and Pedal event are kept. All MIDI in channels are played in the same way that if you were pressing the keys on the keyboard. All buttons of the piano front panel and their functions can be used in this mode. If Piano Mode is Off, MIDI In channels 1-16 are played in GM mode. By default, Piano mode is On. Receiving a system excusive message GM Reset or GS Reset on MIDI In will switch off the Piano mode. Piano mode setting can also be done manually: Press the fourth “Instrument select” button. Display toggles between “P.M d " and “O n ”. Use “Plus” and “Minus” buttons to set the Piano mode “O n ” or “O f f ” PiaRef - User's Manual Rev 21/10/15 13 © 2014-2015 Dream S.A.S. 4. Examples 4.1 Recorder Example 4.1.1 Select song 2 Press “Menu” to open the Menu [3. ] Navigate to “REC” Menu with “Plus” and “Minus” [3.2 ] Press first Instrument-Select button and use “Plus” and “Minus” until Displays shows “S n.2 ” Press “Menu” twice to exit Menu 4.1.2 Record drum track (optional) Press “Manual Drums” Press “Rec Mode” to switch Sequencer into Record-Mode. “Rec Mode” Led is blinking Record automatically starts when pressing the first drum key Press “Rec Mode” again to stop recording. 4.1.3 Record track 1 Disable “Manual Drums” Press “Rec-Mode” to switch Sequencer into Record-Mode Track 1 is is selected by default. “Track A” and “Rec Mode” Leds are blinking Record can be started by pressing “Play Start” or by playing first note. You will hear the previously recorded drums. Press “Rec Mode” again to stop recording. 4.1.4 Play track 1 + Drums Press “Play Start”. You will hear the previously recorded drums and track 1. Press “Play Start” to stop, or wait for the song to finish. 4.1.5 Record track 2 Press “Rec Mode” to switch Sequencer into Record Mode Press “Track B” to select track 2. “Track B” and “Rec Mode” Leds are blinking Record can be started by pressing “Play Start” or by playing first note. You will hear the previously recorded drums and track1. Press “Rec-Mode” again to stop recording. 4.1.6 Play track 1 and 2 + Drums Press “Play Start”. You will hear the previously recorded drums, track 1 and track 2. Press “Play Start” to stop, or wait for the song to finish. 4.1.7 Record track 3 Press “Menu” to open the Menu [3. ] Navigate to “REC” Menu with “Plus” and “Minus” [3.2 ] Press second Instrument-Select button and use “Plus” and “Minus” until Displays Display toggles between “t r.P " and “2 - 3 ”. Press “Menu” twice to exit Menu Press “Rec Mode” to switch Sequencer into Record Mode Press “Track A” to select track 3. “Track A” and “Rec Mode” Leds are blinking Record can be started by pressing “Play Start” or by playing first note. You will hear the previously recorded drums and track1. Press “Rec-Mode” again to stop recording. PiaRef - User's Manual Rev 21/10/15 14 © 2014-2015 Dream S.A.S. 4.1.8 Play track 1, 2 and 3 + Drums Press “Play Start”. You will hear the previously recorded drums, track 1, track 2 and track 3. Press “Play Start” to stop, or wait for the song to finish. 4.1.9 Delete song 2: - Press “Menu” to open the Menu [3. ] - Navigate to “REC” Menu with “Plus” and “Minus” [3.2 ] - Press first Instrument-Select button and use “Plus” and “Minus” until Displays shows “S n.2 ” - While keeping “Rec Mode” button pressed, press “Play/rec Start” button. Selected song is immediately deleted. If the song to delete is the current one, only the last step is needed. 5. Optional Functions 5.1 Style Player Use “Intro_Ending”, “Fill-In”, “Start_Stop”, “Variation”, ”Rhythm Only”, “Style selection” buttons. Style Selection: Press the “Style Selection” button then select with “Plus“ and “Minus” buttons. 0: EuroPop, 1: 90sDance, 2: KickDance, 3: 80sPop, 4: TechnoRock, 5: Country, 6: Beguine, 7: Bossa, 8: Blues, 9: JazzTet, 10: Rock&Roll, 11: Soca, 12: Lounge, 13: Waltzer Recognized chords: Maj Maj6 Aug Min Min7_11 MinMaj7 7b5 7_9 Maj7aug 7aug Maj7 Maj7_s114 Min6 Min7 MinMaj7_9 Dim 7_s11 7_13 1p8 1p5 Maj9 Min7b5 Maj7_9 Min_9 Dim7 7th 7_b9 7_b13 sus4 1p2p5 Maj6_9 Min7_9 7sus4 7_s9 PiaRef - User's Manual Rev 21/10/15 15 © 2014-2015 Dream S.A.S. 6. Feature Table FEATURES Sounds Memory for piano samples Memory for GM sound + variations. Sound Engine Polyphony Display Effect Metronome Sequencer Demo Registrations Touch Curve Dual Split Transpose Tune Temperaments USB SD Card Style Player Pedals Reset Production Test Mike Input DETAILS 8 sounds selectable from panel 128 GM sounds + 99 variations selectable from MIDI Manual Drums 16 MByte 11 MByte 32-parts Multitimbral high range Wavetable Synthesizer Up to 81 voices with effect 3-digit LED Reverb (Room1, Room2, Hall, Plate) Chorus (Chorus1, Chorus2, Short Delay) Time signature: 1/4, 2/4, 3/4, 4/4, 5/4, 3/8, 6/8, 12/8 10-400 bpm with volume control 3 songs, 4 dual tracks per song, 15 000 event per song SMF format 0, storage in DataFlash 3 demo songs 8 registrations for user Storage in DataFlash Soft, Medium, Hard, Constant (programmable from 0 to 127 by user) 2-sound layer with volume balance Programmable Split point -12 to +12 semi-tones 427 to 453 Hz Equal, Pythagorean, Pure Major, Pure Minor, Mean Tone, Werckmeister III, Kirnberger III Programmable Root Note USB MIDI (to Host) Sound Bank and Firmware update SDMMC socket. SD Card support, up to 4 GByte Save sequencer song in SMF format 0, Read SMF, Load SMF format 0, Delete SMF 8-part, 2-group style player 1 volume per group 14 Styles with Intro, Ending, Fill in, Variation Start-Stop, Rhythm Only, Easy Chord Damper (4 levels), Sostenuto, Soft Recall of factory Registrations and settings Test for front panel: Leds, Display, Switches, Pedals, Sliders Test for soundboard components: SAM5704, DataFlash, Serial Flash, MIDI test Play sine wave for audio test mike input with reverb PiaRef - User's Manual Rev 21/10/15 16 © 2014-2015 Dream S.A.S. 7. Technical Information 7.1 Track Mapping Table Pia-Ref firmware has a built in 32-tracks GM synthesizer. Mapping of the sound tracks is shown in the table below: Source Track # (0-31) Keyboard Single or Upper Sound 0 Keyboard Dual or Lower Sound 1 Keyboard Manual Drums 9 Metronome 15 GM-Player (Demo, GM-MIDI-IN, SD, Recorder) 16-31 Style Player 24-31 8. Pia-Ref DSP Modules and Audio Routings Audio In DAAD0_L Mike / AUX Input DAAD0_R Reverb send Inp Mix GMSynth Piano keyboard tracks --> Main Out L/R MAIN1 DABD0_L MAIN2 DABD0_R Piano sequencer tracks Main Out L/R GMFX Demo tracks --> Rev Send Out FX1 Reverb FX2 Chorus MIDI tracks SMF player tracks --> Chr Send Out Style player tracks 9. MIDI Implementation See document: SamVS-C GM2Synth Library.pdf / § Detailed MIDI Implementation PiaRef - User's Manual Rev 21/10/15 17 © 2014-2015 Dream S.A.S. Dream Contact [email protected] Website http://www.dream.fr This publication neither states nor implies any warranty of any kind, including, but not limited to, implied warrants of merchantability or fitness for a particular application. Dream assumes no responsibility for the use of any circuitry. No circuit patent licenses are implied. The information in this publication is believed to be accurate in all respects at the time of publication but is subject to change without notice. Dream assumes no responsibility for errors and omissions, and disclaims responsibility for any consequences resulting from the information included herein. © Copyright 2015 Dream S.A.S. France PiaRef - User's Manual Rev 21/10/15 18 © 2014-2015 Dream S.A.S.