1
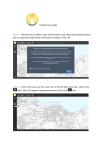
Professional Registration System (HCP)
User Manual
Version 1.0
Restricted
Page 1 of 15
Professional Registration System
User Manual
Version 1.0
REVISION HISTORY
Version
1.0
Effective
Date
22/08/2013
Summary of Changes
Author
Release version
NCS
Restricted
Page 2 of 15
Professional Registration System
User Manual
Version 1.0
TABLE OF CONTENTS
1.
INTRODUCTION ............................................................................................................................ 4
1.1.
1.2.
1.3.
2.
OVERVIEW ............................................................................................................................... 4
SCOPE .................................................................................................................................... 4
DEFINITIONS, ACRONYMS AND ABBREVIATIONS.......................................................................... 4
FUNCTIONS ................................................................................................................................... 5
2.1.
2.2.
2.2.
LOGIN TO THE PRS .................................................................................................................. 5
PC RENEWAL APPLICATION ...................................................................................................... 7
ENQUIRE APPLICATION ........................................................................................................... 13
Restricted
Page 3 of 15
Professional Registration System
User Manual
1.
INTRODUCTION
1.1.
Overview
Version 1.0
The Professional Registration System (PRS) is a common registration system for Healthcare
Professionals in Singapore. It supports the Healthcare Professionals (HCP), Human
Resources Personnel (HR) and Healthcare Professional Entities (HPE) in the execution of the
key business functions of the HPEs, such as professional registration, renewal, disciplinary
and continuing professional education.
The PRS is a web-based application that is hosted in the Medinet Hosting Environment.
1.2.
Scope
The objective of this document is to provide step-by-step guidelines on the proper usage of
the system by Healthcare Professionals to submit applications online to the OOB
(Optometrists and Opticians Board).
The targeted users of this document shall be the HCPs.
Users of the online application functionalities should have the basic knowledge of using a
internet web browser, such as the Internet Explorer (IE), to navigate from one page to
another.
The chapters in this manual are organised in a logically functional manner. They may not
necessarily reflect the order, which the users would normally adopt to use the system.
The reader of this manual may study its content in any order. He/She may read the specific
sections that illustrate the functions being encountered or study the specific section that
he/she is interested in.
1.3.
Definitions, Acronyms and Abbreviations
This manual uses the following typographic conventions:
• A ‘*’ character next to a field indicates a mandatory field.
• [Button Name] refers to a button.
• [Proceed] button indicates that the system will be displaying the next web page after
the current page.
• [Confirm] button indicates that the system will update or insert records in the
database and will display the acknowledgment page.
• [Print] button displays the letter on the browser and the system will update the record
in the database.
The following format is used by the PRS system:
• DD/MM/YYYY as a Date Format
The manual uses the following abbreviations
• HCP: Healthcare Professional
• HPE: Healthcare Professional Entity
• IE: Internet Explorer
• OOB: Optometrists and Opticians Board
• PC: Practicing Certificate
• PRS: Professional Registration System
• RC: Registration Certificate
Restricted
Page 4 of 15
Professional Registration System
User Manual
2.
FUNCTIONS
2.1.
Login to the PRS
Version 1.0
To access the PRS, click on the [Login] button on the OOB’s website (URL:
http://www.OOB.gov.sg).
Figure 1
Restricted
Page 5 of 15
Professional Registration System
User Manual
Version 1.0
The PRS Login screen will be displayed as follows.
Figure 2
To login:
• Enter your User ID.
• Enter your Password.
• Click on the [Login] button.
If your login credentials are correct the landing page
ge will be displayed as follows:
Figure 3
Restricted
Page 6 of 15
Professional Registration System
User Manual
2.2.
Version 1.0
PC Renewal Application
To submit a PC Renewal Application, you must first login to PRS. Refer to 2.1 Login to the
PRS for more information.
After logging in, click on the [PC Renewal] link.
Figure 4
If you are eligible for PC Renewal, the first page of the PC Renewal and Off-Register
application process will be displayed. Please review the Personal Particulars section and the
Employment Details section. If they are outdated, please update them using the Update
Particulars function. Refer to Error! Reference source not found. Error! Reference source
not found. for more information. The following is an extract of the first page.
Restricted
Page 7 of 15
Professional Registration System
User Manual
Version 1.0
Figure 5
The first page will have the following sections:
• PC Renewal Details: This section will display whether you satisfy the renewal
requirements.
• Personal Particulars: This section will d
display
isplay your last known personal particulars as
stored in PRS.
• Employment Details: This section will display your last known Employment Details as
stored in PRS.
To proceed to the Application Form page:
• Recommended: Click on the [here] link to download and read the instructions for
submitting a PC Renewal and Off
Off-Register application.
• Indicate that the information is correct.
correct
• Click on the [Proceed] button.
If the inputs all pass the required validation checks, the Application Form page will be
displayed as follows.
Restricted
Page 8 of 15
Professional Registration System
User Manual
Version 1.0
Figure 6
To proceed to the Declarations page:
• Select the PC Type.
• Indicate your preferred collection method.
• Upload all mandatory documents.
• Upload any additional documents that you will require to support your application.
• Tip: You may click on the links on top to return to the previous pages to make changes, if
necessary.
• Click on the [Save] button to save this application as a draft. You can retrieve the draft
later on from Enquire Applications. Refer to 2.3 Enquire Applications for more information.
• Click on the [Proceed] button.
If the inputs all pass the required validation checks, the declaration page will be displayed as
follows.
Restricted
Page 9 of 15
Professional Registration System
User Manual
Version 1.0
Figure 7
To proceed to the Confirmation page:
• Indicate your answer for all the questions and make your declarations.
• Tip: You may click on the links on top to return to the previous pages to make changes, if
necessary.
• Click on the [Save] button to save this application as a draft. You can retrieve the draft
later on from Enquire Applications. Refer to 2.3Enquire Applications for more information.
• Click on the [Proceed] button.
If the inputs pass the required validation checks, the Confirmation page will be displayed. The
details that you have submitted for your PC Renewal application will be displayed.
Restricted
Page 10 of 15
Professional Registration System
User Manual
Version 1.0
Figure 8
To proceed to the Payment page:
• Tip: You may click on the links on top to return to the previous pages to make changes, if
necessary.
• Click on the [Confirm] button.
If the inputs all pass the required validation checks, the payment page will be displayed.
Figure 9
Restricted
Page 11 of 15
Professional Registration System
User Manual
Version 1.0
To proceed to the Acknowledgement page:
• Click on the [Proceed] button.
BillCollect payment interface will be displayed. Follow the on screen instructions to make
payment. Once payment is completed, the acknowledgement page will be displayed.
Figure 10
•
•
Optional: Click on the [email] link to email the OOB for any queries, if any.
Recommended: Click on [Print] button to print out a copy of the acknowledgement page.
Restricted
Page 12 of 15
Professional Registration System
User Manual
2.3.
Version 1.0
Enquire Applications
You can utilize the Enquire Applications function to do the following:
• Continue your saved drafts
• View the details of submitted applications
• Upload documents for applications where the current status is “Pending Supporting
Documents”.
You will first need to login to PRS. Refer to 2.1 Login to the PRS for more information. After
logging in, click on the [Enquire Application] link.
Figure 11
The Enquire Applications page will be displayed as follows.
Restricted
Page 13 of 15
Professional Registration System
User Manual
Version 1.0
Figure 12
Carrying on with a draft:
• Click on the link in the Application No. column, where the Application Status is “Draft”.
The application form will be loaded and you may proceed with filling in the application.
Viewing the details of submitted applications:
• Click on the link in the Application No. column, where the Application Status is not “Draft”.
The details you entered for the submitted application will be displayed. They will be read
only and non-editable.
Uploading of additional supporting documents:
• Click on the [here] link in the Remarks column the Application Status is “Pending
Supporting Documents”.
The Attach Document form will be displayed as follows.
Restricted
Page 14 of 15
Professional Registration System
User Manual
Version 1.0
Figure 13
To proceed to the Acknowledgement page:
• Select the Document Title
Title.
o If others, select the document title in the text box that appears.
• Click the [Browse] button. A file dialog box will appear. Select the file you wish to upload.
• Click on the [Open] button.
• Click on the [Attach] button. The document will appear in tthe
he Documents Attached table.
• Tip: To view uploaded documents, click on the hyperlink for the document title.
• Tip: Click on the [Replace
[Replace] link to replace the respective document.
• Tip: Click on the [Delete
[Delete] link to remove the respective document.
• Click on the [Proceed] button.
The Acknowledgement form will be displayed as follows.
Figure 14
•
•
Optional: Click on the [email]
[email link to email OOB for any enquiries pertaining to the
application.
Recommended: Click on the [Print] button print a copy of the acknowledgement page.
Restricted
Page 15 of 15