1
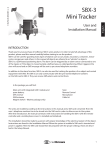
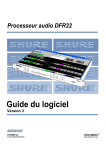
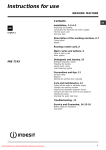
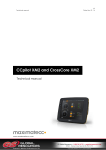
redKnows MiniFinder User Manual Axtech AB St. Jörgens väg 4, 422 49 Hisings Backa, Sweden Tel +46 (0)31 558866, Fax +46 (0)31 558869 [email protected] www.redknows.com EN. redKnows® is a registered trademark owned by Axtech AB The product is developed and manufactured in Sweden by: Axtech AB St. Jörgens väg 4, 422 49 Hisings Backa, Sweden Tel. +46 (0)31 558866, Fax. +46 (0)31 558869, E-mail: [email protected] www.redknows.com 13. MiniFinder Technical Specifications Item number 88810 Dimensions Weight Color Water resistance Temperature Operating voltage Battery Power consumption GPS-antenna Port for external GPS antenna GSM antenna GSM band Activation of functions Alarm settings Frequency ”KeeLoq®Hopping Code” Number of alarm receivers SIM card Monthly fee/subscription Basic packaging includes MiniFinder tracking transmitter, with: • GPS antenna, built-in • GSM antenna, built-in • Internal battery, built-in • Vibration sensor, built-in remote controller, 1 Charger, 220V Cable set for external power supply (1.4 m) Mounting strap Manual 78x62x28 mm 110 g Black IP66 (with complete cover) -20°C till +70°C 6V-30V DC Rechargeable (average) 30 mA at 12 V Built-in Yes Built-in 900/1800/1900 Remote controller/mobile phone www.redknows.com 433,92 MHz Remote controller transfers are encrypted 1-3 Pre-paid card or subscription No Extra accessories Charger, 12V cigarette lighter socket, 88811 External GPS antenna, 88813 Extra cover, 88815 Extra remote controller, 88816 Extra mounting bracket, 88817 TABLE OF CONTENTS 1. INTRODUCTION....................................................................5 2. SIM CARD..............................................................................7 2.1 Inserting and removing SIM card..............................................................8 3. CHARGING MINIFINDER......................................................9 4. STARTING UP MINIFINDER................................................10 4.1 Starting up your alarm.............................................................................10 4.2 Programming your MiniFinder.................................................................11 5. ALARM FUNCTIONS...........................................................12 5.1 Activating MiniFinder remotely................................................................12 5.2 Activating MiniFinder via SMS................................................................14 5.3 When you receive an SMS from MiniFinder...........................................15 6. CALLING AND TRACKING MINIFINDER...........................17 7. GPS AND GEOFENCE........................................................18 8. CONNECTING MINIFINDER TO EXTERNAL BATTERY...20 9. UPGRADING MINIFINDER.................................................20 10. RESETTING MINIFINDER TO FACTORY SETTINGS......21 11. POINTS TO REMEMBER..................................................22 12. FAQ TROUBLESHOOTING.............................................23 13. TECHNICAL SPECIFICATIONS.......................................26 26 PACKAGE CONTENTS 11. I do not receive a Geofence alarm when I have the alarm on and drive away MiniFinder has to find the position. Wait until the red GPS LED stops flashing and changes to a steady glow before you drive away. 1. redKnows MiniFinder 2. remote controller 3. mounting bracket + mounting strap* 4. 230V charger 5. cable for connection to external power source 6. screws* 7. user manual* 12. I can't set the alarm for VIB and GEO First you have to create an account and register the alarm at MiniFinder EZ-Start on www.redknows.com. 13. I can't upgrade my unit with new software You have to use a SIM card that is recommended by a redKnows distributor. Go to www.redknows.com or contact support. Also see FAQ at www.redknows.com. 4 5 2 3 1 * not pictured 25 6. I call MiniFinder, but do not get an SMS back. Check to make sure that: Settings (phone numbers) on the account on the home page are correct. There is a sufficient balance on the SIM card in MiniFinder (in the case of pre-paid cards). The SIM card does not have a PIN number or voice mail is not activated. The MiniFinder SIM card is correctly inserted. The mobile phone registered as the user is not connected by a switchboard. GSM reception in the area is good. The external or internal batteries are not discharged and MiniFinder is not turned off. Wait a moment. SMS can be delayed by the SIM card service provider. 7. MiniFinder does not work abroad - local pre-paid card Some foreign operators require that the SIM card be registered in order for it to be fully functional or that the card be activated before use. Check with the sales outlet. In some cases a subscription card is preferable to a pre-paid card to ensure that SMS communication works. 1. Introduction What is redKnows MiniFinder? The redKnows MiniFinder is a traceable alarm that can be placed in all types of vehicles and boats. Thanks to its compact size and moisture resistance, the MiniFinder can be mounted in tight spaces, such as outboard motors, motorcycles, ATVs, contractor equipment etc. MiniFinder is a tracking transmitter which, with the aid of GPS, provides information on exactly where it is located via GSM SMS. When the Vibration Sensor is active, MiniFinder sends an SMS alert if your property is disturbed. When the Geofence function is active, MiniFinder sends an alert if your property is moved from its authorized area. You choose whether your MiniFinder can be tracked by all mobile phones or only by those you specify. Below are instructions the initial setup of your alarm. More setup options for your MiniFinder are available from www.redknows.com, where you can register your device and manage more advanced features. 8. How do I make a service report? If you turn in your MiniFinder to your retailer or to Axtech for some reason, you should always accompany it with a service report and a copy of the purchase receipt. You will find this at www.redknows.com under Support. 9. I get the wrong position when I enter long/lat from the link in my mobile phone at redknows.com These coordinates should not be used. They are a link to the map image. Click and open it, or if your mobile phone does not support this feature, deselect the map in SMS in your account on the home page. If you open the map link, you will see coordinates above the image that can be entered on the home page to locate the position on the larger map if so desired. 10. I can't open the link to the map in my SMS Your mobile phone does not have internet/WAP service activated or does not support this. Read the mobile phone's instruction manual or contact the service provider's customer service for information. In the account on the home page you can change the settings so that you receive SMS with coordinates instead of a map link. 24 5 redKnows MiniFinder 12. FAQ - Troubleshooting Below are some common questions that can arise. Note that a question can have more than one answer or explanation. 1. I have started up the alarm but the LEDs are not lit. When the alarm starts up, it always takes 30 seconds before the green LED lights up. Then the LED dies down after about 1 minute and MiniFinder goes into power-saving mode. The unit is in power-saving mode. Press the SOS button on the remote controller for one second and the LEDs will indicate the alarm's settings for one minute. 1. Pairing of remote controller 2. LEDs show active modes 3. SIM cardholder 4. Switch 5. Port for external GPS 6. Port for charging Functions Geofence Movement alarm SMS to your mobile phone when MiniFinder is moved from the place where the alarm was armed. Vibration alarm - SMS to your mobile phone when MiniFinder is subjected to vibration or lifted up. Standby Alarm is in standby mode but can be tracked by mobile phone. SOS - SOS button on remote controller SMS to selected mobile phone numbers. Good to know Both GPS and GSM antennas are built-in. External GPS is optional, but is usually not necessary. Signals pass through thin wood and plastic laminates, etc., but placement should be as exposed as possible. GPS signals do not pass through metal! The GPS antenna's placement is indicated with an oval on the upper side of MiniFinder. Place the alarm so that the GPS antenna makes contact with satellites. The RF button (1) should only be used in cases when an extra remote controller is added. The remote controller that is included when you purchase the alarm is already paired with your MiniFinder. 6 2. MiniFinder does not indicate charging and the alarm is in operation. If the alarm is in operation at the time of charging, the LEDs indicate charging a little while before it goes into power-saving mode. (If the alarm is turned off and put on the charger, the LEDs are lit after 30 seconds and during the entire charging period). See section 3 in the manual for more information. 3. My MiniFinder's internal battery has been discharged and charging doesn't seem to be starting - no LEDs are lit, despite the fact that they should be when the alarm is turned off upon charging. When MiniFinder's internal batteries are completely dead, it can take 5-10 minutes before it starts functioning again. That is so that the batteries can be charged as quickly as possible. MiniFinder starts up again automatically again when the base level of charging has been reached. 4. MiniFinder is not making GPS contact. Make sure MiniFinder is not placed under metal or indoors in a space with thick walls. It can be difficult for GPS to find a sufficient number of satellites to determine position. Move MiniFinder to a more suitable place. When MiniFinder detects the position, you can place it where you want it to be and test to see if it is making contact with satellites by calling or sending an SMS to it. Carefully check the position coordinates in the SMS you get back. 5. I don't get position coordinates in SMS when I call the alarm. MiniFinder has poor GPS reception. Move it and try again. 23 11. Points to remember 2. SIM card Always turn off MiniFinder before you insert or remove the SIM card. If MiniFinder is to be used in a different country than the one where it was purchased, choose a SIM card from that country. Make sure that GSM coverage exists and find out if you need to register the card. Mounting - For best reception of GPS signals, MiniFinder is mounted with the arched side having the oval marking facing up toward the sky. Avoid placing it under thick laminates and DO NOT place under metal. If you know that MiniFinder is going to be located in an area with poor GSM coverage, it is a good idea to compare different service providers before you decide which SIM card will be placed in the alarm. For optimum water resistance, ensure that the cover for MiniFinder is properly affixed, that the cover is complete and that the GoreTex membrane is not damaged. If the hole for external power supply/extra GPS antenna is taken up, this should be done with a sharp knife. MiniFinder is splashproof when the power supply/extra GPS antenna cable is connected through the cover. NOTE: Use the furnished cable! If MiniFinder's internal battery has become completely discharged during use, it can take a moment before the unit starts up. redKnows MiniFinder communicates via GSM and requires a SIM card to function. Most SIM cards work well with MiniFinder. With pre-paid cards you can avoid fixed monthly fees (customers should take care that they maintain an active credit balance on pre-paid cards please check with your supplier), but a SIM card linked with a subscription works just as well and may be more reliable. Usually the largest service providers are used because they have the best coverage. Check with your redKnows retailer or your country's distributor to find out which SIM cards work best in your country. You can also go to www.redknows.com and see a list of approved service providers in countries where redKnows has retailers. If you are also going to use MiniFinder outside your country's boundaries, be sure to obtain a card that meets those requirements. Also check with the provider or sales outlet to see if the card needs to be registered or activated for use abroad. The SIM card for MiniFinder should be set up as follows: the SIM card should have Caller ID mobile phone voicemail should be disconnected the SIM card should not have a PIN number! When purchasing a SIM card, find out if it has the right configuration by inserting it in a mobile phone. - Deactivation of the PIN number is usually done under Settings in the phone's menu. Contact your phone service provider if you need help. - You can see if the card has Caller ID and mobile phone voicemail by calling the number from another phone. See if the number shows up on the display and whether mobile phone voicemail is activated. Axtech provides the opportunity to upgrade MiniFinder's software in cases where there is a SIM card in the country that meets the requirement for this. The basic requirement for a MiniFinder phone card is that it supports GPRS, since the software is sent directly to the SIM card. Ask your redKnows distributor in the country which cards are suitable for upgrading. 22 7 2.1 Inserting and removing the SIM card 10. Resetting MiniFinder to factory settings It is important that the alarm is turned off if you are going to remove or insert the SIM card! In other words, the switch on the alarm should be in the 0 position and external power sources should be turned off or disconnected. Insert the SIM card in the rectangular opening in the middle of the panel. The cut corner to the left - see photo. When you purchase your MiniFinder, the factory settings have the following values: SIM should be put in with the corner to the left Function GPS checks position Size of Geofence area Anyone can call and track Map link is shown in SMS Vibration sensitivity Unit of velocity Alarm for disconnected charger Value every 10th minute 250 m Yes Yes Medium Km/h On No alarm or SOS recipient is included in the factory settings. As a result, Geofence and the Vibration alarm can not be activated before you have registered a user number on the home page. When should MiniFinder be reset to factory settings? * Upon change of ownership. * If the settings files have been corrupted because MiniFinder has been turned off as a result of low battery at the same time that settings are being written to memory. * In case of troubleshooting (done in consultation with Axtech's support). * When upgrading software. ! The alarm should always be turned off when you insert or remove the SIM card. ! The alarm does not work with SIM cards that communicate only over the 3G network! ! If you are going to use the alarm abroad, we recommend that you check to see if you need to register your pre-paid card. ! The calling number may not be an anonymous or hidden number (for example, via switchboard). What happens * All telephone numbers entered as alarm recipients and SOS recipients are removed. * All settings are reset to factory settings - see above. You must then go to your account on www.redknows.com and resend your settings, or enter new ones to reactivate your personalised alarm functions. After resetting, MiniFinder no longer has user mobile phone numbers saved. Procedure a) Keep the Standby button on the remote control pressed. First MiniFinder will beep twice. Keep pressing the button after the two beeps and after a few seconds MiniFinder will beep continuously. Keep holding the button down until the beeping stops. - Now MiniFinder is reset to the factory settings. 8 b) Log into your account at EZ-start MiniFinder and go to ”Send”. Click on the button ”Factory reset MiniFinder”. Wait a couple of minutes. Check if the correct information is on the account. Then resend the settings you want your MiniFinder to have by clicking on ”Send settings”. After a couple of minutes MiniFinder is ready for use again. 21 8. Connecting MiniFinder to an external battery 3. Charging MiniFinder A cable for an external power source (6-30V DC) is supplied. Red is plus (+), black minus (-). If the charging is to occur continuously, cut off the narrower portion of the wide cable port to the cover and insert the charging cable through the cover. To guarantee that the cover is tight, you should use the cable for an external power source that Axtech supplies. The internal battery in MiniFinder has a basic charge so that you are able to start up and test your MiniFinder immediately upon delivery. However, it is preferable to charge MiniFinder before you begin using it or to charge it as soon as possible. 9. Upgrading software in MiniFinder In most European countries it is possible to upgrade MiniFinder's software easily. The upgrade is sent to MiniFinder's SIM card via GPRS. Axtech can not guarantee that upgrading via GPRS will work in all countries and with all SIM cards. Therefore, you should contact your country's distributor for more information on which SIM card should be used. Upgrading of software actually means that if Axtech makes adjustments or adds some software-controlled function in a future upgrade of your version of the alarm, you will get free access to it. To be able to upgrade, you must register MiniFinder on the home page. In order for this to work, you must use a SIM card that supports GPRS and that is tested by the country's distributor. Transfer of the software is made directly to your alarm via GPRS. All that you need to do is follow the instructions that come from Axtech. When you create your account and register the alarm at www.redknows.com, you can choose whether you want to have the opportunity to upgrade or not. You will get information from Axtech when software is available, and there will be information on the home page. You will be able to read what the upgrade involves at www.redknows.com. Important to keep in mind when upgrading software: 1. Have the alarm's serial number available! It is listed on the label on the back side of your MiniFinder! 2. See that MiniFinder is connected to a power source! The internal battery should be fully charged before you begin. Transfer is interrupted if the battery charge is too low. If you aren't sure, you can check the battery level by sending an SMS with the text ”Status” to MiniFinder. 3. After carrying out the upgrade, which takes a couple of minutes, you should reset MiniFinder to the factory settings (see section 10). 4. Finally, go to your account at www.redknows.com and resend your settings - now with the updated software installed. 20 There are three charging alternatives: a. Connect the accompanying cable to an external power source, 6-30V DC. b. Charge MiniFinder's internal battery with the 230V charger. The battery is fully charged after about 3-4 hours. c. Charge MiniFinder's internal battery with charging adapter for 12V cigarette lighter socket (accessory). The battery is fully charged after about 3-4 hours. Charging of the internal battery is automatically turned off when the battery is fully charged and then reverts to maintenance charging. The unit can be used during charging. When the MiniFinder is connected to an external power source, the internal battery is automatically charged, ready to take over if the external source is disconnected. A fully charged internal battery lasts between approximately 36 to 60 hours, depending on which settings you have made on your MiniFinder. When the internal battery begins to run down, an SMS is sent to the predetermined mobile phone number. How do I know it is charging? If the switch is in the 0 position and a charger is connected, the LEDs indicate charging status. The three LEDs flash red, yellow and green in succession when the battery is being charged. When the battery is fully charged, only the green and red LEDs flash. If you start charging when the MiniFinder has the switch in the 1 position, the LEDs indicate charging status for a short while and then the LEDs revert to showing which functions of the alarm are active before going into power-saving mode. It can take up to 30 seconds before MiniFinder detects the charger. ! Allow MiniFinder to charge for four hours the first time. ! If the charging cable is removed during charging, it can take up to 30 seconds before the LEDs stop indicating that charging is occurring! ! MiniFinder's internal battery is charged when it is packaged. If it is discharged, it can take a short while before the unit can be started after you have begun charging it. 9 4. Starting up MiniFinder 1. Make sure the SIM card is in place correctly! 2. Move switch from 0 to 1 3. Make a test call get the alarm's position on your mobile phone! 4. Connect to the charger 5. Activate other functions at www.redknows.com Geofence - what is it? Geofence stands for geographical fence. If MiniFinder is moved outside an area from the position where the alarm was armed, it sends a GEO-alarm by an SMS to the registered mobile phone numbers (Instructions 1-3). In your account on the website you can define the size of the approved area. 4.1 Starting up your alarm Provided that the SIM card is in place and your redKnows MiniFinder is charged, you can start your alarm. Start MiniFinder by moving the switch from 0=OFF to 1=ON. Wait until the green LED is lit. Start-up can take up to 30 seconds. The alarm searches for the position for a few minutes. This is NOT indicated by any LED. Make sure that MiniFinder has a clear view of the sky. Call MiniFinder from any mobile phone. The alarm hangs up itself. Within a few minutes you will receive a status SMS with the time (GMT), position and a link that opens a map where the alarm's position is indicated. The LEDs die down themselves after a minute upon start-up and when settings are made in order to save power. This always happens except when GPS is seeking a position when Geofence is activated. Then the LEDs are lit until the position is found. ! Please note that at this stage the Geofence and Vibration functions can not be activated. First you must create an account for MiniFinder at www.redknows.com. ! The coordinates in the SMS map link should not be used for tracking. If you can't open the map link, deselect it when you create your account at www.redknows.com. You then will get the current coordinates in SMS. 10 This is how you arm Geofence: Press GEO on the remote controller or send an SMS to MiniFinder with the text “Geoon”. The red LED on MiniFinder flashes while searching proceeds. Wait until the red LED glows with a steady light the alarm has then got a fix on its position. Call or SMS and check the position. If the alarm has been turned off, it can take about 2 minutes before it finds the position the first time. If the red LED does not glow with a steady light but continues to flash, move MiniFinder to a better position. If MiniFinder does not find the position, it will automatically try again. How soon depends on what interval you have specified in your account between the times GPS should awaken and check its position. The factory setting for GPS is to wake and look for the position every tenth minute. MiniFinder also checks the Geofence settings as often as you have specified that GPS should awaken in your account on the home page. If you enter a long interval, therefore, considerable time can pass before MiniFinder detects movement and sends an SMS. 19 7. GPS and Geofence 4.2 Programming your MiniFinder GPS- what is the best way to position MiniFinder GPS, which means Global Positioning System, is a satellite-based position and navigation system. MiniFinder's GPS monitors at regular intervals the distance to the satellites and thereby determines its location. Before you enter settings for your MiniFinder on the home page, all mobile phones that have the number for MiniFinder's SIM card can call the alarm and get back an SMS with the alarm's position. To change this and to be able to receive SMS for different alarm situations, go to the website www.redknows.com and create a password-protected account. To save settings on the web page At www.redknows.com in EZ-Start MiniFinder you determine which mobile phone numbers are allowed to call MiniFinder and get alarm messages. When you register the alarm there, you also activate the options to use the Geofence and Vibration alarm functions and become able to receive free upgrades of MiniFinder's software. Do this: Go on the internet to www.redknows.com. Click on the EZ-Start button in the upper menu row. Choose EZ-Start MiniFinder. Create an account with your own username and password and log in. Then follow the directions for entering settings for your alarm. You can go into your account and change settings whenever you want. These settings can be made on the home page: The oval symbol on your MiniFinder shows where the GPS antenna is located. GPS makes contact best with a clear view of the sky and with the oval marking upwards. However, signals pass through thin laminates (but not metal!) and detect the location with the antenna turned on its side and even facing down. GPS can also find signals when placed where contact is not so good (indoors, for example), but bear in mind that the margin for error in locating positions can increase. Do some experimentation if you are unsure call your MiniFinder and check how exact the location is. The GPS position can in certain cases vary somewhat even when the object lies still. For example, high buildings can reflect the signals from GPS satellites so that the position moves. If false alarms occur because of reflections, you can increase the radius of Geofence settings. The Geofence area settings can be changed on your account on the home page. 18 - Which mobile phone numbers will have access to MiniFinder - Size of the Geofence area - Sensitivity of the Vibration sensor - Time GPS is awake (how often the position is monitored) - Time zone (to get the correct time in SMS) - In what unit velocity should be stated - Position to be reported i SMS on map in mobile phone or in longitude & latitude - Access to software ugrades In addition: Create a document to send to your insurance company as a basis for a rate discount ! When you have registered your alarm on the home page, you can get access to future updates of MiniFinder's software. The SIM card must meet certain requirements for upgrading. 11 5. Alarm functions 6. Calling and tracking MiniFinder When the settings are made, you can easily activate the alarm with the remote controller or via an SMS by a mobile phone that is registered as a user. When you want to locate the position of a vehicle or boat on which MiniFinder is installed, you can either SMS or call the alarm from a mobile phone. This can be done as often as you want. 5.1 Activation by remote controller The remote controller that is included in the packaging when you buy MiniFinder is paired so that it can communicate with your alarm. It has a range of about 25 meters. Press on GEO Press on VIB RED MiniFinder LED YELLOW MiniFinder LED flashes while searching lights with steady glow for the position. Steady for 1 min. the vibration red light when the alarm is then active. position is found and Geofence is active. When you call your alarm, the following occurs: 1. After the signal has been sent - the alarm hangs up. 2. You receive an SMS with: - Position - Date + time of GPS measurement - Velocity - Direction - Link to map* Map Click on the link to bring up a map that shows where the alarm is located. You can zoom in and out with the help of links beneath the map. If something seems suspect Call again If you note that your vehicle has moved from the place where it should be, you can follow the route by calling MiniFinder. If the vehicle is stolen, call the police! Press on STANDBY Press on SOS - Hold GREEN MiniFinder LED lights down the SOS button with steady glow for 1 min. for five seconds and In this case only tracking of an SMS is sent to the the alarm is active. GEO and mobile phone number VIB are deactivated. you entered at the website. If you don't have access to the internet or WAP on the mobile phone, check first with your mobile provider to see if you have activated the service. If you can't activate the internet or WAP on the mobile phone, you should deactivate the mobile phone map function in your account on the home page. You then will receive only position coordinates in SMS from MiniFinder, which you can enter in the map tool at www.redknows.com redKnows MiniFinder remote controller ! MiniFinder answers in different ways when called, depending on how the service provider programmed your pre-paid card. Regardless of which card you use, you will receive a confirmation that MiniFinder has received the call through the SMS you will get within a couple of minutes. 12 17 Type of SMS When? Why? Content of SMS Geofence alarm Geofence has been activated. MiniFinder has moved outside the boundary you specified on the home page. - Type of alarm - Position - Date + time for latest GPS position - Link to map Vibration alarm Voltage alarm 1 Voltage alarm 2 SOS 16 - Type of alarm The vibration alarm has been activated. Something - Position has disturbed your property - Date + time for latest where MiniFinder is located. GPS position - Link to map Internal battery level is below 20% of capacity. - Alarm. Battery voltage is low. - Battery voltage in % MiniFinder's external power supply has been disconnected. - Alarm. Charger is disconnected. SOS button on remote controller has been activated. Help is required. - 'SOS alarm' - Time - Link to map Status You have sent an SMS to MiniFinder with the message: Status. You then receive an SMS with the alarm's position. GPS status - Software version - Charging status, battery level in %. - Geo on/off - Vib on/off Tracking You have sent a ”Track” SMS to MiniFinder or you have called MiniFinder from your mobile phone. - Type of message - Position - Date + time of GPS measurement - Velocity and direction - Link to map What happens when you activate the remote controller Mode / activated position Function MiniFinder confirmation upon activation GEO (Geofence) Movement alarm. Sends an SMS when MiniFinder is moved from the position where Geofence was activated. The alarm can be tracked via mobile phone. Buzzer sounds once. Red LED flashes while searching. Lights with steady glow when position found. Power-saving mode after 1 minute. LED dies down. VIB (Vibration) Vibration alarm. Sends an SMS when MiniFinder is subjected to vibration. The alarm can be tracked via mobile phone. Start-up and standby mode. The alarm can be tracked via mobile phone. GEO and VIB deactivated when you press on Standby. Buzzer sounds once. Yellow LED lights. Power-saving mode after 1 minute. LED dies down. STANDBY SOS - Emergency SOS button SOS is activated when you press on the SOS button for 5 seconds. Show settings SOS button See active functions. Press on the remote controller's SOS button with a quick click and the LEDs will begin to glow, showing how the alarm is set. Start-up: Green LED lights after 30 sec. Activation of Standby: Buzzer sounds twice, green LED lights. Buzzer sounds once. An SMS is sent to a predetermined mobile phone number. You will see which functions you have activated: Geofence - red LED Vib - yellow LED Standby - green LED GEO and VIB can be activated independently of one another or simultaneously. When you press on Standby, both GEO and VIB are deactivated. 13 5.2 Activating MiniFinder via SMS 5.3 When you receive an SMS from MiniFinder You can send commands to your MiniFinder with SMS. This can be done from all mobile phone numbers registered as users. Enter the command in the text field, send it to MiniFinder's mobile number and the function will be activated. If an alarm is triggered, an SMS will be sent to the mobile phone numbers you entered in your account at www.redknows.com. You can also call or SMS MiniFinder to get its position or alarm setting. Below is a short presentation of the different SMS types: Command / text in SMS Function activated Geoon Geofence is activated SMS to sender reports that the function is active Vibon Vibration alarm is activated SMS to sender reports that the function is active 2. Vibration alarm - An SMS is sent to your mobile phone if your MiniFinder is subjected to vibration or lifted up. The sensitivity of the vibration sensor can be entered in your account at www.redknows.com SMS to sender reports that the function is active 3. SOS - With the remote controller you can send an SOS to a mobile telephone number you listed at www.redknows.com. The remote controller should be no more than 25 meters from MiniFinder when the SOS button is activated. In order for the message to be sent, the SOS button must be depressed for 5 seconds. Stby Track Status SOS 14 Confirmation MiniFinder sends an SMS to selected mobile phone numbers in case of: Standby is activated Tracking is activated Monitoring of alarm's status SOS function is activated SMS to sender reports: ”Tracking started” SMS to sender with information: active functions, battery status, GPS status SMS to SOS recipient with the alarm's position 1. Geofence alarm (movement alarm) - An SMS is sent to your mobile phone if your MiniFinder is moved outside of the geographical area you specified in your account at www.redknows.com 4. Voltage alarm 1: If MiniFinder's external power supply disappears, an SMS is sent to the alarm recipients. You can choose to deactivate this alarm on the website. 5. Voltage alarm 2: When 20% of the internal battery's charge remains, an SMS is sent to you, reporting that it is time to charge it. ! The cost of each SMS that is sent from your MiniFinder is deducted from the SIM card balance. ! The confirmation that you receive at your account on the home page when you send out new settings to MiniFinder is sent via SMS. The cost of an SMS is deducted from your balance every time you update settings on the home page. 15