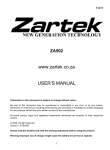
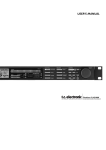
1
USB 2.0
User’s Manual
USB 2.0
VER 2.1
-1-
Table of Contents
1.
2.
3.
4.
5.
6.
7.
8.
9.
10.
11.
12.
13.
14.
15.
Product Introduction
Features
Precautions
Specifications
Accessories
Icons and Buttons
Installation Instructions
File Loading and Reading
Power On/Off/Pause
Function Menu
Language Learning
Recording
Write-protection/Key Lock
Firmware Update
Other Precautions
P.3
P.3
P.4
P.4
P.4
P.5
P.6
P.7
P.7
P.8
P.10
P.10
P.10
P.11
P.14
-2-
1. Product Introduction:
Thanks for purchasing this second generation USB 2.0
Sport MP3
Player. In addition to MP3 / WMA (with DRM) file playback, this MP3 Player also
has the following features: Serves as a portable USB drive / Digital Recording /
Language Learning/FM Radio Tuning / FM Radio Recording / Card Expansion
(SD/MMC) / MP3 Encode (optional). This shockproof, compact, and lightweight
MP3 Player has very low power consumption. It works perfectly as a portable
player. The accessories are luxurious and Ergonomic. This player enables you to
enjoy the wonder of music anywhere and anytime.
2. Features:
1.
2.
3.
4.
5.
6.
7.
8.
9.
10.
11.
12.
13.
14.
15.
16.
17.
18.
19.
20.
21.
22.
23.
24.
25.
26.
USB 1.1 / USB 2.0 Compatible Hi Speed Interface.
Capacity: 16MB ~ 512MB.
Complies with USB 1.1 / 2.0 specifications.
Plug-and-Play is supported in the following Operating Systems: Windows 2000 /
ME / XP, Mac OS 8.6 and above, Linux Kernel 2.4.0 and above.
Driver is supported in Windows 98.
Power Saving/Auto Hibernation Modes.
FM Radio Tuning. (Optional)
Digital Recording/FM Radio Recording. (Optional)
FM Memory Channels. Stores up to 50 memory channels or scan channels.
Supports MP3/WMA/WAV file format playback.
Supports MP3 Encode (Line-in Encoding) function. (Optional)
Supports Language Learning function. (A > B Segment Repeat)
Supports ID3 complete song title display.
Supports multiple languages. (Currently only supports English.)
Support On-line firmware update.
Supports file deleting function. (No need to connect to a computer.)
Supports fast searching function. (Single, Next/Previous, Fast-Forward)
Supports Auto Memory function.
Supports Repeat and Random Playback functions.
Supports Sound EQ Selecting.
Supports Key Lock function.
Supports Power Saving function.
Cold-Light LCD Display Panel.
Built-in SD/MMC memory card reading/expansion functions.
Plug-and-Play Flash Drive. High-speed data transferring and storing.
Low power consumption. One Alkaline AAA battery enables the player to play for
more than 15 hours.
-3-
3. Precautions:
Warning: Ignoring the following precautions or operating the
player improperly might result in injury or product damage.
※ USB 2.0 SPORT MP3 is a high-precise electronic product. Please do not attempt to
disassemble or alternate any part of the product.
※ Avoid dropping or applying force to USB 2.0 SPORT MP3.
※ Avoid using USB 2.0 SPORT MP3 in extremely hot/cold, humid and dusty environments
and avoid exposing it under direct sunlight for a long period of time.
※ Please do not place USB 2.0 SPORT MP3 near any electromagnetic wave interfering
source. Electromagnetic wave might cause product malfunctioning and wrong data.
4. Specifications:
1. Supports FAT12, FAT16, and FAT32 formats.
2. Supports transfer rate: MP3=>32K~320Kbps.
WMA=>32K~192Kbps.
3. Signal-to-Noise Ratio: 90db.
4. Digital Recording Sampling Rate: 8K /16K /32K /48KHz. (Adjustable)
5. FM Frequency Auto Scan: 88.0MHz ~ 108MHz.
6. FM Frequency Scan/Memory Channel: 50 CH.
7. Frequency Response: 20~20KHz.
8. 3.5mm Earphone output power: 20mW +20mW.
9. Dimension: 75 * 65 * 17mm.
10. Weight: 45g.
5. Accessories:
Sport Earphone
Neck Strap
Driver CD-ROM
USB Cable
Wrist/Arm Strap
(Optional)
AAA Battery
-4-
User’s
Manual/CD-ROM
Waterproof Case
(Optional)
6. Icons and Buttons:
7. Neck strap hole
8. Earphone jack
1. Power/Play/Pause
9. Write-protection /
Key Lock
2. Mini USB Connector
10. Cold-light LCD
Display Panel
3. Record/Segment
Repeat A→B Setup
11. Previous/Rewind
12. Volume Down
4. Next/Fast-forward
5. Volume Up
USB 2.0
6. Menu/Confirm
USB 2.0
1.
Power Switch / Play / Pause button.
2.
Mini USB Connector.
3.
Record / Segment Repeat (A→B) setup button.
4.
Next/Fast-forward button. (>>)
5.
Volume Up button. (+)
6.
Menu/Confirm button.
7.
Neck strap hole.
8.
3.5mm Earphone jack.
9.
Write-protection / Key Lock (Lock) switch.
10. Cold-light LCD display panel.
11. Previous/Rewind button. (<<)
12. Volume Down button. (-)
-5-
7. Installation Instructions:
1. In Windows 98 / 98SE operating systems:
a. Place the USB 2.0 SPORT MP3 driver CD-ROM into the CD-ROM drive.
b. Using USB cable to connect USB 2.0 SPORT MP3 to the computer’s USB port.
“Found New Hardware” dialog appears on the screen.
c. ”Add Hardware Wizard” dialog box appears on the screen. Please follow the
on-screen instructions to locate the driver location. For example: “My
Computer” -> “CD-ROM Drive” (which contains the USB 2.0 SPORT MP3
driver CD) -> “Driver”.
d. Follow the instructions to locate the driver then press the “OK” button to install.
Complete the driver installation.
e. After finishing the driver installation, the computer will detect the new hardware.
You should see two removable disks appear in “My Computer”. See the figure
below:
2. In Windows ME / Windows XP / Windows 2000 operating systems:
These operating systems have built-in driver so no installation is needed. Just connect
the USB 2.0 SPORT MP3 to the computer’s USB port. The operating system will
detect two removable disks automatically and the disks will appear in “My
Computer”.
3. In Linux 2.4.0 + / Mac 8.6 + operating systems:
These operating systems do not need drivers. Just connect USB 2.0 SPORT MP3 to
the computer’s USB port. The operating system will detect two removable disks
automatically and the disks will appear in “My Computer”.
-6-
8. File Loading and Reading:
Please use the USB cable that comes with the player to connect USB 2.0 SPORT
MP3 to the computer’s USB port. The computer will detect two removable disks
automatically. One disk is for the MP3 built-in memory, and the other disk is for the
SD/MMC card-reading interface. You can directly copy songs and files you want to the
removable disks. As shown below:
※ If you click on the SD/MMC card-reading disk without having any SD/MMC card
inserted in USB 2.0 SPORT MP3, the computer will notify you to insert a card.
9. Power On/Off/Pause:
1. Press down the “Power” button gently for three seconds, the fancy blue backlight
screen then displays in front of you.
2. You can adjust the backlight time-out time based on your preference. The backlight
would be turned off automatically if no other button is pressed during the time-out
time.
※ When the backlight is on, it consumes more power. The recommended time-out
time is 5 seconds. Please refer to section 10-4-D.
3. After the power is turned on, press the “Power” button again to start playing songs.
Or use “<<” or “>>” buttons to select a song. While a song is playing, press the
“Power” button gently to pause it and press again to resume.
※ The pause function does not work while listening to the FM radio.
4. Press and hold the “Power” button, the shutting-down screen appears and the power
will be turned off automatically.
Play Mode
Key Lock
Segment Repeat Setup
Memory card icon
Music Format
Track/Total Tracks
Power Indication
Play/Pause
Track Name Playing Time
-7-
Sound EQ Selection
10. Function Menu:
After turning on the power, press “Menu / Confirm” button to display different
options. These options are (in-order) Music / Voice / FM Tuner / Settings / Erase Files
/ Memory / Exit. We will introduce each option in the following:
1. Music: In the main menu, using “<<” or “>>” buttons to select “Music” option then
press “Menu / Confirm” button. Press “Power” button
again to start playing songs. As shown in the image,
USB 2.0 SPORT MP3 would automatically detect the
MP3 / WMA files stored in the built-in memory and
memory card. You can then use “<<” or “>>” buttons to
select the song you want to play.
2. Voice: In the main menu, using “<<” or “>>” buttons to select “Voice” option then
press “Menu / Confirm” button. Press “Power” button
again to start playing the recorded file. As shown in the
image, USB 2.0 SPORT MP3 will automatically detect
the WAV files stored in the built-in memory and memory
card. You can then use “<<” or “>>” buttons to select
the recorded file you want to play. The file naming
convention for FM recording file is F00X.WAV and
V00X.WAV for the digital recording file.
3. FM Tuner: In the main menu, using “<<” or “>>” buttons to select “FM Tuner”
option then press “Menu / Confirm” button to start
playing FM radio. As shown in the image, press the
“Menu / Confirm” button again to display Music /
Voice / Save Station / Delete Station / Auto Scan / Exit
sub-options. You can then use “<<” or “>>” buttons to
select these sub-options.
A. Music: Select this option and press “Menu/Confirm” button to enter Music
playing mode.
B. Voice: Select this option and press “Menu/Confirm” button to enter the Voice
(recording) mode.
C. Save Station: Select this option and press “Menu/Confirm” button; A “SA?”
will blink for 10 seconds. Press “Power” button
within 10 seconds to automatically save the station
you are currently receiving.
-8-
D. Delete Station: Select this option and press “Menu/Confirm” button; A “DEL?”
will blink for 10 seconds. Press the “Power” button
within 10 seconds to automatically delete the station
you are currently receiving.
E. Auto Scan: Select this option and press “Menu/Confirm” button to
automatically scan for the receivable stations at your
current location. You only need to use “<<” or “>>”
buttons to select the scanned station. If you want to
manually adjust the channel, press “Power” button.
The word “PRESET” will disappear. You can then
use “<<” or “>>” buttons to adjust the station. To
switch back to the preset station, press the “Power”
button again.
F. Exit: Select this option and press “Menu/Confirm” button to exit the menu.
4. Settings: In the main menu, using “<<” or “>>” buttons to select “Settings” option
and then press “Menu / Confirm” button to display EQ /
PlayMode / Contrast / Backlight / Power Saving / Rec
Bitrate / Language / Exit sub-options. We will introduce
each sub-option in the following:
A. EQ: The built-in defaults are a. Normal / b. Rock / c. Jazz / d. Classic / e. Pop.
B. PlayMode: The built-in defaults are: a. Normal / b. Repeat Track / c. Repeat
All / d. Shuffle / e. Shuf. Repeat.
C. Contrast: The built-in default is 50%. You only need to adjust this value if the
texts on the screen become unclear.
-9-
D. Backlight: The defaults are a. 5 Secs / b. 10 Secs / c. Always ON / d. Disable.
E. Power Saving (Auto Power Off): This applies to when USB 2.0 SPORT MP3 is
idling. The defaults are: a. 1 min / b. 2 min / c. 5 min / d. 10
min / e. Disable.
F. Rec Bitrate: This option sets the recording quality. The higher the number is, the
better the recording quality. Hence, bigger memory space
would be needed. The defaults are: a.8000Hz / b. 16000Hz /
c. 32000Hz / d. 48000Hz.
G. Language: The default is: a. English.
H. Exit: Select this option and press “Menu/Confirm” button to exit the menu.
5. Erase Files: In the main menu, use “<<” or “>>” buttons to select “Erase Files”
option, then press “Menu / Confirm” button. When the
display screen is in music playing mode, you can
delete .mp3/ .wma files. If the display screen is in voice
(recording) mode, you can delete .wav files. Using “<<” or
“>>” buttons to select the file you want to delete. Press
“Power” button within 10 seconds to confirm. The word
“Done” would appear on the screen to indicate the deletion
is complete. If you want to cancel this action, wait for 10
seconds to return to the previous option or press “Menu /
Confirm” button again to exit.
- 10 -
※ If you want to confirm the contents of the song/recorded file you are deleting,
you may select this option during playback. Using “<<” or “>>” buttons to
select the file you want to delete and you will hear the sound so you can confirm.
If you are deleting files consecutively, no sound will be played after the second
time.
6. Memory: In the main menu, using “<<” or “>>” buttons to select “Memory” option
then press “Menu/Confirm” button to display the capacity
and remaining space of the built-in memory. If a SD/MMC
card is inserted, the information of the card would be
displayed here as well.
7. Exit: In the main menu, using “<<” or “>>” buttons to select “Exit” option then
press “Menu/Confirm” buttons to exit the menu.
11. Language Learning:
During .mp3 / .wma / .wav file playback, press Record button once to set the point
A of the repeating segment; press Record button again to set point B. The contents in
this segment will then be played repeatedly. If you want to cancel this Segment Repeat
function, press the Record button again.
12. Recording
Whether it is in music playing mode/recording mode/FM tuning mode, press and
hold the record button for 3 seconds would switch to the record function. All recorded
files would be stored in the “Record Playback” folder. The file naming convention for
FM recorded file is “F00.WAV” and “V00X.WAV” for digital recording. When there is
not enough space in the built-in memory, the word “memory full” will be displayed on
the screen.
- 11 -
13. Write-protection and Key Lock:
When USB 2.0 SPORT MP3 is loading files,
switch this button to the “Lock” potion to
enter the Write-protection mode. You can
then only read data from MP3. You cannot
load or delete any file.
A.
If you switch this button to “Lock” position when the player is off, press
“Power” button would still turn on the player. However, the player would be
turned off shortly after displaying the word “KEY LOCKED” on the screen.
You must disable the “Lock” switch to turn on the player normally. If you
switch this button to “Lock” position while you are playing a song or
listening to an FM Radio, the player would then enter key-locked mode. At
this time, none of the buttons would be functioning and the word “KEY
LOCKED” would be displayed on the screen.
B.
When you place USB 2.0 SPORT MP3 in your backpack, switch this
“Write-protection/Key Lock” button to “Lock” position to enter the
key-locked mode. This can prevent pressing any button accidentally.
14. Firmware Update:
By upgrading the firmware, you can improve the features of this USB 2.0 SPORT
MP3. It also enables the player to support more music formats and languages.
First, run the “Firmware Download” from the USB 2.0 SPORT MP3 CD-ROM. You
may also obtain the latest programs and firmware from the download areas of our
company’s web site. Make sure the firmware version matches the model of your
product.
When you obtain the updated firmware from the Internet, run and decompress the
downloaded executable file first. This would create a USB 2.0 SPORT MP3 folder.
Then click on the setup.exe icon
enter the installation.
inside of the USB 2.0 SPORT MP3 folder to
If you have previously installed any firmware updating program (Firmware
Download), please remove it first.
- 12 -
After removing the old program, run the setup.exe inside of the USB 2.0 SPORT
MP3 folder to complete the installation.
Connect USB 2.0 SPORT MP3 to your computer using USB cable.
From “Start” > “Programs” > “Sigma Tel MSCNMMC Audio Player”, run the
Firmware Download program.
In the Firmware Download options, we recommend you to check the checkbox for
“Format Data Area”. Selecting this option would clear all data in the device, so
please copy the data to your computer first.
- 13 -
After finishing the updating, clock on the “Close” button to complete the firmware
update.
In the case of firmware update failure:
Once you finish updating the firmware, if no screen is displayed when you turn on
the USB 2.0 SPORT MP3 means the firmware update has failed. Please follow the
procedures below to download the firmware again
※ Note: The following procedures will clear all of the data and music files in the
player, so please back them up first.
1. Remove the battery of the USB 2.0 SPORT MP3.
2. Connect one end of the USB cable to the computer and the other end to the USB
2.0 SPORT MP3.
3. Confirm whether the computer detects USB 2.0 SPORT MP3 or not.
(If the USB 2.0 SPORT MP3 is detected, you should see an extra removable disk
in “My Computer”.)
4. If USB 2.0 SPORT MP3 is detected, open the Firmware Download program.
(From “Start”
“Programs”
“Sigma Tel MSCNMMC Audio Player”)
Check the checkbox of “FORMAT DATA AREA” and click “START” to
update the firmware.
If the device is not detected, please follow the procedures below to enter the
Recovery Mode:
1. Close the Firmware Download program.
2. Remove the battery of USB 2.0 SPORT MP3.
3. Please do not connect USB 2.0 SPORT MP3 to the computer at this time.
4. Press and hold the “Power” button of USB 2.0 SPORT MP3.
5. While still holing the “Power” button, connect USB 2.0 SPORT MP3 to your
computer using the USB cable.
6. Launch and run the Firmware Download program (from “Start”
“Sigma Tel MSCNMMC Audio Player”)
“Programs”
7. At this time, you don’t need to hold the “Power” button anymore. The Firmware
Download program should detect the device now. If it still can’t detect the device
(a flashlight icon will be swayed left and right in the Firmware Download
program), please follow steps 1~7 to try again. Make sure you hold the “Power”
button correctly.
- 14 -
8. Press the “START” button to update the firmware.
9. When complete, properly remove the hardware, replace the battery, and then
turn on the player.
(Please refer to 2. Computer Connection Precaution in section 15 – Other
Precautions about how to remove the hardware properly.)
15. Other Precautions:
1. System requirements:
Pentium 133MHz or faster CPU
CD-ROM drive
USB Port
Windows 98 SE / ME / 2000 / XP Operating System
5MB available hard disk space
2. Computer Connection Precautions:
After connecting USB 2.0 SPORT MP3 to the computer, the system will create a
removable disk and assign a disk letter to it in “My Computer”. You can then
enter the system to access data in the USB 2.0 SPORT MP3.
You can access, copy, save, or delete songs or data directly inside of USB 2.0
SPORT MP3 via Windows Explorer or My Computer
When you finish accessing the data and want to remove USB 2.0 SPORT MP3
from your computer, please observe the following procedures to avoid damaging
or losing data:
- 15 -
1. Double-click this icon located in the bottom right corner of the window. See
the image below:
2. The window below appears. Click on the “Stop” button and wait till the
window tells you the hardware is safe to be removed. You can then unplug
USB 2.0 SPORT MP3 from the USB cable. See the image below:
3. Troubleshooting:
Problems
Unable to turn on the power
Earphone has no sound
Poor recording quality
Unable to download music or file
Poor FM reception
No response while pressing any
button
Check Items
Make sure the battery is installed properly.
Make sure the battery has sufficient power.
Make sure the Write-protection/Key Lock switch is set
to “Unlock” position.
Make sure the earphone connector is plugged into the
earphone jack completely.
Make sure the volume is not set to the minimum.
The music file might be corrupted. Please test playing
that file on the computer.
Select higher sampling rate from the Rec Bitrate setting
option.
Check the remaining memory size.
Check the connection with computer.
Check USB cable and USB connector.
Please remove or turn-off any signal interfering source.
This includes computer and electronic device and
equipment.
Adjust the position or angle of the earphone.
Make sure the Write-protection/Key Lock switch is not
set to “Lock” position.
Open the battery cover and reinstall the battery.
- 16 -