1
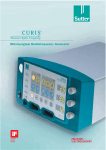
User Manual Söring Ultrasonic Generator Sonoca 300 Absaugung Aspiration - 0,9 bar Spülung Irrigation Ultraschall Ultrasound 150 ml 100 % 100 % Information Schlauch befüllen Pump on/off Filling hose 0 1 2 3 bar kHz Irrigation ml/min Active time 100 100 80 80 60 60 40 40 20 % Aspiration (vac) Frequency min 4 OK 0 0 ERROR 0 GmbH 0 DocNr.: 03-1211_R02.01 | 07-2012 | en Sonoca 300 0123 2 Sonoca 300 | DocNr.: 03-1211_R02.01 | 07-2012 | en Table of Contents Table of Contents 1 Introduction .................................................................................................... 5 1.1 Information About This User Manual .............................................. 5 1.2 1.2.1 1.2.2 Display Conventions......................................................................... 5 Safety Information and Warnings...................................................................... 5 Additional Information.......................................................................................... 6 1.3 General Conditions ........................................................................... 6 2 Safety ............................................................................................................... 7 2.1 Intended Use ..................................................................................... 7 2.2 General Safety Information.............................................................. 7 3 Overview........................................................................................................10 3.1 3.1.1 3.1.2 3.1.3 Overview of the Ultrasonic Generator ..........................................10 Symbols on the ultrasonic generator.............................................................13 Type plate.................................................................................................................14 Operator control panels......................................................................................14 3.2 Scope of delivery.............................................................................17 3.3 System overview .............................................................................17 4 Transport and storage..................................................................................19 5 Installation ....................................................................................................20 5.1 Connecting the ultrasonic generator to the supply network......20 5.2 5.2.1 5.2.2 5.2.3 Putting the ultrasonic generator into operation .........................21 Preparing the ultrasonic generator ................................................................21 Connecting the instrument ...............................................................................25 Turning on the ultrasonic generator..............................................................25 6 Operation ......................................................................................................27 6.1 Checking the settings .....................................................................27 6.2 6.2.1 6.2.2 6.2.3 Beginning treatment ......................................................................29 Using an instrument with rinsing and suction ...........................................30 Using an instrument with rinsing ....................................................................31 Using an instrument without rinsing and suction.....................................31 6.3 Ending treatment............................................................................32 DocNr.: 03-1211_R02.01 | 07-2012 | en | Sonoca 300 3 Table of Contents 7 Reprocessing .................................................................................................34 7.1 Cleaning the ultrasonic generator and accessories .....................34 7.2 Disinfecting the ultrasonic generator and accessories................35 7.3 Sterilising the accessories ..............................................................35 8 Maintenance..................................................................................................36 8.1 Regular checks ................................................................................36 8.2 Faults................................................................................................36 8.3 Repairs .............................................................................................38 9 Disposal .........................................................................................................39 10 Technical Data...............................................................................................40 Index ..............................................................................................................41 4 Sonoca 300 | DocNr.: 03-1211_R02.01 | 07-2012 | en Introduction 1 Introduction 1.1 Information About This User Manual This user manual is intended to help you use the ultrasonic generator optimally. In particular, the installation, start-up and safe operation of the ultrasonic generator are described. The medical application is not described. This user manual is included with the ultrasonic generator. Please read the user manual completely before using the ultrasonic generator. Please keep this manual for future reference. The ultrasonic generator is intended for use with other instruments and accessories from Söring. Please also observe the instructions for use supplied with the instruments. If you have further questions on the content of this user manual or use of the ultrasonic generator, please contact Söring GmbH (contact data on back page) or an authorised dealer. 1.2 Display Conventions 1.2.1 Safety Information and Warnings In this user manual safety information and warnings are marked by symbols and signal words. Hazards are categorised into four levels. Names the source of the hazard Describes the results of the hazard. This will result in death or severe personal injury. Specifies the steps that must be taken to eliminate the hazard. Names the source of the hazard Describes the results of the hazard. This could result in death or severe personal injury. Specifies the steps that must be taken to eliminate the hazard. DocNr.: 03-1211_R02.01 | 07-2012 | en | Sonoca 300 5 Introduction Names the source of the hazard Describes the results of the hazard. This could result in minor personal injury. Specifies the steps that must be taken to eliminate the hazard. Names the source of the hazard Describes the results of the hazard. This could result in material damage. Specifies the steps that must be taken to eliminate the hazard. 1.2.2 Additional Information In this user manual special information is marked by the following symbol. Gives further information about the ultrasonic generator. 1.3 General Conditions Take the following conditions into account when using the ultrasonic generator: The user manual must be read before the ultrasonic generator can be used. Before connecting an instrument to the ultrasonic generator, you must have read the user manual of the instrument. Any recurring faults or problems must be reported to Söring GmbH or an authorised dealer. Söring GmbH does not accept liability for any damage or personal injury arising from: 6 Modifications of the ultrasonic generator, improper use, use of non-recommended instruments, use of accessories other than the recommended ones, improper handling, non-compliance with this user manual. Sonoca 300 | DocNr.: 03-1211_R02.01 | 07-2012 | en Safety 2 Safety 2.1 Intended Use The ultrasonic generator is solely intended for use in ultrasonic surgery and wound treatment on humans. The precise application is determined by the instrument connected. Only the instruments and the accessories which are specified in the system overview can be connected (see chapter 3.3 System overview on page 17). This results in applications for the selective dissection of tissue, the cutting of tissue, the coagulation of tissue. The ultrasonic generator may only be used in medical operating rooms. Only surgeons may operate on patients with instruments which are connected to the ultrasonic generator. The ultrasonic generator may only be used by qualified specialists including OP staff, physicians, sterilisation department staff, medical technicians and medical technical assistants. The ultrasonic generator is only intended for use with instruments from Söring. Any other use is considered to be improper use. The local health and safety at work, hygiene and safety regulations and the specifications in this user manual and the user manual of the instrument used must be complied with. 2.2 General Safety Information Insufficient qualification Improper use of the ultrasonic generator can lead to severe personal injury, irreversible physical injury or death. Only deploy qualified specialists. Do not grant access to unauthorised persons. Contact the manufacturer if necessary for repairs and maintenance work. DocNr.: 03-1211_R02.01 | 07-2012 | en | Sonoca 300 7 Safety Magnetic fields Magnetic fields can affect the ultrasonic generator function and severely injure patients. Do not use the ultrasonic generator in the area of influence of magnetic fields. Ensure electromagnetic compatibility. Damaged cable Electric shock due to damaged mains cable insulation can lead to severe personal injury or death. Check the cable for damage. If a cable is damaged, immediately switch off the power supply (or do not switch it on). Replace the cable if damaged. Only use undamaged cables. Improperly connected instrument cable An improperly connected instrument cable can lead to malfunctioning of the ultrasonic generator and severely injure patients. 8 Correctly connect the instrument cable. Prior to each use of an instrument, ensure that the instrument cable is properly connected. Sonoca 300 | DocNr.: 03-1211_R02.01 | 07-2012 | en Safety Damaged or improperly connected suction hose The working area and the instruments can be contaminated due to a damaged or improperly connected suction hose. This can result in life-threatening injury to persons. Connect the suction hose correctly. Check the suction hose for damage. Only use an undamaged suction hose. Wrong instruments Use of instruments that are not specified can lead to malfunctions and severely injure patients. Only use specified instruments (see chapter 3.3 System overview on page 17). Incorrect accessories Use of accessories other than those recommended can lead to malfunctions and severely injure patients. Only use recommended accessories (see catalogues). Use with other medical devices Use of the ultrasonic generator in combination with medical devices from other manufacturers can have incalculable consequences. Only use the ultrasonic generator in combination with suitable medical devices (e.g. a suitable suction container). The user bears the responsibility for use with any other medical devices. DocNr.: 03-1211_R02.01 | 07-2012 | en | Sonoca 300 9 Overview 3 Overview 3.1 Overview of the Ultrasonic Generator The ultrasonic generator can be operated at three working frequencies (25 kHz, 35 kHz and 55 kHz) so that different treatments can be carried out. Both ultrasonic instruments for selective tissue separation and for wound treatment as well as ultrasonic scissors and ultrasonic hooks for cutting and coagulating as well as bone instruments for preparing bone tissue can be operated with the ultrasonic generator. The function of the ultrasonic generator is process-controlled. Automatic instrument detection ensures preselection of performance parameters. The performance parameters can be adjusted on the operator control panels to the requirements of the treatment. The working frequencies are determined by the instrument used; they cannot be altered. A rinsing and suction device is also integrated in the ultrasonic generator. The tissue is suctioned off and collected in a suction container. The ultrasonic treatment is triggered with a foot switch. At the same time – depending on the instrument connected – the rinsing and suction are activated. 10 Sonoca 300 | DocNr.: 03-1211_R02.01 | 07-2012 | en Overview 5 6 1 2 3 Absaugung Aspiration - 0,9 bar 4 Spülung Irrigation Ultraschall Ultrasound 100 % 150 ml 100 % Information Schlauch befüllen Pump on/off Filling hose 0 % 20 1 40 40 2 60 60 3 80 80 Aspiration (vac) bar Frequency kHz Irrigation ml/min Active time 100 100 min 4 OK 0 0 7 ERROR 0 GmbH 0 11 10 9 8 Fig. 3.1 Front side 1 2 3 4 5 6 Operator control panel for suction Operator control panel for the ultrasonic treatment Operator control panel for the rinsing Operator control panel for the settings Boom for a rinsing bottle Rinsing bottle (not part of the scope of delivery) DocNr.: 03-1211_R02.01 | 07-2012 | en | Sonoca 300 7 Suction container (not part of the scope of delivery) 8 Hose pump for rinsing fluid 9 Connector socket for an instrument 10 Connector socket for a foot switch 11 Mains switch 11 Overview 1 2 3 4 Söring GmbH Justus-von-Liebig-Ring 2 D-25451 Quickborn Germany Vacuum T2.0AH Emergency Vacuum Made in Germany 0123 10 Typ / Model: Sonoca XXX XXXXXXX 20XX Netzanschluß Power Cord XXX XXX V V 50/60 50/60 Hz Hz Strom Strom // Current: Current: X.X X.X A A max max Sicherung Sicherung // Fuse: Fuse: TX.XAH TX.XAH Leistungsaufnahme Leistungsaufnahme // Power Power consumption: consumption: Einschaltdauer Einschaltdauer // switch switch on on duration: duration: XXX XXX VA VA 100 100 % % Ausgangsdaten / Output data Leistung Leistung Power Power -- 9 8 Emergency Pumpswitch SN XXXXXXX Spannung Spannung // Voltage: Voltage: Frequenz Frequenz Frequency Frequency -- XXX XXX W W 20-80 20-80 Hz kHz -- -- -- -- -- -- 7 - Lautstärke + - Volume + 6 5 Fig. 3.2 Rear side 1 2 3 4 5 Connector socket for the mains cable Connector socket for the vacuum hose Type plate Switch for the emergency pump (not part of the scope of delivery) Loudspeaker 1 6 7 8 9 Volume regulator Holder for the bacteria filter Bacteria filter Connection for the potential equalisation cable 10 Fuse holder 2 3 Fig. 3.3 Left side 1 2 3 12 Hose pump Holder for the suction container Holding pipe for the boom Sonoca 300 | DocNr.: 03-1211_R02.01 | 07-2012 | en Overview 3.1.1 Symbols on the ultrasonic generator Symbol Meaning Read user manual Type BF Instrument active Instrument Foot switch High voltage Potential equalisation Non-ionising radiation Hazardous waste DocNr.: 03-1211_R02.01 | 07-2012 | en | Sonoca 300 13 Overview 3.1.2 Type plate The type plate is attached on the back of the ultrasonic generator. Made in Germany 0123 Söring GmbH Justus-von-Liebig-Ring 2 D-25451 Quickborn Germany Typ / Model: 20XX 1 Sonoca XXX XXXXXXX 3 2 4 SN XXXXXXX Spannung / Voltage: 6 Strom / Current: Sicherung / Fuse: Leistungsaufnahme / Power consumption: 8 Einschaltdauer / switch on duration: 5 XXX V 50/60 Hz X.X A max 7 TX.XAH XXX VA 9 100 % Ausgangsdaten / Output data Leistung Power - Frequenz Frequency 10 - XXX W - - 20-80 kHz - - - - 11 Fig. 3.4 Type plate 1 2 3 4 5 6 Manufacturer Type Year of construction Serial number Voltage Current 7 8 9 10 11 Fuse Power consumption Duty cycle Power output Frequency 3.1.3 Operator control panels Operator control panel for suction The suction capacity can be increased and reduced on the operator control panel for the suction. The selected suction capacity is displayed. The suction pump can be switched on and off. 14 Sonoca 300 | DocNr.: 03-1211_R02.01 | 07-2012 | en Overview Absaugung Aspiration - 0,9 bar 1 100 % 4 2 Pump on/off 3 0 0 Fig. 3.5 Operator control panel for the suction 1 2 Button for increasing the suction capacity Button for switching the suction pump on and off 3 4 Button for reducing the suction capacity Display of the suction capacity Operator control panel for the ultrasonic treatment The ultrasonic power can be increased and reduced on the operator control panel for ultrasonic treatment. Alternatively, four preset ultrasonic power values can be selected. The selected ultrasonic power is displayed. A display lights as soon as an instrument is active. Ultraschall Ultrasound 5 1 4 0 % 20 1 40 2 60 3 100 80 4 2 3 Fig. 3.6 Operator control panel for the ultrasonic treatment 1 2 3 Display of the ultrasonic power Button for increasing the ultrasonic power Button for reducing the ultrasonic power 4 5 Buttons for selecting four preset ultrasonic power values Display of the instrument activity Operator control panel for the rinsing The rinsing capacity can be increased and reduced on the operator control panel for the rinsing. The selected rinsing capacity is displayed. The rinsing hose can also be filled. DocNr.: 03-1211_R02.01 | 07-2012 | en | Sonoca 300 15 Overview Spülung Irrigation 150ml 1 100 % 4 2 Schlauch befüllen Filling hose 3 0 0 Fig. 3.7 Operator control panel for the rinsing 1 2 Button for increasing the rinsing capacity Button for activating the hose filling 3 4 Button for reducing the rinsing capacity Display for the rinsing capacity Operator control panel for the settings Settings information can be called up at the touch of a button on the operator control panel for the settings. Information is displayed of the following: The suction pressure [bar], the working frequency of the instrument used [kHz], the volume of rinsing fluid fed in [ml/min], the activation duration of the instrument [min]. In the event of a malfunction, a numerical code is displayed and the ERROR display lights. If the ultrasonic generator is ready for use, the OK display lights. 5 Aspiration (vac) kHz Irrigation ml/min Active time 4 1 bar Frequency min 2 OK ERROR 3 Fig. 3.8 Operator control panel for the settings 1 2 3 16 Display for the information ERROR display that lights upon a safety shutdown or an internal fault OK display that lights if the ultrasonic generator is ready for use 4 5 Button for calling up information Type of information called up Sonoca 300 | DocNr.: 03-1211_R02.01 | 07-2012 | en Overview 3.2 Scope of delivery The ultrasonic generator is delivered without further accessories. Recommended accessories are listed in the catalogs. Only use recommended accessories. For the latest information regarding accessories, please visit our website at www.soering.com 3.3 System overview Use with a micro ENP handpiece or a micro suction pen handpiece Micro-ENP Micro Suction Pen 92-XXX Suction hose Rinsing hose 700S0016 Suction container Vacuum hose 300K0011 300K0013 Sonoca 300 Suction hose Rinsing hose 700S0016 Suction container Vacuum hose 300K0011 300K0013 Sonoca 300 Rinsing hose 700S0010 700S0310 Sonoca 300 Rinsing hose 700S0009 700S0010 700S0309 700S0310 Sonoca 300 Instrument cable 240K0095 240K0195 Use with a macro handpiece Macro 94-XXX Instrument cable 240K0094 240K0194 Use with a micro pen handpiece Micro Pen 91-XXX Instrument cable 240K0095 240K0195 Use with a UAW handpiece UAW 97-XXX Instrument cable 240K0094 240K0194 Use with a ultrasonic hook Hooks 96-XXX Instrument cable 240K0094 240K0194 Sonoca 300 DocNr.: 03-1211_R02.01 | 07-2012 | en | Sonoca 300 17 Overview Use with ultrasonic scissors Scissors 96-XXX 98-XXX Instrument cable 240K0094 240K0194 Sonoca 300 Instrument cable 240K0095 240K0195 Use with a bone instrument Bone 92-05X 18 Instrument cable 240K0095 240K0195 Rinsing hose 700S0010 700S0310 Sonoca 300 Sonoca 300 | DocNr.: 03-1211_R02.01 | 07-2012 | en Transport and storage 4 Transport and storage The ultrasonic generator is supplied in packaging which protects it against damage and contamination. Keep this packaging. Use the packaging if you want to transport the ultrasound generator again or put it in storage. The storage environment must be dry, clean and dust-free. Storage temperature between –20 °C and 50 °C. Relative humidity: Maximum 85 %. After any transport or after lengthy storage, the safety of the ultrasonic generator must be checked (see chapter 8.1 Regular checks on page 36). DocNr.: 03-1211_R02.01 | 07-2012 | en | Sonoca 300 19 Installation 5 Installation The ultrasonic generator must only be put into operation by competent persons who are authorised by the manufacturer. The ultrasonic generator must be installed on a suitable surface which is sufficiently load-bearing and easily accessible. 5.1 Connecting the ultrasonic generator to the supply network The following accessories are required for connecting the ultrasonic generator to the supply network: a mains cable, a potential equalisation cable. Supply network without protective earth Electric shock due to a missing protective earth in the supply network can lead to severe personal injury or death. Only connect the ultrasonic generator to a supply network with protective earth. Damages mains cable Electric shock due to damaged mains cable insulation can lead to severe personal injury or death. Check the mains cable for damage. Replace the damaged mains cable. Only use an undamaged mains cable. Requirements The actual mains voltage corresponds to the voltage shown on the type plate. The ultrasonic generator is switched off; the mains switch is set to 0. Procedure 1. Insert the mains cable in the connector socket on the back of the ultrasonic generator (see Fig. 3.2 on page 12, position 1). 2. Connect the mains cable to the supply network. 20 Sonoca 300 | DocNr.: 03-1211_R02.01 | 07-2012 | en Installation 3. Connect the potential equalisation cable to the connection on the back of the ultrasonic generator (see Fig. 3.2 on page 12, position 9). 4. Connect the potential equalisation cable to the potential equalisation rail in the operating room. 5.2 Putting the ultrasonic generator into operation The following accessories are required for starting up the ultrasonic generator: A foot switch, a suction container with vacuum hose and suction hose (only for instruments with suction), a rinsing bottle with boom and rinsing hose (only for instruments with rinsing), an instrument with instrument cable. Before starting up, observe the user manuals of the instrument and the accessories. Improper initial start-up Improper initial start-up of the ultrasonic generator can lead to life-threatening situations or substantial material damage. Have the safety of the ultrasonic generator checked by a competent person prior to the initial start-up. Have the ultrasonic generator put into operation for the first time by a competent person who is authorised by the manufacturer. 5.2.1 Preparing the ultrasonic generator No instruction in the use of the ultrasonic generator Improper use of the ultrasonic generator can lead to life-threatening situations or substantial material damage. Have a competent person explain the use of the ultrasonic generator to the qualified specialist who will use it. DocNr.: 03-1211_R02.01 | 07-2012 | en | Sonoca 300 21 Installation Installing the foot switch Requirements The ultrasonic generator is switched off; the mains switch is set to 0. Procedure 1. Insert the foot switch cable into the connector socket on the front of the ultrasonic generator (see Fig. 3.1 on page 11, position 10). – The foot switch is installed. Installing the suction container The suction container, vacuum hose and suction hose must only be installed if an instrument with suction is used. The suction container and the vacuum hose must be cleaned and disinfected. The suction hose must be sterile. Requirements The ultrasonic generator is switched off; the mains switch is set to 0. Procedure 1. Connect the vacuum hose to the suction container. Observe the user manual of the suction container. 2. Connect the suction hose to the suction container. Observe the user manual of the suction container. 3. Mount the suction container in the holder on the ultrasonic generator (see Fig. 3.3 on page 12, position 2). 4. Insert the vacuum hose in the connector socket on the back of the ultrasonic generator (see Fig. 3.2 on page 12, position 2). – The vacuum hose engages in the connector socket. – The vacuum hose is fully connected. 5. Connect the suction hose to the instrument. Observe the user manual of the instrument. – The suction hose is fully connected. – The suction container is installed. Installing the rinsing bottle The rinsing bottle and rinsing hose must only be installed if an instrument with rinsing is used. The rinsing hose must be sterile. 22 Sonoca 300 | DocNr.: 03-1211_R02.01 | 07-2012 | en Installation Requirements The ultrasonic generator is switched off; the mains switch is set to 0. Procedure 1. Insert the boom for the rinsing bottle in the holding pipe (see Fig. 3.3 on page 12, position 3). 2. Stick the spike of the rinsing hose into the rinsing bottle. Seal the drop chamber. 3. Hang the rinsing bottle on the boom. 4. Connect the rinsing hose to the instrument. Observe the user manual of the instrument. Activated hose pump Danger of crushing the fingers if the hose pump is open when the ultrasonic generator is switched on. Rotating parts in the hose pump can injure the fingers when inserting the rinsing hose. Ensure that the ultrasonic generator is switched off before the hose pump is opened. 5. Open the hose pump. To do this, push the lever to the left. – The hose pump is open. 6. Move both locking clamps into the upper position. DocNr.: 03-1211_R02.01 | 07-2012 | en | Sonoca 300 23 Installation To do this, press on the locking clamps and slide them up. 7. Insert the reinforced part of the rinsing hose into the hose pump. Make sure that the rinsing hose lies under the locking clamps. 8. Close the hose pump. To do this, push the lever to the right. – The hose pump is closed. 9. Fix the rinsing hose with both locking clamps. 24 Sonoca 300 | DocNr.: 03-1211_R02.01 | 07-2012 | en Installation To do this, press on the locking ratchets and slide them down. – The rinsing hose is fully connected and fixed. – The rinsing bottle is installed. 5.2.2 Connecting the instrument Observe the user manual of the instrument. Only use sterilised instruments. Procedure 1. Insert the instrument cable in the connector socket on the front of the ultrasonic generator (see figure Fig. 3.1 on page 11, position 9). Observe the markings. 2. Insert the instrument cable into the connector socket on the instrument. Observe the markings. – The instrument cable engages in the connector socket. – The instrument cable is fully connected. 5.2.3 Turning on the ultrasonic generator Requirements The ultrasonic generator is connected to the supply network (see chapter 5.1 Connecting the ultrasonic generator to the supply network on page 20). The ultrasonic generator has been prepared (see chapter 5.2.1 Preparing the ultrasonic generator on page 21). An instrument is connected (see chapter 5.2.2 Connecting the instrument on page 25). The ultrasonic generator has reached the permissible temperature for use (between 10 °C and 40 °C). DocNr.: 03-1211_R02.01 | 07-2012 | en | Sonoca 300 25 Installation Procedure 1. Turn the ultrasonic generator on with the mains switch. – The mains switch lights green. – The ultrasonic generator undergoes a self-test. All displays light briefly. – The ultrasonic generator recognises which foot switch is connected. – The ultrasonic generator recognises the connected instrument. – The performance parameters for the connected instrument are preselected. – The OK display lights as soon as the ultrasonic generator is ready for use. 26 Sonoca 300 | DocNr.: 03-1211_R02.01 | 07-2012 | en Operation 6 Operation Only qualified specialists may use the ultrasonic generator and carry out treatment with it. The treating physician is responsible for assessing the risks of treatment against the benefits. Observe the user manual of the instrument. During the treatment, keep a second ultrasonic generator and a second instrument ready in case in case the first ultrasonic generator or instrument fails. Before each use, the ultrasonic generator must be cleaned and disinfected (see chapter 7 Reprocessing on page 34). This also applies to the initial use. Prior to each use the function of the ultrasonic generator and the instrument must be tested. After use the ultrasonic generator, the instrument and the accessories must be reprocessed (see chapter 7 Reprocessing on page 34). 6.1 Checking the settings The settings are displayed on the operator control panels. The settings must be checked before each treatment. Checking preselected performance parameters Requirements The ultrasonic generator is turned on. The OK display lights. Procedure 1. Request the information for the settings on the operator control panel (see Fig. 3.8 on page 16). 2. Check the settings. Is the setting for the suction pressure selected properly? Has the correct working frequency been detected for the instrument used? Is the setting for the volume of rinsing fluid fed per minute properly selected? 3. Adjust the settings if the answer to a question is negative. 4. Check and, if necessary, adjust the suction capacity on the operator control panel for the suction (see Fig. 3.5 on page 15). 5. Check and, if necessary, adjust the ultrasonic power on the operator control panel for the ultrasonic treatment (see Fig. 3.6 on page 15). DocNr.: 03-1211_R02.01 | 07-2012 | en | Sonoca 300 27 Operation 6. Check and, if necessary, adjust the rinsing capacity on the operator control panel for the rinsing (see Fig. 3.7 on page 16). – All settings are checked and correct. Adjusting the volume The volume setting only affects the signal tone which reports the instrument activity. The setting does not affect the alarm tone. Procedure 1. To reduce the volume, turn the volume regulator to the left. To increase the volume, turn the volume regulator to the right. – The volume is adjusted. Requesting the operating time The operating time shows how many minutes the ultrasonic generator has been switched on so far. The operating time is counted up to a period of 999 999 minutes. Counting then starts at zero again. The information for the settings is displayed on the operator control panel in two blocks of numeric digits XXX and YYY, each of three digits. Procedure 1. Press the button for reducing the ultrasonic power and keep it pressed (see Fig. 3.6 on page 15, position 3). 2. At the same time, press the button for increasing the ultrasonic power (see Fig. 3.6 on page 15, position 2). 3. Release both buttons. – The first block of digits XXX is displayed. 4. Press the button for reducing the ultrasonic power again and keep it pressed. 5. At the same time, press the button for increasing the ultrasonic power again. 6. Release both buttons. – The second block of digits YYY is displayed. 7. To return to the original display, press the button for increasing the ultrasonic power again. 28 Sonoca 300 | DocNr.: 03-1211_R02.01 | 07-2012 | en Operation 6.2 Beginning treatment Contaminated instruments Use of contaminated instruments can result in life-threatening infections in patients. Only used sterile reprocessed instruments. Excessively high output power If the output power is set too high at the beginning of the treatment, it can result in an unintentionally strong cavitation, cutting or coagulation effect and injure the patient. Start the treatment at a low output power. Slowly increase the power until the desired level is reached. Excessive pressure on the tissue Excessive pressure applied to the tissue can result in an unintentionally strong cutting or coagulation effect and injure the patient. Do not apply excessive pressure to the tissue with the sonotrode. Wrongly set rinsing capacity If the rinsing capacity is set too low or too high, this can cause damage to tissue, nerves, vessels and skin. Do not set the rinsing capacity too high as otherwise too much rinsing fluid escapes. Do not set the rinsing capacity too low as otherwise the ultrasonic effect is not achieved. Watch the fill level in the rinsing bottle. Continuously check the rinsing. DocNr.: 03-1211_R02.01 | 07-2012 | en | Sonoca 300 29 Operation Incorrectly set suction capacity If the suction capacity is set too low or too high, this can cause damage to tissue, nerves, vessels and skin. Do not set the suction capacity too high as otherwise the tissue will be suctioned dry too quickly. Do not set the suction capacity too low so the suction hose does not clog. Watch the fill level in the suction container. Continuously check the suction. Dangling cables and hoses Dangling cables and hoses can hinder the staff and cause tripping, increasing the danger to the patient. As a result, the treatment may have to be interrupted. Lay the cables and hoses in such a way that no one is hindered. The instrument is activated by means of the foot switch. Rinsing and suction are activated at the same time. A tone signals the instrument activity. As soon as the foot switch is no longer pressed, the ultrasonic treatment stops. The suction runs for a further 30 seconds. Observe the OK and ERROR displays during use. The OK display flashes if there is an overload. Watch the fill levels in the suction container and in the rinsing bottle during use. 6.2.1 Using an instrument with rinsing and suction Both rinsing and suction are required for the following instruments: Micro ENP handpieces (suction only), Micro suction pen handpieces, Macro handpieces. Procedure 1. Open the roller clamp on the rinsing hose. 2. Filling the rinsing hose. 30 Sonoca 300 | DocNr.: 03-1211_R02.01 | 07-2012 | en Operation To do this, keep the button for activating the rinsing hose filling (see Fig. 3.7 on page 16, Position 2) pressed until rinsing fluid escapes from the instrument. – The rinsing hose is filled. – Treatment can begin. 3. Press the foot switch. – The ultrasonic generator is activated. – The rinsing and the suction begin. – The display for instrument activity lights on the operator control panel for the ultrasonic treatment. – A tone signals the instrument activity. 6.2.2 Using an instrument with rinsing Rinsing is required with the following instruments: Micro pen handpieces, UAW handpieces, bone instruments. Procedure 1. Open the drop chamber on the rinsing hose. 2. Filling the rinsing hose. To do this, keep the button for activating the rinsing hose filling (see Fig. 3.7 on page 16, Position 2) pressed until rinsing fluid escapes from the instrument. – The rinsing hose is filled. – Treatment can begin. 3. Press the foot switch. – The ultrasonic generator is activated. – The rinsing begins. – The display for instrument activity lights on the operator control panel for the ultrasonic treatment. – A tone signals the instrument activity. 6.2.3 Using an instrument without rinsing and suction Rinsing and suction is not required with the following instruments: ultrasonic hooks, ultrasonic scissors. DocNr.: 03-1211_R02.01 | 07-2012 | en | Sonoca 300 31 Operation Procedure 1. Press the foot switch. Different ultrasonic powers can be called up by means of a double foot switch. The red pedal supplies the maximum ultrasonic power for cutting. The black pedal supplies the ultrasonic power adjusted for coagulation. – The ultrasonic generator is activated. – The display for instrument activity lights on the operator control panel for the ultrasonic treatment. – A tone signals the instrument activity. 6.3 Ending treatment The ultrasonic generator must be switched off after use. The instrument must then be disconnected from the ultrasonic generator and the accessories dismantled. Stopping the ultrasonic generator Procedure 1. Switch off the ultrasonic generator with the mains switch. – The ultrasonic generator is switched off. Disconnecting the instrument from the ultrasonic generator Procedure 1. Disconnecting the instrument cable from the ultrasonic generator. To do this, only pull on the grip sleeve. Observe the user manual of the instrument. – The instrument is now disconnected from the ultrasonic generator. Dismantling accessories Procedure 1. Disconnecting the mains cable from the supply network and the ultrasonic generator. 2. Disconnecting the foot switch from the ultrasonic generator. To do this, only pull on the grip sleeve. 3. Disconnecting the vacuum hose from the ultrasonic generator. To do this, press the connector socket together and pull out the vacuum hose. 4. Disconnect the vacuum hose from the suction vessel. 5. Disconnecting the suction hose from the instrument and from the suction vessel. 32 Sonoca 300 | DocNr.: 03-1211_R02.01 | 07-2012 | en Operation 6. Disconnecting the rinsing hose from the instrument and the rinsing bottle. 7. Open the hose pump. To do this, push the lever to the left. 8. Pull out the rinsing hose and close the hose pump again. To do this, push the lever to the right. – The accessory is now disconnected from the ultrasonic generator. DocNr.: 03-1211_R02.01 | 07-2012 | en | Sonoca 300 33 Reprocessing 7 Reprocessing The ultrasonic generator as well as the instrument and the accessories must be cleaned and disinfected after each use. The instrument and – where possible – also the accessories must then be sterilised. Reprocessing of the instrument is not described in this user manual. Observe the relevant user manual for reprocessing the instrument. Disposable accessories, such as rinsing hoses and suction hoses, must be properly disposed of. The ultrasonic generator must be switched off and the mains cable pulled out before reprocessing. Reprocessing of the ultrasonic generator and the accessories comprises three main steps: cleaning, disinfection, sterilisation (accessories only). Only use disinfectants recommended by the Robert Koch Institute (see DGHM List). 7.1 Cleaning the ultrasonic generator and accessories Requirements The instrument cable is disconnected from the ultrasonic generator. The mains cable is disconnected from the supply network and from the ultrasonic generator. The foot switch is disconnected from the ultrasonic generator. The vacuum hose and the suction container are disconnected from the ultrasonic generator. The rinsing hose and the rinsing bottle are disconnected from the ultrasonic generator. Procedure 1. Take the boom for the rinsing bottle out of the holding pipe. Incorrect cleaning agent Excessive and incorrect cleaning agents can damage the ultrasonic generator. 34 Clean the ultrasonic generator in such a way that moisture cannot penetrate. Do not use explosive or combustible cleaning agents. Sonoca 300 | DocNr.: 03-1211_R02.01 | 07-2012 | en Reprocessing 2. Wipe off the ultrasonic generator. 3. Wipe off the accessories. – The ultrasonic generator and the accessories have been cleaned and are ready for disinfection. 7.2 Disinfecting the ultrasonic generator and accessories To disinfect the ultrasonic generator and the accessories, only use disinfectants recommended by the Robert Koch Institute (see DGHM-List). An automatic cleaning/disinfection system must be used for disinfecting the accessories which are then sterilised. Observe the instructions for reprocessing the accessories and the user manual of the automatic cleaning/disinfection system. Requirements The ultrasonic generator and the accessories have been cleaned (see chapter 7.1 Cleaning the ultrasonic generator and accessories on page 34). Procedure 1. Subject the ultrasonic generator to a wipe disinfection. 2. Disinfect the accessories. – The ultrasonic generator and the accessories have been disinfected. 7.3 Sterilising the accessories A steam steriliser and special packaging as per ISO 11607 must be used for sterilising the accessories. Please observe the instructions for processing the accessories and the user manual of the steam steriliser. Requirements The accessory has been cleaned and disinfected (see chapter 7.2 Disinfecting the ultrasonic generator and accessories on page 35). Procedure 1. Place the accessories in the packaging. 2. Sterilising the accessories in the steam steriliser with fractionated pre-vacuum. 3. Allow the accessories to dry in the packaging. – The accessories have now been sterilised and can be used for treatment. DocNr.: 03-1211_R02.01 | 07-2012 | en | Sonoca 300 35 Maintenance 8 Maintenance 8.1 Regular checks Prior to each use ensure that: The ultrasonic generator and the accessories are in perfect condition, the ultrasonic generator and the accessories have been cleaned and disinfected. A safety inspection must be carried out on the ultrasonic generator once a year. The safety inspection must only be carried out by competent persons using suitable measuring and testing devices. The procedure and the results of this safety inspection must be reported. 8.2 Faults Internal faults The ultrasonic generator automatically detects internal faults. An internal fault is notified in three ways: a signal tone sounds, the ERROR display lights, a numerical code is displayed. As soon as a numerical code is displayed, all functions are disabled. Numerical code Cause of the fault Remedy 1.1…1.4 Internal computer module Switch the ultrasonic generator off and back on again after 10 seconds. 2.1…2.6 Internal operating voltages Switch the ultrasonic generator off and back on again after 10 seconds. 3.1…3.5 Power supply unit Inform the manufacturer. 4.1 Foot switch detection Pull the foot switch cable out of the connector socket. Switch the ultrasonic generator off and back on again after 10 seconds. If the ultrasonic generator functions properly, insert the foot switch cable back into the connector socket. Replace the foot switch if necessary. 4.2 Instrument detection Pull the instrument cable out of the connector socket. Switch the ultrasonic generator off and back on again after 10 seconds. If the ultrasonic generator functions properly, check the instrument cable. Replace the instrument cable if necessary. If the internal fault cannot be remedied or if it returns, notify the manufacturer. 36 Sonoca 300 | DocNr.: 03-1211_R02.01 | 07-2012 | en Maintenance Other faults Other faults can occur during the treatment which are attributed to other influencing factors. The ultrasonic generator detects such faults in some cases. Detected faults are communicated in two ways: a signal tone sounds, the ERROR display lights. Not all faults are detected by the ultrasonic generator. As soon as you have noticed a fault, the cause must be remedied. If a fault directly endangers the patient, you must immediately switch off the ultrasonic generator. Further treatment despite fault The further treatment of a patient despite a fault can resulting in life-threatening injury to the patient. Immediately switch off the ultrasonic generator. Remedy the cause of the fault. Any recurring faults must be reported to the manufacturer. Fault Possible cause of the fault Remedy Instrument not working. Instrument cable is defective. Replace the instrument cable. Instrument is not automatically detected. The instrument transducer is defective. Use another instrument. Suction not work- Lid of the suction container is not ing. closed. Close the lid. Filter on the suction container is clogged. Replace the filter or disposable bag. Vacuum hose is not connected correctly. Correctly connect the vacuum hose. Suction hose is bent. Lay the suction hose again. Instrument is clogged. Rinse the instrument. Use another instrument if necessary. Suction pump is switched off. Switch on the suction pump on the operator control panel for the suction. Suction pump is defective. Switch over the suction to the surgical aspirator. Suction is incorrectly adjusted. Correct the adjustment for the suction. Pull off the instrument cable and reconnect if necessary. DocNr.: 03-1211_R02.01 | 07-2012 | en | Sonoca 300 37 Maintenance Fault Possible cause of the fault Remedy A signal tone sounds and the ERROR display lights during ultrasonic treatment. The pressure of the sonotrode tip on the tissue is too high. Stop the ultrasonic treatment. Reapply the sonotrode tip. The OK display flashes during ultrasonic treatment. Instrument is overloaded. Stop the ultrasonic treatment. Rinsing not working. There is no more rinsing liquid in the rinsing bottle. Connect a new rinsing bottle. Rinsing hose spike not sitting correctly in the rinsing bottle. Stick the spike correctly in the rinsing bottle. Check the drop chamber. Rinsing hose is not inserted correctly in the hose pump. Open the hose pump and re-insert the rinsing hose. There is a vacuum in the rinsing bottle because the ventilation flap of the drop chamber is not open. Open the ventilation flap of the drop chamber or remedy the vacuum with a syringe needle. Rinsing is not correctly adjusted. Correct the adjustment for the rinsing. 8.3 Repairs Unauthorised repairs Improper repairs can lead to malfunctions and can result in life-threatening injury to patients. Repairs must only be carried out by the manufacturer or individuals authorised by the manufacturer. A defective ultrasonic generator can be sent to the manufacturer for repair. Only send in a cleaned and disinfected ultrasonic generator. Otherwise additional costs will be incurred. Please send an irreparable ultrasonic generator to the manufacturer or a disposal company for proper disposal (see chapter 9 Disposal on page 39). 38 Sonoca 300 | DocNr.: 03-1211_R02.01 | 07-2012 | en Disposal 9 Disposal If the ultrasonic generator has reached its end of life, it must be properly disposed of. Send the ultrasonic generator to a disposal company or to the manufacturer. Only a cleaned, disinfected and sterilised ultrasonic generator can be sent for disposal or returned to the manufacturer. Contaminated ultrasonic generator Improperly disposed of contaminated ultrasonic generators can lead to life-threatening infections in people and/or damage to the environment. Only send cleaned and disinfected ultrasonic generators for disposal. If the accessories have reached the end of their life, they must be properly disposed of. Disposable accessories must be properly disposed of after use. Send the accessories to a disposal company Only cleaned and disinfected accessories must be sent for disposal. Contaminated accessories Improperly disposed of contaminated accessories can lead to life-threatening infections in people and/or damage to the environment. Only send cleaned and disinfected and accessories for disposal. DocNr.: 03-1211_R02.01 | 07-2012 | en | Sonoca 300 39 Technical Data 10 Technical Data Sonoca 300 40 Dimensions (width, height, depth): 430 mm, 150 mm, 640 mm Weight: 27.5 kg Voltage: 230 V/115 V, switchable Frequency: 50 Hz/60 Hz Power consumption: max. 1.5 A Power consumption: max. 300 VA Mains fuse: 2 fuses: T 2.0 AH Temperature: Operation: 10 °C to 40 °C Transport and storage: –20 °C to 50 °C Relative humidity: Operation: Maximum 80 % Transport and storage: Maximum 85 % Activation: foot switch Maximum activation duration: depending on the instrument Frequency range of the oscillator: 20 kHz to 80 kHz Working frequencies: 25 kHz, 35 kHz, 55 kHz Suction pressure: Max. 0.9 bar Suctioned fluid: depending on the instrument, max. 250 ml/min Supplied rinsing fluid: depending on the instrument, max. 150 ml/min Classification: protection class I (in accordance with EN 606011), type BF (in accordance with EN 60601-1), class IIb (in accordance with German Medical Devices Act) Sonoca 300 | DocNr.: 03-1211_R02.01 | 07-2012 | en Index Index This index refers to chapters, not to pages. A Accessories cleaning 7.1 contaminated 9 disinfection 7.2 dismantling 6.3 disposal 9 sterilisation 7.3 Adjusting the rinsing capacity 3.1.3 the suction capacity 3.1.3 the ultrasonic power 3.1.3 of the mains cable 5.1 of the potential equalisation cable 5.1 Connector socket for a foot switch 3.1 for an instrument 3.1 for the mains cable 3.1 for the vacuum hose 3.1 Contaminated instrument 6.2 D Disinfection 7.2 B Display ERROR 3.1.3, 8.2 for the Information 3.1.3 for the rinsing capacity 3.1.3 of the instrument activity 3.1.3 of the suction capacity 3.1.3 of the ultrasonic power 3.1.3 OK 3.1.3, 8.2 Bacteria filter 3.1 Disposable accessories, disposing of 7 Boom for a rinsing bottle 3.1 holding pipe for the 3.1 installing 5.2.1 Disposal 9 C E Cable damaged 2.2 dangling 6.2 Electromagnetic compatibility 2.2 Adjusting the volume 6.1 Alarm tone 6.1 Autoclave see Sterilisation Automatic cleaning/disinfection system 7.2 Check before each use 8.1 regular 8.1 safety 8.1 Disposal company 9 Drop chamber 6.2.2 End of life of the accessories 9 of the ultrasonic generator 9 Error message 8.2 F Checking the settings 6.1 Fail-safe operation 6 Cleaning 7.1 Fault 8.2 actions upon a 8.2 cause of 8.2 further treatment despite 8.2 internal 8.2 other 8.2 remedy 8.2 use despite 8.2 Cleaning agent, incorrect 7.1 Conditions for using the ultrasonic generator 1.3 general 1.3 Connection for the potential equalisation cable 3.1 DocNr.: 03-1211_R02.01 | 07-2012 | en | Sonoca 300 41 Index Foot switch 3.1 disconnecting 6.3 double 6.2.3 installing 5.2.1 Mains cable 5.1 connecting 5.1 damaged 2.2, 5.1 disconnecting 6.3 Fuse holder 3.1 Mains switch 3.1 G N General Safety Information, general 2.2 Numerical code 8.2 H O Hose filling, button for activating 3.1.3 Operating Instructions see User Manual Hose pump 3.1, 3.1 Danger of crushing 5.2.1 Operation 6 I Information 1.2.2 Initial start-up 5.2 Installation 5 requirements on the 5 Instrument connecting 5.2.2 contaminated 6.2 disconnecting from the ultrasonic generator 6.3 not working 8.2 reprocessing 7 using with rinsing 6.2.2 using with rinsing and suction 6.2.1 using without rinsing and suction 6.2.3 wrongly selected 2.2 Instrument cable 3.3 connecting 5.2.2 damaged 2.2 dangling 6.2 disconnecting 6.3 improperly connected 2.2 Instrument detection automatic 3.1 not working 8.2 Intended Use 2.1 L Locking clamps 5.2.1 Loudspeaker 3.1 Operator control panel for suction 3.1, 3.1.3 for the rinsing 3.1, 3.1.3 for the settings 3.1, 3.1.3 for the ultrasonic treatment 3.1, 3.1.3 Operator control panels 3.1 Output power, excessively high 6.2 P Packaging for sterilisation 7.3 for storage 4 for transport 4 Pedal see also Foot switch black 6.2.3 red 6.2.3 Performance parameters checking 6.1 setting the 3.1 Peristaltic pump see Hose pump Potential equalisation cable connecting 5.1 connection for the 3.1 Power cable see Mains cable, instrument cable Pre-vacuum, fractionated 7.3 Q Qualification see also Specialists, insufficient 2.2 R RDA see Automatic cleaning/disinfection system M Magnetic fields 2.2 Mains see Supply network 42 Repair by the manufacturer 8.3 improper 8.3 Sonoca 300 | DocNr.: 03-1211_R02.01 | 07-2012 | en Index unauthorised 8.3 Reprocessing 7 prior to initial use 6 Requesting the operating time 6.1 Rinsing 3.1 not working 8.2 Rinsing bottle 3.1 installing 5.2.1 Rinsing capacity button for increasing 3.1.3 button for reducing the 3.1.3 wrongly set 6.2 Rinsing fixture 3.1 Rinsing hose 3.3 connecting 5.2.1 dangling 6.2 disconnecting 6.3 filling 6.2.1, 6.2.2 Roller clamp 6.2.1 S Suction hose 3.3 connecting 5.2.1 damaged 2.2 dangling 6.2 disconnecting 6.3 improperly connected 2.2 Suction pump, button for switching on and off 3.1.3 Suction system 3.1 Supply network 5.1 Symbol foot switch 3.1.1 hazardous waste 3.1.1 high voltage 3.1.1 Information 1.2.2 instrument 3.1.1 instrument active 3.1.1 non-ionising radiation 3.1.1 on the ultrasonic generator 3.1.1 potential equalisation 3.1.1 read user manual 3.1.1 type BF 3.1.1 Scope of delivery 3.2 System overview 3.3 Setting the performance parameters 3.1 T Signal tone 6.1 sounds 8.2 Technical Data 10 Soiling see Cleaning Transport 4 Specialists, qualified 2.1 Treatment beginning 6.2 benefits of 6 despite fault 8.2 ending 6.3 measures duringthe 6 risks of 6 Steam sterilisation see Sterilisation Steam steriliser 7.3 Sterilisation 7.3 Storage 4 see Storage storage environment 4 Suction 3.1 not working 8.2 Testing functionality 6 Type plate 3.1, 3.1.2 U Suction capacity adjusting the 3.1.3 button for increasing the 3.1.3 button for reducing the 3.1.3 display for the 3.1.3 incorrectly set 6.2 ultrasonic generator, Conditions for using 1.3 Suction container 3.1, 3.1, 3.3 holder for the 3.1 installing 5.2.1 Use see Intended Use actions before 6 Intended 2.1 DocNr.: 03-1211_R02.01 | 07-2012 | en | Sonoca 300 Ultrasonic power button for increasing the 3.1.3 button for reducing the 3.1.3 Usage see Intended Use 43 Index of incorrect accessories 2.2 of instruments 3.1 of wrong instruments 2.2 with other medical devices 2.2 User Manual for the instruments 1.1 for the ultrasonic generator 1.1 Purpose of the 1.1 Using the ultrasonic generator, Conditions for the 1.3 44 V Vacuum hose 3.3 connecting 5.2.1 disconnecting 6.3 Volume regulator 3.1 W Wipe disinfection 7.2 Working frequencies 3.1 Sonoca 300 | DocNr.: 03-1211_R02.01 | 07-2012 | en Söring GmbH Justus-von-Liebig-Ring 2 D-25451 Quickborn Tel.: +49 (0)4106-6100-0 Fax: +49 (0)4106-6100-10 E-Mail: [email protected] Internet: www.soering.com Redaction ZINDEL AG www.zindel.de