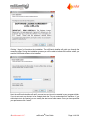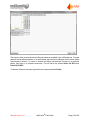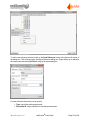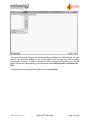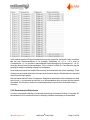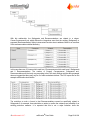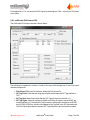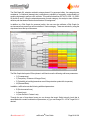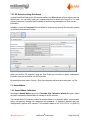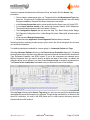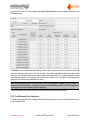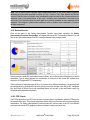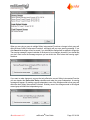
1
User Guide
exSILentia® V3
- Standard - Analysis - Operations - Ultimate -
exida.com LLC
64 North Main Street
Sellersville, PA, 18960
+1 215 453 1720
[email protected]
Released 2012.04.30
Table of Contents
User Guide
1
Table of Contents
3
exSILentia® Version 3 Options
9
Third Party Tool Interfaces
11
Chapter 1 Installation
13
1.1 Minimum System Requirements
15
1.2 Licensing
16
1.3 exSILentia Help Options
17
Chapter 2 exSILentia Projects
19
2.1 SIF Status and Session Log
20
2.2 Action Items
22
2.3 References
23
2.4 Team Members
26
2.5 exSILentia Tool Updates
30
2.6 Equipment Reliability Data Updates
32
2.6.1 Updating the Safety Equipment Reliability Handbook Database
32
2.6.2 Updating Equipment Items
34
2.7 Getting started
35
2.7.1 Projects
35
2.7.2 Safety Instrumented Functions
37
Chapter 3 exSILentia Reports
3.1 SIF List
© exida.com L.L.C.
39
39
exSILentia® User Guide
Page 3 of 168
3.2 SILver Summary Report
40
3.3 IEC 61511 Compliance Report
41
3.4 SRS-C&E
42
3.5 Proof Test Report
44
3.6 Lifecycle Cost Report
45
3.7 IEC 61511 Compliance Requirements and Arguments
46
3.8 Critical Device List
48
Chapter 4 PHAX™
51
Chapter 5 PHA Import
53
5.1 Introduction
53
5.1.1 Support for PHAs and PHA Application Setup
53
5.1.2 HAZOP Principles
53
5.2 Working with PHAX
55
5.3 Working with PHA-Pro
56
5.3.1 Default Worksheets
56
5.3.2 Recommended Worksheets
61
5.3.3 Advanced Worksheets
63
5.3.4 Worksheet Export
65
5.4 Working with PHAWorks
68
5.4.1 Default Worksheets
68
5.4.2 Recommended Worksheets
70
5.4.3 Advanced Worksheets
70
5.4.4 Worksheet Export
72
5.5 Working with Custom CSV Files
73
5.6 Using the exSILentia PHA Import
73
© exida.com L.L.C.
exSILentia® User Guide
Page 4 of 168
5.6.1 exSILentia PHA Import GUI
74
5.6.2 Data Import
77
Chapter 6 SIF Identification
81
Chapter 7 SILect – SIL Selection
83
7.1 Tolerable Risk
83
7.2 Risk Graph
85
7.2.1 Risk Graph Calibration
85
7.2.2 VDI/VDE 2180 Risk Graph
88
7.2.3 SIL Selection Using Risk Graph
90
7.3 Hazard Matrix
90
7.3.1 Hazard Matrix Calibration
90
7.3.2 SIL Selection using Hazard Matrix
92
7.4 Frequency Based Targets / LOPA
93
7.4.1 Single tolerable risk qualitative
94
7.4.2 Single tolerable risk quantitative
94
7.4.3 Tolerable risk categories qualitative
95
7.4.4 Tolerable risk categories quantitative
96
7.4.5 Target SIL Threshold Ratio
97
7.4.6 SIL Selection using Frequency Based Targets / LOPA
97
7.5 Independent Protection Layers
7.5.1 Independent Protection Layer Reuse
99
100
Chapter 8 SIF SRS
103
Chapter 9 SRSC&E - Process SRS
105
Chapter 10 SILver - SIL Verification
109
© exida.com L.L.C.
exSILentia® User Guide
Page 5 of 168
10.1 SILver Structure
109
10.2 General SIL Verification parameters
110
10.2.1 Architectural Constraints
111
10.2.2 IEC 61508 Systematic Capability
112
10.2.3 Mission Time
112
10.2.4 Startup Time
112
10.2.5 Demand Rate
112
10.2.6 Comments and Assumptions
113
10.2.7 Maintenance Capability
113
10.3 Sensor Part Selections
115
10.3.1 Sensor Configuration Options
118
10.3.2 Failure Rate Classification
120
10.4 Logic Solver Selections
120
10.5 Final Element Part Selections
122
10.5.1 Final Element Configuration Options
10.6 Review Results
126
128
10.6.1 PFD Charts
128
10.7 Beta Estimator Quick Tool
129
10.8 Proof Test Coverage
131
10.9 Proven-In-Use Justification
131
10.10 Group Reuse
135
10.11 User Defined device and failure data
138
10.12 Unit Mean Time To Fail Spurious (MTTFS)
140
Chapter 11 SRSC&E - Design SRS
141
Chapter 12 Lifecycle Cost Estimator
145
© exida.com L.L.C.
exSILentia® User Guide
Page 6 of 168
12.1 Setting Life Cycle Cost parameters
145
12.2 Specifying Lifecycle cost for a Safety Instrumented Function
147
Chapter 13 SILAlarm™
151
Chapter 14 SILStat™
153
Chapter 15 Disclaimer and Assumptions
155
15.1 Disclaimer
155
15.1 Assumptions PHA
155
15.2 Assumptions SILect
155
15.2.1 IPL and Initiating Event data
15.3 Assumptions SRS
156
156
15.3.1 Assumptions SIF SRS
156
15.3.2 Assumptions SRSC&E
156
15.4 Assumptions SILver
157
15.4.1 Demand Modes
157
15.4.2 Safety Equipment Data for DTT and/or ETT applications
157
15.4.3 Reliability Modeling Assumptions
157
15.4.4 Proof Test Coverage Calculator
158
15.4.5 Safety Equipment data
158
Chapter 16 Terms and Abbreviations
161
Chapter 17 Software License Agreement – exSILentia
165
© exida.com L.L.C.
exSILentia® User Guide
Page 7 of 168
exSILentia® Version 3 Options
exSILentia® Version 3 is available in 4 different options:
Standard
Analysis
Operation
Ultimate
© exida.com L.L.C.
Base functionality for all users requiring functional safety standard
compliance
Additional functionality for the process hazards analysis phases of the safety
lifecycle
Additional functionality for the operation phases of the safety lifecycle
Complete exSILentia safety lifecycle tool functionality
exSILentia® User Guide
Page 9 of 168
Third Party Tool Interfaces
The exSILentia Team is working to provide seamless integrations between exSILentia and other
tools used in the Safety Lifecycle. An example of an interface between the exSILentia tool and a third
party tool is an automatic interpretation of the exSILentia export file to populate a logic solver
programming tool with the Safety Instrumented Functions configurations as specified in the SILver
tool. This drastically reduces the amount of engineering time required and reduces the likelihood of
errors in the interpretation of the SILver output and conversion to the logic solver application
program.
Currently the following third party interfaces are available:
l
l
Import from PHA-Pro®
Import from PHAWorks®
For information on any of the third party interfaces listed, please contact the exSILentia Team
([email protected]).
© exida.com L.L.C.
exSILentia® User Guide
Page 11 of 168
Chapter 1 Installation
The exSILentia installation package consists of
l
l
l
exSILentia CD
exSILentia USB key
exSILentia User Guide
To install exSILentia on your computer place the exSILentia CD in your CD-ROM drive. exSILentia
setup will take you through the installation process.
Note: Do not insert the exSILentia USB key into your computers USB port until you have installed
the exSILentia software.
If setup does not start automatically for any reason, follow these steps:
1. Insert the exSILentia CD into your CD-ROM drive.
2. On the Start menu, click Run
Windows Vista users: type Run in the Start Search box of the Start menu
3. Type d:\setup.exe, where d is the letter assigned to your CD-ROM drive.
4. Click OK.
Setup starts and guides you through the installation of the exSILentia software.
During the installation process you will be asked if you accept the terms of the exSILentia Software
License Agreement. A copy of the agreement is included in this user guide. If you do not agree with
the exSILentia Software License Agreement do not install the software on your system.
© exida.com L.L.C.
exSILentia® User Guide
Page 13 of 168
Clicking “I Agree” will continue the installation. The exSILentia installer will guide you through the
remaining steps. During the installation process you will be able to indicate the location where you
want the exSILentia software to be installed.
Next, the exSILentia installer will ask if you want a menu item to be created in your programs folder.
If you do not want any shortcut to be created check the “Do not create shortcuts” checkbox. If you
want shortcuts to be created you can modify the start menu folder name. Once you have specified
your preferences click “Install”.
© exida.com L.L.C.
exSILentia® User Guide
Page 14 of 168
When the installation is complete, a dialogue box will appear that indicates that the exSILentia Setup
has been completed. Click “Finish” to conclude the installation. Note that by checking the “Show
Release Notes” checkbox you will be able to review the latest exSILentia release notes.
In order to use exSILentia you will have to put the exSILentia USB key into a free USB port and
double click the exSILentia icon or select exSILentia from your Programs menu.
1.1 Minimum System Requirements
To use exSILentia your system should meet the following minimum requirements
© exida.com L.L.C.
exSILentia® User Guide
Page 15 of 168
l
l
l
l
l
l
l
Microsoft® Windows XP (Service Pack 2 or higher), Windows Vista, Windows 7
CPU of 1.5GHz or higher processor
1GB of RAM (2GB recommended)
100 MB of free hard disk space
CD-ROM drive
Free USB port
Minimum screen resolution of 1280 x 800
1.2 Licensing
exSILentia uses the Sentinel Protection software to enforce its licensing. You need to install the
Sentinel Protection Driver to use the exSILentia USB key. If you do not have Sentinel Protection
Driver installed on your machine a message box will appear when you insert the USB key into your
system. To download and install the driver click “Yes”.
In order to use exSILentia you need the exSILentia USB key inserted in a USB port of your system.
The exSILentia program will not work without this USB key; if the USB key cannot be detected an
error message will appear. If this message appears when you do have the USB key inserted in a
USB port, please try using a different USB port. If that doesn’t resolve the issue, please reinstall the
Sentinel Protection Installer from the SupportFiles folder on the CD.
© exida.com L.L.C.
exSILentia® User Guide
Page 16 of 168
The USB key allows you to install the exSILentia software on multiple machines, e.g. a desktop
station in the office and a laptop used while traveling. However the software can only be used on the
system where the USB key is inserted.
Note: exSILentia 1.x and 2.x USB license keys will not work with version 3.x of the
exSILentia software exSILentia 2.5 license keys will still work for version 2.x of the exSILentia
software. Both versions of the software can be installed on the same computer.
Contact the exSILentia team at [email protected] for upgrade options and pricing.
1.3 exSILentia Help Options
This exSILentia user guide is your first line of support when using the Safety Lifecycle tools. The user
guide gives an overview of all options part of exSILentia and using various examples it explains how
to use the tool and the embedded SILect, SIF SRS, and SILver tools.
exida has launched the exSILentia website www.exsilentia.com, where we provide both exSILentia
updates as well as Safety Equipment Reliability Handbook Database updates. There is also a FAQ
section available on the exSILentia website which addresses typical Trouble Shooting and
Frequently Asked Questions, visit www.exsilentia.com and click on the FAQ link.
If none of the above options provide answer to your question(s) you can contact the exSILentia team
via [email protected]. Please note that we cannot answer any detailed safety lifecycle
engineering questions as that would go beyond general tool support.
© exida.com L.L.C.
exSILentia® User Guide
Page 17 of 168
Chapter 2 exSILentia Projects
The structure of the exSILentia tool is very straightforward. All safety lifecycle information is
organized in a project. Multiple project files can be defined. Each project can consist of any number
of Safety Instrumented Functions.
For each Safety Instrumented Function, various safety lifecycle steps can be performed. exSILentia
defines the following phases / steps:
l
l
l
l
l
l
l
PHA: Process Hazard Analysis
SIF Identification
SILect: SIL selection
SRS: Safety Requirements Specification
SILver: SIL verification
Design SRS: Safety Requirements Specification for Detailed Design
Cost: Lifecycle Cost Analysis
Based on the exSILentia tool option license, several or all of the phases will be shown in the upper
right hand corner of the screen and can be selected for evaluating SIFs.
exSILentia projects are stored in the proprietary “.exi” format. This project “.exi” file can be stored on
any file server / hard disk that the tool user has access to via the standard Windows network
neighborhood. To open a specific project select the “Project – Open” menu option.
If you save a new project by selecting the “Project - Save” menu option or if you save an already
saved project by selecting by selecting “Project - Save as” menu option a file dialog as shown below
will appear.
© exida.com L.L.C.
exSILentia® User Guide
Page 19 of 168
Once you save the exSILentia Project file you can exchange this file with other exSILentia users if
you like. The exSILentia “.exi” files are interchangeable between all exSILentia platforms, i.e.
exSILentia Standalone, exSILentia Online, and exSILentia Server provided the platforms are all
using exSILentia 3.x.
2.1 SIF Status and Session Log
Every individual Safety Instrumented Function has a Status associated with it for each Safety
Lifecycle phase. There are currently five (5) different statuses defined:
l
l
l
l
l
Edit
Review
Closed
Rejected
N/A
The status of a SIF can be updated in the Status menu option in the General Information section of
the SIF Information bar on the right hand side of the screen. Whenever a status is changed, this
change will be documented in the Session Log.
When a SIF is in Edit mode a user with “Edit” rights can make changes to any of the selections, text
boxes, etc. within that phase. The user will also be able to change the tool status from Edit mode to
Review mode.
When a tool is in Review mode a user with “Review” rights can view all selections made and text
entered in that tool but will not be able to make any changes to the tool himself. This review user can
however change the tool status to Closed or Rejected . Closed indicates that the reviewer
approves of the analysis that was performed; Rejected means that the reviewer disapproves of the
analysis performed. At this point an user with Edit rights will be able to move the tool back into the
Edit mode where he can make modifications to his original design.
© exida.com L.L.C.
exSILentia® User Guide
Page 20 of 168
A user with “Edit” rights will also be able to change the tool status from Edit to N/A. The N/A, Not
Applicable status for a SIF indicates that this phase of the Safety Lifecycle does not apply. For
example, a potential SIF may have been defined in a PHA analysis. Performing a SIL selection
analysis may show that there is no required risk reduction for this hazard (target SIL for the potential
SIF is 0). For this particular SIF, the SRS and SIL verification phase can be set to N/A.
Whenever a user changes the status for a SIF a dialog box will appear that allows the user to provide
a description with the reason for the status change.
A complete overview of all SIF status changes made in a specific project can be reviewed by
selecting the “Project – View Session Log” menu option. This will launch the Session Log screen.
© exida.com L.L.C.
exSILentia® User Guide
Page 21 of 168
2.2 Action Items
exSILentia allows the user to document action items in every phase of the lifecycle. Action items will
be associated with a specific Safety Instrumented Function and Safety Lifecycle phase.
Action Items can be added to a SIF/ Safety Lifecycle phase by going to the Action Item menu option
in the General Information section of the SIF Information bar on the right hand side of the screen. To
add an Action Item click on the + button. This will bring up the Action Item Dialog Box. If you want to
delete an Action Item, select the appropriate item and click on the - button.
In the Action Item Dialog Box, you can specify the following information:
l
l
l
l
l
Assigned To: Drop-down list where you can select the Team Member responsible for this
action item
Due: Due date for the action item
Priority: Drop-down list that allows you to set the priority for this action item, either Low,
Medium, or High
Status: Drop-down list that allows you to set the status of the action item, either Open,
Closed, or Review
Action Item: Description of the action item
To review all the Action Items for a project select the Project – Action Item Overview menu
option. This will launch the Action Item Overview. Double-clicking on any Action Item will open the
Action Item Dialog Box where you can edit its information. Action Items are color coded by Due
Date. Overdue Action Items will be shown in Red; Action Items due today will be shown in Orange.
© exida.com L.L.C.
exSILentia® User Guide
Page 22 of 168
The list of Action Items can also be exported to Microsoft Excel. To export, click on the Export button
at the bottom of the Action Item Overview screen. This will open the Save As dialog box where you
can specify the name and location for the Excel file.
2.3 References
In order to ensure proper documentation of the safety lifecycle, all reference documents for different
phases can be documented in the exSILentia tool.
In order to specify reference documents for a project select the Project – Reference Overview
menu option. This will launch the Reference Overview.
© exida.com L.L.C.
exSILentia® User Guide
Page 23 of 168
The top row of the overview shows the lifecycle phases as available in the exSILentia tool. For each
phase it can be defined whether or not a document was used as a reference and for which Safety
Instrumented Functions. To select or deselect all Safety Instrumented Functions in a particular
phase, right- click on a reference document. This will show the options Select All SIFs and
Deselect All SIFs.
To delete a reference document, right-click on the name and select Delete.
© exida.com L.L.C.
exSILentia® User Guide
Page 24 of 168
To add a new reference document click on the New Reference button at the bottom left corner of
the dialog box. This will bring up the Configure Reference dialog box. Right-clicking on a reference
document name and selecting Edit will bring up the same dialog box.
For each reference document you can specify:
l
l
Type: type of the reference document
Document ID: unique identifier for the reference document
© exida.com L.L.C.
exSILentia® User Guide
Page 25 of 168
l
l
l
l
Title: title of the reference document
Revision: revision of the reference document
Revision Date: revision date of the reference document
Description: description of the reference document
Types that can be selected are:
l
l
l
l
l
l
l
l
l
l
l
l
l
l
l
l
Cause and Effects Diagram
Electrical Schematic
Equipment Data Sheet
Heat and Material Balance
Instrument Loop Diagram
Local / State Regulation
Management of Change (MOC)
National Regulation
Operational and Maintenance Manual
Piping & Instrumentation Diagram (P&ID)
Permit to Operate
Process Hazard Analysis (PHA) report
Plant Policy
Process Flow Diagram
Standard Operating Procedure
Other
Instead of or in addition to defining reference documents up front, reference documents can also be
added when working on a particular life cycle phase.
2.4 Team Members
In order to document the involvement of various people in the different phases of the Safety
Lifecycle, exSILentia allows you to define team members.
In order to specify team members for a project select the Project – Team Member Overview menu
option. This will launch the Team Member Overview.
© exida.com L.L.C.
exSILentia® User Guide
Page 26 of 168
The top row of the overview shows the lifecycle phases as available in the exSILentia tool. For each
phase it can be defined whether or not a team member was involved and for which Safety
Instrumented Functions. To select or deselect all Safety Instrumented Functions in a particular
phase, right-click on a team member. This will show the options Select All SIFs and Deselect All
SIFs.
To delete a team member, right-click on the name and select Delete.
© exida.com L.L.C.
exSILentia® User Guide
Page 27 of 168
To add a new Team Member click on the New Team Member button at the bottom left corner of the
dialog box. This will bring up the Configure Team Member dialog box. Right-clicking on a team
member name and selecting Edit will bring up the same dialog box.
For each Team Member you can specify:
l
l
l
l
Name: name of the Team Member
E-mail: e-mail address of the team member
Company: company that the team member is associated with
Title: team member's title
© exida.com L.L.C.
exSILentia® User Guide
Page 28 of 168
l
l
Role: role that this team member fulfills for this project
Options: tool user rights settings
Roles that can be selected are:
l
l
l
l
l
l
l
l
l
l
l
l
l
Designer
Leader
Scribe
User
Specialist - Economics
Specialist - Electrical
Specialist - Enviromental
Specialist - Health and Safety
Specialist - Instrumentation and Control
Specialist - Maintenance
Specialist - Mechanical
Specialist - Process
Other
Instead of or in addition to defining team members up front, team members can also be added when
working on a particular life cycle phase.
The exSILentia tool also allows you to specify tool access rights for team members. By definition,
each team member is a tool user. Currently three user options can be set for team members:
l
l
l
Administrator
Edit Project Information
Generate Reports
By checking the Adminstrator check box, administrator rights are granted to that team member.
Administrators are the only tool users/team members who have the ability to create new users and
specify access rights.
© exida.com L.L.C.
exSILentia® User Guide
Page 29 of 168
Furthermore it can be indicated if a user is allowed to modify project level data (Edit Project
Information check box) and if the user is allowed to generate reports ( Generate Reports
checkbox).
To control team member access to the exSILentia tool, passwords can be set by clicking the Set
Password button in the Configure Team Member dialog box. This will bring up the Change
Password dialog box. If no password has been set yet, the Current Password field can be left blank.
The option of adding user rights to team members will be expanded in the near future and additional
options will be available.
Note: It is best practice to save and close the exSILentia project after editing Team Members to
define user rights.
2.5 exSILentia Tool Updates
exSILentia is equipped with an automatic update checker. Each time you launch the exSILentia tool
it will automatically check if a newer version of the tool is available. If a newer version of the tools is
available a dialog box will appear.
You have the option to instantly update the tool by clicking Yes in which case the exSILentia Updater
will download the latest version of the tool and install it on your machine. You can also opt to install
the update at a later point in time by clicking No. exSILentia will remind you of the new update each
time you launch the tool. If, for some reason, you do not want to be reminded of a new version, you
can check the checkbox "Don't tell again about this version".
At any point during your use of the tool you can check if updates are available using the “Help –
Check For Updates” menu option. If no new versions of the tool are available a message box
indicating so will appear.
© exida.com L.L.C.
exSILentia® User Guide
Page 30 of 168
When you click the Yes button on the exSILentia Update Dialog Box, exSILentia will be closed and
the exSILentia Updater will be launched. The exSILentia Updater will download the latest version of
the tool from the exSILentia website and install it on your machine. You will be guided through the
update by the exSILentia Update wizard.
Clicking Next >> will show the release notes for the newly released version of exSILentia. Clicking
“Next >>” again will start the actual download and installation. During this process a progress bar
indicates the progress during the download and installation.
© exida.com L.L.C.
exSILentia® User Guide
Page 31 of 168
Once the updating process is finished an Update Complete message will appear on the exSILentia
Update Dialog Box. Simply click Finish to finalize the process. exSILentia will now automatically be
launched.
2.6 Equipment Reliability Data Updates
There are two aspects to updating the reliability data available within exSILentia. The first aspect
relates to updates to the Safety Equipment Reliability Handbook database. Updates to the Safety
Equipment Reliability Handbook database are released at least once every quarter year. Whenever
a new database is available users are encouraged to download this database to their local machine
and always use the most up to date data.
The second aspect is that on rare occasions information associated with a specific equipment item is
updated; this could vary from model designations to the actual reliability data. exSILentia is equipped
with an equipment update utility that will update all equipment items selected in any of the exSILentia
tools to the latest version.
2.6.1 Updating the Safety Equipment Reliability Handbook Database
exSILentia is equipped with an update checker for the Safety Equipment Reliability
Handbook.When launching exSILentia, the update checker automatically checks for newer versions
of the Handbook. Whenever a new version of the Safety Equipment Reliability Handbook database
is made available, a dialog box will appear.
© exida.com L.L.C.
exSILentia® User Guide
Page 32 of 168
You have the option to instantly update the Safety Equipment Reliability Handbook database by
clicking Yes in which case the exSILentia Updater will download the latest version of the database
and install it on your machine. You can also opt to install the update at a later point in time by clicking
“No”.
exSILentia will remind you of the new update each time you launch the tool except when you check
the "Don't tell again about this version" checkbox. At any point during your use of the tool you can
check if updates are available using the “Help – Check For Updates” menu options. This function will
look for both tool and Safety Equipment Reliability Handbook database updates.
When you click the Yes button on the exSILentia Update Dialog Box, exSILentia will download the
latest version of the Safety Equipment Reliability Handbook database from the exSILentia website
and install it on your machine. A progress bar will indicate the progress of the download.
Updates to the Safety Equipment Reliability Handbook database are part of a subscription service.
With the purchase of a single exSILentia license a 1- year subscription to Safety Equipment
© exida.com L.L.C.
exSILentia® User Guide
Page 33 of 168
Reliability Handbook database updates is included. At the end of that year you can renew the
subscription by purchasing this for a nominal fee through the exida online store.
If your subscription to Safety Equipment Reliability Handbook database updates has expired a
message box with the expiration date and the option to renew the subscription will appear. Clicking
the Yes button will automatically take you to the exida store where you can renew your subscription.
2.6.2 Updating Equipment Items
When a new version of the Safety Equipment Reliability Handbook database is installed on your
machine there is the possibility that the information associated with a specific equipment item is
updated. Within the Safety Equipment Reliability Handbook database a version is associated with
each equipment item allowing the exSILentia tool to know if any data within your projects might be
affected.
By selecting the “Project – Update Project Equipment Data” menu option the versions of all
equipment items part of the specific project will be compared with the versions of those equipment
items in the Safety Equipment Reliability Handbook database. Any equipment item that has a newer
version in the updated Safety Equipment Reliability Handbook database will be listed in the
Equipment Item Updates dialog box.
© exida.com L.L.C.
exSILentia® User Guide
Page 34 of 168
The Equipment Item Update dialog box shows the specific item, the current database version and
the new database version, any notes indicating the reason for change, and the report reference that
the information associated with the equipment item is obtained from.
By default all equipment items are checked to be updated, but you can select and deselect individual
equipment items. By clicking the Update button you will update the equipment item information for
all equipment items that have been checked.
2.7 Getting started
2.7.1 Projects
Double clicking the exSILentia Icon on your desktop or selecting exSILentia from your Programs in
your Start menu will launch the exSILentia tool. This will launch the exSILentia Mainframe.
© exida.com L.L.C.
exSILentia® User Guide
Page 35 of 168
The main screen of exSILentia is divided into three distinct parts:
On the left hand side is the Project Settings side bar. Here all Project Information can be viewed
and updated. As part of the Project Settings you can specify the lifecycle phases that you want to
include / exclude in this project by (de-)selecting phases in the Project Options submenu. You can for
example opt to not perform SIL selection using exSILentia if that lifecycle task has already been
performed outside the scope of the current project. In that case you would uncheck the SILect
checkbox in the Project Options submenu of the Project Information side bar. Also part of the Project
Information side bar is the Reports submenu. Here you can select which report you want to generate
and the options associated with a specific report.
On the right hand side is the SIF Information side bar. The two main submenus in this sidebar are
General Information and SIF Information. The General Information allows you to set the status of a
specific exSILentia phase / lifecycle task. It also allows you to specify, view and link Team Members,
References and Action items to selected Safety Instrumented Functions. The options available in
the Phase Information submenu are specific to the Safety Lifecycle Phase that is selected in the
upper right hand corner of the mainframe.
The main (middle) section of the main frame is used to display the Safety Instrumented Functions
that are defined in the project. exSIlentia provides three different view options for reviewing the
selections and results for the Safety Instrumented Functions:
l
l
l
Icon View: Graphical view of the defined SIFs and their options
Detail View: Tabular view of the SIF details for the selected phase
Single Item View: Detailed view of the SIF details for the selected phase
© exida.com L.L.C.
exSILentia® User Guide
Page 36 of 168
Note: The menu options that are available at the top of the screen depend on the selected lifecycle
phase
2.7.2 Safety Instrumented Functions
To add a Safety Instrumented Function to the current project select “New SIF” from the SIF Menu
option. Selecting “New SIF” will create a new SIF in the main screen and by default this SIF is shown
in the Single view and the SIF Identification phase.
In this view you can specify all SIF specific information like SIF name, SIF Tag, SIF description, and
Unit Name. The Unit Name can be specified directly or by selecting a Unit Name from the dropdown box. The drop-down box is populated by Unit Names specified for the other SIFs in this
project. Furthermore a Hazard (or Hazardous event) description and Consequence description can
be provided.
© exida.com L.L.C.
exSILentia® User Guide
Page 37 of 168
Chapter 3 exSILentia Reports
exSILentia provides you with the option to generate several types of reports. The reports are
available in the English, German, Portuguese, and Spanish languages and are created in the
Microsoft Word Format. exSILentia 3.0 provides the following output reports:
l
l
l
l
l
l
l
l
l
Safety Instrumented Function List
SILver Summary Report
IEC 61511 Compliance Report
Proven in Use Justification Report
SRSC&E Report
Proof Test Report
Lifecycle Cost Report
IEC 61511 Compliance Requirements and Arguments Report
Critical Device List
The report menu is available in the left sidebar of the exSILentia screen.
3.1 SIF List
The Safety Instrumented Function List provides an overview of all Safety Instrumented
Functions that are associated with the current project.
The Safety Instrumented Functions can be ordered by order of entry in exSILentia (chronologically),
alphabetized by SIF Name, or alphabetized by SIF Tag. The report can be generated in English,
Spanish, German, or Portuguese.
For each Safety Instrumented Function the SIF Tag, SIF Name, SIF description, and SIF reference
are displayed. Furthermore the Required SIL(Safety Integrity Level), calculated using in the SIL
selection phase, and the Achieved SIL, calculated using the SILver tool in the SIL verification
© exida.com L.L.C.
exSILentia® User Guide
Page 39 of 168
phase, are provided for each SIF. It is also indicated for each SIF if the Safety Requirements have
been specified.
3.2 SILver Summary Report
The SILver Summary Report provides a one page summary of key SIL verification selections and
results of each SIF.
© exida.com L.L.C.
exSILentia® User Guide
Page 40 of 168
A SILver Summary Report can be created for specific Safety Instrumented Functions, by checking
the appropriate SIF checkboxes, or for all Safety Instrumented Functions in a project. In addition you
can determine the order in which the SIFs are arranged in the SILver Summary Report, the order is
either by order of entry in exSILentia (chronologically), alphabetized by SIF Name, or alphabetized
by SIF Tag. The report can be generated in English, Spanish, German, or Portuguese.
The SILver Summary Report shows the achieved SIL, calculated PFDavg, RRF, and MTTFS
numbers and also shows a graphical representation of the SIF as analyzed.
3.3 IEC 61511 Compliance Report
The IEC 61511 Compliance Report generates all the documentation required for functional safety
standard conformance.
© exida.com L.L.C.
exSILentia® User Guide
Page 41 of 168
An IEC 61511 Compliance Report can be created for specific Safety Instrumented Functions, by
checking the appropriate SIF checkboxes, or for all Safety Instrumented Functions in a project. You
can specify the order in which the Safety Instrumented Functions should be listed in the IEC 61511
Compliance Report. The order is either by order of entry (chronologically), alphabetized by SIF
Name or by SIF Tag. The report can be generated in English, Spanish, German, or Portuguese.
3.4 SRS-C&E
The SRS C&E report lists all General SIS requirements, General SIF requirements, the Process
requirements,and the Design requirements.The report also documents the SIF Functional
Relationship for each Safety Instrumented Function which is expressed via the Cause and Effect
matrix.
© exida.com L.L.C.
exSILentia® User Guide
Page 42 of 168
You have the option to only include the Process SRS information, only the Design SRS information
or both.
The SRS C&E report can be created for specific Safety Instrumented Functions, by checking the
appropriate SIF checkboxes, or for all Safety Instrumented Functions in a project. You can also
specify the order in which the Safety Instrumented Functions should be listed. The order is either by
order of entry (chronologically), alphabetized by SIF Name or by SIF Tag. The report can be
generated in English, Spanish, German, or Portuguese.
© exida.com L.L.C.
exSILentia® User Guide
Page 43 of 168
Note: If multiple SIFs initiate based on a specific sensor group and/or operate the same final
element group this will not be reflected in these individual cause and effect diagrams. A complete
cause and effect diagram taking into consideration all Safety Instrumented Functions will show these
commonalities assuming that the user has correctly identified identical groups and has used the
reuse feature in the SILver tool to identify these identical groups.
3.5 Proof Test Report
Based on the equipment items you selected during your SIL verification work, the Proof Test Report
option will extract the associated suggested proof tests and create a proof test report. Executing the
latter will ensure that the claimed rates of proof test coverage are achieved.
The Proof Test Report is a real time saver. The objective of a proof test is to test for any failures that
are not revealed during normal operation, i.e. any failures that are not detected by automatic
diagnostics. Manufacturers who have performed a detailed study of their equipment item, e.g. by
doing a Failure Modes Effects and Diagnostic Analysis, will know exactly the type of failures that will
not be detected by any automatic diagnostics. These manufacturers publish suggested proof tests
with associated proof test coverage factors.
© exida.com L.L.C.
exSILentia® User Guide
Page 44 of 168
Note: If you have made use of the SILver group reuse capabilities the Proof Test Report is smart
enough to detect this and will subsequently notice in the report that a specific sensor, logic solver, or
final element group has already been tested as part of a previous SIF’s Proof Test.
3.6 Lifecycle Cost Report
A Lifecycle Cost Report can be generated. This report can be accessed through the exSILentia
report wizard. This report shows all project level settings and the subsequent Total Project cost and
the Total SIF cost for each individual SIF.
© exida.com L.L.C.
exSILentia® User Guide
Page 45 of 168
3.7 IEC 61511 Compliance Requirements and Arguments
The exSILentia® tool supports you in building your compliance case for compliance with IEC 61511
by allowing you to document arguments for all requirements of IEC 61511.
The IEC 61511 Compliance Requirements and Argumentsview can be accessed using the
Project -> Modify Compliance Arguments menu option.
© exida.com L.L.C.
exSILentia® User Guide
Page 46 of 168
The IEC 61511 requirements are listed per phase of the safety lifecycle. A reference of the
applicable section of IEC 61511 is provided. Each phase can be collapsed or expanded as
necessary. It is also possible to expand or collapse all phases by using the Show All and Hide All
buttons at the top right of the view.
To assist you in the compliance documentation process, default arguments have been pre-filled
where appropriate. These will need to be reviewed to ensure that they are indeed applicable to and
sufficient for the current project. For any pre- filled arguments that only partially address the
requirement, a [USER TO COMPLETE] tag is listed.
To ensure consistency, the compliance arguments can use the company [COMPANY] and project
name [PROJECTNAME] as specified in the Project Information in the exSILentia tool. The fields
are referenced by using square brackets. When generating the IEC 6111 Compliance
Requirements and Arguments report, the tool will automatically extract the company name and
project name and use it in the report.
The image below shows an example page from the IEC 61511Compliance Requirements and
Arguments report.
© exida.com L.L.C.
exSILentia® User Guide
Page 47 of 168
3.8 Critical Device List
The Critical Device List shows all devices that have been defined as protection layers during the SIL
Selection process and which are counted on for risk reduction. These critical devices should be
included in a plant maintenance database and all personnel involved should be made aware of the
criticality of these protection layers.
© exida.com L.L.C.
exSILentia® User Guide
Page 48 of 168
A Critical Device List can be created for specific Safety Instrumented Functions, by checking the
appropriate SIF checkboxes, or for all Safety Instrumented Functions in a project. You can specify
the order in which the Safety Instrumented Functions should be listed. The order is either by order of
entry (chronologically), alphabetized by SIF Name or by SIF Tag. The report can be generated in
English, Spanish, German, or Portuguese.
For each critical device, the affected safety function(s), and the claimed risk reduction factor(s) is
listed.
© exida.com L.L.C.
exSILentia® User Guide
Page 49 of 168
© exida.com L.L.C.
exSILentia® User Guide
Page 50 of 168
Chapter 4 PHAX™
Note: For guidance on using the PHAX™ tool, please refer to the PHAX™ User Manual.
© exida.com L.L.C.
exSILentia® User Guide
Page 51 of 168
Chapter 5 PHA Import
The PHA Import allows you to import PHA (HAZOP) worksheet information into exSILentia. The
PHA Import enables you to extract relevant hazard and risk reduction information from your PHA
study files for evaluation of the required risk reduction or SIL selection using SILect, for specification
of safety requirements via SIF SRS, and/or the evaluation of conceptual designs or SIL verification
using SILver. It improves accuracy of your data transfer while minimizing the required time to do so.
5.1 Introduction
5.1.1 Support for PHAs and PHA Application Setup
exida offers supporting services for Process Hazard Analysis and assistance to help you setup your
PHA application for easy integration with exSILentia.
exida PHA specialists have many decades of experience in HAZOP and other Functional and
Process Safety reviews. As well as leading and recording these studies, we also offer a
customization service for PHA-Pro® and PHAWorks® to enable you to get the most efficient and
effective use from your PHA applications.
These services include, but are not limited to:
l
l
l
l
Development of company or site record and reporting templates
Assistance to establish tolerable risk criteria
Preparation of corporate engineering and management procedures for PHA studies
Objective, independent evaluation of the risk reduction required (SIL selection) and the
reduction that can be achieved (SIL verification)
If you require any assistance from the exida PHA specialist please contact exida at [email protected]
or directly contact our main offices or any of our service centers. For most up to date contact
information please go to www.exida.com.
5.1.2 HAZOP Principles
The most common form of Process Hazard Analysis (PHA) is the Hazard and Operability (HAZOP)
study. Alternative PHA methods such as ‘WHAT- IF’ and FMEA can be used and these are
addressed later in this document.
The key elements of the PHA worksheet relevant to the Safety Instrumented Function (SIF)
evaluation process are;
l
l
l
l
Node - What is being protected
Deviation - What is it protected against
Cause - What can go wrong
Consequences - How bad can it be
© exida.com L.L.C.
exSILentia® User Guide
Page 53 of 168
Associated with these are the following protective measures;
l
l
Safeguards - What is available to protect against the deviations or hazards
Recommendations - What additional protection is required to protect against the
deviations or hazards
The definition of a Safety Function (per IEC 61511-1, clause 3.2.6.8) is
Function to be implemented by an SIS, other technology safety related system or external
risk, reduction facilities, which is intended to achieve or maintain a safe state for the process,
with respect to a specific hazardous event
The definition of a Safety Instrumented Function (per IEC 61511-1, clause 3.2.71) is
Safety function with a specified safety integrity level which is necessary to achieve functional
safety and which can be either a safety instrumented protection function or a safety
instrumented control function
Therefore a SIF must relate to “…a specific hazardous event” which is obtained from the PHA
worksheet as a Cause+Consequence pairing and the challenge therefore is to extract relevant
hazardous events that either have a SIF as protection or may require additional protection from a
new SIF.
The following figure shows the “conventional” representation of a HAZOP worksheet as provided in
IEC 61511-3, Annex B, Table B.1.
An alternative representation is provided by the long-established (but rarely quoted) IEC-61882-1,
Annex B, Table B.1.
© exida.com L.L.C.
exSILentia® User Guide
Page 54 of 168
This is the more familiar representation that is offered by PHA-Pro and PHAWorks, however these
formats do not specifically identify where Safety Instrumented Functions are claimed as Safeguards
or are proposed as Recommendations. Since PHA (HAZOP) analyses have been performed using
this latter format since the mid 1970’s and have been recorded using PHA applications since the late
80’s or early 90’s, there are therefore a significant amount of existing worksheets that do not clearly
indicate the presence or need for Safety Instrumented Functions. After all IEC 61508 wasn’t
completely published until 2000 and IEC 61511 wasn’t published until 2003.
The proposed methods of interfacing to PHA applications are given in the subsequent sections of
this user guide.
5.2 Working with PHAX
The PHAX tool is tightly integrated with the exida exSILentia tool to allow for an efficient analysis of
all safety lifecycle phases.
PHAX allows for export of any hazards where a potential Safety Instrumented Function is identified
as part of the Process Hazard Analysis.
The criteria for export are as follows:
l
l
Safeguard has been categorized as PSIF: Potential Safety Instrumented Function, or,
Recommendation has been categorized as SIL
To export hazards from PHAX for analysis with exSILentia, go to the Project menu and select
Export , exSILentia . This will create an exSILentia (.exi) file which can contains all relevant
information.
© exida.com L.L.C.
exSILentia® User Guide
Page 55 of 168
When receiving an export file that has been generated with the exida PHAX tool, there is no
additional steps that need to be taken. The .exi file generated by PHAX can be opened with
exSILentia just like you would open any other exSILentia project.
In addition to identifying Safeguards as Potential Safety Instrumented Function and
Recommendations as perform SIL selection, PHAX also allows that Safeguards and
Recommendations are identified as Alarms through the ALM category. PHAX allows for easy
exporting of any identified alarm to the exida SILAlarm™ tool.
Note: For guidance on using the PHAX™ tool, please refer to the PHAX™ User Manual.
5.3 Working with PHA-Pro
This section will provide an overview of the various Dyadem PHA-Pro7 worksheets and how they
need to be setup to ensure an efficient importing of the PHA information into the exSILentia Safety
Lifecycle engineering tool.
5.3.1 Default Worksheets
If you select a default PHA-Pro PHA study (using File | New with a HAZOP Template), then it will
have the following attributes:
l
l
Headers: The following relevant information will appear in the default PHA-Pro worksheet
header (Other (less relevant) information is also provided but is excluded from this section
for simplicity):
l Node
l Deviation
l Drawings
l Equipment ID
Columns: The following relevant columns will appear in the default PHA-Pro worksheet:
l Causes
l Consequences
l Safeguards
l Recommendations
l
l
The following useful (but less relevant) column: Risk Matrix, Severity (S), Likelihood
(L), Risk Ranking (RR), Responsibility, Status
Hierarchy: The default hierarchy for PHA-Pro worksheets is shown in the following figure.
© exida.com L.L.C.
exSILentia® User Guide
Page 56 of 168
This relationship is simplified as:
Consequently Safeguards and Recommendations are not directly related to a unique
Cause+Consequence pair, they are only “children” of the Cause. This presents a challenge when
exporting to a CSV file as not all the Consequence fields are populated as show in the following
example. The original PHA-Pro worksheet may look like as shown underneath.
© exida.com L.L.C.
exSILentia® User Guide
Page 57 of 168
This will produce a CSV export file that looks like:
In the Default Worksheet example, the Safeguards are linked to the Cause so every Safeguard in
excess of the number of Consequences will create a blank field in the Consequence column. If a SIF
should be created from, for example, Safeguard 1.3 or Recommendation 1.4 then these can not be
immediately referenced to a Cause+Consequence pair (hazardous event) since there are no
Consequences identified to ‘partner’ with Cause 1. In simple terms, the PHA-Pro export will result in
blank cells in the;
l
l
Consequence column if there are more Safeguards than Consequences.
Safeguards column if there are more Consequences than Safeguards.
These blank cells are as a result of a non-ideal worksheet hierarchy.
WARNING - Altering the hierarchy within the Settings tab of the PHA-Pro file can rectify this, but
this has a serious impact on any established relationships!
This is better explained with reference to the default worksheet format. This example has 2 Causes,
each of which have 2 Consequences which themselves do not have their own Safeguards since
these are related to the Causes and similarly the Recommendations are related to the Causes and
not to the Consequences. If the hierarchy is changed such that the Safeguards are ‘children’ of the
Consequences, then the worksheet will look like this.
© exida.com L.L.C.
exSILentia® User Guide
Page 58 of 168
The resulting CSV export file will look as shown underneath.
In this modified safeguard hierarchy the number of Safeguards is doubled. These can however be
deleted, but require some work (particularly for larger studies) as well as a close attention to detail to
ensure that required data is not lost. If the hierarchy is further changed so that the
Recommendations are also ‘children’ of the Consequences, then the worksheet will resemble this.
© exida.com L.L.C.
exSILentia® User Guide
Page 59 of 168
The resulting CSV export file will look as follows.
© exida.com L.L.C.
exSILentia® User Guide
Page 60 of 168
In this case the number of Recommendations is as per the original file, however the user is unable to
add any new Recommendations to, for example, Safeguards 1.2, 1.3 or, 1.4 or even to
Consequences 1.2. You are able to add additional Recommendations to Consequence 1.1 or 2.1
since they already have Recommendations. This is a ‘feature’ of PHA-Pro7 and therefore has the
potential to change, invalidating existing PHA worksheets.
Some exida customers have modified the hierarchy (and occasionally the column headings). These
customers must consider this before the import is performed so they are fully briefed on the expected
output from the import activity.
Also remember that the Cause-Consequence-Safeguards relationships in the worksheet are visual
and not real, i.e. just because the cells line-up in the spreadsheet does not mean that the contents
are related. The only way to confirm the relationship between columns in the worksheet is via the
Hierarchy.
5.3.2 Recommended Worksheets
In order to maximize the benefits of seamlessly transferring Hazard and Existing or Proposed SIF
data between PHA-Pro and exSILentia, the following worksheet relationship is recommended.
© exida.com L.L.C.
exSILentia® User Guide
Page 61 of 168
With this relationship, the Safeguards and Recommendations are related to a unique
Cause+Consequence pair which defines the Hazardous event that the existing (Safeguard) or
proposed (Recommendation) Safety Instrumented Function aims to address. Below is an overview
of this recommended worksheet hierarchy.
In this case there are 2 Causes which each has 2 Consequences which each have 2 Safeguards
and 2 Recommendations. The number of Causes, Consequences, Safeguards and
Recommendations will obviously vary according to the PHA study findings and the above example
does not suggest that there may only be 2 of each worksheet element. The CSV export file for this
example will therefore look like this.
The restriction on such a format is that Recommendations cannot be specifically related to
Safeguards if, for example, there should be an action to confirm the existence and reliability of an
existing protection measure. It is expected that this is not a major limitation since the
© exida.com L.L.C.
exSILentia® User Guide
Page 62 of 168
Recommendation can be related to the Consequence and can quote or reference the Safeguard to
be considered. The recommended hierarchy (i.e. optimized for import to exSILentia) is therefore as
shown.
The extract as shown above is accessed by selecting the Settings tab of PHA- Pro7 and then
selecting the Hierarchy window.
For further assistance with customizing PHA- Pro, please contact the exida PHA
specialists .
5.3.3 Advanced Worksheets
The exSILentia PHA Import works on both inferred and identified Safety Instrumented Functions.
Obviously it is more efficient and effective if Safety Instrumented Functions are specifically and
uniquely identified rather than inferred. This can be achieved by modifying the PHA-Pro worksheet
to include additional information. This additional information should reference the following objects:
l
l
l
l
l
Existing SIF
Proposed SIF
SIF Name
Target SIL
Comments
It is recommended that the PHA-Pro columns shown below are utilized to record this information.
exSILentia PHA Import Field
PHA-Pro Reference
Existing SIF
Safeguard – Safeguard Category
Proposed SIF
Recommendations – Recommendation Category
SIF Name
Safeguard – SIF Name (new text field)
Target SIL
Consequences – Target SIL (new text field)
Comments
Recommendations - Comment
The next figure shows an example of a worksheet with these additional columns.
© exida.com L.L.C.
exSILentia® User Guide
Page 63 of 168
Note that the existing and new columns will not be shown by default in the worksheet and must be
enabled by either right clicking on the appropriate visible column (e.g. Recommendations) and then
selecting Show Column and subsequently selecting the appropriate new column to be shown.
Alternatively, the user can right click anywhere within the worksheet, select Sheet Properties and
then Columns and subsequently check the box for the existing or new column(s) to be shown.
In case Safeguard and Recommendation Categories are used, they should be setup within the
Codes & Categories section of the Settings tab such that the user has the correct list of options
(which should include Safety Instrumented Function or equivalent terminology) to choose from and
assign to the Existing and Proposed SIF. If new columns are required, for example SIF Name and
Target SIL, they can be added by right clicking within the Hierarchy item that will be related to the
new column (e.g. Consequences will “hold” the Target SIL) and then add a new item as shown in the
PHA-Pro New Hierarchy Item Form.
In this example the new item will be a Text Field (note that selecting a Number Field for Target SIL
will preclude the entry of alpha characters such as (a), (b) as per IEC 61511-3 D1 or N/A etc. You
© exida.com L.L.C.
exSILentia® User Guide
Page 64 of 168
can move columns within the worksheet view; however it is recommended that the hierarchy be
carefully constructed to ensure relationships are maintained through export.
For further assistance with customizing PHA- Pro, please contact the exida PHA
specialists .
5.3.4 Worksheet Export
To create an export file in PHA-Pro, select File, Print (or Print Active Sheet if viewing the Worksheet)
and then select the ‘Develop HAZOP Worksheet’ option (or whatever your worksheet is called).
The correct export format for PHA-Pro is the Text Output (comma or tab-delimited file) option with
further choices as shown on the following form:
© exida.com L.L.C.
exSILentia® User Guide
Page 65 of 168
In order to have a fully related import file, the Database Data Layout option is chosen with the Print
column headings as first row option selected as shown above. Note that you are also able to
make detailed selections on what to export (as well as how to export).
© exida.com L.L.C.
exSILentia® User Guide
Page 66 of 168
The items options allow you to print (export) all items that are shown on the worksheet or to select
specific items from the visible worksheet items.
This filter options allow you to print (export) items in the worksheet that meet certain criteria, e.g.
Safeguards that are of a certain Safeguard Category (which could be SIF for example). When
performing the export, ensure that what you want (or don’t want) to export has been defined within
© exida.com L.L.C.
exSILentia® User Guide
Page 67 of 168
the Items and Filters options. By clicking on the Export button, the user is prompted for a filename
and location to create the CSV file that will automatically open if MS- Excel is installed on your
workstation. Note that Comma-Delimited and Tab-Delimited options are given in the “Save as type”
drop-down and you must select the Comma-Delimited option.
For further assistance with customizing PHA- Pro, please contact the exida PHA
specialists.
5.4 Working with PHAWorks
The PrimaTech PHAWorks application is another world leading application for PHA studies. This
section will provide an overview of the various PHAWorks worksheets and how they need to be
setup to ensure an efficient importing of the PHA information into the exSILentia Safety Lifecycle
engineering tool.
5.4.1 Default Worksheets
If you select a default PHAWorks PHA study (using Create PHA | Initial PHA with HAZOP
(Traditional Study)), then it will have the following attributes;
l
l
l
Headers : The following relevant information will appear in the default PHAWorks
worksheet header. (Other (less relevant) information is also provided but is excluded from
this section for simplicity)
l Node
l Drawings
l Components (equivalent to Equipment)- you need to configure the banner to show
this; it does not appear in the default worksheet header
Columns: The following relevant columns will appear in the default PHAWorks worksheet
l Deviation
l Causes
l Consequences
l Safeguards
l REF# (Recommendation reference number)
l Recommendations
l The following useful (but less relevant) columns will appear in the default
PHAWorks worksheet: GW (Guideword which becomes the Deviation), Severity
(S), Likelihood (L), Risk (R), By
Hierarchy: The default hierarchy for PHAWorks worksheets is shown below.
© exida.com L.L.C.
exSILentia® User Guide
Page 68 of 168
This relationship is simplified as:
Safeguards and Recommendations are therefore directly related to a unique Cause+Consequence
pair as “children” of the Consequence.
© exida.com L.L.C.
exSILentia® User Guide
Page 69 of 168
5.4.2 Recommended Worksheets
The default format of PHAWorks is considered suitable for immediate import into exSILentia. If you
adapt the hierarchy of the worksheet, then you must ensure that the adaptation follows the
recommended guidance for the following critical columns, which is to use a hierarchy as per the
default PHAWorks format.
For further assistance with customizing PHAWorks, please contact the exida PHA
specialists
5.4.3 Advanced Worksheets
The exSILentia PHA Import works on both inferred and identified Safety Instrumented Functions.
Obviously it is more efficient and effective if Safety Instrumented Functions are specifically and
uniquely identified rather than inferred. This can be achieved by modifying the PHAWorks
worksheet to include additional information. This additional information should reference the
following objects:
l
l
l
l
l
Existing SIF
Proposed SIF
SIF Name
Target SIL
Comments
It is recommended that the PHAWorks columns as shown in the table below are utilized to record
this information.
exSILentia PHA Import Field
PHAWorks Reference
Existing SIF
Safeguard – Safeguard Category
Proposed SIF
Recommendations – Recommendation Category
SIF Name
Safeguard – SIF Name (new Standard field)
© exida.com L.L.C.
exSILentia® User Guide
Page 70 of 168
Target SIL
Consequences – Target SIL (new Standard field)
Comments
Recommendations - Comment
An example of a worksheet with these additional columns is provided in the next figure.
Note that the existing and new columns will not be shown by default in the worksheet and must be
enabled via the Worksheet Views feature as follows. Select Project, then Worksheet Views to get
the PHAWorks Worksheet Views Dialog.
You then check the box within the blue highlighted column at the row for the column to be shown.
Right clicking in any column heading can also access Worksheet Views. When Safeguard and
Recommendation Categories are used, they should be setup within the Quick Entry option when
right clicking in the respective column. You then add new items into the list (which should include SIF
or equivalent terminology) so that they are available for future selection and assignment to the
Existing and Proposed Safety Instrumented Functions. If new columns are required, for example
© exida.com L.L.C.
exSILentia® User Guide
Page 71 of 168
SIF Name and Target SIL, they can be added by clicking within the Hierarchy item that will be
related to the new column (e.g. Consequences will “hold” the Target SIL) and then add a new item
via the “Add Child” button as shown in the PHAWorks Add Child Column Dialog.
New columns, which are added to the hierarchy, are automatically shown within the worksheet. You
can move columns within the worksheet view; however it is recommended that the hierarchy be
carefully constructed to ensure relationships are maintained through export.
Note: For further assistance with customizing PHAWorks, please contact an exida PHA
specialist.
5.4.4 Worksheet Export
To create an export file in PHAWorks, select File, Export and then select the Outline option.
By clicking the OK button, the user is prompted for a filename and location to create the TXT file. It is
not necessary to give the filename a file type extension, as this will be automatically assigned. Note
that this text file will not be automatically opened but can be opened if necessary using Notepad or
© exida.com L.L.C.
exSILentia® User Guide
Page 72 of 168
other text editing applications. There are no Options or Filters available to the user to customize the
export file.
Note: For further assistance with customizing PHAWorks, please contact an exida PHA
specialist.
5.5 Working with Custom CSV Files
Although PHA-Pro and PHAWorks are considered to dominate the PHA tools market, there are
many other applications available that have varying degrees of market share. In addition many exida
customers use Microsoft Office applications such as Word, Excel, or Access. The benefits of these
are that they are well understood and provide a simple recording presentation with the opportunity
for easy customization.
In order for users of proprietary PHA applications or bespoke MS Office worksheets to import their
HAZOP data into exSILentia, these files must be exported or structured into a CSV file format. Once
the CSV file is created, the exSILentia PHA Import can easily interpret this data and prepare it for
import into the exSILentia tool.
In order for a successful import into exSILentia the CSV file will need to show the recommended
hierarchy as shown below, which allows for the identification of each Cause+Consequence pair.
Though the creation of CSV files is almost trivial within MS Excel, you should ensure this hierarchy is
available in that file.
For further assistance and technical support on creating CSV files, please contact the
exida PHA specialists
5.6 Using the exSILentia PHA Import
This section will describe the actual use of the exSILentia PHA Import. The section consists of two
sub-sections, the first sub-section will make you familiar with the tool GUI (Graphical User Interface),
and the second sub-section will describe how the import function is implemented for the different
© exida.com L.L.C.
exSILentia® User Guide
Page 73 of 168
PHA applications. You can launch the PHA Import by selecting the “PHA – Import from PHA Data”
menu option.
5.6.1 exSILentia PHA Import GUI
The exSILentia PHA Import Interface is shown below.
The following list explains the function of each of the Import file settings part of the PHA Import
Interface components.
l
l
l
l
PHA Export File: Input File selection; Select the PHA import file
SIF Tag Prefix: Enter the text string that will prefix all the imported SIF Tags (default is
‘SIF’).
SIF Tag Start: Select the number that the SIF Tags will start from (default is 1).
SIF Tag Digits: Select the number of digits that will form the unique, sequential SIF tag
number (default is 3). The default SIF tag convention will therefore commence at SIF001,
then SIF002, SIF003 etc, which will be mapped to the Tag field in the SIF Information tab.
The PHA Import generates an example SIF Tag based on the text and selections made.
© exida.com L.L.C.
exSILentia® User Guide
Page 74 of 168
l
l
l
l
l
l
Import based on Keywords: Check this box if you wish the tool to search for keywords
within the selected columns (Safeguard and / or Recommendations depending on status of
their respective check box). The text box provides an overview of all keywords you specified
that need to be looked for during the PHA Import.
Search Safeguard: Check this box if you wish the tool to search the Safeguards field for
the text in box Keyword search text box. The text box provides an overview of all keywords
you specified that need to be looked for during the PHA Import. to indicate that an existing
SIF may be present and requires evaluation. If the keywords are found during the search of
the Safeguards column, then the Cause+Consequence pair with their associated, Node
(Unit), Equipment, Deviation, Safeguard, and Recommendation will be imported into
exSILentia within a new SIF.
Search Recommendations: Check this box if you wish the tool to search the
Recommendations field for the text in box Keyword search text boxThe text box provides an
overview of all keywords you specified that need to be looked for during the PHA Import. to
indicate that an existing SIF may be required and requires evaluation. If the keywords are
found during the search of the Recommendations column, then the Cause+Consequence
pair with their associated, Node (Unit), Equipment, Deviation, Safeguard, and
Recommendation will be imported into exSILentia within a new SIF.
Add keyword: Select this button to add a keyword to look for within the selected columns
(Safeguard and / or Recommendations depending on status of their respective check box).
Typical search strings may be “SH” for example PSHH (high high pressure switch) or “SL”
for example FSL (low flow switch) or “SIF”, “SIL”, “ESD” (emergency shutdown) etc.
Edit: Select the text string you wish to modify for the search within the keyword search text
box Keyword search text boxThe text box provides an overview of all keywords you
specified that need to be looked for during the PHA Import. and then select this button to
modify the string.
Remove: Select the text string you wish to remove from the search within the keyword
search text box Keyword search text boxThe text box provides an overview of all keywords
you specified that need to be looked for during the PHA Import. and then select this button to
confirm the removal.
The following list explains the function of each of the PHA import data settings of the PHA Import
Interface. The drop-down boxes are populated based on the header information included in the file
selected as part of the PHA import file settings.
l
l
l
l
l
l
SIF Name: From the drop-down box select which header in the PHA import file
corresponds to the SIF Name variable in exSILentia.
Equipment: From the drop-down box select which header in the PHA import file indicates
the equipment being protected.
Deviation: From the drop-down box select which header in the PHA import file indicates
the deviation being considered.
Unit Name: From the drop-down box select which header in the PHA import file
corresponds to the Unit Name variable in exSILentia.
Cause: From the drop-down box select which header in the PHA import file indicates the
cause being considered.
Consequence: From the drop-down box select which header in the PHA import file
indicates the consequence being considered.
© exida.com L.L.C.
exSILentia® User Guide
Page 75 of 168
l
l
l
l
l
l
Safeguards: From the drop-down box select which header in the PHA import file
represents the identified safeguards.
Recommendations: From the drop-down box select which header in the PHA import file
represents the identified recommendations.
Existing SIF: From the drop-down box select which header in the PHA import file indicates
any existing SIF.
l Search for: Identify the text that identifies any existing SIF
Proposed SIF: From the drop-down box select which header in the PHA import file
indicates any proposed SIF.
l Search for: Identify the text that identifies any proposed SIF
Target SIL: From the drop-down box select which header in the PHA import file indicates
specified target Safety Integrity Levels.
l Import all where Target SIL > 0: Check this checkbox to only import SIFs where the
Target SIL is greater than 0. This only applies if a PHA import file header was
identified for the Target SIL option.
Comments: From the drop-down box select which header in the PHA import file represents
comments made during the PHA.
Once all PHA import data settings are completed click on OK to execute the import. Cancel will
close the PHA Import window without importing any information. The PHA import will yield a list of
Safety Instrumented Functions identified during the PHA. The imported data will either be linked to
exSILentia SIF information tab fields or to fields documented on the PHA tab for each SIF.
Note that by default the imported data is read-only to ensure consistency between data in the PHA
file and the exSILentia project file. Users have the option to enable to edit mode for the PHA tool at
which point they can overwrite the imported data.
© exida.com L.L.C.
exSILentia® User Guide
Page 76 of 168
5.6.2 Data Import
The method of how PHA data is imported into exSILentia is defined in this section for each of the
PHA applications. The first two subsections will cover the PHA-Pro and PHAWorks applications.
The third subsection covers the import of CSV files. The fourth subsection contains a statement on
multiple initiating events leading to the same hazard and how these could be handled. Finally the fifth
subsection covers how WHAT-IF studies can be handled by the PHA Import.
The import from PHA-Pro files is implemented as follows:
Inferred SIF: Safety Instrumented Functions are inferred according to the following rules:
l
l
Safeguard includes any of the keyword text, or;
Recommendation includes any of the keyword text, or;
Identified SIF : Rules for identified Safety Instrumented Functions will be implemented in a
subsequent version of the exSILentia PHA Import.
SIF Data: The data listed and mapped in per the selections made as part of the exSILentia PHA
Import Data Settings are imported for each SIF that has been either inferred or identified.
© exida.com L.L.C.
exSILentia® User Guide
Page 77 of 168
If the fields within the export CSV file are blank (empty) then the equivalent exSILentia fields are also
empty. SIFs are automatically given a Tag according to the rules defined by the user for, Prefix,
Start, and Digits as described for the exSILentia PHA Import Settings.
The SIF will automatically be given a Name based on the Equipment ID + Deviation. This will be the
default option to indicate what is being protected and what it is being protected against.
Within exSILentia, you are able to modify all imported fields, although it is recommended that you
limit modifications to maintain data integrity with the PHA. The PHA-Pro references given are based
on the default naming given to each worksheet column (or heading in the case of Node, Deviation,
Drawings, and Equipment ID).
Incomplete Exports: If the PHA-Pro worksheet is based on the default worksheet hierarchy where
Safeguards and Recommendations are children of the Cause and not distinct to the Consequence,
then the information imported into exSILentia will be incomplete.
The following caveats must be made regarding import of existing PHA-Pro worksheets.
l
l
If the default hierarchy is used, then the Cause+Consequence pairings will be incomplete as
in some cases only the Cause will be imported and the Consequence will be blank.
Modification of existing worksheet hierarchies is likely to offset recommendations and
therefore the study record is corrupted.
For future PHA studies that utilize PHA- Pro the PHA- Pro worksheets should be suitably
constructed so that a unique relationship exists between Safeguards (and Recommendations) and
Consequences. Appropriate care must be taking when creating PHA-Pro export files to ensure that
Filters and Items have been set correctly as this may reduce the number of worksheet elements
(rows) that are included in the CSV file.
Reference Numbering: PHA-Pro automatically numbers worksheet information unless the user
disables this feature. The number is integral to the contents of each field and forms part of the export
text. In a subsequent version of the exSILentia PHA Import it will have the facility to retain this
number as part of the import or to remove this number using a prefix trimming. Removal of PHA
numbering will be universal i.e. it will apply to all imported data and can not be configured for specific
fields.
The import from PHAWorks files is implemented as described in this subsection.
Inferred SIF: Safety Instrumented Functions are inferred according to the following rules;
l
l
Safeguard includes any of the keyword text, or;
Recommendation includes any of the keyword text, or;
Identified SIF : Rules for identified Safety Instrumented Functions will be implemented in a
subsequent version of the exSILentia PHA Import.
SIF Data: The data listed and mapped in per the selections made as part of the exSILentia PHA
Import Data Settings are imported for each SIF that has been either inferred or identified.
© exida.com L.L.C.
exSILentia® User Guide
Page 78 of 168
If the fields within the export XML file are blank (empty or null) then the equivalent exSILentia fields
shall also be empty. SIFs are automatically given a Tag according to the rules defined by the user
for, Prefix, Start, and Digits as described for the exSILentia PHA Import Settings.
The SIF will automatically be given a Name based on the Equipment + Deviation a concatenation of
the [Component] + [Deviation]. This will be the default option to indicate what is being protected and
what it is being protected against.
Within exSILentia, you are able to modify all imported fields, although it is recommended that you
limit modifications to maintain data integrity with the PHA. The PHAWorks references given are
based on the default naming given to each worksheet column (or heading in the case of Node,
Drawings & Component).
Incomplete Exports: If the PHAWorks worksheet is based on the default worksheet hierarchy
where Safeguards and Recommendations are children of the Consequence, then the information
imported into exSILentia will have the correct structure and no data errors or omissions are
anticipated. For future PHA studies that utilize PHAWorks the PHAWorks worksheets should be
suitably reviewed to confirm that a unique relationship exists between Safeguards (and
Recommendations) and Consequences.
Reference Numbering: PHAWorks does not automatically number worksheet information unless
the user enables this feature. The number is integral to the contents of each field and forms part of
the export text. In a subsequent version of the exSILentia PHA Import the tool will have the facility to
retain this number as part of the import or to remove this number using a prefix trimming. Removal of
PHA numbering will be universal i.e. it will apply to all imported data and can not be configured for
specific fields.
The import from CSV files is currently implemented identically to the PHA-Pro files import.
Inferred SIF: Safety Instrumented Functions are inferred according to the following rules;
l
l
Safeguard includes any of the keyword text, or;
Recommendation includes any of the keyword text, or;
Identified SIF : Rules for identified Safety Instrumented Functions will be implemented in a
subsequent version of the exSILentia PHA Import.
SIF Data: The data listed and mapped in per the selections made as part of the exSILentia PHA
Import Data Settings, are imported for each SIF that has been either inferred or identified.
If the fields within the CSV file are blank (empty) then the equivalent exSILentia fields are also
empty. SIFs are automatically given a Tag according to the rules defined by the user for, Prefix,
Start, and Digits as described for the exSILentia PHA Import Settings.
The SIF will automatically be given a Name based on the Equipment ID + Deviation. This will be the
default option to indicate what is being protected and what it is being protected against.
© exida.com L.L.C.
exSILentia® User Guide
Page 79 of 168
Within exSILentia, you are able to modify all imported fields, although it is recommended that you
limit modifications to maintain data integrity with the PHA. The CSV file references given are based
on the exida suggested naming for the columns in the CSV file.
Incomplete Exports : If the CSV file utilizes a worksheet hierarchy where Safeguards and
Recommendations are children of the Consequence, then the information imported into exSILentia
will have the correct structure and no data errors or omissions are anticipated. For future PHA
studies that utilize CSV files, worksheets should be suitably reviewed to confirm that a unique
relationship exists between Safeguards (and Recommendations) and Consequences.
Reference Numbering : The PHA application or bespoke MS-Office documents may include
reference numbering to aid the tracking of HAZOP items. In a subsequent version of the exSILentia
PHA Import the tool will have the facility to retain this number as part of the import or to remove this
number using a prefix trimming. Removal of PHA numbering will be universal i.e. it will apply to all
imported data and cannot be configured for specific fields.
Note: Multiple Scenarios The exSILentia PHA Import will extract existing or proposed SIF
according to the selections and rules the user enters within the exSILentia PHA Import Data
Settings. It is expected that there will be cases where the import generates multiple Safety
Instrumented Functions, which all relate to the same cause (initiating event) or the same
consequence may be generated by multiple causes.In these scenarios you must consider when
evaluating the Safety Instrumented Function and associated Target Safety Integrity Level if scenario
frequency shall be based on the sum of the frequencies or the maximum of the frequencies.This is
not an issue that the exSILentia PHA Import can be expected to address and is merely noted as a
caveat to users to ensure they adopt the appropriate company or site guidelines for evaluating the
necessary risk reduction.
The two PHA applications, PHA-Pro and PHAWorks, both have the capability to generate PHA
worksheets based on the “WHAT-IF” methodology instead of the HAZOP methodology. The main
difference between WHAT-IF and HAZOP is that there are no Deviations within WHAT-IF; basically
the questions are the deviations that stimulate discussion on probable Causes and possible
Consequences. In some cases the Cause and Deviation are combined within the text of the WHATIF question and in other cases the Hazard may appear as a separate column alongside the
Consequences (as in the PHAWorks version 5 example or default WHAT-IF file).
Since the objective of the PHA import is to identify existing or potential SIF related to a specific
hazardous event, you may need to customize how that hazardous event is described. For HAZOP,
the hazardous event is the Cause+Consequence pair and for WHAT-IF this may be a WHATIF+Consequence pair or a WHAT- IF+Hazard pair or a similar as with the HAZOP a
Cause+Consequence pair.
Because the worksheet representation of the hazardous event (by column names or headings) may
vary between methodologies, companies, sites or projects; the use of user- selected columns
addresses this requirement to import WHAT-IF study data.
© exida.com L.L.C.
exSILentia® User Guide
Page 80 of 168
Chapter 6 SIF Identification
The SIF Identification phase in exSILentia will help you define all the potential Safety Instrumented
Functions for a project. Safety Instrumented Functions can be defined manually or can be imported,
either from another exSILentia project or from a Process Hazard Analysis (PHA) if you have the
exSILentia Analysis or Ultimate option.
The SIF Identification screen is shown below.
The following information can be specified to identify a SIF:
l
l
l
l
l
l
Name: Name of the SIF
Tag: Unique tag of the SIF
Unit Name: Name of the unit where the SIF is (to be) implemented.
Description: a description of the intended function of the SIF
Hazard Description: description of the hazard that the SIF is protecting against
Consequence Description: description of he consequence of the hazard that the SIF is
protecting against
When the SILect phase in exSILentia is disabled, the SIF Identification screen will also allow the
user to specify information that was obtained from a SIL selection. The following additional fields are
available:
l
l
l
Target SIL: Required Target Safety Integrity Level of the SIF
Required RRF: Required Risk Reduction Factor that the SIF needs to provide
Demand Mode: Demand Mode (Low, High, or Continuous) in which the SIF will be
operating
© exida.com L.L.C.
exSILentia® User Guide
Page 81 of 168
By selecting the menu option “Project – Save” the information will be saved to the project “.exi” file.
© exida.com L.L.C.
exSILentia® User Guide
Page 82 of 168
Chapter 7 SILect – SIL Selection
The use of the exSILentia SILect (SIL Selection) phase will be described in this chapter. This
chapter will provide an overview of the SILect tasks and options. It will explain how you can select
between three different SIL selection techniques, i.e. Risk Graph, Hazard Matrix, and Frequency
Based Targets. Based on the SIL selection technique applied, this chapter will explain how you can
perform Safety Integrity Level selections for Safety Instrumented Functions. The first part of the
selection process is to calibrate the tolerable risk to be considered during the SIL selection that fits
your plant / company. The second part of the selection process is to specify the severity and
likelihood of the hazard that the Safety Instrumented Function is protecting against. The tolerable
risk specification and severity and likelihood selections will be described per SIL selection technique.
7.1 Tolerable Risk
In Safety Integrity Level selection there are two key aspects, i.e. inherent risk of the process versus
the tolerable risk:
l
l
The Process inherent risk or unmitigated risk is determined by the Severity
(Consequence) and Frequency (Likelihood) of the Hazard that the Safety Instrumented
Function will be protecting against.
The safety integrity that the SIF should provide is determined by dividing the unmitigated risk
by the tolerable risk which yields the required risk reduction. The required risk reduction
directly relates to a PFDavg value which in its turn relates to a required or target SIL level for
the Safety Instrumented Function.
You will only be able to determine the required risk reduction given a certain level of process risk
after you have specified the tolerable level of risk. If you try to calculate a Target SIL level before you
have specified the tolerable risk, exSILentia will give you a warning that no tolerable risk calibrations
have yet been specified.
For each of the SIL selection methods in exSILentia the first step will be define the tolerable risk
criteria. Once a tolerable risk calibration is defined it can be saved in a separate etr (exSILentia
Tolerable Risk) file through the SILect - Save Tolerable Risk menu. An existing etr file can be used to
load the tolerable risk criteria in an exSILentia project.
© exida.com L.L.C.
exSILentia® User Guide
Page 83 of 168
To specify a tolerable risk calibration you will need to click on the Add button in the Phase
Information sidebar.
Note: New in exSILentia 3.0 is the ability the have multiple tolerable risk calibrations per project.This
means that instead of the torable risk information being valid for an entire project like in version 2.5
and earlier, you will need to assign tolerable risk criteria (tolerable risk calibration) to one or more
safety instrumented functions.
When adding a tolerable risk calibration, the tolerable risk calibration wizard will pop-up to guide you.
The Tolerable Risk Calibration Wizard allows you to choose from three different SIL selection
methods, where the third method is further divided into three sub methods:
1. Risk Graph
l VDI/VDE 2180 Risk Graph
2. Hazard Matrix
3. Frequency Based Targets / LOPA
l Health and Safety Executive - HSE UK
l IEC 61511 part 3, Annex C
l Single tolerable risk qualitative
l Single tolerable risk quantitative
l Tolerable risk categories qualitative
l Tolerable risk categories quantitative
When defining a calibration, please specify a unique name in the Name field at the top of the screen.
This will allow you to uniquely identify each set of tolerable risk criteria that you define.
© exida.com L.L.C.
exSILentia® User Guide
Page 84 of 168
After closing the wizard, any tolerable risk calibration that have been defined will show up in the
Phase Information box in the sidebar.
Note: Special attention has to be given to changing an existing tolerable risk calibration.This will
warrant a review of all SIL selections that have been associated with that tolerable risk calibration.
exSILentia will automatically close all SIF windows to ensure that the updated tolerable risk settings
are applied to all affected Safety Instrumented Functions.
For a specific end-user organization the tolerable risk calibration will most likely be identical for all
projects. exSILentia allows you to save and load your tolerable risk data. Once you have specified
your tolerable risk criteria simply select the “SILect – Save Tolerable Risk Data” menu option. This
will launch a Save As dialog box and save all tolerable risk calibrations in a “.etr” (exSILentia
Tolerable Risk) file.
If you have a new project where you want to use the previously saved tolerable risk calibrations,
select the “SILect – Load Tolerable Risk Data” menu option. Your new project will now be populated
with all tolerable risk calibrations from the .etr file.
7.2 Risk Graph
7.2.1 Risk Graph Calibration
Selecting the Risk Graph option in the Tolerable Risk Calibration Wizard dialog box allows the
user to calibrate the Risk Graph to consider in the SIL selection.
© exida.com L.L.C.
exSILentia® User Guide
Page 85 of 168
The Risk Graph SIL selection method is category based. For personnel safety, four categories are
considered, i.e. likelihood (demand rate), consequence, probability of occupancy, and probability of
avoiding the hazard to perform a SIL selection. This method is based on IEC 61511-3 Ed. 1.0 (200303) Annex D and E. Using the selected parameter for each category, the analyst or team follows a
decision path that leads to the box that contains a SIL assignment.
In addition to a Risk Graph for personnel safety, the user can also calibrate a Risk Graph for
environmental loss, asset loss and user defined / custom category. These are selected by using the
drop-down box at the top of the screen.
The Risk Graph that is part of SILect phase in exSILentia uses the following well know parameters:
l
l
l
l
C (Consequence)
F (Occupancy / Presence in Danger Zone)
P (Probability of avoiding hazardous event if the protection system fails to operate)
W (Demand Rate).
In addition, exSILentia uses the following additional parameters:
l
l
l
E (Environmental Loss)
A (Asset Loss)
U (User Defined / Custom Loss)
Through the use of drop-down boxes you can change the target Safety Integrity Level that is
associated with a certain combination of parameters, e.g. you can change CA – W1 to Target SIL 1 if
desired.
© exida.com L.L.C.
exSILentia® User Guide
Page 86 of 168
The Load Defaults button at the bottom of the screen allows you to reload the default Risk Graph
calibration at any point.
It is also possible to enable or disable certain "selection paths" in the Risk Graph. Move your mouse
over the path that you want to enable / disable and you will see the line turn Red (to disable) or
Green (to enable). This allows you to customize the Risk Graph.
Clicking on the Options button at the top of the screen will cause the Risk Graph Options screen to
appear. This screen allows you to further define your Risk Graph tolerable risk criteria.
© exida.com L.L.C.
exSILentia® User Guide
Page 87 of 168
You are able to specify which risk receptor category, i.e. Personnel Safety, Environmental Loss,
Asset Loss, and/or Custom Loss should be considered during the SIL selection by simply checking
or un- checking the appropriate checkbox(es). In addition you are able to completely modify the
default Risk Graph. You can specify the meaning of each of the Parameters, e.g. change CA =
Minor Injury to CA = One Death. Selecting “OK” will close this screen and return you to the Tolerable
Risk Calibration screen.
Once you complete the Risk Graph calibration you will be able to open any SIF that you defined for
this project and perform the Risk Graph SIL selection using SILect.
7.2.2 VDI/VDE 2180 Risk Graph
The VDI/VDE 2180Risk Graphbutton at the bottom of the Tolerable Risk Calibration screen will
load the Risk Graph calibration per the German guideline VDI/VDE 2180 "Safeguarding industrial
process plants by means of process control engineering".
© exida.com L.L.C.
exSILentia® User Guide
Page 88 of 168
The VDI/VDE 2180 Risk Graph uses the following parameters:
l
l
l
l
S (Consequence)
A (Presence in Danger Zone)
G (Probability to avert Hazard)
W (Demand Rate)
This standard does not address Environmental, Asset, or any custom risk receptor. Therefore only
the Personnel Safety risk receptor is available. The personnel risk criteria can be customized
similarly to the regular risk graph.
Selecting “OK” will return you to the exSILentia Main screen. Now you will be able to open any SIF
that you defined for this project and perform the VDI/VDE 2180 Risk Graph SIL selection using
SILect.
When you perform SIL selection using the VDI/VDE 2180 Risk Graph you will still be able to specify
Independent Protection Layers even though this concept is not defined in the VDI/VDE 2180
guideline.
© exida.com L.L.C.
exSILentia® User Guide
Page 89 of 168
7.2.3 SIL Selection Using Risk Graph
If you selected Risk Graph as the SIL selection method, the SILect phase will look similar to the one
shown below. You can easily make your category selections to derive your Target SIL. For each
category selection a Comments field is available to document any assumptions or other relevant
information.
In addition, a general Comments field is available to document any specific SIL Selection remarks
for the Safety Instrumented Function.
When you perform SIL selection using the Risk Graph you are able to specify Independent
Protection Layers to account for non-SIF protection.
By selecting the menu option “Project – Save” the information will be saved to the project “.exi” file.
7.3 Hazard Matrix
7.3.1 Hazard Matrix Calibration
Selecting the Hazard Matrix option in the Tolerable Risk Calibration Wizard dialog box , allows
the user to calibrate the Hazard Matrix to consider in the SIL selection..
The Hazard Matrix SIL selection method is category based. For personnel safety, environmental
safety, and property damage two categories are considered, i.e. likelihood (demand rate) and
consequence to perform a SIL selection. This method is based on IEC 61511-3 Ed. 1.0 (2003-03)
© exida.com L.L.C.
exSILentia® User Guide
Page 90 of 168
Annex D and E. Using the selected parameter for each category will lead to the matrix intersection /
cell that contains a SIL assignment.
Note: The probability of occupancy and the probability of avoiding the hazard, two additional
categories in the Risk Graph, can be included in the likelihood and consequence analysis for the
Hazard Matrix.
In addition to a Hazard Matrix for personnel safety, the user can also calibrate the Hazard Matrix to
include environmental loss and financial / property damage.
The Hazard Matrix is set up to be a 7-by-7 matrix. With this format you will be able to implement any
m-by-n hazard matrix as long as both m and n are less than or equal to 7.
Note: The 7-by-7 matrix is an extension of the previously available 5-by-5 matrix. Projects with
calibrations defined in the 5-by-5 matrix format are automatically upgraded and will show empty D6,
D7, C6, and C7 parameters.
The Hazard Matrix tolerable risk calibration page allows you to specify which risk receptor category,
i.e. Personnel Safety, Environment, Assets, and “User Defined / Custom”, you want to consider
during the SIL selection. You can simply check or un-check the appropriate checkbox(es).
© exida.com L.L.C.
exSILentia® User Guide
Page 91 of 168
The Hazard Matrix can be completely modified to meet the user's needs. You can specify the
meaning of each of the parameters, e.g. change C1 = Slight Injury to C1 = Major Injury, by directly
typing in the Consequence Category or Demand Frequencies text boxes. Furthermore through the
use of drop-down boxes you can change the target Safety Integrity Level that is associated with a
certain combination of parameters, e.g. you can change C1 – D1 to Target SIL 1 if desired.
If you would like to use a different size matrix, for example a 5-by-5 matrix, the C6, C7, D6, and D7
selections become superfluous. By clicking on the C6 block the matrix will be resized to a 7-by-5
matrix, subsequently clicking on the D6 header will make the matrix a 5-by-5 matrix.
The Load Defaults button at the bottom of the screen allows you to reload the default Risk Graph
calibration at any point.
Selecting “OK” will save your calibration and return you to the exSILentia Main screen. Now you can
open any SIF that you defined for this project and perform the Hazard Matrix SIL selection using
SILect.
7.3.2 SIL Selection using Hazard Matrix
If you selected Hazard Matrix as the SIL selection method, the SILect phase will look similar to the
one shown below.You can easily make your category selections using the drop- down boxes to
derive your Target SIL. For each category selection a Comments field is available to document any
assumptions or other relevant information.
In addition, a general Comments field is available to document any specific SIL Selection remarks
for the Safety Instrumented Function.
© exida.com L.L.C.
exSILentia® User Guide
Page 92 of 168
When you perform SIL selection using the Hazard Matrix you are able to specify Independent
Protection Layers, See "Independent Protection Layers" on page 99 , to account for non- SIF
protection.
By selecting the menu option “Project – Save” the information will be saved to the project “.exi” file.
7.4 Frequency Based Targets / LOPA
The Layer of Protection Analysis (LOPA) SIL selection method is a quantitative method that
considers the initiating event frequency and probability of failures of the various layers of protection.
This method is based on IEC 61511-3 Ed. 1.0 (2003- 03) Annex F. Using the initiating event
frequency and probability of failures of the various layers of protection, the unmitigated event
frequency is calculated. Based on the consequence of the hazard a tolerable frequency is
determined. From tolerable frequency and unmitigated event frequency the required risk reduction
and required Target SIL are determined.
Six types of Frequency Based Targets / LOPA tolerable risk calibrations can be defined:
l
l
l
l
l
l
Health and Safety Executive - HSE UK
IEC 61511 part 3, Annex C
Single tolerable risk qualitative
Single tolerable risk quantitative
Tolerable risk categories qualitative
Tolerable risk categories quantitative
The first four methods specify a single, quantitative tolerable risk level. These four tolerable risk
specifications therefore represent a so- called risk neutral approach: there is a linear relation
between the severity of the hazard and the tolerable frequency.
For the Health and Safety Executive - HSE UK and the IEC 61511 part 3, Annex C tolerable
risk calibrations, the tolerable frequency of a fatality (tolerable risk level for personnel safety) is
automatically specified based on reference documents from HSE and IEC respectively. In the
Single tolerable risk, qualitative and Single tolerable risk, quantitative tolerable risk
calibrations the user can specify the tolerable risk level for personnel safety.
For each of these three specifications you can specify if you want to include environmental, asset
loss and User Defined / Custom aspects in the SIL selections and what the tolerable losses per year
are for these categories.
The last two available tolerable risk calibrations are category based, either qualitative or quantitative.
These methods allow you to specify non-linear risk criteria (not risk neutral), i.e. the relation between
the severity of the hazard and the tolerable frequency is not linear. For example, one could define the
risk tolerance for an event that has double the consequences to be 10 times less. A tolerable
frequency is defined for five (5) different categories, Minor, Serious, Severe, Extensive, and
Catastrophic.
© exida.com L.L.C.
exSILentia® User Guide
Page 93 of 168
7.4.1 Single tolerable risk qualitative
Shown below is the screen where the Single tolerable risk - qualitative can be defined. First the
Tolerable Frequency (1/year) is specified. For each risk receptor, Personnel, Environment, Asset
Loss, and Custom, 7 severity level classifications can be defined, e.g. P0 through P6. Each
classification is then assigned a weight. The specified tolerable frequency is divided by the weight to
determine the tolerable frequency per classification.
For the Personnel risk receptor the unit is implied in the descriptions of the classifications. For the
Environment, Asset Loss and Custom risk receptors, the units can be specified at the top of each
category. The environmental, assets, and custom categories can be included / excluded by checking
or unchecking the appropriate checkbox.
The Load Defaults button at the bottom of the screen allows you to reload the default calibration at
any point.
7.4.2 Single tolerable risk quantitative
Shown below is the screen where the Single tolerable risk - quantitative can be defined. The
screen for the Health and Safety Executive - HSE UK and the IEC 61511 part 3, Annex C
© exida.com L.L.C.
exSILentia® User Guide
Page 94 of 168
tolerable risk calibrations looks similar except that the Personnel category is predefined.
The tolerable risk for Personnel is defined in fatalities per year(s). The other risk receptor units are
typically defined in monetary impact, e.g. $, per year(s). The environmental, assets, and custom
categories can be included / excluded by checking or unchecking the appropriate checkbox.
The Load Defaults button at the bottom of the screen allows you to reload the default calibration at
any point.
7.4.3 Tolerable risk categories qualitative
Shown below is the screen where the Tolerable risk categories qualitative can be defined. A
tolerable frequency is defined for five (5) different consequence categories, Minor, Serious, Severe,
Extensive, and Catastrophic.
For each risk receptor, Personnel, Environment, Asset Loss, and Custom, 7 severity level
classifications can be defined, e.g. P0 through P6. Through the use of drop-down boxes you can
change the severity level classication that is associated with a risk receptor - consequence category
combination.
© exida.com L.L.C.
exSILentia® User Guide
Page 95 of 168
The Load Defaults button at the bottom of the screen allows you to reload the default calibration at
any point.
7.4.4 Tolerable risk categories quantitative
Shown below is the screen where the Tolerable risk categories quantitative can be defined. A
tolerable frequency is defined for five (5) different consequence categories, Minor, Serious, Severe,
Extensive, and Catastrophic.
The tolerable risk for Personnel is defined in fatalities and injuries per year(s). The other risk receptor
units are typically defined in monetary impact, e.g. $, per year(s). The user can set the severity level
that is associated with a risk receptor - consequence category combination.
The environmental, assets, and custom categories can be included / excluded by checking or
unchecking the appropriate checkbox.
The Load Defaults button at the bottom of the screen allows you to reload the default calibration at
any point.
© exida.com L.L.C.
exSILentia® User Guide
Page 96 of 168
7.4.5 Target SIL Threshold Ratio
For each of the Frequency Based Targets tolerable risk calibrations you are also able to specify the
Target SIL Threshold Ratio. This parameter determines how the Required Risk Reduction (as
determined by the SIL selection process) is related to the Target SIL. By default this Ratio is set to 1,
meaning that a Required Risk Reduction between 10 and 100 will results in a Target SIL of SIL 2.
With a SIL Threshold Ratio of, for example 3, a SIL 2 target is related to a Required Risk Reduction
of 30 and 300. The SIL determination threshold (the boundary between one SIL level and the next
one up) is calculated by multiplying the relevant lower limit of the Risk Reduction range times the SIL
Threshold Ratio.
Note: Though the SIL Threshold Ratio parameter is not specified by any of the functional safety
standards, it is implemented in the SILect phase per request of several customers. If you have no
company policy requiring the need for a SIL Threshold, exida suggest leaving it at the default
number of 1.
7.4.6 SIL Selection using Frequency Based Targets / LOPA
If you selected Frequency Based Targets as the SIL selection method, the SILect phase will look
similar to the one shown below.
© exida.com L.L.C.
exSILentia® User Guide
Page 97 of 168
First the user will be able to specify Severity Levels and/or consequences for the Hazard that the
Safety Instrumented Function is protecting against. Based on the risk receptors that are included in
the tolerable risk selections you will be able to specify severity levels for personnel, environment
assets, and custom. You will need to specify the severity levels and/or consequences either using
drop-down boxes with descriptive text, through text fields, or using a combination of drop-down
boxes and text fields..
The next step is to specify Initiating Events . SILect allows for specification of more than one
Initiating Event per Hazard. You can specify a description for the initiating event and its frequency
(1/yr). Each Initiating Event can have a single Enabling Condition for which you can specify a
description and assign a probability to the condition. An entry for Enabling Condition is not required;
however the default probability of 1 will always be displayed if no Enabling Condition exists.
An example of an enabling condition is the usage factor of a batch process. Sometimes the usage
factor is accounted for as an IPL. Note that the enabling condition applies to all risk receptors. If a
usage factor is to be used to account for 8 hour workdays per 24 hours this should be implemented
as an IPL since this usage factor has no effect on the environmental and equipment damage risk
receptors.
© exida.com L.L.C.
exSILentia® User Guide
Page 98 of 168
If you want to delete an Initiating Event, select the Initiating Event and click “Delete”. Note that once
deleted the Initiating Event can not be recovered.
Per initiating event it is also possible to specify Independent Protection Layers to account for nonSIF protection. By clicking the “+” button in the Independent Layers ofProtection area in the
SILect phase, an IPL is automatically added to this Initiating Event.
Comments and assumptions can be documented in the Comments field.
Once the severity level selections are made and while the details of the Initiating Event and
associated Independent Protection Layers are entered, the calculated results, and consequently
Target SIL, will be updated on the lower portion of the SILect screen.
By selecting the menu option “Project – Save” the information will be saved to the project “.exi” file.
7.5 Independent Protection Layers
By clicking the “Add” button in the Independent Layers ofProtection area in the SILect phase, an
Independent Protection Layer (IPL) is automatically added to this SIL selection.
Note: an Independent Layer of Protection can only be considered when the following requirements
for that IPL are met. An IPL needs to be:
l
l
l
l
Specific
Independent
Auditable
Dependable
IPLs are added using the Independent Layers ofProtection Configuration dialog box.
© exida.com L.L.C.
exSILentia® User Guide
Page 99 of 168
On the Independent Layers of Protection Configuration dialog box you can specify the
effectiveness of an IPL per risk receptor category. For example a pressure relief valve may be very
useful in protecting personnel and equipment; however it will be less effective for the environment
because of the release. The following information needs to be specified for the IPL:
l
l
l
l
l
Description
Same or different effectiveness for risk categories
Unit: Risk Reduction Factor or Probability of Failure on Demand
Reuse of IPL (when checking this box, ensure that the Description is specific enough)
Effectiveness for Personnel, Environment, Assets and Custom risk categories
Selecting "OK" will save the IPL and add it to the current SIL selection.
If you want to edit the details for an IPL you can simply do so by double clicking the IPL in the list. If
you want to delete an IPL, select the IPL from the list and click “Delete”. Once deleted, the IPL
cannot be recovered.
7.5.1 Independent Protection Layer Reuse
In many projects it is highly likely that the same Independent Protection Layer is effective in
protecting against several initiating events that lead to the same hazard. When you specify an IPL
you can identify if this IPL is to be reused by checking the Reuse this IPL? checkbox. Once an IPL
is marked as a reuse IPL you can select this IPL from the drop-down box on the Independent
Layers ofProtection Configuration dialog box.
Note: The key requirement for the reuse of IPLs is that the effectiveness of the IPL is similar.
When making changes to a reused IPL, the changes will affect all SIL selections that use this IPL.
This will also be shown in a warning box when saving changes to a reused IPL.
If you want to make changes to a Independent Protection Layer that only affects the current Safety
Instrumented Function SIL selection you can deselect the Reuse this IPL? checkbox and make the
IPL independent. A warning message will appear. By making an IPL independent none of the
changes made to that IPL will affect the other Safety Instrumented Functions / Initiating Events.
Similarly none of the changes made to the original reused IPL will affect the independent IPL.
© exida.com L.L.C.
exSILentia® User Guide
Page 100 of 168
If you decided that an existing Independent Protection Layer needs to be replaced by a IPL available
from the reuse IPL drop-down list you can do so by simply selecting that reuse IPL. A warning
message will appear explaining that the current data will be replaced by the reused IPL data.
In order to obtain a clear overview of the IPLs that are reused you can select the “SILect –Reused
IPLs” menu option. Each reused IPL is shown with the SIF Tags of the Safety Instrumented
Functions that it is used in and the initiating event that it applies to. Note that IPLs that are not reused
will not be shown in this overview.
© exida.com L.L.C.
exSILentia® User Guide
Page 101 of 168
Chapter 8 SIF SRS
The SIF Safety Requirements Specification (SRS) phase in the exSILentia tool is designed to help
the user with the Safety Requirements Specification task of the Safety Lifecycle. The exSILentia tool
provides a template for collecting the Safety Requirements for a Safety Instrumented Function. As
such its primarily focus is on the collection of information.
The following requirements should be specified for a Safety Instrumented Function:
l
l
l
l
l
l
Equipment: This lets you specify the equipment that the SIF is protecting
Process Safe State: This field is used to specify the safe state, for example, the safe state
represents the situation where flow through the supply line is stopped
SIF Test Interval: This indicates the interval at which periodic proof tests are performed.
This is one of the major parameters in the SIL verification phase. It should be indicated how
rigid this requirement is, as during SIL verification the proof test interval may be adjusted to
achieve the target SIL.
Overall Response Time : This field allows you to specify how quickly the Safety
Instrumented Function should act. The action should be performed within the Process
Safety Time.
Protection Method: This field should indicate how the SIF will function; mostly this is Deenergized to Trip.
Trip Reset: This field is used to specify if a reset is required and if so how the reset is to be
implemented
© exida.com L.L.C.
exSILentia® User Guide
Page 103 of 168
l
l
l
l
l
l
Maximum Spurious Trip Rate: This allows you to specify the Mean Time To Fail Spurious
for a SIF. Even though the functional safety standards have no specific requirements
regarding this parameter, spurious trips can be dangerous and if they occur to frequently
they might lead to bypassing of the SIF, reducing the safety integrity of the SIF.
Diagnostics : This field can be used to specify if additional diagnostics are to be
implemented for the SIF
Manual Shutdown: This field is used to specify the manual shutdown option, if any
Regulatory Requirements : You can spcify the specific regulations that need to be
considered in the SIF conceptual design
Notes: Any addition remarks can be documented here
Target SIL: The target SIL is automatically obtained from the SILect phase of exSILentia or
the SIF Information if the SILect tool is disabled for this project.
On the right side of the screen, a brief functional description of the Sensor Part, Logic Solver Part,
and the Final Element Part can be provided. These descriptions should help the engineers
developing the Safety Instrumented Function in coming up with the conceptual design for the SIF.
By selecting the menu option “Project – Save” the information will be saved to the project “.exi” file.
© exida.com L.L.C.
exSILentia® User Guide
Page 104 of 168
Chapter 9 SRSC&E - Process SRS
The SRS C&E , part of exSILentia Ultimate, will enhance your process requirements collection and
optimize your detailed design requirements communication. When using exSILentia Ultimate, the
exSILentia interface will show a Process SRS phase and a Design SRS phase . The Process SRS
addresses those requirements that are derived from the SIL selection and that form the input into the
conceptual design evaluation; the Design SRS handles all requirements that are derived from the
SIL verification and that form the input into the detailed design.
The Process SRS component of SRSC&E addresses those requirements that are derived from the
SIL selection and that form the input into the conceptual design evaluation. These requirements are
specific for each Safety Instrumented Function. When using exSILentia Ultimate, the Process SRS
phase replaces the SIF SRS phase.
© exida.com L.L.C.
exSILentia® User Guide
Page 105 of 168
The following requirements should be specified for a Safety Instrumented Function:
l
l
l
l
l
l
l
Equipment: This lets you specify the equipment that the SIF is protecting
Process Safe State: This field is used to specify the safe state, for example, the safe state
represents the situation where flow through the supply line is stopped
SIF Test Interval: This indicates the interval at which periodic proof tests are performed.
This is one of the major parameters in the SIL verification phase. It should be indicated how
rigid this requirement is, as during SIL verification the proof test interval may be adjusted to
achieve the target SIL.
Overall Response Time : This field allows you to specify how quickly the Safety
Instrumented Function should act. The action should be performed within the Process
Safety Time.
Protection Method: This field should indicate how the SIF will function; mostly this is Deenergized to Trip.
Trip Reset: This field is used to specify if a reset is required and if so how the reset is to be
implemented
Maximum Spurious Trip Rate: This allows you to specify the Mean Time To Fail Spurious
for a SIF. Even though the functional safety standards have no specific requirements
© exida.com L.L.C.
exSILentia® User Guide
Page 106 of 168
l
l
l
l
l
l
l
l
l
l
l
l
l
l
l
l
regarding this parameter, spurious trips can be dangerous and if they occur to frequently
they might lead to bypassing of the SIF, reducing the safety integrity of the SIF.
Diagnostics : This field can be used to specify if additional diagnostics are to be
implemented for the SIF
Manual Shutdown: This field is used to specify the manual shutdown option, if any
Regulatory Requirements : You can spcify the specific regulations that need to be
considered in the SIF conceptual design
Notes: Any addition remarks can be documented here
Target SIL: The target SIL is automatically obtained from the SILect phase of exSILentia or
the SIF Information if the SILect tool is disabled for this project.
Demand Source : This field allows you to specify the initiating event that the Safety
Instrumented Function needs to act upon.
Demand Rate: Here you can specify the expected demand rate on this SIF, based on the
frequency of the initiating event that the SIF needs to act upon as specified in the Demand
Source field. The demand rate should take into consideration any independent protection
layers that will execute before the SIF is requested to act.
Demand Mode: This field specifies the demand mode per the functional safety standards,
low, high or continuous demand. The demand rate and proof test intervals selected for the
SIF will determine its operating mode.
Additional Mitigation: This field allows you to document additional measures you may
have in place to protect against the hazardous event. Note that if these measures were
taken into consideration during the SIL selection there is no need to document them here.
Startup Overrides : Here you can specify any start- up overrides that need to be
implemented for this Safety Instrumented Function, e.g. to prevent the SIF from executing
on a low pressure trip when the unit is not running
Related Interlock: It allows you to specify any other SIFs or control system interlocks that
perform a similar function. This is especially useful if you have multiple SIFs that are
identical; you could limit the number of Conceptual Design evaluations to avoid doing
redundant work.
Maintenance Overrides: This field allows you to specify any maintenance overrides that
need to be implemented for this Safety Instrumented Function
Operating Modes: Specific operating modes can be documented here.
Mission Time: Here you can specify the required operational time for the SIF.
Special Requirements: Any additional requirements that are not captured by any of the
other Process SRS aspects should be listed in the Special Requirements fields.
Non-Safety Actions: Here you can specify any auxiliary actions that may be associated
with this Safety Instrumented Function. These should be actions that are not required to
achieve the safe state but that are nice to haves
By selecting the menu option “Project – Save” the information will be saved to the project “.exi” file.
© exida.com L.L.C.
exSILentia® User Guide
Page 107 of 168
Chapter 10 SILver - SIL Verification
The SIL verification phase in exSILentia will help you verify the Safety Integrity Level (SIL) of your
Safety Instrumented Functions. The target SIL for all SIFs will have been determined by
completeting the SIL Selection phase (SILect) in exSILentia.
The SIL verification phase tool, SILver, is an analysis tool that uses Markov model calculation
technique during all analyses. For equipment selections, it features the exida Safety Equipment
Reliability Handbook database. This allows you to perform a reliability analysis of your favorite
equipment without the hassle of manually filling in all reliability data.
The user should review all assumptions that are the basis of the SILver tool. The user is also
responsible for reviewing all selections made during the analysis.
Note: SIL verification using exSILentia’s SILver tool can be performed for all SIL verifications up to
SIL 4. For any safety functions that need to achieve SIL 4, independent verification of the results
should be performed by the user as required by IEC 61508 / IEC 61511.
The SIL verification phase in exSILentia (SILver) has been assessed by a third party to ensure the
SILver development process meets the IEC 61508 software development process requirements.
The assessment report is available through the “Help – SILver Assessment Report” menu option.
This assessment report is all you need to provide for tool use justification.
10.1 SILver Structure
When analyzing a Safety Instrumented Function (SIF), the functional safety standards IEC 61508
and IEC 61511 distinguish three distinct parts. These three parts are the Sensor Part, the Logic
Solver Part, and the Final Element Part. These parts are clearly distinguished in the SIL verification
phase, SILver, of the exSILentia tool.
The exSIlentia tool allows the user to further define the Sensor Part and the Final Element Part by
dividing a part into groups. Both the Sensor Part and the Final Element Part can consist of up to 4
groups. Defining groups will allow a user to model voting arrangements between groups of
equipment items that constitute the Sensor Part and Final Element Part.
The exSIlentia tool allows for the following voting options for voting between groups (in words):
l
l
l
XooX (X is the number of groups): all groups need to trip for the safety function to trip
1ooX: one group needs to trip for the safety function to trip .
2oo3: two out of three groups need to trip for the safety function to trip; in case 3 groups are
used in the conceptual design.
The exSILentia tool allows the user to further define Sensor and Final Element groups into
redundant legs. A sensor group can consist of a maximum of 4 legs; a final element group can
consist of a maximum of 6 legs. Voting options within these groups correspond to the required
number of legs.
© exida.com L.L.C.
exSILentia® User Guide
Page 109 of 168
exSIlentia has the following voting options available for sensor groups:
l
l
l
l
l
1oo1, 1oo1D
1oo2, 1oo2D, 2oo2
1oo3, 2oo3, 3oo3
1oo4, 2oo4, 3oo4, and 4oo4 (Identical legs only)
MooN (Identical legs only)
exSIlentia has the following voting options available for final element groups:
l
l
l
l
l
l
l
1oo1
1oo2, 2oo2
1oo3, 2oo3, 3oo3
1oo4, 2oo4 [2oo(1oo2)], 4oo4 (Identical legs only)
5oo5 (Identical legs only)
6oo6 (Identical legs only)
MooN (Identical legs only)
10.2 General SIL Verification parameters
In order to perform a SIL verification for a specific Safety Instrumented Function you need to select
that SIF and go to the SIL Verification Phase.
© exida.com L.L.C.
exSILentia® User Guide
Page 110 of 168
10.2.1 Architectural Constraints
You can indicate if Architectural Constraints should be considered in the SIL Verification
analysis. Architectural constraints place requirements on the Minimum Hardware Fault Tolerance in
a Safety Instrumented Function.
When Use IEC 61508:2000 tables [Per 61511-1 11.4.5] Architectural Constraints are selected,
the achieved SIL of the Safety Instrumented Function will be limited to the SIL supported by either
table 2 or 3 of IEC 61508-2 2000 edition, based on Equipment Type, Safe Failure Fraction and
Hardware Fault Tolerance.
When Use IEC 61508:2010 tables [Per 61511-1 11.4.5] Architectural Constraints are selected,
the achieved SIL of the Safety Instrumented Function will be limited to the SIL supported by either
table 2 or 3 of IEC 61508-2 2010 edition, based on Equipment Type, Safe Failure Fraction and
Hardware Fault Tolerance.
The main difference between these two IEC 61508 based methods is that IEC 61508:2000 defined
all failures that are not dangerous as safe. As such equipment failures that have no impact on an
equipment's capability to perform a safety function, i.e. No Effect failures, are classified as safe and
therefore considered in the numerator of the Safe Failure Fraction formula. In the IEC 61508:2010
methodology the No Effect failure are not included in the Safe Failure Fraction.
© exida.com L.L.C.
exSILentia® User Guide
Page 111 of 168
When Use IEC 61511 tables Architectural constraints are selected, the achieved SIL of the Safety
Instrumented Function will be limited to the SIL supported by table 5 or 6 of IEC 61511-1 based on
Hardware Fault Tolerance and Prior-Use considerations.
When Use IEC 61511 tables [ignore 11.4.3 for Type A devices] Architectural constraints are
selected, the achieved SIL of the Safety Instrumented Function will be limited to the SIL supported
by table 5 or 6 of IEC 61511-1 based on Hardware Fault Tolerance and Prior-Use considerations.
However in this case IEC 61511-1 clause 11.4.3 which requires that the minimum hardware fault
tolerance is increased by one (1) if the dominant failure mode is not to the safe state and dangerous
failures are not detected, i.e. the Safe Failure Fraction < 60%, is ignored for Type A devices. This
assumption is quite significant as the majority of final elements will have a Safe Failure Fraction <
60% for non partial stroke operation which would lead to a minimum hardware fault tolerance
requirement of 1 for all SIL 1 SIFs.
For a detailed explanation on prior- use, a free article is available for download from the exida
website (http://www.exida.com/company/articles.asp).
10.2.2 IEC 61508 Systematic Capability
You can indicate if IEC 61508 Systematic Capability should be considered in the SIL Verification
analysis. Per IEC 61511 users of existing hardware either need to select hardware that is developed
and assessed per IEC 61508 or justify the use of that hardware. When the Systematic Capability
option is selected, SILver will review the IEC 61508 assessment levels and/or the justification levels
of the equipment used, i.e. their Systematic Capability. In order to achieve a certain SIL level all the
equipment used must be assessed up to that SIL level and/or the proven in use justification for the
equipment used must be up to that specific SIL level.
10.2.3 Mission Time
In the Mission Time field, the time period that the SIF is expected to be operational should be
selected. For Low Demand applications, the PFDavg parameter, which determines the Safety
Integrity Level at which this Safety Instrumented Function can be used, is determined over this
mission time. One can choose from a variety of options up to a 30-year period. The mission time
could, for example, correspond to the major turnaround period of the unit.
Note: The mission time should at least be as long as the largest proof test interval.
10.2.4 Startup Time
In the Startup Time field you can list the number of hours it takes to restart the process after a
shutdown. This should be an integer number between 4 and 336 hours.
10.2.5 Demand Rate
SILver distinguishes between three application demand modes of operation, i.e.
© exida.com L.L.C.
exSILentia® User Guide
Page 112 of 168
l
l
l
Low Demand
High Demand
Continuous Demand
The drop-down box allows you to specify which demand mode of operation you want to consider for
the Safety Instrumented Function. You have the option to “hardcode” the demand mode by selecting
the Low Demand, High Demand, or Continuous Demand options. Alternatively you can specify that
exSILentia should determine the demand mode the SIF is operating in based on the demand rate
you specify. When selecting the Based on Demand Rate option, an extra field will appear that allows
you to enter the Demand interval in months.
exSIlentia will take proof test intervals and automatic diagnostic test intervals into consideration
when determining if a SIF is operating in the Low, High, or Continuous demand mode:
l
l
l
An application is considered to be a Low Demand application if the demand interval is at
least 2 times larger than the longest proof test interval; otherwise the application is
considered High Demand or Continuous Demand
If the demand interval is at least 10 times larger than the longest diagnostic test interval of
the equipment in the Safety Instrumented Function the application is considered a High
Demand application
a Continuous Demand application is an application where the demand interval is smaller
than 10 times the worst case diagnostic test interval and where the demand interval is
smaller than 2 times the longest proof test interval
For Low demand applications the average Probability of Failure on Demand (PFDavg) is calculated.
For High and Continuous demand applications the Probability of a Dangerous Failure per Hour
(PFH) is calculated. In High demand applications credit for automatic diagnostics is taken whereas
the automatic diagnostics are considered ineffective in Continuous demand applications.
Note: The definitions of the demand modes of operation deviate from IEC 61508 and IEC 61511 as
the minimum length of the demand interval of 1 year is not considered. There is no mathematical
basis for this 1 year limit, e.g. an application with a demand interval of 10 months and a longest proof
test interval of 1 month should still be considered a low demand application.
10.2.6 Comments and Assumptions
In the Comments and Assumptions field you can document any specific remarks related to the
SIL verification of this SIF.
10.2.7 Maintenance Capability
The Maintenance Capability concept was introduced in exSILentia 2.5. It allows users to take into
consideration the effectiveness of the repair processes in place at a specific site. exSILentia 2.4 and
older assumed that when repair is performed it is always performed perfectly, many interviews with
maintenance personnel revealed that this assumption is in the majority of cases very optimistic. The
Maintenance Capability is a parameter that should be taken into consideration in addition to the
Proof Test Coverage.
© exida.com L.L.C.
exSILentia® User Guide
Page 113 of 168
A total of 5 levels have been identified for the Maintenance Capability called the Maintenance
Capability Index (MCI), these are shown in the table below.
MCI
Correctness
Maintenance Capability
MCI 0
0%
No repair
Repair actions are not performed
MCI 1
60%
Medium repair
Repair actions are performed when maintenance crew is available
roughly once every two occasions, frequently tool calibration is
expired, frequently maintenance crew does not completely fix
original problem
MCI 2
90%
Good repair
Repair actions are always performed, tool calibration is not always
up to date, maintenance crew does not always completely fix
original problem.
MCI 3
99%
Almost perfect repair
Repair actions are always performed, tool calibration is always up to
date, a minor maintenance mistake is hardly ever made.
MCI 4
100%
Perfect repair
Repair actions are always performed, tool calibration is always up to
date, maintenance errors are never made
The Maintenance Capability Index is a parameter that should be specific on project level and can be
specified for field equipment and logic solvers separately.
Maintenance Capability can be specified for a project by going to the Maintenance Capability menu
option in the PhaseInformation section of the SIF Information bar on the right hand side of the
screen. By using the drop-down selections Maintenance Capability can be set for Sensors, Logic
Solvers, and Final Elements.
For projects that were performed with exSILentia 2.4 or before the Maintenance Capability Index will
default to MCI 4 which assumed 100% correctness of all maintenance activities.
© exida.com L.L.C.
exSILentia® User Guide
Page 114 of 168
By selecting the menu option “Project – Save” the information will be saved to the project “.exi” file.
10.3 Sensor Part Selections
To enter information about the configuration of the sensor part, click on Sensor Group 1 in the
Navigation Box.
The Navigation Box shows 2 voting options for the Sensor Part. This first one (directly next to the
Sensor Group) specifies the voting within that Sensor Group; the other determines the voting
between the Sensor Groups. Changing the latter will make additional groups active to allow you to
specify details.
When selecting the voting between groups, you can also specify the beta factor to account for
common cause between groups. The beta factor must be entered as an integer between 0% and
100%. The default value for the common cause between groups is 0% as different groups are
typically used to model independent equipment items. In case there is no complete independence
however, i.e. there is common cause susceptibility, a beta factor other than 0% should be used.
The next step is to enter detailed Sensor Group information. To do this you must select the specific
Sensor Group from the Navigation Box. In this example description we select the first group. The
sensor selection options are now available at the bottom of the main screen.
© exida.com L.L.C.
exSILentia® User Guide
Page 115 of 168
You can specify a Name and Voting within the group. For the example SIF that we are considering
the voting is “1oo1” and the Voting Type is “Identical”. For redundant configurations exSILentia
allows you to specify “diverse” as voting type, this way you can select a temperature sensor in leg 1
and a level sensor in leg 2, for example. You can also indicate if the hardware that this sensor group
represents is part of other Safety Instrumented Functions within this project through the Reuse this
Group checkbox. For this example we will leave the box unchecked.
For this Sensor Group you must also specify group reliability data:
l
l
l
l
The beta factor is the common cause factor; this is the percentage of failures that is subject
to common cause. The beta factor must be entered as an integer between 0 and 100%. For
1oo1 and 1oo1D configurations, no beta factor needs to be entered.
The Mean Time To Repair (MTTR) indicates the expected time to repair the equipment
items in the group in case of a detected failure. The MTTR must be an integer between 4
and 336 hours.
The Proof Test Interval is the time interval between two proof tests. This must be an
integer value between 1 and 360 months.The proof test is the periodic test performed to
detect failures in a safety-related system so that, if necessary, the system can be restored to
an “as new” condition or as close as practical to this condition.
The Proof Test Coverage indicates the effectiveness of a proof test. A 100% proof test
coverage would mean that 100% of all dangerous failures would be detected in the test. In
order to claim 100% proof test coverage the proof test must be extremely comprehensive,
which is very unrealistic. The proof test coverage must be an integer value between 0 and
100%.
© exida.com L.L.C.
exSILentia® User Guide
Page 116 of 168
In order to complete the selections for this Sensor Group, we need to fill in the Sensor Leg
information:
l
l
l
l
l
l
First we select a measurement type, e.g. Temperature from the Measurement Type dropdown box. This gives us all Temperature measurement devices available in the exida Safety
Equipment database. We select the Generic temperature transmitter.
In the Process Connection section we can specify that the Sensor uses a 2-/3-wire RTD.
For the Input interface module of this sensor leg we select Generic HART Multiplexer.
The second interface module is left at the default “<None>”.
The Configuration Options that we select are High Trip; Alarm Setting Under Range;
PLC Detection Configuration Over / Under Range ON, Alarm Filtering ON; Alarms voted as
Trip OFF
We do not select External Comparison.
We also leave the Application Level Diagnostic Test checkbox unchecked.
Switching phases or selecting another group or part to edit in the SILver Navigation Box will store
your entries and selections.
Two additional options are available for a sensor group, i.e. Advanced Options and Tags.
Selecting Advanced Options will bring up the Sensor Group Properties dialog box .This dialog
box displays the failure rate data of the selected equipment items and also identifies the Architecture
Type, Systematic Capability, and SERH version. If one of the components you selected was a
MyOwn component, then you need to specify its failure rate data on this screen. In addition this
dialog box allows you to indicate if you want to claim Proven In Use for a specific equipment item.
The Proven In Use Justification is available once you check the Proven In Use checkbox.
Selecting Tags will bring up the Sensor Tags dialog box. Here you can specify the applicable tags
associated with the sensor equipment you selected. Though the tag information is not critical for the
actual SIL verification, it is used in the SRS phase and it is often used by third party tools that
interface with the exSILentia tool.
© exida.com L.L.C.
exSILentia® User Guide
Page 117 of 168
After all details for the Sensor Part have been entered click on the Safety Instrumented Function
Results box in the main frame. You will see that the calculation results for the Sensor Part are now
displayed.
Note that for Sensor Groups configured such that all over range and under range failures are
detected and where no automatic shutdown is implemented on detection of a failure the spurious trip
rate will be equal to 0. The Sensor Group that constitute the Sensor Part has no spurious failures
because of the logic solver detection behavior.
10.3.1 Sensor Configuration Options
As part of the Sensor Group definition, you will need to set Configuration Options.
The following Sensor Configuration Options need to be set:
l
Trip: Specify whether a High Trip or Low Trip is configured in the application software. This
is especially important for 4-20 mA operating devices. For such devices a failure resulting in
an output below 4 mA is considered a Fail Low failure and a failure resulting in an output
above 20 mA is considered a Fail High failure. Depending on the PLC Detection
Configuration settings, a Fail Low and Fail High failures will either be classified as safe or
© exida.com L.L.C.
exSILentia® User Guide
Page 118 of 168
l
l
l
dangerous, detected or undetected
Alarm (Analog Devices Only): Specify whether the analog output is driven over range or
under range by the transmitter, upon detection of an internal failure (Fail Detected). This is
typically done by setting a jumper / switch on the transmitter itself. The Alarm Setting option
determines how Fail Detected faults are classified. They will be classified as either Fail High
or Fail Low failures which will lead to the subsequent classification into safe or dangerous,
detected or undetected.
PLC Detection Configuration (Analog Devices Only): These options allows you to
indicate the type of input signal diagnostics that are implemented in the logic solver
connected to the equipment items selected in the current Sensor group. exSILentia offers
the selection of the following PLC Detection Configuration options:
l Over/Under Range: f the logic solver connected to the equipment items selected
can detect over range or under range signals (>20mA and <4mA) and you
programmed the logic solver to use this functionality, there is input signal range
checking. This would mean that you need to select the Over / Under Range ON
option. At this point the Alarm Filter option will be enabled. If the logic solver
connected to the equipment items selected does not detect over range or under
range signals (>20mA and <4mA) or you do not program the logic solver to use the
functionality, there is no input signal range checking. This would mean that you
need to select the Over / Under Range OFF option. This will disable the Alarm
Filter option.
l Alarm Filter : If the logic solver performs a type of sampling, e.g. the value
communicated from the input card to the CPU is averaged or a median value is
used, the option Alarm Filter is considered ON. The effect here is that if there is an
internal fault in, for example, a transmitter which drives the output over range (Fail
High) and you would have a high trip this will not immediately lead to a trip on
application level as sudden input signal transitions are filtered. A next sampling of
the input signal is very likely to show an over range signal rather than a signal in
active scale above the trip point as internal failure transitions are typically very fast.
Consequently if this type of sampling is done you need to select the Alarm Filter
ON option. If this sampling is not done you need to select the Alarm Filter OFF
option.
l Alarm Voted as Trip : In some cases end- users do not want to cause any
transmitter malfunction to result in a shutdown of a unit but simply have an alarm
and perform maintenance on the specific unit that failed. Other end-users do not
want to operate in such a degraded mode where, arguably, the SIF protection is
lost. Based on your operating philosophy you can indicate if transmitter alarms
should result in a vote for trip.
External Comparison: Indicates that the device signal is compared with a similar second
signal. External comparison is highly effective for analog signals since one can monitor
differences in the dynamic signals and see if something is wrong with one of the analog
devices; it is very ineffective for digital signals since digital devices have a static output. IEC
61508 allows claims of up to 99% diagnostic coverage on external signal comparison. In
exSILentia a more conservative external signal comparison diagnostic coverage of 95% is
used for analog signals and 0% for digital signals. In order to claim external comparison, the
actual comparison needs to be done in the Safety Logic Solver as the outcome of the
© exida.com L.L.C.
exSILentia® User Guide
Page 119 of 168
comparison would be rated as safety-related. Note that a BPCS signal can be used in the
comparison, however the signal needs to be provided to the SIS before it is handled (i.e.,
interpreted and / or modified) by the BPCS.
10.3.2 Failure Rate Classification
Based on the Sensor Configuration Option selections made, the failure rates for analog devices will
be classified into safe or dangerous, detected or undetected. The following table provides a
complete overview as to how Fail Low, Fail High, and Fail Detected failures are classified based on
the options selected.
PLC DETECTION
CONFIGURATION
APPLICATION
FAILURE CLASSIFICATION
OVER /
UNDER
RANGE
ALARM
FILTERING
TRIP POINT
ALARM POINT
FAIL LOW
FAIL HIGH
FAIL
DETECTED
ON
ON
HIGH
OVER RANGE
DD
DD
DD
ON
ON
HIGH
UNDER RANGE
DD
DD
DD
ON
OFF
HIGH
OVER RANGE
DD
SD
SD
ON
OFF
HIGH
UNDER RANGE
DD
SD
DD
OFF
ALWAYS OFF
HIGH
OVER RANGE
DU
SU
SU
OFF
ALWAYS OFF
HIGH
UNDER RANGE
DU
SU
DU
ON
ON
LOW
OVER RANGE
DD
DD
DD
ON
ON
LOW
UNDER RANGE
DD
DD
DD
ON
OFF
LOW
OVER RANGE
SD
DD
DD
ON
OFF
LOW
UNDER RANGE
SD
DD
SD
OFF
ALWAYS OFF
LOW
OVER RANGE
SU
DU
DU
OFF
ALWAYS OFF
LOW
UNDER RANGE
SU
DU
SU
10.4 Logic Solver Selections
To enter information about the configuration of the logic solver part, click on the logic solver box in
the Navigation Box.
The logic solver selection options are now available at the bottom of the main screen.
© exida.com L.L.C.
exSILentia® User Guide
Page 120 of 168
You will need to specify the following information for the logic solver:
l
l
l
l
l
l
l
You need to specify a Name for the logic solver, to uniquely identify it.
You can also indicate if the main hardware, CPU, Power Supply, Rack, etc., that this logic
solver group represents is part of other Safety Instrumented Functions within this project
through the Reuse this Logic Solver Group checkbox. For this example we will leave the
box unchecked.
Select the desired logic solver, e.g. General purpose PLC from the exida Safety Equipment
database.
Enter the expected Mean Time To Repair (MTTR); The MTTR indicates the expected
time to repair the logic solver in case of a detected failure. The MTTR must be an integer
between 4 and 336 hours.
Enter the Proof Test Interval; The Proof Test Interval is the time interval between two
proof tests. This must be an integer value between 1 and 360 months.The proof test is the
periodic test performed to detect failures in a safety-related system so that, if necessary, the
system can be restored to an “as new” condition or as close as practical to this condition.
Enter the Proof Test Coverage; The Proof Test Coverage indicates the effectiveness of a
proof test. A 100% proof test coverage would mean that 100% of all dangerous failures
would be detected in the test. In order to claim 100% proof test coverage the proof test must
be extremely comprehensive, which is very unrealistic. The proof test coverage must be an
integer value between 0 and 100%.
Select if there is any Application Level Diagnostic Test
The beta factor for the logic solver is embedded in the Safety Equipment database since it is
specified by the manufacturer and therefore does not need to be entered.
Switching phases or selecting another group or part to edit in the SILver Navigation Box will store
your entries and selections. By selecting the menu option “Project – Save” the information will be
saved to the project “.exi” file. When you select the Safety Instrumented Function Resultsbox,
you will see that calculation results are displayed for the Logic Solver Part.
Based on the entries and selections you make for the Sensor part and the Final Element part, SILver
automatically determines the number of analog / digital input and output channels in combination
with the number of analog / digital input and output modules required for the logic solver
configuration. The logic solver calculation is done accordingly. To review the number of I/O channels
and modules automatically determined by the exSILentia tool click on Detailsat the bottom of the
© exida.com L.L.C.
exSILentia® User Guide
Page 121 of 168
Logic Solver Part box. This will expand the Logic Solver Part box to show additional details, such
as channel count.
The Details section shows the detailed Logic Solver failure rates as well as manufacturer specified
name and common cause factor. On the left side of the failure rate table the dialog box shows the
number of I/O channels and modules automatically determined (AUTO). It is also possible to use a
User defined number of I/O channels and modules, by selecting “User” and filling in the appropriate
number of I/O channels and modules to be used.
Note: After specifying only the Sensor part, only the appropriate number of Input modules is
determined for the logic solver. Consequently the calculated PFDavg and MTTFS for the logic solver
will change when the Final Element part is specified.
The Details section will also be used to fill out information for a My Own logic solver.
10.5 Final Element Part Selections To enter information about the configuration of the final element part, click on Final Element Group 1
in the Navigation Box.
© exida.com L.L.C.
exSILentia® User Guide
Page 122 of 168
The Navigation Box shows 2 voting options for the Final Element Part. This first one (directly next to
the Final Element Group) specifies the voting within that Final Element Group; the other determines
the voting between multiple Final Element Groups. Changing the latter will make additional groups
active to allow you to specify details.
When selecting the voting between groups, you can also specify the beta factor to account for
common cause between groups. The beta factor must be entered as an integer between 0% and
100%. The default value for the common cause between groups is 0% as different groups are
typically used to model independent equipment items. In case there is no complete independence
however, i.e. there is common cause susceptibility, a beta factor other than 0% should be used.
The next step is to enter detailed Final Element Group information. To do this you must select the
specific Final Element Group from Navigation Box. In this example description we select the first
group. The final element selection options are now available at the bottom of the main screen. © exida.com L.L.C.
exSILentia® User Guide
Page 123 of 168
You can specify a Name and select Voting within the group. For the example SIF that we are
considering the voting is “2oo2” and the Voting Type is “Identical”. For redundant configurations
exSILentia allows you to specify “diverse” as voting type, this way you can select an air operated
valve in leg 1 and a motor starter in leg 2, for example. You can also indicate if the hardware that this
final element group represents is part of other Safety Instrumented Functions within this project
through the Reuse this Group checkbox. For this example we will leave the box unchecked.
For this Final Element Group you must also specify group reliability data:
l
l
l
l
The beta factor is the common cause factor; this is the percentage of failures that is subject
to common cause. The beta factor must be entered as an integer between 0 and 100%. For
1oo1 and 1oo1D configurations, no beta factor needs to be entered.
The Mean Time To Repair (MTTR) indicates the expected time to repair the equipment
items in the group in case of a detected failure. The MTTR must be an integer between 4
and 336 hours.
The Proof Test Interval is the time interval between two proof tests. This must be an
integer value between 1 and 360 months.The proof test is the periodic test performed to
detect failures in a safety-related system so that, if necessary, the system can be restored to
an “as new” condition or as close as practical to this condition.
The Proof Test Coverage indicates the effectiveness of a proof test. A 100% proof test
coverage would mean that 100% of all dangerous failures would be detected in the test. In
order to claim 100% proof test coverage the proof test must be extremely comprehensive,
which is very unrealistic. The proof test coverage must be an integer value between 0 and
100%.
© exida.com L.L.C.
exSILentia® User Guide
Page 124 of 168
In order to complete the selections for this Final Element Group, we need to fill in the Final Element
Leg information:
l
l
l
l
l
l
l
l
l
l
l
l
First we can select whether or not an interface module is part of the loop. For the Interface
Module of this final element leg we selected
Next we select a final element type, e.g. Remote Actuated Valve from the Final Element
drop-down box. This gives us all remote actuated valve devices available in the exida Safety
Equipment database. This will also cause additional selection boxes to appear.
From the Final Element Interface drop-down box we selectGeneric 3-way solenoid
For the Pneumatic Element 1 of this final element leg we select Generic Solenoid Driver.
The Pneumatic Element 2selection box is left at the default <None>.
We choose to specify valve and actuator seperately. Alternatively, in some cases it is easier
to specify an actuator-valve combination.
For the Actuator we select
For the Valve we select
We then specify that the valve action is to Close on Trip
We do not select Tight shutoff Required.
We do not select Severe Service
We also leave the PVST(Partial Valve Stroke Testing) checkbox unchecked.
Switching phases or selecting another group or part to edit in the SILver Navigation Box will store
your entries and selections.
Two additional options are available for a Final Element Group, i.e. Advanced Options and Tags.
Selecting Advanced Options will bring up the Final Element Group Properties dialog box . This
dialog box displays the failure rate data of the selected equipment items and also identifies the
Architecture Type, Systematic Capability, and SERH version. If one of the components you selected
was a MyOwn component, then you need to specify its failure rate data on this screen. In addition
this dialog box allows you to indicate if you want to claim Proven In Use for a specific equipment
item. The Proven In Use Justification is available once you check the Proven In Use checkbox.
© exida.com L.L.C.
exSILentia® User Guide
Page 125 of 168
Selecting Tags will bring up the Final Element Tags dialog box. Here you can specify the
applicable tags associated with the final element equipment you selected. Though the tag
information is not critical for the actual SIL verification, it is used in the SRS phase and it is often used
by third party tools that interface with the exSILentia tool.
After all details for the Final Element Part have been entered click on the Safety Instrumented
Function Results box in the main frame. You will see that the calculation results for the Final
Element Part are now displayed.
10.5.1 Final Element Configuration Options
For equipment items in Final Element Groups where Remote Actuated Valves are considered
additional Final Element Options need to be specified.
Once you have selected a Remote Actuated Valve as the Final Element you can specify the
following options:
l
l
Actuator and Valve selection: Separate or Combination: This allows you to select an
actuator and valve separately or as a package. The distinction is made as different
manufacturers provide either a single component or a combined package
Close on Trip or Open on Trip: You will need to indicate if the valve or actuator-valve
combination opens or closes to achieve the safe state of the SIF. Based on the selection
© exida.com L.L.C.
exSILentia® User Guide
Page 126 of 168
l
l
l
appropriate failure rates from the exida Safety Equipment database will be selected. When
a My Own selection is made for a valve or an actuator- valve combination the user is
responsible for entering data that is representative for the open or close to trip situation.
Tight Shutoff Required: This option allows you to select if Tight Shutoff is required for the
valve or actuator- valve combination to achieve the safe state of the SIF. Based on the
selection appropriate failure rates from the exida Safety Equipment database will be
selected. If a My Own component is selected, the failure rates that will be entered should
reflect the Severe Service conditions.
Severe Service: This option allows you to indicate if a valve or actuator-valve combination
will likely be used in severe service conditions. Severe Service is defined as the condition
that exists when material through the valve has abrasive particles, as opposed to Clean
Service where these particles are absent. Based on the selection appropriate failure rates
from the exida Safety Equipment database will be selected. If a My Own component is
selected, the failure rates that will be entered should reflect the Severe Service conditions.
Partial Valve Stroke Testing: This option allows you to specify if Partial Valve Stroke
Testing is performed on the Final Element. It allows you to take credit for performing partial
stroke tests on otherwise static valves.
l Use Equipment Data: when you select this option specific data from the exida
Safety Equipment database will be used.
l Custom Coverage : this option allows you to specify the percentage of Partial
Stroke Test Coverage expected from the Partial Stroke Test. Published Partial
Stroke Test Coverage numbers for valves that do not have to achieve a tight shutoff
are in the 40-80% range. exida urges you to be conservative when it comes to the
Partial Stroke Test Coverage claimed.
l Interval: exSIlentia assumes that the Partial Stroke Test is performed at least an
order of magnitude more frequent than the proof test and that the test can be
assumed an automatic diagnostic, i.e. if a proof test is performed once a year, the
partial stroke test should be performed once a month. This is reflected in the interval
that is displayed when you select Use Equipment Data. If the Partial Stroke Test is
not performed at least an order of magnitude more frequent than the proof test, the
Partial Stroke Test should be considered a proof test and the Partial Stroke Test
interval and test coverage should be entered in the Proof Test Interval and Proof
Test Coverage fields. Because of the automatic diagnostic assumption the Partial
Stroke Test will also have an impact on the Safe Failure Fraction.
Leakage requirements for valves are specified in IEC 60534-4. Different classes of leakage exist
with six classes shown in Table 2 of that standard. Class VI is the most stringent with leakage given
in terms of the number of bubbles per minute allowed during a leakage test. Class IV is a less
stringent class with leakage given as 0.01% of rated flow capacity. In many safety instrumented
functions, the hazard will be prevented even if the valve leaks a small amount (Class IV for example).
If this level of leakage would not be acceptable, then the valve needs “tight shut-off” characteristics.
Valves that require tight shut-off will have higher failure rates because certain stress events that
damage the seat or the ball, for example, will be classified as failure. Such events would not be
classified as failure if a small amount of leakage is allowed. For typical industrial valves tight shutoff
has no visible leakage and full stroke achieves a leakage less than IEC 60534-4 Class IV. In the
event of valves with lesser design sealing criteria, only full stroke is valid.
© exida.com L.L.C.
exSILentia® User Guide
Page 127 of 168
Note: Not all valves and/or actuator- valve combinations listed in the exida Safety Equipment
database may have data specified for Open on Trip / Close on Trip, Tight Shutoff and Severe
Service. Either the valve or actuator-valve combination cannot be used in one of these selections or
additional study of the performance of the valve / actuator- valve combination still needs to be
performed. If you select an option for which data is not currently available, an error message will be
displayed. If this happens, please select a different valve or actuator-valve combination, or enter a
My Own component.
10.6 Review Results
Once all the parts of the Safety Instrumented Function have been specified, the Safety
Instrumented Function Results Box will display the overall SIF Performance Metrics. You can
now review the results and see if the SIF meets the desired Safety Integrity Level.
Not only are the overall SIF performance metrics shown, but on the left side of the screen pie charts
are shown. The pie charts indicate the contribution of each part to the overall SIF performance
metrics for PFDavg and MTTFS respectively .
If the results do not meet the required SIL or if you want to try different selections, you can easily edit
the configuration by clicking on the specific group you want to change in the SILver SIF navigation
box. Note that all SILver input and calculated results will be part of the exSILentia report for
functional safety standard compliance.
10.6.1 PFD Charts
The PFD graphs show the PFD as a function of mission time in combination with the PFDavg over
the entire mission time. They clearly indicate the effects of the proof test interval / proof test coverage
combination. For Safety Instrumented Functions where the various parts of the SIF use different
proof test intervals the PFD graphs provide an indication of each parts proof test.
© exida.com L.L.C.
exSILentia® User Guide
Page 128 of 168
In order to view PFD graphs of your results you can select the “SILver – PFD Charts” menu option.
Three sub menu options are available, i.e. “Parts”, “Sensor Groups”, and “Final Element Groups”.
When selecting the “SIF – PFD Charts – Parts” option the graph overview box will appear. The
Parts option shows PFD graphs for the Safety Instrumented Function (if overall results are
available) and each of the three SIF parts, Sensor Part, Logic Solver Part, and Final Element Part.
The Sensor Groups option and Final Element Groups option show PFD graphs for each of the
sensor groups and each of the final element groups respectively.
10.7 Beta Estimator Quick Tool
Apart from the equipment selected for redundant configurations, the beta factor is the most
dominant parameter when it comes to the behavior of the redundant configuration. This common
cause factor ranges from 0 to 100%. Making the (unrealistic) claim that beta is equal to 0% would
indicate a true redundant behavior where no two failures can occur at the same time. The other
extreme claim would be a beta factor of 100%. This would indicate that the redundant units of the
configuration always fail at the same time, i.e. the configuration would behave as a single, nonredundant, configuration.
If you are uncertain as to what beta-factor to select you can use the Beta Estimator Quick Tool. This
Quick Tool is launched by simply clicking on the “Beta” box on either the Sensor Group or Final
Element Group screens.
© exida.com L.L.C.
exSILentia® User Guide
Page 129 of 168
The beta estimator quick tool evaluates the beta factor to be used for common cause modeling
based on the method presented in IEC 61508-6 for sensors and final elements. The tool presents
statements about measures that influence the occurrence of common cause failures and thus the
value of the beta factor for sensors and final elements. To estimate the beta factor one must
ascertain which statements apply to the system in question and check the relevant checkboxes.
The scoring has been designed to allow for items that are not mutually exclusive. For example, a
system with logic subsystem channels in separate racks is entitled to score for “Are the logic
subsystem channels in separate cabinets?” and that for “Are the logic subsystem channels on
separate printed-circuit boards?”. A number of items relate to the operation of the system, which
may be difficult to predict at the design time. In these cases, the designers should make reasonable
assumptions and subsequently ensure that the eventual user of the system is made aware of these
assumptions.
You can either manually enter the resulting beta factor on the Sensor Part / Group or Final Element
Part / Group screens or have the beta estimator quick tool automatically copy the calculated beta
factor.
© exida.com L.L.C.
exSILentia® User Guide
Page 130 of 168
10.8 Proof Test Coverage
When performing your reliability calculations you will notice that the proof test coverage factor, in
combination with the mission time, can have a drastic effect on the achieved PFDavg. The higher the
proof test coverage the lower the calculated PFDavg; the lower the proof test coverage, the higher
the calculated PFDavg will be for constant mission time intervals.
Proof test coverage is an indication of the amount of failures that are detected / revealed during a
proof test that were not detected by any online diagnostics. The proof test can be either online or
offline.
The proof test coverage factor ranges from 0 to 100%. Per IEC 61511:xxxx the analyst is allowed to
make the assumption of a perfect proof test, i.e. proof test coverage is 100%. Making the
(unrealistic) claim that the proof test coverage is equal to 100% would indicate that all failures
unrevealed during normal operation are detected during the proof test. The other extreme claim
would be a proof test coverage factor of 0%. This would indicate that the proof test does not detect
any unrevealed failures or that the proof test is simply not performed.
In order to assist their customers many manufacturers have published suggested proof tests with
associated proof test coverage factors. This information is part of the database. As part of the SIL
verification phase in exSILentia the proof test coverage calculator is available. Based on the
equipment selections made, and the associated proof tests and proof test coverages in the Safety
Equipment Reliability Handbook database, the calculator will determine the overall proof test
coverage for your sensor, logic solver or final element group.
To use the proof test coverage calculator simply click the Coverage [%] link that is part of the proof
test selections in the selected group’s overview.
After clicking the Coverage [%] link the Suggested Proof Test Coverage dialog box will appear. In
this particular example a Proof Test Coverage factor of 38% is suggested. By clicking “Yes” you will
copy this suggested value in the Proof Tests Coverage text box on the selected group’s overview. If
you click “No” no action will be taken and the dialog box will simply close.
10.9 Proven-In-Use Justification
exSILentia allows you to identify if a specific equipment items is considered Proven In Use. The
Proven In Use concept allows a user to justify the use of a specific component that has not been
assessed per IEC 61508. The justification that the user is to provide along with the Proven In Use
© exida.com L.L.C.
exSILentia® User Guide
Page 131 of 168
claim is intended to demonstrate that the product in that specific use does not have any systematic
failures. With the Proven In Use justification the end- user takes away the burden for the
manufacturer to demonstrate that he followed good engineering practices while developing the
product. This is a significant responsibility the end-user takes upon himself so exida urges you to be
conservative in the use of the Proven In Use checkbox on these property dialog boxes.
Claiming Proven In Use will impact the SIL verification results in two ways. First of all, IEC 61511
architectural constraints allows reduction of the minimum Hardware Fault Tolerance by 1 (one) if a
device is proven in use (note that other requirements apply as well though compliance with these
requirements is trivial). Secondly, if you claim proven in use for a device you are able to specify its
Systematic capability, i.e. the SIL level up to which you claim that the systematic integrity of the
proven in use device is identical to that of a product developed per IEC 61508.
When you check the Proven In Use checkbox for an equipment item you will be asked if you want to
perform the Proven In Use Justification for that device.
By selecting “Yes” the Proven In Use Justification dialog box will appear.
© exida.com L.L.C.
exSILentia® User Guide
Page 132 of 168
The Proven In Use Justification dialog box allows you to specify the specific use / application that
the proven in use justification applies to. It also allows you to specific the specific revision of the
product. The specific use / application is important to ensure that the proven in use justification
actually applies to the proposed use of the equipment in the Safety Instrumented Function, e.g.
proven experience in control (dynamic) environment may not suit safety (static) application use. The
revision is especially import with regard to the software version of the product as this is usually the
place with the majority of systematic failures.
exida specified a set of Proven In Use Justification criteria based on the IEC 61508 and IEC 61511
functional safety standards. The intent of the justification is to provide a rationale and reference to
reference documents why a criterion is met for the specific equipment item. You can use the Yes &
No buttons in combination with the Arguments scale to track your progress of addressing each of the
issues.
Furthermore you can specify up to which SIL level the device can be used through the Systematic
Capability drop-down box. This is important when you are considering the Systematic Capability in
your project. Additionally the you can identify who is responsible for the proven in use justification,
who the project manager is and (if applicably) why a device can be considered proven in use when
not all criteria are met.
A completely filled out Proven In Use Justification dialog box is shown below.
© exida.com L.L.C.
exSILentia® User Guide
Page 133 of 168
Once you complete a Proven In Use Justification it will be stored as part of the exSILentia project. If
you want to claim proven in use on a the same equipment item in a second Safety Instrumented
Function, the Proven In Use Justification functionality allows you to associate this second proven in
use claim to a previously made claim. The Associate Proven In Use Claim with existing Justification
dialog box will appear.
© exida.com L.L.C.
exSILentia® User Guide
Page 134 of 168
The overview shown is specific to the equipment item that the proven in use is claimed on. Per item
you can have multiple application / usage description or revisions. As the example shows, there is a
proven in use claim both on revision 1.0 and revision 1.1 of the alarm bell.
A complete overview of proven in use justifications is available through the “SILver – Proven In Use
Justification” menu option. Selecting this option will launch the Proven In Use Justification
Overview dialog box. Here you can revisit a specific Proven In Use Justification or even delete the
justification if it is no longer applicable.
10.10 Group Reuse
In large projects it is highly likely that specific equipment is used in more than one Safety
Instrumented Function. A typical example is a Master Fuel Valve. It is expected that the majority of
Safety Instrumented Functions will lead to a Master Fuel Valve Trip. For a single SIF the Master Fuel
Valve is likely to be part of a single group. Similarly it is likely that you will use the same PLC logic
solver in each SIF.
© exida.com L.L.C.
exSILentia® User Guide
Page 135 of 168
SILver allows you to specify if sensor, logic solver, and/or final element groups are reused by simply
checking the Reuse this Group checkbox. This way you can simply select the same group in the
subsequent Safety Instrumented Functions. If you need to change something to the specific group
the changes will automatically be made to all Safety Instrumented Functions that this group is used
in. Next to the Reuse this Group checkbox there will be an indication on how often the group is
reused.
The key requirement for the reuse of groups is that the hardware is identical. If you have two Fuel
Valves, each part of different Safety Instrumented Functions, you will need to model these valves
using two separate groups (each of which can be reused). The reusing of groups will drastically
speed up your engineering time. Third party tools that import exSILentia export files, for example to
program a Safety PLC, will recognize the reused groups and link the identical hardware in their
programming tool.
Each reuse group is shown with the SIF Tags of the Safety Instrumented Functions that it is used in.
Note that sensor and final element groups that are not reused will not be shown in this overview.
© exida.com L.L.C.
exSILentia® User Guide
Page 136 of 168
When you are using a group in multiple Safety Instrumented Functions a change to that group will
affect all those Safety Instrumented Functions. exSILentia will pop-up a warning message. If you
click Cancel the changes will not be saved, if you click OK the changes will be applied to all groups.
The warning message is a good reminder of the impact of your changes, however if you decide that
you don’t want to see the message anymore you can check the “Don’t show this warning again”
checkbox.
If you want to make changes to a group that only affects the current Safety Instrumented Function
you can deselect the Reuse this Group checkbox and make the group independent. A warning
message will appear. By making a group independent none of the changes made to that group will
affect the other Safety Instrumented Functions. Similarly none of the changes made to the original
reused group will affect the independent group.
© exida.com L.L.C.
exSILentia® User Guide
Page 137 of 168
If you decided that an existing group needs to be replaced by a group available from the reuse group
drop-down list you can do so by simply selecting that reuse group. A warning message will appear
explaining that the current data will be replaced by the reused group data.
10.11 User Defined device and failure data
For all equipment item selections in the SIL verification phase, equipment items can be entered that
are not in the exida Safety Equipment Reliability Handbook database. Instead of selecting a device
from the exida Safety Equipment database, you have to select “User Defined”. This selection is
available at each point where you have to select an equipment item.
To enter a User Defined device, click on the >> arrows to the right of the device selection box. This
will bring up the following dialog box.
For the User Defined device you can specify the following items:
l
l
l
l
l
l
Name: Name for the equipment item
Failure Rates: The failure rates for the equipment item must be entered as number of
failures per hour. The Fail Low, Fail High, and Fail Detected categories are only applicable
for analog devices. These represent failures were the output goes either below scale or
above scale.
Architectural Constraint Type: Type A or B per IEC 61508
Systematic Capability: IEC 61508 assessment level and/or the justification level of the
equipment used
Proven In Use: Justification for equipment item not dev eloped / assessed per IEC 61508
Channel(s): Channel count or number of Analog and/or Digital input / output channels
required for this device
© exida.com L.L.C.
exSILentia® User Guide
Page 138 of 168
l
Process Connection: To specify if the data includes the Process Connection. If this box is
checked the Process Connection selection made on the Sensor Component page will be
ignored in the calculation. This selection is for Sensors only.
If the User Defined device is a Logic Solver, additional selection are available. The User Defined
selection for the logic solver can be accessed by expanding the Logic Solver Details. When defining
a logic solver, two options are available:
l
l
Simple
Advanced
The difference between these two selections is in the failure data entry. The simple selection allows
you to enter just the failure rates for one module.It assumes that all the failure rates for various logic
solver modules have been summed. In the advanced selection you can enter the detailed failure
data for each module and channel.The module failure rates represent the common part of the I/O
module, the channel part represents the part of a module that is unique to each channel.
The following selections can be made for a User Defined logic solver:
l
l
l
l
l
l
l
Name: Name for the equipment item
Voting: Internal voting of the logic solver, either 1oo1, 1oo1D, 1oo2, 1oo2D, 2oo2, 1oo3,
2oo3, or 3oo3
Architectural Constraints Type: Type A or B per IEC 61508
SIL Capability: IEC 61508 assessment level and/or the justification level of the equipment
used
Channel Count: Channel count or number of Analog and/or Digital input / output channels.
This can be automatically calculated by exSILentia or User Defined
Number of Channels per Module (Advanced): Number of channels available per module
Failure Rates: The failure rates for the equipment item must be entered as number of
failures per hour.
While the User Defined option allows you to specify an equipment item that is not part of the exida
Safety Equipment Reliability Handbook database it requires that you know the failure rate and
failure mode distribution of the specific equipment item. In addition it would be more convenient to be
able to select the component directly from the equipment item selection box rather than having to
specify its failure rates manually. Feel free to discuss adding equipment items to the exida Safety
Equipment Reliability handbook database with your suppliers.
© exida.com L.L.C.
exSILentia® User Guide
Page 139 of 168
Note: Requests for adding devices to the Safety Equipment Reliability Handbook database can be
sent to [email protected].
10.12 Unit Mean Time To Fail Spurious (MTTFS)
exSILentia will calculate the Mean Time To Fail Spurious (MTTFS) of each Safety Instrumented
Function. Though this is an important parameter, especially in cases where spurious trips result in
hazardous situations, many users are also interested in how often the complete unit will trip. As part
of the SIL Verification phase, exSILentia will calculate the Unit MTTFS for all Units specified in the
SIF Identification phase.
exSILentia determines what SIFs are part of a specific unit by performing a string comparison of the
unit names that you specify. You should therefore make sure that you use consistent spelling when
defining the unit name or use the drop-down box to select a name that was specified earlier.
Selecting the “SILver – Unit MTTFS” menu option will launch the Unit MTTFS dialog box. This dialog
box shows the spurious trips that are associated with the various units specified.
© exida.com L.L.C.
exSILentia® User Guide
Page 140 of 168
Chapter 11 SRSC&E - Design SRS
The Design SRS component of the SRS C&E functionality addresses all requirements that are
derived from the SIL verification and that form the input into the detailed design. Like the Process
SRS requirements, these requirements are specific for each Safety Instrumented Function.
The information to be entered in the Design SRS phase is specific for each group. Shown below
are the specification options for a Sensor Group.
The following requirements can be specified for Sensor / Final Element Groups:
l
l
l
Common Cause Sources: Specify the common cause sources for this specific group. This
area will only be enabled for redundant architectures.
Diagnostics: Here you can list any specific diagnostic to be implemented on SIF level.
Partial valve stroke testing and external comparison requirements will be automatically
defined based on your SILver selections
Process Connection: Any specific process connection requirements can be specified
here, like type of impulse line tap or tracing requirements
© exida.com L.L.C.
exSILentia® User Guide
Page 141 of 168
l
l
l
l
l
l
l
l
l
l
l
l
l
l
l
Environment Extremes: You can identify what the environmental extremes are that the
equipment will be subjected to. This is important to keep track of as part of your design to
ensure any equipment items selected are suitable for use in their environment.
Start Requirements : This field can be used to document if there are any special
precautions to be taken upon startup for the equipment item, for example consider a tank
low level measurement which may need to be bypassed during startup as a level above the
low level trip will not be reached until a certain amount of time has passed
Re-start Requirement: If similar to the start requirements refer to the previous field and
only document specific re-start requirements here
Other Special Requirements: Document any remaining requirements with regard to the
Safety Instrumented Function here
Survivability : Used to define the requirements for any safety instrumented function
necessary to survive a major accident event, for example, time required for a valve to remain
operational in the event of a fire
Degraded Voting - Fail: This field will automatically be specified based on your selections
in SILver; upon failure detection either the fault will be treated as a vote for trip or a
temporary bypass (applies to Sensor groups only)
Degraded Voting - Override: Here you can list any specific requirements related to voting
degradation based on maintenance overrides, specifically if this deviates from the concepts
as defined in the general SIF body of the SRS (applies to Sensor groups only)
Interfaces: Used to document any special interface requirements, e.g. HART
communicator
Notes: Used to document any remaining issues or assumptions
Tag: When tags have been specified in the SILver phase they will be displayed here, or they
can be added now.
Type: This field is filled in automatically based on your equipment selection in the SILver
phase
P&ID: Specific P&ID references for the devices in the group
Model / Data Sheet: Equipment model and data sheet reference
Action: This field is filled in automatically based on your selection in the SILver phase
MOR: Here you can list any specific maintenance overwrite requirements
The fields that can be specified for a logic solver are slightly different. There are two fields that are
specific to logic solvers:
l
l
Unsafe Process Condition
Unsafe Process States
© exida.com L.L.C.
exSILentia® User Guide
Page 142 of 168
© exida.com L.L.C.
exSILentia® User Guide
Page 143 of 168
Chapter 12 Lifecycle Cost Estimator
.
The functional safety standards have one main focus, i.e. safety. Preventing harm to personnel, the
environment and assets are the key interests when using the exSILentia integrated Safety Lifecycle
software. There are however other aspects that need to be considered like spurious trip rates,
frequency of proof tests, maintenance requirements, installation cost etc. Most of these are all
expressed in a cost of the achieved safety. The Lifecycle Cost Estimator allows you to take all these
aspects into consideration and determine, based on inflation rates, what the net current cost is of a
proposed Safety Instrumented Function.
The Lifecycle Cost Estimator is available in the exSILentia Operation option and the exSILentia
Ultimate option.
The Lifecycle Cost Estimator allows you to evaluate different conceptual designs, with different cost
properties and determine which of these designs is optimal financially. The Lifecycle Cost Estimator
automatically takes into consideration proof test frequencies, spurious trip rates, etc. that were
determined during your SIL verification work (SIL verification phase).
12.1 Setting Life Cycle Cost parameters
The first step in using the Lifecycle Cost Estimator is to define overall project parameters with regard
to cost. To access these project setting, click on Life Cycle Cost Options in the SIF Information
toolbar on the right hand side of the screen.
© exida.com L.L.C.
exSILentia® User Guide
Page 145 of 168
This will bring up the Lifecycle Cost Estimator Options dialog box. Here you can specify a variety
of hourly rates, like engineering rates, drafting rates, installation labor rates, etc. You can also define
the cost of loss production per hour. Finally you can specify the inflation / discount rate, the time
period over which you want to annualize the cost and your monetary identifier like $, £, €, ¥, etc.
© exida.com L.L.C.
exSILentia® User Guide
Page 146 of 168
12.2 Specifying Lifecycle cost for a Safety Instrumented Function
In order to specify the lifecycle cost for a specific Safety Instrumented Function click on the Cost
phase in the exSILentia main window.This will show the Lifecycle Cost Estimation fields.
Note: Lifecycle Cost calculations use cost parameter settings as specified in the Life Cycle Cost
Options. Before performing any calculations ensure that these settings are appropriate for the
project and SIF.
© exida.com L.L.C.
exSILentia® User Guide
Page 147 of 168
All numbers in blue font are calculated by the exSILentia Lifecycle Cost Estimator. The black text
boxes allow you to specific SIF specific cost in terms of fixed expenses or hours required to perform
a specific task.
It is very unlikely that the initial lifecycle cost estimation shows $0.00 for the Total Lifecycle Cost.
When a SIL verification analysis has been performed, there will most likely be spurious trips that will
result in failure cost. The SILver input and parameter settings for failure cost are thus automatically
accounted for.
© exida.com L.L.C.
exSILentia® User Guide
Page 148 of 168
A completely filled in Lifecycle Cost Estimator tool could look like this.
© exida.com L.L.C.
exSILentia® User Guide
Page 149 of 168
The screens shown so far all focus on a single SIF. For a complete project the overall project cost
may be of interest as well. You can view the overall Project Lifecycle Cost by selecting the Cost –
Project Total Lifecycle Cost menu option. In this particular example, the Lifecycle Cost Estimator
was completed for the first SIF (SIF 01), but not for the second or third SIF. Despite this there are
already basic lifecycle costs for these SIFs as they have initial failure costs and because (in this
particular case) the second and third SIF have groups that are reused between the SIFs.
The Project Total Lifecycle Cost, takes the reuse of groups into consideration, thereby avoiding
double counting of overall lifecycle costs for pieces of equipment that are used by multiple SIFs. This
also explains why in the example shown the Total Project Lifecycle Cost is less than the sum of the
Individual SIF Total Lifecycle Cost.
© exida.com L.L.C.
exSILentia® User Guide
Page 150 of 168
Chapter 13 SILAlarm™
Note: For guidance on using the SILAlarm™ tool, please refer to the SILAlarm™ User Manual.
© exida.com L.L.C.
exSILentia® User Guide
Page 151 of 168
Chapter 14 SILStat™
Note: For guidance on using the SILStat™ tool, please refer to the SILStat™ User Manual.
© exida.com L.L.C.
exSILentia® User Guide
Page 153 of 168
Chapter 15 Disclaimer and Assumptions
Limitations and assumptions associated with the use of the exSILentia safety lifecycle tool are
discussed in the following sections.
15.1 Disclaimer
The user of the exSILentia software is responsible for verification of all results obtained and their
applicability to any particular situation. Calculations are performed per guidelines in applicable
international standards. exida.com L.L.C. accepts no responsibility for the correctness of the
regulations or standards on which the tool is based.
In particular, exida.com L.L.C.accepts no liability for decisions based on the results of the exSILentia
software. The exida.com L.L.C. guarantee is restricted to the correction of errors or deficiencies
within a reasonable period when such errors or deficiencies are brought to exida’s attention in
writing. exida.com L.L.C. accepts no responsibility for adjustments to the automatically generated
reports made by the user.
15.1 Assumptions PHA
Guidance on PHA principles and the relationship between PHA and SIL Selection is given in the
publications listed underneath.
Safety Integrity Level Selection - Systematic Methods Including Layer of Protection Analysis,
ISBN 1-55617-777-1, by Ed Marszal and Eric Scharpf, 2002, ISA; Particularly section 4.2
(pp 52)
Layer of Protection Analysis: Simplified Process Risk Assessment, 2001, AIChE - Center for
Chemical Process Safety (CCPS); New York, NY, USA; Particularly sections 7.2 (pp 119)
and 11.3 (pp 184) for multiple scenarios.
Guidance on the application of Hazard and Operability studies is given in the following International
Standard;
IEC 61882, Hazard and operability studies (HAZOP studies) - Application guide, 2001,
International Electrotechnical Commission, Geneva, Switzerland
15.2 Assumptions SILect
The SILect phase of the exSILentia Safety Lifecycle tool is based on several assumptions. This
section lists those assumptions. The SIL selection calculations are performed using straightforward
algebraic multiplication, division, addition, etc. No simplifications have been made.
l
The severity level translation into tolerable frequencies is based on the tolerable risk
specification selected by the user.
© exida.com L.L.C.
exSILentia® User Guide
Page 155 of 168
l
l
l
l
l
Unmitigated frequencies are directly calculated from initiating event frequencies and
probabilities for enabling conditions and Independent Protection Layers using algebraic
formulas.
The required Risk Reduction Factor is obtained directly from the relation between tolerable
frequency and unmitigated frequency. The Target Safety Integrity Level is obtained from the
relation between required Risk Reduction Factor and Safety Integrity Level boundaries, as
defined by the Target SIL Threshold Ratio, which is set by the user.
The tolerable fatality frequency used in the Health and Safety Executive – HSE UK
tolerable risk selection is based on “The Setting of Safety Standards: A Report by an
Interdepartmental Group of External Advisors”, London, UK, HM Stationery Office, 1996.
The tolerable fatality frequency used in the IEC 61511 part 3, Annex C tolerable risk
selection is based on IEC 61511 part 3, Functional Safety: Safety Instrumented Systems for
the process industry sector – Part 3: Guidance for the determination of Safety Integrity
Levels, Geneva, Switzerland, IEC, 2003.
exida holds no responsibility for the above mentioned tolerable fatality frequencies nor any
other tolerable fatality frequencies used in the SILect phase of the software.
15.2.1 IPL and Initiating Event data
exida has compiled a proprietary protection layer and initiating event database. This database is a
compilation of failure data collected from a variety of public and confidential sources and presents an
industry average. The database is available in the SILect phase of the exSILentia tool.
The user is responsible for determining the applicability of the failure probabilities of the independent
protection layers and the initiating event frequencies to any particular application. Accurate plant
specific data (historic data) is preferable to general industry average data. Industrial plant sites with
high levels of stress must use protection layer and initiating event data that is adjusted to a higher
value to account for the specific conditions of the plant.
15.3 Assumptions SRS
15.3.1 Assumptions SIF SRS
All information that is output of the SIF SRS tool is directly linked to user input. No calculations are
performed, nor is the information provided by the user changed in any way. The Target Safety
Integrity Level listed in the SIF SRS (if any) is derived from user input into the SILect tool.
15.3.2 Assumptions SRSC&E
The safety requirements specification document that is generated as part of the SRS C&Ephase is
based on user selections in the SIL selection phase and SIL verification phase in combination with
specific safety requirements specification entries on both project and SIF level.
The cause and effect diagram that is created as part of the SIF Functional Relationship only depicts
the actions to be taken for the specific SIF under consideration. If multiple SIFs initiate based on a
specific sensor group and/or operate the same final element group this will not be reflected in these
© exida.com L.L.C.
exSILentia® User Guide
Page 156 of 168
individual cause and effect diagrams. A complete cause and effect diagram taking into consideration
all Safety Instrumented Functions will show these commonalities assuming that the user has
correctly identified identical groups and has used the reuse feature in the SILver phase to identify
these identical groups.
The position of the safety requirements specification document generated as part of the
SRS C&E phase within the overall safety lifecycle deviates from the lifecycles published in the
functional safety standards. Typically the SRS phase is located between SIL selection phase and
Conceptual Design phase, i.e. SIL verification. The required information in the SRS however covers
information developed in the SIL selection phase as well as in the Conceptual Design / SIL
verification phase. For example specific application level diagnostic requirements like external
comparison of analog signals or the implementation of partial valve stroke testing are determined
during the SIL verification but also need to be documented in the safety requirements specification
document. Consequently exSILentia defines a Process SRS and a Design SRS. The Process SRS
handles all requirements for the conceptual design; the Design SRS handles all requirements for the
detailed design.
15.4 Assumptions SILver
15.4.1 Demand Modes
The SIL verification phase (SILver) of the exSILentia software is designed to verify Safety
Instrumented Systems (SIS) that are used in any of the three demand modes identified in the
functional safety standards, i.e. Low Demand, High Demand, Continuous Demand. SILver will
either automatically determine the applicable demand mode or the user can define the demand
mode to consider. Based on the demand mode selected, SILver will either calculate the average
Probability of Failure on Demand of the SIF over the mission time or calculate the Probability of a
Dangerous Failure per Hour.
15.4.2 Safety Equipment Data for DTT and/or ETT applications
The SIL verification phase (SILver) of the exSILentia software is designed to verify Safety
Instrumented Functions (SIFs) that are based on either the de-energize- to-trip principle or teh
energize-to-trip principle. De-energize- to-trip implies that on loss of power the SIF will go to a
predetermined safe state. Energize-to-trip implies that that power needs to be applied in order to go
to a predetermined safe state. Unless specifically stated, all discrete equipment failure rates and
failure modes in the Safety Equipment database assume a de-energize-to-trip application. SILver
can be used for energized-to-trip applications however the user is cautioned to review the failure
rates and failure mode distribution of the selected equipment. Additionally, when modelling the
energize-to-trip applications the user is responsible for estimating the failure probability of the power
supply and including this in the SIL verification calculations.
15.4.3 Reliability Modeling Assumptions
The SILver Safety Integrity Level verification phase has been developed per guidelines in applicable
international standards, such as IEC 61508. SILver is based on many of the assumptions that are in
© exida.com L.L.C.
exSILentia® User Guide
Page 157 of 168
IEC 61508-6, Annex B. The assumptions on which the calculations within SILver are based are
listed below.
l
l
l
l
l
l
l
l
l
l
l
l
l
l
l
l
The sensor part ranges from the actual sensing element up to (but not including) the first
functional element that combines the signal with the other sensors in the same voting group
The logic solver part ranges from the first functional element that combines the input signals
to the last function element that contains the same output for the logic groups or function
block
The final element part ranges from (i.e. not including) the output of the function element that
contains the same output for the logic group or function block through to the final actuating
elements within the safety system
The logic solver data in the exida Safety Equipment database assumes local I/O
Equipment failure rates are constant over the useful life of the equipment
Only a single failure can occur within one independent part of a configuration / PLC
The (self-)diagnostic test time is much shorter than the average repair time
The proof test interval is at least an order of magnitude greater than the diagnostic test
interval
Limited coverage of failures during a proof test is modeled using the proof test coverage
factor, it is assumed that the proof test coverage has effect on all states, undetected and
detected
For each sensor / final element group there is a single proof test interval and Mean Time To
Repair
Multiple repair teams are available to work on all known failures
Repair rates are constant
Perfect repair is assumed
The Mean Time To Repair (MTTR) is an order of magnitude less than the expected demand
rate
Common cause failures are assumed to be the same in redundant units
Common cause failures are only considered within groups, no common cause is considered
between different groups as groups are assumed to be independent (for example two
sensor groups involving two different process measurements)
15.4.4 Proof Test Coverage Calculator
The suggested Proof Test Coverage factor that is determined by the SILver Proof Test Coverage
calculator is based on a manufacturer suggested proof test and the effectiveness of that proof test. If
you use the suggested proof test coverage, you must ensure that the actual test(s) performed is
(are) at least as effective as the manufacturer suggested test(s).
15.4.5 Safety Equipment data
exida has compiled a proprietary equipment failure database. This database is a compilation of
failure data collected from a variety of public and confidential sources and presents an industry
average. The database is published as the “Safety Equipment Reliability Handbook, third edition”
© exida.com L.L.C.
exSILentia® User Guide
Page 158 of 168
ISBN 978-0-9727234-9-7. The reliability data collection process as described in this book applies to
the SILver equipment data collection process.
The user is responsible for determining the applicability of the failure data to any particular
environment. The stress levels assumed to determine the equipment failure rate are average for an
industrial environment and can be compared to the RAC Ground Benign classification. Accurate
plant specific data is preferable to general industry average data. Industrial plant sites with high
levels of stress must use failure rate data that is adjusted to a higher value to account for the specific
conditions of the plant.
© exida.com L.L.C.
exSILentia® User Guide
Page 159 of 168
Chapter 16 Terms and Abbreviations
BMS
Burner Management System
BPCS
Basic Process Control System
C&E
Cause and Effect
DTT
De-energize To Trip
ESD
Emergency Shutdown
ETT
Energize To Trip
FMEDA
Failure Modes Effects and Diagnostic Analysis
A systematic procedure during which each failure mode of each component is
examined to determine the effect of that failure on the system and whether that
failure is detected by any automatic diagnostic function
HAZOP
Hazard and Operability Study
HFT
Hardware Fault Tolerance
The number of dangerous random failures tolerated by a system while still
maintaining the ability to successfully perform the safety function
IEC
International Electrotechnical Commission
IPL
Independent Protection Layer
MCI
Maintenance Capability Index
MTTFS
Mean Time To Fail Spurious
MTTR
Mean Time To Repair
PFD
Probability of Failure on Demand
PFDavg
average Probability of Failure on Demand
PFH
Probability of a Dangerous Failure per Hour
PHA
Process Hazard Analysis
PIU
Proven In Use
A Proven In Use assessment is a study of product operational hours, revision
history, fault reporting system, and field failures to determine if there is evidence of
systematic design faults in a product. The IEC 61508 standard provides levels of
operational history required for each SIL level.
PLC
© exida.com L.L.C.
Programmable Logic Controller
exSILentia® User Guide
Page 161 of 168
PTC
Proof Test Coverage
PTI
Proof Test Interval
RRF
Risk Reduction Factor
SFF
Safe Failure Fraction
SIF
Safety Instrumented Function
SIL
Safety Integrity Level
Discrete level (one out of a possible four) for specifying the safety integrity
requirements of the safety functions to be allocated to the electronic /
programmable electronic safety-related systems, where safety integrity level 4
has the highest level of safety integrity and safety integrity level 1 has the lowest
[IEC 61508-4]
Systematic
Capability
Indication of systematic failure protection for an equipment item
SIL Threshold
Parameter to specify the boundary between target Safety Integrity Levels
Per IEC 61511 users of existing hardware either need to select hardware that is
developed and assessed per IEC 61508 or justify the use of that hardware. The
objective of the assessment or justification is to identify that there are “no”
systematic problems with the equipment item under consideration. Systematic
failure protection is part of IEC 61508 compliant development processes,
alternatively sufficient recorded experience can also be used to identify that there
is no known systematic problem.
Assume a calculated Required Risk Reduction Factor of 29, which would fall in
the 10 - 100 Risk Reduction range. With a SIL Threshold Ratio of 1, a calculated
Risk Reduction Factor of 29 would result in a Target SIL of SIL 2. The calculated
Risk Reduction Factor is in this case greater than the SIL determination threshold
which lies at 10 (10 * 1). With a SIL Threshold Ratio of 3, a calculated Risk
Reduction Factor of 29 would result in a Target SIL of SIL 1. The calculated Risk
Reduction Factor is in this case less than the SIL determination threshold which
lies at 30 (10 * 3).
SILac
Achieved Safety Integrity Level based on Architectural Constraints
SILcap
Achieved Safety Integrity Level based on Equipment Systematic Capability
SILpfd
Achieved Safety Integrity Level based on Safety Instrumented Function
probability of failure
SIS
Safety Instrumented System
SRS
Safety Requirements Specification
SRSC&E
System SRS with C&E Matrix
β-factor
Beta factor, indicating common cause susceptibility
© exida.com L.L.C.
exSILentia® User Guide
Page 162 of 168
DD
Dangerous Detected
DU
Dangerous Undetected
SD
Safe Detected
SU
Safe Undetected
AD
Annunciation Detected
AU
Annunciation Undetected
No Effect
No Effect
© exida.com L.L.C.
exSILentia® User Guide
Page 163 of 168
Chapter 17 Software License Agreement – exSILentia
IMPORTANT – READ CAREFULLY: This Software License Agreement is the legal agreement
(“agreement”) between you, the customer who has acquired the software (“You”) and exida.com
LLC (“exida”). Please read this agreement carefully before completing the installation process and
using the exida exSILentia tool (together with its accompanying documentation, the “Software”).
This agreement provides a license to use the Software and contains warranty information and
liability disclaimers.
BY INSTALLING, COPYING OR OTHERWISE USING THE SOFTWARE, YOU ARE
CONFIRMING YOUR ACCEPTANCE OF THE SOFTWARE AND AGREEING TO BECOME
BOUND BY THE TERMS OF THIS AGREEMENT. IF YOU DO NOT AGREE, DO NOT
INSTALL OR USE THE PRODUCT.
IF YOU DID NOT ACQUIRE THE SOFTWARE FROM EXIDA, THEN YOU MAY NOT ENTER
INTO THIS AGREEMENT OR USE THE SOFTWARE. NO OTHER PARTY HAS THE RIGHT
TO TRANSFER A COPY OF THE SOFTWARE TO YOU.
The Software is owned by exida and is protected by copyright laws and international copyright
treaties, as well as other intellectual property laws and treaties.
THE SOFTWARE IS LICENSED, NOT SOLD.
If you have any questions or concerns about this agreement, please contact exida at
[email protected].
1. DEFINITIONS.
a. “exida” means exida.com LLC
b. “You”, “Your” means you and your company
c. "Software" means the product provided to You, which includes the exSILentia tool
and may include associated media, printed materials, and "online" or electronic
documentation.
2. OWNERSHIP.The Software is owned and copyrighted by exida. Your license confers no
title or ownership in the Software and is not a sale of any rights in the Software.
3. GRANT OF LICENSE. exida grants You the following rights provided You comply with all
terms and conditions of this agreement. For each license You have acquired for the
Software:
a. You are granted a non-exclusive right to use and install ONE copy of the software
b. You are granted a non- exclusive right to apply quarterly updates to the Safety
Equipment Reliability Handbook database for the duration of 1 year
c. The license key restricts use to ONE PC only
d. You may make one copy of the installation program for backup or archival purposes
4. RESTRICTED USE.
© exida.com L.L.C.
exSILentia® User Guide
Page 165 of 168
a. You agree to use reasonable efforts to prevent unauthorized copying of the Software
b. You may not disable any licensing or control features of the Software or allow the
Software to be used with such features disabled
c. You may not share, rent, or lease Your right to use the Software
a. You may not modify, sublicense, copy, rent, sell, distribute or transfer any part of the
Software except as provided in this Agreement
b. You may not reverse engineer, decompile, translate, create derivative works,
decipher, decrypt, disassemble, or otherwise convert the Software to a more humanreadable form for any reason
c. You may not use the Software for any purpose other than to perform safety lifecycle
tasks in accordance with the accompanying documentation
d. You may not remove, alter, or obscure any confidentiality or proprietary notices
(including copyright and trademark notices) of exida on, in or displayed by the
Software
e. You will return or destroy all copies of the Software if and when Your right to use it
ends
f. You may not use the Software for any purpose that is unlawful
5. DISCLAIMER OF WARRANTY. The Software is provided on an "AS IS" basis, without
warranty of any kind, including, without limitation, the warranties of merchantability, fitness
for a particular purpose, non- infringement title, and results. The entire risk as to the quality
and performance of the Software is borne by You. Should the Software prove defective,
You, not exida, assume the entire cost of any service and repair. If the Software is intended
to link to, extract content from or otherwise integrate with a third party service, exida makes
no representation or warranty that Your particular use of the Software is or will continue to
be authorized by law in Your jurisdiction or that the third party service will continue to be
available to You. This disclaimer of warranty constitutes an essential part of the agreement.
6. LIMITATION OF LIABILITY. UNDER NO CIRCUMSTANCES AND UNDER NO LEGAL
THEORY, TORT, CONTRACT, OR OTHERWISE, SHALL exida BE LIABLE TO YOU OR
ANY OTHER PERSON FOR ANY INDIRECT, SPECIAL, PUNITIVE, INCIDENTAL, OR
CONSEQUENTIAL DAMAGES OF ANY CHARACTER INCLUDING, WITHOUT
LIMITATION, DAMAGES FOR WORK STOPPAGE, COMPUTER FAILURE OR LOSS
OF REVENUES, PROFITS, GOODWILL, USE, DATA OR OTHER INTANGIBLE OR
ECONOMIC LOSSES. IN NO EVENT WILL exida BE LIABLE FOR ANY DAMAGES IN
EXCESS OF THE AMOUNT PAID TO LICENSE THE SOFTWARE, EVEN IF YOU OR
ANY OTHER PARTY SHALL HAVE INFORMED exida OF THE POSSIBILITY OF SUCH
DAMAGES, OR FOR ANY CLAIM. NO CLAIM, REGARDLESS OF FORM, MAY BE
MADE OR ACTION BROUGHT BY YOU MORE THAN ONE YEAR AFTER THE BASIS
FOR THE CLAIM BECOMES KNOWN TO THE PARTY ASSERTING IT.
7. TERMINATION. exida may terminate Your license if You do not abide by the license terms.
Upon termination of license, You shall immediately discontinue the use of the Software and
shall within ten (10) days return to exida all copies of the Software or confirm that You have
destroyed all copies of it. Your obligations to pay accrued charges and fees, if any, shall
survive any termination of this Agreement. You agree to indemnify exida for reasonable
attorney fees in enforcing its rights pursuant to this license. Sections 2, 4 5, 6, 7 and 13 will
survive expiration or termination of this Agreement for any reason.
© exida.com L.L.C.
exSILentia® User Guide
Page 166 of 168
8. exSILentia USE. You are required to perform any verification activities when using the
software as described in its user guide.
9. REGISTRATION. The software will only function if You are using a valid "License Key". The
License Key will be provided by exida. Software registration is required.
10. UPGRADES. If this copy of the software is an upgrade from an earlier version of the
software, it is provided to You on a license exchange basis. Your use of the Software
upgrade is subject to the terms of this license, and You agree by Your installation and use of
this copy of the Software to voluntarily terminate Your earlier license and that You will not
continue to use the earlier version of the Software or transfer it to another person or entity.
11. ADDITIONAL SOFTWARE. This license applies to updates, upgrades, plug-ins and any
other additions to the original Software provided by exida, unless exida provides other terms
along with the additional software.
12. THIRD PARTY SERVICES. This Software may make use of, or have the ability to make
use of, link to, or integrate with 3rd party content or services. The availability of the content
or services is at the sole discretion of the 3rd party service providers and may be subject to
usage agreements and other restrictions. You agree to indemnify and save harmless exida
from all claims, damages, and expenses of whatever nature that may be made against exida
by 3rd party content and service providers as a result of Your use of the Software.
13. GENERAL.
1. SERVICES. There are no services provided under this Agreement. Support,
maintenance and other services, if available, must be purchased separately from
exida
2. APPLICABLE LAW. This license shall be interpreted in accordance with the laws of
Pennsylvania, USA without giving effect to any choice of law principles that would
require the application of the laws of a different state or country. Any disputes
arising out of this license shall be adjudicated in a court of competent jurisdiction in
Pennsylvania, USA. The United Nations Convention on Contracts for the
International Sale of Goods and the Uniform Computer Information Transactions
Act (USA) do not apply to this Agreement.
3. GOVERNING LANGUAGE. Any translation of this License is done for local
requirements and in the event of a dispute between the English and any nonEnglish versions, the English version of this License shall govern.
4. COMPLIANCE WITH LAWS. You will comply with all applicable export and import
control laws and regulations in your use or re-exportation of the Software and, in
particular, you will not export or re- export the Software without all required
government licenses. You will defend, indemnify, and hold harmless exida and its
suppliers from and against any violation of such laws or regulations by you.
5. RELATIONSHIP BETWEEN THE PARTIES. The parties are independent
contractors and neither party is the agent, partner, employee, fiduciary or joint
venturer of the other party under this Agreement. You may not act for, bind, or
otherwise create or assume any obligation on behalf of exida. There are no third
party beneficiaries under this Agreement.
6. ASSIGNMENTS. You may not assign or transfer, by operation of law or otherwise,
your rights under this Agreement (including your licenses with respect to the
Software) to any third party without exida’s prior written consent. Any attempted
© exida.com L.L.C.
exSILentia® User Guide
Page 167 of 168
assignment or transfer in violation of the foregoing will be void. exida may freely
assign its rights or delegate its obligations under this Agreement.
7. SEVERABILITY. If any provision of this Agreement is held unenforceable by a
court, such provision may be changed and interpreted by the court to accomplish
the objectives of such provision to the greatest extent possible under applicable law
and the remaining provisions will continue in full force and effect. Without limiting
the generality of the foregoing, you agree that Section 6 will remain in effect
notwithstanding the unenforceability of any other provision of this Agreement.
8. ENTIRE AGREEMENT. This license constitutes the entire agreement between the
parties relating to the Software and supersedes any proposal or prior agreement,
oral or written, and any other communication relating to the subject matter of this
license. Any conflict between the terms of this License Agreement and any
Purchase Order, invoice, or representation shall be resolved in favor of the terms of
this License Agreement. In the event that any clause or portion of any such clause is
declared invalid for any reason, such finding shall not affect the enforceability of the
remaining portions of this License and the unenforceable clause shall be severed
from this license. Any amendment to this agreement must be in writing and signed
by both parties.
9.
Software License Agreement v1.0 (May 20, 2005)
Copyright © 2005 exida.com LLC
64 North Main StreetSellersville, PA 18960
exSILentia, SILect, and SILver are trademarks of exida.com LLC
© exida.com L.L.C.
exSILentia® User Guide
Page 168 of 168