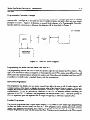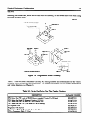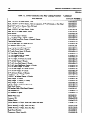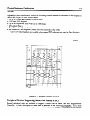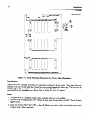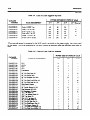
1
Series One”
Programmable
Controllers
Series One/One Plus
User’s Manual
GE Fanuc Automation
hgust
1988
GEK-90842C
WARNINGS, CAUTIONS, AND NOTES AS USED IN THIS PUBLICATION
Warning notices are used in this publication to emphasize that hazardous voltages, -ts,
mmtures,
or other conditions that could cause personal injuryexist in this equipment or may be asso&ted with its
use.
In situations where inattention could cause eitkr personal injury or damage to equipment, a Waning
noticeis used.
El
CAUTION
Caution notices are used where equipment might be damaged if care is not taken.
NOTE
Notes merely call attention to information that is especially significant to understanding and operating the
equipment.
This document is based on information available at the time of its publication. While efforts have been made to be accurate,
the information contained he1611does not purport to cover all details or variations in hardware ad software, nor to provide
for every possible contingency in connection with installation, operation, and maintenance. Features may be described herein
which are not present in all hardware and software systems. GE Fanuc Automation assumes no obligation of notice to
holders of this document with respect to changes subsequently made.
GE Fanuc Automation makes no representation or warranty, expressed, implied, or statutory with respect to, and assumes no
responsibility for the accuraq, completeness, suBiciency, or usefulness of the information contained herein. No wananties
of merchantability of fitness for purpose shall apply.
Wopyright 1987GE Fanuc Auto&n
North Amerka,
Inc.
l
Preface
e*
Rll
GE&90842
The purpose of this manual is to provide information for the user to install, program and implement the
family of Series One TMfamily of Programmable Controllers (PCs) into a control system. The Series
One family of PCs includes the Series One, Series One Model E, Series One Plus and Series One Plus
3.7K PCs, which are described in this manual. The Series One Junior PC is described in a separate
User’s Manual, GEK-90503.
The Series One PC provides the user with the capability of developing and programming a control
system using the familiar ladder diagram logic approach. The Series One Plus includes the same ladder
diagram function plus a group of data operation functions, which includes data moves, math functions,
conversion, and fault diagnosis.
Chapter 1, Introduction, is an introduction
to the Series One and Series One Plus PCs, with emphasis
on features and capabilities. A summary of terms common to PCs is provided at the end of this chapter
as an aid to first-time PC users.
Chapter 2, Physical Equipment Configuration, provides a detailed description of the hardware
components of the PC. This chapter provides an understanding of the components of a Series One or
Series One Plus PC system and how they are related to the overall system
Chapter 3, Installation, provides the specifications
Programmable
and instructions
required for installation
of your
Control system.
Chapter 4, J?C Operation, describes the operation of the Series One and Series One Plus PCs,
including features and functions of the programmer used for entering new programs, editing existing
programs, monitoring the status of inputs or outputs, displaying timer or counter accumulated values,
and displaying register contents. The last part of this chapter describes operation of peripheral devices
Peripherals include an audio cassette tape
which may be used with both Programmable Controllers.
recorder for recording your program after it has been entered in order to have a permanent record of that
program, a PROM Writer Unit, which allows a non-volatile means of program storage within the PC,
and a Printer Interface Unit to allow documenting of your programs.
Chapter 5, Programming, provides the basic information required in order to develop, enter, and
implement your programs. A description of each function is provided, including examples of using each
Progr amming, Basic Instructions,
function.
Three sections are included:
and Data Operation
Instructions.
Chapter 6, I/O Specifications and Wiring, is a guide to the specifications
modules
and their physical
connections
of the input and output (I/O)
to field devices.
Chapter 7, Maintenance, is a guide to basic maintenance
of your system, should it be needed.
Reliability of the Series One family of PCs is excellent and other than changing the Lithium back-up
battery, when required, there should be little maintenance required of your PC. This chapter includes
troubleshooting procedures and information on replacing components.
Chapter 8, Applications, provides several typical Applications
and Series One Plus PCs.
mable controller.
This chapter should be especially
using the capabilities of the Series One
helpful to first-time users of a program-
Appendices A through D contain a summary of Related Documentation,
a Glossary of Programmable
Controller Terms, a guide to the compatibility of the Series One family of Programmable Controllers,
and a Description of other GE Fanuc Automation North America, Inc. Programmable Controllers. A
comprehensive index is included as an aid to the location in the manual of particular items of interest.
iv
Preface
GEK-90842
All references to Series One in this manual for hardware and programming apply to both the Series One
and Series One Model E PCs, except where specifically noted in the text. Similarly, all references to
Series One Plus apply to both the Series One Plus and Series One Plus 3.7K PCS.
Should further infomation
be required, contact your salesperson
America, Inc., P. 0. Box 8106, Charlottesville, Virginia 22906.
or GE Fanuc Automation
First Edition - May 1986
Second Edition - March 1987
Third Edition -September 1987
Henry A. Konat
Senior Technical
Writer
North
Preface
V
GEK-90842
NOTE
The Series One/Series One Plus and associated modules have been tested and found
to meet or exceed the requirements of FCC Rule, Part 15, Subpart J. The following
note is required to be published by the FCC.
This equipment generates, uses, and can radiate radio frequency energy and if not
installed and used in accordance with the instruction manual, may cause interfe=nce
to radio communications.
It has been tested and found to comply with the limits of
a Class A computing device pursuant to Subpart J of Part 15 of FCC Rules, which
are designed to provide reasonable protection against such interference when operated in a commercial environment. Operation of this equipment in a residential area
is likely to cause interference, in which caSe the user at his own expense will be
required to take whatever measures may be required to correct the interference.
Content
vii
GE&90842
CHAPTER
CHAPTER
CHAPTER
CHAPTER
1.
2.
3.
4.
SERIES
ONE/SERIES
ONE PLUS PC INTRODUCTION
History of Programmable Controllers
Advantages Over Other Control Devices
Series One Programmable Controllers
Series One Model E Programmable Controller
Series One Plus 3.7K
Programmable Controller Concepts
Programming the Series One and Series One Plus
PCS
Function of the Central Processing Unit
Memory Word Length
Types of Memory for Program Storage
Function of the Input/Output Circuitry
Communicating
With Other Devices
Remote I/O for Series One and Series One Plus
PC Terminology
PHYSICAL
EQUIPMENT CONFIGURATION
Rack Description
Module Location in Rack
Heat Dissipation
Adding Racks
Programmer Tape Port
Programmer Mount Assembly
Hardware Requirements
System Estimating
Peripheral Devices Supporting Series One Family of
PCS
Data Communications
Unit
Printer Interface Unit
PROM Writer Unit
l-1
1-1
1-1
l-3
1-3
l-5
1-5
1-6
1-6
1-7
1-7
l-8
l-8
l-8
2-1
2-1
2-2
2-2
2-4
2-4
2-7
2-7
29
2-10
2-11
2112
INSTALLATION
Specifications for Installation
Installation
Power Supply Limitations for Racks
units of Load
Safety Considerations
Recommended
Field Wiring Procedures
3-l
32
3-13
3-13
3-15
3:15
PC OPERATION
Introduction to PC Operation
Programmer
Programmer Features
Mode Switch
Atikhwss
Data Display
Status Display
Logic Display
Logic Keys
Editing Keys
4-l
4-l
4-2
4-2
4-2
4-2
4-2
4-3
4-4
Content
GEK-90842
Shifted Functions
Data Operation Keys
Peripheral Jack
Program Checking and Error Codes
Operation Sequences
Monitor CPU Logic
Search CPU Logic
Alter One Logic Element
Delete One Logic Element
Clear All Memory
Insert One Logic Element
Monitor I/O Status
Monitor Timer or Counter Status
Display a Specific Address
Monitor Data Register Contents
Change Contents of a Data Register
Enter or Change a Password
Access to Programmer Functions with Password in
Effect
Forcing References
Operation With Peripheral Devices
Tape Recorder Operation
Recording A Program
.
Verifying A Program
Loading A Program
Printer Interface Unit
Hardware Description
Hardware Features
80/l 32 Column Selection Switch
External Power Supply Connector
Power Supply Select Switch
Sequence of Operation
Power-up Sequence
User Program Transfer From PC To Printer Interface
unit
Selection of Printout Format and Type of PC
Start Printer Operation
Printing Of Error Messages During Ladder Diagram
Listing
Printing Of Error Messages During Boolean Listing
Cross Reference Printout
Expanded Print Format
Printout Annotation Explanation
Sample Printout
PROM Writer Unit
Front Panel Features
Sequence of Operation
External Power Supply Connector
Power Supply Select Switch
4-5
4-6
4-7
4-7
48
4-10
4-11
4-11
4-12
4-12
4-12
4-12
4-13
4-13
4-14
4-14
4114
4-14
4-15
4-15
4-15
4-16
4-16
4-18
4-18
4-19
4-20
4-21
4-21
4-21
4-22
4-22
4-22
4-22
4-22
4-23
4-23
4-23
4-24
4-24
4-25
4-29
4-30
4-3 1
4-31
4-31
ix
Content
GEK-90842
Timer/Counter Setpoint Unit
Timer/Counter Setpoint Unit Specifications
Remote Mounting of Timer/Counter Setpoint Unit
References for the Timer/Counter Setpoint Unit
Example of Using Thumbwheel Inputs
CHAPTER 5.
Section 1.
Section
2.
PROGRAMMING
Introduction to Programming
General Information
Planning a PC System
How to Use This Chapter
Programming Fundamentals
Significance of References
Significance of Input/Output References
Internal Coils
Use of the Special Function Coils
Shift Register References
Timer and Counter References
Data Registers
Flexibility in Using References
Operating Principles
scanning
Programmer Functions
Basic Ladder Diagram Format
Concept of Power Flow
Unlimited References
Basic Instructions
Basic Instructions
How to Begin Programming
Entering a Rung With Series Contacts
Entering the Clear all Memory Sequence
Entering a Rung with Parallel Contacts
Entering a Simple Timer Rung
Basic Relay Logic (Motor Starter)
Motor Starter Logic Description
Normally Closed Input
Push-Down Stack
Detailed Example of AND SIR, OR STR
Description of Operation
Use of Retentive Coils as Latches
Programming a Latched Relay
Master Control Relay Functional Description
Programming a Master Control Relay Function
Multiple Master Control Relay Functions
Disabling of Outputs
Timer and Counter Functional Description
Special Timer/Counter References
Programming Timers
Specifying Timer Preset Values
Programming Counters
4-32
4-33
4-33
4-33
4-34
5-1
5-l
5-l
5-1
5-7
5-7
58
5-13
5-13
5113
5-13
5-13
5-14
5-14
5-14
5-15
5-17
5-17
5-18
5-19
5-19
5-19
5-19
5-19
5-20
S-20
5-20
S-21
5-22
5-23
5-24
5-24
5-26
5-26
5-27
5-28
5-28
5-29
S-30
5-30
5-30
5-31
5-32
Content
X
GEK-90842
Section
3.
Extending the Timer and Counter Range
Sequencer Operation
Referencing Sequencer Contacts with a Series One
Plus PC
Shift Register Functional Description
Shift Register References
Shift Register Operation
Forcing I/O References
Data Operation Instructions for the Series One Plus Programmable
Controller
Data Operations
Using References for Data Operations
Entering a Constant Value
Entering a Group Reference
Data Register References
Timer/Counter References
Example of Specifying a Group Reference
Programming the Data Operation Instructions
Special Function Coils for Data Operations
D*STR (FSO)
D.STRl (F51)
D.STR-2 (F52)
D*STR3 (F53)
D*STRS (FSS)
DeOUT (F60)
D.OUTl (F61)
D*OUT2 (F62)
D*OUT3 (F63)
D*OUTS (F65)
CMPR (F70)
Addition (+), BCD 4 Digit (F71)
Subtraction (-), BCD 4 Digit (F72)
Multiplication (X), BCD 4 Digit (F73)
Division (:), BCD 4 Digit (F74)
DoAND (DATA AND) (F75)
D.OR (DATA OR) (F76)
Shift Right (FSO)
shift Left (F81)
Decode (F82)
Encode (F83)
INV (F84)
BIN (BCD to Binary) (F85)
BCD (Binary to BCD) (F86)
External Fault Diagnosis (F20)
CHAPTER 6.
I/O SPECIFICATIONS AND WIRING
I/O system IntKKhlctio~
Field Wiring to I/O Modules
16 Circuit J/O Modules with Connectors
I/O References for 16 Circuit Modules
5-34
5-36
5-37
5-38
5-39
5-40
5-42
5-43
5-43
5-44
5-44
5-44
5-44
5-45
5-45
5-45
5-46
5-47
5-48
5-48
5-49
5-49
5-50
5-50
5-51
5-51
5-52
5-52
5-53
5-56
5-58
5-59
5-61
5-63
5-65
S-65
5-67
5-68
5-68
5-69
5-70
5-71
6-1
6-2
6-4
6-4
xi
Content
GEK-90842
I/O Interface Cable Cross Reference
List
I/O Module Catalog Numbers
I/O Module Specifications and Wiring
115 V ac Input IC61OMDL125
230 V ac Input IC61OMDL127
115 V ac Isolated Input IC61OMDL126
24 V dc Sink Input (8 Circuits) IC61OMDLlOl
24 V dc Sink Input (16 Circuits) IC61OMDL106
24 V dc Sink Load Input (16 Circuits) with
Removable Terminal Board IC61OMDL107
24 V ac/dc Source Input IC61OMDLlll
24 V ac/dc Source Input (16 Circuits) with
Removable Terminal Board IC61OMDL112
115/230 V ac Output IC61OMDL175
115/230 V ac Isolated Output IC61OMDL176
24 V dc Sink Output (8 Circuits) IC61OMDL151
24 V dc Sink Output (16 Circuits) IC6lOMDL156
24 V dc Sink Output (16 Circuits) with Removable
Terminal Board IC6lOMDL157
24 V dc 2 Amp Sink Output IC61OMDL153
24 V dc 2 Amp Sir&/Source Output IC61OMDL154
24 V dc Source Output IC61OMDL155
24 V dc Source Output (16 Circuits) with
Removable Terminal Board IC61OMDL158
_
Relay Output (8 Circuits) IC61 OMDL180
Relay Output (16 Circuits) with Removable
Terminal Board IC61OMDL182
24 V dc Input/Output (4 In/4 Out) IC61OMDL103
24 V dc Input/Relay Output (4 In/4 Out)
IC61OMDL104
Thumbwheel InterfaceIC61OMDL105
High Speed CounterIC6lOMDLllO
Module Location
Interface to Field Devices
Up/Down Counter Inputs
Encoder Interface 1
Binary Coded Decimal (BCD) Output
Counter Output
Interface to User Logic
Interface Function Definition
Ouptut Logic
Manual Mode
Counter Mode
Fitter Selection
Fast Response I/OIC61OMDLll!5
Mode Selection
Output Logic - Manual Mode
Output Logic - Fast Response Mode
I/O SimulatorIC61OMDL124
Analog InputIC61OMDL116
6-5
6-6
6-7
6-7
6-8
69
6-10
6111
6-12
6-13
6-14
6-16
6-17
6-18
6-19
6-20
6-22
6-23
6-24
6-26
6-27
6-29
6-31
6-33
6-36
6-39
6-41
6-42
6-43
6-44
6-46
6-48
6-49
6-50
6-53
6-53
6-53
6-55
6-56
6-58
6-58
6-58
6-61
6-62
Content
xii
GEK-90842
Introduction
Hardware Features
Power Requirements
General and Electrical Specifications
I/O Reference Definitions
Sample Ladder Logic
Analog Input Module Features
Selection Of Operating Mode
Analog OutputIC61OMDL166
Introduction
Hardware Features
Power Requirements
General and Electrical Specifications
I/O Reference Definitions
Sample Ladder Logic
Analog Output Module Features
UL Listed Products
5-Slot Rack, UL ListedIC61OCHS 111
115 V ac Input Module, UL ListedIC61OMDL135
Relay Output Module, UL ListedIC61OMDL181
115 V ac Output Module, UL ListedIC61OMDL185
115 V ac Input Module (16 Circuits) with
Removable Terminal Board IC61OMDL129
,~
115/230 V ac Output Module (8 Circuits) with
Removable Terminal Board IC61OMDL179
CHAPTER
7.
8.
6-76
6-77
MAINTENANCE
Introduction to Maintenance Procedures
Troubleshooting
Aids
Basic Troubleshooting
Procedure
General Troubleshooting
Procedure
Replacement of Components
Replacing a Rack
Replacing a CPU Module
Replacing I/O Modules
Replacing the Battery
Adding Memory
Spare Parts and Components
Fuse List
CHAPTER
6-62
6-62
6-62
6-62
6-63
6-64
6-66
6-66
6-67
6-67
6-67
6-67
6-67
6-68
6-69
6-70
6-71
6-72
6-73
6-74
6-75
7-1
7-1
7-1
7-2
7-3
7-3
7-3
7-4
7-4
7-5
7-6
7-7
APPLICATIONS
Application
1 - One-Shots
Application 2 - Flip Flop
Application 3 - Event/I%ne Drum
Application 4 - Cascaded Counters
Application 5 - Coil 374, Power-Up One-Shot
Description of Operation
Application 6 - Coil 375, lOHz Clock
Example 1: - Cumulative Timer
Example 2: - Time of Day Clock
Application 7 - Start/Stop Circuit
8-1
8-2
8-3
8-5
8-7
8-7
8-8
8-8
88
8111
e
Content
GEK-90842
Application 8 - High Speed Counter Applications
Programmable Cam Switch
Cut to Length
Measuring a Random Length
Sample Calculation
Application 9 - Typical Shift Registers
Shift Register References
APPENDIX A.
Related Documentation
Introduction
GEK-90477 Series One/Three Data Communications
Manual
GEK-90507 Remote I/O User’s Manual
GEK-90825 Series Six PC I/O Link Local Module
User’s Manual
GEK90846Portable Programmer User’s Manual
GEK-96662 Logicmaster 1 Programmer Documentor
Manual
GFK-0075 Logicmaster 1 Family Programming and
Documentation Software User’s Manual
APPENDIX B.
APPENDIX C.
APPENDIX D.
Glossary of Terms
Series One Family of Programmable Controllers Compatibility
Guide
0 t her Programmable Controllers
Series OneTMJunior Programmable Controller
Series ThreeTMProgrammable Controller
Available I/O Types
Series SixTMProgrammable Controller
Programming
Optional Items
Series SixTMPlus Programmable Controller
8-12
8-13
8-16
8-18
8-18
8-21
8-21
A-l
A-l
A-l
A-l
A-2
A-2
A-3
A-4
B-l
Cl
D-l
D-l
D-2
D-2
D-3
D-3
D-4
D-4
Figures
xiv
GEK-90842
Figure
1-l
l-2
2-l
2-2
2-3
2-4
2-5
2-6
2-7
2-8
29
2110
3-l
3-2
3-3
3-4
3-5
3-6
3-7
3-8
39
3-10
3-11
3-12
3-13
3114
4-l
4-2
4-3
4-4
4-5
4-6
4-7
4-8
49
4-10
4111
5-1
5-2
5-3
5-4
5-5
5-6
5-7
5-8
59
5110
Series One/Series One Plus Programmable Controllers
Basic PC Block Diagram
Typical Rack
Typical Hardware
Typical (5 Slot) Rack
Typical (10 Slot) Rack
Expander Cable Installation
Programmer Mount Assembly
Example of Relay Control
Data Communications Unit
Printer Interface Unit
Prom Writer Unit
Rack Mounting Dimensions for Proper Heat Dissipation
Recommended Rack Grounding
10 Slot Rack, 19 Inch Mounting Dimensions
I/O Expansion Cable Connection
I/O Addressing Switches in Series One Plus 10 Slot Racks
Examples of Rack Configuration Switch Setting Series One
Plus
Typical Installation Dimensions
CPU Module
Proper Module Insertion
_
Proper Module Removal
Typical Routing of I/O Wiring
Pull Tab on Programmer Cable
Installation of Programmer Cable
Programmer Mount Assembly
Programmer Features
Series Logic (AND)
Parallel Logic (OR)
Volume Control Range Setting
Printer Interface Unit
Sample Ladder Diagram Printout
Sample Boolean Printout
Sample Outputs Used Table Printout
Sample Outputs Used Table Printout (continued)
PROM Writer Unit Features
Timer/Counter Setpoint Unit
I/O References Per Physical Placement for 5 and lo-Slot
Racks
CPU Scanning Sequence
Programmer for Series One and Series One Plus
Typical Ladder Diagram
Sample Relay Logic (Motor Starter)
Example of Normally Closed Inputs
AND STR and OR STR COMCCtiOIlS
Push-Down Stack Storage Locations
Push-Down Stack Logical Opcmtions
AND SIR/OR STR Example Number 1
l-2
l-5
2-l
2-2
2-3
2-3
2-4
2-5
29
2-10
2-11
2112
3-2
3-3
3-4
3-4
3-5
3-6
3-7
3-8
3-9
39
3-11
3-12
3-12
3113
4-l
4-3
43
4-17
4-20
4125
4-26
4-27
4-28
4-29
4-32
59
5-15
5-16
5-17
5-21
5-22
5-23
5-24
5-24
5125
Figures
XV
GEK-90842
5-11
5-12
5-13
5-14
5-15
5-16
5-17
5-18
5-19
5-20
5-21
5-22
5-23
5-24
5-25
5-26
5-27
6-l
6-2
6-3
6-4
6-5
6-6
6-7
6-8
69
6-10
6-11
6-12
6-13
6-14
6-15
6.16
6-17
6.18
6-19
6-20
6-21
6.22
6-23
6-24
6-25
6-26
6-27
6-28
6-29
Q30
6-31
6-32
AND SIR/OR STR Example Number 2
Example of Latching Logic
Example of Master Control Relay Logic
Multiple Master Control Relay Logic
Sample Coil Disabler Logic
Sample of Timer Logic
Example of Timer Logic
Example of Counter Logic
Example of Counters
Example of Extended Counters
Illustration of Sequencer Operation
Example of Sequencer
Typical Sequencer Logic
Typical Shift Register
Example of Shift Register
Example of Shift Register Logic
Data Operation Block Diagram
A. Typical I/O Module
B. High Density Module With
Removable Connector
Typical I/O Terminal Configuration
I/O Interface Cable Wiring List
Example of 16 Circuit I/O References
Wiring for 115 V ac Inputs
Wiring for 230 V ac Inputs
Wiring for 115 V ac Isolated Inputs
Wiring for 24 V ac Sink Inputs
I/O Points VS Temperature
Wiring for 16 CIRCUIT, 25 V dc Sink Input Module
J/O Points VS Temperature
Wiring for 16 Circuit, 24 V dc Sink Load Inputs
Wiring for 24 V ac/dc Inputs
If0 Points vs Temperature Chart
Wiring for 16 Circuit 24 V ac/dc Source Load Inputs
I/O Points vs Temperature
Wiring for 115/230 V ac Outputs
I/O Points vs Temperature Chart
Wiring for 15 V ac Isolated Outputs
YO Points vs Temperature Chart
Wiring for 24 V dc Sink Outputs
x/O Points vs Temperature
Wiring for 16 Circuit 24 V dc Sink Outputs
YO Points vs Temperature Chart
Wiring for 16 Circuit 24 V dc Sink Outputs
I/O Points vs Temperature Chart
Wiring for 24 V dc 2 Amp Sink Outputs
UO Points vs Temperature
Wiring of 24 V dc 2 Amp Sink/Source Output
I/O Points vs Temperature Chart
Wiring for 24 V dc Source Outputs
I/O Points vs Temwrature
5-26
5-27
5-28
5-29
5-30
5-31
5-32
5-33
5-34
5-35
5-36
5-37
5-38
5-39
5-40
5-41
5-43
6-3
6-3
6-4
6-5
6-7
6-8
69
6-10
6-11
6-11
6-12
6-12
6-13
6-14
6-15
6.16
6.16
6-17
6-17
6.18
818
6-19
6-19
6-20
6-21
6-22
6-22
6-23
6-23
6-24
6-25
6126
Figures
xvi
GEIWO842
6-33
6-34
6-35
6-36
6-3’7
6-38
6-39
6-40
641
6-42
6-43
6-44
645
6-46
6-47
6-48
6-49
6-50
6-51
6-52
6-53
6-54
6-55
6-56
6-57
6-58
6-59
6-60
6-61
6-62
6-63
6-64
6-65
6-67
7-l
7-2
7-3
7-4
8-l
8-2
8-3
8-4
8-5
Wiring for 24 V dc Source Outputs
Wiring for 8 Circuit Relay Outputs
Wiring for 16 Circuit Relay Outputs
Wiring for 24 V dc Inputs/Outputs
Typical Wiring Diagram
Sample 24 V dc INPUT/RELAY OUTPUT Circuits
Wiring for Thumbwheel Interface
Thumbwheel Interface Cable Wire List
High Speed Counter Overview
HSC Location in 5-Slot Rack
HSC Connector Pin Definition
Signal Direction
UP/DOWN/RESET
Input Circuit
Encoder with RESET/MARKER
Option Resetting Counter
Once per Revolution of Encoder Shaft
Encoder with RESET Option in Series with Home Limit
Switch Such That Counter is Reset When Both Home
Limit Switch and RESET/MARKER
Pulse are Enabled
Encoder With Limit Switch Resetting Counter and
Photoelectric Cell Inhibiting the Counter Operation
Sample BCD Output Circuit
BCD Output Wiring Diagram
User Load Wiring Diagram
I/O and Counter Function Reference Chart
Filter Selection with Dip Switch
Module Reference NUMBER/LOGIC
Symbol Definition
Fast Response Module Logic Diagram
Wiring for Fast Response I/O Module
I/O Simulator Module Faceplate
Analog Input Module Faceplate
Analog Output Module Faceplate
UL Listed 5-Slot Rack
Wiring for UL Listed 115 V ac Input Module
Wiring for UL Listed Relay Output Module
Wiring for UL Listed 115V ac Output Module
YO Points vs Temperature Chart
Wiring for 115 V ac Inputs with Removable Terminal
Board
J/O Points vs Temperature Chart
Wiring for 115/230 V ac Output with Removable Terminal
Board
Troubleshooting
Indicators
Battery Location and Connection
Location of Extra Memory Socket
Acccssury Kit for Series One/One Plus
Typical One-Shot Timing
Typical One-Shot Logic
Typical Flip-Flop Timing Diagram
Typical Flip-Flop Logic
.
Evenflime Drum Logic
6-26
6-28
6-30
6-32
6-34
6-35
6-37
6-38
6-40
6-41
642
6-43
6-43
6-44
6-44
6-45
646
6-47
6-48
6-49
6-55
6-57
6-59
6-60
6-61
6-66
6-70
6-72
6-73
6-74
6-75
6-76
6-76
6-77
6-77
7-2
7-4
7-5
7-7
8-l
8-l
8-2
8-2
8-3
xvii
Figures
GE&90842
8-6
8-7
8-8
89
8-10
8-11
8-12
8-13
8-14
8-15
8.16
8-17
8-18
8-19
8-20
8121
Sample Cascaded Counter Logic
Typical Machine or Process Power-Up Inhibit Logic
Cumulative Timer
Sample 24 Hour Time Clock Logic
Time Clock Resetting
Fast Response Start/Stop Logic
Worst Case Timing Diagram
Application System
Programmable CAM Switch Logic Timing Diagram
Programmable CAM Switch
Output No. 1 Logic Diagram
Wiring Diagram
Cut to Length Program
Measuring a Random Length
Shift Register Example
Typical Shift Register Logic
8-6
8-7
8-8
89
8-10
8111
8-11
8-12
8-13
8-14
8-16
8-16
8-17
8-18
8-21
8-22
Tables
moo
XVIII
GEK-90842
Table
l-l
l-2
2-l
3-1
3-2
3-3
3-4
3-5
4-l
4-2
4-3
4-4
4-5
4-6
4-7
4-8
5-l
5-2
5-3
5-Q
5-5
5-6
5-7
5-8
6-1
6-2
6-3
6-4
6-5
6-6
6-7
6-8
6-9
6-10
6-11
6-12
6-13
6-14
6-15
6-16
6-17
7-1
c-1
Series One Family General Specifications
Common PC Terminology
Series One/Series One Plus Catalog Numbers
Series One Installation Specifications
CPU Option Settings
Memory Size
Units of Load Supplied by Rack
Units of Load Used by Modules
Error Code Definitions
PC Operation Sequences
Printer Interface Unit Specifications
Printer Requirements
Format and PC Selection
Ladder Diagram Listing Error Messages and Definitions
Boolean Listing Error Messages and Definitions
Timer/Counter Setpoint Specifications
Series One Model E/One Plus Basic Ladder Diagram
Instructions
Series One Execution Times
Series One Plus Data Operation Instructions
Series One/One Plus Instruction Groups
Summary of References
-Summary of I/O References for 8 Circuit Modules
^
Effect of Coil 376 (Output Disabler)
Data Operation Function Numbers
I/O Module Catalog Numbers
Maximum Current vs Load Type for Relay Outputs
Maximum Current vs Load Type for Relay Outputs
Maximum Current vs Load Type for Relay Outputs
Number of HSCs vs Discrete I/O Capacity
Manual Mode Output Logic Truth Table
Real Time Comparison Table for Preset Initially > Current
count
Real Time Comparison Table for Preset Initially < Current
count
Output State vs Real Time Comparison Status in Counter
Mode
Output Logic in Counter Mode
Maximum Current vs. Load Type for Relay Outputs
Operating Mode Selection
Truth Table for Output in Fast Response Mode
(S5 or S7 Have Been Enabled)
Analog Input Module Specifications
&!o Poh Iwinition
Analog Output Module Specifications
I/O Point Definition
I/O Module Fuse List
I/O Module Capability/Compatibility Guide
l-4
l-8
2-5
3-1
3-8
38
3-14
3114
4-7
49
4-19
4-19
4-22
4-23
4123
4-33
5-2
5-3
5-4
5-7
58
5-10
5-29
5-46
66
6-27
6-29
6-34
6-42
6-53
6-53
6-54
6-54
6-55
6-57
6-58
6-58
6-63
6-63
6-68
6-68
7-7
c-3
xix
Tables
c-2
c3
cb
D-l
D-2
D-3
D-4
Summary of Progr amming References for Series One
Family of Programmable Controllers
Pv!r amming Function Compatibility Guide
Examples of Valid System Configurations for I/O Points
Series One Junior Capabilities
Series Three PC Specifications
Series Six CPU Capacities
Series Six Plus Combined Memory Configurations
C-4
c5
C-6
D-l
D-2
D-3
D-4
Chapter
m
11
1
Series One/Series One Plus PC Introduction
?
GEL90842
History of Programmable Controllers
The factory
with a future is here today, with machine and process controls provided by modem
electronic devices. Today’s automated factory can provide improved system reliability, product quality,
information flow, reduced costs, efficiency, and flexibility. One of the basic building blocks of such a
factory is an electronic device called a Programmable Controller. This device was first introduced in
1970 and has been refined every 4-7 years as newer electronic components, such as microprocessors, are
made available. Today’s Programmable Controllers are designed using the latest in microprocessor
designs and electronic circuitry which provide reliable operation in industrial applications where many
hazards such as electrical noise, high temperature, unreliable AC power, and mechanical shock exist.
Here is where the Programmable Controller is in its element; it was designed for the industrial
environment from its conception.
Advantages Over Other Control Devices
Programmable Controllers, or PCs or PLCs as they are frequently referred to, offer many advantages
over other control devices such as relays, electrical timers and counters, and drum type mechanical
controllers.
These advantages should be considered beyond just price when selecting any control
device:
l
Improved reliability
Smaller space required
Easiertomaintain
0 Reusable
0 Reprogrammable if requhments change
0 More flexible-performs more fhctions
Series One Programmable Controllers
A complete Series One PC contained in one S-slot rack can have over 1700 words of user logic, up to 64
timer/counters, and up to 64 I/O points in a panel surface area of only 54 square inches. That is less
space than four 4pole relays might occupy. An available lo-slot rack can contain up to 120 I/O points.
By adding additional racks (up to a total of three), the I/O can be expanded up to a total of 112 I/O
points in a Series One PC or 168 points in a Series One Plus PC. Modules can be replaced individually
without disturbing adjacent modules or their field wiring. The VO can be intermixed in many configurations, limited only by the module types available (either 4,8, or 16 circuits per module - see Chapter 6).
Users need only purchase those modules required for their application; there is no fixed mix such as 12
in/8 out or 20 in/l2 out,
The hand-held programmer can be fixed onto the CPU for quick reference, removed and carried in a
pocket for future use, connected to the CPU via a 5 foot (1.5m) cable for flexible temporary use or
mounted on the outside of a panel or console. It is a simple pushbutton and display unit designed for
easy transportation and rugged use. Progr amming can also be done with the Portable Programmer or
with a Workmaster Industrial computer using Logicmaster 1 application software for Series One or
Logicmaster 1F application software for Series One Model E, Series One Plus and Series One Plus
3.7K.
The Series One and Series One Plus PCs are designed
control replacements.
One Plus PCs.
to be very cost effective relay or other sequential
Despite the low cost, there is a lot of capability within the Series One and Series
12I)
Series One/Series One Plus PC Introduction
GEK-90842
The advantages
l
l
l
l
l
l
l
l
l
a
0
a
l
l
0
l
0
l
l
0
0
l
and features offered by the Series One and Series One Plus PCs include:
Small size - (64 I/O points in a 5-slot rack)
Large Memory Capacity Timers/Counters Programming LanguageMaximum I/O Latching relays
&bit Data Registers
Flexible I/O Replaceable I/O Modules
Portable ProgrammerPersonal Password Security
54 in2 panel space, 5 l/2 in. maximum depth, 250 i.19total volume
Up to 1724 wonk of CMOS or PROM
Up to 64 (4 digit, 9999 maximum preset)
Boolean Based Relay Ladder Data Operations
(Series One Plus Only)
112 (Series One) - 168 (Series One Plus)
28 total
64 (Series One Plus), 124 with TC refennces
Anymixingroupsof4,8or16
Weight only 7 02s.
Series One Plus and Series One Model E
(Permits only Authorized Access To User’s Programs)
Internal and external indication of low battery
Reliable operation without fan finm 0’ to 60’ C (convection cooling)
Retentive counters
Shift Registers (128) Built-in
Sequencers Standard - Up to 64, each with up to 1000 steps
Meets or exceeds NEMA ICS3-304 for noise rejection
Self Diagnostics
htemal Power for 24 V dc Inputs
Inexpensive
High Speed Counter
Remote I/O - Saves instalktion and wiring cost
a40793
Figure l-l. Series One/Series One Plus Programmable Controllers
Series One/Series
One Plus PC Introduction
m
13
GEK-90842
Series One Model E Programmable
Controller
The Series One Model E PC is an enhanced version of the Series One PC that offers more capability
while retaining all of the features and functions of the Series One PC. The Model E requires an
Ic610CPUI04
CPU module. The additional features of the Series One Model E are:
Faster Scan Rate.Typical scan times are:
8 mSec for a OSK word program
12 mSec for a l.OK program
15 mSec for a 1.7K word program
Password ProtectionAs with the Series One Plus PC, this is a valuable feature in that it permits only
authorized access to user programs stored in the PC memory. A unique 4digit password is entered by
the user and thereafter access to all functions (except monitor functions) is gained through a LOG ON
sequence entered by the operator. After completion of required operations, a LOG OUT sequence
returns the PC to password protection.
Faster Data Communications.The
Series One Model E PC requires the IC61OCCM.105 Data
Communications
Unit to communicate with external devices. Communications speed is noticeably
faster when communicating with external devices, such as a host computer, than with a Series One PC
using either the older version IC61OCCMlOO or the IC61OCCM105 Data Communications
Unit.
Program upload or download time, and access time to I/O, and timer/counter data is reduced during
I
communications
sessions.
Series One Plus 3.7K
The Series One Plus 3.7K PC is an enhancement of the Series One Plus PC which offers greater memory
capability, while retaining all other features and functions of the Series One Plus PC. The Series One
Plus 3.7K PC uses an IC61OCPU106 CPU module that provides 3700 words of CMOS RAM: or optional
PROM memory (compared to 1700 words of memory available with a Series One Plus with an
IC61OCPU105 CPU module). A typical scan time for a 3.7K word program is 36 milliseconds.
This additional memory capability allows the Series One Plus 3.7K PC to moTe fully take advantage of
programming with the data operations since those ladder logic programs that require numerous data
operations also require more memory than do programs using the basic functions.
The additional
memory in a Series One Plus 3.7K PC provides the user with a great deal of capability in a small
package.
An additional feature of the Series One Plus 3.7K PC is that timers can be programmed to be .Ol second
timers instead of .l second. This is done by setting output 770 (SET 770) to the ON condition. The
timer preset range with a .Ol second duration selected is 0.01 to 99.99 seconds. When selecting timers
to be .Ol in this manner, care must be exercised to prevent your program from resetting coil 770, since
this would cause all timers programmed to then be .l second timers. Timer durations cannot be mixed,
they can all only be .l second or .Ol second in the same program.
Any Timer/Counter accumulate
registers not being used for a Timer/Counter can be accessed and used as data registers as with the
Series One Plus PC. Table l-1 provides a summary of general specifications for both PCs.
(I)
14
Series One/Series One Plus PC Introduction
I
GEK-90842
Table M. Series One Family General Specifications
Operating Temperature
Storage Temperature
Humidity (non-condensing)
AC Power Required:
1C610CHS101/110/130
Rack
vohage
FFequency
Maximum Load
output
CwTeen~
Maximum Individual
DC Power Required
IC61OCHS114/l34 Rack
Voltage
Ripple
output
current
Maximum Individual
Maximum, Total (All Voltages)
Typical Battery life * (loaded)
shelf We * (no load)
0’ to 60°C (32” to 14OOF)
-loo to 7ooc (14O to +lSs”F)
5 to 95%
llSV/230 v ac 15%
47-63 Hz
30 VA (CHSlOl/llO)
36.7 VA (CHS130)
1.4 A at 5 V dc, (0.4 A, CHSlOl)
0.8 A at 9 V dc, CHSllO
(1.7 A, CHS130), (0.6 A, CHSlOl)
0.5 A at 24 V dc, (0.2 A, CHSlOl)
20.5 - 30 V dc (100% of capacity used)
18 - 30 V dc (90% of capacity used)
10% of Input Voltage
1.4 A at 5 V dc
0.8 A at 9 V dc, CHS114
(1.7 & cHS134)
0.4 A at 24 V dc, -114
(0.5 A, CHS134)
22 A, CHS114 (2.3 A, CHS134)
2-5 years
8-10 years
*Depends upon operating temperature
Memory Size and Type (16-bit words)
700 words (CMOS) or
1724 words (CMOS or EPROM)
3700 words (Series One Plus 3.7K
(CMOS or EPROM)
Typical Scan Time per K of Memory)
(Only memory programmed is scanned)
20 m&c (O.SK)
Series One
Overhead time must be added to the
40 m&c (l.OK)
65 msec (1X)
logic solution for total real scIu1,
time overhead is typically 4 to 5 m&c.
series one Plus
aadModelE
one Plus 3.7K
Maximum I/O
Intemal coils
special Fbuaction coils
Retintive Coils (Latches)
Timer/Counters
Shift Register Stages
seqrrepcers
Data Rm
(Series One Pius and
Series one Pius 3.7K)
8 mSec (0.5K)
12 mSec (l.OK)
15 mSec (1.7K)
36 m&c (3.7K)
112 (s&es one)
168 (Series One Plus)
144
4
28
64 (Wigit)
128
64atlooOstepseach
’ 64 (&bit), up to 124 with
mused T/C references
l-5
Series One/Series One Plus PC Introduction
GEK-90842
Programmable Controller Concepts
When using a new product for the first time, there are always new concepts and terms to become
familiar with. Although PC’s are relatively easy to install, program, and apply, there are some simple
principles to follow. Figure 1-2 illustrates a general block diagram of a Programmable Controller.
Specific hardware components to illustrate this diagram will be described in Chapter 2.
1
c
INPUT/
OUTPUT
I
0
II
I
1
I
I
I
CENTRAL
PROCESSOR
UNIT
PROGRAMMER
1
I
I
1
USER SUPPLIED
FIELD DEVICES
L ---B-B---
I
I
1
I
J
Figure l-2. Basic PC Block Diagram
Programming the Series One and Series One Plus PCs
The programmin g devices are used to enter the specific logic the user desires the PC to follow.
This
logic, to be described in detail in Chapter 5 is what makes the user’s PC a unique unit, different from all
others unless the identical logic is entered into another unit. Recording and reloading logic from one PC
to another or to itself is also a standard feature with the programmers.
Hand-Held Programmer
The programmer can display any previously entered logic, allow the user to edit it (make changes, add
or delete portions of the logic), or display the current value of any internal timer or counter. It is a very
valuable and powerful piece of peripheral equipment, for entry of logic, control system checkout, and
troubleshooting.
It can be permanently comected to the CPU or removed without disturbing the
operation of the CPU. If removed, one programmer can service several CPUs. The exact quantity of
CPUs is dependent upon the expected rate of usage but typically is between 5 and 20 CPUs.
Portable Programmer
The portable programmer uses a liquid crystal display (LCD) screen to allow ladder
for both the Series One and Series One Plus PCs. New programs can be created,
ladder logic displayed and existing logic edited. An on-line monitor function is
Portable Programmer is used with the Series One Plus. Programs can be transferred
logic programming
previously entered
available when the
to the PCs or stored
16m
Series One/Series One Plus PC Introduction
GEK-90842
on cassette tape. The program can be printed using a standard parallel or Centronics compatible printer
through the printer port located on the rear of the Portable Programmer.
For detailed information refer
to GEK-90846, which is the Portable Programmer User’s Manual.
Logicmaster 1 Family Application Software
Another option available for programmin g the Series One Family of PCs is the Workmaster industrial
computer with Logicmaster 1 Family application software. This software allows you to write, edit,
display, and print programs in ladder diagram format. You can view up to 7 lines of your ladder
diagram program on one screen. Programs can be annotated by assigning names and nicknames to
program elements, assigning labels to coils and adding explanations of program rungs or segments.
Many programs can be stored on a single 3 inch diskette and each program can be assigned a unique
name.
For detailed information on using the Workmaster industrial computer with Logicmaster 1
application software refer to GFK-0075, which is the Logicmaster 1 Family Programming and Documentation Software User’s Manual.
Series One Plus Program Protection
The Series One Plus and Series One Model E PCs allow the user to enter a unique password with the
hand-held programmer or the LCD Portable Programmer, which prevents unauthorized users or inadvertent program access. When a password is entered, all programmer functions are disabled except the I/O,
T/C accumulated value and register monitor functions.
In order to have access to all programmer
functions when a password has been entered, a log on sequence must be entered.
i
Function of the Central Processing Unit
The next element of the PC is the Central Processor Unit (CPU). The CPU is the “brain” behind all
logical decision making. It reads in the status of the control system, makes decisions based upon the
logic it has been provided, and then provides decisions to the actuating portion of the control system.
The CPU also performs self checking of its internal operation to ensure reliable operation. If an error is
detected, it will shut itself down. The logic entered by the programmer is actually stored in the CPU
along with storage for the operation of timers and counters.
Memory Word Length
The memory provided for this storage diction
is normally measured in K words, where K is an
abbreviation for kilo or 1024. Typically, one word is required storage for each function such as a relay
contact, timer preset or timer storage. These words can be of various lengths such as 16 bits, 8 bits, or
even 4 bits, wherein a bit is the most elementary measurement and can have only two states (on or off).
The word length is much like a ruler used to measure wire, sheet steel, or fabric. It can be a yard long
(16 bits) or a foot (8 bits) or an inch (4 bits). Numerical values are for illustrative purposes only and do
not represent exact ratios. Thus when quoting memory in K words (lK, UC, 4K, etc.) always check to
verify the word length. The Series One and Series One Plus PCs use the most common measurement,
16 bits per word.
Series One/Series One Plus PC Introduction
17-
GEK-90842
Types of Memory for Program Storage
There are several types of memory used in PCs to store both logic and data. ‘Ike two used in the Series
One and Series One Plus PCs are CMOS and PROM. CMOS or CMOS RAM, which is an acronym
for Complimentary Metal-oxide Semiconductor, Random Access Memory, provides a fast, low cost, low
power memory that can be both examined (read) and also changed (written) easily. However, it is
volatile, which means that it can lose its content if power is removed. To avoid reloading memory (and
losing counts and system status) every time power is turned off, the CMOS memory is usually provided
(as it is in Series One and Series One Plus) with a back-up battery to maintain its content (not system
operation) when power fails. Due to the low power drain of CMOS technology, a single new lithium
battery can maintain memory without application of power for up to 2 to 5 years. The battery is not
used when the power is applied and the system is operating normally. Its storage or shelf life is many
years, typically 8 to 20 years.
The second memory is PROM(Programmable
Read only Memory) that again is fast, relatively low cost,
and retentive upon loss of power. However, this memory cannot be easily changed. It can be examined
(read) at anytime, but to change (write) it requires some special action on the part of the user. In this
system, the PROM must be cleared of all previous contents (new PROM, or erased with an intense
ultraviolet light) and then placed into a special loader. A previous logic program developed in CMOS is
then written into the PROM. Finally, the PROM is removed from the loader and placed into the CPU.
Function of the Input/Output Circuitry
The final element of the PC is the Input/output section. Electrical noise such as spikes on the power
lines, inductive “kick-back” from loads, or interference picked up from field wiring is very prevalent in
industrial applications. Since the CPU operates at relatively low voltage levels (typically 5 volts), this
noise would have serious impact on its operation if allowed to reach the internal circuits of the CPU.
The I/O section, both inputs and outputs, protects the CPU from electrical noise entering via the I/O
modules or wiring. The I/O section is where status signals are filtered to remove noise, voltage levels
are validated, and where decisions made by the CPU are put into operation. Inputs provide their status
to a storage area within the CPU and outputs are driven from similar stored status in the CPU.
In general, the I/O section is modular in design and can accommodate a variety of signals. A complete
discussion of the types and capacities available for both the Series One and Series One Plus PCs is
provided in Chapter 6. The specific type of module (e.g. 115 V ac or 24 V dc) is usually determined by
the field device the user selects. Decisions such as number of 115 V ac solenoids, 24 V dc solenoids,
motor starters, limit switches (their voltages), control panel lamps (what voltage), pushbuttons, and
external relays have a major impact on the configuration of any PC. These parameters should be
established as early as possible in the overall design of the control system. Of course, being a flexible
device, the PC configuration either on paper or in hardware, can be changed if rtQuireirements change.
Typically, the user provides the field devices, wires them to the I/O section, and provides the power
source to operate them.
UL Listed Products
Several Series One family products are available that have been tested and approved by the Underwriters Laboratory (UL). These UL listed products should be used in installations where UL listed products
are required. The UL listed products include the Series One CPU (IC61OCPU101, revision C), 5-slot
18-
Series One/Series One Plus PC Iutroduction
GE&90842
rack (IC610CHSlll),
115 V ac Input module (IC61OMDL135), Relay Output module (IC61OMDLl81),
and a 115 V ac Output module (IC61OMDLl85).
Specifications and wiring information for the UL
listed modules can be found in chapter 6 of this manual.
When installing a system requiring UL approval, do not mix non UL listed products with the UL listed
products.
Communicating With Other Devices
An available Data Communications
Unit (DCU) allows the Series One and Series One Plus to communicate with external devices. The Series One PC uses the IC61OCCMlOO DCU, while the Series One
Model E, Series One Plus and Series One Plus 3.7K PCs use the IC61OCCM.105 DCU. These devices
can be other programmable
controllers, computers, or other smart devices.
User programs and I/O
information in a Series One or Series One Plus PC can be uploaded and downloaded to or from any
master device that supports the Series Six CCM2 protocol as defined in the Series Six Data Communications Manual, GEK-25364.
For detailed information on how to use a DCU in a Series One or Series
One Plus PC system, refer to the Series One Data Communications Manual, GEK-90477.
Remote I/O for Series One and Series One Plus
Another option available for a Series One or Series One Plus PC system is Remote I/O. By using
Remote I/O, I/O modules can be located in a rack convenient to the input sensors or the&output devices
being controlled by the PC at a distance of up to .6 miles (1 km) from the PC. This is accomplished by
installing a Link Local module in the CPU rack, a Link Remote module in the distant I/O rack and
connecting them through a single twisted-pair cable. For detailed information on using Remote I/O in a
Series One or Series One Plus PC system, refer to the Series One Remote I/O Manual, GEK-90507.
PC Terminology
To summarize the preceding discussion of Programmable Controller concepts, table 1-2 provides a
definition of terms discussed above that you should be familiar with, relating to PCs. A more complete
list of terms is provided in a glossary at the end of this manual.
Table l-2. Common PC Terminology
TERM
PC
Programmer
Logic
CPU
Memory
DEFINTTION
Programma&kController or Rogrammable Logic Controller. An indudal control device using
microprocessor technology to perform logic decision maEng with r&y ladder diagram based
programming*
*A device for entry, examdtion and alteration of the PC’s memory including logic and storage ~RXS.
A fixed set of respond (outputs) to various external conditions (inputs). All possible situations for
both syncbr~nous and non-synchronous activity must be sped% by the user. Also r&d
to as
the pTo8T8m*
Central Processor Unit - the physical unit in which the PC’s intelligence ~lesides. Decision making is
performMi heI&
A physical place to stow information such as programs and/or data.
Series One/Series One Plus PC Introduction
\
19m
GEE90842
Table l-2. Common PC Terminology - Continued
TERM
K
word
CMOS
PROM
I/O
Noise
Inau@
outputs
Modules
Field
Devices
DEFINITION
An abbreviation for kilo or exactly 1024 in the world of computers. Usually r&ted to 1024 words of
memory.
A measurement of memory usually 16, 8, or 4 bits long.
A read/write memory that requires a battery to retain content upon loss of power.
A read only memory that requires a special method of loading, but is inherently retentive upon power
loss.
Input/Output - that portion of the PC to which field devices are connected. Isolates the CPU from
electrical noise.
Undesirable electrical disturbances to normal signals genefly of high frequency content.
A signal, typically ON or OFF, that provides information to the PC.
A signal typically ON or OFF, that originates h-am the PC with user supplied power that controls
earnal devices based upon commands from the CPU.
A replaceable electronic subassembly usually plugged in and secured in place but easily removable in
case of fault or system redesign
User supplied &vices typically providing information to the PC (Inputs: pushbutton, limit switches,
day contacts etc.) or performing PC tasks (Outputs: motor starters, solenoids, indicator lights, etc.).
Chapter
2
Physical Equipment Configuration
21
m
.
.c
GEK-90842
Rack Description
The Series One and Series One Plus PCs are provided as a family of racks into which modules can be
inserted. Each rack contains a power supply to the right and space for up to either 5 or 10 modules (see
figure 2-1). Racks are available in 6 versions, 5 or lo-slot that accept 115/230 V ac input power, 5 or
lO-slot that accept 24 V dc, a UL listed 5-slot rack, IC61OCHSlll which accepts only a 115 V ac power
source, and a low-cost 5-slot rack (IC6lOCHSlOl)
that does not include an expansion part, 24 V dc
tetials
for external use, or a RUN relay. Each supplies internal power to the modules inserted into
the rack. Mounting is provided by the brackets each with two keyholes at the rear of the rack. All racks
are similar. The differences being the function of the rack as determined by the placement of modules
by the user, the number of modules which may be inserted into a rack, and the input power required.
Figure 2-2 illustrates typical modules for the Series One Family of PCs, illustrating in hardware, the
block diagram concept of figure l-l.
a40535
Figure 24. Typical Rack
Module Location in Rack
The CPU module is always placed adjacent to the power supply in the first ra& it contains the
microprocessor and required memory storage. There is a connector on the CPU to which the programmer is attached when mounted on the rack. As an option, between the CPU and programmer a 5 foot
(1.5m) cable can be installed for more flexible operation. The remaining slots can contain I/O modules
in any mix of inputs versus outputs or voltage levels desired by the user for his particular application.
Ail modules as well as the programmer are secured to the rack by two snap-locks which can be released
by squeezing the module top and bottom toward the center (see Chapter 3 fo+ additional installation
details).
22m
Physical Equipment Configuration
GE&90842
a40019
Figure 2-2. Typical Hardware
Heat Dissipation
The rack is designed to dissipate internal heat through convection
cooling only and does not require a
fan for forced air cooling. However, to ensure efficient operation, free air flow should not be inhibited at
the top and bottom of the unit. A minimum of 3 inches (75mm) is recommended at the top and 4 inches
(1OOmm) at the bottom with 6 inches (15Omm) between racks. Both sides should be free of obstacles to
allow easy removal of the unit, approximately 3 inches (75 mm) from each side excluding the mounting
brackets is recommended. Furthermore, the unit should be mounted horizontally as shown in figure 2-3
and not inverted nor rotated 90’.
If not oriented as shown, derating of the maximum ambient
temprature specification would need to be considered. Placements of other sources of large volumes of
heat near the units should also be avoided, especially directly below the rack. For reliable operation, the
air entering the bottom of the rack should not be at a higher temperature than 60°C (140”. Wiring to the
I/O modules and the power supplies should be placed so as to avoid blocking the air flow, yet provide a
suitable service loop to allow easy removal of modules with wiring attached. Wires should be tied to
maintain their order in the event they must be disconnected during module replacement.
Adding Racks
If more ?/O points a~ required than one rack can contain, additional racks can be installed similar to the
first unit previously discussed (IC61OCHS101 cannot be used as an expansion rack). At the left of each
rack are two connectors used to connect to additional I/O. An 18 inch (46Omm) cable is available to
connect the rack containing the CPU module to the first I/O expansion rack. The ends of this cable are
marked “CPU” and “EXP” (Expander). The CPU end is plugged into the bottom connector at the first
rack and the EXP end similarly connected to the second rack using the top connector (see figure 2-S). If
a third rack is used, another cable links the second rack to the third rack, the CPU end is inserted into the
bottom conneztor on the second rack and the EXP end into the top connector on the last rack. Within
these added racks, I/0 modules can be inserted in any order desired, up to five modules in a S-slot rack
and up to 10 modules in a lo-slot rack. No additional CPU modules can be installed, nor are reckred.
.\
23-
Physical Equipment Configuration
GE&90842
a4001 8
Figure 2-3. Typical (5 Slot) Rack
lo-Slot Rack
The 100slot rack provides in a single housing, as shown in figure 2-4, the same number of I/O module
slots as two 5-slot racks. An added advantage of the lO-slot rack is easier and less expensive installation
since fewer racks have to be mounted and wired. A system can be configured in many ways to contain
Refer to Appendix B, which contains examples of valid I/O rack
various quantities of I/O.
configurations.
Rack Mount Brackets
Rack mount brackets (IC610CHS191) are available to adapt the lo-slot racks for mounting in 19 inch
racks. With the brackets assembled on either version of a lo-slot rack, the rack can be mounted on
standard mounting rails in 19 inch cabinets and consoles.
a40792
Figure 24. Typical (10 Slot) Rack
24m
Physical Equipment Configuration
GEK90842
83-pc-3Sm m-4-1 -3 1a
Figure 24. Expander Cable Installation
Programmer Tape Port
The hand-held programmer,
when installed on the CPU module, provides an auxiliary tape port for
memory transfers to peripheral devices. Tape recordings of user programs can be made on virtually any
audio cassette recorder and once made can be used to initialize any CPU to that program.
Thus
programs can be made once and transported to other CPUs without manually being reentered.
Of
course, once entered they can be edited if additional tailoring is required. In the unlikely event that a
CPU fails, a replacement can be installed and quickly reloaded to perform specifically the task its
predecessor was accomplishing, if a tape record was made. The tame recorder functions are discussed in
detail in Chapter 4, PC Operation.
A
Programmer Mount Assembly
A Programmer Mount Assembly (IC610PRG190) is available that can be used to mount and protect the
hand-held programmer on the outside of a panel or console. A hand-held programmer, when mounted
externally, can be used as an operator interface unit to change timer or counter presets, monitor timer or
counter current values, monitor 16 consecutive I/O points, monitor the entire contents of the user
program, and, with a Series One Plus PC, monitor register contents. The programmer mount assembly
includes a mounting bezel, a clear plastic cover, and a cable fastener. In addition to the mounting
assembly, a shielded, round CPU/Programmer cable (Catalog No. IC61OCBLl02), designed specifically
for mounting the hand-held programmer away from the CPU rack must be ordezed separately for use
when installing the hand-held programmer in this manner.
The Programmer Mount Assembly bezel installs on the outside of a panel or console with only four
screws. The hand-held programmer snaps into the bezel using its two snap-locks. A clear plastic cover
then fits over the bezel and programmer, thereby protecting it &om its industrial environment. The
Programmer Mount Assembly can also be used as a table top stand for the hand-held programmer by
250
Physical Equipment Configuration
GEK90842
mounting four rubber feet, which are included with the assembly, on the reverse side of the bezel using
the panel mounting holes.
a401 48
l WHENUSEDASABENW-TYPE
l WHENMOWTEDONARSEL
Figure 2-6. Programmer Mount Assembly
Table 2-1 lists the Series One/Series One Plus PC catalog numbers and nomenclature for the various
For detailed information on I/O module specifications
modules, cables, peripherals, and accessories.
and wiring diagrams, see Chapter 6.
Table 2-l. Series One/Series
I
One Plus Catalog Numbers
DESCRIPTION
CPU, Series One (700 wonls of CMOS Memory, standad) Version C is UL listed
CPU, Series One Model E (Enhanced Version of CPUlOl)
CPU, Series One Plus (700 words of CMOS Memory, std)
CPU, Series One Plus 3.7K (3700 wads of CMOS Memory)
I/O Expander Cable
Programmer with Keylock
Programmer w/Keybck (Required for Series One Plus)
CPU to Programmer Cable, 5’ (1Sm)
CATALOG
NUMBER
1C61OCPu101
IC61OCPU104
IC61OCPU105
IC61OCPU106
IC61OCBLlOl
IC61OPRG100
IC61OPRGlOS
IC61OCBLlOO
26(I
Physical Equipment Configuration
GE&90842
Table 2-l. Series One/Series One Plus Catalog Numbers - Continued
CATALOG
DESCRIPTION
Rack, 115/230 V ac Power Source, 5-&t
Rack, 115/230 V ac Power Source, S-slot (no expansion, 24 V dc Tee,
NUMBER
IC61OCHSllO
or Run Relay)
Rack 115 V ac Power Source, 5-slot, UL listed
IC61OCHSlOl
IC61OCHSlll
Rack w/24 V dc Power Source, S-slot
IC61OCHS114
Rack, 115/230 V ac Power Source, lO_slot
IC61OCHS130
Rack, w24 V dc Power Source, l&slot
IC61OCHS134
Kller Module
24 V dc Sink Input, 8 circuits
IC61OMDLlOO
IC61OMDLlOl
14 V dc Input/Output, 4 Inputs/4Outputs
IC61OMDL103
IC61OMDL104
Z4 V dc Sink Input/Relay Output, 4 Inputs/4 Outputs
humbwheel Interface
Z4 V dc Sink Input, 16 Circuits w/LEDs
L/OInterface Cable 10’ (3m)
24VdcSinkLoadI~put,16Circuits
14 V ac/dc SoInput, 8 Circuits
14 V ac/dc Source Input, 16 circuits
115 V ac Input, 8 Circuits
115 V ac Isolated Input, 4 Chuits
230 V ac Input, 8 circuits
115 V ac Input, 6 Circuits (UL listed)
IC61OMDL105
IC61OMDL106
IC61OCBL105
IC61OMDL107
IC61OMDLlll
IC61OMDL112
IC61OMDL125
IC61OMDL126
IC61OMDL127
14VdcSinkOutput,8Circuits
24 V dc 2 Amp Sink Output, 4 Circuits
24 V dc 2 Amp Si&hurce
Output, 4 Circuits
IC61OMDL135
IC6lOMDL151
IC61OMDL153
IC61OMDL154
24VdcSourceOutput,8C!ircuits
24VdcSinkOutput,16CircuitswjLEDs
24 V dc Sink Output, 16 Cixuits
24 V dc Source Output, 16 Cinxxits
115/230 V ac Output, 8 Circuits
115/230 V ac Isolated Output, 4 Circuits
IC61OMDL155
IC61OMDL156
IC61OMDL157
IC61OMDL158
IC61OMDL175
IC61OMDL176
Relay Output, 8 Chuits
Relay Output, 5 Circuits (‘UL listed)
Relay Output, 16 Circuits
115 V ac Output, 6 Circuits (UL listed)
Hi@ Speed Counter
I/O Interthe Cable (High Speed Counter)
IC61OMDL180
IC6lOMDLl85
IC61OMDL182
IC61OMDL181
IC61OMDLllO
IC61OCBL107
Fast Response &/O
I/O Simulator, 8 Inputs
printer Interface Unit
PROM Writer Unit
IC61OMDLl15
IC61OMDL124
IC61OPER151
IC6lOPER154
IC61OACC120
IC61OACCl50
Accessory Kit
Lithium Battery
PROM Memory (4 Chips), Series
CMOS Memory (4 Chips), Series
PROM Memory (4 Chips), Sties
CMOS Memory (4 Chips), Series
Rack Mount Brackets
Programmer Mount Assembly
One, Series One Junior
One
One Plus
One Plus
IC61OACC151
IC61OACC152
IC61OACC155
IC61OACC156
IC61OCHS191
IC61OPRG190
27I
Physical Equipment Configuration
GEK-90842
Table 2-l. Series One/Series One Plus Catalog Numbers - Continued
I
DESCRIPTION
CATALOG
Remote CPU/Programmer Cable
Data Communications Unit
I/o Link Local
I/O Link Remote
NUiiiiii~
IC61OCBL102
1C61OCCM105
IC61OCCMllO
IC61OCCMlll
Hardware Requirements
The Series One and Series One Plus PCs are an excellent relay and timer/counter replacer or substitute
for other sequential type control devices, such as drum or stepping switch based systems. However, one
question always arises - how much hardware do I need to buy ? The answer varies extensively based
upon different applications and their attendant complexities.
Areas of concern include amount of
memory, mix of inputs versus outputs, voltages of I/O, and physical size of the Series One or Series
One Plus PC system. The following steps are guides to estimate the requirements of the Series One or
Series One Plus PC system. With a little experience, estimating required components will become
second nature. If you require assistance, please contact your local GE Fanuc Automation distributor
who handles the Series One Family of PCs.
NOTE
CPU Module IC61OCPUlOlA is different from 1OlB and 1OlC in that 1OlA has a 3 digit preset
for Timers and Counters, while the updated modules, 1OlB and 1OlC have a 4 digit preset. The
1OlA method of monitoring the accumulated value of Timers and Counters is also different. With
the 1OlA module, each individual Timer or Counter must be accessed by using the sequence
SHF, 6X, MON for each Timer/Counter to be monitored. With the 1OlB or the 1OlC CPU
module, the keys NXT or PRV will move the monitor display to the next or previous Timer or
Counter.
System Estimating
The Series One and Series One Plus PCs are provided with 700 words of CMOS memory as a standard
feature. Expansion to 1724 words is possible by adding a CMOS memory chip. If the unit is to be
PROM based, the program can be up to 1724 words. The Series One Plus 3.7K PC provides the user
with 3700 words of CMOS memory as a standard feature. For average complexity relay replacement,
700 words should be adequate for up to 64 I/O, and the 1724 should be adequate for up to 168 I/O. If
the logic is conside& more complex than that used as examples in this manual, a representative sample
(10 to 15%) of the logic should be programmed.
From the amount of memory (on paper) the sample
requires, the total memory requirements can be estimated. If in doubt, obtain the optional memory with
your unit to ensure simple system design.
The key to many of the answers (cost, physical size, memory requirements, etc.) is the I/O structure. If
a design exists such as shown in figure 2-7, assume that all the relays and timers are enclosed within a
box; these are the elements to be replaced. This figure is for illustrative purposes only; no indication is
given that it performs any real functions. Passing through this box are wires tirn switches, auxiliary
contacts, overload relays, etc.; these are inputs to the control system. There are wires connecting to
loads or actuating devices such as solenoid valves, motor starters, indicator lights, etc.; these are outputs
280
Physical Equipment Configuration
GEK-90842
from the control system. The power lines (e.g., 115 V ac and 24 V dc) are not considered
important to estimating the number of I/O modules required.
Use the following
steps to estimate rack and module quirements;
I/O, but are
figure 2-7 is used as an example:
1 . Add total number of inputs and outputs separating them by type and voltage.
(5) 24 V dc inputs plus (3) 115 V ac and (1) 24 V dc output).
(e.g. (4) 115 V ac and
2 . Divide each separate category by 8 (assume 8 circuit modules), (e.g. (1) 115 V ac and (1) 24 V dc
input modules and (1) 115 V ac and (1) 24 V dc output modules). See Chapter 6 for I/O that uses 4
or 16 circuits per module.
3 . Add total I/O modules (e.g. 4 I/O modules). One 5-slot rack is required for l-4 I/O modules, two
5-slot racks for 5-9, and three 5-slot racks for 10-14.
4 . If lo-slot racks are used one lo-slot rack is required for 1-9 I/O modules,
lo-slot and a 5-slot rack will contain 1-14 I/O modules.
5.
wo
lo-slot racks or a
Each additional rack also requires an I/O expander cable. Empty slots should be covered by blank
filler plates.
6 . Estimate memory requirements
Total I/O Points
l-64
65-168
as follows:
Estimated Memory
Basic Unit with 700 words
Add 1K Memory Chip
7 . The following optional hardware is available and should be considered
Had-Held Programmer
Portable Programmer
Extender Cable
Programmer Mount Assembly
when configuring
a system:
PROM Writer Unit
Printer Interface Unit
Thumbwheel Illunit
Timer/Counter Setpoint Unit (Series One Plus)
If the system has not yet been designed, the same basic technique can be used. Inputs are signals the PC
will require to perform its assigned functions. Any device or person regardless of intelligence can not
respond to events it does not know occurred. Plan to provide the PC all the information you would
require to perform the same function. Make a list of those inputs, including source and voltage level (if
currently defined). Outputs, on the other hand, are devices the PC will use to perform its fimctions.
Again, even if the PC knows it must do something, if it is not given control over these actuating devices,
it can not maintain proper control. Make a list of these devices including their voltage levels and
current/power requirements. Use the above steps with the list of l/O devices. In any case, when
290
Physical Equipment Configuration
GEL90842
estimating system requirements, review the following
define their impact on your control needs:
standard features as discussed in later chapters to
Up to 64 Timers and Counters (4 digits each)
128 Stage Shift Register
Up to 64 Sequencers Each With Up to 1000 Steps
28 Latched Relays
Data Operations (Series One Plus and Series One 3.7K)
64 Sixteen Bit Data Registers (Series One Plus and Series One 3.7K)
- Up to 124 Data Registers are possible when unused T/C references are used as Data Registers.
a421 53
Figure 2-7. Example of Relay Control
Peripheral Devices Supporting Series One Family of PCs
Several peripheral units are available to support a Series One or Series One Plus Programmable
Controller.
A basic description of these units is provided in the following paragraphs. For a more
detailed description of the use and operation of these units, refer to Chapter 4, Operation, in this manual.
2-10
Physical Equipment Configuration
GEK-90842
Data Communications Unit
The Data Communications Unit (DCU), 1C610CCM100/105, provides the ability for external devices to
communicate with the Series One, Series One Model E, Series One Plus or Series One Plus 3.7K PC.
Series One Model E, Series One Plus and Series One Plus 3.7K PCs require the CCM105 DCU. These
devices function as a host to the Series One or One Plus PC and can be other programmable controllers,
computers, or other smart devices. User programs and I/O information in the Series One or One Plus
PC can be uploaded and downloaded to or from any master device that supports the Series Six CCM2
(Communications
Control Module, Version 2) master/slave protocol as defined in GEK-25364, which is
the Series Six Data Communications Manual. The Series One or Series One Plus can only function as a
slave device during a communications
session.
a40537
Figure 2-8. Data Communications Unit
241
Physical Equipment Configuration
GE&90842
Printer Interface Unit
The Printer Interface Unit, IC61OPER151, is a compact, easy to use device that attaches to the Series
One, One E, One Plus or One Plus 3.7K PC in the same manner as the programmer.
This peripheral
interfaces to many readily available personal computer printers and provides a means of obtaining a
hard-copy printout of the user program in either boolean or ladder diagram format. Version B works
with Series One, One E and One Plus PCs. A higher revision will be available that will also work with
the Plus 3.7K PC.
a40538
Figure 2-9. Printer Interface Unit
2-12
Physical Equipment Configuration
GEK-90842
PROM Writer Unit
Also available is a PROM Writer unit, IC61OPER154, which allows the user program in CMOS
memory to be transferred to PROM memory, thereby providing a convenient method of non-volatile
(permanent) storage for those programs. The PROM Writer unit is a compact, easy to use unit which
attaches directly to the PC in the same manner as the programmer.
In addition to providing a means of
non-volatile storage, an added advantage of PROM memory is that several PROMS can be programmed,
each containing a different program, for use as required. Version B of this unit replaces version A and
can be used with a Series One Plus PC as well as Series One and Series One Junior PCs. Version B will
not work with the Series One Plus 3.7K PC. A revisedversion will be available that can be used for all
Series One Family PCs.
a40539
Figure 2-10. Prom Writer Unit
PROGRAMMABLE CONTROLLER
series One/OneE
series OIX!Plus/3.7K
PROM
2732A-2
27256-25
Chapter
I
31
3
Installation
GEK-90842
Specifications for Installation
The Series One and Series One Plus PC can be easily installed in any NEMA panel or similar metal
surface. Figure 3-1 provides details on the mounting of up to three racks except for input voltage
requirements to form a single PC system. Since a completed &lot rack weighs less than five pounds
(lo-slot rack, less than 7 pounds), it can be easily installed by one technician.
Table 3-1 provides
specifications
to be met during installation.
Table 3-l. Series One Installation Specifications
Rack
size
11.4“ x 4.7” x 5.5“ (290 x 120 x 14Omm)
18.3” x 4.7“ x 5.5” (465 x 120 x 14Omm)
S-slot
lo-slot
Completed Rack Weight
(less wiri@
0’ to 60°C (32” to 14OOF’)
Ambient Temperature
Storage Temperature
-10’ to 7oOC (14’ to 158°F)
5-95s (Non-CorKieIlsing)
HUmidiQ
AC Power Required:
1C61OCHS101/110/l30
Vohage
FrequeW
Maximum Load
output
current
Maximum Individual
DC Power Required
IC16OCHSll4/l34
Voltage
Ripple
output
current
Maximum Individual
Maximum, Total
(All vohRges)
Run relay
4.5 lbs (2.0 Kg), 5-Slot
6.5 lbs (2.9 Kg), lo-slot
Rack
115v/230 v ac 15%
47-63 Hz
30 VA, CHSlOl/llO (70 VA, CHS130)
1.4 A at 5 V dc (0.4 A CHSlOl)
0.8 A at 9 V dc, CHSllO (0.6 A, CHSlOl; 1.7 A, CHS130)
0.5 A at 24 V dc, (0.2 A, CHSlOl)
20.5 - 30 V dc (100% of capacity used)
18 - 30 V dc (90% of capacity used)
10% of Input Voltage
1.4 A at 5 V dc
0.8 A at 9 V dc, CHS114 (1.7 A, CHS134)
0-4 A at 24 V &, CHSll4 (0.5 A, CHS134)
2.2 A, CHS114 (2.9 A, CHS134)
250 V, 4 amp, Resistive Load
(Not Present on CHSlOl)
Vibration
MestsJISC0911IIBClass3
Shock
Tested to ML STD 810C Method 514.2
Meets JIS C 0912
Meets NE&IA ICS3-304
Noise Immunity
Installation
GEK-90842
W7.52
t
*#18.3
(445)
**
C465,
FOR lO-SLOT
CHASSIS
11.41,,
-AL
12 PLACES
MAX:
MIN:
7.2
(183)
4"
4
,3:40,
MIN
MMENsK)(ys
IN PARENTHESES
ARE MI MUMETERS,
OTHERS IN INCHES.
Figure 3-l. Rack Mounting Dimensions for Proper Heat Dissipation
Installation
Unpack each unit candidly and retain any instructions shipped with the units. Two spare fuses are
attached to the top of each rack; they should be removed and retained for future use. The racks can be
installed either with no modules or with modules installed. The following steps will assist in organizing
and simplifying the installation of a Series One or Series One Plus PC System.
1 Using the rack as a template,
l
2 . Drill the four mounting
tapped holes).
ma& where mounting
holes are to be drilled.
holes (l/4“ (6mm) if using pass through bolts, or 3/16”
3 . Insert top 2 bolts (3/16“ X l-1/2”
washers, lock washers and nuts.
or 5mm X 4Omm),put unit
,.
CR
in place,
(5mm) if using
and loosely secure with
Installation
GEK-90842
4. Tap holes and insert top two bolts.
Place unit onto mounting
bolts and loosely secure.
NOTE
men inserting the 2 top bolts, attach the green jumper as shown in figure 3-2. This jumper wire
is packed with each rack and provides a method of groundingthe rack when an earth ground
(such as the shield or hard wire in the power cord) is also connected to a mounting bolt.
5. The power supply ground connection is made to one of the mounting bolts (step 3 or 4 above). A
jumper wire is included with each rack to interconnect the mounting brackets. The “C” terminals
on the power supplies are interconnected when more than one rack is used. Otherwise, the “C”
terminal is not connected to anything in a single rack system.
a40147
jumper
wtre tncluded
wtth
Ix> base
star washer
W
to 8n earth ground
Figure 312. Recommended Rack Grounding
6. Complete
the installation of the bottom two bolts and tighten
supplies are shipped installed in each base.
7. If additional racks are to be used, repeat steps l-4 above.
15 .
all mounting
hardware.
Power
If only one base unit is used, go to step
NOTE
When drilling or tapping holes ensure that
work area before installing base units
chips do not enterunit afready installed. clear
8. Obtain flat ribbon cable used to interconnect racks. Locate end marked “To CPU”, remove dust
cover from bottom connector of first (CPU) rack, and insert cable co~ector (see figure 3-d) fully
into receptacle until locking tabs capture connector.
9. Fold cable as shown on figure 3-7. Remove dust cover from top connector of second rack and insert
opposite end of cable marked “To Expander.”
10. Secure cable in place with wire wraps or cable ties.
34m
Installation
GEL90842
11 .
a third rack is used, repeat steps 8-10 with CPU end of cable *in bottom connector on second rack
and Expander end in top connector of third and last rack.
If
12 . If a lo-slot rack (IC61OCHS130 or IC61OCHS134)) is to be included in a system, it can be mounted
on standard mounting rails in 19 inch cabinets and consoles by attaching the rack mount brackets.
Two adapter brackets and hardware required for assembly are included in the bracket package,
IC6lOCHS191.
a4021 4
I
ohmmoNs
IN INCHES,
WLLIMnERS
ARE
W PARENTHESIS
I
Figure 3-3. 10 Slot Rack, 19 Inch Mounting Dimensions
’
a40280
Figure 3-4. I/O Expansion Cable Connection
13. Unused rack connectors such as at the top of the CPU unit and the bottom of the last rack should
retain their dust covers.
35m
Installation
GE&90842
14 . Inside each 5-slot rack at the rear of the leftmost module slot is a two position switch. On the CPU
unit, this switch must be positioned towards the left. On the first expander it must be towards the
right. If a third rack is used, the switch must be towards the left again. An exception to the
described switch settings is when a 5-slot rack is used as an expansion rack in a Series One Plus
system, where the CPU rack is a 10.slot rack. In this case, the switch must be positioned to the left
This switch is not included in the IC6lOCHSlOl rack, since it cannot be used as an expansion rack.
All switches must be set properly. The Series One or Series One Plus PC may not function
correctly if any switch is not in the correct position.
15 . The lo-slot racks, IC61OCHS130/134 have two bridge connectors on the back plane which must be
configured. Bridge connector SWl, located between slots 3 and 4, has 2 positions EXP and CPU.
The jumper must be positioned on the corresponding pins to specify whether the rack is a CPU rack
or an Expansion rack. Bridge connector SW2, located between slots 9 and 10, selects the address to
be assigned to slot 10 and the expansion rack slots. The selections are either 100 EXP or 700.
Figure 3-5 shows the location of SW1 and SW2.
a40794
SW2
700 loo
EXP
BRIDGE-CONNECTOR I,
:
s
ml3 : -Bf?IDGE-CONNECTOR 2
A
Fiire
3-5. I/O Addressing
SW1
EXP CPU
--
A
IC6lOCHSl30
OR
IC6~OCHSi34
Switches in Series One Plus 10 Slot Racks
360
Installation
GEK-90842
16. Example of SW1 and SW2 settings are shown below in figure 3-6.
a40795
SW2 Ii00 EXP)
SW2 1700 EXPI
SET TO LEFT POSITION
SW2 t100 ExPr
SWI IEXPI
Figure 3-6. Examples of Rack Configuration Switch Setting Series One Plus
37I
Installation
GEK-90842
ET-
Its v&c
Itsv -
MEUT
1
23ovAC
23OvWEUT
+ 24 VDC
-2uDC
PC
1
COMMON CONNECTION
'
Figure 3-7. Typical Installation Dimensions
NOTE
Ground Connection should be made to mounting bracket, not to the terminal strip.
CPU
17. Locate the CPU module (see figure 3-8) and set switches and shorting bridge connectors per table
3-2. If additional CMOS or PROM memory is to be installed, now is the time to do it. For detailed
instructions, see Chapter 7.
18. The CPU module must be installed adjacent to the power supply in the first or topmost rack.
38m
Installation
GEK-90842
a40281
s2
Figure 3-8. CPU Module
Table 3-2. CPU Option Settings
SWITCH
1 - POWER
OFF
ON
SWITCH
UP FUNCTIONS
2 - MEMORY
PROM
CMOS
OFF
ON
Clear coils
Retain Coils
TYPE
NOTE
ON is Towards the Faceplate. Factory setting is: Clear Coils and Select CMOS memory. Retain
Coils affects 340-373 only. Copters and Shift Registers are always retentive.
Table 3-3. Memory Size
MEMORY
CONNECT
SIZE
JUMPERS BETWEEN
PINS
ABandDE
B Cad-i?
ABandDE
700 words CMOS
1724 words CMOS
1724 Words PROM
I
CAUTION
I
Remove jumper EF before installing PROM. Battery will discharge in a very short time if
is not disconnected.
E
NOTE
Pin A is towards the faceplate. Factory setting is: 700 words CMOS, 1724 words PROM (same Setting)
Installation
GEK-90842
a40282
Figure 3-9. Proper Module Insertion
19. Tilt the module approximately 10’ as shown in figure 3-9. Insert bottom of the large printed circuit
board into the bottom card slot.
20. When the bottom slot is engaged, rotate the module to engage top slot. Slide module into base unit
until it is firmly seated and snap locks engage.
II0
21. Other modules are installed into racks at slot locations as determined
by installation plans.
Follow
steps 19 and 20 above for each I/O module.
22. To remove a module, squeeze the snap locks top and bottom (see figure 3-10) towards the center
and pull the module straight out. Squeeze force should be approxbately 10 pounds (5 Kg) and pull
force 8-12 pounds (4-5 Kg).
a40283
Figure 3-10. Proper Module Removal
3-10
Installation
GEK-90842
Power
Co~ections
23 . AC or DC power connections are made to the terminal strip on the far right of each unit. See table
3-l for power requirements. The minim um recommended wire size for power connections is AWG
No. 18 (lmm).
24 .
Strip 0.4 2 0.1 inches (10 & 2mm) of insulation from each wire (hot, neutral, and ground or + and -)
or place a No. 6 insulated lug (ringed or forked) onto each wire.
25 . Remove plastic cover over terminal strip and retain. Connect the hot wire to the top terminal. The
neutral is connected to either the next (second) terminal for 115 V ac operation or the third terminal
for 230 V ac operation as marked on the base unit. For 24 V dc racks, connect the + and - terminals
to the DC power source.
Do not use the top screw for power connections; it secures the terminal block
connections before applying power.
Verify
26 . Connect an earth ground wire to the rack mounting bracket as shown in figure 3-2. (Typically this
ground wire is the green wire from the ac power source.)
Ensure that aI1 exposed wiring is either under the screw-down plate of the terminals or
insulated by shrink tubing or sleeves.
27 . The terminals labeled +24 V dc and -24 V dc provide 24 V dc @ 100 mA for connection
external sensor (not on IC61OCHSlOl).
to an
28 . The two remaining terminals are used with the RUN indicator.
Use of this standard feature on all
racks is optional. It can be used to drive an external indication of the functional state of this rack.
The Run relay is closed when the CPU is scanning (not on IC61OCHSlOl).
29 . If the Run indication
is desired, it can be wired separately to an external indicator (light, bell,
whistle, etc.) or in series with other racks. Follow steps 24-25 above for guidance on connecting
these wires. Then replace the plastic cover.
If0 Field Wiring
30 . Recommended wire size for connection to the I/O modules is stranded AWG No. 12 (0.65~2mm)
wire. Two wires per terminal are possible with AWG No. 14 (0.65.1.6mm) wire.
31 . Strip 0.3 i 0.05 inches (8 * 1.5mm) from each wire to be connected to the I/O modules or install a
No. 6 insulated lug (ringed or forked). Bare wire co~ections
are recommended
for multiple wire
co~ections
to one terminal.
32 . Carefully remove plastic covers over I/0 terminal
sliding it to right or left.
co~ections
by lifting top or bottom leg and
33 . starting with the lower terminals, connect the field wires to all UO terminals. Power connections
such as those to commons (C) should be made last. No co~ections
are required to unused circuits;
however, screws on unused terminals should be tightened.
Instdlation
3-11
GEK-90842
34. For 16 point I/O modules that connect to I/O through a connector on the faceplate,
connector on the I/O Interface cable to the connector on the module.
secure the
Ensure that wires to the top set of terminals do not extend beyond the screw-down plate.
Any wire exposed before the terminal plate must be covered by shrink tubing or sleeves.
35. Wires should be laced together to leave a service loop adequate for removal of I/O modules without
discoMecting wires. See figure 3-11. After testing of I/O wiring, replace plastic covers.
a4001 7
Figure 3-11. Typical Routing of I/O Wiring
Programmer
36 . The hand-held programmer (catalog no. IC61OPRGlOO or IC61OPRG105) can be placed over the
CPU and power supply for permanent or temporary mounting. Its connector fits into the receptacle
on the CPU and it snap locks onto the power supply.
37 . If an extender cable is used with the programmer, it should be installed next or when required. One
end of the cable has a push tab (see figure 3-12). This end is connected to the programmer (see
figure 3-13). The other end is connected to the 26.pin coMector on the CPU. Both ends m keyed
for proper instaIlation. The red edge of the ribbon cable is installed up at both ends.
Installation
342
GEK-90842
a40163
Figure 342. Pull Tab on Programmer Cable
NOTE
For proper noise immunity, it is recommended that the extender cable be used on a temporary
basis and not permanently installed with the programmer.
38.
TO installthe programmer
of the power supply and
directly onto the CPU, align the programmer
gently push down to engage snap locks.
on the outside dimensions
To ensure proper. CPU operation, it is recommended that the programmer not be connected
nor disconnected with ac power applied.
83-pc-35m m-4-3-3 1a
Figure 3-13. Installation of Programmer Cable
Installation
3-13
39. The Programmer Mount Assembly (catalog no. IC610PRG190) can be used when installing the
hand-held programmer on the outside of a panel or console, or can be used as a table top stand for
the programmer.
Figure 3-14 shows how to install the mounting assembly. The CPU/Programmer
cable must be ordered separately.
a40148
*cABLEwsTBE
OmEREDsEPARAELY
Figure 3114. Programmer Mount Assembly
Power Supply Limitations for Racks
If the power supply in either a CPU or expansion rack should become overloaded, unpredictable system
operation may occur. To ensure that this does not happen, the total current capabilities of the modules
placed in the rack must not exceed the current carrying capabilities of the rack power supply.
Units of Load
The power used by each module is expressed in (units of load), where 1 unit equals 10 mA. Calculations are based on the worst case condition with all inputs and outputs on. Table 3-4 list the units of
load supplied by each rack, and table 3-5 is a list of units of load used by each module.
When
configuring a rack, note the units of load supplied, then add the total units of load used by the modules
you have selected. The total units of load for the modules must not exceed the total units of load
supplied by the rack. If they do, the system should be redesigned.
3-14
Installation
GEK-90842
Table 3-4. Units of Load Supplied by Rack
CATALOG
NUMBER
POWER SUPPLIED IN UNITS OF LOAD
RACK DESCRIPTION
+s v
+9 v
+24v
+24VExtemaI
*If an external sensor is connected to the 24 V + and - terminals on the power supply, the current used
by the sensor (up to the maximum of 100 mA), should be deducted from the available listed units of
load.
Table 3-S. Units of Load Used by Modules
CATALOG
NUMBER
IC6lOCPUlOl
IC61OCPU104
IC61OCPU105
IC61OCPU106
IC610PRGlOO
IC61OPRG105
IC61OMDLlOl
IC61OMDL103
IC61OMDL104
IC61OMDL105
IC61OMDL106
IC61OMDL107
IC61OMDLllO
IC61OMDLlll
IC61OMDLll2
IC6lOMDLll5
IC61OMDL124
IC61OMDL125
IC6lOMDL126
IC61OMDL127
IC61OMDL135
IC6lOMDL151
IC61OMDL153
IC61OMDLl54
IC61OMDL155
IC61OMDLI ,-“:
IC61OMDL157
L
MODULE DESCRIPTION
CPU
CPU25
CPU
CPU
Programmer
Programmer
24 V dc Sir& Input (8)
24 V dc In/Out (4/4)
24 v dc In/Relay out (4/4)
Thumbwheel Interhce
24 V dc Sink In wm
(16)
24 V dc Sink Load In (16)
High Speed Counter
24 V dc ac/dc Input (8)
24 V ac/dc Source In (16)
Fmt Resgonse UO (4/2)
m Simllatm (8) Inputs
115 V ac Input (8)
115vacIsolatedIIpt(4)
230 V ac Input (8)
UL, 115 V ac Input (6)
24 V dc Sink Output (8)
24V&2ASinkOut(4)
24 v dc sink/Soum! out (4)
34 V dc Source Output (8)
’ G. -J dc Sink Out W/WEDS(16)
I 24VdcShkOutw/LEDs(16)
POWER USED IN UNITS OF LOAD
+s v
25
m
25
25
6
6
+9v
_
+24V
I)
5
5
1
2
20
1
3
3
7
1
13
8
1
1
1
1
1
2
10
7
6
9
24
23
m
6
11
1
0
10
Installation
345
GEL90842
Table 36. Units of Load Used by Modules - Continued
CATALOG
NUMBER
IC61OMDL158
IC61OMDLl75
IC61OMDL176
Ic61oMDL18o
IC61OMDL181
IC61OMDL1.82
IC61OMDL185
IC61OCCM105
IC61OCCMllO
IC61OCCMlll
IC6lOPERlSl
IC61OPER154
IC609CTUlOO
MODULE DESCRIPTION
POWER
USEDINUNITSOF
LOAD
+s v
+P v
+24 V
24 V dc Source Out w/LEDs (16)
115/230 V ac Output (8)
115/230 v ac Isolated OUT (4)
Relay Output (8)
UL, Relay Output (5)
Relay Output (16)
UL, 115 V ac Output (6)
Data Communications Unit
I/Ok&Local
I/O Ihk Remote
Printer Interface Unit
PROM Writer Unit
Timer/Counter Setpoint Unit
1 unit of load = 10 m4.
Calculations
are based on the worst case, that is, all inputs and outputs on.
Safety Considerations
When planning the layout of a system, safety should be a prime consideration.
System planning should
include procedures and methods to ensure the physical safety of personnel, the Series One or One Plus
Those personnel who are involved in the
system and the equipment or process being controlled.
planning and installation of a system should be familiar with all local and national electrical codes as
well as installation instructions in this manual.
All practices should be followed that are specified by the IEEE (Institute of Electrical
Engineers) Standard 510 which includes tray and conduit spacing and wiring procedures.
standard can be obtained by writing:
and Electronic
A copy of this
Institute of Electrical and Electronic Engineers
345 East 47th Street
New York, NY 10017
Recommended Field Wiring Procedures
The following Drocedures are recommended
_ _ when runnine. field wiring:
Low-level $nal
wires should be separated fkom other yfield wiring.”
AC power wiring should be separated from DC field wiring.
.
Wiring should not be routed near devices causing electrical interference.
If severe noise problems are present, additional power supply filtering or an isolation transformer may
be required. Contact your GE Fanuc Automation sales representative if assistance is required.
Proper grounding should be provided to minim& hazards to personnel.
Label all I/O wires. Circuit numbers or other identification can also be marked on the cover over the
wire terminals on each ?!O module.
I/O wires should be no larger than No. 12 AWG.