1
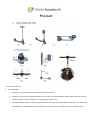
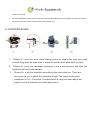
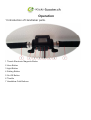
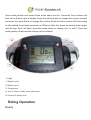
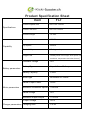
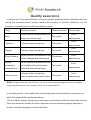
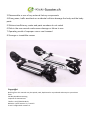
User Manual
Thank you for purchasing our products. For your convenience, please carefully
read the user's manual and warranty book before using this product.
Safety
1. The product is for adults only, limited one adult, please do not carry two
adults at the same time. Prohibit use by minors.
2. Please wear your safety helmet and other protective equipment when riding.
3. Do not ride in traffic lane or unsafe and violate local regulations place.
4. Please exercise in broad areas, and ride after skilled manipulation, do not
ride in traffic lane.
5. Do not make any dangerous actions when riding or riding with one hand.
Keep your feet on the scooter.
6. Do not attempt to across the stairs which above 3 cm directly; it may
overturn the scooter causing injury or damage. For less than 3 cm step
should try to avoid, too.
7. The scooter’s highest speed is 20km/h. Please try to avoid using at night, if
needed, please limit the speed within 15km/h or less and turn on headlight.
8. Do not use the scooter when the temperature lower than -5 ℃.
9. Please slow down or get off when riding in rough or poor road conditions.
10. Do not ride the scooter in oil or ice surface terrain.
11. Please adjust the height of handlebar to the appropriate location according
to your height to ensure riding safety.
12. Do not immerse the scooter in the water with the depth of 4 cm or directly
injected by the water to avoid damage of the electrical part of the vehicle.
13. Please try to avoid riding in bad weather such as heavy rain and high winds
to protect it from unnecessary factors that cause unnecessary harm.
Product
1 Use-Unfold and Fold
a. Fold/ Illustration
1.
Shown<1>, open the lockstitch according to the arrow direction
2.
Shown<2>, press the T conduit pinball (in the red circle), press the handlebar to the location shown in<3>at the
same time, then lock the lockstitch to the original place shown in<1>.
3.
Hold the handlebar with both hands, press the pinball (in the red circle) down firmly as shown in <4>. Hold them
downward and it will be like Pull out the handlebar to the maximum according to the arrow direction shown
Figure<4>,then (B).
4.
Push the handlebar forward, press or stamp the silvery white folding wrench according to the direction shown in
Figure<6> at the same time. It will be fold after that shown as C.
b. Unfold/Illustration
1.
Shown<7>, push the silver white folding wrench to expand the body and push
forward the grip at the same time to make the sustain hook plate back to place.
2.
Shown<8>, push the handlebar according to the arrow direction and then the
handlebar will back automatically.
3.
Shown<9>, push the lockstitch according to the arrow direction. There are
two levels for you to adjust the handlebar height. The height limiting hole
wasshown in<10>. (Press the T conduit pinball if it pop out when adjust the
height).Lock the lockstitch back after adjustment.
Operation
1 Introduction of Handlebar parts.
1 Thumb Electronic Magnetic Brake
2 Horn Button
3 Light Button
4 Setting Button
5 On-Off Button
6 Throttle
7 Handlebar Fold Buttons
2 Operating Instructions
a ON/OFF <5>
Press the switch, and the display lights indicate power on. It will turn off after unused for
3minutes.
b Speed control<6>
Press the right thumb accelerator to control the speed (1-20km/h).
c Braking Control <1>
Press the left thumb electronic magnetic brake. The greater angle you press, the greater
braking force will be.
d Horn<3>
Turn on the power, press the horn button and it will hoot.
e LED Headlight
Press the LED headlight button when need and there will be a sign in display indicates the
light is turn on. Press the button again when you do not need the light.
f Mileage Show
When power off, it shows time.
When power on, it displays three modes: total, trip and time. You can press the mode button
to change it.
When it displays the ‘trip’ mode, press the setting button for 3 seconds and it will clear the
trip.( Single stroke accumulated more than 100 belongs to 100)
g Emergency
Emergency, stamp the rear foot brake can simultaneously achieve front electronic magnetic
brake and rear wheel friction brake; under normal circumstances, please do not use the
emergency brake at high speed to avoid the wheel damage and the company shall not be
responsible for this damage. Please repair it for pay.
3 Display Factory Setting
Press setting button and mode button at the same time for 3 seconds, four numbers will
flash at the bottom right of display. Press the setting button to change the number location
and press the mode button to change the number from0-9.Set the number 0624 according
to this method (front wheel perimeter is 0624mm).After this, press the setting button again
and the sign ‘km/h’ will flash, press the mode button to change ‘m/h’ to ‘km/h’. Press the
setting button at last and the settings will be finished.
8 Light
9 Speed control
10 Battery Level
13 Temperature
11 and 12 Tripe or totally driven kilometers
14 Percent of battery level
Riding Operation
Ready
1 Choose a suitable venue for riding.
2 Expand the scooter in accordance with the description.
3 Adjust the T-pipe to the suitable height according to your height.
Start
1 Press the power button to turn on the power
2 Stand one foot on the scooter and leave another foot on the ground.
3 Gently press down on the right thumb accelerator, the scooter will immediately move
forward slowly. Place the foot which is on the floor on the pedal after smooth riding. Press
the right thumb accelerator, the greater the angle you press, the faster it will be.
Brake
1. Under normal circumstances, pressing the left thumb electronic magnetic brake, the
scooter will immediately de-energized and then brake. The greater the angle you press, the
greater the braking force will be.
2 Emergency, stamp the rear foot brake can simultaneously achieve electronic magnetic
front brake and rear wheel friction brake; under normal circumstances, please do not use
the emergency brake at high speed.
Battery and Charger
Each FLT electric scooter was equipped with a special lithium battery and special smart
charger, accessories carried by each scooter have a dedicated number, please do not use
the charger of other brands, the charger is not appropriate to other company supplied
charger, too. If the battery or charger is damaged owing to these, the company shall not be
responsible.
Battery
When you get the FLT electric scooter the first time, please charge the battery fully before
using.
The battery can be charged at any time, in order to ensure that the battery has power, during
which the battery will not charge for any damage.
Please charge the battery once every three months if stop using.
Due to water, collision, and other non-normal factors that lead to battery damage, which is
not covered under warranty.
Charger
The company provides dedicated charger which has a charging protection function, when
the battery is 100% charged, the charger will automatically stop charging.
Charging time is no more than 3 hours.
Due to water, collision, and other non-normal factors that lead to battery damage, which is
not covered under warranty.
Charge Description
Open the charging hole rubber protective cover, put the charger connector into the
charging hole.
Connect the charger plug into the power socket.
It means it is charging when charger light is red; charger light turns green when the
battery is fully charged.
Maintenance
Lubricating
Please add a small amount of grease or lubricants to handle folded position every six
months.
Please check scooter every three months weather the screws are loose, if yes screw it.
Battery
The lithium battery provided by company can be recharged at least 500 times, the normal
use can reach more than 1,000 times. Every time after fully charged, the lithium battery
needs to be replaced if the travel distance is too short.
Placement and daily care
Do not exposure the scooter under the sun for too long or other serious damp places.
Please keep the scooter clean.
General Troubleshooting
Checklist
When the products have any problems, please refer to the following methods。
1 LED display black screen
Reason:Exposure under the sun for too long.
Solution:Place it in shadow and it will return to normal after a period.
2 Values appeared do not fit the actual values
Reason: Parameters are set incorrectly or missing.
Solution: Please reset the display factory settings following the instructions
3 Digital display dim
Reason: Bad battery contacts or the battery is dead
Solution: Turn off the power then restart again, if the problem still occurs; please contact
your local reseller.
When the product does not operate normally, check the following work is completed or
not :
a Turn on the battery
b Check the battery via the display if there is electricity.
c Left thumb electronic brake and rear brake in place.
d All jacks and connectors holes linked accurately.
If the above steps are completed, the product still does not operate normally; please
contact your local vendor or reseller.
Product Specification Sheet
Item
FLT
Overall Expand Size
940*1160*135mm
Overall Fold Size
945*300*135mm
Specifications
Capability
Scooter Weight
10.5KG
Maximum load
100KG
Top Speed
20km/h
Grade Ability
15 degree slope
Single Life
22km(varied from weight, wind speed, road
conditions, temperature and other factors)
Battery parameters
Motor parameters
Standard Voltage
24V
Battery Type
Li-po Lithium Battery
Battery Capacity
6.5AH
Motor type
Brushless DC Motor
Rated Output Power
250W
Maximum Rotational Speed
700r/min
Rated voltage
24V
Maximum output torque
13.3N.m
Output Voltage
220V
Charger parameters Charging time
2.5-3h
Quality assurance
In normal use, if the parts of electric scooters got any problems listed in the following form
during the warranty period, please contact the company or product distributor, we will
provide a complete service within the warranty book.
Fitting
Motor
Quality problems
Under normal circumstances the
motor can not be used
Warranty period Service item
Two years
Controller
Failures under normal use
Two years
Charger
Failures under normal use
Two years
Lithium Battery
Under normal circumstances can
not be charged and discharged
Display
Under natural conditions can not
Accelerator
be used(Excluding the impact
overall device
force and external damage)
Body structure
Failures under normal use,
such as deformation and fracture
Six months
Two years
Two years
Free
maintenance
Free
maintenance
Free
maintenance
Free
maintenance
Free
maintenance
Free
maintenance
Note: Please follow the correct way to use our products, parts damages and other damages
caused by abnormal use, the company shall not be responsible for.
In warranty period, if the malfunction and damage caused by following causes are not
within the scope of the quality assurance:
1Do not did the proper maintenance and repair in accordance with the instruction manual.
2Use the electronic scooter for other purposes such as performing super dangerous
actions, resulted damage or functional failure.
3 Disassemble or use of any external factory components
4 Wrong uses, traffic accidents or accidental collision damage the body and the body
parts.
5 Stickers insufficiency, water and parts numbers do not match
6 Ride in the non-normal roads cause damage or failure to use
7 Operating rental of improper use or non-licensed
8 Scourge or irresistible reason
Copyright
Nothing from this manual may be copied, used, duplicated or reproduced without prior permission
from:
CH.Wey Handelsvertretung
Importer for Switzerland
Telefon: +41 (0)76 429 69 69
Website: e-Kicki-scooter.ch / e-Kicki.li
E-mail: [email protected]