1
HENRY SCHWAB
C O M PA N Y
THE FUNERAL INDUSTRY STANDARD SINCE 1937
Grave Marker Program
USER MANUAL
HENRY SCHWAB
C O M PA N Y
THE FUNERAL INDUSTRY STANDARD SINCE 1937
GRAVE MARKER SOFTWARE
800.447.1049
HENRY SCHWAB COMPANY | P.O. BOX 1347 | NEWBURYPORT, MA 01950 | PH. 800.447.1049 | FAX 800.582.0585
Table of Contents
Introduction
Installation
System Requirements
Printer Setup
Backup
Restore
View Images
The Tool Bar
Cut, Copy, Paste and Delete
What are Objects
4 Modes – Preview, Select, Text
Think Right Button
Preview Mode
Select Mode
Text Mode
Background Mode
Creating a new composition
Printing your Composition
Select an image screen
Introduction
The Henry Schwab Company offers classically unique Grave Marker Program that allows the
insertion of color graphic images.
The key to making the Grave Marker sheets possible is our unique software program. This
stand-alone Windows based program enables you to compose professional quality signage.
All conventional Windows features such as drop-and-drag, and cut-and-paste, are incorporated in
the Henry Schwab Grave Marker Software Program's functionality, along with unique, desktop
publishing features including background printing and comprehensive graphic functions.
Installation
The Henry Schwab Grave Marker Program will self-install when inserted into your CD-ROM drive.
During installation, all Grave Marker files are installed into a directory called Markers and the
Grave Marker icon is placed on your Desktop. To start the Grave Marker Program, simply click
on the icon.
Page 2
You may also manually install it by following the directions listed below.
1. Insert CD-ROM into appropriate Drive (D:)
2. Click the Start selection on the Desktop task bar.
3. Select Run from the Start Menu. Follow the instructions on the screen. The
Install program will tell you when the installation is complete.
4. Enter Setup and click OK.
5. Follow the instructions on the screen.
The Grave Marker Program tells you when the installation is complete. The whole process should
take less than two minutes.
System Requirements
Computer: Virtually any hardware setup that is capable of running Microsoft Windows 95, 98, NT,
2000, Millennium, XP, Vista, or Windows 7 - and which includes a CD-ROM drive - will
accommodate the Grave Marker Program.
Printer: Generally speaking, any printer that is "Windows compatible” is
compatible with the Henry Schwab Grave Marker Program. The one area of
importance, however, is that your printer be equipped with a paper feed that is
manually adjustable.
The manual adjustability is necessary so that you can feed paper that is other than 8 1/2" x 11"
in size. If your printer has a manual feed that is either 1). Two sides that converge to the center
(centered), or 2). One side that pushes sideward (edge justified), your printer has an adjustable
manual feed.
Using a manual feed (using the cassette tray) provides a more direct feed of paper and minimizes
curling and jamming of stock. If the feed does not accommodate multiple sheet feeding, you will
have to feed the printer one sheet at a time.
Printer Setup
The type of manual feed your printer uses to print non-standard sizes of stationery is extremely
important when using formats that are narrower than the standard 8 1/2". If your printer has
two slides that converge toward the center to accept stock, it is centered. If your printer employs
one slide that push toward either side it is edge justified. Failure to use the correct setting will
result in printed output being off laterally. Edge justified is the default setting.
Another important setting involves how the leading edge of the paper that is fed into your printer
is registered. The default setting is "Right edge exits first". If your printer functions differently,
simply make the appropriate change.
NOTE: This setting is only applicable when printing in landscape orientation.
Page 3
Backup
Back-up or "save" files contain all information about your Grave Marker compositions. Backed up
information can be restored at a later date if needed. Files can be backed up to any directory or disk.
You must specify the location to which you want the files backed up (such as A:). Files to be backed
up will overwrite files with the same name.
Restore
Restore or "retrieve" files that have been backed up using the Backup selection above. Files to be
restored will overwrite same-named files in your Grave Marker directory. You must specify the source
from which files will be restored (forexample, C:/Markers).
View Images
View all images in the Grave Marker directory that are .bmp, .jpg, .pcx or .tif file formats. You can
also access the default scanner on your computer from this function.
The Tool Bar
Navigating within The Grave Marker Program is a relatively straightforward procedure. Simply select
Grave Marker from the Main menu and create a new layout or select from a previously saved layout.
All saved layouts will automatically be alphabetized. Layouts can be renamed and deleted from the
Select Layout screen.
To create a new composition, either 1) select an existing work whose format you want to use, modify
the times, dates and other information accordingly, and Save the composition under a new name, or,
2) select new and start from scratch and, when finished save it under a unique name. This newly
named composition will then be alphabetized among any already existing names.
As soon as a specific selection is made, the Tool Bar will appear on the top of the composition screen.
Cut, Copy, Paste and Delete
While in the Text mode, the standard Windows choices of Cut, Copy, Paste, Delete and undo are in full
effect for text (graphics do not apply). Note that, in order to Cut, Copy or Delete any text, a specific line
of text or a portion of that line must first be highlighted. You can Paste source text anywhere on the
document.
If a line of text was entered in the Text mode but does not appear on the Preview screen, the reason is
that the text block holding the actual text is not big enough to hold the font size chosen. Simply go to
the Select mode and either increase the size of the text block or decrease the size of the font.
Page 4
What are the Objects?
An object is a block or field that holds images or lines of any text; any individual item that appears on
your screen is an object. A blank layout has no objects; you must add them (see Select Mode).
There are two types of objects that can be used in the Grave Marker Program: Text Blocks and Image
Blocks. You can use as many as 20 different text blocks and three image blocks per composition screen.
In order for an image to be recognized by the program, it must be .jpg, .bmp, .pcx, or .tif file. If a
background image is used, it counts as one of the three images.
4 Modes
Designed to allow you to create your memorial compositions as easily as possible, there are 4 modes to
operate from within the Grave Marker Program software. The mode selected from the Tool Bar dictates
what other tools on the Tool Bar can and cannot be used while in that mode. The functions and
capabilities of each are discussed below.
Think Right Button!
The Grave Marker Program relies heavily on the use of the right button of your mouse. There are no
hidden icons or unselected task bars. Navigation with the Grave Marker Program is a left or right-click
away. Only those options that are applicable to the mode you are in can be selected.
Preview Mode
The Preview mode shows you how your composition will appear when it is printed as well as how it will
look before it is saved. The only selectable choices while in Preview mode are: Print and Save.
Changing to the other Modes is possible as well.
To print any selection, click the Print icon on the tool bar or right click anywhere on the composition
screen then select Print.
To save any selection, under any given name, click the Folder icon on the tool bar or right click
anywhere on the composition screen and select Save. The Grave Marker Program will present a screen
prompting you for the name under which you would like to save the current layout. The name you enter
will become part of and alphabetized with all other selections for future recall.
NOTE: If a line of text that you absolutely, positively know was entered in the Text mode does not
appear on the Preview screen, the reason is that the text block holding the actual text is not big enough to
hold the font size chosen. Simply go to the Select mode and either increase the size of the text block or
decrease the size of the font in the Select Font window.
Select Mode
You must be in the Select mode if you want to add, delete, resize or move an image or text object, as well
as when duplicating a text field, or inserting/replacing an image or text. In order to manipulate any object,
Page 5
it must first be added and then selected.
To add a text object or an image object, right click any "white space" on the composition screen where
there is no object and make your selection. In all cases, an object will appear that can be resized. This is the
only place where you can add an object to your composition.
To select an object, simply point at that object with your mouse and then double-click it with the left mouse
button. Once selected, the object will appear with two small, square, black indicator marks. One indicator is
located on the top of the object and one at the right side of the object. If the black, indicator marks do not
appear, the object is not selected and you will be able to move or resize it.
To move a selected object, simply left click that object once again, hold the button down and then drag and
drop that object elsewhere on the composition screen. A symbol with four arrows pointing in different
directions will appear on the object while it is in a "moveable” state.
To stretch a selected object, place the mouse cursor directly over one of the two black indicator marks, at
which the standard, solid arrow point "click and drag" symbol will appear over that indicator mark. While
the arrow-points appear on your screen, left click your mouse and pull the arrow-points and stretch to suit
your needs.
To delete or replace an image, right click a selected image and choose as appropriate. If you choose to
replace an image, you will be presented with the Select an Image screen that shows all applicable images
that reside in your Grave Marker Program directory (C:/Markers). Refer to the section on Images for
more details.
To delete or duplicate a text object, right click that selected text object and make your selection. If you
choose Duplicate, a text object identical in size will be created. This new object will have a red outline. To
reposition, left click this new object, then drag and "drop" it at the desired location. From this point
forward, this new object can be treated as any other text object.
Text Mode
You must be in the Text mode to enter or modify text. To select any particular block of text, left click your
mouse button while the cursor is in that text-object. That object block is selected and is now the object that
will be directly affected by the choices described below.
In addition to the standard Cut, Copy, Paste, Delete and Undo choices conventional to Windows, right
clicking any text object will allow you to change the font of all text within that object. By selecting to change
the font, you are presented with a standard Font modification screen that will allow you to change the type
Page 6
style, size and color of the font. While in text edit mode, you may also click the Select Font button to bring
up the Font modification screen.
To left align, center or right align text within any text object, simply click the text object and choose one of
the three alignment tools (i.e., left, center or right justified). Text will visibly change between alignments
on your screen. "Block" alignment (even on both sides is not available, but can be approximated by using
a fixed vs. proportionately spaced font such as Courier.
NOTE: If the text block you are using is to be centered on a page, then, if you choose the center alignment
tool, all lines will be similarly centered for a neater appearance. Remember, dotted lines on composition
screen are for reference only; they do not print on the final product.
Background Mode
The Background Mode is designed to allow the use of background images such as borders, watermarks
and logos. Backgrounds can only be added and deleted while in the Background mode. They can only be
viewed while in the Background, Text or Preview mode. It is not apparent in the Select mode at all. As
mentioned elsewhere, ALWAYS view your composition in the Preview Mode BEFORE printing and saving
your work. To add, delete or replace a background, select the Background mode icon and you will be
presented with the display shown above. Select the background field by double clicking the gray rectangle.
The two indicator marks will appear on the top and to the right of the background field. Right clicking the
selected background field will prompt you to insert an image, replace an image, or delete an image.
If you choose to insert or replace an image, you will be presented with the Select an Image screen that
shows all applicable images that reside in your Grave Marker directory (C:/Markers). Choosing to delete
the image only deletes the image from this background field; it does NOT delete the image from your
Grave Marker Program directory. Refer to the section on Images for more details.
To move a background, simply left click the field once again, hold the button down, and then drag and
drop the object elsewhere on the composition screen. A symbol with four arrows pointing in different
directions will appear on the object while it is in a “moveable" state.
To stretch a background, place the mouse cursor directly over one of the two black indicator marks, at
which time the standard, solid arrow-point "click and drag" symbol will appear over that indicator mark.
While the arrow-points appear on your screen, left click your mouse and pull the arrow-point up or to the
right and stretch to suit your needs. Note that, if an image is stretched to "fit" the composition screen, it
may be distorted. Accordingly, it is recommended that you experiment with each image when first using.
Page 7
Creating a new composition
There are basically two ways to create a new composition. First, you can select an already existing layout
(either one of your own or one of the samples provided) and then modify it to suit your needs. Second,
you can choose New from the Select a Layout screen and start from scratch. In either case, you must
assign the "new" a unique name if you wish to recall it later.
NOTE: The mode you are in when creating a New layout is the Select Mode, as opposed to being in the
Preview Mode when opening an existing composition. To add an image or text block, right click on any
"white space" inside the composition area.
Printing your compositions
Printing your memorial compositions is not unlike printing ordinary documents from a word processor. Unless
you specify otherwise in the Setup function, the default printer configured in your Windows operating system
will take precedence.
The Grave Marker Program provides for as many as three images to be placed anywhere on a single
composition screen (background images count as one of the three images). Images can be logos, photographs,
icons, or any picture file having an extension of .bmp, .jpg, .pcx, or .tif. If the file extension you want to
print is different from the ones listed, simply use your favorite image editing software and convert the file
type ("Save As") into one of those extensions listed above.
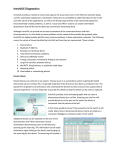
Select an image screen
The Select an image screen, accessed by right clicking a selected image while in the Select mode and then
choosing Replace Image, presents you with an alphabetized list of all qualifying images located in the
C:/Markers directory. If you want to use an image other than those listed, you must copy it into this
directory. The Grave Marker Program will automatically alphabetize your image(s). All images to be used
must reside in the C:/Markers directory.
To scan an image into the program, choose the Scan an Image button from the Select an image Screen.
After the new image is cropped and created to suit, use the Save As option to save the image into the Grave
Marker directory. The new image will now appear in the alphabetical listing and can be selected for use with
future compositions using the Replace image function.
If you encounter an Error Code 50 message, you have tried to place an image with a file size that is too large
for the program to use. You must edit or re-scan the image to a smaller scale (smaller picture dimensions) or
to a lower resolution and then try to re-insert it into your template.
Page 8