1
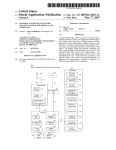
Quick Guide for PyroMark™Q24 Software Start PyroMark™Q24 Software Set Up a Run In the Windows Start menu, select All Programs | Biotage | Pyromark Q24. 1. In the shortcut browser, right-click the folder you want to place the run file in and select New Run from the context menu.1 Context-sensitive help can be accessed at any time by pressing the F1 key. Set Up an Assay 1. In the shortcut browser, right-click the folder you want to place the assay file in and select New Assay and then AQ Assay or CpG Assay from the context menu.1 2. Enter the file name and press the Enter key. 3. Select Instrument Method; see the instructions supplied with the used reagents and cartridge. 4. Set up the plate: a. Add an assay to each used well, e.g. drag an assay in the shortcut browser to a well or a selection of wells. 2. Enter the file name and press the Enter key. 3. Type or paste the Sequence to Analyze. 4. Click the Generate Dispensation Order button. 5. Click in the toolbar.2 6. Before running your samples, validate your assay using reference samples; see the Assay Design and Validation section in PyroMark™Q24 User Manual. A well is colored according to the assay loaded to the well. b. To enter a sample ID or note, select the cell and enter the text. Optional If desired, enter a Note about the assay and set up the variable positions at the Variable Positions tab. If creating a CpG assay, we recommend that you add bisulfite treatment controls by left-clicking a bold, orange T or A in the histogram. Preferable in the beginning of the sequence. A selected cell is highlighted with a blue background color. 4. Click in the toolbar.2 5. Print a list of required volumes of reagents and the plate setup; select Pre Run Information from the Tools menu and, when the report appears, click . Note: In the sequence before bisulfite treatment (can be entered in the assay), check whether the suggested bisulfite controls are Cs converted to Ts (read as Gs and As in a reverse assay) or not. 1 Optional If desired, enter the Reagent ID (i.e. the lot number for PyroMark™Q24 Gold Reagents), a Plate ID, a Barcode number for the plate, and a Run Note. To add a shortcut to a folder in the shortcut browser, click Add Folder Shortcut. The more frequently a file is saved, the more information is recovered if there is a power failure or similar problem while the file is open. To secure the data, a backup of PyroMark™Q24 files should be performed frequently. 2 60-0278 AA 6. Close the run file and copy it to one of the USB memory sticks supplied with the system. Analyze the Run Quality Assessments 1. Move the processed run file from the USB memory stick to a computer running PyroMark™Q24 Software. The quality assessments for the variable positions are displayed by: • Quality bars in the plate overview at the Overview tab. 2. Open the run file by double-clicking the run file ( ) in the shortcut browser.1 • The background color of the analysis results in Pyrogram. 3. At the Overview tab, either analyze all wells or a selection of wells with a valid analysis setup for the selected analysis mode. = Not analyzed1 = Passed = Check = Failed Analysis Modes AQ assays are analyzed in the AQ mode and CpG assays are analyzed in the CpG mode. SNP genotyping can be accessed through the AQ mode. To toggle between the modes, select AQ or CpG in the toolbar. Note: How the analysis is performed can be modified at the Analysis Setup tab. Either analysis is not supported by the software (e.g. SNP when in the CpG mode) or the variable position has been deselected by the user. 1 Methylation Levels When in the CpG mode, a methylation bar at the Overview tab shows the methylation level for each CpG site in the well. = Below the defined range View the Analysis Results = Within the defined range Select an analyzed well at the Overview tab and the following information is shown: = Above the defined range • Well information Assay name, sample ID, note, and any analysis warnings are listed in the Well Information area. • Pyrogram® The analysis results (the allele frequencies or the methylation percentages) are displayed above the variable positions in Pyrogram, for example . Analysis Reports To generate a report, select the desired report from the Reports menu. For more information about the reports, see the online help. More Information Context-sensitive help is accessed by pressing the F1 key when in a dialog or window in the software. Variable positions are highlighted with a blue-gray background color, and bisulfite treatment controls with a light yellow background color. United States: PyroMark™Q24 System is designed for Laboratory Use Only, which means it may be used for either research purposes or by high complexity CLIA certified laboratories. Europe: PyroMark™Q24 System is available for research and, in certain European countries*, for in vitro diagnostic applications. PyroMark™Q24 System meets the requirements of Annex III of the European Directive for In Vitro Diagnostic Medical Devices 98/79/EC. * For more information, see www.biotagebio.com. Quick Guide for PyroMark™Q24 Vacuum Prep Workstation Detailed instructions are available in PyroMark™Q24 User Manual. I. Immobilize the PCR Product to Beads 1. Gently shake the bottle with Sepharose beads* from side to side until a homogenous solution is obtained. II. Separate the DNA Strands and Release the Samples in PyroMark™Q24 Plate 2. Beads* 2 µl/sample Binding Buffer† 40 µl/sample Milli-Q 18.2 MΩ x cm or equivalent 18–28 µl/sample Turn for instructions III. Anneal the Samples to a Sequencing Primer MIX 60–70 µl/well Heat at 80°C for 2 minutes and cool to room temperature for at least 5 minutes. Add 10–20 µl of PCR product/well Total volume = 80 µl/well 3. Seal using strip caps. 4. Agitate constantly for 5–10 minutes, 1400 rpm. The plate can now be processed in PyroMark™Q24 Instrument. IV. When You Have Finished the Day’s Work At the end of a working day, liquid waste and any solutions left in the troughs should be discarded; see instructions in PyroMark™Q24 User Manual. United States: PyroMark™Q24 System is designed for Laboratory Use Only, which means it may be used for either research purposes or by high complexity CLIA certified laboratories. Europe: PyroMark™Q24 System is available for research and, in certain European countries*, for in vitro diagnostic applications. PyroMark™Q24 System meets the requirements of Annex III of the European Directive for In Vitro Diagnostic Medical Devices 98/79/EC. * For more information, see www.biotagebio.com. 60-0279 AA * Streptavidin Sepharose High Performance (34 μm, 5 ml, GE Healthcare) † A product from Pyrosequencing® II. Separate the DNA Strands and Release the Samples in PyroMark™Q24 Plate 1. Fill a plate (PyroMark™Q24 Plate) with 0.3 μM sequencing primer in 25 μl Annealing Buffer† in each well. 2. Open the vacuum switch on the tool (ON) and wash the filter probes by flushing them with approximately 70 ml water‡. Use the trough to the left of Parking. 6. 3. Fill the troughs with indicated volumes. Flush 5 seconds. 5. on/off PUMP 8. 7. Flush 10 seconds. Flush 5 seconds. 40 ml of Denaturation Solution† 50 ml of Washing Buffer† 50 ml of 70% ETOH Note: Sepharose beads sediment quickly. If more than one minute has passed since the plate was agitated, agitate it for one more minute before capturing the beads. 4. Move to beyond 90° vertical for a few seconds. Carefully capture all beads, ~ 15 seconds. PCR Product 12. Parking. 11. 10. Vacuum switch on the tool Flush with 70 ml water and repeat step 8. Agitate 10 seconds. 50 ml of H2O ON OFF ‡ 70 ml of H2O‡ 9. Release beads by shaking the tool from side to side. 0.3 µM sequencing primer in 25 µl Annealing Buffer† A product from Pyrosequencing ‡ Milli-Q 18.2 MΩ x cm (Millipore Corporation) or equivalent † WARNING! Irritant. The Denaturation Solution contains sodium hydroxide. MSDS can be downloaded at www.biotagebio.com. Quick Guide for PyroMark™Q24 Instrument Start the Instrument Turn on (I) the instrument using the power switch at the rear of the instrument. A light indicator in the left corner of the screen is lit when the instrument is turned on. The screen is blank during start-up, which may take up to one minute. The instrument shall be connected to properly grounded mains outlets using the supplied power supplies; see the Installation and Safety document. Load the Reagents and Plate E A T S C G Label 1. Fill a reagent cartridge according to the Pre Run Information report and the instructions supplied with the reagents (PyroMark™Q24 Gold Reagents). 2. When the instrument is not processing, open the instrument lid. An audible warning signal will alert you if the lid is opened when it is not safe. 3. Open the cartridge gate and insert the cartridge. Push it the whole way in and then down. 5. Open the plate-holding frame and place the plate on the heating block. 6. Close the frame and the instrument lid. WARNING! Pinch and impact hazards due to moving parts. Keep the instrument lid closed while the instrument is processing. WARNING! Sharp nedles at the bottom of the reagent cartridge. 60-0277 AA 4. Ensure that the line is visible in front of the cartridge and close the gate. Start and Monitor a Run Run files are transferred to the instrument using the USB memory sticks supplied with the system. 1. Plug the USB memory stick containing the run file into the USB port. 2. Select Run in the main menu (using the and screen buttons) and press Ok. 3. Select the run file and press Select. The instrument will start dispensing reagents when the pressure in the dispensing unit, the speed of the mixer, and the temperatures of the heating block, process chamber lid, and the coolant liquid have reached their preset levels (may take several minutes). To show Pyrogram® of another well, use the and screen buttons. When the Run is Finished 1. When the instrument confirms that the run has been finished, press Close. 2. Remove the USB memory stick. (If it was removed before the run was finished, insert the memory stick and select Administration and then Copy Unsaved Runs.) 3. Remove and discard the plate. 4. Remove the cartridge (by opening the gate and lifting the cartridge up and pulling it out) and discard or clean it. Refer to PyroMark™Q24 User Manual for cleaning instructions. 5. Analyze the run on an office computer running PyroMark™Q24 Software. When You Have Finished the Day’s Work 1. Shut down the instrument. 2. At the rear of the instrument, press the light button and check that the coolant level is visible in the window. If not, please contact 1-Point Support (see footer). 3. If the instrument needs to be cleaned, see instructions in PyroMark™Q24 User Manual. Shut Down the Instrument 1. Select Shutdown in the main menu and press Ok. 2. When the message It is now safe to turn off the instrument appears, turn off (O) the instrument. The power switch is located at the rear of the instrument. United States: PyroMark™Q24 System is designed for Laboratory Use Only, which means it may be used for either research purposes or by high complexity CLIA certified laboratories. Europe: PyroMark™Q24 System is available for research and, in certain European countries*, for in vitro diagnostic applications. PyroMark™Q24 System meets the requirements of Annex III of the European Directive for In Vitro Diagnostic Medical Devices 98/79/EC. * For more information, see www.biotagebio.com.