1
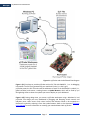
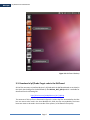
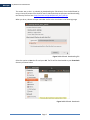
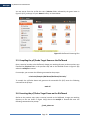
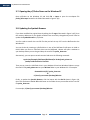
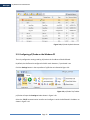
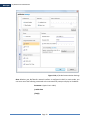
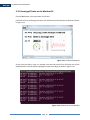
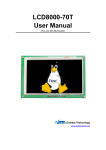
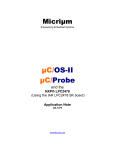
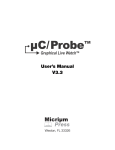
Micriµm µC/Probe on the RIoTboard Micriμm μC/Probe on the RIoTboard (Linux) 1. Introduction Whether you are doing kernel, driver or application development in a Linux environment, it's likely that at some point, you will need to debug your program using the GNU Debugger (GDB) to do basic operations such as printing variable values, setting breakpoints and stepping through your code. There are several GUIs available for GDB such as the Eclipse CDT IDE that effectively help you debug and trace your application and libraries at the C source code level. Other tools exist to analyze performance, execution paths and memory, including memory leak detection, benchmark and optimization. However, if you are doing embedded application development in a Linux environment, all the previously mentioned tools are simply not enough. µC/Probe is a Windows application tool that helps you extend your debugging scope to a higher level where you can model the system and operate the model using virtual controls to simulate stimulus and virtual indicators to simulate response. By having a dashboard for your C code, you will gain a firm understanding of what the embedded system is doing at any given time. µC/Probe works with any embedded target processor and in most cases it does not require any special code running on the embedded target (e.g. no kernel, baremetal). Other platforms such as the RIoTboard featured in this document, require a few files written in C that are available for free and are royalty-free. This document will walk you through the steps necessary to run a Linux process written in C on the RIoTboard and interface the process with µC/Probe via TCP/IP. Global variables declared in the Linux process will be available for read/write access from a dashboard in the Windows PC. Figure 1-1 shows an overview of the system and data flow. The annotations at the bottom of the image describe each step in the data flow. Page 1 Micriµm µC/Probe on the RIoTboard Figure 1-1: µC/Probe and the RIoTboard Flow Diagram Figure 1-1(1): You have to provide μC/Probe with an ELF file with DWARF-2, -3 or -4 debugging information. The ELF file is generated by your toolchain’s linker (i.e. GNU’s gcc). μC/Probe parses the ELF file and reads the addresses of each of the RIoTboard’s symbols (i.e., global variables) and creates a catalog known as Symbol Browser, which will be used by you during design-time to select the symbols you want to display on your dashboard. Figure 1-1(2): During design-time, you create a μC/Probe workspace using a Windows PC and μC/Probe. You design your own dashboard by dragging and dropping virtual controls and indicators onto a data screen. Each virtual control and indicator needs to be mapped to a RIoTboard’s symbol by selecting it from the symbol browser. Refer to the document μC/Probe User’s Manual for more information on creating your own dashboard with μC/Probe. Page 2 Micriµm µC/Probe on the RIoTboard Figure 1-1(3): Before proceeding to the run-time stage, μC/Probe needs to be configured to use TCP/IP. In order to start the run-time stage, you click the Run button and μC/Probe starts making requests to read the value of all the memory locations associated with each virtual control and indicator (i.e., buttons and gauges respectively). At the same time, μC/Probe sends commands to write the memory locations associated with each virtual control (i.e., buttons on a click event). Figure 1-1(4): In the case of a reading request, the RIoTboard responds with the latest value. In the case of a write command, the RIoTboard responds with an acknowledgement. Figure 1-1(5): μC/Probe parses the responses from the RIoTboard and updates the virtual controls and indicators. 2. Requirements To conduct the steps in this guide you must meet the following requirements: Have a RIoTboard Board: the RIoTboard can be purchased from here. Have a HDMI cable and monitor. Have a USB-based keyboard and mouse. The RIoTboard comes with an Android OS image preinstalled on the onboard flash storage. The example in this document requires Linux. To re-flash the board with a Linux image, follow the instructions in this manual. Be familiar with the RIoTboard, including how to power up the board, connect a mouse and keyboard, connect a monitor and, connect it to the Internet. Click here for more information. Have a basic understanding of Linux and GNU commands. Have a basic understanding of Linux-based embedded systems development using POSIX threads in the C language. Page 3 Micriµm µC/Probe on the RIoTboard 3. Quick Start Guide This section will guide you through the necessary 10 steps to run the example of Micriμm’s μC/Probe on the Linux version of the RIoTboard. 3-1. Installation of µC/Probe for Windows Start by downloading and executing the µC/Probe Windows Installer from the following link: http://micrium.com/tools/ucprobe/software-and-docs/ The installation process will automatically create a shortcut on your Desktop that you will need later on. Figure 3-1: µC/Probe Shortcut on the Windows Desktop With the purchase of the RIoTboard from element14, you are eligible for a 1-month subscription to the Professional Edition of μC/Probe. You can choose to activate your license at any time, but because the subscription period begins from the moment you activate it, we recommend activating it at a later time as this demo simply requires the Evaluation Edition of μC/Probe. Whenever you are ready to activate your license, you will need internet access and then you can activate it by simply clicking File -> Activation and entering the 20-characters license key provided by element14. Page 4 Micriµm µC/Probe on the RIoTboard 3-2. Connecting the RIoTboard Connect the RIoT board to your Windows PC as shown in Figure 3-2: USB Keyboard USB Mouse Internet HDMI TV or Monitor 5V 4A DC Figure 3-2: RIoTboard Connections The RIoTboard will start Linux and will show a Desktop on your display connected to the HDMI port of the RIoTboard, similar to the one shown in Figure 3-3. Some of the steps in this quick start guide will ask you to use the tools indicated in Figure 3-3 to perform the following actions: Web Browser: To download software. Terminal: To compile the demo and build the executable. USB flash drive file system: To transfer the ELF file from the RIoTboard to your Windows PC. Page 5 Micriµm µC/Probe on the RIoTboard Figure 3-3: RIoTboard Desktop 3-3. Download of µC/Probe-Target code in the RIoTboard All the files necessary to interface Micriµm’s µC/Probe with the RIoTboard board are archived in the Quick Start Package for the RIoTboard zip file Micrium_RIoT_QSP.zip which is available for download from the following link: http://micrium.com/probe/Micrium_RIoT_QSP.zip The contents of this zip file are illustrated in Figure 3-4, where the files surrounded by the Blue box are meant to be used in the host Windows PC, while the files surrounded by the Green boxes are meant to be used in the Linux side of the system (i.e. RIoTboard’s file system). Page 6 Micriµm µC/Probe on the RIoTboard For discussion purposes, we can separate the directory structure in 5 different categories as indicated in Figure 3-4. The annotations at the bottom of Figure 3-4 will describe each group of files. └───Micrium_RIoT_QSP │ │ probe_demo.out │ probe_demo.wspx │ └───micrium │ ├───Examples │ └───RIoTboard │ └───RIoTboard │ └───uC-Probe │ app.c │ cpu_cfg.h │ lib_cfg.h │ makefile │ probe_com_cfg.h │ └───Software │ ├───uC-CPU │ ├───uC-Lib │ └───uC-Probe └───Target └───Communication └───Generic ├───Source │ probe_com.c │ probe_com.h │ └───TCPIP ├───OS │ └───Posix │ probe_tcpip_os.c │ └───Source probe_tcpip.c probe_tcpip.h (1) (2) (3) (4) (5) Figure 3-4: Micriµm Quick Start Package Directory Structure Page 7 Micriµm µC/Probe on the RIoTboard Figure 3-4(1): These files are meant to be used on the Windows PC side of the system by µC/Probe. They are the input files to µC/Probe and can be described as follows: The file probe_demo.out is the executable file (ELF) generated by the compiler. The file probe_demo.wspx is the workspace file format used by µC/Probe to store the dashboard where all the graphical widgets get configured. Figure 3-4(2): This folder contains the files that implement and make the example. The file app.c is the application-level example that demonstrates how easy it is to include a µC/Probe interface in your embedded Linux C project. The files with the suffix _cfg are for configuration purposes. You don’t really need to edit any of these files, simply type make all at the command line to build the example and generate the ELF file. Figure 3-4(3): The µC/CPU module consists of files that encapsulate common CPUspecific functionality and CPU compiler-specific data types. Although there is no need to get familiar or edit any of these files they are still required to build the example. Figure 3-4(4): The μC/Lib module consists of library functions meant to be highly portable and not tied to any specific compiler. It contains the source code of the functions used to manipulate ASCII strings, perform memory copies, and more. Similar to the µC/CPU files previously described, there is no need to get familiar or edit any of these files but, they are still required to build the example. Figure 3-4(5): The µC/Probe-Target module implements the communication protocol on the embedded target (i.e. RIoTboard) to respond to the requests from μC/Probe running on the Windows PC. There is no need to get familiar or edit any of these files. 3-4. Installation of µC/Probe-Target code in the RIoTboard Extract the files indicated by the blue box in Figure 3-4(1) to any folder in your Windows PC. For example, you can extract these files to a folder called Micrium on your Desktop: C:\Users\<your name>\Desktop\Micrium Now, in regards to the files indicated by the green boxes in Figure 3-4(2-5), there are multiple ways to transfer them to your RIoTboard’s file system. Here are some ideas: USB flash drive in one of the USB ports in HUB1 or HUB2. Micro SD Card in J7. SecureCopy (SCP) command. Directly from the RIoT board. Page 8 Micriµm µC/Probe on the RIoTboard The easiest way to do it is probably by downloading the files directly from the RIoTboard by using an Internet browser from the RIoT board’s Ubuntu desktop environment and downloading the same zip file from here: http://micrium.com/probe/Micrium_RIoT_QSP.zip When you do so, Ubuntu will open a window similar to the one shown in the following image. Figure 3-5: RIoTboard: Downloading File Select the option to Save the file and press Ok. The file will be downloaded to your Downloads directory as shown below: Figure 3-6: RIoTboard: Downloads Page 9 Micriµm µC/Probe on the RIoTboard You can extract from the zip file the entire /micrium folder indicated by the green boxes in Figure 3-4(2-5), and copy it to your Home directory as shown below: Figure 3-7: RIoTboard: Extracting Files 3-5. Compiling the µC/Probe-Target Demo on the RIoTboard Open a terminal console to the RIoTboard, change your working directory to the one where you installed the /micrium folder in the previous step and to the subfolder shown in Figure 3-4(2) where the makefile is located. For example, you can enter the following command at the prompt: cd micrium/Examples/RIoTboard/RIoTboard/uC-Probe/ To compile the µC/Probe demo and generate the executable file (ELF) enter the following command at the prompt: make all 3-6. Executing the µC/Probe-Target Demo on the RIoTboard Similar to the previous step, open a terminal console to the RIoTboard, change your working directory to the one shown in Figure 3-4(2) where the makefile is located and enter the following command at the prompt: ./probe_demo.out Page 10 Micriµm µC/Probe on the RIoTboard 3-7. Opening the µC/Probe Demo on the Windows PC Open µC/Probe on the Windows PC and click File -> Open to open the workspace file probe_demo.wspx located in the folder illustrated in Figure 3-4(1). 3-8. Updating the Symbols Browser If you have modified the original demo by editing the file app.c illustrated in Figure 3-4(2), then the memory addresses of your global variables have most likely changed and you will need to update the Symbols Browser in µC/Probe. You first need to transfer the new ELF file that you built in step 3-5 from the RIoTboard to the Windows PC. You can do that by inserting a USB flash drive in one of the RIoTboard’s USB ports in HUB1 or HUB2. When you insert a USB flash drive into the RIoTboard, Ubuntu will open a window on your desktop where you can drag and drop the new ELF file probe_demo.out. Alternatively, you can open a console terminal and enter the following command: cp micrium/Examples/RIoTboard/RIoTboard/uC-Probe/probe_demo.out /media/<USB Flash Drive’s Serial #> Then you can insert the USB flash drive in your Windows PC and use Windows Explorer to copy the new ELF file probe_demo.out into your Micrium folder in your Windows PC. For example: Removable Disk (E:) \probe_demo.out To C:\Users\<your name>\Desktop\Micrium Finally, to update the Symbols Browser, click the button with the Red X shown in Figure 3-8, then click the button labeled ELF and browse to the folder where you transferred the new ELF file probe_demo.out For example, C:\Users\<your name>\Desktop\Micrium Page 11 Micriµm µC/Probe on the RIoTboard Figure 3-8: µC/Probe Symbols Browser 3-9. Configuring µC/Probe on the Windows PC The only configuration setting need by µC/Probe is the IP address of the RIoTboard. By default, the RIoTboard is configured in DHCP mode. However, if your board is set Click the Settings button in the top toolbar of µC/Probe as indicated in Figure 3-9: Figure 3-9: µC/Probe Top Toolbar µC/Probe will open the Settings window shown in Figure 3-10. Select the TCP/IP communication interface and configure it with the RIoTboard’s IP address as shown in Figure 3-10. Page 12 Micriµm µC/Probe on the RIoTboard Figure 3-10: µC/Probe Communication Settings Note: Whether your RIoTboard’s network interface is configured in DHCP or static mode, you can enter one of the following commands at the command line prompt to display its IP address: hostname -I (capital I as in India) ip addr show ifconfig Page 13 Micriµm µC/Probe on the RIoTboard 3-10. Running µC/Probe on the Windows PC Click the Run button in the top toolbar of µC/Probe. µC/Probe will start exchanging data with your RIoTboard and will display the dashboard shown in Figure 3-11: Figure 3-11: µC/Probe Dashboard As you move the slider or type in a message in the text box control from µC/Probe, you will see the RIoTboard’s terminal window updating its output accordingly as shown in Figure 3-12: Figure 3-12: RIoTboard Terminal Window Page 14