1
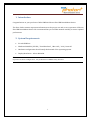
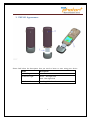
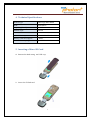
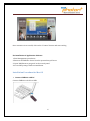
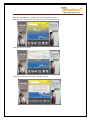
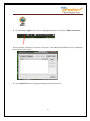
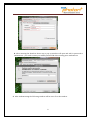
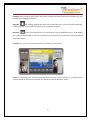
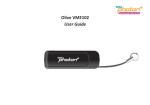
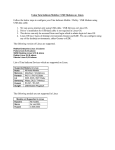
Olive VME101 Table of Contents 1. Introduction ..................................................................................................................................................3 2. System Requirements ................................................................................................................................3 3. VME101 Appearance .................................................................................................................................4 4. Technical Specifications ............................................................................................................................5 5. Inserting a Micro-SD Card ........................................................................................................................5 6. Using the device ...........................................................................................................................................6 Installation Procedure for Windows XP ............................................................................. 6 Installation Procedure for Mac OS ..................................................................................... 10 Installation Procedure for Linux ........................................................................................ 15 7. Using the Dialer........................................................................................................................ 22 8. Troubleshooting ....................................................................................................................................... 26 9. Care and Maintenance ............................................................................................................................ 27 10. Important Safety Information ............................................................................................................ 28 2 1. Introduction Congratulations on your purchase of Olive VME101 Photon Plus USB Data Modem Device. The User Guide contains important information on the proper use and correct operation of Photon Plus USB Data Modem Device. We recommend that you read this manual carefully to ensure optimal performance 2. System Requirements PC with USB Port Windows 2000SP4 / XP SP2 / Vista Windows7 / Mac 10.5 / 10.6 / Linux OS Hardware configuration should satisfy the demand of the operating system. Display Resolution:Above 800x600 Note: If your PC has lower configuration,the performance of VME101 may be lower. 3 3. VME101 Appearance Please find below the description that you need to know to start using your device Name Description 1.USB Plug 2. Indicator light Power:Red light flash Link:Blue light flash 3. T-Flash Slot Installing T-Flash card 4 4. Technical Specifications Modem Type USB Dongle NON-RIUM Mode EVDO REV A Frequency (Band ) 800 MHz Antenna Type Internal Dimension 76.0*25.4*10.8mm Internal Memory 1Gbit NAND+ 256Mbit DDR Memory Card Slot Support T-Flash External Memory Support Upto 32Gb 5. Inserting a Micro-SD Card 1. Remove the back casing and USB cap. 2. Insert the T-flash card. 5 6. Using the device For different operating system, the installation process is different. Please note the process for the following Operating Systems Installation Procedure for Windows XP 1. Connect VME101 with PC Connect VME101 with PC via USB. 2.Install VME101 Dialer & Driver If PC opens the auto run function, it will pop up an installation interface. If not, please go to CD as shown in the figure below and open it and double click the “AutoRun.exe” file or right click and click on Autoplay. 6 Please refer to the following screenshots for the further steps of installation Click “Next and then “Install” 7 Please click on “Finish” button After installation, please go back to desktop, click on the icon”Olive Dialer” The main interface appears Notie: Please allow the OliveDcService.exe to run. 8 . When the installation is complete, the following dialer appears Please click on the “Activate” button as shown in the image below Enter Password as “0000” Please dial *228 and click on the “Activate Now” button 9 Once activation is successful, click on the “Connect” button and start surfing Un-installation of Application Software 1. Exit Management procedures. 2. Remove the VME101 device from the system then pull it out. 3. Open “Add/Remove program” in the control panel. 4. Accord the prompt, finish un-installation Installation Procedure for Mac OS 1.Connect VME101 with PC Connect VME101 with PC via USB. 10 2.Install VME101 Dialer & Driver Insert the VME101 device into computer Double click icon of “TTSL Olive VME101 Dialer” 11 , Click “Continue” then install Then enter your laptop’s password when pop up window appears 12 When installation is successful click on close button After clicking on close Dialer opens 13 When the installation is complete, the following dialer appears Please click on the “Activate” button as shown in the image below Enter Password as “0000” Please dial *228 and click on the “Activate” button 14 Once activation is successful, click on the “Connect” button and start surfing Un-installation of Application Software 1. Exit Management procedures. 2. Open “uninstall TATA Photon+ Dialer”, click “OK” >“OK”. Installation Procedure for Linux Before proceeding further make sure you have wvdial installed on your laptop/desktop. If not then install it by writing apt-get install wvdial in terminal. (You need internet connection for it) Now plug in your modem in USB port. On inserting you will notice icon of VME101 on your desktop screen, right click on it and eject it. 1. In terminal write the following command: $sudo lsusb Sometimes it need to input the password for sudo, such as [sudo] password for ***: Please input it, then it should has similar information as follows: Bus 002 Device 002: ID 201e:2009 Here the 201e:2009 is very important; it corresponds to the VID&PID of the data card. 2. Now it should load the proper module to let the kernel know the device. Please do as follows: 15 $sudo modprobe usbserial vendor=0x201e product=0x2009 After that, using the command “dmesg” to check again, it will see the following information: usbcore: registered new interface driver usbserial drivers/usb/serial/isb-serial.c: USB Serial support registered for generic usbserial_generic 2-2:1.0 generic converter detected usb 2-2: generic converter now attached to ttyUSB0 usbserial_generic 2-2:1.1 generic converter detected usb 2-2: generic converter now attached to ttyUSB1 usbserial_generic 2-2:1.2 generic converter detected usb 2-2: generic converter now attached to ttyUSB2 usbcore: registered new interface driver usbserial_generic drivers/usb/serial/usb-serial: USB Serial Driver core This is for loading the device; the next steps should introduce how to dial the data service. We use the wvdial command as example. 3. Edit the wvdial configure file by typing the following command: $sudo gedit /etc/wvdial.conf On entering the above line a new window will pop up. Fill in the details as given below and click save and close that window. Edit the wvdial.conf file as follows: [Dialer Defaults] Init = ATZ Init = ATQ0 V1 E1 S0=0 &C1 &D2 +FCLASS=0 Modem Type = USB Modem Baud = 115200 Modem = /dev/ttyUSB0 Phone = #777 Username = internet Password = internet Stupid Mode = 1 4. Do the wvdial to connect data service: $sudo wvdial This command will initialize the modem and connect you to internet. 16 If connected successfully you will see this in terminal window, see the image: Once you are connected press CTRL+C to disconnect from internet. From next time, 1. Plug in the device, eject it. 2. sudo modprobe usbserial vendor=0x201e product=0x2009 3. sudo wvdial . 4. ctrl+ c to disconnect Note the following user guide only implies to Linux version 10.4 LTS which comes with kernel 2.6.32-23 Generic & above. All below Linux OS versions will have to use Terminal to connect to internet, if not upgraded to 2.6.32-23 kernel. 1. Plug in your device and you will notice the dialer on desktop , right click on the dialer and eject it. (Ejecting is compulsory ) 17 2. On task Manger right click on the icon highlighted and select the option “Edit Connections “. 3. New window “Network Connections” will open > select Mobile Broadband option as displayed, then click on “Add” option: 3. Select Forward without changing anything from drop down box: 18 4. Select Forward again without changing anything from drop down box: 19 5. Select TATA Indicom (Photon+) option & click on Forward: 6. Select “Apply” 7. After clicking “Apply” new window will pop up as displayed in picture below: Fill the following details:Username –internet (small letters) Password- internet (small letters) Check the option “Connect automatically” & “Available to all users”, then click “Apply”. 20 8. After entering the details in above step, a pop up window will open and ask for password to authenticate – you need to enter your admin password & after entering press authenticate. 9. After authenticating the following window will be seen. Close the window. 21 10 Now single click on network connection and you will notice there will be a connection named as “ Tata Indicom (Photon+) connection1 “ ---Single click on the connection name & you will be connected to internet . 7. Using the Dialer With this Dialer, you can enter the corresponding function modules through each button or menu in the main interface. Same like as below: 22 Connect: Press Connect, the software will create a wireless network connection automatically. You can then start surfing the internet Upgrade: On clicking Upgrade the dialer will check if the latest version of dialer is installed on the computer. If not it will prompt the user to upgrade the dialer Activate: This option shall be used to activate the device by the OTASP service. If the MIN of the modem is default MIN, it only can do this function unless it is activated. The default password should be “0000”. General: You can set a series of parameters of the dial-up connection. Lock: On selecting Lock, General Lock and Internet Lock options should be provided. These options should be password protected. The default password should be “0000”. 23 Network: You can set the mode when connecting the net and edit the Profile Name. Hybrid mode: Select it, you will access network with the mode mixed with HSD and CDMA. Hsia: Select it, you will access network in a higher rate. CDMA 1X: Select it, you will access network with the mode of CDMA. Information: You can get the information of the software 24 Log: On clicking on Log the user will be redirected to his Tata Photon Plus MyAccount section Speedometer: On clicking on Speedometer the user will be redirected to a website. Using this website the user can check his current speed. Browser: On clicking Browser the default Web browser of the customer will be opened Setting: You can enter into "Settings" window by clicking this button 25 8. Troubleshooting 1. Q: Which operation systems VME101 supports? A: The supported operation systems are as follows: Windows2000SP4/XP SP2/Vista Windows7/Mac 10.5/10.6 /Linux OS/Fedora 2. Q: What's the max speed of dongle supports? A: The max speed is 3.1Mbps. 3. Q: Why the Dialer displays no signal? A: 1. Please confirm the device works normally. Please refer to the user manual. 2. Please confirm the local network is fine. 3. If still not resolved, please contact carrier. 4. Q: How to in-plug/unplug dongle device? A: Connect the device to the PC. 5. Q: What's means red/blue LED flash? A:No service state:red light flash. Enter service area state:blue light double flash. Connect state:blue light fast flash. 6. Q: How to use T-Flash card? A: 1. Insert the T-flash card to your data card 2. Connect Data card to the computer 3. Install the Dialer 4. Open “My computer”---Removable disk. If your radio card has abnormal conditions, please refer to the following table. Common problems Check item Cannot automatically install the driver & Dialer tool in the first time Maybe the computer does not open the auto run function. Please go to “My Computer”->CD Rom which name is “VME101 Dialer”, open it and run the autorun.exe manually. Cannot install driver successfully Please try to uninstall it and then install it again. 26 Common problems Check item Cannot find the device by Dialer tool Please check whether it can find the device from Device Manager. If not, please check whether you can see the CD “VME101 Dialer” from “My Computer”. If so, then eject the CD. Cannot search signal from Dialer tool Please check whether the number you used is activated or not. Please contact operator whether the parameters are configured correctly. Cannot connect to internet by Dialer tool Please check whether it can search signal by Dialer first. Please check whether the Modem configuration of PC is ok or not. 9. Care and Maintenance Your radio card is a product of superior design and craftsmanship and should be treated with care. The suggestions below will help you to fulfill any warranty obligations and to enjoy this product for many years. Keep the radio card and all its parts and accessories out of small children's reach. Keep the radio card dry. Precipitation, humidity, and all types of liquids or moisture can contain minerals that will corrode electronic circuits. Do not use or store the radio card in dusty, dirty areas. Do not store the radio card in hot areas. High temperatures can shorten the life of electronic devices, and warp or melt certain plastics. Do not store the radio card in cold areas. When it warms up (to its normal temperature), moisture can form inside, which may damage electronic circuit boards. Do not attempt to open the radio card. Non-expert handling may damage it. Do not drop, knock, or shake the radio card. Rough handling can break internal circuit boards. Do not use harsh chemicals, cleaning solvents, or strong detergents to clean the radio card. Do not paint the radio card. Paint can prevent proper operation. Use only the supplied antenna. Unauthorized antennas, modifications, or attachments could damage the radio card and may violate regulations governing radio devices. All of the above suggestions apply equally to your radio card or any accessory. If any of them is not working properly, take it to your nearest qualified service facility. The personnel there will assist you and, if necessary, arrange for service. 27 10. Important Safety Information Traffic safety Do not use the radio card while driving a vehicle. Do not place the radio card on the passenger seat or where it can break loose in a collision or sudden stop. Operating environment Remember to follow any special regulations in force in any area and always power off your radio card whenever it is forbidden to use it, or when it may cause interference or danger. Note that the radio card may cause similar interference as any cellular terminal (e.g. mobile phone) and must not be used in areas where the use of any such device is prohibited. Use the radio card in its normal operating positions. Electronic devices Most modern electronic equipment is shielded from radio frequency (RF) signals. However, certain electronic equipment may not be shielded against the RF signals from your radio card. Pacemakers Pacemaker manufacturers recommend that a minimum separation of 20 cm (6 inches) be maintained between a radio card and a pacemaker to avoid potential interference with the pacemaker. These recommendations are consistent with the independent research by and recommendations of wireless technology research. Persons with pacemakers: You should always keep the radio card more than 20cm (6 inches) from their pacemaker when the radio card is powered on. You should not carry the radio card in a breast pocket. If you have any reason to suspect that interference is taking place, power off your radio card immediately. Hearing aids Some digital radio cards may interfere with some hearing aids. In the event of such interference, you may want to consult your service provider. Other medical devices 28 Operation of any radio transmitting equipment, including radio cards, may interfere with the functionality of inadequately protected medical devices. Consult a physician or the manufacturer of the medical device to determine if they are adequately shielded from external RF energy or if you have any questions. Power off your radio card in health care facilities when any regulations posted in these areas instruct you to do so. Hospitals or health care facilities may be using equipment that could be sensitive to external RF energy. Persons with pacemakers: Pacemaker manufacturers recommend that a minimum separation of 20 cm (6 inches) be maintained between a radio card and a pacemaker to avoid potential interference with the pacemaker. these recommendations are consistent with the independent research by and recommendations of wireless technology research. Emergency Call You can use your phone for emergency calls. However, connections in call conditions cannot be guaranteed. You should never rely solely on the phone for essential communications. Children Safety Put your phone, battery, and charger in places beyond the reach of children. Do not allow children to use the phone, battery, or charger without guidance. Do not allow children to put the battery in mouth, for electrolyte in the battery is poisonous. Do not allow children to touch the small fittings. Otherwise, suffocation or gullet jam can be caused if children swallow the small fittings. 29