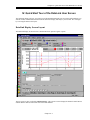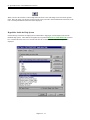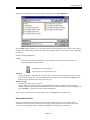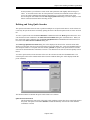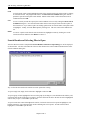
1
Contents:
Contents
I. Introduction ......................................................................................................................... 5
II. Software Installation ........................................................................................................ 1
Step #1 – Checking for Minimum Computer Requirements: .............................................................................1
Step #2 Software Installation: ............................................................................................................................2
Step #3 License Disk Installation: ......................................................................................................................3
Step #4 Setting the Default Configuration File ..................................................................................................3
Step #5 Setting the default Serial Communication Port For Uploading Data ....................................................4
Step #6 Installation Verification:........................................................................................................................5
III. CUSTOMIZING THE DATALINK SOFTWARE: ..................................................... 1
Setting the Screen Resolution and Color Palette on the Windows DeskTop: ....................................................1
Customizing the Screen Layout of the DataLink Software: ...............................................................................2
Step #1 – Editing the System Preferences: .....................................................................................................3
Step #2 – Editing the Chart Colors.................................................................................................................4
Step #3 – Editing the Graph Color Palette .....................................................................................................5
Step #4 – Setting the Screen Size Sequences .................................................................................................6
IV. Quick Start Tour of the DataLink User Screen............................................................. 1
DataLink Display Screen Layout .......................................................................................................................1
Channel Display Region.....................................................................................................................................2
Graphics Display Region....................................................................................................................................4
Time Cursor....................................................................................................................................................5
Cursor Time Display ......................................................................................................................................5
Channel Grid Selection Button and Display...................................................................................................5
Average Cursor ..............................................................................................................................................6
Run Log Display Region ....................................................................................................................................6
DataLink User Interface .....................................................................................................................................7
Graphics Toolbar............................................................................................................................................7
Clear Graphs Command .................................................................................................................................9
Quick Graphs Command ................................................................................................................................9
The Nudge Commands .................................................................................................................................10
The Set Start Time Commands.....................................................................................................................11
Using Help....................................................................................................................................................11
The Context Sensitive Help..........................................................................................................................13
Hyperlinks Inside the Help System ..............................................................................................................14
V. File Management................................................................................................................ 1
Overview ............................................................................................................................................................1
Car Configuration Files ......................................................................................................................................2
Opening Car Configuration Files ...................................................................................................................2
Editing Car Configuration Files .....................................................................................................................3
Closing Car Configuration Files.....................................................................................................................3
Setting the Default Car Configuration File.....................................................................................................4
Run Data Files ....................................................................................................................................................4
Opening Run Data Files .................................................................................................................................4
Editing Run Data Files ...................................................................................................................................5
Closing a Run Data File .................................................................................................................................7
Saving Data to an ASCII FILE.......................................................................................................................8
Printing Data on the System Printer .............................................................................................................10
III
Contents
VI. Working with Data Channels .......................................................................................... 1
Editing Existing Data Channels from the Channel Display Pane ...................................................................... 1
Selecting the Channel to Edit......................................................................................................................... 1
The Easy Edit Channel Dialog Boxes................................................................................................................ 2
Editing Simple Expression Math Calculation Channels ................................................................................ 4
VII. Working with Run Log Pages........................................................................................ 1
Using the Run Log Pages................................................................................................................................... 1
The Session Run Log Data Page.................................................................................................................... 1
The Weather Log Data Page .......................................................................................................................... 3
The User Defined Run Log Pages................................................................................................................. 3
Setting Up the Run Log Pages ....................................................................................................................... 4
Edit the Heading ............................................................................................................................................ 4
Editing the Answers....................................................................................................................................... 4
Renaming the User Run Log Tabs................................................................................................................. 4
Editing the Run Log Pages in Your Run Files............................................................................................... 5
Moving Log Page Layouts and Data between Files........................................................................................... 5
Copy Runlog Command ................................................................................................................................ 5
Paste Run log Command................................................................................................................................ 6
Exclude Items from Paste Dialog Box........................................................................................................... 6
Changing the Default Log Layout ..................................................................................................................... 7
VIII. Working with the Run Log Database.......................................................................... 1
Searching the Run Log Database....................................................................................................................... 1
Defining and Using Quick Searches .................................................................................................................. 3
Search Results and Selecting Files to Open....................................................................................................... 4
APPENDIX I – Unilog Language Reference ........................................................................ 1
APPENDIX II --Supported Math Functions........................................................................ 1
Appendix III. Creating Your Own Color Palette ............................................................... 1
Appendix IV How the File Security Works.......................................................................... 1
IV
I. Introduction:
I. Introduction
Thank you for your purchase of ‘DataLink Lite’, Racepak’s new data display and analysis software for
Windows 95, 98, and NT. The material in this manual is designed to get you up and running as quickly and
easily as possible. Chapters II through IV are must reads. Chapter II will guide you through the hardware and
software installation. Chapter III will help you set up the display on your PC to best utilize the DataLink
interface and Chapter IV will give you a quick tour of the DataLink user interface.
We also strongly recommend you read Chapter V – File Management. This chapter provides important
information on how DataLink manages and stores the information. If you read this chapter now you will save
you a lot of time later on as you begin to use the more advanced features of the DataLink program.
Before you begin we would like to review some important facts about the DataLink package. First the
‘DataLink Lite’ package is licensed to the end user for use with one onboard data logger system. If you have
multiple data logger systems you will need to purchase additional packages for use with the additional data
loggers. DataLink Lite is designed as an affordable software package that allows the user to view the data
recorded on a RacePak data logger. It does include limited run log capabilities which allows the user to keep a
very basic electronic database. It does not include full math and run log capabilities nor does it include all the
features embedded in the sample data files provided on the DataLink Lite CD. Math and run log capabilities
can be purchased separately as add on features to the DataLink Lite software package. If you are interested in
purchasing the math and/or run log software please contact Racepak.
Secondly the DataLink software package contains software protection that prevents the unauthorized use of the
software and the unauthorized viewing of your teams data files by another individual. Security unlock keys
have been included in the License Disk used to install you software. These security keys will enable your team
to upload and view new data files on your PC’s. If you wish others to view your data files they will need to
include these security unlock keys on their PC. Please see Appendix IV for a detailed explanation of the
function of the security keys.
Finally, the DataLink system uses some of the more advanced features of the Microsoft Windows Operating
System and in the various software drivers utilized by Windows. If your PC contains early versions of
Windows 95, 98, NT, and/or video drivers you may experience occasional problems with the
Windows/DataLink software. You may want to contact your PC’s manufacturer and update the Windows and
driver software contained in your PC. If you are using Windows NT you should download and install Service
Pack #4 from Microsoft.
If you have further problems please contact RacePak at (949) 580-6898.
Chapter I -- 1
I. Introduction
(THIS PAGE INTENTIONALLY LEFT BLANK)
Chapter I -- 2
II. Software Installation
II. Software Installation
This chapter will guide you through the installation of the RacePak DataLink Software to your personal
computer system. To accomplish this task we will guide you through the following steps.
1.
2.
3.
4.
5.
6.
Verify your PC meets the minimum requirements needed by the RacePak DataLink Software.
Install the RacePak DataLink software onto your hard drive.
Use the RacePak DataLink License disk to install the configuration files for your on board data acquisition
equipment and your user Security Keys
Select the supplied configuration file as the default configuration file.
Set the default COM port for uploading data to your PC.
Verify the software and hardware installation is working properly.
Step #1 – Checking for Minimum Computer Requirements:
Although the RacePak DataLink Software can be operated on any IBM PC or clone capable of running
Windows 95/98/NT, there are several items which should be considered before selecting a computer system on
which to install the software. These items are:
1. Number of Files to be Overlaid – The DataLink software allows the user to open and overlay as many run
data files as there is available RAM memory in the PC. A typical run data file will require approximately
200 Kbytes of available RAM memory to open. For most installations, 8 Mbytes of RAM memory will be
sufficient.
2. Number of Files to be Stored – The amount of disk space required will depend on how much data you
wish to keep on the PC at a given time. Many teams keep up to 2 complete years of data on the PC. This
would require the ability to store up to 400 run data files on the PC. Depending on the size of the data
files, as discussed above, the amount of disk space required can easily be estimated. If you are buying a
new PC the standard disk drives shipped with new PC’s should be sufficient.
3. Monitor Size and Video Resolution – The DataLink software is capable of displaying large amounts of
data on the video monitor. The larger the monitor and the higher the resolution of the video adapter the
more data can be displayed at any given time and the more readable the data will be. As a standard
system, we recommend a 17 inch monitor at a resolution of 1280 x 1024 or 1024 x 768. The software will
work quite nicely on smaller monitors and laptops, however, the video adapter and monitor must support a
video resolution of at least 1024 x 768.
4. Laptop versus Desktop Computer – The DataLink software is capable of operating on either a laptop or
desktop style computer. We recommend, however, the use of a desktop style PC as the computer used to
download the data from the onboard data acquisition system. Our experience has shown the laptops to be
more susceptible to damage from static electricity and more expensive to repair if damaged.
Minimum System:
•
•
•
•
•
•
•
•
IBM PC or clone with 200 MHz Pentium Processor and 8 Mbytes Ram
Windows 95/98/NT Operating System
100 Mbytes free disk space
3.5 inch 1.4 Mbytes floppy disk drive
CDROM drive
Video card and monitor with a minimum resolution of 1024 x 768 pixels
Keyboard and mouse
One 9 pin serial communication port
Chapter II -1
II. Software Installation
Recommended System:
•
•
•
•
•
•
•
•
•
•
IBM PC or clone with 350 MHz or higher Pentium II Processor and 64 Mbytes Ram
Windows 95/98/NT Operating System
Motherboard with AGP video bus and 8 Mbytes AGP type video board
1024 x 768 minimum video resolution.
17 inch or greater high resolution color monitor
5 Gbyte hard drive
Iomega JAZ Drive or Iomega Zip Drive or LS120 Floppy drive or CD-RW drive.
Keyboard and mouse
One parallel and one 9 pin serial communication port
One open ISA bus slot or one available PCMCIA slot
Step #2 Software Installation:
To install the RacePak DataLink software on your computer the following steps are required.
Installing the software from a CD for the first time.
1.
2.
3
4
Switch on the computer and start Windows
Insert the CD Labeled RacePak DataLink Software into the CD drive.
The RacePak DataLink Setup program will automatically be started and the setup Install Shield Wizard will
be displayed. Please note—If you have disabled auto run in your computer the installation wizard will not
automatically start. To manually start the installation program; Select My Computer from the computer
desk top, select the CD drive by clicking on it, next open the INSTALL folder on the CD, and double click
on Setup.exe to start the installation program
Read the instructions on the dialog boxes and answer any questions required. We recommend you install
the software in the default directories as indicated during the installation procedure. This will make it
easier for our technicians to assist you at a later date should you have an application problem. If you install
the software in a directory other than the default directory, please write the install directory on the cover
sheet of this manual to assist our technicians should a problem arise.
The install wizard will automatically create a shortcut on the main desktop for the RacePak DataLink program.
Adding a new logger to an existing DataLink installation.
1. Start the DataLink software.
2. Select Security from the main menu bar then click on Read License disk with the left mouse button.
3. Insert the license disk into the a:\ drive of you computer. The license disk is included with the DataLink
software you purchased for the logger you are adding. The DataLink Lite software is license for use with one
data logger. A separate software license must be purchased for each logger you wish use with the DataLink
program.
4. Follow the onscreen instructions outlined below.
Note: When prompted to Select Items to Copy, make sure all three boxes have check marks next to them.
Chapter II - 2
II. Software Installation
Step #3 License Disk Installation:
The next step in the installation process is to install the information contained in the license disk shipped with
the RacePak DataLink software. To install the license disk information, start the RacePak DataLink program by
clicking on the program icon created above. If this is the first time you have installed the DataLink software the
following dialog box will be displayed.
Insert the license disk into the floppy disk drive, type the correct drive letter in the dialog box and select OK.
Copy User Registry Keys
This portion is used to initialize the Windows registry keys containing the name of the racing team.
Copy Configuration File:
To make the installation process easier and to get you up and running faster, personnel at RacePak will
have created a configuration file which matches the hardware on your on board data acquisition
system. This file contains the information that tells the DataLink Software how to display the
information collected by the data acquisition system on the computer screen. This information
includes items such as the name and scaling factors for each of the channels
The configuration file will also contain a default run log typical to the type of racing specified when
the DataLink software was ordered. You will be able to edit this run log to meet your specific need.
The configuration file will be located in the RacePakData\RPxxxx\ folder on the drive you installed the
DataLink software. Where ‘xxxx’ represents the serial number of the data logger for which the
configuration file is intended.
You will need to select this file as the default configuration file before you begin to utilize the
DataLink software. This is covered in Step 4 below.
Copy License Keys:
The License disk contains the appropriate security keys required for you to utilize your system to
upload new data from your on board data logger and view previously stored runs..
Step #4 Setting the Default Configuration File
Each time the RacePak DataLink software is started the default car configuration file is opened and made
accessible for editing by the user. The run log portion of this file is used to store the current setup of the racing
Chapter II -3
II. Software Installation
vehicle and should be updated any time changes are made to the vehicle. The data contained in this file is then
copied into the run data file each time data is uploaded from the onboard computer. Keeping this file current
will insure the correct setup data is stored in the file.
To select the car configuration file loaded with the license disk as the default car configuration file perform the
following steps.
1.
2.
3.
4.
Start the RacePak DataLink program
From the File main menu item select the Open Car Configuration menu selection. The select
configuration dialog box will be displayed.
Next select the car configuration file to be opened. The configuration file created by RacePak will be
located in a folder named RP followed by the serial number of your Racepak Unit. The configuration file
will be named after the model Racepak data logger for which the file was intended. For example the folder
created for a Hot Tach Pro with the serial number 99061000 would be named RP99061000. This folder
would then contain a configuration file with the name HTPro.cfg. To select this file from the selection box
locate the RP99061000 folder in the left hand selection list and select it by positioning the mouse on the
folder and clicking the left mouse button. The name of the configuration file should appear in the second
list on the right, in this case HTPro. Select OK to open this car configuration file. A tab will be created at
the top of the DataLink display page showing the file was loaded.
Next from the File main menu item select the Default configuration file menu item. When selected a
check mark will appear in front of the menu item. This signifies the configuration file selected above is
now set as the default configuration file.
Note: If you are using one personal computer to upload from multiple Racepak data loggers, we recommend
renaming the folders containing each data loggers configuration file. For example, ARP99061000 for the
first data logger and BRP99061001 for the second data logger. This will ensure a unique filename will
automatically be generated for each data logger every time new data is uploaded.
Step #5 Setting the default Serial Communication Port For Uploading Data
The next step in the installation process is to tell the DataLink program which serial port will be used to upload
data from the onboard data logger to the PC. To set the communications port, select the Preferences menu
command located in the Settings main menu selection. When the command is selected the Edit Preferences
Dialog box will be displayed as shown on the following page. Locate the section on the dialog box labeled
Logger COM Port. Select the serial communication port from the list to be used for uploading data from the
logger communication port by clicking on the name of the port. The radio button will indicate the selected port.
Chapter II - 4
II. Software Installation
Step #6 Installation Verification:
The final step is to upload data from your onboard data acquisition system to verify the software has been
properly installed. Perform the following steps:
1.
2.
3.
4.
5.
Following the data logger instructions, record data into the onboard data logger.
Following the data logger instructions, prepare the onboard data logger for send recorded data to
the PC.
Connect the download cable between the data logger and the computer serial port.
Select the New file menu item form the File main menu. The Select Configuration dialog box
will be displayed. The configuration folder and your default configuration file should be
highlighted in the selection box. If it is not select CANCEL and repeat Step #4 above to set the
default configuration file. If it is highlighted, select OK. At this point the upload of data from the
on board data logger will begin.
If an error occurs during the download process an error message will be displayed on the screen.
Insure that the default serial port is correct, check all connections and repeat the download
procedure.
Chapter II -5
II. Software Installation
If the upload process proceeded correctly the following run log page will be displayed.
This screen is used to enter the race track and run information used to name and store the run data file. Enter
the correct year and track information and select the race type and sequence number with the selection buttons.
If the correct year and or track name does not appear in the selection list simply type in the correct value in the
selection box. The value will be added to the selection list.
Select the Next button to continue.
The second page of the run log will be displayed as illustrated below. (Please note your second page may
appear differently depending on the type of racing)
Chapter II - 6
II. Software Installation
You would normally enter your weather conditions and comments at this time. For our test purposes select the
OK button. The File Save As Dialog box will be displayed as shown below.
The DataLink software will have named your file automatically. If you wished to keep this name select SAVE
to store the file and advance to the normal display screen. If you wish to change the name simply type the new
name in the File Name text entry box. For our test purposes, select the Cancel button, this will load the data
for display but will not save the data on disk.
CONGRATULATIONS: The installation has been completed successfully.
Chapter II -7
II. Software Installation
(THIS PAGE INTENTIONALLY LEFT BLANK)
Chapter II - 8
III. Customizing the DataLink Software
III. CUSTOMIZING THE DATALINK SOFTWARE:
The RacePak DataLink software is capable of presenting large amounts of data on the video monitor of your
computer. Due to the large number of combinations of video cards, monitors, and your personnel viewing
preferences, however, the default layout of the DataLink Software may not be optimum for your particular
application. The DataLink software can be customized to better fit your needs and PC hardware.
The following chapter will lead you through a step by step process to customizing the layout of the DataLink
software. Once you have completed this section, you will be ready to begin using your software.
Don’t worry about getting it perfect the first time, you can go back and modify any of the settings at any time.
As you become familiar with the software, you may find different settings better fit your needs.
Setting the Screen Resolution and Color Palette on the Windows desktop:
The first step in setting the layout of the RacePak DataLink software is to set the display properties of the
standard Windows Desktop. The Windows Desktop is the default screen layout that appears after booting your
system and is utilized by all your software, including DataLink, in determining how to display data on the video
screen. For this application, we will only adjust the screen resolution and the color palette. If you wish to
further customize your desktop, please refer to the Windows documentation provided with your PC.
To check and/or change the screen resolution of you desktop, click on the “Start” button on the task bar, select
“Settings” and then “Control Panel” and finally “Display”. The Display Properties dialog box will be
displayed. Next click on the “Settings” tab in the Display Properties dialog box. The screen will appear as
shown below.
Locate the area on the Display Properties box labeled Desktop Area. The slide bar in this area is used to adjust
the screen resolution. The current resolution will be displayed below the slide bar. The resolution must be set
to a minimum of 1024 by 768 or portions of the DataLink tool bar will not be visible. We recommend a setting
Chapter III -1
III. Customizing the DataLink Software
of 1280 by 1024 for most PC systems. If you have a large monitor you may wish to increase the resolution. If
you have a small monitor you may wish to set the resolution at the minimum of 1024 by 768 pixels.
The next step is to select the color palette. You should select the color palette with the highest number of
colors that can be supported by your video hardware at the screen resolution selected above. If you try to select
a palette with too many colors Windows will automatically reduce the screen resolution to accommodate the
increased number of colors. If this occurs, select a lower number of colors and reset the screen resolution to the
desired level.
Once you have selected a screen resolution and color palette, exit the display properties dialogue box by
clicking on the “OK” button. You should check other software programs you use on a frequent basis to insure
they are still usable. When you are satisfied with the setting you are ready to start the RacePak DataLink
software and continue the customization of the software.
Customizing the Screen Layout of the DataLink Software:
We are now ready to begin the customization of the screen layout of the DataLink Software. At this time you
will want to start the DataLink software by clicking on the DataLink icon on the Windows desktop. Once the
program is running be sure it is maximized (uses the complete video screen).
You will also need to load a demo data file to view the changes you make. To open a demo file click on the
“File” selection in the DataLink menu bar. Next click on the “Open” item in the pull down menu. The
following dialog box will be displayed.
Click on the folder named “Demo” in the open dialog box. The box will be updated with a new set of folders.
The folder will be named with the type of vehicle used to generate the demo files contained in the folder. Select
the type of vehicle that is the closest to your type of racing by double clicking on the folder. At this time the
dialog box will display several demo files which can be loaded and viewed by the DataLink software. Select
one of the files by clicking on it. The software will load the file for viewing.
If this is the first time you have modified the screen layout, the screen will be divided into three equal sections.
The top section will contain a group of boxes (buttons) containing the name of each of the measured channels in
the data file. The middle section will contain the area used to display the graphs. The bottom section will
contain the run log data sheets. The middle or graphics section will be empty at this time as no graphs have
been enabled. Before we continue, you will want to enable some graphs to view any changes you make. To
Chapter III - 2
III. Customizing the DataLink Software
enable the graph of one of the measured channels, simply position the mouse cursor on top of the button
containing the channel name in the top section and click the left mouse button. To remove the graph from the
screen, click the left mouse button again. You can enable as many channels on the screen as you like. We are
now ready to begin to customize the DataLink software.
Step #1 – Editing the System Preferences:
We will begin by editing the system preferences. The system preferences allow you to set several of the key
parameters used by the DataLink software to control the operation and screen layout. To display the system
preferences dialog box, click on the “Settings” selection in the DataLink menu bar, next click on the “Edit
Preferences” selection in the pull down menu. The following dialog box will be displayed.
User Scale Beginning and Ending Time
The first items to set in the edit preferences dialog box are the User scale begin time and the User scale end
time. The user scale refers to the default time scale displayed on the x axis of the graphics display. For
example, if the begin time is set to 0 and the end time is set to 12, the graphic section will display the section of
the run between 0 and 12 seconds in the run from the start reference point. If you are a drag racer you will want
to set the begin time to before the start of the run and the end time to slightly longer than your normal run. For
example if a normal run is 8.0 seconds you would set the start time to –0.5 seconds and the end time to 10.0
seconds. If you are not a drag racer simply set the begin time to 0 and the end time to a value equal to the
amount of time you wish to display on the screen at one time.
Logger COM Port
Your on board data logger uses a serial communication port to upload the run data from the data logger to the
PC. You will need to select which communication port the serial download cable to the data logger is using.
Click on the appropriate com port setting to select it.
Chapter III -3
III. Customizing the DataLink Software
User Title
This text entry field is used to enter the name of the racing team using the RacePak DataLink software. This
name will be copied to the run file each time a new file is uploaded. The team name will be displayed in the
title section on the graphics display region each time the run file is opened for display.
Mouse Preferences
The mouse preferences selection is used to select how the left and right buttons of the mouse are used by the
DataLink software with respect to the graphics display window. Two selections are available, traditional
RacePak and standard Windows. If traditional RacePak is selected, the left mouse button is used to position the
time line cursor in the graphics window and the right mouse button, when clicked and dragged, is used to zoom
in on a section of the graphics display. This is the same as in the MSDos version of the RacePak software. If
standard Windows is selected, the buttons work in the opposite manner. This is more consistent with many
CAD/CAM packages. Either method works equally well. If you do not have a preference we would
recommend selecting RacePak traditional. This will simplify getting assistance from team members who have
operated earlier versions of the RacePak software.
Channel Font Size
The channel font size slider bar is used to set the size of the font used in the top portion of the display window.
This section contains the channel selection buttons and the channel’s value at the time cursor position. The
smaller the size of the font the more information can be displayed at a time in the same area on the screen which
in turn maximizes the amount of the display screen available for displaying graphs. Experiment with different
font size and select the smallest font size you can easily read. You will need to change the font size and click
the “OK” button to see the new font size displayed. Don’t worry if only a portion of the top section of the
display screen contains channel selection buttons. We will show you how to resize the screen at a later point.
Log Font Size
The log font size slider bar is used to set the size of the font used in the bottom section of the display window.
This section contains the run log data book. The smaller the size of the font the more information can be
displayed at a time in the same area of the screen. Experiment with different font sizes and select the smallest
font size you can easily read. You will need to change the font size and click the “OK” button to see the new
font size displayed. Don’t worry if a portion of the log book is cut off and not displayed. We will show you
how to resize the screen at a later point.
Step #2 – Editing the Chart Colors
The next step in customizing the DataLink software is to set the background, foreground, and cursor colors for
the graphics section of the display screen. Two methods are available for setting the colors used by the
DataLink Software. The first method is to use the default Windows display properties to select the colors used
by the program. If you choose to use this method you will need to use Windows Display Properties Dialog Box
to modify the display colors. This is the same dialog box as used earlier to set the screen resolution and color
palette. The second method is to use the DataLink software to select the colors to use. We recommend using
this method.
To edit the chart colors, click on the “Settings” selection of the DataLink menu bar, next click on the “Edit
Chart Colors” selection in the pull down menu. The following dialog box will be displayed.
Chapter III - 4
III. Customizing the DataLink Software
If you wish to use the Windows default colors make sure the “Use Windows Colors” box is checked and then
click on the “OK” button to accept the settings. If you wish to set the colors via the DataLink program make
sure the “Use Windows Colors” box is not checked. Next, using the scroll selection boxes choose a color from
the color palette for each of the foreground, background and cursors colors. When you have selected the
desired color click on the “OK” button to accept the settings. The graphics display will be updated with the
new colors.
Step #3 – Editing the Graph Color Palette
The RacePak DataLink program is supplied with a default color palette used to display the graphs on the
graphics section of the display screen. Depending on the color selected for the background of the graphics
section, some of the colors in the color palette may not be clearly visible when used to graph a channel on the
graphics display. These colors can be turned off so they are not utilized by the graphics routines. To edit the
color palette, click on the “Settings” selection of the DataLink menu bar, next click on the “Pick Colors” item
on the pull down menu. The following dialog box will be displayed.
If the box next to the color bar is checked the color is active and will be used in graphing the channels on the
display screen. If it is not checked the color is inactive and will be not be used. Using the scroll bar on the
available colors box to review the color palette and turn off any colors that do not graph clearly.
If you wish to create your own set of colors to be used by the graphics routines please refer to Appendix III –
Creating a custom color palette.
Chapter III -5
III. Customizing the DataLink Software
Step #4 – Setting the Screen Size Sequences
As you have seen, the DataLink video display is divided into three windows, the top window contains the
channel selection buttons, the middle window contains the graphics area, and the bottom window contains the
run log data sheets. At any time during a DataLink session the user can resize any of the three windows by
clicking on and dragging the border between any two of the widows. This allows the user to adjust the relative
window sizes to best meet the task he is currently performing.
Although this method works very well, the method can be time consuming if the user wants to jump between
several different tasks during his/her analysis session. The DataLink software provides a method of presetting
up to eight different combinations of window sizes. These preset combinations are accessed through the
“Organize Pane” icon in the DataLink toolbar. Each time the icon is clicked the window sizes are adjusted to
the next preset combination in the list.
The user can define the size of the three windows in each of the eight preset combinations. To define the preset
combinations click on the “Settings” selection of the DataLink menu bar, next click on the “set window sizes”
item on the pull down menu. The following dialog box will appear.
Each row in the table represents one combination of window region or pane sizes. Values for the size of the
windows are expressed as a percentage of the full screen and the sum of the sizes for the three windows must
sum to 100 %. If you enter a value in window which makes the total greater than 100 % DataLink will
automatically adjust the window sizes to sum to 100 %.
As was discussed above, each time the “Organize Pane” icon in the DataLink toolbar is clicked the windows
will be resized to the next enabled entry in the preset list. Each entry in the list is enabled/disabled by checking
the box at the beginning of each entry. In the above example the screen will be sized as 20% on the top 50% in
the middle and 30% in the bottom when the program is started. The first time the “Organize Pane” icon in the
toolbar is clicked the screen will be sized 20% top 80% middle and no run log portion will be displayed. The
second time the ”Organize Pane” icon in the toolbar is clicked the window will be resized to 20% top, no
middle or graph section and 80% bottom or run log display.
You have completed the customization process. After you have utilized the program, you may wish to revisit
this section and make additional changes to better fit your data analysis needs.
Chapter III - 6
Chapter IV. Quick Start Tour of the DataLink User Screen
IV. Quick Start Tour of the DataLink User Screen
The following chapter will give you a brief tour of the RacePak DataLink’s user screen and will familiarize you
with the various commands and toolbar functions utilized to display and analyze your run data. We will begin
by reviewing the main screen layout.
DataLink Display Screen Layout
The DataLink display as shown below is divided into three separate regions or panes.
The top region or pane is called the Channel Display. This region is used to display the channel control buttons
and the numeric data associated with each of the data channels.
Chapter IV -1
IV. Quick Start Tour of the DataLink User Screen
The middle region or pane is called the Graphics Display. This region is used to graphically display the
channel data from the run files.
The third region or pane is called the Run Log Display. This region is used to display and enter logbook data
used to build the run log database.
The relative sizes of the three display panes can be adjusted at any time to best suit the users needs. Two
methods for adjusting the relative size of the panes are provided. The first method uses the Screen Sequence
Sizes Table and the Organize Panes toolbar icon to rapidly switch between preset screen layouts. You
previously setup the values in this table earlier in the chapter on Customizing the DataLink display.
The second method is to click and drag the border between any two of the three panes. To resize the screen
using the second method position the mouse cursor on the border between two of the panes until the mouse
shape changes to two horizontal bars with an up arrow and down arrow attached. Next press and hold the left
mouse button and drag the border to the desired position by moving the mouse.
We will look at the functions of each of the three regions below.
Channel Display Region
The channel display pane shown below is used to display the run file and configuration file data channel
information and to control the information graphed on the graphics display pane.
The Channel Pane contains the following information and performs the following functions;
File Tabs
Across the top of the channel pane are the run and configuration file tabs. There will be one tab per
run or configuration file loaded into memory. To select a particular run or configuration file simply
left click on the file tab. When this occurs the information on the selected file will be brought to the
front of the display screen. Both the channel data and the run log data will be brought to the front of
the display to allow viewing by the user.
In addition to being brought to the front of the display for viewing the selected file becomes active
with respect to the menu and toolbar commands. This means when any of the commands are executed,
such as the set start command, the commands will operate on the selected file. Commands and menu
items that are not appropriate for the selected file are grayed to show they are inactive.
Chapter IV - 2
Chapter IV. Quick Start Tour of the DataLink User Screen
Each file tab contains an icon to indicate the type of file. A floppy disc icon indicates the file is a run
data file containing the data from the on board recorder. A wrench icon indicates the file is a car
configuration file and contains setup data for the car and onboard recorder.
The left most tab, the Graph tab, is used to summarize the graphed channels such that the numeric
data of all graphed channels can be displayed on one screen. The run file name and graphed data
channels are displayed side by side.
Channel Buttons
Directly under the File Tabs are the channel buttons. Each channel button represents a data channel,
such as ENGINE RPM, stored in the run file. The buttons are used to control the graphing of the
channel information.
Left clicking on the channel button displays that channel on the graphics display. When the channel is
enabled a small square will appear in the channel button indicating the color being used to graph the
channel. A second left click on the channel disables the graphing of the channel.
Right clicking on the channel button brings up the appropriate Easy Edit dialog box used to modify the
setup of the channel. The Easy Edits are discussed in detail in the chapter called Working with Data
Channels.
Numeric Data Display
Directly to the right of the channel button is the channel numeric data display. This display shows the
value of the channel at the current Cursor Time position. The cursor position and the associated time
is discussed below.
Channel Region Scroll Bar
If the channel pane is too small to display the entire group of channel buttons at the same time a scroll
bar will appear at the bottom of the channel pane. The scroll bar can be used to select the portion of
the channel pane displayed at any given time.
Chapter IV -3
IV. Quick Start Tour of the DataLink User Screen
Graphics Display Region
The graphics display pane, as shown below, is used to display the data from the on board data acquisition
system and math channels derived from this data in x y plot format.
The graphics display pane is composed of the following items:
X Y Plot Region
The x y plot region is the area on the screen that is used to plot the graphics information. This
area is composed of the following elements
X-axis
The x axis or horizontal axis is used to represent the time axis. The start of the run is
represented as 0 time. Time into the run increases from left to right on the x-axis.
Vertical Grid
The vertical grid shown as light dotted lines from the bottom of the graph to the top
correspond to the time axis. Each point on the grid line is equal time into the run.
Y-axis
The y-axis or vertical axis is used to represent the value of the data being displayed. Data
values increase from bottom to top in the graph
Horizontal Grid
The horizontal grid shown as light dotted lines moving from left to right on the x y plot are
points of constant value for the data.
Data Grid Legend
The data grid legend is displayed on the left-hand side of the x y plot. The data grid is used to
show the value of the horizontal grid lines for the data channel selected as the channel grid.
The name of the selected channel and the engineering units displayed are also shown on the
left-hand side of the graph.
Chapter IV - 4
Chapter IV. Quick Start Tour of the DataLink User Screen
Time Cursor
The time cursor is shown as a solid line from the bottom to the top of the plot region. The time cursor
is used to indicate the point in the run currently being displayed in the numeric displays and in the time
dependent data fields in the run log displays.
To move the time cursor to a new time position, use one of the following methods.
Computer Mouse
Position the mouse cursor at the desired point on the x y plot region and click the left mouse
button. The time cursor line will move to the new position and the data values will be
updated on the screen.
The DataLink software also features ‘mouse tracking’. This feature allows you to click and
hold the left mouse button. When the mouse is moved, the time cursor will follow the mouse
pointer and the data values will be updated accordingly.
Left Arrow Key
Press the left arrow key to move the time cursor one increment earlier in the run.
Right Arrow Key
Press the right arrow key to move the time cursor one increment later in the run.
Up Arrow Key
Press the up arrow key to move the time cursor ten time increments later in the run.
Down Arrow Key
Press the down arrow key to move the time cursor tem time increments earlier in the run.
Cursor Time Display
The cursor time display, located in the upper left-hand corner of the graphics display region, shows the
time into the run from the start time marker to the current time cursor position.
Channel Grid Selection Button and Display
The channel grid selection button and display is located in the upper right corner of the x y plot region.
The channel grid selection button is used to select the data channel that controls the horizontal grid and
grid legend. It is also used to display the current, average, minimum, and maximum values for the
channel selected as the grid channel.
To select a channel to display as the vertical grid, left mouse click on the channel grid button until the
name of the channel appears in the button. Only channels that are currently displayed in the graphics
display region can be selected. The small colored square in the channel button indicates the color of
the channel’s graph in the x-y plot.
When the channel is selected the display portion of the channel grid display is used to display
summary data on the channel in the four text boxes directly to the right of the button. The information
displayed is as follows.
1st Display
The current value of the channel at the time in the run selected by the time cursor.
2nd Display
The average value of the channel in the time region defined by the average
cursors
3rd Display
The minimum value of the channel in the time region defined by the average cursors.
Chapter IV -5
IV. Quick Start Tour of the DataLink User Screen
4th Display
The maximum value of the channel in the time region defined by the average
cursors.
The average, minimum and maximum values will not be displayed if the averaging cursors have not
been positioned as discussed below.
Average Cursor
The average cursors are used to define a region of time in the run file over which to average the
channel data and to define minimum and maximum values. Two average cursors are required to define
the average region. One to define the lower time boundary and one to define the upper time boundary.
To define the lower time boundary, position the time cursor to the desired position in the run to be
used as the start of the averaging region. Next press the open square bracket ‘[‘ to define the lower
boundary.
To define the upper time boundary, position the time cursor to the desired position in the run to be used
as the end of the averaging region. Next press the close square bracket ‘]’ to define the upper
boundary.
The average, minimum, and maximum values will now be displayed on the channel grid display for the
data channel selected.
To remove the average cursors press the ‘[‘ and ‘]’ at the same cursor location. The average cursors
will be removed
Run Log Display Region
The run log display region is used to display and edit the run log information stored in each of the run and
configuration files. This information includes the car setup information, run performance data, weather
conditions, time dependent numeric channel data, video data, and in the case of the Pro Series II data loggers,
the logger setup information.
The data that is displayed is taken from the run or configuration file selected on the file tabs located in the
channel display pane.
Chapter IV - 6
Chapter IV. Quick Start Tour of the DataLink User Screen
The run log display consists of the following elements;
Run Log Page Tabs
The run log page tabs are used to select the run log page to be displayed. Simply left click on the
desired tab to select the page. The page tabs are located at either the bottom or the top of the Run log
display region.
Run Log Scroll Bar
If more log pages are contained in the run log than run log tabs can be displayed, a scroll bar is created
next to the run log tabs. The scroll bar can be used to view the tabs that are hidden.
Text Labels
The run log pages contain text labels to identify the context of the text entry boxes.
Text Entry Fields
The text entry fields are utilized to enter run log data base values. In some instances the text entry
field are ‘grayed’ and will not accept data entry, this is due to the fact the field is protected. Fields
such as track, year, date, and time can be modified only during the upload procedure. Once the file has
been uploaded and saved, these fields become protected and the entry box is ‘grayed’.
Command Buttons
The run log data sheets can be designed to incorporate buttons similar to the windows command
buttons. Left click on these buttons to executed the desired commands.
DataLink User Interface
In addition to the user interface provided directly by the controls in the graphics display, the DataLink program also provides
control of the program through a series of pull down menus and toolbars. These menus are discussed in the following
chapters that deal with the various topics encountered in using the DataLink software.
Many of the controls contained in the various menus that are frequently used are also included in the graphics toolbar. The
graphics tool bar provides a one click shortcut to the menu items. The graphic toolbar icons and the routines they call are
discussed below.
Graphics Toolbar
The graphics toolbar is displayed along the left-hand end of the chart window. The toolbar provides quick
mouse access to many of the commands used by RacePak DataLink program. The tool bar icons and the
commands they implement are summarized below.
Click
To
Create a new run data file by downloading a new data from a RacePak on board data acquisition
computer.
Open an existing run file. The program displays the open files dialog box, in which you can locate
and open, selected run data file.
Save the selected run or configuration file with its current name.
Close the selected run or configuration file.
Chapter IV -7
IV. Quick Start Tour of the DataLink User Screen
Print the screen or the selected graphs.
Switch to the next pane size in the screen sequence list.
Clear the chart by removing all graph traces.
Open the Quick Graph dialog box.
Zoom In reduces the chart’s time axis (x-axis).
Zoom Out increases the chart’s time axis (x-axis).
Auto scale changes the time axes to include all data.
User Scale sets the time axis as specified in the Preferences dialog box.
Shift Left moves the graph time axis to the left.
Shift Right moves the graph time axis to the left.
Nudge Up adds a small offset to every reading of the channel that has the grid.
Nudge Down subtracts a small offset to every reading of the channel that has the grid.
Nudge Reset resets all up- and down nudges. Nudges are permanent once the run is saved or
the grid is reassigned.
Sets the point in the run of the active (highlighted) run file at the time cursor as the start of the run.
When pressed the Set Start Time dialog box is displayed to confirm selection.
Nudge the Start Time left or right
Opens the About DataLink dialog box.
Click help and then a button or control to see help about that item.
Chapter IV - 8
Chapter IV. Quick Start Tour of the DataLink User Screen
Many of the icons and the commands they implement such as file open and close are self-explanatory. Those
that are not as obvious are discussed below.
Clear Graphs Command
Single click on this icon to remove the graphs of channels from the selected run file (highlighted tab) from the
graphics display pane. Double click this icon to remove all of the graphs from all of the files.
Quick-Graph Command
The Quick Graph provides the user with the ability to save and recall a set of channels to be graphed on the
graphics display pane eliminating the need to individually select each channel to be graphed each time a
graphics display of a set of channels is desired.
In order to use the quick graph function to display a set of graphs on the display screen the user must first define
each of the desired graph sets. To save a graphic set the user must select a run file by clicking on the run file
tab and graph the channels to be included in the graphic set in the colors desired. The graph set can only
include channels from the selected data file. Channels that are displayed in the graphics display area from files
other than the selected file will not be included in the quick graph set.
Next the user selects the Quick Graph command by left clicking on the quick graph icon. When executed the
Quick-Graph dialog box will be displayed as shown on the following page.
If this is new quick graphs set, enter a name under which to store the graph set in the text entry box on the top
and select the SAVE button to store the graph set. If you wish to store the graph set under an existing quick
graph name, click on the name in the list and then select SAVE.
To recall the graph set at a later time simply select the Quick-Graph command by left clicking on the quick
graph icon, when the dialog box is displayed, highlight the desired graph set in the selection list and select
Load. The appropriate graph data will be placed on the screen.
Chapter IV -9
IV. Quick Start Tour of the DataLink User Screen
If you wish to remove a quick graph set from the selection list, highlight the set to be deleted by left clicking on
the name in the list and then select the Delete command from the dialog box.
The Quick Graph also provides the Auto Quick Graph feature. This feature is very helpful when viewing the
same data in numerous run files. When the Auto Quick graph feature is enabled the selected quick graph set
(Current Auto QGraph) is automatically displayed for the currently selected run file. Each time a new run file is
selected the channels contained in the auto quick graph set are disabled in the old file and are enabled in the
new run file. In this manner the user can rapidly scan through multiple data files looking at specific data
channels without being required to manually turn off and on the respective data channel.
To enable the Auto Quick Graph function, select the Quick Graph icon. Next select the quick graph set to
display by left clicking on the name of the quick graph set. Select the Set as Auto QGraph command button.
The highlighted name will appear in the Current Auto Q Graph box and will become active.
The auto quick graph feature can also be used to compare data channels in one file with the corresponding data
channels in multiple other run data files, one at a time, without the need to turn off and on the respective data
channels. To perform this function, select the auto quick graph set as detailed above. Next select the run data
file to be compared with the remaining files. The channels included in the auto quick graph set will be
automatically displayed. Next change the color of the channels to be compared by turning the selected channels
off and then back on such that they are displayed in a color different from the color displayed by the auto quick
graph. Next select the run data file to be compared with this file. The auto quick graph function will graph the
selected channels in the new run data file but will not remove the channels from the initial as the channels are
displayed with a different color. Next select a third run data file to compare. This time the selected channels
will be removed from the second run data file and graphed from the third run data file. The data channels from
the first data file will remain.
To disable the Auto Quick Graph function, select the Quick Graph icon and select the Clear Auto QGraph
command.
The Nudge Commands
The three icons Nudge Up, Nudge Down, and Nudge Reset provide a convenient method to change the zero
offset for a specific data channel without the need to explicitly edit the scaling parameters in the data channel.
The first two commands have the effect of shifting the graph of the channel up and down respectfully. The
numeric readout displayed in the channel numeric display field is also increased accordingly. The third
command returns the offset to the value prior to the using of the up and down commands. If a file is saved after
the nudge commands have been implemented the nudged values are also saved and the nudge reset command is
not able to reset the offset to the previous value.
The normal usage of this command is to align the starting points of two curves and/or to set the zero on a data
channel, such as a g meter, that drifts slowly with time.
The commands modify the channel that has been selected as the active grid and is displayed in the Channel Grid
Button and Display as discussed above. To select a channel to be nudged, first graph the channel by left
clicking on the channel button in the channel display pane. Next select the channel on the Channel Grid display
by left clicking on the Channel Grid button until the channel name appears in the button. Then click the Nudge
Up or Nudge Down icons until the data channel has moved the desired amount.
Chapter IV - 10
Chapter IV. Quick Start Tour of the DataLink User Screen
The Set Start Time Commands
The three icons Set Start, Nudge Start Left, and Nudge Start Right are used to identify the start of the run
in the run data file.
•
•
Set the time cursor line at the new zero point.
Select the Set Start Time command from the Edit menu or toolbar. The following dialog box will be
displayed. It displays the name of the run file that will be affected, and the time that will become the
new start time.
•
•
Verify the information in the Confirm Start Time Change dialog box and press OK to set zero.
Zero seconds is now set to the location of the cursor line.
Select OK to proceed or Cancel to abort changes.
If you wish to move the start time of the selected file (highlighted tab) slightly to the left or right, click on the
following in the tool bar;
To move the start time slightly to the left.
To move the start time slightly to the right,
Using Help
The DataLink program contains an extensive on line help system to assist the user in the learning and operating
the program. The help system can be accessed by selecting the Help Topics menu item found in the Help main
menu selection or via the context sensitive help commands built into each portion of the DataLink program.
The Help Menu access the help system via the Help main menu, select the Help Topics command located in
the Help main menu selection. The following dialog box will be displayed.
Chapter IV -11
IV. Quick Start Tour of the DataLink User Screen
The contents tab of the Help Topics dialog box displays a table of contents for the help system included with
the DataLink Program. The topic listed will have either a book or a question mark icon located in front of the
topic heading. If the topic contains the book icon the topic is a main category and has further topics listed under
it. To expand the main topics, place the mouse cursor over the desired topic and double click. The topic will be
expanded showing the subtopics covered under the main topic. If the topic contains the question mark icon the
contents of the help file will be displayed when selected. Double click on the topic to display the information
contained in the help file.
The Index tab of the help file when selected will display the following dialog box.
Chapter IV - 12
Chapter IV. Quick Start Tour of the DataLink User Screen
This dialog box allows the user to search the index included with the DataLink help systems for keywords
relating to topics that you wish to explore. Type in the word you are looking for in the top line of the dialog
box. Entries in the help index beginning with the letters typed in the top line will be displayed as you type.
When the topic you desire is displayed, click on the topic to highlight it and then click the Display button to
display the topic.
The Find index tab is used to locate the topics in which a word or phrase is used in the help file. When selected
the dialog box shown below will be displayed as shown on the following page.
Type in the word you want to find in the top line of the dialog box. Words beginning with the letters will
appear in the list box below as you type. When the desired word appears in the selection list, click on the word
in the list to highlight it. All topics containing the word or phrase will be listed in the topic display box.
Highlight the topic you wish to read and select the Display button to view the topic.
The Context Sensitive Help
The context sensitive help system is designed to provide information to the user based on the tasks currently
being completed by the user. To obtain help on a menu item or a tool bar icon simply place the mouse cursor
over the item and press the ‘F1’ function key. The help information on the item will be displayed. The ‘F1’
function key can also be used to display the help information for a dialog box any time that dialog box is
displayed.
The second method to activating the context help system is to click on the context help icon located in the
graphics toolbar. This icon is displayed below;
Chapter IV -13
IV. Quick Start Tour of the DataLink User Screen
When you select the Toolbar’s Context Help button the mouse cursor will change to an arrow and a question
mark. Place the cursor over the item or portion of the screen you wish to obtain information on and click on the
item. The help information on that item will be displayed.
Hyperlinks Inside the Help System
Each of the help screens that are displayed can contain links to help pages of related topics located in the
DataLink Help system. These links are designated by text printed in Bold Green Underlined Print as shown
here. Position the mouse cursor over the link and click the left mouse button. The related topic will be
displayed.
Chapter IV - 14
V. File Management
V. File Management
Overview
The RacePak DataLink program uses two types of files to store the car setup information and the data generated
during each of your logging sessions. These are the Car Configuration Files and the Run Data Files. In
structure the Car Configuration File and the Run Data Files are basically the same, the only difference being the
Run Data File contains the actual channel data from the logging session. Many of the operations used to
maintain and edit the two types of files are also the same. How the files are used, however, is quite different.
The car configuration file is used to store the current information on how the vehicle is setup, how the onboard
logger is configured, and how you wish to display and analyze the data from the vehicle. In the ideal
circumstances, every time a change is made on the vehicle or to the onboard logger, or to your analysis needs,
the car configuration file would be updated to reflect the changes.
When a logging session has been completed and the data is uploaded from the onboard data logger, the
DataLink program combines the information contained in the car configuration with the data uploaded from the
onboard data logger and creates a Run Data File. You enter into this Run Data File any log book information,
such as time slip data, that is specific to this run. This file then becomes a snapshot of how the vehicle was
setup, how the logger was configured, and the performance of the vehicle at that particular point in time.
Because the car configuration file is copied each time a new run data file is created, changes made to a car
configuration file will be included in all run data files made from that time forward. These changes, however,
will not effect any run data files that have previously been loaded. Changes to a run data file effect only the one
file the changes were made.
This process, when understood, can save you significant time in maintaining your run log datasheets and
database by allowing you to minimize the amount of changes required to maintain the file system. In general
the following methods should be followed
•
•
•
Make changes to the logger setup, data and math channel configurations, and run log page layouts
in the Car Configuration file.
Fill in the answers to the run log in the Car Configuration File pertaining to any items that do not
change frequently. Leave blank any entry boxes that contain information that changes frequently
or pertains only to a given run.
Enter items in the run log that are specific to a particular run in the Run Data File created after the
logging session.
The following outlines the procedures during a typical logging session.
Typical Data Logging Session Procedures
•
Open the Car Configuration File for the Vehicle
•
Update the Car Configuration file for any Changes to the Setup
•
Save the Car Configuration File
•
Perform the Data Logging Session
Chapter V -1
V. File Management
•
Upload the New Data from the Onboard Data Logger to create a new Run Data File
•
Enter the Run Specific Data into the Run Data File
•
Save the Run Data File to Disk
•
Analyze the Run Data
Each of these steps are discussed in more detail in the following chapters.
Car Configuration Files
As discussed above the car configuration file is used to store the current information on how the vehicle is
setup, how the onboard logger is configured, and how you wish to display and analyze the data from the
vehicle. Normally each vehicle will have one Car Configuration File. Additional Car Configuration Files,
however, can be used when switching back and forth between different setups. For instance, you may have a
test session logger configuration versus a race day logger configuration. Having multiple car configuration files
will allow you to avoid continually modifying the car configuration files.
The car configuration files are saved in the X:\RacePakData directory under a file folder with the same name as
the car. X represents the drive designator. Thus the car configuration file for a vehicle named Alpha_1
installed on drive C would be located in the directory C:\RacePakData\Alpha_1.
The following will discuss the basics on car configuration files.
Opening Car Configuration Files
To open a car configuration file for editing use the Open Car Configuration Command located in the File
menu of the main menu bar. When the command is selected, the Select Configuration dialog box will be
displayed. The select configuration dialog box is used to select a car configuration file for editing or to use as a
template to upload data from the onboard data acquisition system.
The left-hand column contains a list of the cars currently setup in the RacePak DataLink software system. The
right hand column displays the list of available car configuration files for the highlighted car.
Chapter V - 2
V. File Management
Select the desired car from the left-hand list by clicking on it. Then select the desired car configuration file by
clicking on it. Click on the OK button to accept your choices. The selected car configuration file will be
loaded. A file tab for the car configuration file will be created at the top of the channel display area. The file
tab will contain the name of the car configuration file and a wrench icon. The wrench icon is used to
distinguish this file as a car configuration file.
Editing Car Configuration Files
After the car configuration file has been opened, the setup information stored in the file can be edited to
correspond to modifications made to the vehicle, on board data logger, run log pages, and to modify answers to
the data entry fields. Please refer to the following chapters for details on editing the following types of
information.
Hardware and Math Channel Setup
Chapter VI -- Working with Data Channels
Run Log Page Layouts
Chapter VII– Working with Run Log Pages
Run Log / Data Base Information
Chapter VIII – Working with the Run Log Data Base
Saving Car Configuration Files
After you have finished editing a car configuration file, you will want to save the file to disc to preserve the
changes. To save the file; 1) make the file active by left clicking on the file folder tab at the top of the channel
display pane (area) at the top of the display and 2) select the Save command from the File menu.
The file will be saved to disc.
You can also use one of the following short cuts. Pleas note you must first select the file by left clicking on the
file folder tab
Shortcuts
Toolbar:
Keys:
CTRL+S
Closing Car Configuration Files
If you wish to close a car configuration file; 1) make the file active by left clicking on the file folder tab for the
car configuration file you wish to close, and 2) select the Close command from the File menu. If the file has
been modified the DataLink program will suggest you save changes to your file before you close it. If you
close a file without saving, you lose all changes made since the last time you saved it.
You can also use one of the following short cuts to close the file. Please note you must first select the file by
left clicking on the file folder tab.
Chapter V -3
V. File Management
Shortcuts
Toolbar:
Keys:
CTRL+C
Setting the Default Car Configuration File
In most cases the RacePak DataLink software will be used to upload data from a single vehicle on any given PC
installation. To simplify the upload process, the software allows a single configuration file to be selected as the
default configuration file. This file is automatically loaded into memory every time the RacePak DataLink
software is started making the file available for editing. In addition, this car configuration file is pre-selected as
the car configuration file to be used during the upload process when the Select Configuration dialog box is
displayed.
To select a car configuration file as the default car configuration file use the Open Car Configuration command
from the File menu to open the car configuration file. Next select the file by left clicking of the file tab at the
top of the channel display pane. Finally select the Default Configuration command from the File Menu. A
check mark will appear in front of the Default Configuration command. This indicates the car configuration
file has been selected as the default car configuration.
Run Data Files
Run data files are used by DataLink to store the data and performance information uploaded from the onboard
data logger to the PC and to store the configuration of the vehicle during the logging session.
Opening Run Data Files
To open a run data file use the Open command found in the File menu. You can also use the following shortcut
methods.
Shortcuts
Toolbar:
Keys:
CTRL+O
In addition, the File menu contains a list box of the most recently opened data files. If the file you wish to open
is located on the list, left click on the name of the file in the list to open the file.
Chapter V - 4
V. File Management
When the open command is executed the program will display the file Open Dialog box.
The file Open dialog box allows you to specify the name and location of the file you are about to open. When
the dialog box is first displayed, the list will contain the file folders named for each of the vehicles configured in
your system.
Enter the following information;
Look in:
Select the vehicle folder in which the file to be opened is located by clicking on the folder. To
navigate through the directory use the;
To display the current directory tree.
To move up one level in the directory tree.
File Name
Type the file name or click on the file you want to open. This box lists files with the extension you select
in the List Files of Type box. To open multiple files at the same time, press and hold the CTRL key and
then left click on the names of the files you wish to open.
List Files of Type
Select the type of file you want to open:
You can either open a file previously stored by RacePak Chart (extension .rpk), or a file created with
RacePak for DOS. Since Racepak for DOS did not enforce a specific extension, you have to change the file
type to All Files (*.*) in order to see the RacePak for DOS files.
After you have selected the files to be opened, left click on the Open button to open the files.
Editing Run Data Files
After the run data file has been opened, the setup information stored in the file can be edited to modify
information as to the setup of the vehicle, the run log pages, and to modify answers to the data entry fields.
Please refer to the following chapters for details on editing the following types of information.
Chapter V -5
V. File Management
Hardware and Math Channel Setup
Chapter VI -- Working with Data Channels
Run Log Page Layouts
Chapter VII– Working with Run Log Pages
Run Log / Data Base Information
Chapter VIII—Working with the Run Log Data Base
Saving Run Data Files
After a run data file is edited you must save the file to disk to preserve the changes to the file. To save a run
data file, select the file by left clicking on the file folder tab located in the top of the channel display pane. Next
select the Save command from the File menu. The selected file will be saved to disk.
You can also use the following shortcuts to save the file once the file has been selected.
Shortcuts
Toolbar:
Keys:
CTRL+S
In some instances, you may wish to rename the data file or save the data file in a different directory. To
perform this operation, select the file by left clicking on the file folder tab located at the top of the channel
display pane. Next select the Save As command from the File menu. The Save As dialog box will be
displayed as shown below.
The file Save As dialog box allows you to specify the name and location in which to store the selected file.
Chapter V - 6
V. File Management
Enter the following information;
Save in:
Select the folder in which to store the new file by clicking on the folder. To navigate through the
directory use the;
To display the current directory tree.
To move up one level in the directory tree.
To create a new folder in the currently selected folder
File name:
Type a new filename to save a document with a different name. A filename can contain over sixty
characters and an extension of up to three characters.
Save as type:
If you use the extension that RacePak Chart suggests (.RPK) it will be easier to work with the file later.
After you entered the appropriate information, left click on the Save button to save the file.
Closing a Run Data File
If you wish to close a run data file; 1) make the file active by left clicking on the file folder tab for the run data
file you wish to close, and 2) select the Close command from the File menu. If the file has been modified the
DataLink program will suggest you save changes to your file before you close it. If you close a file without
saving, you lose all changes made since the last time you saved it.
You can also use one of the following short cuts to close the file. Please note you must first select the file by
left clicking on the file folder tab.
Shortcuts
Toolbar
Keys:
CTRL+C
Creating a new Run Data File
This command is used to upload a new run file from an on board RacePak data acquisition computer system.
You can open an existing run file with the Open command.
Shortcuts
Toolbar:
Keys:
CTRL+N
Chapter V -7
V. File Management
Saving Data to an ASCII FILE
The channel data recorded during a logging session can be saved in ASCII format to a separate data file. This
file can then be used to print out the data to a printer or to import the data into a separate application such as a
spread sheet program. To save the recorded data to an ASCII file open the run data file and select it by left
clicking on the file tab located at the top of the channel display pane.
Next select the data channels to be saved in the ASCII file. Only those data channels that are selected and
graphed in the graphics pane will be downloaded to the ASCII file. Next select the section (time) of the run to
be downloaded. Only the section of the run displayed in the graphics window will be saved to the ASCII file.
After you have selected the channels and time period to save to the ASCII file select the Save ASCII Data
command from the File Menu. When the Save ASCII Data command is executed the
following Dialog box will be displayed:
The following options are available:
Column Delimiter:
The column delimiter is used to separate the data values contained in the ASCII data file to allow the
importing program to read in the data properly. Three different delimiters are available. Select the
delimiter appropriate for your application.
Sampling Interval:
The sampling interval is used to determine the number of data points transferred in the data file. If a
sample interval faster than the sample rate of the channel is selected, a data point will be generated via
linear interpolation.
When you have entered the desired options, left click on the OK button to generate the ASCII file. After the
file is generated the Save As file dialog box will be displayed as shown below.
Chapter V - 8
V. File Management
The file Save As dialog box allows you to specify the name and location in which to store the ASCII file just
created. Enter the following information;
Save in:
Select the folder in which to store the new file by clicking on the folder. To navigate through the
directory use the;
To display the current directory tree.
To move up one level in the directory tree.
To create a new folder in the currently selected folder
File name:
Type a new filename to save a document with a different name. A filename can contain over sixty
characters and an extension of up to three characters. The program uses the extension “.WRI”. This is
a registered file type for Microsoft Word. Word can be used to open and view the file.
After you entered the appropriate information, left click on the Save button to save the file.
The DataLink program will then open the newly created ASCII data file using the Microsoft Word program.
You can now use the Word program to view, edit, or print the ASCII data file. Please refer to the Microsoft
Word documentation supplied with you system for details on using Microsoft Word.
Chapter V -9
V. File Management
Printing Data on the System Printer
In addition to printing the ASCII data to the printer using the Save ASCII
Data command, the DataLink software can be used to print out the graphic
charts from the display screen to a graphics printer. To control the
printing four separate commands found in the File menu are used. The
commands are;
Print Setup command
Print Type command
Print Preview command
actual printing
Print Command
Used to select the printer on your PC
Used to set the type of printout to be generated.
Used to preview the printout before the
Used to make the actual printout
Print Setup command (File menu)
Use this command to select a printer and a printer connection. This
command presents a Print Setup dialog box, where you specify the
printer and its connection.
The following options allow you to select the destination printer and
its connection.
Printer
Select the printer you want to use. Choose the Default Printer; or choose the Specific Printer
option and select one of the current installed printers shown in the box. You install printers
and configure ports using the Windows Control Panel.
Orientation
Choose Portrait or Landscape.
Paper Size
Select the size of paper that the document is to be printed on.
Paper Source
Some printers offer multiple trays for different paper sources.
Specify the tray here.
Options
Displays a dialog box where you can make additional choices about
printing, specific to the type of printer you have selected.
Network...
Choose this button to connect to a network location, assigning it
a new drive letter.
Print Type command (File menu)
This command selects the type of print out to be generated by the
PRINT command. When selected the following dialog box will be displayed:
Chapter V - 10
V. File Management
Chapter V -11
V. File Management
Two types of printout are available;
Print Chart Only:
Select this option to print the graph area of the chart only. This option provides the highest
detail to the printout, but does not provide the numeric data.
Print Whole Window:
Select this option to print the entire screen just as it appears on the display monitor. NOTE:
When using this option the background to the graph region will appear the same on the
printout as on the display. (i.e. black will be black). You may wish to select a white
background prior to printing with this option.
Select the desired option and click on OK.
Print Preview command (File menu)
Use this command to display the active document as it would appear
when printed. When you choose this command, the main window will be
replaced with a print preview window in which one or two pages will
be displayed in their printed format. The print preview toolbar
offers you options to view either one or two pages at a time; move
back and forth through the document; zoom in and out of pages; and
initiate a print job.
The print preview toolbar offers you the following options:
Print
Bring up the print dialog box, to start a print job.
Next Page
Preview the next printed page.
Prev Page
Preview the previous printed page.
One Page / Two Page
Preview one or two printed pages at a time.
Zoom In
Take a closer look at the printed page.
Zoom Out
Take a larger look at the printed page.
Close
Return from print preview to the editing window.
Print command (File menu)
When you have prepared the graphics screen, setup the printer and selected
the type of printout to make the Print command is used to print the
graphics screen. When executed the Print Dialog box will be displayed.
Left click on the OK button to perform the printout. You can also use;
Shortcuts
Toolbar:
Chapter V - 12
V. File Management
Keys:
CTRL+P
Chapter V -13
V. File Management
(THIS PAGE INTENTIONALLY LEFT BLANK)
Chapter V - 14
Chapter VI. Working with Data Channels
VI. Working with Data Channels
The term data channel is used to describe the various pieces of information gathered from your on board data
logger and the information obtained from this information by using the mathematical calculation capabilities of
the DataLink program. For instance the engine rpm and drive shaft rpm measured by your onboard data logger
and the engine/ds ratio derived by dividing the engine rpm by the drive shaft rpm are all data channels.
In the use of the DataLink program you may need to edit the existing data channels supplied in the default car
configuration. The following chapter reviews the steps involved in editing existing data channels. Before you
begin editing your data files be sure to understand the difference in editing the data channel information in the
car configuration files versus the data channel information in the run data files. When you edit the data channel
information in a run data file you will only modify the channel information in that one file. When you edit the
channel information in the car configuration files you change the channel information in all files created by
uploading data from your onboard data logger from that point in time on.
Whether you are editing the data channel information in the run data files or in the car configuration files the
same procedures described below are utilized.
Editing Existing Data Channels from the Channel Display Pane
All existing data channels in car configuration and in run data files can be edited directly by right clicking on
the channel selection buttons located in the channel display pane. When the channel is selected the Easy Edit
dialog box appropriate for the channel will be displayed. The user can then edit the channel as desired.
Caution: Improperly editing data channels or entering the wrong information can cause data to
display incorrectly. In most cases the data channels have already been configured for you. You most
likely will only need to change the name of the data channel to something meaningful for your
application.
Selecting the Channel to Edit
To edit an existing data channel, select the data file in which the channel is located by left clicking on the file
tab in the channel display pane of the DataLink display area. When the file is selected, the file tab and the
channel information for that file will be brought to the front of the channel display pane as illustrated below. In
this case the file “Sample” has been selected.
Chapter VI -1
VI. Working with Data Channels
Next find the name of the channel to be edited in the channel buttons located in the channel display pane. Move
the mouse cursor over the button and right click on the channel button. The Easy Edit dialog box appropriate
for that channel will be displayed. The easy edit dialog box is then used to edit the information on the channel.
The different Easy Edit dialog boxes are discussed below.
The Easy Edit Channel Dialog Boxes
The easy edit channel dialog boxes are used to input channel configuration data into the RacePak DataLink car
configuration and run data files. There are several different types of Easy Edit dialog boxes corresponding to
the different types of data channels used by the DataLink program. When a channel is selected for edit the
appropriate Easy Edit Dialog box is displayed. On line help is available on the dialog boxes by pressing the F1
any time a dialog box is displayed.
Name
This is the name of the channel being edited. If you wish to change the name of the channel the new
name must be different from the remaining channels in this data file. In addition, any reference to this
channel in the run log data sheets must be updated with the new channel name if you wish the data in
the run logs to be updated correctly.
Raw Data Value A / B ... will become …
These four numbers tell the software how to convert the raw data from the RacePak computer
(typically in Volts) into engineering units like PSI or °F. In the example above the Engine RPM
channel returns 0 at 0 RPM and 1 at 1 RPM.
If a standard 60-PSI pressure transducer was utilized the raw data value A would be set 1.0 will
become 0 PSI and raw data Value B would be set 5.0 will become 60 PSI to match the transducer
calibration.
Chapter VI - 2
Chapter VI. Working with Data Channels
Display … digits before decimal point, … after
These values tell the system how to format the numeric display of the channel data. The Engine RPM
shown above would display as values from 0 to 10000.
Result unit
Enter the name of the engineering unit that this channel reads.
Minimum result value: ..., maximum: …
Enter the minimum and maximum values to graph. All similar channels should be set to consistent
values so that the graphs make sense when charted together. Racepak’s default values sets all analog
channels to their engineering values at 0 and 5V, all RPMs from 0 to 10000, and all temperatures from
0 to 2000°F. Graphs may not line up properly if you change this scaling.
Smoothing Range
The smoothing range is used to set the filtering on the channel. The higher the number of smoothing
that is set the more filtered or smoother the data channel will become.
Do not display
This box when checked will cause the channel not to display in the channel selection box at the top of
the display screen. This is normally used to inhibit the display of an intermediate channel used in the
calculation of a final value. In most cases, if Do not display is checked on a channel which is enabled
in the hardware of the on board data logger, the channel will be displayed regardless.
To exit the scaled buffer edit dialog box select;
OK
This button saves all changes you have made and closes the dialog box.
Cancel
Press Cancel to close the dialog box and abandon any changes you have made.
Chapter VI -3
VI. Working with Data Channels
Editing Simple Expression Math Calculation Channels
The Simple Expression Channel Parameters Easy Edit dialog box is used to enter and edit simple mathematical
equations used in the data analysis process. The example below illustrated the computation of the average
cylinder temperature on a two-cylinder engine.
This dialog box is used to enter or edit the following required inputs.
Name
This is the name of the channel being edited. If you wish to change the name of the channel the new
name must be different from the remaining channels in this data file. In addition, any reference to this
channel in the run log data sheets must be updated with the new channel name if you wish the data in
the run logs to be updated correctly.
Expr: (Expression)
This is the mathematical expression to be evaluated. The expression can contain the following;
• Name of any valid data channel
• Built in mathematical functions
• All standard mathematical operators
• Names of Run Log defined database constants
• Numeric constants.
The expression can be typed directly into the expression-input box. Channel names and Run log
defined database constants which contain spaces in their names must be enclosed in single quotes.
Optionally the name of the data channels and built in functions can be entered by double clicking on
the corresponding name in the Currently Defined Channels and Built in Functions selection lists. The
channel names and functions will be inserted at the current cursor location.
The order of evaluation is not guaranteed. Use ( ) to force the proper order of evaluation.
Chapter VI - 4
Chapter VI. Working with Data Channels
Currently Defined Channels
This selection list contains the names of all of the valid data channels contained in the currently
selected run data file. Double clicking on the name of a channel in the list inserts the name of the
channel at the current cursor position in the expression-input field.
Built In Functions
This selection list contains the math functions currently supported be the data link system. Double
clicking on the function inserts the function name at the current cursor position in the expression-input
field. After the function has been inserted, replace the x between the parenthesis with the expression to
be evaluated.
Display … digits before decimal point, … after
These values tell the system how to format the numeric display of the channel data. The result of the
above example would be displayed as a four digit number with no decimal points.
Result unit
Enter the name of the engineering unit that this channel reads.
Minimum result value: ..., maximum: …
Enter the minimum and maximum values to graph. All similar channels should be set to consistent
values so that the graphs make sense when charted together. Racepak’s default sets all analog channels
to their engineering values at 0 and 5V (as above), all RPMs from 0 to 10000, and all temperatures
from 0 to 2000°F. Graphs may not line up properly if you change this scaling.
Do not display
This box when checked will cause the channel not to display in the channel selection box at the top of
the display screen. This is normally used to inhibit the display of an intermediate channel used in the
calculation of a final value.
Chapter VI -5
VII. Working with the Run Log Pages
VII. Working with Run Log Pages
The Run Log section of the RacePak DataLink program allows the user to define and maintain a comprehensive
run log data book for each of the test and/or racing sessions logged using a RacePak on board data logger
system. In addition to being available in the logbook format, information entered into the run log pages is also
available to the database search engine integrated in the DataLink package. The search engine, discussed in the
following chapter, allows the user to search for run data files which meet a set of user defined conditions, such
as all runs with corrected altitude from 2000 to 2500 feet.
The run logbook is constructed by a series of templates that define each page of the run log. These templates
are stored in each of the individual car configuration files. Each time new data is downloaded from the onboard
data logger, the templates and any default answers to the run log questions in the car configuration file are
transferred to the new run data file. In addition, during the upload process selected pages from the run log are
presented to the user for data entry. After the upload process is completed, any run log page can be called by
the user for viewing and/or data entry by selecting the appropriate run log page tab displayed in the run log pane
located at the bottom of the DataLink display screen.
When working with the run logs the user should keep in mind the copying process performed during the upload
process as it dictates the proper order in maintaining the run logbook. Specifically the following rules should be
followed
•
•
•
Always make changes to the Run Log Page templates in the car configuration file for your vehicle.
Changes to the templates in a run data file effect only that one file. Changes made in the car configuration
file will be made in all new run data files made from that point on.
Enter default answers in the car configuration file to all data entry boxes that contain information that does
not change on a run to run basis. These default answers are copied into the new run data file upon upload.
You will not have to enter this information every run. If the information changes enter the new data into
the car configuration file before uploading information using the new data. This will keep you from being
required to change the data entry field in the car configuration file and any run data files uploaded with the
out of date answers.
Leave any data entry fields blank that contain information that changes on a run by run basis. This will
avoid the need to erase the entry field each time new data is input. In addition, it will prevent you from
mistaking incorrect data as correct data in fields that have not properly been updated.
The following chapter discusses the steps involved in working with the run log pages.
Using the Run Log Pages
The Run Log Pages include two predefined run log pages that are displayed during the upload process. The
first page (SESSION page) is used to provide information to the DataLink program necessary for the program
operation. The user cannot edit this page. The second page (Run/Weather page) is used to enter run time slip
and weather information.. This page is provided for drag racing applications only.
The Session Run Log Data Page
The SESSION page of the run log is used to enter the date, time, location and type of session that was
conducted. This information, combined with the vehicle selected during the upload process, is used to create
the name of the run data file under which on board data and log book information will be stored and to
determine the proper directory folder in which to place the run data file.
Chapter VII -1
VII. Working with Run Log Pages
The SESSION page of the run log is automatically displayed during the upload process. Enter the information
as described below. Once the upload process is complete the values entered in the SESSION page will be
PROTECTED and cannot be changed.
Year
Select the current year from the selection list by clicking on the correct year in the list. If the correct
year is not in the list simply enter the year in selection box by typing in the correct 4 digit number for
the year.
Track
Select the current track from the track selection list by clicking on the name of the track in the
selection list. If the name of the track is not in the list simply type the name in the selection box. The
new track name will be entered in the list.
Date
The current system date will be displayed in the Date entry box. To change the date simply enter the
new date in the following format mm/dd/yyyy.
Time
The current system time will be displayed in the time entry box. To change the time simply enter the
desired time in the following format hh:mm. A 24 hour clock is used, i.e. 2:23 PM is entered as 14:23.
Race Type
Select the type of race session that was conducted by clicking on the button in front of the type that
most closely matches the test that was conducted.
Race Sequence
Select the appropriate sequence number for the test conducted by clicking on the button in front of the
desired sequence number.
Using the information entered above the DataLink program will create the name for the new run file and
prepare the necessary directory folders under which to store the new run data.
The run data file will be named as follows.
XZZZMMDDYYTS.rpk
X
ZZZ
MM
DD
YY
T
S
.rpk
First Letter in car name
First Three letters in track name
Month
Day
Year
First letter in race type
Race Sequence number.
default file type for DataLink files.
The run data file will be stored under the following directory path
Drive\
RacePakData\
Car Direcory\
Year\
Track\
Disk drive on which program was installed
Root directory for data files
Main directory for this vehicle
Year from selection box above
Track from selection box above
Chapter VII- 2
VII. Working with the Run Log Pages
To exit the SESSION page during the data upload process select the NEXT button located at the bottom of the
run log page.
The Weather Log Data Page
The Weather run log page is used to enter the weather data and time slip information(drag race version only).
Altitude:
Enter the true altitude at the track location
Air Temperature
Enter the air temperature during the run
Humidity
Enter the relative humidity as measured
Barometric Pressure
Enter the current barometric pressure as measured (uncorrected)
Grains H20
Enter the grains of water as measured
Corrected Altitude
Enter the corrected altitude
Per Cent 02
Enter the Per Cent Oxygen as measured.
Comments
Next enter any run comments by typing the comments in the Comment field.
When you have completed the entry of the information select the OK button located at the bottom of the run log
page to complete the data upload process.
The User Defined Run Log Pages
The run log templates contained in the basic run log package include the SESSION and RUN/WEATHER log
pages described above. They also contain 4 user defined run log data page templates. Each user run log page
template allows the user to enter up to 20 questions and answers, give the page a heading, and rename the log
book tab used to access the page from the run log pane of the data screen. A sample of the user run log page
included in the car configuration file is shown below.
Chapter VII -3
VII. Working with Run Log Pages
The user, to meet his/her run logbook requirements, must edit each of these page templates. This process is
discussed below.
Setting Up the Run Log Pages
The first step in setting up the user run log pages is to enter the desired page and tab headings and to enter the
questions on each of the pages. In order to perform this step we must first open the car configuration file in
which we wish to enter the questions. This file is normally the default car configuration selected during the
installation of the software. This car configuration file is loaded each time the RacePak software is started and
should already be opened with the corresponding file tab with the wrench icon showing in the file selection
tabs. If the file is not loaded select the Open Car Configuration File command from the File main menu
selection. A dialog box will be displayed listing all of the Cars installed and their associated Car Configuration
files. Selected the desired configuration file by clicking on it, and then select OK. The file will be opened.
The next step is to select which of the run log pages is to be edited. Select the page by left clicking on the tab in
the lower section (the run log pane) in the display screen. At this point you may need to expand the run log
portion of the screen so that you can see the entire run log page. To expand the screen position, the mouse
cursor on the border of the run log pane, the cursor will change to an up and down arrow when it is in the proper
position. Next click and hold the left mouse button and drag the border of the run log to the desired position.
To edit the page, follow the following instructions.
Edit the Heading
Edit the heading by left clicking in the Heading box at the top of the run log page. Enter the new
heading as desired.
Edit the Questions.
The questions are contained in the first and third columns in the run log page. To edit the questions
simply click on the desired question entry box and either enter the new question or edit the existing
question. To exit the question box simply select another box or leave the page.
Editing the Answers
Normally the answers are edited after run data is uploaded to the PC from the onboard data acquisition
computer in the car. You may however wish to enter default answers to the run log pages by editing
the answers in the car configuration file. Answers entered in this manner will appear automatically in
the run data files. They can be edited at any time in the run data file.
Renaming the User Run Log Tabs
After the questions have been edited in the user page you may wish to rename the user tab to describe
the data stored on that page in the run log. To edit the name of the tab, position the cursor on top of the
tab and click the right mouse button. The Edit Log Page Dialog Box will be displayed as shown
below.
Enter the new tab name in the text entry box and select OK.
Chapter VII- 4
VII. Working with the Run Log Pages
Saving the Run Log Pages.
After you have finished editing the run log pages you must save the car configuration file to preserve
the edits you have just finished. To save the car configuration file click on the Save File icon in the
toolbar (the blue floppy disc) or select the SAVE command from the File main menu selection.
Editing the Run Log Pages in Your Run Files
After you have uploaded new data from your onboard computer into the PC you will want to edit the
run log information stored in the run log pages. To edit a particular page in the run log, left click on
the desired run log tab to select the page and then left click on the desired answer edit box to edit the
answer.
You will not be able to edit the questions on the run log pages in the run data file. The questions can
only be edited in the car configuration file as discussed above.
Remember to save the run data file after you have made the necessary edits. To save the run data file
click on the Save File icon in the toolbar (the blue floppy disc) or select the SAVE menu item from the
File main menu selection.
Moving Log Page Layouts and Data between Files
In addition to the ability to edit the individual run log pages, the DataLink program provides two utilities to
copy the entire logbook layout and the answers from one car configuration file or run data file to a second file.
These utilities are extremely useful in ‘catching up’ your run log and data files should you get behind in your
record keeping during a racing event. The utilities are the Copy RunLog and Paste RunLog commands found
in the RunLog main menu selection.
The Copy RunLog command allows the user to copy the run log page layouts and database answers from a data
file to a temporary paste buffer. The Paste RunLog command then allows the user to selectively copy the
information from the paste buffer to the run log pages of a second file. These commands are described in detail
below.
To prevent the user from accidentally copying data between car configuration files and/or run data files from
two different cars, the files must contain the same file security setting before the process will proceed. For
more information on the file security setting please review the chapter on File Management.
Copy RunLog Command
This command when executed copies all of the run log layouts and all of the data entries from the
selected file (file with highlighted tab) into a temporary paste buffer. This information can then be
pasted into other run and/or configuration files. See the Paste RunLog Command.
The purpose of this command is to allow the user to update run and/or configuration files from a single
updated file. For instance, during a race the user has insufficient time to update the configuration files
and run files between two runs and uploads a new file with out updating the car configuration file.
After the run is uploaded the user updates the run file to match the cars setup during the run. The car
configuration file that will be copied into the next uploaded run is still out of date. The user can use
the Copy and Paste commands to update the configuration file from the last run file that contains the
current setup data.
Note: Care must be taken not to copy data specific to a single run between run. See the Paste function
for more information.
Chapter VII -5
VII. Working with Run Log Pages
Paste Run log Command
This command is used to copy the run log layout and data entry information copied into the temporary
paste buffer with the Copy RunLog Command into the selected run and/or configuration file (file
with highlighted tab).The purpose of this command is to allow the user to update the run log layouts
and data entries of files without the need to individually enter the information in each of the run or
configuration files. When the command is executed the Select Items to Paste dialog box will be
displayed. This dialog box, as shown below, controls what information will be pasted into the selected
file.
The options as to what information to copy are as follows.
Paste Log Layouts check box
Check this box if you wish to copy the run log layouts from the temporary paste buffer into
the selected file.
Paste Data Entries check box
Check this box if you wish to copy the data entries from the temporary paste buffer into the
selected file.
Edit Excluded Key List
Click on this button if you wish to display the Select Keys to Exclude dialog box. This
dialog box is used to define a list of keys not to copy when the paste function is executed.
This list is very useful when using the paste function to update files. The user can set the list
such that run dependent variables such as elapsed time, mph, etc. are not copied run to run.
This feature is discussed in detail below.
OK Command Button
Click on the ok button to transfer the selected information from the paste buffer to the
selected car configuration or run data file.
Exclude Items from Paste Dialog Box
This dialog box is used to create and edit a list of data base keys to exclude from the copy and paste
run log commands described earlier. This list allows the user to copy some items of the data entries
from one file to the next while excluding other items. This can be used to exclude copying such items
as Elapsed Time and Mph and other items that are particular to a given run from one file to the next
during the paste operation. This avoids the necessity of deleting and reentering data entries that have
been needlessly copied during the paste operation. All items that are run dependent in the data base
should be included in the exclude list.
Chapter VII- 6
VII. Working with the Run Log Pages
When called the following dialog box is displayed.
The Keys in Pasted File list contains all of the data base entries that will be copied during the paste operation.
The Keys Currently Excluded list contains the list of the data base keys that will not be copied during the
paste operation.
To move a data base key from the Keys in Pasted File list to the Keys Currently Excluded list, highlight the key
by clicking on it in the Keys in Pasted File list and click on the Exclude => button. The data base key will be
inserted in the Keys Currently Excluded list.
To move a data base key from the Keys Currently Excluded list to the Keys in Pasted File list, highlight the key
by clicking on it in the Keys Currently Excluded list and click on the <=Include button. The data base key will
be inserted in the Keys in Pasted File list.
Press OK to accept the exclude list and return to the Select Items to Paste Dialog Box.
Changing the Default Log Layout
Force Common Log Definition command (RunLog menu)
When a run file is created the run log templates and default values are copied into the new run file from the
configuration file selected during the upload process. Changes to the configuration file after the run file is
created are not reflected in the run file.
For instance if the layout of the Run/Weather page was modified and/or a new log page was added to the
original configuration file, the old run file would display in the original format, new runs would display in the
modified format. This makes reviewing the run data more difficult and makes the adding of the new run log
data to old files extremely difficult as both the run log pages for the old file and the new values would require
inputting into the appropriate entry fields.
To avoid this problem the Force Common Log Definition command found in the RunLog main menu
selection is used. This command instructs the software to display the run log data contained in the selected run
file using the current format contained in the car configuration file used to create the file.
Chapter VII -7
VII. Working with Run Log Pages
To enable or disable the option simply click on the command line in the menu. This option does not modify the
original run file. It only modifies how the file is displayed. To permanently modify the file use the Copy
RunLog and Paste RunLog commands.
Chapter VII- 8
Chapter VIII. Working with Run Log Database
VIII. Working with the Run Log Database
The run log book information entered in the run data files are stored in a database contained in each of the
individual files. The DataLink program provides the ability to search this database to locate run data files
which meet user defined conditions. This process is discussed below.
Searching the Run Log Database
The primary purpose of the run log database is to allow the user to search the runs stored in his PC to find runs
made in conditions similar to the those facing the racing team during the present testing or racing session. The
Search Data Base command located in RunLog main menu selection is used to perform this function as
discussed below.
Search Data Base command (RunLog menu)
This command is used to search the run log databases of all of the run files (*.rpk files) contained in the default
RacePakData directory. This includes the run files from all the cars, years, and tracks contained in the default
directory.
The user can specify detailed search conditions and select ranges of values for any information included in the
database. When the search is completed only the run files that meet the detailed search conditions will be
displayed. The user can then select the run files to be opened for viewing.
When the command is executed the Select Search Conditions dialog box will be displayed. This dialog box is
used to enter the conditions for the data base search. When the box is displayed the search conditions will be
preloaded with the ‘_Default’ quick search conditions set (see using quick searches).
The database can be simultaneously searched for up to seven different conditions. Only files meeting all search
conditions will be displayed for opening. The search conditions are entered as follows:
Chapter VIII-1
VIII. Working with Run Log Database
Parameter Name
This is the name of the data base key from the run log pages. Up to seven different data base keys can
be selected on a given search. When searching on the user defined pages the names use the following
format. P1Q1 for user page 1 question 1. Question 1 is on the upper left and question 20 is on the
lower right of the screen. Example: P3Q2 would be question number 2 on the user defined page 3.
To select a database key click on the down arrow located at the end of the parameter name entry box.
A list of parameter names will be displayed. Find the name on the list and click on it to accept the data
base key for searching.
Condition
Each Parameter can be tested to determine if the parameter’s value falls within a range of desired
values. These ranges are entered as search conditions. Search conditions are divided into two types;
1) text conditions and 2) numeric conditions. Text conditions are tested in the same manner as
entering the values in alphabetical order. Thus a search on text in a given range from A to D would
include all items beginning in A through D. The valid search conditions are;
TEXT is equal to:
Checks to see if the value of the parameter is identical to the Value test parameter
TEXT is less than:
Checks to see if the value of the parameter would be found earlier than the Value test
parameter in an alphabetical list.
TEXT is greater than
Checks to see if the value of the parameter would be found later than the Value test parameter
in an alphabetical list.
TEXT is in a given range
Checks to see if the value of the parameter would fall between the Value/Min Value test
parameter and the Max Value test Parameter
TEXT contains
Checks to see if a string in the Value test parameter is contained in the parameter’s value.
NUMBER is equal to
Checks to see if the numeric value of the parameter is identical to the Value test parameter.
NUMBER is less than
Checks to see if the numeric value of the parameter is less than the Value test parameter.
NUMBER is greater than.
Checks to see if the numeric value of the test parameter is greater than the Value test
parameter
NUMBER is in given range
Checks to see if the numeric value of the parameter would fall between the Value/Min Value
test parameter and the Max Value test Parameter
Value/Min Value
This is the text string or numeric value used to compare the parameter’s value against. It is the only
parameter required for all conditional tests with the exception of the ‘is in given range’ condition. In
this type of test the value is the min value or the starting text string used in the test.
Max Value
Used only if the condition ‘is in given range’ test. This value represents the largest value that will be
accepted.
Once the search conditions have been entered, select the OK button to execute the search. When the search is
complete the Search Results dialog box will be displayed. Select the desired files to be opened.
Save/Load Quick Search
Chapter VIII- 2
Chapter VIII. Working with Run Log Database
In many instances you will want to search on the same parameters with slightly different ranges of
values. To avoid the need to enter all of the parameters each time, the DataLink software allows you
to save the search conditions and recall them when desired. To select this feature click on the
Save/Load Quick Search button and the Select/Type Quicksearch dialog box will be displayed. This
feature is discussed in detail in the following section
Defining and Using Quick Searches
The quick search feature allows the user to predefine multiple sets of quick search criterion. Each of these sets
is stored by the system and can be recalled by picking the name of the desired quick search set from a selection
list.
To create a quick search select the Search Data Base command located in the RunLog main menu item. Next
enter the desired search conditions in the Select Search Conditions dialog box as detailed above. When you
have entered the search conditions select the Save/Load Quick Search command button located at the lower
left corner of the Select Search Conditions dialog box.
The Select/Type Quick Search Name dialog box will be displayed as shown below. Enter the name under
which to save the quick search you just created in the top line of the dialog box. Next select the Save button to
store the quick search set. The quick search set named ‘_Default’ is special. This quick search set is loaded
each time the Search Data Base command is executed. You should store the search set most frequently used as
this set.
To recall a quick search set locate the name of the set in the selection list and select the Load button. The
selected quick search will be loaded and the Select Search Conditions dialog box will be displayed with the
preset conditions.
The functions utilized to maintain the quick search feature are as follows:
Quick Search Selection List
This list displays the name of all of the quick search condition sets that have been created and stored in
the system. The quick search named default is loaded automatically each time the search database
command is executed.
Chapter VIII-3
VIII. Working with Run Log Database
Load
To load a quick search, simply highlight the name of the desired search in the selection list by clicking
on it and select load. The program will return to the Select Search Conditions dialog box with the
parameters specified in the quick search loaded. Edit the Value fields to reflect the desired search
conditions and select OK.
Save
To save a search you must first specify the search conditions to be saved by editing the Select Search
Conditions dialog box. Next enter the name under which to store the quick search in the top line of
the selection list. If you want to replace an existing quick search, click on the name of the quick search
to highlight it. Finally, select the Save option by clicking on it. The new search will be added to the
list.
Delete
To remove a quick search from the search selection list, highlight its name by clicking on it in the
search selection list and then select Delete to remove it.
Search Results and Selecting Files to Open
After the data base search is completed the Search Results: Select File to Open dialog box will be displayed
as shown below. The box will contain all of the run files that meet the search conditions defined in the Select
Search Conditions dialog box.
Any or all of the files listed in the run file list can be opened for viewing.
To open a single run, simply click on the run to highlight it and select OK.
To open a group of runs, highlight the first run in the group by clicking on it, next hold down the shift key and
click on the last run file in the list to be opened. All of the runs from the first to the last run will be highlighted
and are ready to open. Select OK to open the runs.
To open several runs scattered throughout the run list, click on the first run to be opened to highlight it, next
hold the control key (Ctrl) down and click on the remaining runs to be opened. All runs selected will be
highlighted. Select OK to open the files.
Chapter VIII- 4
Appendix I – Unilog Language Reference
APPENDIX I – Unilog Language Reference
The Unilog Language is not included with the DataLink Lite software package.
Appendix I -1
Appendix I –Unilog Language Reference
(THIS PAGE IS INTENTIONALLY LEFT BLANK)
Appendix I- 2
Appendix II – Supported Math Functions
APPENDIX II --Supported Math Functions
The RacePak DataLink Lite program supports one math channel. The functions can be used in both the
expressions used to define math data channels and in the expressions used to define calculated variables within
the run log pages.
To utilize these functions, type the function in the desired function replacing the ‘x’ with the expression to be
evaluated. If variable names used in the expression contain spaces such as Engine Rpm be sure to enclose the
name in single quotes i.e. ‘Engine Rpm’.
acos(x)
Calculates the arccosine.
double acos( double x );
Return Value
The acos function returns the arccosine of x in the range 0 to p radians. If x is less than –1 or greater
than 1, acos returns an indefinite.
Parameter
x Value between –1 and 1 whose arccosine is to be calculated
asin(x)
Calculates the arcsine.
double asin( double x );
Return Value
The asin function returns the arcsine of x in the range –p/2 to p/2 radians. If x is less than –1 or greater
than 1, asin returns an indefinite.
Parameter
x Value whose arcsine is to be calculated
atan(x)
Calculates the arctangent of x
double atan( double x );
Return Value
atan returns the arctangent of x. If x is 0, atan returns 0. atan returns a value in the range –p/2 to p/2
radians;
Parameters
x Any number
atan2(x)
Calculates the arctangent of y/x.
double atan2( double y, double x );
Return Value
atan2 returns the arctangent of y/x. If both parameters of atan2 are 0, the function returns 0. atan2
returns a value in the range –p to p radians, using the signs of both parameters to determine the
quadrant of the return value.
Parameters
x, y Any numbers
Remarks
atan2 is well defined for every point other than the origin, even if x equals 0 and y does not equal 0.
Appendix II -1
Appendix II –Supported Math Functions
cos(x)
Calculate the cosine
double cos( double x );
Return Value
The cos function returns the cosine of x. If x is greater than or equal to 263, or less than or equal to –
263, a loss of significance in the result of a call to cos occurs, in which case the function
returns an indefinite
Parameter
x Angle in radians
cosh(x)
Calculate the hyperbolic cosine
double cosh( double x );
Return Value
The cosh function returns the hyperbolic cosine of x. If the result is too large in a cosh call, the
function returns HUGE_VAL
Parameter
x Angle in radians
exp(x)
Calculates the exponential.
double exp( double x );
Return Value
The exp function returns the exponential value of the floating-point parameter, x, if successful. On
overflow, the function returns INF (infinite) and on underflow, exp returns 0.
Parameter
x Floating-point value
fabs(x)
Calculates the absolute value of the floating-point argument.
double fabs( double x );
Return Value
fabs returns the absolute value of its argument. There is no error return.
Parameter
x Floating-point value
fmod(x,y)
Calculates the floating-point remainder.
double fmod( double x, double y );
Return Value
fmod returns the floating-point remainder of x / y. If the value of y is 0.0, fmod returns infinity.
Parameters
x, y Floating-point values
Appendix II- 2
Appendix II – Supported Math Functions
log(x)
Calculates natural logarithm.
double log( double x );
Return Value
The log functions return the natural logarithm of x if successful. If x is negative, this function returns
an indefinite. If x is 0, it returns INF (infinite).
Parameter
x Value whose logarithm is to be found
log10(x)
Calculates base 10 logarithm.
double log10( double x );
Return Value
The log functions return the base 10 logarithm of x if successful. If x is negative, this function returns
an indefinite. If x is 0, it returns INF (infinite).
Parameter
x Value whose logarithm is to be found
pow(x,y)
Calculates x raised to the power of y.
double pow( double x, double y );
Return Value
pow returns the value of x to the power of y.
Values of x and y
Return Value of pow
x < > 0 and y = 0.0
1
x = 0.0 and y = 0.0
1
x = 0.0 and y < 0
INF
Parameters
x Base
y Exponent
Remarks
The pow function computes x raised to the power of y.
sin(x)
Calculate the sine
double sin( double x );
Return Value
The sin function returns the sine of x. If x is greater than or equal to 263, or less than or equal to –263,
a loss of significance in the result of a call to sin occurs, in which case the function returns an
indefinite
Parameter
x Angle in radians
sinh(x)
Calculate the hyperbolic sine
double sinh( double x );
Return Value
The sinh function returns the hyperbolic cosine of x. If the result is too large in a sinh call, the function
returns HUGE_VAL
Parameter
x Angle in radians
Appendix II -3
Appendix II –Supported Math Functions
sqr(x)
Calculates the square
double sqr( double x );
Return Value
The sqr function returns the square of x.
Parameter
x Any floating-point value
sqrt(x)
Calculates the square root.
double sqrt( double x );
Return Value
The sqrt function returns the square-root of x. If x is negative, sqrt returns an indefinite.
Parameter
x Nonnegative floating-point value
tan(x)
Calculate the tangent
double tan( double x );
Return Value
tan returns the tangent of x. If x is greater than or equal to 263, or less than or equal to –263, a loss of
significance in the result occurs, in which case the function returns an indefinite
Parameter
x Angle in radians
tanh(x)
Calculate the hyperbolic tangent (tanh).
double tanh( double x );
Return Value
tanh returns the hyperbolic tangent of x. There is no error return.
Parameter
x Angle in radians
tcos(x)
Calculate the triangulated cosine
double tcos( double x );
Return Value
The cos function returns the triangulated cosine of x – a triangular wave values with peaks ang
minimums like in cosine. If x is greater than or equal to 263, or less than or equal to –263, a
loss of significance in the result of a call to cos occurs, in which case the function returns an
indefinite
Parameter
x Angle in radians
Appendix II- 4
Appendix III – Creating Your Own Color Palette
Appendix III. Creating Your Own Color Palette
The RacePak DataLink program contains a default color palette used to display the graphs of the data channels
on the graphics section of the display screen. This default color palette is stored in the file “ChartColors.Txt”
located in the C:\Program Files\RacePakChart folder. The content of the file is a table that describes the colors
in the palette. A portion of the table is shown below.
N
N
Y
Y
Y
Y
Y
Y
Y
Y
Y
Y
Y
0
255
255
0
0
255
255
125
0
255
255
0
0
0
255
0
255
0
200
255
255
255
125
0
255
200
0
255
0
0
255
0
0
0
255
0
255
125
255
The first column in the table is a flag indicating to the program if the color is enabled. The 2nd, 3rd,and 4th
columns in the table are the red, green, and blue components of the color.
The table in this file can be edited to customize and/or replace the color palette with selections of your own. To
edit the table, open the file with the Windows notepad editor. Substitute the values in the table with values of
your own and save the file.
For help in selecting your colors start the Microsoft Paint program and select the Edit Colors command found in
the options menu. Next select the Define Custom Colors button in the Edit Colors dialog box. The following
dialog box will be displayed.
Appendix III -1
Appendix III –Creating Your Own Color Palette
Either select a color from the Basic Colors selection box or use the right hand slide bar and the color chart by
clicking on the chart with the mouse to select a color. The color will be displayed in the Color Solid display
window. When you have found a desired color, record the values from the Red, Green and Blue display boxes.
These are the colors required for the table in the ChartColors.txt file.
Appendix III- 2
Appendix IV How the File Security Works
The RacePak DataLink software and run files generated by the software are protected from unauthorized
viewing by a series of user serial numbers and their corresponding unlock keys. The unlock keys are available
only to licensed users through Competition Systems, Inc. (RacePak) at (949) 580-6898.
The serial numbers and the unlock keys control access to the software and run files as discussed below;
Access to Uploading Data and to Run Data Files:
Access to the DataLink software is controlled by a series of user serial numbers and unlock keys. Three types
of serial numbers are utilized. These are;
File Conversion Serial Number (Type CONV)
The file conversion serial number is derived from the serial number of the CPU in which the DataLink
software is installed. This serial number and unlock key is required to convert old style RacePak data
files created under MSDOS for viewing under DataLink. The serial number and unlock key is valid
only for the PC system containing the corresponding CPU. When a file is converted the conversion
serial number is assigned to the file. The file can then be transferred to other PC’s, however, only
users with this serial number and valid unlock key included in their serial number list will be able to
view the file.
PIO Board Serial Number (Type PIO)
The new style PIO expansion board used to upload data from the onboard data acquisition system
contains a unique serial number. Each time data is uploaded from the onboard computer system this
serial number is read and the serial number list is checked to see if a valid unlock key has been entered.
If the unlock key is present the data from the onboard data acquisition system is uploaded and a file is
created. The new file is assigned the PIO serial number. The file can then be transferred to other
PC’s, however only users with this serial number and valid unlock key included in their serial number
list will be able to view the file.
PC systems with a serialized PIO expansion board and valid unlock keys can be used to convert
MSDOS based data files without the need of a separate file conversion serial number and key.
Onboard Data Logger Serial Number (Type HTPRO, AVENGER, SC1000, PROII, V50C, V300, V500)
Newer data loggers such as the Hot Tach Pro contain a serial number that is transferred to the PC
during the upload process. This serial number and the corresponding unlock key must be entered in
the serial number list or the upload process will be terminated. If a valid key is present, the data from
the onboard data acquisition system is loaded and a run file is created. The new file is assigned the
logger serial number. The file can then be transferred to other PC’s, however only users with this
serial number and valid unlock key included in their serial number list will be able to view the file.
Access to Configuration Files
Configuration files are used to store information on the hardware setup of the onboard data logger, user
programmed math channels, and the run log templates. To protect against unauthorized copying of setup data
and to prevent the accidental usage of the wrong setup with a given on board data logger, the configuration file
is also assigned the same serial number as discussed above.
The serial number and valid unlock key must exist in the serial number list before the configuration file can be
opened for editing. The serial number of the configuration file must match the serial number of either the PIO
board and/or data logger before the upload process is allowed to continue.
Appendix IV –How the File Security Works
User Level Access and Permission Levels
In addition to controlling the uploading of data and opening of files, the serial numbers and unlock keys also
determine the user level and software permission levels available to the user. Several advanced options of the
software are available depending on the needs of the user. These advance levels are as follows;
Advanced Math Channel Capability
This option allows the user to add complex calculations which utilize the channel data gathered by the
on board data logger. These calculations can then be displayed in both the numeric channel display
and on the graphics display.
Advanced Run Log Capability
This option allows the user to create his own run log pages and to add spread sheet like data entry
forms. In addition, this option also provides expanded run log search capabilities.
Video Capture and Display Capability
This option allows the user to capture and display real time video data. The video data can be
synchronized to the data collected by the on board data logger.
If you have not purchased these options certain menu items will be inaccessible. Contact RacePak at (949) 5806898 if you have questions concerning these items.
Showing and Assigning of Serial Numbers
Run file and configuration files can be reassigned to different serial numbers. This allows the reassigning of a
configuration file to a different on board data logger. Please refer to Chapter VI- File Management for a detail
review of modifying file security settings
In order to reassign the serial number both the old and new serial numbers must be included in the valid serial
number list and, in addition, the user levels associated with both serial numbers must be the same. The Add
Security Unlock Keys dialog box selected by the Show/Edit Security List located in the Security main menu is
used to enter and display the serial numbers and unlock keys. The information contained in the dialog box is as
follows:
Currently Installed Serial Numbers List
This list displays all of the currently installed serial numbers and unlock keys. In addition it displays
the user level associated with each of the serial numbers.
To delete a key from this list, select the key by clicking on it. It will be highlighted. Then select the
Delete Selected Entry button.
New Serial Number/Unlock Data entry box.
This box is used to enter new serial numbers and unlock keys into the system. The information
required is as follows;
Product Type
Current valid product types are
CONV
File conversion type
PIO
PIO expansion board serial number
SC1000
SC1000 data logger serial number
PROII
Pro Series II data logger serial number
HTPRO
Hot Tach Pro data logger serial number
AVENGER
Avenger data logger serial number
Serial Number
The serial number for the Product
Appendix IV- 2
Unlock Key
The unlock key obtained from CSI/RacePak for the above serial number.
Enter the above information into the corresponding entry boxes and select the ADD Above
Serial Number Information button to add the serial number to the list. If the unlock code
entered is correct for the serial number the number will be added to the installed serial number
list.
Please note the serial number is case sensitive.
System ID:
The system ID number is derived from the serial number of the CPU in the PC on which the software
is installed. This ID number is used by RacePak to generate the file conversion (CONV) serial number
and unlock key
Entering the Security Keys using the License Disk
When a new DataLink software package is purchased, RacePak ships the user the software installation disks
plus the user License Disk. The license disk contains all the information that is specific to the user that
purchased the DataLink software. This includes the users security unlock keys, customized configuration file
for the users on board data logger, and any demonstration files for racing applications similar to the users
application.
When the DataLink software is run for the first time, the software checks to see if the license disk information
has been installed in the PC. If it has not, the software will display the Insert License Disk Dialog box shown
below.
Insert the license disk into the appropriate drive. Enter the corresponding drive and select OK to copy the
license information
Appendix IV –How the File Security Works
Allowing Others to View Your Files
If you wish others to view the run data and configuration files created by your DataLink system you will need to
give them your Security Unlock keys. Without these keys they will not be able to open or view your files. The
keys can be entered in their system by manually entering each of the unlock keys entered into your system via
the Security menu. Alternately the keys can be copied into their system by installing the keys from your license
disk into their PC. To install the security unlock keys repeat the section above. However, when the Select
Items to Copy dialog box is displayed check only the Copy License Keys box as shown below.
Select OK to copy the License Keys.
Appendix IV- 4
Competition Systems, Inc.
26806 Vista Terrace
Lake Forest, CA
92630
(949) 580-6898