1
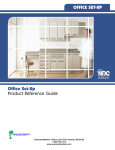
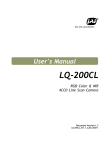
Dynamic Messenger
User’s Manual
DM10, DM15, DM18, DM19
Dynamic Messenger
CONTENTS
1. Introductions-------------------------------------------------------------------------1.1 10.4” Dynamic Messenger --------------------------------------------------------1.2 15” Dynamic Messenger ----------------------------------------------------------1.4 18” Dynamic Messenger ----------------------------------------------------------2. Warnings and Suggestions---------------------------------------------------------2.1 Safety Precautions------------------------------------------------------------------2.2 Troubleshooting --------------------------------------------------------------------2.3 Warranty
3. Installation ---------------------------------------------------------------------------4. Operation Guide
4.1 Remote control
4.2 Setup Password
4.3 Turn On/off Dynamic Messenger
4.4 Auto Timer Setup
4.4.1 Setup the current time
4.4.2 Setup First On-time
4.4.3 Setup First Off-time
4.4.4 Setup Second On-time
4.4.5 Setup Second Off-time
4.4.6 Key Instructions of Timer
4.4.6.1 Setup One Set of Auto Timer
4.4.6.2 Setup Two Sets of Auto Timer
5. Media Guide
5.1 Parameter Setting
6.4.1 SETUP MENU MAIN PAGE ........................................................................
6.4.2 SETUP MENU PHOTO.................................................................................
6.4.3 SETUP MENU MUSIC .................................................................................
6.4.4 SETUP MENU SLIDE SHOW ......................................................................
6.4.5 SETUP MENU MOVIE .................................................................................
6.4.6 SETUP MENU PREFERENCES PAGE........................................................
6.4.7 SETUP MENU – EXIT SETUP
7. OSD menu setting
7.1 VIDEO ADJUST
7.2 OSD ADJUST
7.3 INPUT SELECT
7.4 AUDIO
7.5 EXIT
8. Specifications -------------------------------------------------------------------------9. Check List ------------------------------------------------------------------------------
2
Introductions
This user’s manual covers operational instructions and technical specifications of 10.4”, 15”,
17” and 19” Adview Dynamic Messengers, either with built-in DVD player or built-in 6-in-1
Memory Card player. Please read it carefully prior to turning on the unit.
1.1 10.4-inch Dynamic Messenger
Frame: 10.4 inch Glass with insert.
Built-in 6-in-1 memory card player
Auto on/off Timer. AV input/Audio out connections.
1.2 15-inch Dynamic Messenger
Frame: 15 inch Glass façade with insert
Built-in Memory Card player
Auto off Timer. AV input/Audio out connections.
1.4 18-inch Dynamic Messenger
Frame: 18 inch Glass façade with Insert.
Built-in DVD player or multimedia card player.
Auto on/off Timer.
AV input/ Audio out connections.
Warnings and suggestions
2.1 Safety precautions
1. Handle unit with care. Place machine on a soft cloth or surface before installation in order to
prevent scratches or damage to the panel.
2. Clean panel by wiping with a soft cloth only..
3. Never block the vent in order to prevent overheating.
4. Never disassemble or perform self-maintenance and repair. Opening or removing cover plate
may result in a high-voltage electric shock hazard. Have a qualified technician perform all product
maintenance. Warranty will be void if the unit is disassembled.
2.2 Troubleshooting
1. Will not switch on.
Please ensure the power supply is connected.
Press the “POWER” key on remote control once. Check the timer function. Make sure every
item of time setting is in order. We recommend users check and adjust the timing setting every
week.
2. On DVD’s if frequent stops or mosaic are encountered please check the disc for dust or
scratches.
3. If sound is heard but no picture is visible, please press “POWER” key to restart the machine.
4. If picture is played but no sound, please turn up the volume.
3
5. Can not read files after multimedia card is inserted
Check the insertion direction
Make sure the card is supported by the machine.
7. Blue screen
Please press “POWER” key on remote control to restart.
2.3 Warranty
Our warranty does not cover the following:
1. Removed or altered serial number label
2. Damage as a result of natural disasters.
Disasters such as floods, fires, winds, earthquakes or lightening
3. Misuse or abuse, any modification or alternation
Improper installation or maintenance
Used with an unauthorized Accessory
3.
Installation
Insert multimedia card and lock it up after installation.
4
4. Operation Guide
4.1 Remote Control
5
KEY
1. POWER
2. OPEN
3. Number Keys
4. DISPLAY
5. SOURCE
With DVD Player
Press it to turn the machine on or off
Press to eject the DVD tray
0 through 9
Display Language
Switch between DVD, Video Input or
S-Video
Return to the previous menu
Switch between PAL/NTSC/Auto for DVD
Press it to repeat playing.
Press other numbered key first, then press
it for 0.
Press for DVD setup.
Press to pause, press again to resume.
Press it for previous file
Switch between languages
Press it for Timer setup
Press it to setup LCD PANEL
Press it to next file
Press it to switch between Left/Right
speaker
With Memory Card Player
Press it to turn the machine on or off
Normal operation
Menu is activated
Normal operation
17.
Fast Forward (x8
speed)
Arrow Up
18.
Decrease Volume
Arrow Left
Decrease Volume
Arrow Left
19.
Increase Volume
Arrow Right
Decrease Volume
Arrow Right
20.
Fast Reverse
speed
6. TITLE
7. MODE
8. REPEAT(0)
9. SETUP
10. PAUSE
11. PREV
12. LANG.
13. TIMER
14. MENU
15. NEXT
16. AUDIO/B.M
Arrow Key
21. ENTER
4.2
x8
0 through 9
Display Photo/Music/Video files
Switch between Memory Cards, Video
Input or S-Video
Display all files in memory card
Switch transition form of slide show
Press it to repeat playing.
Press other numbered key first, then press
it for 0.
Press for card reader sutup
Press to pause, press again to resume.
Press it for next file
Press it for Timer setup
Press it to setup LCD PANEL
Press it to the next file
Press it to play background music.
Menu is activated
Arrow Up
Arrow Down
Arrow Down
Press to
selection
Press to
selection
confirm
Setup Password
Users must enter 4-digit password for operations.
When the machine is on, press any key and “PASSWORD” is displayed in the upper right corner
asking user to enter a password. Press numbered keys on remote control and machine will check
the 4-digit input automatically and permit the entry of remote control functions.
6
confirm
The default password is “1 1 1 1”. User should change the password.
Refer to OSD menu to change password.
If no password is wanted, change password to “0 0 0 0.”
No password is required to press “POWER” key to turn on/off unit. The Dynamic
Messenger will stay on for 1 minute. After 1 minute, it will respond based on the user’s
setup of the Auto Timer.
Password will disappear after 3 minutes. Password is required to operate any of the
functions of the messenger.
To change password by remote control
Press MENU key on remote to open OSD menu, press Left/Right arrow key to highlight “OSD”,
press ENTER to enter. Press Up/Down arrow key to highlight “PASSWORD MODIFY”, then
press ENTER. “YES/NO” is displayed. Choose “NO” for cancel. Choose “YES”, then “Input
Password” is showed on screen. Enter new 4-digit password, and reenter it when “VERIFY
PASSWORD” shows up. If the new password is “0 0 0 0,” no password will be required to
operate the Dynamic Messenger. We highly recommend using passwords to ensure security and
stop unauthorized use of the unit. However, please recognize that a forgotten password will make
the unit inoperable without factory maintenance.
4.3 Turn the unit On/Off
The Messenger turns on & off automatically based on settings in the Auto Timer.
The POWER key on remote control is for periodic/temporary use only to set up password,
Auto Timer, etc.
During the ON period of Auto Timer, if the POWER key is pressed, the unit will turn off for
1 minute and back on automatically. During the OFF period of Auto Timer, if the POWER key is
pressed, the unit will come on for 1 minute and turn off automatically.
4.4 Auto Timer Setup
4.4.1 Adjust Current Time
Press the TIMER key on the remote control, the current time will be displayed. Press the number
7
keys to set the correct time. If the current time is 13:15:41, press 1, 3, 1, 5, 4, 1 as the arrow
flashes. Confirm your settings after setting the time.
4.4.2 Setup:
First On-Time (There are two on off timers)
Press TIMER and use the number keys to enter the First-On Time. The unit will come on at the
specified time.
4.4.3 Setup First Off-Time
Press TIMER and use the number keys to enter the First-Off Time. The unit will turn off
automatically at the specified time.
4.4.4 Setup Second On-Time
Press TIMER one more time to enter Second-On Time.
4.4.5 Setup Second Off-Time
Press TIMER again to enter Second-Off Time.
4.4.6 Key Instructions of Timer
The Dynamic Messenger can be set to “No Auto Timer”, “One Set Auto Timer” or “Two Sets
Auto Timer.”
4.4.6.1 No Auto Timer
Set the first-on and first-off time to be the same, and second-on and second-off time to be the same.
This will disable the Auto Timer function. Use the remote to turn it on and off.
4.4.6.2 Setup One Set of Auto Timer
Set the first-on and first-off times to be different, and set the second-on and second-off time to be
the same. This will enable only one Auto Timer and the unit will turn on & off based on these
settings.
The default on and off time are: FIRST ON 09:00:00 FIRST OFF 21:00:00 SECOND ON
13:00:00 SECOND OFF 13:00:00
8
4.4.6.3
Setup Two Sets of Auto Timer
Set the second on/off times to be different, two sets of timers will be enabled. Please ensure that
the two timers do not conflict with each other in the time settings.
Multimedia
Player System
6.1 Memory Cards
SM, SD, Memory Stick, Memory Stick Pro, CF, MMC cards are supported by card
player.
6.2 File Formats Supported
Photo: JPEG
Music: MP3
Video: MPEG 1 (MPEG II ready for CF card)
6.3 Multimedia System Setup
Please insert the memory card in the corresponding slot.
Press SOURCE to switch to MEDIA mode.
Press DISPLAY to switch between PHOTO, MUSIC and VIDEO mode.
Play Photo: Press DISPLAY to enter PHOTO interface, then press ENTER or numbered
keys to play. The system will start automatically if no action is taken.
Slideshow Transitions: Press MODE to change the slideshow transitions.
Play Music: Press DISPLAY to enter MUSIC interface. Then press ENTER or numbered
keys to play.
Play Video: Press DISPLAY to enter VIDEO interface. Then press ENTER or numbered
keys to play.
Note:
•
While playing multimedia files, press “
•
Press “
” or “
” to pause, press it again to resume.
” to play previous or next file.
9
•
Press “TITLE” to view all files on memory card.
Background Music (Playing music and photo at the same time):
1) While playing or browsing photo files, press “AUDIO” to play background music.
2) While playing photo and music at the same time, press “
” to pause photo, music continues;
press it again to pause both photo and music; press it again to resume playing both.
Note: Make sure photo and music files are saved on memory card.
6.4 Memory Card Player Setting
Tips: To change the settings fast and easily, operate with arrow keys,
6.4.1 SETUP MENU MAIN PAGE
SETUP MENU – MAIN PAGE
PHOTO SETUP (Change Photos Settings
MUSIC SETUP (Change Music Settings
SLIDESHOW SETUP (Change Slideshow
Settings
MOVIE SETUP (Change Movie Settings
PREFERENCES (Change Menu Settings
MAIN PAGE
EXIT SETUP(Exit main page)
Press SETUP key on remote control to open
SETUP MENU.
6.4.2
SETUP MENU PHOTO
PHOTO THUMBNAIL DIGEST
ON/OFF turn this function on/off
10
Enter main page
Press ENTER to open submenu PHOTO
SETUP
Press
to highlight item to change
press
to highlight your selection press
ENTER to save.
press
to the previous menu choose MAIN
PAGE and press ENTER to go to the previous
menu.
PHOTO TRANSITION MODE
FAST
NORMAL
SLOW
Enter PHOTO SETUP menu
Press
to highlight TRANSTION
MODE press
to show submenu on right,
press ENTER to confirm.
PHOTO TRANSITION MODE
press
to go back to choose MAIN PAGE
and press ENTER to go to previous menu.
PHOTO ORIENTATION
DEFAULTS
IGNORE
Enter PHOTO SETUP menu
Press
press
PHOTO ORIENTATION
to highlight ORIENTATION
to show submenu on the right, press
to select desired item press ENTER
to save
press
to go back to choose MAIN PAGE
and press ENTER to go to previous menu.
11
6.4.3
SETUP MENU
MUSIC
MUSIC Repeat
ONE repeat one music file
ALL repeat all music files
OFF: turn repeat function off
MUSIC REPEAT MODE
6.4.4
SETUP MENU
Operation as above
SLIDE SHOW
SLIDE SHOW playing function setup
MANUAL slide show playing manually
AUTO
slide show playing automatically
Operation as above
SLIDE SHOW
SLIDE SHOW MODE
SLIDE SHOW folder repeat function setup
ON/OFF turn folder repeat function on/off
Operation as above
SLIDE SHOW FOLDER REPEAT
12
SLIDE SHOW INTERVAL TIME
ONE SECOND
THREE SECONDS
FIVE SECONDS
SLIDE SHOW INTERVAL TIME
TEN SECONDS
SLIDE SHOW TRANSITION
SLIDE SHOW TRANSITION
FULL SCREEN
TOP->BOTTOM
BOTTOM->TOP
T/B->CENTER
CENTER->T/B
BLIND:T/B
LEFT->RIGHT
RIGHT->LEFT
L/R->CENTER
None
Wipe Down
Wipe Up
Box In
Box Out
Blinder
Tile Fill Left
Tile Fill Right
Tile Box In
SLIDE SHOW – AUTO START
ON/OFF turn auto start on/off
Operation as above
SLIDE SHOW
6.4.5
AUTO START
SETUP MENU
MOVIE
MOVIE – INTERVAL TIME
FAST
Fast Speed
NORMAL Normal Speed
Operation as above
MOVIE INTERVAL TIME
13
MOVIE
OFF Turn It off
ONE Repeat one file
ALL Repeat all files
MOVIE REPEAT MODE
6.4.6
SETUP MENU
PREFERENCES PAGE
PREFERENCES PAGE – TV TYPE
MULTI.SYSTEM
NTSC
For countries adopt NTSC system
PAL For countries adopt PAL system
PREFERENCES PAGE TV TYPE
PREFERENCES PAGE – VIDEO OUTPUT
S-VIDEO
S-VIDEO
(recommended)
signal
YPBPR YPBPR signal output
PREFERENCES PAGE VIDEO OUTPUT
RGB RGB signal output
PREFERENCES PAGE – OSD OUTPUT
ENGLISH OSD in English
CHINESS OSD in Chinese
PREFERENCES PAGE OSD LANG
14
output
PREFERENCES PAGE
- OSD MESSAGE
ON/OFF Turn it on or off
PREFERENCES PAGE OSD MESSAGE
PREFERENCES PAGE - DEFAULT
RESET: Restore the default settings
PREFERENCES PAGE DEFAULTS
NOTE:
PREFERENCES PAGE menu can be activated under initial state. If not , press SOURCE to
change back to initial state.
6.4.7
SETUP MENU
EXIT SETUP
SETUP MENU - MAIN PAGE
Press
to exit.
Press ENTER to exit OSD menu
Note:
You can press SETUP to exit OSD menu
after change the settings.
EXIT SETUP
15
OSD Setup
Note:
Press arrow keys,
for quick operations
General Menu
VIDEO ADJUST
OSD ADJUST
INPUT SELECT
AUDIO
EXIT
7.1
VIDEO ADJUST
BRIGHTNESS
HUE
CONTRAST
COLOR
TEMPERATURE
RESET
RETURN
SHARPNESS
SATURATION
Press MENU to enter submenu, then press ENTER to enter
“VIDEO ADJUST” (or press“ ”
Press “
” to highlight your choice.
Press ENTER to open, press “
” to change settings. Or press
ENTER for options.
16
7.2
OSD ADJUST
OSD ADJUST
H-POSITION
Move horizontally
V-POSITION
Move vertically
OSD-OFF TIME
OSD auto off time set
OSD-TRANSPARENT
OSD transparency
RETURN
Press MENU to enter submenu, then press ENTER to enter
“VIDEO ADJUST” (or press “ ”).
Press “
” to highlight your choice.
Then press ENTER to enter, then press “
” to change
settings. Or Press ENTER for options.
7.3
INPUT SELECT
INPUT SELECT
DVD or MEDIA PLAYER
For DVD or Media Player
VIDEO
For VIDEO input signal
SVIDEO
For S-VIDEO input signal
RETURN
Press MENU to enter submenu, then press ENTER to enter
“INPUT SELECT” (or press “ ”).
Highlight your choice, and press “ENTER” to confirm.
17
7.4
AUDIO
AUDIO
VOLUME
BASS
TREBLE
BALANCE
RETURN
Press MENU to enter submenu. Then press ENTER to open
“AUDIO” menu. (or press“ ”
Press “
” or “
” on machine to highlight your choice.
Press ENTER to open and press “
” to change settings. Or
press ENTER for options.
7.5
EXIT
EXIT
Press ENTER to exit OSD menu.
18
Specifications
10.4-inch
Panel
Viewing Area (mm)
Pixel (mm)
Horizontal Frequency
Vertical Frequency
Lift Time
Brightness
Contract Ratio
Viewing Angel
Power
Power Management
Power Consumption
10.4-inch Active Matrix TFT LCD
211.2 (H) × 158.4 (V
0.33 (H) × 0.33 (V)
30 80KHZ
60/75HZ
40,000 Hours
330cd/m
250 : 1
Vertical 110° / Horizontal 140°
AC 110 240V(50HZ-60HZ)
VESA DPMS
25W
15-inch
Panel
15-inch Active Matrix TFT LCD
Viewing Area (mm) 304.1 (H) × 228.1 (V
Pixel (mm)
0.297 (H) × 0.297 (V)
Horizontal Frequency
30 80KHZ
Vertical Frequency
60/75HZ
Lift Time
50,000 Hours
Brightness
330cd/m
Contract Ratio
500 : 1
Viewing Angel
Vertical 110° / Horizontal 140°
Power
AC 110 240V(50HZ-60HZ)
Power Management
VESA DPMS
Power Consumption
50W
19
18-inch
Panel
Viewing Area (mm)
Pixel (mm)
Horizontal Frequency
Vertical Frequency
Lift Time
Brightness
Contract Ratio
Viewing Angel
Power
Power Management
Power Consumption
18-inch Active Matrix TFT LCD
359.04 (H) × 287.232 (V
0.2805 (H) × 0.2805 (V)
30 80KHZ
60/75HZ
50,000 Hours
250cd/m
550 : 1
Vertical 170° / Horizontal 170°
AC 110 240V(50HZ-60HZ)
VESA DPMS
65W
20