1
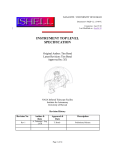
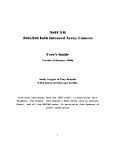
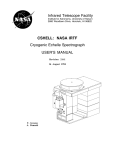
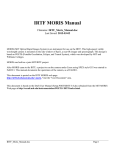
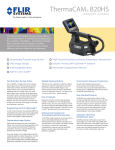
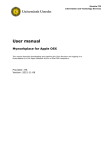
A BRIEF CAMERA SOFTWARE (SOLIS) USER GUIDE
The POETS computer is turned on by pressing the silver button on its front. A Windows
XP desktop should appear automatically. If for any reason you need to provide a
password for the IRTF POETS account, it is KBO_occ@IRTF.
The bold text below contains simple instructions for camera operation. Note that the
screenshots in Figs. 2-5 are from an earlier version of the Solis software than that
currently used at the IRTF and thus may be slightly different; however, the instructions
here are valid. A hard-copy user manual is onsite, which describes many other features!
(1) CLICK on the “Andor iXon” desktop shortcut icon to start the camera software.
(Note that this icon should be near the Spectrum Inst./TM-4 icon that is employed to
monitor and send trigger signals from the GPS. Other software shortcuts are provided
on the desktop for usefulness, but are not necessary to run the instrument).
(2) CONFIRM that the camera software starts and presents a screen like that
shown in Figure 2.
a. Note that the camera S/N should appear in the top bar. This confirms that the
software recognizes the camera.
b. Note that a pre-existing configuration file should be loaded automatically.
This will cause the camera to cool upon startup and ensure that the shutter is
closed. (If you want to change the configuration file, simply set software
parameters to your choosing. Then overwrite the .cfg file listed under File >Configuration Files.)
c. Note that the temperature display in at the lower left is red, which indicates
that the temperature has not stabilized. That box will turn blue when the
camera has stabilized at the set temperature.
Figure 2. Solis v.4.6.5 (POETS camera software) as it appears upon successful startup.
(3) To take data, the shutter must be open. CLICK Hardware->Shutter Control, and
ensure that the Internal Shutter is set to permanently open. For longer exposures,
a manual shutter setting could be used; however, this mode is not tested.
(4) To set data-taking parameters, CLICK on the white wrench icon (denoted by an
arrow in Fig. 3) or use the Acquisition->Setup Acquisition menu. Typically, the
configuration file starts with the settings shown in Fig. 3. The exposure time, number
of exposures, and readout rate amplifier will be the selections that are usually altered
between frames.
a. “Triggering” should be Internal if you plan to take frames using the Solis
software; External Start if you plan to take a data cube containing the
number of frames listed in the Solis software and starting at a GPS trigger;
External if you want the camera to take a data cube containing the number of
frames specified in the Solis software with each frame being triggered by a
GPS repeat signal. See (9) for sending GPS triggers.
Important note: The camera software and GPS software do not communicate with one
another. Therefore, you must hand-record the start time of any images triggered via GPS.
b. Note that the “Shift speed” is the time to shift electrons per CCD row.
Number selections listed in brackets will allow the data to read out even more
quickly, but are likely to incur some electron loss.
c. “Readout rate” allows selection of the amplifier: 1 MHz (Conventional &
Electron Multiplying; EM), 3 MHz (Conventional & EM), 5 MHz (EM) or 10
MHz (EM). Faster readout rates incur higher read noise – see the
specification sheet for details. Note that the EM modes can be run with EM
disabled. Usage of EM modes while disabled removes worry that the
avalanche gain will be compromised; however, taking data in this mode (or
even with EM enabled at very, very low EM values) is inadvisable because
the EM must be high enough to compensate for the higher read noise and
excess noise factor in these modes.
d. Readout gain, in e/ADU, is selected by choosing “Pre-amplifier gain”. See the
specification sheet for values corresponding to the listed numbers.
e. The “Number of prescans” can be set to a non-zero value if you would like to
ensure that the first frame of every saved cube does not contain any residual
signal. Note that prescans have not been used with occultation (or other timespecific) observations. We typically drop the first data frame during analysis.
f. Ensure that the “Frame Transfer” box is checked. The camera has not been
tested in non-frame transfer modes.
g. Note that frames (.fits or otherwise) can be opened in either the Solis software
(under the File menu) or in ds9
h. Note that the WinScp icon on the desktop is a user-friendly interface for
transferring files between POETS and stefan, or other remote servers.
Preview
Take Data
Stop Taking Data
Data Acquisition Settings
Figure 3. Data acquisition settings for typical operation of the POETS camera.
(5) To preview data, (take and see frames without storing) CLICK on the video
camera icon labeled “preview” in Fig. 3. The stop button labeled in Fug. 3 will
stop the preview.
(6) To take data, CLICK on the camera icon labeled “take data” in Fig. 3. The stop
button labeled in Fug. 3 will abort.
Important Note: The configuration file is currently set to automatically spool, save, and
incrementally number the data cubes. (See next item.) If you do not want to autospool
and save, you must change these settings. With no spooling, any image you take should
display and then allow you the option to save and name.
(7) To spool and automatically name data, GO TO the Setup Acquisition window
and CLICK on the “Spooling“ and/or “Auto-Save” tabs. The typical settings for
these are shown in Figs.4a & b. Spooling ensures that every frame is saved – when
taking a very large data cube this prevents total data loss should a mid-cube crash
occur. When the “Use Append Setting from Autosave tab” is selected, the spooled
data are compiled into a data cube and named via the pattern selected in “Auto-save”.
Figure 4. Typical settings for data storage: the “Spooling” and “Auto-save” tabs.
(8) To change the cooling settings, CLICK on the menu Hardware->Temperature
Control. Adjust the temperature by entering a value in ºC or moving the adjustment
bar. The cooler should be on and the box for “on at program startup” should be
checked. See Fig. 5 for typical settings.
Figure 5. Typical settings for the
temperature control panel for POETS. The
minimum cooling depends on ambient
temperature: for reference, at 68º F the
camera can cool to –60C.
(9) To trigger the camera using the GPS, SELECT all of the acquisition settings you
desire. CLICK on the camera icon to take data. Next, enter the GPS software
and select POP (lower right). Set start time (UT) and repeat interval, as desired.
The camera will sit until it receives the trigger (at the POP time you set), at which
point frames will display in the software.
Important Note: Again, note that the GPS start time is NOT RECORDED anywhere
other than when you type it into the GPS software. The time in the FITS header will be
that when the take data command was given in the Solis software.
(10) To close the software, simply click File->Close. The camera fan may continue to
run if the software is closed but the computer is still running. It is best to shut down the
entire system at the end of each night.