1
User Manual
for Version 3.5
(last edited on Monday, November 3, 2008)
ProPresenter 3 User Manual
Table of Contents
1 Welcome to ProPresenter – Getting Started...................1
1.1 Installing ProPresenter.............................................................. 1
1.2 Understanding Foreground and Background Elements............ 4
1.3 Media Files on your Computer.................................................. 4
1.4 Importing Media into Library...................................................... 6
1.4.1 Foreground Media Elements.................................................. 6
1.5 Media Browser............................................................................. 7
1.6 Media File Types......................................................................... 7
2 Video Output Screen......................................................... 8
2.1 Using a Projector or Other Display Device................................. 8
2.2 Display Settings........................................................................... 8
2.3 Window Settings.......................................................................... 9
2.4 Output Screen Settings..............................................................10
2.5 Text Shadow.............................................................................. 11
2.6 CCLI Display.............................................................................. 11
3 Working with Presentations........................................... 12
3.1 Organizing your Library............................................................. 12
3.2 Playlists......................................................................................13
3.3 The Presenter View................................................................... 14
3.4 Global Edits............................................................................... 15
3.5 The Edit View.............................................................................15
3.6 Quick Edit...................................................................................16
3.7 Hot Keys.................................................................................... 17
3.8 Working with Foreground Media Elements................................ 18
3.9 Quick Announcements............................................................... 19
3.10 Importing and Exporting...........................................................19
3.11 Print Selected Presentations.................................................... 21
4 Working with Background Elements .............................
22
4.1 Adding and Managing Background Elements............................ 22
4.2 Background Playback Settings.................................................. 23
4.3 Creating Background Cues........................................................24
4.4 Background Settings and Performance Hints............................ 24
4.5 Live Video.................................................................................. 25
4.6 Bail to Logo................................................................................25
5 Working with Audio.........................................................27
5.1 Adding and Managing Audio...................................................... 27
5.2 Auto Slide Sequencing.............................................................. 28
Renewed Vision
Table of Contents 1
ProPresenter 3 User Manual
6 Working with Bibles ........................................................
30
6.1 Adding Bibles............................................................................. 30
6.2 Bible Verse Lookup....................................................................31
6.3 Save Bible Verses...................................................................... 31
7 Working with the Count Down Timer............................. 32
7.1 Setup Count Down Timer...........................................................32
7.2 Timer Settings............................................................................ 33
8 Working with DVDs......................................................... 34
8.1 Save DVD Clips......................................................................... 34
8.2 Display DVD.............................................................................. 35
8.3 Prevent DVD Spin Down........................................................... 35
9 Working with Modules ....................................................
36
9.1 Registering Modules.................................................................. 36
9.2 Key and Fill................................................................................ 37
9.3 Advanced Module Bundle.......................................................... 38
10ProPresenter Short Cuts ................................................
39
11ProPresenter FAQs .........................................................
41
Renewed Vision
Table of Contents 2
ProPresenter 3 User Manual
1 Welcome to ProPresenter – Getting
Started
We appreciate your purchase of our award-winning worship and
media presentation software. To get started, we want to acclimate
you to some of the basics of how to install ProPresenter, as well
as the basic interface structure and files with which ProPresenter
can work.
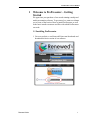
1.1 Installing ProPresenter
1. Go to our website, www.RenewedVision.com/downloads and
download the latest version of our software.
Renewed Vision
1
ProPresenter 3 User Manual
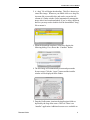
2. A “.dmg” file will begin downloading. This file is known as a
virtual disc image. Whenever you double-click on a .dmg file,
it mounts like a removable disc and can be seen on the left
column of a Finder window. Safari automatically mounts this
image after it has been downloaded. If you’re using a different
browser you may need to double-click the downloaded ".dmg"
file to mount it.
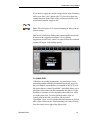
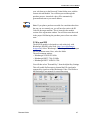
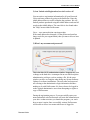
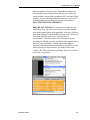
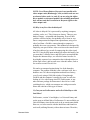
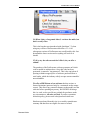
3. When the download completes, Safari may display the
following dialog. If so, choose the “Continue” button.
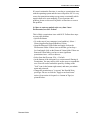
4. The disc image will automatically mount and present the
license screen. Click the “Agree” button and the installer
window will be displayed in the Finder.
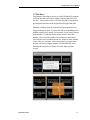
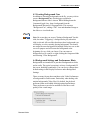
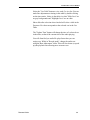
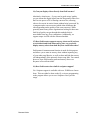
5. Drag the ProPresenter icon into the Applications folder as
depicted by the large blue arrows. That’s it! There is no
“installer” application. Additional resources are available on
Renewed Vision
2
ProPresenter 3 User Manual
the disk image and can be copied to your hard drive. When
you are finished with the disk image, unmount it as you would
a CD or DVD.
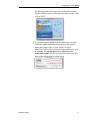
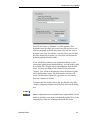
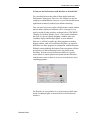
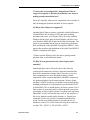
6. To run the program, double-click the application icon from
within the Application folder and enter your Registration
Name and Unlock Code, or click “Demo” to begin.
Note: The Unlock Code is tied to the Registration name, so it
is vital they are entered precisely as shown on your
confirmation email. We always recommend using copy and
paste of this information to prevent typos.
Renewed Vision
3
ProPresenter 3 User Manual
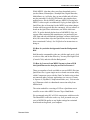
1.2 Understanding Foreground and Background
Elements
ProPresenter utilizes two different "layers" of display elements to
create dynamic presentations. These are called Foreground
elements and Background Elements. Foreground elements can be
lyrics, presentation videos with or without audio, audio files, or
still graphics. Background elements can be still graphics or video
loops without audio. Foreground elements appear in the top
window pane of the main Presentation view, while Background
elements appear in the lower window pane. Foreground Video
files can also be directed to play out through your Firewire port
or other Output Components (i.e. SDI card). This process is used
to ensure "Good as tape" video signals and can be set up in
"Display Preferences".
1.3 Media Files on your Computer
Media files for either Foreground or Background layers can
reside anywhere on your hard drive. You can also connect
external hard drives to your computer to access those files. We
recommend that you store files on a local drive and place them in
your User's "Movie" folder, or another quickly accessible
location on your local hard drive. Don't lose your clip
investment! Back up your video clips regularly!
Renewed Vision
4
ProPresenter 3 User Manual
Lyric files are stored within a database on your hard drive that is
specific to the current user. At present, presentations cannot be
shared between multiple accounts on your computer; however,
ProPresenter 3 has an easy import/export function to make
moving files from one machine to another painless. This is
accessed by choosing one or more presentations from within
ProPresenter, and selecting: File > Export Selected Presentations
Renewed Vision
5
ProPresenter 3 User Manual
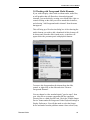
1.4 Importing Media into Library
There are a number of ways to import media files into your
ProPresenter Library
1.4.1 Foreground Media Elements
Foreground video clips can be added by creating a new slide and
right-clicking (control-clicking) on the slide and choosing Add
foreground Video/Image. This will present you with an open file
dialog box with which you can select a video or audio file.
You can also select and drag media files from the Finder or
Desktop to the Foreground window pane, or to the Media Bin.
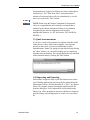
1.4.2 Background Media Elements
To import clips into your background media bin, choose File >
Import Media (Command-Shift-R) or press the button “+” that
appears underneath the Background window pane to open the
File Dialog. Then select the files you wish to import. You can
also drag media files from the Finder or Desktop to a playlist or
to the background bin.
Renewed Vision
6
ProPresenter 3 User Manual
1.5 Media Browser
There is a "Media Browser" which can be opened under the
Window -> Media Browser file menu. This browser will allow
you to search certain media directories like your "Pictures" or
"Movies" folder, along with your iTunes and iPhoto Library.
You can then drag and drop the selected file(s) onto the
Presentation View or Background area.
1.6 Media File Types
Any video format QuickTime recognizes is playable within
ProPresenter. The speed of your machine and the type of
compression will dictate how smoothly the videos playback. You
can also import a variety of image and audio-only file formats
that QuickTime recognizes.
Renewed Vision
7
ProPresenter 3 User Manual
2 Video Output Screen
ProPresenter uses your computer's DVI or Video port, taking
advantage of MacOS X's extended desktop capability. That
means when you connect a projector, plasma, or other display
device, your desktop expands to take advantage of this new
display. What you will see is your main screen with the
ProPresenter interface, and a second screen through your other
device. You will be required to set up your output screen both in
System Preferences, and in the ProPresenter Screen Preferences.
2.1 Using a Projector or Other Display Device
Connect a projector to the Display port on your computer.
ProPresenter will automatically detect the external screen when
the application is started. Choose Window > Show Video
Window (Command-1) from the file menu to show or hide the
video out. If the video appears over top of the ProPresenter
interface on the main screen, you will need to quit and restart
ProPresenter for the auto detection to occur. Use Video
Preferences to adjust output settings. (see Screen Settings above)
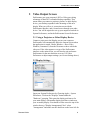
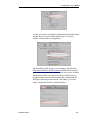
2.2 Display Settings
Open your System Preferences by Choosing Apple > System
Preferences. Click on the "Displays" button under the
"Hardware" grouping. This opens the display preferences for
your main display, with another display preference window on
your secondary display. You should see tabs across the top of the
window that say "Display/Arrangement/Color". select
"Arrangement" and make sure the checkbox on the lower left for
Renewed Vision
8
ProPresenter 3 User Manual
"Mirror Displays" is NOT checked. Now return to the "Display"
tab.
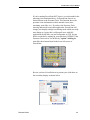
To make the remainder of the set up easier, click on the "Gather
Windows" button to bring your secondary display preference
window to the main screen. It will appear behind your current
setting window. Click the title bar of this window to make it
active. Select the output resolution you desire from the available
display settings options, but be mindful that lower resolutions
result in optimal video playback performance.
2.3 Window Settings
Choose Window > Enable Output (Command-1) to toggle the
Video Out screen on and off. The video out screen is typically
your secondary display, be it a monitor or projector. If you start
ProPresenter up without a secondary display connected, your
main screen will be selected as the video out display (this is not
recommended for live presentations as you have no access to the
ProPresenter interface in this mode).
Renewed Vision
9
ProPresenter 3 User Manual
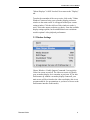
2.4 Output Screen Settings
Choose Preferences under the Apple menu (Command-,) to open
the Screen Preference panel. Enter the desired pixel dimensions
for your output screen. Most Standard Definition signals will be
720 x 480. Typically, you will want to match your output device
resolution in the Operating System Preferences to that of
ProPresenter Screen Preferences. You can set this automatically
to the resolution of your output screen by selecting "Full Screen".
Display at Top Most Window Layer will force the Output
window to the front most position. This way, no other application
will appear on the output screen. Disable this feature to allow
quick switching between other presentation applications like
Keynote or Power Point.
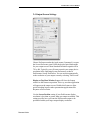
Use the Screen Position setting if your ProPresenter display
resolution is less than or greater than your output resolution. This
setting specifies how you want the ProPresenter output to be
positioned within your larger output display resolution.
Renewed Vision
10
ProPresenter 3 User Manual
The Screen Color setting specifies the background color for
your output display. This is to say that if there is no background
selected, this is the color that will be seen on the output display.
Usually, this is black.
The Screen Margin settings are measured in pixels for the main
screen.
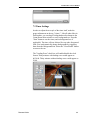
2.5 Text Shadow
ProPresenter offers a beautiful feathered Text Shadow for easy
readability of text over still or moving backgrounds. These
settings define how this shadow looks and is based on an x and y
offset, blur, and color. By default, we have this set up as a lower
right black shadow with x=5, y=-5, and a 5 pixel blur. The Text
Outline settings effect the outline stroke and color.
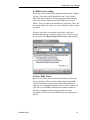
2.6 CCLI Display
Copyright or CCLI information can be automatically displayed
within your presentations. Use the settings of this panel to
specify on which slide you want this information to appear. The
information in the Copyright field of each presentation will be
displayed according to these settings. You have control of the
display positioning and text attributes and can define this
information by clicking on "Change Text Display Style".
When the CCLI option is checked near the copyright information
field, the CCLI Number entered in preferences will automatically
be appended to the copyright information displayed on screen.
Renewed Vision
11
ProPresenter 3 User Manual
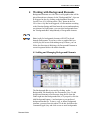
3 Working with Presentations
As explained in the "Getting Started" section, ProPresenter
utilizes two different "layers" of display elements to create
dynamic worship presentations. These are called Foreground
elements and Background Elements. Foreground elements can be
lyrics, presentation videos (with or without audio), audio files, or
still graphics that will float above chosen background elements.
The foreground elements are stored in a master Library of
Presentations. Presentations are most usually slides of lyrics for
songs, but can also contain slides with videos or audio files.
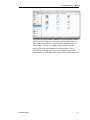
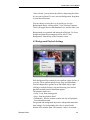
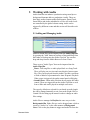
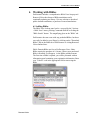
3.1 Organizing your Library
On the left side of the ProPresenter screen are the Library and
Playlists panes. The top pane is your complete presentation
library, and the bottom pane contains playlists of presentations.
Presentations may be accessed directly from the Library, but
users generally prefer to create Playlists of their presentations for
easy accessibility, such as a playlist for this Sunday's service.
When you click on a presentation in either the Playlist or
Library panel, the slides for that presentation are automatically
shown in the Presenter view to the right of these panels.
To add a presentation, you can click on the button that appears
underneath the main Library to the left of the search box, or
choose from the various import options that appear under the File
menu to import slides from text files or prior ProPresenter
versions.
Renewed Vision
12
ProPresenter 3 User Manual
Creating a new presentation will prompt you to enter the name of
the presentation and will take you to the edit mode of the slide so
that you can quickly create new slides.
To quickly find songs, type any part of the title into the search
box.
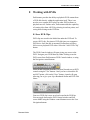
3.2 Playlists
Playlists are user definable directories that make it easy to
organize your presentations into an easily accessible structure.
The Playlists window pane is located directly below the Library
pane.
The playlist window pane can be collapsed for easy access to a
single playlist. To see a list of all of your playlists, click on the
expand button at the bottom of the pane
To create a playlist, click on the Add Playlist button To add
presentations to your playlist, just drag them over the playlist
you've created. If you want more organization to your playlists,
you can create folders by clicking on the add folder button and
drag your desired playlists into this folder.
Renewed Vision
13
ProPresenter 3 User Manual
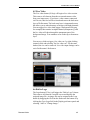
3.3 The Presenter View
The presenter window pane is where all the foreground slides of
a presentation can be accessed and made active on the
presentation screen.
The slides are presented in a grid format that is easily scalable by
sliding the scale at the bottom of the window pane.
At the top of the window is the song information screen. Here
you can enter or edit the song's name, the artist name, and the
copyright information. This section also tells you the last time a
song was used. This date is automatically updated when 50% or
more of the slides of a song are clicked on and is an easy way to
keep track of how often you've done the same song.
To make a slide "live" just click on it. Note that ProPresenter
slides become active when the mouse is depressed, not on the
mouse down.
To move, copy, or delete slides, you must first select them. To do
this, hold down the Command key and click on one or more
slides. Once selected, you can delete the slides by depressing the
delete key on your keyboard. To move selected slides, drag them
to your desired location. If you hold down the option key while
dragging, the slides will be copied to the selected location.
Renewed Vision
14
ProPresenter 3 User Manual
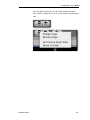
Slides in presenter view have a number of options available to
them. You can view these options by control- or right-clicking
on a slide. These options are explained below. If multiple slides
have been selected, the action chosen from this menu will apply
to all of the selected slides.
3.4 Global Edits
Use the "Format" button at the bottom of the presenter view to
make a global font/size/color/alignment change to all the slides
of a presentation. To change multiple songs all at once, select
each Presentation while holding down the Command Key (Apple
key). You can modify each attribute individually, or click on the
"Update All" button to apply all attributes to the selected
Presentations. Note that the settings in this global format panel
always show the last used settings from this panel. It does not
update based on the currently active song, but the last settings
chosen.
3.5 The Edit View
To edit individual slides of a presentation, click the "Edit" button
at the bottom of the window pane, or select "Edit Slide" from the
contextual menu that appears when you right-click or controlclick on a slide.
The Edit view window pane displays thumbnails of all the slides
of your current presentation at the top of the screen. When you
click on a slide's thumbnail while in edit mode, this slide will be
come active for editing. In this mode, you can make detailed
changes to individual words of a given slide just like a word
processor's text editor.
Renewed Vision
15
ProPresenter 3 User Manual
If you desire to apply the current settings shown in the formatting
tool to your slide, click "update slide". If you wish to apply the
settings shown to all the slides of the current presentation, click
on the button labeled "Apply to All".
™
Note: This will replace ALL current formatting of slides with the
chosen settings.
Spell check is built-in to ProPresenter and misspelled words will
be shown with a jagged red underline. To see spelling
suggestions for this word, control- or right-click on the word and
a menu will appear with spelling options.
3.6 Quick Edit
Oftentimes in worship presentations, you won't notice a text
formatting problem until the presentation has already begun. In
the past, changes were difficult to accomplish on the fly. It is for
this reason that we created "QuickEdit". QuickEdit allows you to
edit slides right in-line with the presentation and allows you the
flexibility to continue to select and make other slides live while
you make youre edits. To enter QuickEdit mode, right- or
control-click on the slide you wish to edit and select
"QuickEdit". Now, you can edit the slide and continue to click on
other slides. When you are finished making your edits, click the
close box on the lower right of the chosen slide.
Renewed Vision
16
ProPresenter 3 User Manual
3.7 Hot Keys
ProPresenter can assign a hot key to a slide. Right-click (controlclick) on the slide you wish to assign a hot key and select "Set
hot key". Enter a letter value (A-Z) and click OK. From then on,
pressing that character on the keyboard will trigger that slide.
Entering a number from the keyboard will prompt the hot key
trigger indicator to open. To select the slide corresponding to the
number entered, press return. For example, if you want to choose
slide number 12, enter the following key strokes. Press the
number 1 key. Press the number 2 key and press enter/return.
You will have two seconds between key strokes to enter another
value. After two seconds, if the enter/return key has not been
pressed, the hot key trigger window will automatically close.
Pressing the escape key will also close this slide selection
overlay.
Renewed Vision
17
ProPresenter 3 User Manual
3.8 Working with Foreground Media Elements
If you wish to display videos with or without audio, audio files,
or still graphics that will float above chosen background
elements, you can do this by creating a new blank slide, right- or
control-clicking on the slide you wish to attach this element to,
and selecting "Add foreground media element" from the menu
that appears.
This will bring up a file selection dialog box. After choosing the
media element you wish to add, a thumbnail of this element will
be shown and, when the slide is made active, a timeline will
appear below the presenter panel with playback buttons.
To remove this foreground media element from the slide,
control- or right-click on the slide and select "Remove
Foreground Element".
You can channel a video standard signal ("good as tape") from
your video file to an output component like the computers
Firewire Port or a third part SDI card. Check the "Enable Output
Device" button under the Foreground Video Playback Settings in
Display Preferences. You will then need to select the Output
device and mode from the pulldown menus. Once selected, any
Renewed Vision
18
ProPresenter 3 User Manual
foreground movie triggered will direct the video out through its
chosen device. The "Auto Start Video" option determines
whether a Foreground video will play immediately, or wait for
user a user to press the "Play" button.
™
NOTE: When using the Output Component for foreground
videos it is important that your videos be in a format that is
readable by the chosen component. Failure to use standards
recognized by the chosen component could result in
unpredictable behavior. (ie. DV for Firewire, DVCProHD for
HD-SDI...)
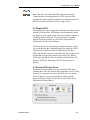
3.9 Quick Announcements
If you have a need to alert parents of a problem with their child
in the nursery or have other needs to display a text message
quickly on the screen, you can use ProPresenter's Quick
Announcement feature. By typing text into this box and clicking
the "show" button, you can quickly display any text separately
from the main presentation. You can pre-define the style and look
of this announcement by clicking the "Edit" button.
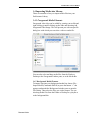
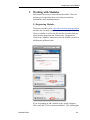
3.10 Importing and Exporting
ProPresenter recognizes many export file formats from various
Lyric/Worship Applications and can easily be imported into the
ProPresenter Library. All files should be in a "Text" (.txt) format.
Select File->Import->Import Presentation and choose the file
from the dialog box. Every imported file will be added to the
library. You will be prompted to choose to add the new import to
only the Library, an existing playlist or create a new one on the
fly.
Renewed Vision
19
ProPresenter 3 User Manual
You will also choose a "delimiter" or slide separator. This
determines how the slides are created: one slide per line or one
slide per paragraph or double line return. You can also elect to
designate your own. For instance, you can create a text file that
has some unique key sequence (ie. ####) that will become the
delimiter/separator between slides.
If you would like to backup your presentation library, or just
some songs within the presentation library, you can do this easily
by selecting File->Export Selected Presentations from the File
menu. You may also Right-Click (Control-Click) and select
"Export". You will have the option to select the format as plain
text or ProPresenter export. The ProPresenter selection will
create a ProPresenter3 export file (.pro) that you can transfer
from one computer to another.
To import this file, double click on the .pro file OR select File>Import->Import Presentation and select the file from the dialog
box.
™
Renewed Vision
Note: background cues are included in the exported data, but the
media to which the cues point are not bundled in the file. It is the
responsibility of the user to manage the media file assets.
20
ProPresenter 3 User Manual
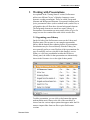
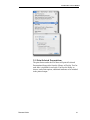
3.11 Print Selected Presentations
The print feature under the File Menu will print all selected
Presentations/Songs titles from the Library or Playlist. Text for
each slide is included for each title. You have the ability to
choose, under Print options, additional attributes to be included
in the printed output.
Renewed Vision
21
ProPresenter 3 User Manual
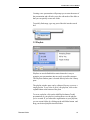
4 Working with Background Elements
Background elements are video files or still graphics that will be
played beneath text elements. In the "Background Bin", clips can
be triggered to play by clicking on the thumbnail from the
Layout View, or by clicking on the "Play" button in the List
View. Once a clip has been triggered, it will transition according
to the Duration Setting and blend onto the screen underneath any
text element. In ProPresenter, you can select backgrounds from
the "Backgrounds Bin" independently of foreground elements.
™
Note: Audio for background elements will NOT be played
through ProPresenter. If you have video or graphics that you
wish to play full screen with nothing on top of them, you can
follow the directions in Working with Foreground Elements to
create foreground slides with media elements.
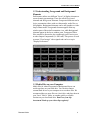
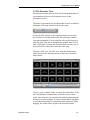
4.1 Adding and Managing Background Elements
The Backgrounds Bin is accessed by clicking on the
Backgrounds Tab found below the Presentation View. To add
background elements to ProPresenter, drag the file from the
Finder right into the Backgrounds Bin, or if you prefer, click the
Add Background button (+) and navigate to your preferred
background media file. To move, copy, or delete background
elements, you must first select them. To do this, hold down the
Command (Apple) key and click on one or more backgrounds.
Renewed Vision
22
ProPresenter 3 User Manual
Once selected, you can delete the slides by depressing the delete
key on your keyboard. To move selected backgrounds, drag them
to your desired location.
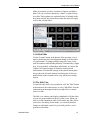
You can choose to select the way in which you view the
Backgrounds Bin by clicking on the "View Selection" buttons.
These will toggle between the thumbnail view and the table view.
Backgrounds are organized and managed in Playlists. To clear a
background from the presentation screen, select "Clear
Background" from the top of the Presenter screen.
4.2 Background Playback Settings
Each background clip contains its own attribute values for how it
is to play. These options include Loop, Stop, and Palindrome.
You can change these options for an individual clip by rightclicking or control-clicking a clip and choosing your desired
playback method from the menu that appears.
The playback modes are:
• Loop - Loop from starting point
• Stop - Stop the playback head
• Palindrome - Reverse motion at end so the clip will playback
forward and backward.
Foreground and background object have independent transition
time settings. For backgrounds, this value is entered at the
bottom of the window pane. This numeric value is in seconds.
Renewed Vision
23
ProPresenter 3 User Manual
4.3 Creating Background Cues
In addition to choosing backgrounds on the fly, you may wish to
create a Background Cue, which triggers a particular
Background when a slide is chosen. While holding down the
Command (Apple) key, drag a background from the
Backgrounds Bin onto a Foreground slide. This creates a
"Background Cue", adding a "BG" icon and thumbnail image to
the slide as a visual indicator.
™
Note: Be aware that you are not "Setting a Background" for this
slide, but rather "Triggering" a background to play when this
slide is selected. All text slides that do not have background cues
will display over the currently playing background. You should
not assign the same background to multiple slides in a row as this
serves no purpose and will restart the background at the
beginning of every slide you choose. You can remove a
background cue by control- or right-clicking the foreground slide
and selecting "Clear Background".
4.4 Background Settings and Performance Hints
Backgrounds are intended to be just that. Backgrounds to slides
and or audio. The typical execution is to have a background fill
the screen, disabling sound/audio. You can elect to change those
default settings in the Display Preference under Background
Settings.
There are many factors that contribute to the Video Performance
of backgrounds in ProPresenter. Particularly when dealing with
motion backgrounds (Video files). By default, the playback
preference hints are disabled allowing optimal performance.
Those preferences can also be enabled to effect the overall
quality of the visual image.
Renewed Vision
24
ProPresenter 3 User Manual
4.5 Live Video
The Live video button (F6 key) will begin a live video session.
This removes all elements from the screen and streams video
from your input source. If you have a video camera connected
via Firewire, this feed will be selected and sent to the back most
layer of ProPresenter. The back most layer is important because
this allows you to take advantage of images with alpha channels.
You can trigger live video, then trigger a background file (png
for example) that contains an alpha channel (transparency), and
the live video will show through the transparent part of the
background image. Text continues to be on the top or front most
layer.
You can set a slide to trigger a live video cue by right-clicking
(control-click) and selecting "Set live video cue". By the same
method, the cue can be removed. Live video input settings can be
set in ProPresenter's Preferences.
4.6 Bail to Logo
The Logo button (F5 key) will trigger the "Bail to Logo" feature.
This removes all elements from the screen and displays the
assigned image file. An image file can be assigned to the Logo
button by dragging the file from the finder onto the button or by
clicking the Go to Logo field in the Display preference panel and
selecting "Add" or "Change Image."
Renewed Vision
25
ProPresenter 3 User Manual
You may further select the way the image handles the aspect
ratio, either by filling the screen or preserving the original aspect
ratio. .
Renewed Vision
26
ProPresenter 3 User Manual
5 Working with Audio
Audio elements can enhance a production using sound just as
background elements add to a production visually. There are
three basic audio elements within ProPresenter: Sound Track,
Sound Effect and Audio embedded in a Video. All audio levels
are controlled by the global volume setting. Audio can be
triggered by different events and this section will describe each
of these.
5.1 Adding and Managing Audio
Audio or Sound files can be imported into the Audio Clips Bin
by pressing the "Add" button or perform a Drag-and-Drop from
the Finder or Desktop into the Audio Clips bin. You can also
drag-and-drop from the Media Browser or form iTunes.
There are two "Audio Types" that can be imported into the
Audio Clips Bin:
• Tunes - Full song files or audio played back as a Song Track.
These will play one at a time and cross dissolve between tune
files. They can be played from the Audio Clips Bin, cued from
a Slide or added to a presentation for Auto Sequence Playback.
When a tune is triggered, the audio control panel will display.
• Sound Effects - Short audio files that do not require full audio
control. These are triggered from the Audio Clips Bin or cued
from a Slide and can be played in multiple succession.
The types by default are selected for you based on audio length
but can be changed manually to suit your needs. Right-Click or
Control-Click to bring up the menu in order to change an audio
files settings.
Audio files are managed in Playlists the same way as in the
Backgrounds Bin. Either file type can be dragged onto a slide to
create an "Audio Cue" in the same manner as Background
Cues. Click on the play button to trigger and audio file from the
Renewed Vision
27
ProPresenter 3 User Manual
Audio Clips Bin. Use the "Audio Transition" slider to control the
transition time between audio files.
5.2 Auto Slide Sequencing
Auto Slide Sequence takes an "Audio Tune" and adds it to a
Presentation's sound track. This sound track is then used to cue
the display of slides and any Background cues associated with
that slide. Control Click or Right-Click on the "Audio Track
Target" and select "Add Audio" from the popup menu. You can
also drag audio files from the Audio Clips Bin, Media Browser
or iTunes.
An Auto Sequence Control Strip appears below the Presentation
View. Click on the "Record Cue" button to active Song
Sequencing and press play on the audio control strip. Every
time you click on a foreground slide, a sequence cue will be
added. Click on a slide containing text. Continue to click on the
same slide. Each subsequent click highlights a word from that
slide and saves the cue.
™
Renewed Vision
Note: You can also use the Space Bar to simulate a slide click,
and the arrow keys to move to another slide.
28
ProPresenter 3 User Manual
Select the "Cue Table" button to view each Cue in a list. You can
make fine adjustments to timing in this table by double clicking
on the time entries. Notice in the table view that "Slide Cues" are
on gray backgrounds and "Highlight Cues" are on white.
Show slide after selection when checked will select a slide in the
Presenter View that corresponds to the selected cue in the Cue
Table.
The "Update Time" button will change the time of a selected cue
in the table, to that of the current time of the audio playing.
You will often find you audio file plays faster then you can
assign cues. While in "Record mode", change the audio rate
using the"Rate Adjustment" slider. This will slow down (or speed
up) the playback rate allowing more accurate cues.
Renewed Vision
29
ProPresenter 3 User Manual
6 Working with Bibles
ProPresenter includes a comprehensive Bible Verse loop up tool.
Renewed Vision has dozens of Bible translations and is
continually updating our library. Visit our website to download
public domain translations, or purchase Licensed translations.
6.1 Adding Bibles
The Bible Verse Lookup panel can be accessed by the "Actions > Bible Verse" menu, pressing Command-Shift-B or clicking the
"Bible Search" button. The magnifying glass on the "Bible" tab.
ProPresenter does not come with any preloaded Bibles, but these
can easily be added to your library by clicking on the "Download
Bibles" link in the Bible tab of ProPresenter or visiting Renewed
Vision Online Store.
Public Domain Bibles are free to ProPresenter Users. Other
Bibles require the purchase of a License. When a new purchased
Bible is installed, it will appear in the Bibles pulldown menu.
The first time a Bible is opened, you will be presented with an
information panel containing your registration information. Enter
your "Unlock" code in the appropriate field to start using the
Bible.
Renewed Vision
30
ProPresenter 3 User Manual
6.2 Bible Verse Lookup
Enter your search criteria in the appropriate field: Book, Chapter,
Verse(s). The results will be displayed in the "Verse Results"
field. This can be edited for line spacing and custom indenting.
Select the "Format" button to open the "Bible Verse Format
Editor". Here you make your standard style selections. These will
be used to display the verse(s) on screen when the "Show" button
is pressed.
You may select the verse numbers check box to add verse
numbers indicated by a subscript, and the verse reference check
box to generate the Book Chapter:Verse-Verse (right aligned).
6.3 Save Bible Verses
Bible Verse results can be saved and stored in the ProPresenter
Library data base. There are four options when saving Bible
Verses. ProPresenter can parse the results field and generate
slides by Verse, Paragraph (double return), by line or All on one
slide. These saved Bible presentations can then be added to a
playlist by dragging it onto a playlist just like any other
presentation. Just click on the red Bible button to display these
options.
Renewed Vision
31
ProPresenter 3 User Manual
7 Working with the Count Down Timer
ProPresenter has the ability to display a count down timer. This
timer can be customize just like any other slide both with text
styles and backgrounds.
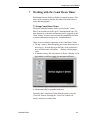
7.1 Setup Count Down Timer
The quick count down timer can be accessed in the "Count
Down" tab located next to the quick "Announcement" tab. The
time duration is set by hour and minutes and is triggered by the
"Start" button. You may enter text into the countdown text field
to add an additional message to the countdown timer.
There are two essential components of the Count Down Timer.
1. The tag: {timer}. When designing your count down timer, it is
necessary to include this tag in the body of the count down
text, as ProPresenter will replace
that tag with the proper
clock.
2. A duration setting. This will consist of Hours : Minutes. 01:30
for example, would set a timer for one and a half hours.
If the "{timer}" tag is not present in a count down text message,
it will automatically be appended to the text.
To remove the Count Down Timer from the screen, press the
"Clear All" button. Selecting the "Clear Text" button will
remove only the text of the timer.
Renewed Vision
32
ProPresenter 3 User Manual
7.2 Timer Settings
In order to adjust the text style of the timer itself, make the
proper adjustments to the tag "{timer}". Like all other slides in
ProPresenter, you can drag a background media element to the
Count Down editor window to set a background cue. Press the
"Start" button to cue the timer (and its background cue if
applicable). The time will now behave like any other foreground
slide. You can dynamically change backgrounds by triggering
them from the backgrounds bin. Select the "Clear Media" button
to remove the cue.
The "Leading Zeros" check box will enable/disable the clock
format. Thirty minutes with leading zeros would appear as:
00:30:00. Thirty minutes without leading zeros would appear as:
30:00.
Renewed Vision
33
ProPresenter 3 User Manual
8 Working with DVDs
ProPresenter provides the ability to playback DVD content from
a DVD disk directly within the application itself. There is no
need to use a separate DVD player or other DVD software to
playback movies. Further more, ProPresenter adds the capability
of creating clips from a DVD by selecting in and out points, and
saving those settings to the DVD bin.
8.1 Save DVD Clips
DVD clips are stored in the Media bin under the DVD tab. To
create a DVD clip, first insert a DVD disk into your computers
DVD drive. Once the disk is mounted, ProPresenter will have
full access to playback DVD video. Select the "Add DVD Clip"
button.
The DVD Control window will open giving you access to the
DVD. Navigate your DVD Menu by either clicking on on the
DVD screen from ProPresenters DVD Control window, or using
the Navigation control buttons.
Select in and out points from the Cue panel located next to DVD
controls using the "Set" buttons. Once you have selected the IN
and OUT points, click on the "Save" button. A panel will open
allowing you to give your clip a Bookmark Name and DVD Title
Name.
Your new DVD clip is now saved an located in the DVD bin.
You can toggle between the DVD Control window and Full
screen Mode using the Window control buttons next to the User
Navigation buttons.
Renewed Vision
34
ProPresenter 3 User Manual
™
Note: The Set Cue buttons will ONLY appear in the DVD
Control Window. During playback of a DVD clip, the DVD
controls will appear in the Presentation view allowing control of
the DVD clip, but NOT allow for the saving of clips.
8.2 Display DVD
The playback of a clip is triggered by clicking on the Play button
from the DVD bin table. ProPresenter will automatically output
the display to your output screen. Full screen playback requires a
secondary display connected. If you do not have a secondary
display (Projector, monitor, etc.) the DVD will playback in
ProPresenters DVD Control Window.
Similar to the process of assigning a background loop to a slide,
you can hold down the Command (Apple) key and drag a DVD
Clip to the Presentation window. ProPresenter will create a
NEW clip with the reference to the DVD clip. You can then click
on that slide to trigger the playback of the DVD clip. When a
DVD clip is playing, the Preview window of ProPresenter will
display a DVD icon, indicating a DVD is in the process of
playing.
8.3 Prevent DVD Spin Down
ProPresenter has an option to prevent a mounted DVD from
spinning down. This will increase the performance of a DVD clip
because your computer can access the DVD data very quickly.
This will, however, decrease the length in which a laptops
battery will hold a charge. For this reason, this feature can be
disabled in DVD preferences.
Renewed Vision
35
ProPresenter 3 User Manual
9 Working with Modules
ProPresenter has access to some advanced modules. These are
add-ons you can purchase from our website to extend the
functionality of the standard software.
9.1 Registering Modules
To register a module, go to www.renewedvision.com/registration
and enter the activation code that was sent to you by Renewed
Vision or a dealer as well as the ID code that is found when you
select from the program menu: ProPresenter->Registration...
Click on the "Modules" button and select the Module you wish to
add from the pulldown menu.
If you are planning to add a module to the current computer,
click on the link "Click to purchase Modules". This will navigate
Renewed Vision
36
ProPresenter 3 User Manual
your web browser to the Renewed Vision Online store with the
current selected Module. You will then proceed through the
purchase process. An unlock code will be automatically
generated and sent to your email address.
™
Note: If you plan to purchase a module for a machine other then
the one you are currently on, you will need to retrieve the ID
Code for the target machine. This is located in the module
section of the registration window. You will then enter that code
in the proper field during the purchase process from our online
store.
9.2 Key and Fill
The Key/Fill module is designed to work exclusively with
Blackmagic HD/SDI video cards. (http://www.blackmagicdesign.com/) Select "Blackmagic Video Output" from the Output
Device pulldown menu. Next, select the Mode.
The most common settings:
• Blackmagic NTSC/PAL 10 Bit
• Blackmagic HDTV 720p 59.94Hz
• Blackmagic HDTV 1080i 29.97Hz
You will then select "External Key" from the Alpha Key Settings.
This will enable ProPresenter to channel the Fill signal and a
separate Key signal out of the Blackmagic Video Card. Refer to
the Blackmagic user manual for connection setup.
Renewed Vision
37
ProPresenter 3 User Manual
9.3 Advanced Module Bundle
9.3.1 Extended Video Output
This module takes advantage of Quicktimes component
architecture. It will allow you to select a secondary output to
which ProPresenter will send the output signal. You can send a
DV stream out through the firewire port or take advantage of an
SDI card installed in your Mac tower. (Mac Pro or G5)
9.3.2 Network with ProVideoPlayer
This extends the functionality of ProPresenter to pair with
ProVideoPlayer (PVP is a video mixing system with multi-screen
capability, a Renewed Vision product). PVP has the capability to
network multiple machines. ProPresenter Network Module
allows PVP to control the backgrounds bin remotely. This will
allow the ProPresenter operator to concentrate on lyric
presentation, and the PVP operator to control the backgrounds
separately from ProVideoPlayer.
Enter a Unique name for the network module, select whether
PVP will control the visual adjustments of the backgrounds (i.e.
Hue, Saturation, Contrast...) and enable the module by selecting
the "Receive Network Commands" check box.
Renewed Vision
38
ProPresenter 3 User Manual
10 ProPresenter Short Cuts
ProPresenter Menu
• Open Preferences: Command - ,
• Hide ProPresenter: Command - H
• Hide Others: Command - Option - H
• Quit ProPresenter: Command - Q
File Menu
• New Presentation: Command - N
• Import Presentation: Command - R
• Import Background: Command - Shift - R
• Export Selected Presentation: Command - Shift - E
• Save Data: Command - S
• Show Data File in Finder: Command - Option - S
Edit Menu
• Undo: Command - Z
• Redo: Command - Shift - Z
• Edit Slide / Done Editing: Command - E
• Duplicate Slide: Command - Shift - D
• Cut: Command - X
• Copy: Command - C
• Paste: Command - V
• Paste as Rich Text (Keep styles): Command - Shift - V
• Select All: Command - A
• Deselect: Command - D
• Spelling Panel: Command - :
• Check Spelling: Command - ;
• Special Characters: Command - Option - T
Special Options while Editing Slide
• Create New Slide with Remaining Text: Option - Return
• Send Remaining Text to Next Slide: Option - Shift - Return
Text Format Menu (Only Active in Edit Mode)
• Show Fonts: Command - T
• Bold (Font Dependent): Command - B
• Italic (Font Dependent): Command - I
• Underline: Command - U
• Bigger: Command - +
Renewed Vision
39
ProPresenter 3 User Manual
• Smaller: Command - Action Menu
• Clear All: F1
• Clear Text: F2
• Clear Background: F3
• Clear Audio: F4
• Show / Hide Announcement: Command - Shift - K
Window Menu
• Close (Panels Only): Command - W
• Show / Hide Output Window: Command - 1
Help Menu
• ProPresenter Help: Command - ?
Renewed Vision
40
ProPresenter 3 User Manual
11 ProPresenter FAQs
1) What are the system requirements for ProPresenter?
ProPresenter runs exclusively on Apple's MacOS X - 10.4
(Tiger) and above. The system requirements are as follows:
• iMac (Intel or PowerPC G5), MacBook Pro, MacBook, Mac
Pro, PowerMac G5. Will work on some G4's, but not
guaranteed or supported.
• 1GB of RAM
• Dual video support - standard on PowerMac, PowerBook, and
ALL Intel based Macs except for the Mac Mini (read
information about G5 iMac, iBooks, and Mac mini below)
• Core Image-capable graphics card - Video card with a
programmable GPU (All Intel Macs)
* iBooks and iMacs (G5, not Intel) are shipped from Apple with
hardware that is capable of supporting two independent displays.
However, Apple only enables 'mirroring' mode which means that
when you connect one of these systems to an external display, it
shows exactly what's on the internal display (like a mirror). Both
ProPresenter and ProVideoPlayer require 'spanning' which is a
configuration that allows for the desktop to be extended (or
spanned) across a secondary display providing additional desktop
space, not just mirroring it. If you have one of these older
systems that can only mirror, there is a freely available hack that
will enable spanning and works on most systems. It's called
Screen Spanning Doctor (http://www.rutemoeller.com/mp/
ibook/ibook_e.html) and while we cannot guarantee it will work
for you, we have found it to be quite reliable. Be aware that if
you do choose to install it, you do so at your own risk.
The Mac mini is NOT supported. While this device has enough
horsepower to run ProPresenter, it has only one video out and
dual video support is highly suggested to run ProPresenter
(operator screen and an output screen). There are ways to work
around this with a Dual or TripleHead2Go, but it is a hack and
NOT recommended. Try it at your own risk, but we do not
support this implementation. You can also theoretically set up
your presentations in ProPresenter and use arrow keys to
navigate through your presentation, but this is not suggested.
Renewed Vision
41
ProPresenter 3 User Manual
2) Lost Unlock code/Registration, how do I retrieve it?
You can retrieve registration information for all your Renewed
Vision software products by going to the link below. Enter the
eMail address that was used to complete the purchase. We will
find all products purchased using that eMail address and send all
results to that eMail address. The same link is also found under
the "Help" menu within ProPresenter.
Go to: www.renewedvision.com/support.php
If the email address has changed (i.e. that person and email no
longer work for your organization), then you must call us to have
it updated.
3) What’s my username and password?
This is the Mac OS X authentication window. It appears any time
a change to the hard drive is attempted in an area which requires
administrative privileges, such as writing a file. It's the same
window you have to complete when doing any System Software
Updates or software installations. The user name and password
are referring to the administrative login information and have
nothing to do with ProPresenter. It's always best to be logged in
as the original administrative user when attempting to register a
copy of ProPresenter.
During the registration process, if you successfully enter your
name and unlock code ProPresenter will write this information to
your drive so that next time you launch the program, you won't
have to enter it again. Once successfully written, ProPresenter
will be able to access it no matter which user is logged in.
Renewed Vision
42
ProPresenter 3 User Manual
If it wasn't written the first time, it was due to a permissions issue
with the operating system and the issue will persist. OS X is very
secure, but permission settings can go astray occasionally which
requires them to be reset manually. If you experience this
problem, please see the next FAQ below to learn how to correct
this problem.
4) I have to enter my unlock code every time I start
ProPresenter, how do I fix that?
This is likely a permissions issue with OS X. Follow these steps
to correct the problem:
• Quit ProPresenter.
• Go to the root of your computer (your harddrive). Select: /
Library/Application Support/Renewed Vision.
• Open the Renewed Vision folder and single click on the
ProPresenter Folder. If there is no such folder, go back up a
level and single click on the Renewed Vision folder. If there no
Renewed Vision folder, you have a more significant
permissions issue - call us to discuss.
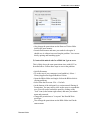
• Select from the file menu: File -> Get Info.
• At the bottom of the info panel is a section named: Sharing &
Permissions. You may need to click on the arrow to expand this
area. You will need to unlock the panel by clicking on the
"lock" icon (in the bottom right corner) and enter your admin
name and password.
• Change the permissions so "everyone" has Read & Write
privileges. Be sure to click the "Apply to enclosed items"
action (it's an action in Leopard vs. a button in Tiger) as
pictured below:
Renewed Vision
43
ProPresenter 3 User Manual
• Also change the permissions on the Renewed Vision folder
itself in the same manner.
• Launch ProPresenter and enter your unlock code again. It
should save it without issue resolving the problem. You can test
this by quitting and launching again.
5) I entered the unlock code for a Bible but I get an error.
This is likely due to the same permissions issue with OS X as
described above. Follow these steps to correct the problem:
• Quit ProPresenter.
• Go to the root of your computer (your harddrive). Select: /
Library/Application Support/Renewed Vision.
• Open the Bibles folder and single click on the Bible which is
causing problems.
• Select from the file menu: File -> Get Info.
• At the bottom of the info panel is a section named: Sharing &
Permissions. You may need to click on the arrow to expand this
area. You will need to unlock the panel by clicking on the
"lock" icon (in the bottom right corner) and enter your admin
name and password.
• Change the permissions so "everyone" has Read & Write
privileges.
• Also change the permissions on the Bible folder itself in the
same manner.
Renewed Vision
44
ProPresenter 3 User Manual
• Launch ProPresenter and enter your unlock codes for each
Bible.
6) I notice latency when using live video through firewire.
How can I get rid of this?
In short, latency is inherent in the decoding and re-encoding of
video obtained through firewire. This is the case in all software
using firewire for video input. While we do have this feature
available, we still recommend live video and keying be handled
in a video switcher. This is the proper way to handle live video,
and we implemented this feature in ProPresenter for
environments where latency is not as much of an issue (overflow
rooms, etc). ProPresenter does support video input via SDI, using
a Blackmagic or other similar card, and this methodology
produces less latency.
7) What version of QuickTime should I use?
This answer varies with each release of QuickTime from Apple.
All testing indicates that 7.5.5 is a solid Quicktime release and is
recommend for Pro users.
Warning: Qucktime 7.5 has a bug that effects Foreground
Movies in ProPresenter 3.3.5 and earlier. Upgrade to 3.3.8 if you
have problems with foreground movies and Quicktime 7.5
Watch this FAQ for updates when a new version of QuickTime is
released. We test new versions as soon as possible to let you
know whether or not they are problematic.
8) Is ProPresenter compatible with Leopard? (OS X 10.5)
ProPresenter 3 works great with Leopard and is actually
recommended as the latest version of Tiger (10.4.11) is subject to
occasional anomalies that can't be determined. We recommend
using the latest version of Leopard (v.10.5.2) and QuickTime
(7.4.1) as they remedy a number of issues created by earlier
versions.
BEST PRACTICES FOR UPDATING. Apple introduces
frequent updates. On the Mac people are accustomed to just
clicking the update button when it pops up telling you of system
Renewed Vision
45
ProPresenter 3 User Manual
software updates - it's just so easy. Unfortunately though, our
most frequent source of major bugs and issues are caused by
Apple and their system software updates (OS X and QuickTime
namely). So try to break that habit and start a new one by NOT
updating blindly and checking our site first. Our mantra is:
DON'T FIX WHAT ISN'T BROKEN!
BEFORE YOU UPDATE, it's good practice to back up your
song library if for any reason you experience trouble opening
your ProPresenter Library after upgrading. To do this, click on a
song in the Library. From the EDIT file menu, click "Select All".
Then from the FILE menu, click "Export Selected
Presentations". This will create a file containing all of your
presentations. Should you have a problem with Leopard, remove
the file in your user folder: /Library/Application Support/
Renewed Vision/ProPresenter/ProPresenter3.rvd (Move it to the
trash). Should you need to restore, just double click on the
"Export" file. This will restore your library. Note: You will have
to recreate your playlists.
Renewed Vision
46
ProPresenter 3 User Manual
9) Can you use ProPresenter with KeyNote or PowerPoint?
Yes, switching between the either of these applications and
ProPresenter works great. There are a few settings you need to
configure as outlined below, however, so you can switch between
applications seamlessly without your audience knowing.
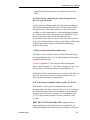
First, you need to be sure you have ProPresenter's output window
(the secondary display the audience will be viewing) set so it
won't override all other windows as shown below (UNCHECK
"Display at Top Most Window Layer"). This feature eliminates
the issue of a user accidently dragging a window onto your
secondary display and having it appear to your audience.
However, it will also override any other programs secondary
display window, such as PowerPoint or KeyNote, so it must be
disabled to use these programs in conjunction with ProPresenter.
With this setting disabled, the output of these programs will take
precedence over the ProPresenter screen (lay on top in the
forefront). It's best to leave ProPresenter while on a generic
screen (black or church splash screen) and start the slide show
with the same screen as there is no way to cross-dissolve when
switching programs.
For Keynote, be sure you have it set to present your slide show
on the secondary display as shown below (in it's Preferences
window).
Renewed Vision
47
ProPresenter 3 User Manual
In order to be able to switch back and forth between ProPresenter
and Keynote, be sure the following Preference is selected
(similar to ProPresenter's setting above):
For PowerPoint 2008, be sure you're running it with the latest
Mac Service Pack 2 (12.2.0 or later) installed, which corrects a
screen mirroring issue that earlier versions use to cause. Without
this updated version, you cannot switch successfully between
programs without PowerPoint automatically reconfiguring the
displays to mirroring mode when in a slide show (a very bad
thing). Change the Preference indicated below:
Renewed Vision
48
ProPresenter 3 User Manual
If you're running PowerPoint 2007, there is a work around for the
mirroring issue mentioned above. In PowerPoint, there is an
feature known as the Presenter Tools. This function shows the
presenter some information on their internal screen (time
remaining, next slide, etc.). If you have the Presenter Tools
showing and switch to any other application, PowerPoint will
change your display settings to mirroring mode which can really
mess things up. Again, this is a Microsoft issue with ALL
applications on the Mac, not just ProPresenter or PVP. You are
able to avoid this by starting up your slide show WITHOUT the
Presenter Tools screen. You do this by "option"-clicking the
start slide show button found in the lower left corner of
PowerPoint.
Be sure you have PowerPoint set to present your slide show on
the secondary display as shown below.
Renewed Vision
49
ProPresenter 3 User Manual
NOTE: Use of PowerPoint or Keynote is not possible with
video output cards (Blackmagic, AJA) as these cards are not
accelerated video cards. As such, if you are using the Alpha
Keyer module or Advanced module, the switching mentioned
here will not send the PowerPoint or Keynote signals to the
video output card.
10) Why is my live video feed delayed?
All video is delayed if it is processed by anything (computer,
switcher, scaler, etc.). This is known as latency. There are two
kinds of latency - acceptable and distracting. Even a $100k
switcher will have latency, but probably only a frame or two.
Due to compression/decompression requirements, using a live
video feed from a FireWire camera through a computer is
probably the worst case scenario. This standard was designed for
simplicity, not speed. Before video even leaves the camera itself
it has been delayed as a result of compressing the video signal
into DV. Using an SDI input method will reduce this latency, but
you must have a MacPro tower and SDI card to accomplish this.
Despite the inherent delays, we offer this feature because it's
been highly requested, our competition has it (though subject to
all the same issues), and in some cases it doesn't matter, such as
for overflow rooms. Plus it's free.
We tend to recommend against doing live feeds through a
computer. The problem with this is not a software issue, but a
hardware one. All video manipulation methods have latency,
even if you're using a $100,000 switcher. Going through
FireWire and the computer is usually the worst. As such, the
feeding of a live video image into PVP, ProPresenter, or any
other software package for that matter is best left to a video
switching device, which our customers use with great results.
Hence the criticism of this type of feature.
11) Can you use ProPresenter and/or ProVideoPlayer with
Intel Macs?
ProPresenter, version 3.0 and higher, is a Universal binary and
works great on all Intel Macs. ProPresenter 2 is not available as a
Universal Binary since the the tools to do so remain unavailable.
However, we have tested it with the Intel Macs and found it to
work well (utilizing Rosetta), with no known issues. Therefore,
Renewed Vision
50
ProPresenter 3 User Manual
we support all versions of ProPresenter on Macs with Intel
processors.
12) Can you build a playlist for service and preview what is
next in order?
Yes, click on the Add Playlist button at the bottom of the Playlist
view to create a new Playlist. Drag and drop Presentations from
the Library over to your new Playlist.
13) Does ProPresenter allow you to build a song database?
Yes. And because you have complete access to your song
database, you can add songs at any time without exiting the
presentation.
Renewed Vision
51
ProPresenter 3 User Manual
14) Can you display videos directly from ProPresenter?
Absolutely, what's more... if you want 'as good as tape' quality,
you can stream the digital signal from the foreground videos over
the Firewire port to a DV to Analog converter box, allowing
video to be seen in its native format without being 'processed' by
a computer and a scan converter (which often desaturates the
video depending on the quality of the scan converter). While
generally unnecessary, those organizations looking for that extra
little bit of quality can get through this method which is
unavailable from any of our competitors. Additionally, we
support output via SDI with the advanced module.
15) Does ProPresenter support nursery alerts-and if you have
to switch back and forth between KeyNote, can you easily
display nursery alerts from both KeyNote and ProPresenter?
ProPresenter's Announcement function is made for this purpose
and allows you to enter in nursery alerts without impacting any
of your other song libraries, as well as show and hide the nursery
call independently of the presently shown song slide. You cannot,
however, show ProPresenter generated nursery alerts over
Keynote or PowerPoint slides.
16) Does ProPresenter have built in scripture support?
Yes. Scripture support is available with over 50 Bibles to choose
from. This can either be done on the fly, or in pre-programming
as the program allows you to save Scripture verses just like
songs.
Renewed Vision
52
ProPresenter 3 User Manual
17) Our order of worship quickly changed from Video to
songs to Powerpoint or Keynote presentations- any issues in
making seamless transitions here?
Not at all, especially when used in conjunction with a switcher to
fade out during the transition and back in when complete.
18) What video formats are supported?
Anything QuickTime recognizes is playable within ProPresenter
(which includes DV, Sorenson, H.264, and more including
uncompressed video). As of January 2006, the freely available
Windows Media player plug-in from Flip4Mac will allow even
your Windows Media files to play back within ProPresenter. The
speed of your machine and the type of compression will dictate
how smoothly the videos playback. Playing back MPEG 2 video
requires the purchase and installation of the QuickTime MPEG-2
Playbac Component from Apple.
**Please read the following FAQ for info on getting smooth
playback from your ProPresenter station.
19) Why does my purchased stock video not play back
smoothly?
Smooth playback can be effected by the Codec (short for
compressor/decompressor) used for compression and the Data
Rate of the compression settings. Movie clips that you receive
from a manufacture are set to the highest quality possible.
Original files from various manufactures should be compressed
for optimum playback for the target machine. We have found
Sorenson 3 and DV produce a nice balance between high quality
and high performance. For HD playback, you should use H.264
or PhotoJPEG (50% or middle quality) on faster systems (Core 2
Duo) as they are processor intensive and require the extra power
(avoid these on slower/older systems). Uncompressed clips using
PhotoJPEG at 100% will not play back well on any machine as
this is raw, highest possible quality footage (i.e. Digital Juice
Jumpbacks), so be sure you have recompressed them before
trying. For the most reliable playback, use either the DV or
Sorenson3 codecs. DV will be seen in the drop down codec list
as either "DV - NTSC" or "DV/DVCPro - NTSC".
Renewed Vision
53
ProPresenter 3 User Manual
While MPEG1 clips that often come from download services
(such as Barna, SermonSpice, WorshipFilms, Digital Hotcakes,
MediaShout, etc.) will play, they are not reliable and will often
not play smoothly. It's an old, GOP based codec that has been
updated twice, first by MPEG2 and now MPEG4. Playing back
MPEG2 videos require an additional $19 plug in from Apple for
QuickTime (due to licensing fees the MPEG association charges
vendors which are passed onto the consumer). All our software is
based on the QuickTime architecture, not WMA which runs
AVIs. To get the desired playback out of old MPEG1 clips, we
suggest either contacting the manufacturer you purchased your
clips from and ask to download Quicktime versions (which most
have) OR convert these clips into QuickTime movies using the
above mentioned Codec(s). See FAQ below for instructions on
doing so.
20) How do you delete backgrounds from the Backgrounds
Bin?
Hold down the command key (the one with the apple on it), click
to select a slide, and hit the delete key. You may also Right-Click
(Control-Click) and select Delete Background.
21) How do I convert from MPEG format or from a DVD
into QuickTime movies that play well in ProPresenter?
There are a number of tools available to convert MPEG files into
QuickTime files. A great single movie or batch conversion utility
called Compressor comes with the Final Cut Studio suite or there
are numerous other 3rd party applications you can use (Cleaner
6, Squeeze 4, Flip4Mac, Compression Master, etc.). You can also
try QTAmateur which is a free batch conversion utility from
Michael Ash.
The easist method for conveting a DVD to a Quicktime movie
would be to use either MPEG Stream Clip or Hand Brake.
We recommend using DV or H.264 compressors with these tools.
The PhotoJPEG codec also works very well, just make sure you
set it to MEDIUM quality as any higher settings have minimal
benefit and can bog down your computer.
Renewed Vision
54
ProPresenter 3 User Manual
22) Where did the ProPresenter font from version 2.x go and
what was it called?
One of the standard fonts that we were able to include in the
previous version of ProPresenter was called Triplex (Bold) from
www.emigre.com. This is a very good looking font and was
quite popular.
23) How does ProPresenter compare to other products?
ProPresenter is used by some of the most well-respected and
influential churches in the country and around the world. Our
focus on high quality, stable and easy to use applications, over
quickly crafted marketing bullet point features, defines the
reputation we have earned.
Customers switching from other products to ProPresnter praise
its ease of use and it's media handling. Video playback is better
than most other competitors, and the interface is designed for
volunteers. This advantage has only improved with ProPresenter
3, our latest release.
Specific features that Pro has beyond the ease of use, smooth
video playback and stability are:
• Independently control backgrounds and and text slides... this
enables you to have as many backgrounds within a song as you
wish.
• Smooth video cross dissolves
• Video playback through SDI or Firewire outputs
• What You See is What You Get slide previews... the entire
interface shows exactly what a slide will look like when made
live so you can see text formatting/line returns and make
changes before making a slide live
• Fully searchable song database
• QuickEdit feature allows you to edit or reformat slides while
still clicking on other slides to make them live
• Dynamically generated count down timer
While we hope this helps, we encourage you to take a look at
ProPresenter for yourself with the free demo available from the
"Download" link above.
Renewed Vision
55
ProPresenter 3 User Manual
24) How can I get a clean key of text over other video sources
with my switcher?
First of all, all switchers work differently. You will want to
consult with your switcher's manual to find exact instructions for
adjusting the key settings.
While the act of "chroma" or "luminance" keying seems
somewhat simple (you're just taking a color out of the video
image), to get a good key is more complicated than this. The first
step to achieve a good key is to make sure you have the hardest
edges possible in your text and graphics. This means you should
set the Text Shadow blur radius to 0 in the Preferences window
and use keyable graphics that have hard edges (in the case of
lower third graphics).
Once these settings are completed, you need to look at the
threshold and edge settings for the key on your switcher. The
threshold is specifying how much variance in the selected color
you are allowing for the key... the higher the threshold, the lower
the tolerance for other hues of the color to key. The edge option
generally specifies how much of a blur you want around the
keyed edge. There are no magical numbers or advice I can give
you on these settings... you must go through a trial and error
process with your particular switcher.
25) Does ProPresenter run on Windows computers?
No, ProPresenter is only Mac-based. We write software
specifically for the Mac for two reasons: 1) the tools that are
available to us as developers on the Mac are first rate and allow
us to build quality features into our products far more easily than
we could on the PC, and 2) the stability and security of the Mac
platform make an exceptional foundation on which to build our
tools.
We had the difficult choice to make a couple of years ago to
write applications for both the Mac and the PC, or to pursue just
the Mac-market. Ultimately, we want to make the best software
possible for our customers. By focusing on what we believe to
the best platform, we can add new features more quickly without
being burdened with the task of developing for two different
platforms.
Renewed Vision
56
ProPresenter 3 User Manual
If this would be your first Macintosh purchase, let us assure you
that many have made the transition before you successfully and
are now not only our biggest advocates, but huge advocates for
the Mac as well. You'll find Macs integrate well into mixedcomputer networks and ultimately provide a better user
experience for you and your users. For more information, please
give us a call.
26) JPEGs (jpg) show as a white image.
Still images in ProPresenter run within the QuickTime
environment. This limits their resolution to either 2k
(2,000x2,000) for MacBooks and Mac minis, and 4k for
MacBook Pros, MacPros, and iMacs. So if you see a blank white
image when you expected to see that nice picture from your 6mp
camera, try sizing down the image to under 2k. You will not lose
any noticeable resolution when displayed since your output is
likely far less than these sizes and would be resized anyway
during output (i.e. if your secondary output display / program
screen is set to 1024x768, your 6mp, 2848x2136 image would be
sized down to 1024x768 as it goes out the card). So ideally, just
re-size the image to the same size as your output display
resolution is set to (800x600 or whatever).
Also, since images display using the QuickTime engine, they
must be using the RGB color space that the video world uses (not
CMYK that the print industry uses).
27) Can I play back parts of a DVD from within
ProPresenter?
Yes! ProPresenter 3.2 released in early November 2007 included
many free upgrades to our users, including DVD playback. You
can set in and out points of the DVD clip you want to play in preproduction, and call the clip up on the fly during the service
28) How do I install/duplicate ProPresenter on another Mac?
To begin, install ProPresenter on the new system the same way it
was done on the first by downloading the latest version from our
site, dragging the application to the Applications Folder as
instructed, and launch and enter your Unlock Code.
Renewed Vision
57
ProPresenter 3 User Manual
If you want each ProPresenter installation to remain consistent
throughout your organization, it's best to choose one machine in
particular to be the "Master" station that incorporates all changes.
The best way to duplicate one complete installation of
ProPresenter to another Mac begins with Media Management.
We recommend placing all your media clips into one location
and suggest using the "Movies" folder within your "Home"
folder since every user has such a folder (like they do a
"Pictures" folder and a "Music" folder). Feel free to subcategorize it within your Movies folder by creating a folder
called "ProPresenter Media" (whatever name you wish). Once
you get into the habit of organizing all your media content into
this folder and then adding that media to ProPresenter, you've
won half the battle. ProPresenter stores only the paths to media,
not the actual media itself. So when you want to recreate your
ProPresenter installation on another Mac, you will start by
copying this entire media folder into the respective location on
the new Mac so all paths will resolve properly.
Next, you need to move the existing ProPresenter database file
(and thumbnails) to it's corresponding location on the new Mac.
Another easy way to locate these files is to have ProPresenter
show it to you. With ProPresenter running, click on the File
menu, hold down the Option key, and choose the "Reveal Data in
Finder" item. The database file will appear in a Finder window
(ProPresenter.rvd) along with your Thumbnails folder. Go up one
level to the folder containing these items and copy this whole
folder. Place it in the same respective location on the new system
(~ Your User Folder/Library/Application Support/Renewed
Vision/ProPresenter).
Once both steps have been completed, you will have created an
exact duplicate of your Master system on the new computer.
29) What version of QuickTime do I have installed?
This can be determined by using either QuickTime Player or the
latest version of the ProPresenter 3. Just launch one or the other
and look in the respective "About" boxes under menu item with
the name of the program ("QuickTime Player" or
"ProPresenter").
Renewed Vision
58
ProPresenter 3 User Manual
30) I can’t add videos purchased from iTunes.
Protected videos from the iTunes store will NOT play in
ProPresenter due to programming restrictions put in place by
Apple. Until they change this policy and limitation, the videos
can not be supported. However, protected music WILL play fine.
31) How do we get YouTube videos into ProPresenter?
This is done by digitizing YouTube videos into QuickTime
movies on your local machine. You then treat them like any other
QuickTime movie and drag and drop them into ProPresenter for
playback as a foreground video. To begin, you need a tool to
facilitate creating these digital movies. There are numerous
available. Below are three to choose from: Tooble, TubeStock,
and Vixy.net.
32) Can I run ProPresenter and ProVideoPlayer on the same
machine at the same time?
Technically, yes, you can do this, but it is NOT possible to do
this in the way that most people want to do it. You cannot overlay
ProPresenter words over ProVideoPlayer's output within the
machine, nor can you output ProVideoPlayer's output feed on a
different output than ProPresenter's output. For all practical
purposes, these should be used on two different machines.
33) Does ProPresenter support importing lyrics from Song
Select (CCLI)?
Absolutely. ProPresenter 3.4 and higher supports an internal
browser so you can browse and download SongSelect.com lyrics
right inside the software. You can also download song lyrics
through any browser and then import them into ProPresenter
separately. ProPresenter supports importing a single song or an
entire folder of song text files all at once.
Renewed Vision
59
ProPresenter 3 User Manual
34) When I play a foreground video, I can hear the audio, but
don’t see any video.
This is the bug that was introduced with Quicktime 7.5 when
using any version of ProPresenter older than v.3.3.6. All
subsequent versions of ProPresenter are not affected by this. Just
download the latest version and everything will work as it
should.
35) If we try the software and don’t like it, do you offer a
refund?
The purchase of the ProPresenter software generates an Unlock
code to enable its unfettered use. Once this code has been
generated, it cannot be "un-generated". This is the equivalent of
opening a shrink-wrapped piece of software purchased from a
retail outlet, which the industry widely accepts as non-returnable/
non-refundable.
We offer a FREE demo of our software that has no time or
feature limitations (protected only by a watermark on the output
screen). This allows any potential customer to thoroughly test the
software before spending any money. We HIGHLY encourage
this. As such, we do not offer any refunds for purchases under
any circumstances. All sales are final. If you have questions
about this policy, please email [email protected].
Hardware purchased from this site is covered by manufacturer
warranty and therefore not eligible for return or refund.
Renewed Vision
60
ProPresenter 3 User Manual
36) Do you offer any discounts? (education, migration from
another product, church/non-profite, etc)
Our products are largely made for non-profit organizations and
have been priced to represent the best value possible for the
functionality of the product. As such, there are no discounts off
of the listed price of the software. In effect, everyone gets the
non-profit price!
37) How do I import songs from my previous worship
presentation software?
ProPresenter is great at importing text documents (including
Microsoft Word). Since there is no standard file type for song
lyrics, the default is plain text in a structured format (as
commonly seen in CCLI). Therefore, to import anything into
ProPresenter from any other program, you first need to export all
song files as text from your existing solution. Not all worship
software allows for easy exporting as text and every developers
database is proprietary, so we can't easily interpret and transpose
a competitor's data. This is why all songs must first be converted
to a cross-platform plain text document. Some do help facilitate
this, however, as outlined below.
Once you've exported from your existing worship software and
moved that file or files over to your Mac (via thumb drive or the
network), importing into ProPresenter is the same from any
source as outlined at the bottom of this FAQ.
Exporting from MediaShout (quick and easy):
MediaShout makes this easy with a built-in function. Just follow
the steps below.
•
Choose Shout Singer -> File -> Export Songs ->
Shout Singer Text File
•
Choose Destination file
•
Name your file -> Next -> All Songs
* Uncheck the "Save as Unicode" box (will not work right unless
you do this)
•
Export / Save file and move it to your
ProPresenter machine (via thumb drive or network)
Renewed Vision
61
ProPresenter 3 User Manual
•
Skip to last step below "Import into
ProPresenter".
Exporting from Easy Worship:
•
EasyWorship has no simple way to export text
built-in like MediaShout, but there is a tool you can get that will
do this for you. It's called "EasySearch" and it integrates into
EasyWorship providing a function to export all songs as text.
We're not PC experts, so you'll have to read about it yourself and
figure it out. The only alternative to this is to copy the text of
each song and paste it into a Word document (one song per
document). ProPresenter can import multiple documents at a
time.
Exporting from PowerPoint:
•
There is no fast way to export from PowerPoint,
but it can be sped up. For every song you have, open it in
PowerPoint and view it in Outline mode. From here you can
"select all" and copy this text into a Word document (one song
per document). ProPresenter can import multiple documents at a
time.
Importing from Other Presentation Software:
•
Look at the respective user manual or call the
developer to inquire about the easiest way to export all songs as
plain text documents.
Import into ProPresenter:
•
From the File menu, choose "Import
Presentation"
•
Locate the .txt file
•
Choose "Import into Library" and select
"Paragraph break"
•
Finish by clicking the Continue button and
ProPresenter will import the file(s).
Renewed Vision
62