1
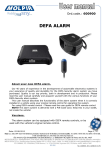
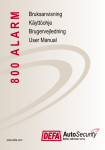
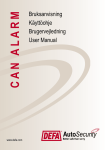
DEFA HOME
User Manual
Base Unit PRO
Table of Contents
Overview5
Logging into the app
9
Home10
Calendar13
Adding an event
14
Editing an event
15
Zones16
Switch mode17
Thermostat mode
19
Regulator mode
26
Follow master switch
29
Temperature alerts
32
Change the mode of a zone
35
Add and remove rooms
39
Adding rooms43
Removing a room
44
Alerts45
Settings46
Unit guide47
Glossary51
OVERVIEW
DEFA Home Base Unit PRO is used to manage and control the heating appliances.
All of the connected heating appliances are controlled under one main device and you
can remotely manage your heating directly from your smart phone. The product is made
up of two parts:
The Base Unit PRO is the hardware unit used to control all of the heating appliances
under one main device.
The DEFA Link app is the simple and fast mobile application used to remotely manage
the Base Unit PRO.
Used together, you can manage all of your heating requirements with a simple swipe of
a finger on your smart phone. Your options include:
•
•
•
•
•
•
•
•
turning the heating on and off instantly
turning the heating on and off on a set day and time in advance
viewing the inside temperature
viewing a weather forecast for your location
the choice of three different heating modes to best suit your needs
the ability to manage the heating for the whole system or in individual areas
the ability to manually control the heating mode
receiving alerts if the temperature inside becomes too cold or too hot
To get the most out of your product, we recommend that you read the Functionality
section of this guide for an introduction in to the different functions that DEFA Base
Unit PRO has. You can then go on to read the DEFA Link app Guide to discover how to
remotely manage your heating from your smart phone. For a summary of the hardware
device, you can read the Base Unit PRO Unit Guide in the final section of this guide.
Commonly used terms and expressions are highlighted throughout the guide and you
can find an explanation of these in the Glossary at the end of the guide.
NB: Before you can begin to use DEFA Link with the Base Unit PRO, you must first have
the product installed and tested by a licensed installer.
English
5
FUNCTIONALITY
DEFA Home Base Unit PRO has a range of different functions that can be used to
manage your heating. One of the main features is the ability to change the heating
between a comfort and save heating status. This is known as the IN and AWAY status.
The IN status heats to a comfortable, warm temperature and is best for when you will
be staying in. The AWAY status heats to a low temperature, keeping you safe from
dangerous temperatures that could cause frost damage, while also saving you energy
and money by using less electricity. This is recommended for when you are away.
Each room will be associated to a zone, allowing you to manage a whole area with
the same heating settings. When you change between the IN and AWAY status for a
zone, all of the rooms in that zone will heat to your comfort or save heating settings
as appropriate. You can also choose to manage the IN and AWAY status for the whole
system by using the DEFA Link app.
This mobile application gives you the option to group all of the zones together and
control the heating under one switch, called the Master Switch. The IN and AWAY
status chosen on the Master Switch will then be applied to all of the zones that follow
master switch. You can set a zone to follow the master switch by setting this option
to ON. When the follow master switch option is set to OFF, the zone will be managed
independently and any changes made to the Master Switch will not be made to this
zone.
There arThere are three different heating modes that you can choose from. You can
select a heating mode that best suits your needs and also have different heating
modes in different zones if you wish. The three heating modes are Switch, Thermostat
and Regulator. The Switch mode is a basic mode where the heating can be turned
either on or off. When you set the Switch mode to IN status, the heating is turned on.
In AWAY status, the heating is turned off.
6
English
The Thermostat mode regulates the heating according to the temperature of the zone,
turning the heating on and off when preset temperatures are reached. When you set
the Thermostat mode to IN status, the heating is turned on and heats the zone until a
high temperature limit is reached. The high temperature default settings is 20°C, which
means the heating will be turned off when that temperature is reached and stay off
until the temperature falls below 20°C. In AWAY status, the heating is turned on if the
temperature falls below a low temperature limit. The low temperature default setting
is 5°C, which means the heating will be turned on when the temperature falls to 5°C
and will stay on until 8°C is reached. You can change the high and low temperature
settings in the DEFA Link app. There is also the option to manually control the exact
temperature of a zone.
The Regulator mode regulates the heating in 10 minutes cycles, turning the heating
on for a percentage of the time cycle. When you set the Regulator mode to IN status,
the heating is turned on for a high percentage of the time. The high percentage default
setting is 80%, so the heating will be on for 8 minutes of the 10 minute cycle. In AWAY
status, the heating is on for a low percentage of the time. The default value for the low
percentage setting is 60%, which means the heating will be turned on for 6 minutes
and then off for 4 minutes in the 10 minute cycle. You can change the low and high
percentage settings in the DEFA Link app. There is also the option to manually control
the exact percentage of time that the heating is on.
The following table shows a summary of the different heating modes when they are in
the IN and AWAY status.
ZONE MODE
IN
AWAY
Switch
Heating is on
Heating is off
Thermostat
Regulates heating to high
temperature setting
Regulates heating to low
temperature setting
Regulator
Regulates heating to high
percentage time setting
Regulates heating to low
percentage time setting
English
7
DEFA LINK APP GUIDE
The DEFA Link app is the simple and fast mobile application used to remotely manage
the Base Unit PRO. Using this app you manage all of your heating requirements from
your smart phone. The app has five sections:
•
•
•
•
•
Home- Gives you an overview of your system, including the current temperature,
weather forecast and the option to switch your heating between the comfort and
save temperature status.
Calendar- Allows you to plan ahead by creating an event to activate your heating on
a set day.
Zones- Provides you with more specific details about your heating management.
You can have full control over each zone, view the current temperatures there and
adjust advanced settings.
Alerts- Shows any power or heating alerts that you have received.
Settings- Manages your alerts and unit location settings.
NB: Before you can begin to use the DEFA Link app with the Base Unit PRO, you must
first have the product installed and tested by a licensed installer.
Downloading the app
To access the app for the first time you need to download the free DEFA Link app for
your iPhone from the App Store or for your Android phone from the Play Store. You must
apply for a DEFA Link subscription from your dealer or you can set up your own on the
customer portal at www.defa.com.
8
English
LOGGING INTO THE APP
1. Open the DEFA Link app on your smart phone and log into the app using your user
name and password. These details will be sent to you by email or SMS when you
register a DEFA Link account on the customer portal on www.defa.com.
You may change your password once you have logged into the app or via the
customer portal.
2. Select the unit you wish to control and you will then be taken to the Home screen.
If you want to change your login password, tap on the Settings cog
1.
2.
English
9
HOME
Once you have logged into the app and selected your unit, you will be taken to the
Home screen. This screen has the Master Switch and shows a summary of the system
details when the dashboard is open. You can also navigate to the different app screens
using the menu buttons across the bottom. You can return to the Home screen at any
time by tapping the Home button.
Return to unit selection screen
Heating control panel
Menu buttons
Home screen
Calendar screen
10
English
Using the Master Switch you can control the heating of the whole system. When the
switch is set to IN, the system heats to your comfort settings. When the switch is set
to AWAY, the system heats to your save heating settings. Only zones that are set to
follow the master switch will follow the changes you make here.
Refresh button
Master Switch
Show/hide the Dashboard
Settings screen
Alerts screen
Zones screen
English
11
A summary of the cabin’s details are displayed when the dashboard is opened. You can
open and close this by sliding the dashboard panel up or down. You can slide sideways
on the dashboard to show the future weather report for the cabin’s location.
Return to unit selection screen
Show/hide the Dashboard
Inside temperature (from Zone 1)
Dashboard panel
Slide to the right to view future
weather report
Weather and temperature outside
(supplied by YR.no)
12
English
CALENDAR
You can manage your heating settings in advance using the Calendar. By adding an
event to the Calendar, you can set a date and time that you want the heating to be
automatically switched to IN or AWAY. All zones that are set to follow the master
switch will then activate your IN or AWAY heating settings on this date and time. You
can view the Calendar screen by tapping on the Calendar button. All of your planned
events will be shown here and you can also edit events.
Edit event
Add event
A planned event that will set the heating
status to AWAY at 15:46 on 19th October
2012
A planned event that will set the heating
status to IN at 20:00 on 19th October
2012
English
13
ADDING AN EVENT
1. On the Calendar screen, tap the Add button
and the Add event
screen will be shown
2. Set status to IN or AWAY depending on what you want to be activated
3. Set the date and time for the event to be executed
4. Tap “Done” and the event will be added to the Calendar
Done button
Set the IN or AWAY status
Set the date and time
14
English
EDITING AN EVENT
1. Tap the Edit button on the Calendar screen and the screen below will be shown
2. Tap the event you want to edit
3. You can modify the date and time of the event and the IN or AWAY status, in the
same way as you added the event
4. To delete an event, tap the Remove button
Done button
Set the IN or AWAY status
Set the date and time
English
15
ZONES
An overview of the zones is shown on the Zones screen. In the zone information panel,
you can view the rooms assigned to each zone and the temperature in each zone. You
can also view and change the settings for a zone by tapping on the zone name. To edit
advanced settings such as changing the heating mode of a zone or to add and remove
rooms from a zone, you can tap the Edit button. You can view the Zones screen by
tapping the Zones button
Edit advanced settings
Zone 1 information panel
Tap to view the zone settings
Zone 2 information panel
Shows the current temperature in the
zone
Scroll down to go further in the zone list.
The screen that will be displayed when you tap on a zone will vary depending on the
heating mode you have preselected. The three heating modes are Switch, Thermostat
and Regulator.
16
English
VIEWING ZONE SETTINGS - SWITCH MODE
The following screen will be shown when you tap on a zone that is in Switch Mode. In
this mode, the heating can either be turned on or off. You can also view and edit the
temperature alert limits set for this zone. These alerts will only be sent if you turn
on the temperature alerts on the Settings screen. Using the slider you can manually
control whether the heating is on or off for the zone. This slider will override the Master
Switch so remember to set the follow the master switch to ON again, if you want to
return to that setting
Edit the temperature alert limits
Slide to manually turn the heating ON and
OFF in the zone
Shows you the temperature alerts limits
Tapping on the Presets tab will show the settings for the zone. You can view the current
status of the mode and change the follow master switch option here.
English
17
View the Manual settings
for the zone
Slide between ON/OFF to set if the zone will
follow the master switch.
18
English
VIEWING ZONE SETTINGS - THERMOSTAT MODE
The following screen will be shown when you tap on a zone that is in Thermostat mode.
In this mode the heating is regulated by the temperature. You can also view and edit
the temperature alert limits set for this zone. These alerts will only be sent if you turn
on the temperature alerts on the Settings screen. Using the slider you can manually
control the exact temperature of the zone. This slider will override the Master Switch so
remember to set the follow master switch setting to ON again, if you want to return to
that setting.
View the Preset for the zone
Edit the temperature alert limits
Current temperature
Slide to manually increase
or decrease the temperature
in the zone
Tapping on the Presets tab will show the settings for the zone. You can view the current
status of the mode set your low and high temperature limits and change the follow
master switch option here.
English
19
EDITING THE LOW AND HIGH TEMPERATURE LIMITS IN
THERMOSTAT MODE
To give you full control over the temperature of a zone, you can edit the low and high
temperature limits in Thermostat mode. The low temperature limit will keep your
heating above your set temperature, while the high temperature limit will keep your
heating below your set temperature. By changing these limits you can control how warm
a zone is when in the IN and AWAY status. The default the low temperature is 5°C and
high temperature is 20°C. The high and low temperature limits cannot be closer than
5°C to one another.
View the Manual settings
for the zone
Edit the High and Low
heating values
Shows the heating is currently in
Low temp status
Slide between ON/OFF to
set if the zone will follow
the master switch
20
English
1. Tap on the Settings cog on the Preset tab
2. Select either the Low or High temperature limit that you want to change
Tap to edit the temperature Edit
English
21
Set low temperature limit
Set high temperature limit
22
English
3.
4.
You can then move the slider to your chosen temperature.
Tap Done to confirm your changes
Slide to increase or decrease the
temperature limit
English
23
VIEWING ZONE SETTINGS - REGULATOR MODE
The following screen will be shown when you tap on a zone that is in Regulator mode.
In this mode, the heating is regulated by a percentage of time the heating is on. You
can also view and edit the temperature alert limits set for this zone. These alerts will
only be sent if you turn on the temperature alerts on the Settings screen. Using the
slider you can manually control the exact percentage of time the heating is on in the
zone. This slider will override the Master Switch so remember to set the follow master
switch setting to ON again, if you want to return to that setting.
Edit the temperature alert limits
View the Preset for the zone
Current percentage of time heating is on
Slide to manually increase or decrease
the percentage of time the heating is on
in the zone
Shows you the temperature alerts limits
24
English
Tapping on the Preset tab will show the settings for the zone. You can view the current
status of the mode, set your low and high percentage limits and change the follow
master switch option here.
View the Manual settings for the zone
Edit the Low and High percentage values
Shows the heating is currently in Low
percentage status
Slide between ON/OFF to set if the zone
will follow the master switch
English
25
EDITING THE LOW AND HIGH PERCENTAGE
LIMITS IN REGULATOR MODE
To give you full control over the heating of a zone, you can edit the low and high
percentage limits in Regulator mode. The low percentage limit will turn your
heating on a low percentage of time, while the high temperature limit will turn your
heating on a high percentage of time. By changing these limits you can control how long
the heating is on when in the IN and AWAY status. The default low percentage is 60%
and high percentage is 80%. The high and low percentage limits cannot be closer than
5% to one another.
1. Tap on the Settings cog on the Preset tab
Tap to edit the percentage limits
26
English
2. Select either the Low or High percentage limit that you want to change.
3. You can then move the slider to your chosen percentage
Edit the Low and High percentage values
Shows the heating is currently in Low
percentage status
English
27
4. Tap “Save” to confirm your changes
Slide to increase or decrease the
percentage limit
28
English
HOW TO EDIT THE FOLLOW MASTER SWITCH OPTION
You can choose whether to manage the heating settings for zones independently or
in a group, by editing the follow master switch option. When the follow master switch
option is set to ON, any changes made to the Master Switch on the Home screen will
be applied to the zone. When the follow master switch option is set to OFF, the zone will
be managed independently and the heating settings on the Manual or Preset tab will be
used. Any changes made to the Master Switch will then not be made to this zone. You
can change the follow master switch setting by using the following instructions.
1. On the Zones screen, tap on the zone you want to edit the follow
master switch option
Tap for Zone 1
Tap for Zone 2
Tap for Zone 3
English
29
2. Tap on the Preset tabs
Tap for Zone 1
Tap for Zone 2
Tap for Zone 3
30
English
3. Slide the follow master switch to the ON or OFF option you require for the zone.
The zone will follow the IN and AWAY status of the Master Switch when the option
is set to ON. The zone will follow the settings on the Manual or Preset tab when
the option is set to OFF.
Slide between ON/OFF
English
31
HOW TO SET TEMPERATURE ALERT LIMITS
To receive temperature alerts that notify you if the temperature in a zone becomes
too cold or too hot, you need to turn on the temperature alert setting on the Settings
screen. You will then receive an alert if the temperature falls below or goes above
your set temperature limits. When you have activated this setting, you can change the
temperature limits for any heating mode following these steps. Temperature alerts are
available in Switch, Thermostat and Regulator mode.
1. On the Zones screen, tap on the zone you want to set the temperature alert limits
Tap for Zone 1
Tap for Zone 2
Tap for Zone 3
32
English
2. Tap the Settings cog on the Manual tab for the zone
3. You can then adjust both the low and high temperature alert limits to the
temperature that you wish. If the low temperature limit is set to 5°C, then you will
receive an alert if the temperature goes below 5°C.
Settings cog
Shows your current temperature
alerts limits
English
33
If high temperature limit is set to 20°C, then you will receive an alert if the temperature
goes above 20°C. The high and low temperature alert limits cannot be closer than 5°C
to one another.
If you slide the temperature slider all the way to either side of the slider bar, the
temperature alert for either HIGH or LOW alert will be disabled. The alert will be
disabled until you slide the bar back to a valid temperature.
4. Tap Done and the settings will be saved. Your new limits will be shown on the
temperature limits alerts bar at the bottom of the Manual tab.
Tap for Zone 1
Tap for Zone 2
Tap for Zone 3
34
English
HOW TO CHANGE THE MODE OF A ZONE
You can change the heating mode from Switch, Thermostat, Regulator and Off for
a zone from the Zones screen. The zone will then follow the heating management
settings for this new selection. You can read about the different heating modes in the
Functionality section of the guide.
1. Tap Edit on the Zones screen
Shows your current temperature
alerts limits
English
35
2. Select the zone you wish to modify
Tap for Zone 1
Tap for Zone 2
Tap for Zone 3
36
English
3. Tap Mode
4. The current mode for the zone is shown by the tick. To change to another mode,
tap on the mode you want to use.
Tap to modify Mode
English
37
NB! If the mode is set to OFF, you will receive a warning message to confirm that you
want to deactivate the zone. The heating will be turned off and will not be managed by
DEFA Base Unit PRO.
38
English
HOW TO ADD AND REMOVE ROOMS
NB! Adding and removing of rooms from a zone should only be completed
by a licensed installer.
Each zone can be made up of more than one room, you can edit which rooms are in a
zone following these instructions. By adding a room to a zone, the heating settings for
the room will be managed by the overall zone settings.
1. Tap Edit on the Zones screen
Edit advanced settings
English
39
2. Select the zone you wish to modify.
Tap for Zone 1
Tap for Zone 2
Tap for Zone 3
40
English
3. Tap Rooms
4. All of the rooms in the zone are then listed
Tap to modify rooms
English
41
Add buttons
Remove buttons
42
English
Save button
ADDING ROOMS
1. Tap the Add button
2. A room list will then be displayed, where you can select a room from a preset list
of 72 rooms to add to the zone. Tap on the rooms you want to add or tap the back
button at the top of the screen to exit without adding any rooms. You can add a
maximum of 5 rooms to a zone.
Edit advanced settings
3. Tap Save to finish adding rooms to the zone
English
43
REMOVING A ROOM
1. Tap the Remove button
next to the room you want to remove
Save button
Save button
2. Tap the Remove button again to confirm that you want to remove the room.
The room will then be removed.Tap Save to finish adding rooms to the zone
44
English
ALERTS
Using the Alerts screen you can view any power or heating alerts that you have
received. You can access the Alerts screen by tapping on the Alerts button.
Edit advanced settings
English
45
SETTINGS
Using the Settings screen you can manage your alert and unit location settings.
You can access the Settings screen by tapping on the Settings button
46
English
BASE UNIT PRO UNIT GUIDE
The Base Unit PRO is the hardware used to control all of the heating appliances under
one main device. It will be installed in the electrical fuse box and looks like this:
Signal indicator
Zone 1 button
Zone 2 button
Backup battery door
Zone 3 button
English
47
SIGNAL INDICATOR
When the Base Unit PRO is turned on, the unit loads the settings for each zone and
then connects to the DEFA server before the device is ready to use. The signal indicator
LEDs blink to show the various connection stages of the device and this is shown in
the table below:
LED Pattern
Connection Stage
1st LED is blinking green
Stage 1: Powering up the Base Unit PRO
1st LED is permanent green and 2nd LED
Stage 2: Setting up the Base Unit PRO
is blinking green
1st and 2nd LED are permanent green
and 3rd LED is blinking green
Stage 3: Connecting to the GPRS network
1st, 2nd and 3rd LED are permanent
green and 4th LED is blinking green
Stage 4: Connecting to the DEFA server
Once the device is connected and ready to use, the LEDs will stop blinking and the
signal strength will then be shown for the unit. If the signal strength is too low, an
orange light will be displayed and the unit will restart and attempt to get a stronger
signal. The signal strength is displayed on the signal indicator as follows:
LED Pattern
Signal Strength
1st LED is permanent orange
No signal
1st LED is permanent green
Weak signal
1st and 2nd LED are permanent green
Average signal
1st, 2nd and 3rd LED are
permanent green
Good signal
All 4 LEDs are permanent green
Full signal
48
English
ZONE BUTTONS
Using the zone buttons you can switch each zone from the IN and AWAY status. When
a zone button is red it is in the low or off status, when it is green it is in the high or
on status. By pressing a zone button you can manually change the status for the
corresponding zone. For example, if Zone 1 is in Thermostat mode and the button is
red, the status will change from regulating the heating from the low temperature setting
to the high temperature setting. The Zone 1 button will then change colour to green. If
a zone is set to follow the master switch, the status of the zone will be overridden to
the status of the zone button. When you change the IN and AWAY status on the Master
Switch in the DEFA Link app, the zone will then go back to follow the master switch. The
table below shows a summary of the different heating modes when they are in the IN
and AWAY status:
Zone Mode
Red
Green
Switch
Heating is off
Heating is on
Thermostat
Regulates heating to low
temperature setting
Regulates heating to high
temperature setting
Regulator
Regulates heating to low
percentage time setting
Regulates heating to high
percentage time setting
BACKUP BATTERY
To protect the Base Unit PRO from power outages, a backup battery is installed. If a
power cut occurs, the unit will be powered by the backup battery. This battery is stored
behind the backup battery door. To open the door, slide the door down and it will pop
open. You will receive an alert in the DEFA Link app if there is a power outage and also
if the backup battery is low.
English
49
AUX MODULE
An AUX module can be added to the Base Unit PRO to increase the number of zones
that you can control. This must be installed and tested by a licensed installer before
use. Contact your dealer for further information about purchasing and installing an AUX
module.
TROUBLESHOOTING
To reboot the Base Unit PRO:
•
Hold in the Zone 1 and Zone 2 buttons simultaneously for more than 5 seconds
To trigger a hard reset of the Base Unit PRO and return all the settings back to factory
defaults:
•
Hold in the Zone 1, Zone 2 and Zone 3 buttons simultaneously for more than 10
seconds
You can contact Customer Support for further assistance on +47 815 50 085 or by
email to [email protected]
50
English
GLOSSARY
Alerts
A section in the DEFA Link app that shows any power or heating alerts that you have
received.
AWAY
This status heats to a low setting, keeping you safe from dangerous temperatures
that could cause frost damage, while also saving you energy and money by using less
electricity. This is recommended for when you are away.
Base Unit PRO
The hardware unit used to control all of the heating appliances under one main device.
Calendar
A section in the DEFA Link app that allows you to plan ahead by creating an event to
activate your heating on a set day.
DEFA Home Base Unit PRO
The market name of the overall product used to manage and control any heating
appliances. The product is made up of the Base Unit PRO and the DEFA Link app.
DEFA Link app
The simple and fast mobile application used to remotely manage the Base Unit PRO.
Follow master switch
This switch is used to change from managing the heating settings for a zone in a group
or independently. When the follow master switch option is set to ON, any changes made
to the Master Switch on the Home screen will be applied to the zone. When the follow
master switch option is set to OFF, the zone will be managed independently and any
changes made to the Master Switch will then not be made to this zone.
English
51
Heating mode
There are three different heating modes that you can choose from to control your
heating appliances. Each mode regulates your heating in a different way.
You can select a heating mode that best suits your needs and also have different
heating modes in different zones if you wish. The three heating modes are Switch,
Thermostat and Regulator.
Home
A section in the DEFA Link app that gives you an overview of your system.
It includes the current temperature, weather forecast and the option to switch your
heating between the comfort and save temperature status.
High percentage limit
This is used in Regulator mode to regulate your heating to a high percentage of time.
The high percentage default setting is 80%, so the heating will be on for 8 minutes of
the 10 minute cycle. The high percentage limit setting is applied when a zone is in the
IN status. You can change the high percentage setting for a zone in the DEFA Link app.
High temperature limit
This is used in Thermostat mode to keep your heating below a set temperature. The
high temperature default settings is 20°C, which means the heating will be turned off
when that temperature is reached and stay off until the temperature falls below 20°C.
The high temperature limit setting is applied when a zone is in the IN status. You can
change the high temperature setting for a zone in the DEFA Link app.
IN
This status heats to a comfortable, warm setting and is best for when you will be
staying in.
Low percentage limit
This is used in Regulator mode to regulate your heating to a low percentage of time.
The default value for the low percentage setting is 60%, which means the heating will
be turned on for 6 minutes and then off for 4 minutes in the 10 minute cycle. The low
percentage limit setting is applied when a zone is in the AWAY status. You can change
the low percentage setting for a zone in the DEFA Link app.
52
English
Low temperature limit
This is used in Thermostat mode to keep your heating above a set temperature. The
default low temperature setting is 5°C, which means the heating will be turned on when
the temperature falls to 5°C and will stay on until 8°C is reached. The low temperature
limit setting is applied when a zone is in the AWAY status. You can change the low
temperature setting for a zone in the DEFA Link app.
Master Switch
This switch is used to change the heating status from IN and AWAY. It is located on the
Home screen. When the switch is set to IN, the system heats to your comfort heating
settings. When the switch is set to AWAY, the system heats to your save heating
settings. Only zones that are set to follow the master switch will follow the changes you
make here.
Regulator
A heating mode that regulates the heating in 10 minutes cycles, turning the heating
on for a percentage of the time cycle. When you set the Regulator mode to IN status,
the heating is turned on for a high percentage of the time. The high percentage default
setting is 80%, so the heating will be on for 8 minutes of the 10 minute cycle. In AWAY
status, the heating is on for a low percentage of the time. The default value for the low
percentage setting is 60%, which means the heating will be turned on for 6 minutes
and then off for 4 minutes in the 10 minute cycle. You can change the low and high
percentage settings in the DEFA Link app. There is also the option to manually control
the exact percentage of time that the heating is on.
Settings
A section in the DEFA Link app that manages your alerts and unit location settings.
Switch
A heating mode where the heating can be turned either on or off. When you set the
Switch mode to IN status, the heating is turn on. In AWAY status, the heating is turned
off.
English
53
Temperature alert
An alert that is sent if the temperature in a zone goes below or above your temperature
alert limits. You can view all temperature alerts on the Alerts screens. Temperature
alerts will only be sent if you turn on the temperature alerts option on the Settings
screen.
Temperature alert limit
You can set a low and high temperature alert limit to receive a temperature alert if the
temperature becomes too cold or too hot. Temperature alerts will only be sent if you
turn on the temperature alerts option on the Settings screen.
Thermostat
A heating mode that regulates the heating according to the temperature of the zone,
turning the heating on and off when preset temperatures are reached. When you set
the Thermostat mode to IN status, the heating is turned on and heats the zone until a
high temperature limit is reached. The high temperature default settings is 20°C, which
means the heating will be turned off when that temperature is reached and stay off
until the temperature falls below 20°C. In AWAY status, the heating is turned on if the
temperature falls below a low temperature limit. The low temperature default setting
is 5°C, which means the heating will be turned on when the temperature falls to 5°C
and will stay on until 8°C is reached. You can change the high and low temperature
settings in the DEFA Link app. There is also the option to manually control the exact
temperature of a zone.
Zone
An area that you can manage with the same heating settings. Each room will be
assigned to a zone and any heating changes made to the zone will then be applied to
all of the rooms in the zone. A zone can contain between one and five rooms.
Zones
A section in the DEFA Link app that provides you with more specific details about
your heating management. You can have full control over each zone, view the current
temperatures there and adjust advanced settings.
54
English
English
55
8349 E00_UserManual YCP 100413
www.defa.com