1
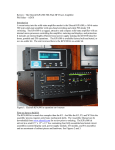
HVAC Shutoff System
Instruction & Wiring Tutorial
Version 1.3, September 25, 2015
Kenneth Delahoussaye Consulting
web: www.kadtronix.com
email: [email protected]
Copyright © 2015
All rights reserved
1
Table of Contents
Licensing..........................................................................................................................................3
Disclaimer........................................................................................................................................3
Revision History..............................................................................................................................4
Introduction......................................................................................................................................5
Features & Specifications................................................................................................................7
Special Considerations.....................................................................................................................8
Item Lists.......................................................................................................................................10
Before You Begin...........................................................................................................................13
HVAC Compatibility.....................................................................................................................14
Relay Controller.............................................................................................................................15
Wired-Sensor Implementation.......................................................................................................19
Wireless-Sensor Implementation...................................................................................................26
Contact Information.......................................................................................................................43
2
Licensing
This document is a copyrighted publication that contains intellectual property. You, the licensee
are granted a single-use license for this material. The information contained herein may not be
sold, shared, or otherwise distributed to any third party under any circumstances.
Any misuse of this material shall be considered a violation of the license agreement and
copyright law. This material may be freely printed and/or copied so long as all such
reproductions remain under the sole ownership and use of the licensee. It is the responsibility of
the licensee to protect all reproductions under the terms and conditions of this agreement.
Disclaimer
While every effort has been made to ensure the validity of the material, the author shall not be
held liable or responsible for any content that may be inaccurate, outdated, or misinterpreted by
the licensee. The author shall not be held liable or responsible for any damage or injury that may
occur as a result of the use or misuse of the information contained in this document.
The licensee is responsible to have a thorough understanding of the project and to follow proper
safety precautions when working with tools and electrical equipment. The licensee must also be
aware of the potential hazards when working with HVAC equipment which typically involves
dangerous voltages. If you are unfamiliar with the electrical wiring involved with these systems
or do not possess the proper skills, you should not attempt this project.
3
Revision History
Rev.
Date
Description
1.3
9/25/15
• Added operational note pertaining to Skylink
wireless receivers.
1.2
7/9/14
• Added revision history
• Migrated the document tool to OpenOffice Writer
1.1
7/7/14
• Miscellaneous updates
1.0
7/5/14
• Initial Release
4
Introduction
This manual describes how to assemble a low-cost HVAC shutoff system. This system provides
automatic shutoff capability for an air conditioning or heating system when a violation occurs
(i.e., a door or window that has remained open for a predetermined period of time). The system is
then automatically re-activated when the violation has cleared. The photo below depicts the main
(relay) controller:
Relay Controller Unit
Two sensor implementation types are described in this manual. (Both types utilize the same relay
controller device.) Your selection will depend on the type of installation desired:
•
•
Wired Sensors
Wireless Sensors
The wired-sensor implementation is the least expensive option, requiring no soldering, assembly,
or sensor programming. It is comprised of these primary elements:
•
•
•
Relay controller unit (& ac adapter)
Door/window sensor(s)
Sensor wire/cabling
The primary disadvantage of this approach is the necessity to install wires or cables from each
door/window sensor to the relay controller.
The wireless-sensor implementation is a favorable alternative when wire runs may be unsightly
or inconvenient. It is comprised of the following elements:
•
•
•
Relay controller unit
Wireless receiver (& ac adapter)
Wireless door/window sensor(s)
Notes:
5
1) The wireless system requires a third-party receiver and related door/window transmitters.
(Refer to the Items Lists section for details including suggested suppliers.)
2) Minor customizations will be required to the receiver to facilitate interfacing to the relay
controller. Basic soldering and assembly skills are required.
3) The primary customization to the receiver involves applying wires to specified solder points
on the printed circuit. This procedure is unobtrusive to the device’s intended operation. Be sure
to power off the device prior to performing any of the operations described in this manual.
6
Features & Specifications
The list below summarizes features and specifications applicable to both wired & wireless
system types:
•
•
•
•
Low-cost HVAC shutoff control
Relay controller unit wires directly into the indoor air handler (evaporator) unit
Powered by a single power source
Controls up to four independent HVAC systems or other devices
The list below summarizes features specific to wireless applications only:
•
•
•
•
Supports 4 available zones for sensor programming (learning)
Learns up to 4 sensors per zone (16 total sensors)
Monitors up to 16 doors and/or windows
Wireless door/window sensor range up to 800 feet *
* - Maximum range as indicated by the manufacturer, Skylink Technologies, Inc. Range may be
severely impacted by a number of factors including nearby buildings, metal objects, and other
obstructions.
7
Special Considerations
Please carefully review the following considerations prior to undertaking this project:
•
Instructions contained in this manual require you to remove the back cover of the Skylink
wireless receiver and perform the following customizations:
•
•
Solder-attach a multi-conductor interface cable to the printed circuit board
Drill a hole in the plastic rear cover
Note: The manufacturer (Skylink Technologies, Inc.) neither condones nor
recommends any customer-initiated enhancements to their products. Understand that
any changes to the receiver will immediately void the product's warranty.
•
The relay controller unit is intended for use with low-power applications and should not
be used with higher voltages. Therefore, you should not attempt to wire the relay
controller directly to AC line voltage. Most split system (central) HVAC systems utilize
two primary circuits: high-voltage (typically 220vac) and low-voltage (usually 24vac).
The relay controller should only be used to control (switch) the low-voltage circuit.
•
This tutorial is ideally suited for split system (central) HVAC systems. If your system is
something other than a central ac system such as a mini-split, multi-split, PTAC, window
unit, etc., you may not be able to apply these instructions. This is because such systems
are not typically designed to permit external control by a third-party controller.
•
The wireless sensor approach utilizes a third-party receiver by Skylink Technologies, Inc.
The receiver provides four available zones which can each be programmed to accept up
to four wireless door/window sensors. Since each zone operates independently, you may
control (switch) as many as four independent HVAC systems, utilizing a maximum of
four sensors per system. However, most applications will typically only need to control
one HVAC system.
Notes:
1) If you desire to apply more than four sensors to a single HVAC system, you must wire
two or more sets of relay contacts together in series. (Refer to the Wireless Sensor
Implementation for details.)
2) Instructions contained in this manual require you to remove the back cover of the
Skylink wireless receiver and perform some specific customizations. (Refer to the
wireless-sensor implementation for details.) The manufacturer (Skylink Technologies,
Inc.) neither condones nor recommends any customer-initiated enhancements to their
products. Understand that any changes to the receiver will immediately void the
warranty.
8
•
An important consideration with the Skylink system pertains to the situation that occurs
when multiple door sensors are programmed into the same zone. In this configuration, the
receiver does not appear to recognize subsequent sensor activity following the activation
of a "trigger" sensor. To illustrate the issue, consider the following test scenario:
1. Program the receiver so that both sensors are applied at zone 1. (For the sake of
clarity, presume that the sensors correspond to doors A & B.)
2. Open door A and verify that the receiver detects the violation, illuminating red LED
indicator #1.
3. Next, while door A remains open, also open door B so that both sensors are
concurrently active.
4. Now, if door A is subsequently closed, the receiver clears the violation (the red LED
extinguishes) even though door B is still open.
This appears to be normal behavior as designed by Skylink. While a sensor is active (i.e.,
door is open), the receiver ignores all other subsequent sensor activity until the offending
sensor returns to the non-triggered state. If your application involves the use of multiple
door sensors, consider programming each into a separate zone and wire the QRDS relay
accordingly. (Refer to the sample application schematic at the end of the manual, titled
"Wireless Application 3 of 3".)
•
Please give special attention to your safety at all times and take appropriate precautions to
prevent potential injury and damage to equipment. (Please review the Disclaimer
section.)
9
Item Lists
This section specifies required elements and miscellaneous items necessary for both wired and
wireless sensor implementations. This information includes suppliers, required quantities, part
numbers, approximate costs and descriptions. (In some instances a part number is not provided.
These items are commonly available and require no specific identification.) You will also find
note(s) pertaining to each item which may describe any additional considerations.
Note: While every effort has been made to provide reliable information, we cannot guarantee
accuracy since suppliers frequently change their inventory without notice. We can assume no
responsibility for modified pricing, stock issues, or discontinued products. If you encounter
difficulty locating an item, contact us at [email protected] and we will do our best to
suggest an alternate supplier, if possible.
Wired-Sensor Implementation
Item
Supplier(s)
Qty
Cost
Each
1
kadtronix.com
1
$149
1
Quad Relay Delay Switch, Kadtronix #QRDS-1000
Includes ac adapter - no enclosure or mounting base.
(Enclosure with mounting base available at additional
cost.)
2
kadtronix.com
-
$15
10
Door/window sensor (magnetic contact switch)
Kadtronix #KD-DW10
3
homesecuritystore
.com
-
$30
11
Alarm cabling (for wiring door/window sensors),
#WIN-W2-100 (see note)
Notes
Description
10
Wireless-Sensor Implementation
Item
Supplier(s)
Qty
Cost
Each
Notes
1
kadtronix.com
1
$149
1,2
2
skylinkstore.com
smarthome.com
amazon.com
ebay.com
1
$40
3,4,5,6 Wireless Door/Window Alert (receiver & door/window
sensor) Skylink Technologies, #WD-434RTL
3
cablewholesale.com
1
$5
3,7,8,9 Serial extension (interface) cable, RS-232, 3 ft, black,
DB9, male/female, #10D1-03203BK (see notes)
4
Ace Hardware
Home Depot
Lowes
2
$2
3
Optional angle brackets, 2" (for wall-mounting the
receiver)
5
Ace Hardware
Home Depot
Lowes
1
$2
3
Optional double-sided foam adhesive tape (for attaching
receiver to angle brackets).
Description
Quad Relay Delay Switch
Kadtronix #QRDS-1000-INT (Integrator’s Package)
Includes mounting base only (no lid or ac adapter)
11
Notes:
1
For a more robust HVAC shutoff solution, consider the Kadtronix HSRS product which generally offers
more features and options than the QRDS device. (The one exception is that the QRDS provides mulitple
relays for independent control of four (4) HVAC systems. The HSRS contains one relay and therefore
controls a single HVAC only.)
2
If performing the wireless-sensor implementation, be sure to specify the integrator’s package.
3
Required for wireless applications. Not necessary for wired installations.
4
Includes wireless receiver, door/window sensor, and AC adapter.
5
Additional door/window sensors are also available (sold separately as item #WD-434TL).
6
The manufacturer specifies a maximum wireless range of 800 feet under ideal conditions. However,
individual results may vary. Range can be severely impeded by building walls, metal objects, and other
obstructions.
7
Cable connector ends will not be needed and can be cut/removed & discarded.
8
There is no requirement for a particular brand of cable. Most any multi-conductor cable can be utilized
including RS-232, Ethernet, or telephone cable. These can be found at many electronics stores, online
suppliers, and surplus outlets.
9
A minimum of three (3) conductors is required for controlling a single HVAC system. One additional
conductor will be needed for each additional HVAC to be controlled. (Six conductors max.)
10 The wired sensor is a two-piece item that consists of reed switch and magnet. It is the same variety used in
residential and commercial security systems.
11 There is no requirement for a particular type or brand of cable. Generally speaking, most any multi-conductor
cable can be utilized including speaker, telephone, intercom, etc. (Requires two-conductors minimum, max.
length 100 ft.) These can be found at many electronics stores, online retailers, and surplus outlets. For those
seeking a specific recommendation, choose a two-conductor alarm cable with AWG 22 wire size.
12
Before You Begin
This project requires basic knowledge of HVAC wiring. Also required is experience with
soldering and minor mechanical assembly (wireless application only). Though the devices
described in this manual are not particularly difficult to wire or assemble and require no expert
knowledge of electronics, you do need the ability to understand simple wiring diagrams and
assembly instructions. In addition, some experience in working with electronics and simple
mechanical assembly is helpful.
IMPORTANT: Electronic devices and components are susceptible to damage due to static
electricity. Therefore, an ESD anti-static wrist strap or other suitable protection is strongly
recommended when working with sensitive electronics.
While expert skill is not required, the novice may find portions of the project challenging and
should seek appropriate assistance whenever necessary.
CAUTION: HVAC systems involve high-voltage that can pose a deadly hazard. Do not attempt
the procedures outlined in this manual without a thorough understanding of these systems. Do
not hesitate to seek assistance from a qualified HVAC technician or contractor.
Prior to beginning the project, you are advised to carefully review the entire document to become
thoroughly familiar with it. This is the time to assess your skills and to determine where you
might encounter difficulty. This is also the time to take inventory of your tools and parts. There’s
little more frustrating than beginning a project and discovering you cannot complete it because of
a critical missing item.
Project build time will vary and depends on your experience level. Roughly speaking, you should
be able to complete the required wiring in a couple of hours or less.
Before beginning this project, refer to the Item Lists provided earlier. Make sure you have
everything needed. Use proper care and patience at all times. Placing a wire at the wrong
location could result in a damage to a device or to your HVAC equipment. You are advised to
read through the entire content in this manual carefully before beginning. (Please give
particular attention to Special Considerations.)
The following tools are needed for the project:
•
•
•
Wire cutters / strippers
Screwdrivers: Philips and flat-blade
ESD anti-static wrist strap
Additional items you will need (only if performing the wireless-sensor implementation):
•
•
•
Soldering iron
Solder & flux
Power drill (with 1/4” bit)
13
HVAC Compatibility
This tutorial can be applied to a number of possible HVAC system types, but is primarily
applicable to split-system (central) air conditioning systems.
Split-system (central) A/C system
Notes:
• Some HVAC manufacturers may not permit the use of third party controllers with their
equipment. To avoid warranty issues, please consult the HVAC manufacturer. (We accept
no liability or responsibility for issues or disputes with your HVAC supplier or
manufacturer.)
• Smaller HVAC units including mini-split, multi-split, PTAC and window air conditioners
are not necessarily conducive to automatic shutoff because many of these systems do not
provide an accessible means of external control by third party devices.
14
Relay Controller
The relay controller unit is manufactured and distributed by Kadtronix and is known as the Quad
Relay Delay Switch (QRDS). The device features four independently operated relays with
onboard digital processor and configurable activation delay. (Refer to the Item Lists section for
purchase details.)
Note: When ordering the Quad Relay Delay Switch (QRDS), be sure to specify the Integrator’s
Package if performing the wireless-sensor implementation.
Relay Controller Unit
(Quad Relay Delay Switch by Kadtronix)
15
The relay controller contains five (5) wiring terminal blocks for connecting sensors and for
wiring to your HVAC air handler. (Refer to the QRDS User Manual for connector locations,
pinouts and configuration details. The manual is available as a PDF download from the
Kadtronix website.)
Sensor Wiring
Terminal Block TB-5
HVAC Wiring
TB-1 thru TB-4
16
Onboard configuration DIP switches are provided for customizing relay controller operation.
These switches allow you to set up several parameters including relay activation delay. This
delay establishes the period of time that a door or window must remain open before the relay is
engaged, shutting down the HVAC system. (Refer to the QRDS User Manual for additional
details.)
Configuration
DIP Switches
Notes:
1) You may also configure an optional deactivation delay. This delay specifies the amount of time
that must elapse before the relay is allowed to disengage and is useful as a means of compressor
protection.
2) If performing the wireless-sensor implementation, be sure to specify the following DIP switch
settings:
•
•
Pulse Input Enable = Enabled
External Switch Type = Normally-open
17
The relay controller unit is powered by standard household power (110 VAC). The supplied AC
adapter converts this voltage to 12VDC (required by the controller).
110VAC-to-12VDC adapter
Optionally, the device may be powered by voltage supplied indirectly from the HVAC unit (air
handler) and requires a special 24 VAC power converter such as the unit shown below.
24VAC-to-12VDC adapter
(optional)
Note:
If applying the wireless-sensor implementation, the relay controller must be powered by the
receiver device and does not require its own power source. Do not attempt to use either adapter
shown above.
18
Wired-Sensor Implementation
A wired-sensor implementation requires few items and is quite straightforward. It is the least
expensive option, requiring no soldering, assembly or sensor programming. It is comprised of
these primary elements.
•
•
•
Relay controller unit
Door/window sensor(s)
Sensor wire/cabling
Quad Relay Delay Switch & Door/Window Sensor
19
The door/window sensor is an essential element of the system. It is a two-part item that consists
of reed switch and magnet as shown below:
Door/window sensor consisting of magnet &
reed switch (shown with connecting wires)
The magnet is usually mounted on an upper corner of the door or window being monitored. The
reed switch element is then mounted adjacent to the magnet on the door/window frame.
Normally-open switch contacts are held closed by the magnet. When a door or window is
opened, the contacts open, breaking the circuit.
Note: Multiple sensors from nearby doors or windows may be wired together in series to form
one large zoned circuit.
20
•
Wire your door/window sensor(s) to the relay controller unit at wiring terminal block TB5 as indicated in the Relay Controller section. (You may also refer to the QRDS User
Manual for additional details. Wiring diagrams at the end of this section provide
additional perspective.)
•
At this point, you may choose to make any desired adjustments to relay controller
settings. For example, use the “Activation Delay” setting to specify the time period that a
door or window must remain open before the relay is engaged, resulting in HVAC
shutoff. You may also optionally enable a “Deactivation Delay” to postpone relay
disengagement. (Refer to the QRDS User Manual for details on configuration settings.)
Note: The relay controller unit should be powered off prior to making any settings
changes.
•
Before wiring the relay controller unit to your HVAC system, you should conduct a
preliminary test. Power on the controller by plugging in the AC adapter. (Plug the large
module end into a suitable wall outlet. Insert the small barrel connector end into the relay
controller’s power jack.) When power is applied, the green indicator will begin flashing.
Note: The green LED is an operational status indicator that flashes continually when the
unit is powered on.
•
Begin the test by bringing the magnet in close proximity with the reed switch unit. (Or
close the door or window if you have installed the sensor.)
•
Now, activate the sensor by removing the magnet. (Or simply open the door or window if
you have installed the sensor.)
•
Activate the sensor by separating the magnetic contact from the reed switch unit. (Or
simply open the door or window if you have installed the sensor.) This action should
result in illumination of a red LED at the relay controller unit. The corresponding relay
will also engage. (Engagement will occur immediately unless you have configured an
activation delay. If a delay has been configured, the red LED at the relay controller unit
will flash at a periodic rate indicating that relay engagement will occur following the
delay period.)
Note: If relay engagement did not occur and the LED did not illuminate, you should go
back and check sensor wiring. Also confirm your controller settings.
•
Deactivate the relay by bringing the magnet back together with the reed switch unit.
(Disengagement will occur immediately unless you have enabled a deactivation delay. If
a delay has been configured, the relay will disengage following the delay period.)
•
Repeat this testing with remaining door/window sensor(s).
21
Subsequent pages contain wiring diagrams for several possible wired-sensor implementation
scenarios. Use appropriate wire or cabling as indicated in the Item Lists section, applying the
diagram that most closely matches your application. (Refer to the QRDS User Manual for wiring
screw-terminal locations and pinouts.)
IMPORTANT:
1) Be sure to disable power to the HVAC system at the breaker panel before initiating any wiring
operations.
2) HVAC equipment involves dangerous high voltages which can be potentially deadly. If you are
unfamiliar with these systems, you should not attempt these procedures. Instead, consult a
qualified HVAC technician or contractor.
22
––––––––––––––––––
Wired Application (1 of 3)
––––––––––––––––––
23
––––––––––––––––––
Wired Application (2 of 3)
––––––––––––––––––
24
––––––––––––––––––
Wired Application (3 of 3)
––––––––––––––––––
25
Wireless-Sensor Implementation
The wireless-sensor implementation is a favorable alternative when wire runs may be unsightly
or inconvenient. It is comprised of the following elements:
•
•
•
•
Relay control unit
Wireless receiver (& ac adapter)
Wireless door/window sensor(s)
Interface cable
Quad Relay Delay Switch with
Wireless Receiver & Door/Window Sensor
Notes:
1) Minor customizations will be required to the receiver device to facilitate interfacing to the
relay controller. (Basic soldering and assembly skills are required.)
2) The primary customization to the receiver involves applying wires to specified solder points
on the printed circuit. (This procedure is unobtrusive to the device’s intended operation.) Be sure
to power off the device prior to removing the lid or performing any of the operations in this
manual.
3) When programming the receiver to accept individual door/window sensors, corresponding
relay(s) on the relay control unit will become engaged. To avoid undesired switching of your
HVAC unit, you should disable the system at the thermostat or the breaker panel prior to
initiating the programming operation.
4) A single ac adapter is necessary for powering both the relay controller unit and the receiver
device. Since the adapter included with the receiver powers both devices, the relay controller
unit does not require its own adapter.
26
Manufactured and distributed by Skylink Technologies, the wireless receiver and door/window
sensor (transmitter) may be purchased together in a single package called the Wireless
Door/Window Alert. (Refer to the Item Lists section for purchase details.)
Skylink Wireless Door/Window Alert
(wireless receiver & door/window sensor)
Intended for wireless home security, the Skylink product is utilized in this project as a wireless
interface for monitoring a desired door or window. The Skylink product includes ac wall adapter
for powering the unit. (This same source also powers the relay control unit.)
27
Notes:
1) Though the relay controller and receiver are each capable of being powered from separate
sources (i.e., AC adapters), only one adapter should be used. (The receiver’s AC adapter is
recommended for powering both devices.)
2) Despite the specialized use of the Skylink system in this application as a wireless interface, its
intended function as a home security system is not precluded. In fact, the wireless alarm and
HVAC shutoff functions can both coexist, providing two applications in one.
3) An important consideration with the Skylink system pertains to the situation that occurs when
multiple door sensors are programmed into the same zone. In this configuration, the receiver
does not appear to recognize subsequent sensor activity following the activation of a "trigger"
sensor. To illustrate the issue, consider the following test scenario:
•
•
•
•
Program the receiver so that both sensors are applied at zone 1. (For the sake of clarity,
presume that the sensors correspond to doors A & B.)
Open door A and verify that the receiver detects the violation, illuminating red LED
indicator #1.
Next, while door A remains open, also open door B so that both sensors are concurrently
active.
Now, if door A is subsequently closed, the receiver clears the violation (the red LED
extinguishes) even though door B is still open.
This appears to be normal behavior as designed by Skylink. While a sensor is active (i.e., door is
open), the receiver ignores all other subsequent sensor activity until the offending sensor returns
to the non-triggered state. If your application involves the use of multiple door sensors, consider
programming each into a separate zone and wire the QRDS relay accordingly. (Refer to the
sample application schematic at the end of the manual, titled "Wireless Application 3 of 3".)
28
The door/window sensor is a two-part item consisting of transmitter unit and magnet. The
transmitter unit is powered by a single coin-cell battery and is typically mounted on the frame
adjacent to the door or window being monitored. The magnet is usually mounted on an upper
corner of the door or window adjacent to the sensor unit. When the monitored door or window is
opened or closed, the transmitter sends a message to the receiver.
Wireless Door/window Sensor
(magnet & transmitter unit)
by Skylink Technologies, Inc.
The receiver is a specialized device that accepts radio frequency (RF) signals from compatible
wireless sensors. It features alert & alarm capability with four available zones. Each zone can be
programmed to accept up to four wireless sensors. (For details, refer to the instruction manual
included with the Skylink product.) The receiver is powered by AC adapter (included).
Note: The receiver’s AC adapter will also power the relay controller unit. Do NOT attempt to
power the two devices using separate power sources.
Wireless Receiver
by Skylink Technologies, Inc.
29
An interface cable is required for connecting the wireless receiver and relay controller unit.
(Refer to the Item Lists section for purchase details.)
Interface Cable
The multi-conductor cable consists of nine (9) individual signal wires, some of which will not be
needed for this project. Perform the following operations to prepare the cable:
•
•
•
Use wire cutters to cut/remove the 9-pin connectors. (The connectors will not be needed
and may be discarded.)
Remove approximately two (2) inches of the outer jacket from one end of the cable. Strip
1/4" of insulation from each wire. (This is the “short-wire” end of the cable. Individual
wires will be connected to the relay controller via wiring screw terminals.)
Remove approximately three (3) inches of the outer jacket from the opposite end of the
cable. Strip 1/8" of insulation from each wire. (This is the “long-wire” end of the cable.
Individual wires will be solder-attached to the receiver’s internal printed circuit board.)
Notes:
1) Not all signal wires in the cable will be required. Unused wires should be cut or taped back at
each end.
2) The wire colors specified in these instructions may not necessarily correspond to those
contained in the cable that you have chosen. In this case, you will need to make the necessary
cross-referencing adjustments.
30
In order to provide signal interfacing to the relay controller unit, the following receiver hardware
customizations are required:
•
•
Drill a cable-entry hole
Solder-attach cable wires
Drill a cable-entry hole:
A hole must be drilled into the left side of the receiver’s back cover to permit entry of the
interface cable:
•
•
•
•
•
Place the receiver face-down on a table or other suitable surface.
Use a Philips screwdriver to remove the two retaining screws.
Carefully detach the back cover.
Using a power-drill and appropriate bit, drill a 1/4" hole in into the left side (the side
opposite the power jack input). The hole should be located approximately 3/4" from the
base.
Set the rear cover aside for now.
Rear cover with 1/4" cable-entry hole
31
Solder-attach cable wires:
Individual wires of the interface cable must be soldered to specific locations on the receiver’s
printed circuit board:
•
•
Pre-tin each of the “long-wires”in preparation for soldering. (Apply flux if necessary.)
Solder the wires to indicated locations on the exposed printed circuit board as shown
below:
Printed circuit board (PCB)
with solder-attached wires
32
Closeup showing solder locations
Additional solder locations
33
Reattach the rear cover, inserting the unattached end of the cable through the 1/4" hole you
drilled earlier. (You may wish to apply an optional cable-tie around the cable for strain-relief.)
Rear cover reattached (access panel
removed, exposing the interface cable)
Completed receiver customizations
with reattached access panel
Completed receiver customizations
with attached interface cable
34
Connect the opposite end of the cable (“short-wires”) to terminal block TB-5 on the relay
controller as shown below:
Wire
Color
----red
blk
yel
blu
grn
brn
TB-5
Terminal
-------1
2
4
6
8
10
Interface wiring at relay controller unit
(terminal block TB-5)
Notes:
1) A minimum of 3 wires is required for monitoring a single zone (red, black, and yellow wires).
This minimum configuration accommodates up to four (4) wireless door/window sensors.
2) Additional wires (up to 6) expand the system to accommodate more zones (up to 4) and more
sensors (up to 16).
35
Receiver & relay controller with
connecting interface cable
36
At this point, you may power up the devices and program your door/window sensor(s) into the
receiver:
•
Obtain the AC adapter (included with the receiver.) Plug the large module end into a
suitable wall outlet. Insert the small barrel connector end into the receiver’s power jack.
(The power jack input is located on the right side of the receiver unit.)
IMPORTANT: Though the relay controller and receiver are each capable of being
powered from separate sources (i.e., AC adapters), only one adapter should be used.
(The receiver’s AC adapter is recommended for powering both devices.) Refer to ensuing
diagrams for wiring details.
•
When power is applied, green indicators on both devices will be illuminated.
Note: The green LED is an operational status indicator for each unit. The LED flashes
continually on the relay controller unit, but remains steady (i.e., no flashing) on the
receiver unit.
•
Begin by programming available door/window sensor(s) into the receiver. (Refer to
instructions included with your Skylink Wireless Door/Window Alert system for details manufactured by Skylink Technologies, Inc.)
IMPORTANT: During the programming process, you may notice that individual relay(s)
on the relay controller unit will engage. (They will automatically deactivate when
programming is complete.) This is considered normal and is to be expected. However,
once you have wired the relay controller to your HVAC system, this behavior may result
in unintended HVAC shutoff. Therefore, you are advised to disable your HVAC system at
the thermostat or the breaker panel whenever sensor programming is necessary.
•
You may make desired adjustments to relay controller DIP switch settings. For example,
use the “Activation Delay” setting to specify the time period that a door or window must
remain open before relay engagement occurs, resulting in HVAC shutoff. You may also
optionally enable a “Deactivation Delay” to postpone relay disengagement. (Refer to the
QRDS User Manual for details on configuration settings.)
Notes:
1) The following settings are required for proper relay operation when interfaced to the
Skylink receiver:
•
•
Pulse Input Enable = Enabled
External Switch Type = Normally-open
2) The relay controller unit (and receiver) should be powered off prior to making any
settings adjustments.
3) Refer to the QRDS User Manual for details on configuration settings.
37
Once you have programmed sensors at the receiver and completed relay controller settings, you
should conduct a preliminary test. This testing is recommended prior to proceeding with HVAC
wiring in subsequent steps. (Wireless door/window sensor(s) will be needed for the test.)
•
Begin by bringing the magnet in close proximity with the sensor/transmitter unit.
Note: There is a red marking on one side of the sensor/transmitter unit to denote where
the magnet should be placed. The sensor will detect presence of the magnet only when
placed on the marked side.
•
Power on the system by plugging in the AC adapter at the receiver.
•
Activate the sensor by separating the magnet from the transmitter unit. This action should
result in illumination of a red LED, both at the receiver device and at the relay controller
unit. The corresponding relay will also engage. (Engagement will occur immediately
unless you have configured an activation delay. If a delay has been configured, the red
LED at the relay controller unit will flash at a periodic rate indicating that relay
engagement is imminent, following the delay period.)
Note: If relay engagement does not occur and the LED(s) did not illuminate, you should
go back and repeat the programming operation described earlier.
•
Disengage the relay by bringing the magnet back together with the sensor/transmitter
unit. (Disengagement will occur immediately unless you have enabled a deactivation
delay. If a delay has been configured, the relay will disengage following the delay
period.)
•
Repeat this testing with remaining door/window sensor(s) you have programmed into the
receiver.
38
You are now ready to wire the relay controller into your HVAC system. (You should first power
off the receiver and relay devices by unplugging the AC adapter at the receiver.)
IMPORTANT: Be sure to disable power to the HVAC system at the breaker panel before
initiating any wiring operations.
Subsequent pages contain wiring diagrams for several possible wireless-sensor implementation
scenarios. These diagrams will assist you in wiring your HVAC system to the relay controller
(terminal connectors TB-1 through TB-4.) Apply the diagram that most closely matches your
application. (Refer to the Relay Controller section for wiring screw-terminal locations and
pinouts.)
CAUTION: HVAC equipment involves dangerous high voltages which can be potentially deadly.
If you are unfamiliar with these systems, you should not attempt these procedures. Instead,
consult a qualified HVAC technician or contractor.
39
––––––––––––––––––––
Wireless Application (1 of 3)
––––––––––––––––––––
40
––––––––––––––––––––
Wireless Application (2 of 3)
––––––––––––––––––––
41
––––––––––––––––––––
Wireless Application (3 of 3)
––––––––––––––––––––
42
Contact Information
Should you have any questions or comments please contact us :
Delahoussaye Consulting
http://www.kadtronix.com
[email protected]
43