1
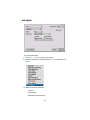
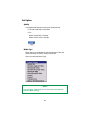
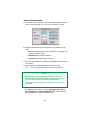
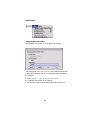
Copyright Information
Copyright © 2007 by Oki Data. All Rights Reserved
Document Information ________________________________
C7350n/7550n Mac Technical Reference
P/N 59366101
Revision 2.0
March, 2007
Disclaimer__________________________________________
Every effort has been made to ensure that the information in this document is
complete, accurate, and up-to-date. The manufacturer assumes no responsibility
for the results of errors beyond its control. The manufacturer also cannot guarantee
that changes in software and equipment made by other manufacturers and referred
to in this guide will not affect the applicability of the information in it. Mention of
software products manufactured by other companies does not necessarily
constitute endorsement by the manufacturer .
While all reasonable efforts have been made to make this document as accurate and
helpful as possible, we make no warranty of any kind, expressed or implied, as to
the accuracy or completeness of the information contained herein.
The most up-to-date drivers and manuals are available from the web site:
http://www.okiprintingsolutions.com
Trademark Information _______________________________
Oki and Microline are registered trademarks of Oki Electric Industry Company Ltd.
Apple, Macintosh and Mac OS are registered trademarks of Apple Computers Inc.
Hewlett-Packard, HP, and LaserJet are registered trademarks of Hewlett-Packard
Company.
Microsoft, MS-DOS and Windows are either registered trademarks or trademarks of
Microsoft Corporation in the United States and/or other countries.
Other product names and brand names are registered trademarks or trademarks of
their proprietors.
Regulatory Information _______________________________
This product complies with the requirements of the Council
Directives 89/336/EEC (EMC) and 73/23/EEC (LVD) as amended
where applicable, on the approximation of the laws of the member
states relating to Electromagnetic Compatibility, Low Voltage and
Radio & Telecommunications Terminal Equipment.
C7350n/7550n Mac Technical Reference
2
Contents
Document Information ......................................................................... 2
Disclaimer.................................................................................................. 2
Trademark Information ......................................................................... 2
Regulatory Information ......................................................................... 2
Notes, Cautions, etc. .............................................................................. 5
Macintosh OS 9.x .................................................................................... 6
Printer Driver ................................................................................................... 6
Setting Up the Printer Driver ..................................................... 6
Operation ......................................................................................................... 8
Color Print Matching ................................................................. 9
Choosing a Color Matching Method ....................................... 12
Color Option ............................................................................ 14
Job Option................................................................................ 21
Job Type Plug-in ...................................................................... 25
Printing Multiple Pages on One Sheet ..................................... 35
Duplex Printing (Printing on Both Sides of the Paper) .......... 36
Collating................................................................................... 38
Utilities............................................................................................................ 40
General Information................................................................. 40
Installing the Utilities............................................................... 41
Fonts Downloader.................................................................... 42
Color Swatch Utility ................................................................ 43
Storage Device Manager.......................................................... 45
Macintosh OS 10.1 & 10.2 .................................................................53
Printer Driver ................................................................................................ 53
Operation ...................................................................................................... 54
Color Print Matching ............................................................... 55
Choosing a Color Matching Method ....................................... 59
Driver Options ......................................................................... 61
Printing Multiple Pages on One Sheet ..................................... 71
Duplex Printing (Printing on Both Sides of the Paper) ........... 72
Collating................................................................................... 73
Utilities............................................................................................................ 74
Macintosh OS 10.3 ...............................................................................75
Printer Driver ................................................................................................ 75
Operation ...................................................................................................... 76
Color Print Matching ............................................................... 77
3
Choosing a Color Matching Method ....................................... 80
Driver Options ......................................................................... 82
Printing Multiple Pages on One Sheet (N-up Printing) ........... 91
Duplex Printing (Printing on Both Sides of the Paper) ........... 92
Collating................................................................................... 94
Utilities............................................................................................................ 95
4
Notes, Cautions, etc.
NOTE
A note appears in this manual like this. A note provides
additional information to supplement the main text.
CAUTION!
A caution appears in this manual like this. A caution
provides additional information which, if ignored, may result
in equipment malfunction or damage.
WARNING!
A warning appears in this manual like this. A warning
provides additional information which, if ignored, may
result in a risk of personal injury.
Important!
An Important box appears in the manual like this. An important
box provides information which can impact the usability of that
particular printer function.
5
Macintosh OS 9.x
Printer Driver
This section describes how to change the PPD file and how to
activate optional accessories in the printer driver, once you have
installed them in the printer.
See your printed Software Installation Guide for information on
installing printer drivers.
Setting Up the Printer Driver
1. From the Apple menu, select Chooser.
2. Double click LaserWriter8.
3. Select the name of the new icon (e.g., OKI 9043589) which
appeared after you installed the driver, then click Setup.
Select the PPD
4. Click Select PPD.
5. Click Printing → Change Setup....
6. Select your printer model from the list, then click Open.
6
Activate Installed Options in the Driver
7. Click Configure
.
Mac9.1_SelectOptions.jpg
Mac9.1
_Select
Options
.jpg
8. Optional Trays: To engage optional trays, change the setting for
Available Tray to 2 or 3 depending on how many trays you have
installed.
9. Duplex Unit: To engage the Duplex Unit, change the setting to
Installed.
10. Hard Disk Drive: To engage the hard disk drive, change the
setting to Installed.
11. DIMMs: To engage additional memory, set Memory
Configuration to the new total value of memory installed
(standard memory + any installed optional DIMM memory).
12. When done, click OK.
13. Click OK.
14. Close Chooser.
7
Macintosh OS 9.x
Operation
This section explains how to change the printer’s operation for
specific print jobs directly from within an application.
Most applications allow the printer properties to be accessed from
within the document print dialog.
This section will only detail options as they apply to the LaserWriter®
8 driver. Refer to manufacturer’s guidelines regarding other driver
operations, for example the AdobePS™ driver.
8
Color Print Matching
The install utility provides a color matching profile for your printer, as
well as Color Option utility in the print driver. In general, using the
Auto settings will provide reasonable default settings that produce
good results for most documents.
Many applications have their own color settings, and these may
override the settings in the printer driver. Please refer to the
documentation for your software application for details on how that
particular program’s color management functions.
If you wish to manually adjust the color settings in your printer driver,
please be aware that color reproduction is a complex topic, and there
are many factors to take into consideration. Some of the most
important factors are listed below.
Differences between the Range of Colors a Monitor or
Printer Can Reproduce
• Neither a printer nor a monitor is capable of reproducing the full
range of colors visible to the human eye. Each device is restricted
to a certain range of colors. In addition to this, a printer cannot
reproduce all of the colors displayed on a monitor, and vice versa.
• Both devices use very different technologies to represent color. A
monitor uses Red, Green and Blue (RGB) phosphors (or LCDs), a
printer uses Cyan, Magenta, Yellow and Black (CMYK) toner or
ink.
• A monitor can display very vivid colors such as intense reds and
blues and these cannot be easily produced on any printer using
toner or ink. Similarly, there are certain colors, (some yellows for
example), that can be printed, but cannot be displayed accurately
on a monitor. This disparity between monitors and printers is often
the main reason that printed colors do not match the colors
displayed on screen.
9
Viewing Conditions
A document can look very different under various lighting conditions.
For example, the colors may look different when viewed standing
next to a sunlit window, compared to how they look under standard
office fluorescent lighting.
Printer Driver Color Settings
The driver settings for Manual color can change the appearance of a
document. There are several options available to help match the
printed colors with those displayed on screen. These options are
explained in subsequent sections of this User Manual.
To access the color matching options in the driver discussed below:
1. Access the printer settings page via the Print dialog from any
application (usually accessed via File → Print).
2. Click the General drop down menu and select Color Option.
10
Monitor Settings
The brightness and contrast controls on your monitor can change
how your document looks on-screen. Additionally, your monitor color
temperature influences how “warm” or “cool” the colors look.
NOTE
Several of the Color Matching options make reference to
your monitor’s Color Temperature. Many modern monitors
allow the color temperature to be adjusted using the
monitor’s control panel.
There are several settings found on a typical monitor:
• 5000k*
Warmest; yellowish lighting, typically used in graphics arts
environments.
• 6500k
Cooler; approximates daylight conditions.
• 9300k
Cool; the default setting for many monitors and television sets.
*k = degrees Kelvin, a measurement of temperature
How Your Software Application Displays Color
Some graphics applications such as Macromedia Freehand® or
Adobe® Photoshop® may display color differently from “office”
applications such as Microsoft® Word. Please see your application’s
online help or user manual for more information.
Paper Type
The type of paper used can also significantly affect the printed color.
For example, a printout on recycled paper can look duller than one
on specially formulated glossy paper.
11
Choosing a Color Matching Method
There is no one way to achieve a good match between the document
displayed on your monitor and its printed equivalent. There are many
factors involved in achieving accurate and reproducible color.
However, the following guidelines may help in achieving good color
output from your printer. There are several suggested methods,
depending on the type of document you are printing.
NOTE
These suggestions are for guidance only. Your results may
vary depending on the application from which you are
printing. Some applications will override any color matching
settings in the printer driver without warning.
RGB or CMYK?
The guidelines for choosing a color matching method makes
distinctions between Red, Green, Blue (RGB) and Cyan, Magenta,
Yellow, Black (CMYK).
Generally, most documents you print will be in RGB format. This is
the most common, and, if you do not know your document’s color
mode, assume that it is RGB.
Typically CMYK documents are only supported in professional
Desktop Publishing and Graphics applications.
Matching Photographic Images
RGB Only
The standard Color Matching (found in the printer driver under
Color Matching) is a generally a good choice. Select a matching
method appropriate to your monitor.
RGB or CMYK
If you are printing photographic images from a graphics
application such as Adobe Photoshop, you may be able to use
Soft-Proofing to simulate the printed image on your monitor. To do
this, you can use the ICC-Profiles provided, and then print using
the ICC profiles as the Print Space (or Output space).
12
Matching Specific Colors
(e.g., a Company logo)
RGB Only
• Standard Color Matching, and the sRGB setting.
• PostScript Color Matching using the Absolute Colorimetric option.
• Use the Color Swatch Utility to print out a chart of RGB swatches
and enter your desired RGB values in your application's color
picker.
RGB or CMYK
• If you are printing from a graphics application such as Adobe
Photoshop, you may be able to use Soft-Proofing to simulate the
printed image on your monitor. To do this, you can use the
ICC-Profiles provided, and then print using the ICC profiles as the
Print Space (or Output space).
• Alternatively, use PostScript Color Matching with the Absolute
Colorimetric setting.
Printing Vivid Colors
RGB Only
• Use Color Matching, with the Monitor 6500k Vivid, sRGB or Digital
Camera settings.
RGB or CMYK
• Use PostScript Color Matching with the Saturation option.
13
Color Option
Mac9.1_OKIColorOption.jpg
1. Open your printer driver (by choosing File → Print from an
application) and select your printer.
2. Open the drop-down menu directly underneath the printer and
select Color Option.
ColorOptionSelecting_crop.jpg
ColorOptionSelecting_crop.jpg
14
Color Control
Color Control allows you to determine the scheme in which the
printer will display colors.
Mac9.1_ColorControl.jpg
Select from:
a. OKI Color Matching
This is OKI’s proprietary color matching system. It affects RGB
data only. This is the default setting. This option provides the
fastest, best color matching for your printer.
b. PostScript Color Matching
This uses PostScript Color Rendering Dictionaries built into the
printer. It affects both RGB and CMYK data.
c. PANTONE®
Uses PANTONE color definitions built into the printer.
d. No Color Matching
No color correction occurs when selected. This option is
beneficial when other matching regimens are used, specifically
if you select a Color Simulation option.
e. Print in Grayscale
No color will print. The printer will interpret all colors as a
variation of grays.
15
Color Setting
This option allows you to select your color settings as they appear on
your monitor.
ColorSettingDialog.jpg
Select the method you wish to use:
Monitor(6500k) Auto
The default setting that selects the best options for your printer.
This selection works best for office situations.
Monitor (6500k) Perceptual
Optimized for printing photographs when using a monitor with a
color temperature of 6500K. This is best for printing photographic
images.
Monitor (6500k) Vivid
Optimized for printing bright colors when using a monitor with a
color temperature of 6500K. Ideal for office graphics and text.
Vivid or Digital Camera settings produce brightest colors.
Monitor (9300k)
Optimized for printing photographs when using a monitor with a
color temperature of 9300K.
Digital Camera
Optimized for printing photographs taken with a digital camera.
This tends to produce prints with lighter and brighter colors. For
some photographs, other settings may be better depending on the
subjects and the conditions under which they were taken. Vivid or
Digital Camera settings produce brightest colors.
16
sRGB
This option attempts to simulate RGB color.
Optimized for matching specific colors, such as a company logo
color. The colors within the printer's color gamut are printed without
any modification, and only colors that fall outside the printable colors
are modified.
Rendering
When a document is printed, a conversion takes place from the
document's color space to the printer color space. The rendering
intents are essentially a set of rules that determine how this color
conversion takes place.
RenderingDialog.jpg
Select the desired option:
Auto
The best default. This selects the optimal settings for a general
office environment.
Perceptual
Best choice for printing photographs. Compresses the source
gamut into the printer's gamut while maintaining the overall
appearance of an image. This may change the overall
appearance of an image as all the colors are shifted together.
Saturation
Best choice for printing bright and saturated colors if you don't
necessarily care how accurate the colors are. This makes it the
recommended choice for graphs, charts, diagrams etc. Maps fully
saturated colors in the source gamut to fully saturated colors in the
printer's gamut.
Relative Colorimetric
Good for proofing CMYK color images on a desktop printer. Much
like Absolute Colorimetric, except that it scales the source white to
17
the (usually) paper white; i.e. unlike Absolute Colorimetric, this
attempts to take the paper white into account.
Absolute Colorimetric
Best for printing solid colors and tints, such as Company logos etc.
Matches colors common to both devices exactly, and clips the
out-of-gamut colors to their nearest printed equivalent. Tries to
print white as it appears on screen. The white of a monitor is often
very different from paper white, so this may result in color casts,
especially in the lighter areas of an image.
Color Simulation
Affects CMYK output only and is usually used in offset printer
environments only.
ColorSimulation.jpg
This option simulates what the output will look on a printing press
using the ink types SWOP, Euroscale or Japan. If using CMYK Ink
Simulation, it is recommended that you switch off all other Printer
Color Matching by selecting No Color Matching under the Color
Match option in the printer driver.
Select the option desired.
Black Finish
This setting determines Black Toner usage only.
BlackFinish.jpg
Auto
This option is best for an office environment, with the printer
determining which style is better.
18
Glossy
This option uses more CMYK and less Black while producing a
shinier black.
Matte
This option uses more Black and less CMYK while producing a
flatter black.
Separations
This option affects output only, allowing you to print all four colors as
separate plates.
Separations.jpg
Black Overprint
This option prevents registration errors and only works for 100%
black text.
Click the checkbox to enable the option.
BlackOverprint.jpg
Printer Halftone
This option prevents the halftone of a high-end graphics application
from printing.
Click the checkbox to enable the option.
Halftone.jpg
19
Custom Gamma Adjustment
Not available.
20
Job Option
JobOption_oem.jpg
To access Job Option:
1. Click File → Print, and select your printer.
2. Open the drop-down list directly below Printer: and select Job
Option.
JobOptionSelect.jpg
3. Make the desired selections.
• Quality
• Media Type
• Miscellaneous Selections
21
Job Option
Quality
A straightforward selection of the print quality desired.
• Fast: 600 x 600 dpi, both models
• Fine
Model C7350: 600 x 1200 dpi
Model C7550: 1200 x 1200 dpi
Quality.jpg
Media Type
Many options are available for selecting the type of the print
media. Normally the Printer Setting is sufficient.
Select your desired Media Type.
Mac9.1_MediaType.jpg
NOTE
Any selection, other than Printer Setting will override the
printer’s Menu setting.
22
Job Option
Miscellaneous Selections
JobOptions.jpg
Collate
Collating can be carried out with or without a hard disk drive
installed. However, printers with a hard disk drive will provide
greater performance. This option is useful when printing multiple
copies of large documents and wish for them to be printed in
sequence.
Click to enable collation of your documents.
1pg_2pg.jpg
Media Check
Sets whether the printer checks the matching of paper size to that
of the tray. Only standard sizes are checked.
MP tray is handled as manual feed
Selecting this will cause the MP tray to be used in manual feed
situations. The MP tray cannot be used for duplex printing.
23
Page Rotate
Checking this will rotate the printed material on the page 180
degrees.
Apg_Apg.jpg
Toner Saving
Checking this will enable toner saving.
24
Job Type Plug-in
This plug-in allows you to utilize features through the printer’s
optional hard disk drive.
NOTE
• The internal hard disk must be installed in the printer and
enabled to allow for spooling of the print job before final
printing.
• If the hard disk memory is insufficient for the spooled
data, DISK FULL is displayed and only one copy printed.
• If the software application being used has a collate print
option, this must be turned OFF for secure printing to
operate correctly.
• Secure printing may not be available in some software
applications.
To access Job Type,
1. Select your printer.
2. Open the drop-down menu directly underneath the printer and
select Job Type.
JobTypeAccessing.jpg
Each feature on the Job Type screen is detailed below.
25
Job Type Features
Print Type
JobTypeFixed_oem.jpg
JobTypeFixed_oem.jpg
From here you select the type of printing you wish to use.
Normal
The default setting.
Job Spool
Lets you spool your print job to the printer’s hard drive.
Secure
(see page 28)
Allows you to print confidential documents on network printers by
storing them on the printer’s hard drive, then going to the printer
and using the control panel to print out the document.
Proof and Print
(see page 30)
Allows printing of a single copy of a document for checking before
printing multiple copies of the same document.
26
Store to HDD
(see page 32)
Allows print jobs to be stored on the hard disk for future printings.
27
Job Type Features
Print Type
Secure Print
Allows you to print confidential documents on network printers by
storing them on the printer’s hard drive, then going to the printer
and using the control panel to print out the document.
NOTES
• The internal hard disk must be installed in the printer and
enabled, to allow for spooling of the print job before final
printing.
• If the hard disk memory is insufficient for the spooled
data, DISK FULL is displayed and only one copy is printed.
To send a confidential document to the printer using Secure
Print:
1. Select the Secure option.
2. Enter a job name of up to 16 characters next to Job Name and
a four digit personal ID number from 0000 to 9999 in the ID
Number box.
3. Press Print to proceed with your print job. The document will
be stored on the printer’s hard disk.
4. Walk up to the printer to print out the document using the front
panel (see below).
To print a confidential document
PrinterMenu.eps
MENU
0
ITEM VALUE SELECT
1
2
ON LINE
4
3
CANCEL
5
6
7
1. Press the MENU button to access the PRINT JOBS MENU and
press the SELECT button.
28
2. Use the numbered buttons on the control panel to enter the
personal ID number you set above.
3. Press the VALUE button until ALL JOBS or the required job name
is displayed.
4. Press the SELECT button.
The document will print and be deleted from the hard disk drive.
To delete a confidential document before printing it:
1. Press the MENU button to access the PRINT JOBS MENU and
press the SELECT button.
2. Use the numbered buttons on the control panel to enter the
personal ID number you set above.
3. Press the VALUE button until ALL JOBS or the required job name
is displayed.
4. Press the CANCEL button to delete the job from the printer.
29
Proof and Print
NOTES
• The internal hard disk must be installed in the printer and
enabled, to allow for spooling of the print job before final
printing.
• If the hard disk memory is insufficient for the spooled
data, DISK FULL is displayed and only one copy is printed.
• If the software application being used has a collate print
option, it must be turned OFF for proof and print to
operate correctly.
• Proof and print may not be available in some software
applications.
Using Proof and Print
1. Select Proof and Print.
2. Enter a job name of up to 16 characters under Job Name
Setting and a four digit personal ID number from 0000 to
9999.
3. Click Print to proceed with your print job. Print the document
from the software application being used. The document will
be stored on the printer’s hard disk and one copy will print for
your perusal.
4. After checking the proof, you then can print or delete (if
incorrect) the remaining copies of the document using the
procedures given below.
Printing the copies of a Proof and Print document
1. Press the MENU button to access the PRINT JOBS MENU, then
press the SELECT button.
2. Use the numbered buttons on the control panel to enter the
personal ID number you set above.
3. Press the VALUE button until ALL JOBS or the required job
name is displayed.
4. Press the SELECT button to print the remaining copies of the
document.
30
Deleting a Proof and Print document before printing the
copies
If the proof is not ready for printing, the job must be deleted from
the printer:
1. Press the MENU button to access the PRINT JOBS MENU
and press the SELECT button.
2. Use the numbered buttons on the control panel to enter the
personal ID number you set above.
3. Press the VALUE button until ALL JOBS or the required job
name is displayed.
4. Press the CANCEL button to delete the remaining copies of
the document.
5. When the deletion confirmation message appears, confirm by
pressing the SELECT button.
31
Store To Hard Disk
NOTES
• The internal hard disk must be installed in the printer and
enabled to allow for spooling of the print job before final
printing.
• If the hard disk memory is insufficient for the spooled
data, DISK FULL is displayed and only one copy printed.
• If the software application being used has a collate print
option, this must be turned OFF for store to hard disk to
operate correctly.
• Store to hard disk may not be available in some software
applications.
Using Store to Hard Disk
1. Select Store to HDD.
2. Enter a job name of up to 16 characters under Job Name and
a four digit personal ID number from 0000 to 9999.
3. Click Print to proceed with your print job. The document will be
stored on the printer’s hard disk.
4. The document can then be printed or deleted using the
procedures given below.
32
Printing a document stored on the hard disk.
PrinterMenu.eps
MENU
0
ITEM VALUE SELECT
1
2
5
6
ON LINE
4
3
CANCEL
7
1. Press the MENU button to access the PRINT JOBS MENU and
press the SELECT button.
2. Use the numbered buttons on the control panel to enter the
personal ID number you set above.
3. Press the VALUE button until ALL JOBS or the required job
name is displayed.
4. Press the SELECT button to print the document.
Deleting a stored document from the hard disk drive
1. Press the MENU button to access the PRINT JOBS MENU and
press the SELECT button.
2. Use the numbered buttons on the control panel to enter the
personal ID number you set above.
3. Press the VALUE button until ALL JOBS or the required job
name is displayed.
4. Press the CANCEL button to delete the remaining copies of
the document.
5. When the deletion confirmation message appears, confirm by
pressing the SELECT button.
33
Run Maintenance Cycle Before Printing
JobTypeFixed_oem.jpg
Selecting Run Maintenance Cycle Before Printing forces the
printer to automatically clean itself before printing. This option allows
you to improve your print quality if there is a problem with printing
such as too much graininess.
34
Printing Multiple Pages on One Sheet
(N-up Printing)
1. Click File → Print, and select your printer.
2. Open the drop-down menu directly underneath the printer and
select Layout.
Layout_crop.jpg
3. From the Layout screen, select the options desired.
LayoutOptions_oem.jpg
a
b
c
a. Set the number of pages to be printed.
b. Select the desired orientation (portrait or landscape).
c. Select a border between the sheets, if desired.
4. Click Print to print or Save Settings to save and close the printer
dialog box.
35
Duplex Printing (Printing on Both Sides of the
Paper)
NOTE
The optional duplex unit must be installed in the printer and
enabled before duplex printing can be carried out.
• Standard paper sizes only.
• Paper weight range 20 to 28 lb. US Bond (75 to 105 g/m²).
• Paper must be loaded print side up.
• Only Tray 1, optional Trays 2 and 3, and the High Capacity Feeder
trays can be used for duplex printing. The MP tray cannot be used
for duplex printing.
1. Click File → Print, and select your printer.
2. Open the drop-down menu directly underneath the printer and
select Layout.
Layout.jpg
36
3. From the Layout screen, select the options desired.
LayoutOptions_oem.jpg
a
b
a. Select Print on Both Sides.
b. Select which Binding you prefer.
4. Click Print to print or Save Settings to save and close the printer
dialog box.
37
Collating
Collating can be carried out with or without a hard disk drive installed.
However, printers with a hard disk drive will provide greater
performance.
Important
If your software application has a collate option, use it instead of
the collate option in the printer driver. Doing so will prevent any
conflicts in printing, i.e. collate from the software application or
collate from the printer driver.
1. Click File → Print, and select your printer.
2. The General dialog box should already be displayed. If not, then
select General from the menu.
GeneralSelect.jpg
38
3. Select Collated.
4. Click Print.
General_oem.jpg
39
Mac OS 9.x
Utilities
General Information
Important!
These Utilities are unavailable for Mac OS 10.x.
The following utilities are supplied:
• Fonts Downloader (see page 42)
This utility allows you to transfer fonts to the printer’s RAM or
optional hard disk and to manage fonts on your PostScript
printer. This utility is an Adobe product and is not supported by
Oki Data. Please see the Read Me file for further information.
• Color Swatch Utility (see page 43)
The Color Swatch Utility allows you to print color samples or
swatches on your color printer. The swatches are used with
your software program to select and reproduce color
accurately. The swatches represent selected samples of the
your printer's color palette and can be used to find the desired
colors for your printed documents.
• Storage Device Manager (see page 45)
Using the software improves the internal performance of the
printer allowing you to adjust printer options.
Important!
The printer’s internal hard drive does not communicate directly
back to the Storage Device Manager software; it sends any error
messages to the printer display. If things seems to be “stuck,”
check the display of the printer.
40
Installing the Utilities
1.
2.
3.
4.
Insert the CD supplied with your printer into the CD-ROM drive.
Double-click the CD icon that appears on the desktop.
Open the MAC folder.
Click PSDRV → English, then double click the Mac Installer
icon.
MacInstallerIcon.jpg
5. Click Continue and accept the Software License Agreement.
6. Select Custom Install to access the Utility Installation.
InstallSelect_oem.jpg
7. Click the boxes beside the Utilities you wish to install, then click
Install.
The Utilities install into the folder you specify during the installation
process.
41
Fonts Downloader
This utility allows you to transfer fonts to the printer’s RAM or hard
disk and to manage fonts on your PostScript printer. This utility is an
Adobe product and is not supported by Oki Data. Please see the
Read Me file for further information.
Important!
This utility only communicates with the printer via AppleTalk and
is incompatible with USB connections.
42
Color Swatch Utility
Things To Remember:
• Your software may not be able to match colors using the
information provided by the swatch files. In that case, you may
need to use other means of matching.
• Many other factors influence how you see color: the color and
finish of the paper, the light you are using, even the colors
surrounding the one you are identifying.
• The swatches represent selected samples of your printer’s color
palette and can be used to find the desired colors for your printed
documents.
Open Color Swatch
Double click the local hard drive icon, then double click Oki
Data → Swatch Utility → Swatch Utility.
InstallSelect_oem.jpg
Each color block, or sample, is identified with information your
software package needs to reproduce that color accurately. The
numbers under each block specify the amounts of the primary
colors—red (R), green (G), and blue (B), that mix to form each
particular shade. The amounts are given as a numerical value
between 0 and 255.
43
Create a Custom Swatch
1. If the color you are seeking is not in the Simple Swatch, create a
new color by selecting Custom Swatch from the File menu.
CustomSwatch.jpg
2. Drag the handles as required and press OK to create the new
color.
• Hue bar changes the hue of the swatches, for example, red
to green or blue to yellow.
• Saturation bar changes vividness.
• Lightness bar changes light intensity.
3. The utility then creates many different possibilities from which you
can choose.
4. Once satisfied, print the swatch from the menu using
File → Print or repeat the steps to find the color desired.
NOTE
• Swatch utility does not guarantee that the printer will
print the same color as displayed; consider this only as a
reference from which you can adjust parameters.
• The printer may not be able to print the exact color that
you desire.
• For additional information, including Applying Color Value in
your Application, and Setting Monitor Color, see the Swatch
Utility ReadMe file located in the Mac folder.
44
Storage Device Manager
Important!
• When attempting to open the application, ensure that the
default printer is connected and turned on.
• If your default printer is a virtual printer, the application will
return the error message “This utility does not support this
interface.” Reset your default printer to a real printer.
Open SDM
Double click the local hard drive, then double click
Okidata → SDM for Mac → Storage Device Manager for Mac.
From the main screen, you can set the default feed tray as well as
paper sizes for the feed trays. You can also enable (the default) or
disable the Auto Tray Switch feature.
Mac9.1_SDMforMac.jpg
Mac9 1 SDMforMac jpg
NOTE
Trays that are not installed are grayed out and disabled.
45
Using Storage Device Manager to set Options
Click the Options button and make any desired changes in the
settings. When you are done making changes, click Save to
download the settings to the printer.
Mac9.1_SDMOptions.jpg
Mac9.1_S
DMOption
s.jpg
Manual Timeout
When manual feed is selected and the printer detects that there is
no paper in the requested feed tray, it will show a message
requesting that paper be loaded and wait a period of time for the
paper to be loaded before cancelling the print job. This sets the
period of time the printer will wait.
Mac9.1_SDMManualTimeout.jpg
Mac9.1_SDMManualTimeout.jpg
Printing Timeout
When printing a job and the paper in the selected tray runs out, the
printer will wait a period of time for more paper to be loaded before
cancelling the print job. This sets the period of time the printer will
wait.
Mac9.1_SDMPrintTimeout.jpg
Mac9.1_SDMPrintTimeout.jpg
46
Media Check
Sets whether the printer checks the matching of paper size to that
of the tray. Only standard sizes are checked. This should be
disabled when printing transparencies or labels. It can also be
disabled in the driver as a job is being printed.
Paper Jam Recovery
This parameter, when enabled, sets whether or not printing
continues after a paper jam has been cleared. If set to Disable, the
print job that was being printed when the paper jam occurred will
be cancelled after clearing the paper jam. When set to Enable, the
print job will continue after the jam has been cleared.
Power Save
This will enable Power Save Delay.
Power Save Delay
When no input is received for the specified time, the printer will
enter Power Save Mode.
Mac9.1_SDMPowerDelay.jpg
Mac9.1_SDMPowerDelay.jpg
SDM Menu Items
File Menu
Mac9.1_SDMFileMenu.jpg
Mac9.1_SDMFileMenuy.jpg
Refresh
Downloads the latest settings from the printer.
Update PPD
Loads the latest PPD file.
47
Utilities Menu
Mac9.1_SDMUtilMenu.jpg
Mac9.1_SDMUtil
Menu.jpg
Change Printer Name/Zone
Only available if the printer is on an AppleTalk network.
Mac9.1_SDMPrinterName.jpg
1 SDMPrinterName
jpgthe PostScript interpreter
This changes theMac9
name
that is stored in
in the printer. However, this will not change the name displayed in
the Chooser.
1. Click Utilities → Change Printer Name/Zone.
2. If available, choose the Zone required.
3. Rename the printer with the desired name and press Save.
48
Download File
Mac9.1_SDMDownloadFile.jpg
Mac9.1_SDMDownloadFile.jpg
This utility allows you to download PS/PDF/Font files to the
printer’s hard drive for faster printing. The printer will automatically
print the PS/PDF files unless they are specified to be stored on the
hard disk.
1. Click Utilities → Download File.
2. Select the file you wish to download to the printer.
3. Click Open to start the download process.
49
Display Font List
Shows a list of fonts currently loaded in the printer.
DisplayFontList.jpg
DisplayFontList.jpg
Initialise Disk
InitialiseDisk.jpg
InitialiseDisk.jpg
CAUTION!
This utility erases the printer’s hard disk and causes it to
rebuild the directories. This action cannot be undone.
1. Click Utilities → Initialise Disk.
2. Select the Disk to erase and click Initialise.
50
Substitute Fonts
This function is not supported for a non-kanji printer.
PS Gamma Adjuster
Mac9.1_SDMGamma.jpg
Mac9.1_SDMGamma.jpg
This option allows adjusting the gamma output, or toner density,
when printing a job. The Gamma Curve profile is sent to the printer
with the print job.
1. Because Gamma Curve profiles are tied to the displayed PPD
file, select the correct PPD file before proceeding.
2. To add an available Gamma Curve profile, highlight the
desired profile and press the Add button.
3. To remove a Gamma Curve profile from the PPD column,
press the Delete button, not the Remove button. Only use the
Remove button if you edit (using the Edit button) the profile
and wish to store it in the Available Gamma Curves column.
51
Create/Edit a New Gamma Curve Profile
1. To create a new Gamma Curve, click New.
To edit an existing Gamma Curve, highlight the profile and click
Edit.
GammaCurve.jpg
GammaCurve.jpg
2. To apply the curve to all four colors, select All (CMYK) [the
default]. To edit a specific color, deselect All (CMYK) and click
the individual color.
3. To modify a gamma curve, click a point on the curve and drag it to
change the shape of the curve. Or if known, enter the values in
the fields at the bottom of the screen.
4. Once the configuration is complete, fill in a name and click Save.
Important!
Remember, the Gamma Curve profile is tied to the displayed
PPD file; so the PPD file must be selected in the printer setup to
gain access to the Gamma Curve profile saved to the same PPD
file.
52
Macintosh OS 10.1 & 10.2
Printer Driver
See your printed Software Installation Guide for information on
installing printer drivers.
Adjusting Options
Apple Computer has not enabled Configure Printer... for OS 10.1
and 10.2. Therefore, direct configuration of the printer driver is
unavailable at this time.
ConfigurePrinter.jpg
53
Macintosh OS 10.1 & 10.2
Operation
This section explains how to change the printer’s operation for
specific print jobs.
Most applications allow the printer properties to be accessed from
within the document print dialog.
This section will only detail options as they apply to the Oki Data
printer driver.
54
Color Print Matching
The install utility provides a color matching profile for your printer. In
general, using the OKI Color Matching settings will provide
reasonable default settings that produce good results for most
documents.
Many applications have their own color settings and these may
override the settings in the printer driver. Please refer to the
documentation for your software application for details on how that
particular program’s color management functions.
Factors That Affect the Appearance of Printed Documents
If you wish to manually adjust the color settings in your printer driver,
please be aware that color reproduction is a complex topic, and there
are many factors to take into consideration. Some of the most
important factors are listed below.
Differences between the Range of Colors a Monitor or Printer
Can Reproduce
• Neither a printer nor a monitor is capable of reproducing the full
range of colors visible to the human eye. Each device is restricted
to a certain range of colors. Additionally, a printer cannot
reproduce all of the colors displayed on a monitor and vice versa.
• Both devices use very different technologies to represent color. A
monitor uses Red, Green and Blue (RGB) phosphors (or LCDs), a
printer uses Cyan, Yellow, Magenta and Black (CMYK) toner or
ink.
• A monitor can display very vivid colors such as intense reds and
blues and these cannot be easily produced on any printer using
toner or ink. Similarly, there are certain colors, (some yellows, for
example), that can be printed, but cannot be displayed accurately
on a monitor. This disparity between monitors and printers is often
the main reason that printed colors do not match the colors
displayed on screen.
Viewing Conditions
A print can look very different under different lighting conditions. For
example, the colors in a print may look different when viewed
standing next to a sunlit window, compared to how they look under
standard office fluorescent lighting.
55
Monitor Color Profile Select
Apple provides a ColorSync Utility → Devices that allows
selection of the Oki Data supplied ICC color profile for your monitor.
The profile will attempt to calibrate the monitor to more closely match
the printer’s output. However, merely selecting the profile will not
automatically produce perfect results as many factors will contribute
to the gamut of color selection.
1. Navigate to the utility by accessing your Local Hard
Drive → Applications → Utilities → ColorSync Utility.
2. Click the arrow next to Displays and select your monitor (in this
example it is iMac). For Current Profile, select Other...
ColorSyncDeviceProfile.jpg
ColorSyncDeviceProfile.jpg
3. From the Profile selection menu, click the desired Oki Data ICC
Profile, then press Open to enable it.
56
Color Profile Select: Apple ColorSync
Not to be confused with the ColorSync Utility → Devices, Apple
also provides a System Preference utility, ColorSync, for selection
of color profiles for the printer and documents.
1. Click System Preferences → ColorSync.
2. On the Device Profiles tab, select your Oki Data Output profile.
3. On the Document Profiles tab, for the CMYK Default option,
highlight the Oki Data profile desired.
Printer Driver Color Settings
The driver settings for Manual color can change the appearance of a
printed document. There are several options available to help match
the printed colors with those displayed on screen. These options are
explained in subsequent sections.
To access the color matching options in the driver discussed below:
1. Access the printer settings page via the Print dialog from any
application (usually File → Print).
2. Click the drop down menu and select Printer Features and then
select the Feature Set 2 tab for Color Control.
57
Monitor Settings
The brightness and contrast controls on your monitor can change
how your document looks on-screen. You can calibrate your
monitor’s color regimen in System
Preferences → Displays → Color. Additionally, your monitor
color temperature influences how “warm” or “cool” the colors look.
NOTE
Several of the Color Matching options make reference to
your monitor’s Color Temperature. Many modern monitors
allow the color temperature to be adjusted using the
monitor’s control panel.
There are several settings found on a typical monitor:
• 5000k* or D50
Warmest; yellowish lighting, typically used in graphics arts
environments.
• 6500k* or D65
Cooler; approximates daylight conditions.
• 9300k*:
Cool; the default setting for many monitors and television sets.
(*k = degrees Kelvin, a measurement of temperature)
How Your Software Application Displays Color
Some graphics applications such as Macromedia Freehand or
Adobe Photoshop may display color differently from “office”
applications such as Microsoft Word. Please see your application’s
online help or user manual for more information.
Paper Type
The type of paper used can also significantly affect the printed color.
For example, a printout on recycled paper can look duller than one
on specially formulated glossy paper.
58
Choosing a Color Matching Method
There is no one correct way to achieve a good color match between
the document displayed on your monitor, and its printed equivalent.
There are many factors involved in achieving accurate and
reproducible color.
However, the following guidelines may help in achieving good color
output from your printer. There are several suggested methods,
depending on the type of document you are printing.
NOTE
These suggestions are for guidance only. Your results may
vary depending on the application from which you are
printing. Some applications will override any color matching
settings in the printer driver without warning.
RGB or CMYK?
The guidelines for choosing a color matching method make
distinctions between Red, Green, Blue (RGB) and Cyan, Magenta,
Yellow, Black (CMYK).
Generally, most office documents you print will be in RGB format.
This is the most common, and, if you do not know your document’s
color mode, assume that it is RGB.
Typically CMYK documents are only used in professional Desktop
Publishing and Graphics applications.
59
Matching Photographic Images
RGB Only
The standard Color Matching (found in the printer driver under
Printer Features → Feature Set 2) is a generally a good choice.
Select a matching method appropriate to your monitor.
RGB or CMYK
If you are printing photographic images from a graphics application
such as Adobe Photoshop, you may be able to use Soft-Proofing to
simulate the printed image on your monitor. To do this, you can use
the ICC-Profiles provided by Oki Data, and then print using the ICC
profiles as the Print Space (or Output space).
Matching Specific Colors
(For instance, a Company logo.)
RGB Only
• OKI Color Matching, and the sRGB setting.
• PostScript Color Matching using the Absolute Colorimetric option.
RGB or CMYK
• If you are printing from a graphics application such as Adobe
Photoshop, you may be able to use Soft-Proofing to simulate the
printed image on your monitor. To do this, you can use the
ICC-Profiles provided and then print using the ICC profiles as the
Print Space (or Output space).
• Alternatively, use PostScript Color Matching with the Absolute
Colorimetric setting.
60
Printing Vivid Colors
RGB Only
• Use OKI Color Matching, with either the Monitor 6500k Vivid,
sRGB or Digital Camera settings.
RGB or CMYK
• Use PostScript Color Matching with the Saturation option.
Driver Options
OKI Printer Features
To access Features:
1. Click File → Print and select your printer.
2. Open the drop-down menu and select Printer Features.
Mac10.2_PrinterFeatures.jpg
SelectPrinterFeatures.pdf
61
Feature Set 1
Mac10.2_FeatureSet1.jpg
Mac10.2_FeatureSet1.jpg
Select from the following options:
Quality
• Fast: 600 x 600 dpi, both models
• Fine:
Model C7350: 600 x 1200 dpi
Model C7550: 1200 x 1200 dp
Collate
1pg_2pg.jpg
1pg_2pg.jpg
62
Collating can be carried out with or without a hard disk drive
installed. However, printers with a hard disk drive will provide
greater performance. This option is useful when printing multiple
copies of large documents and you want to print them in
sequence.
NOTE
If your software application has a collate option, use it
instead of the collate option in the printer driver.
Media Type
Many options are available for selecting the media type. Normally
the Printer Setting is used.
MediaTypeOSX.jpg
Any selection, other than Printer Setting, will override the
printer’s menu setting.
MP tray is handled as manual feed
Select the option desired: the default is No. The MP tray cannot be
used for duplex printing.
Black Overprint
This option prevents registration errors and only works for 100%
black text.
Click the checkbox to enable the option.
63
Feature Set 2
Mac10.2_FeatureSet2.jpg
Mac10.2_FeatureSet2.jpg
Select from the following options:
Color Control
Mac10.2AND3_ColorControl.jpg
OKI Color Matching
Affects RGB data only. This is the default setting and provides the
fastest, best color matching for your printer.
Postscript Color Matching
Uses PostScript Color Rendering Dictionaries built into the printer,
and affects both RGB and CMYK data.
PANTONE®
Uses PANTONE color definitions built into the printer.
64
No Color Matching
No color correction occurs when selected. This option is beneficial
when other matching regimens are used, specifically if you select
a Color Simulation option.
Print In Grayscale
No color will print. The printer will interpret all colors as a variation
of grays.
Black Finish
This setting determines Black Toner usage only.
BlackFinishOSX.jpg
BlackFinishOSX.jpg
Auto
This option is best for an office environment, with the printer
determining which style is better.
Glossy
This option uses more CMYK and less black while producing a
shinier black.
Matte
This option uses more black and less CMYK while producing a
flatter black.
Color Setting
This option allows you to select your color settings as they appear
on your monitor.
ColorSetting.jpg
ColorSetting.jpg
65
Monitor(6500k) Auto
The default setting that selects the best options for your printer.
This selection works best for office situations.
Monitor (6500k) Perceptual
Optimized for printing photographs when using a monitor with a
color temperature of 6500K, This is best for printing photographic
images.
Monitor (6500k) Vivid
Optimized for printing bright colors when using a monitor with a
color temperature of 6500K. Ideal for office graphics and text.
Vivid or Digital Camera settings produce brightest colors.
Monitor (9300k)
Optimized for printing photographs when using a monitor with a
color temperature of 6500K.
Digital Camera
Optimized for printing photographs taken with a digital camera.
This tends to produce prints with lighter and brighter colors. For
some photographs, other settings may be better depending on the
subjects and the conditions under which they were taken. Vivid or
Digital Camera settings produce brightest colors.
sRGB
Optimized for matching specific colors, such as a company logo
color. This option attempts to simulate RGB color. The colors
within the printer's color gamut are printed without any
modification, and only colors that fall outside the printable colors
are modified.
66
Rendering Intent
When a document is printed, a conversion takes place from the
document's color space to the printer color space. The rendering
intents are essentially a set of rules that determine how this color
conversion takes place.
RenderingIntent.jpg
RenderingIntent.jpg
Auto
The best default select as this selects the optimal settings for a
general office environment.
Perceptual
Best choice for printing photographs. Compresses the source
gamut into the printer's gamut whilst maintaining the overall
appearance of an image. This may change the overall appearance
of an image as all the colors are shifted together.
Saturation
Best choice for printing bright and saturated colors if you don't
necessarily care how accurate the colors are. This makes it the
recommended choice for graphs, charts, diagrams, etc. Maps fully
saturated colors in the source gamut to fully saturated colors in the
printer's gamut.
Relative Colorimetric
Good for proofing CMYK color images on a desktop printer. Much
like Absolute Colorimetric, except that it scales the source white to
the (usually) paper white; i.e. unlike Absolute Colorimetric, this
attempts to take the paper white into account.
Absolute Colorimetric
Best for printing solid colors and tints, such as company logos etc.
Matches colors common to both devices exactly, and clips the out
of gamut colors to their nearest printed equivalent. Tries to print
white as it appears on screen. The white of a monitor is often very
67
different from paper white, so this may result in color casts,
especially in the lighter areas of an image.
Printer Halftone
This option prevents the halftone of a high-end graphic application
from printing. Click the checkbox to enable the option.
PrinterHalftone.jpg
PrinterHalftone.jpg
Feature Set 3
Mac10.2_FeatureSet3.jpg
Mac10.2_FeatureSet3.jpg
Select from the following options:
Color Simulation
Affects CMYK output only and is usually used in offset printer
environments only.
ColorSimulationOSX.jpg
ColorSimulationOSX.jpg
68
This option simulates what the output will look on a printing press
using the ink types SWOP, Euroscale or Japan. If using CMYK Ink
Simulation, it is recommended that you switch off all other Printer
Color Matching by selecting the No Color Matching option under
the Color Match option in the printer driver.
Separations
This option affects output only, allowing you to print all colors or
separate plates.
SeparationsOSX.jpg
SeparationsOSX.jpg
NOTE
You must select a non-generic PostScript Printer
Description (PPD) file for a printer that supports color
separations.
Media Check
MediaCheckTonerSavePageRotate.jpg
MediaCheckTonerSavePageRotate.jpg
Sets whether the printer checks the matching of paper size to that
of the tray. Only standard sizes are checked.
Toner Saving
Checking this will enable toner saving but reduce print quality.
69
Page Rotate
Checking this will rotate the printed material on the page 180
degrees.
Apg_Apg.jpg
Apg_Apg.
jpg
70
Printing Multiple Pages on One Sheet
(N-up Printing)
1. Click File → Print and select your printer.
2. Open the drop-down menu and select Layout.
Mac10.2_SelectLayout.jpg
Mac10.2_SelectLayout.jpg
3. From the Layout screen, select the options desired.
LayoutMultiplePages.jpg
a
b
c
LayoutMultiplePages.jpg
a. For Multiple Pages, access Pages per sheet
b. Select the desired Layout Direction.
c. Select a Border between the sheets, if desired.
71
Duplex Printing (Printing on Both Sides of the
Paper)
1. Click File → Print and select your printer.
2. Open the drop-down menu at left and select Duplex.
Mac10.2_SelectDuplex.jpg
Mac10.2_SelectDuplex.jpg
3. From the Duplex screen, select the options desired.
Duplex.jpg
Duplex.jpg
a. For Duplexing (printing on both sides of the sheet), select Print
on Both Sides.
b. Select which Binding you prefer. Normally, the first option is
the default.
NOTES
• Duplex printing can only be carried out on standard
paper sizes and paper weights between 20 and 28 lb. (75
and 105 g/m²).
• The optional duplex unit must be installed in the printer
and enabled before duplex printing can be carried out.
• Paper must be loaded into the paper tray with the print
side facing upwards. The multi purpose tray cannot be
used for duplex printing.
72
Collating
Collating can be carried out with or without the optional hard disk
drive. However, using the HDD improves performance.
If the software application being used has a collate print option, it is
recommended to use only one collate option to prevent any conflicts
in printing, i.e. collate from the software application or collate from the
printer driver.
1. Click File → Print and select your printer.
2. The Copies & Pages dialog box should display. If not, select
Copies & Pages from the menu.
3. Select Collated.
CopiesandPagesOptions.jpg
CopiesandPagesOptions.jpg
4. Click Print.
73
Mac OS 10.1 & 10.2
Utilities
With the exception of Job Accounting, the utilities on the Drivers CD
are unavailable for Mac OS X and will only run on Mac 9.x or Classic
OS.
Once the Job Accounting utility has been set up by your Network
Administrator, it is transparent to the operation of the printer driver on
your OS X system.
For more information on Job Accounting, see the “User’s Guide,
Windows” on the Manuals CD supplied with your printer.
74
Macintosh OS 10.3
Printer Driver
See your printed Software Installation Guide for information on
installing printer drivers.
Adjusting Options
Apple Computer has not enabled Configure Printer... for OS 10.3.
Therefore, direct configuration of the printer driver is unavailable at
this time.
ConfigurePrinter.jpg
75
Macintosh OS 10.3
Operation
This section explains how to change the printer’s operation for
specific print jobs.
Most applications allow the printer properties to be accessed from
within the document print dialog.
This section will only detail options as they apply to the Oki Data
printer driver.
76
Color Print Matching
The install utility provides a color matching profile for your printer. In
general, using the Color Matching settings will provide reasonable
default settings that produce good results for most documents.
Many applications have their own color settings and these may
override the settings in the printer driver. Please refer to the
documentation for your software application for details on how that
particular program’s color management functions.
Factors That Affect the Appearance of Printed Documents
If you wish to manually adjust the color settings in your printer driver,
please be aware that color reproduction is a complex topic, and there
are many factors to take into consideration. Some of the most
important factors are listed below.
Differences between the Range of Colors a Monitor or Printer
Can Reproduce
• Neither a printer nor a monitor is capable of reproducing the full
range of colors visible to the human eye. Each device is restricted
to a certain range of colors. Additionally, a printer cannot
reproduce all of the colors displayed on a monitor and vice versa.
• Both devices use very different technologies to represent color. A
monitor uses Red, Green and Blue (RGB) phosphors (or LCDs), a
printer uses Cyan, Yellow, Magenta and Black (CMYK) toner or
ink.
• A monitor can display very vivid colors such as intense reds and
blues and these cannot be easily produced on any printer using
toner or ink. Similarly, there are certain colors, (some yellows, for
example), that can be printed, but cannot be displayed accurately
on a monitor. This disparity between monitors and printers is often
the main reason that printed colors do not match the colors
displayed on screen.
Viewing Conditions
A print can look very different under different lighting conditions. For
example, the colors in a print may look different when viewed
standing next to a sunlit window, compared to how they look under
standard office fluorescent lighting.
77
Monitor Color Profile Select
Apple provides a ColorSync Utility → Devices that allows
selection of the Oki Data supplied ICC color profile for your monitor.
The profile will attempt to calibrate the monitor to more closely match
the printer’s output. However, merely selecting the profile will not
automatically produce perfect results as many factors will contribute
to the gamut of color selection.
1. Navigate to the utility by accessing your Local Hard Drive →
Applications → Utilities → ColorSync
Utility → Devices.
2. Click the arrow next to Displays and select your monitor (in this
example it is iMac). For Current Profile, select Other...
ColorSyncDeviceProfile.jpg
3. From the Profile selection menu, click the desired Oki Data ICC
Profile, then click Open to enable it.
Printer Driver Color Settings
The driver settings for Manual color can change the appearance of a
printed document. There are several options available to help match
the printed colors with those displayed on screen. These options are
explained in subsequent sections.
78
To access the color matching options in the driver discussed below:
1. Access the printer settings page via the Print dialog from any
application (usually File → Print).
2. Click the drop-down menu and select Printer Features and then
select the Feature Set 2 tab for Color Setting.
Monitor Settings
The brightness and contrast controls on your monitor can change
how your document looks on-screen. You can calibrate your
monitor’s color regimen in System
Preferences → Displays → Color. Additionally, your monitor
color temperature influences how “warm” or “cool” the colors look.
NOTE
Several of the Color Matching options make reference to
your monitor’s Color Temperature. Many modern monitors
allow the color temperature to be adjusted using the
monitor’s control panel.
There are several settings found on a typical monitor:
• 5000k* or D50
Warmest; yellowish lighting, typically used in graphics arts
environments.
• 6500k* or D65
Cooler; approximates daylight conditions.
• 9300k*:
Cool; the default setting for many monitors and television sets.
(*k = degrees Kelvin, a measurement of temperature)
How Your Software Application Displays Color
Some graphics applications such as Macromedia Freehand or
Adobe Photoshop may display color differently from “office”
applications such as Microsoft Word. Please see your application’s
online help or user manual for more information.
79
Paper Type
The type of paper used can also significantly affect the printed color.
For example, a printout on recycled paper can look duller than one
on specially formulated glossy paper.
Choosing a Color Matching Method
There is no one correct way to achieve a good color match between
the document displayed on your monitor, and its printed equivalent.
There are many factors involved in achieving accurate and
reproducible color.
However, the following guidelines may help in achieving good color
output from your printer. There are several suggested methods,
depending on the type of document you are printing.
NOTE
These suggestions are for guidance only. Your results may
vary depending on the application from which you are
printing. Some applications will override any color matching
settings in the printer driver without warning.
RGB or CMYK?
The guidelines for choosing a color matching method make
distinctions between Red, Green, Blue (RGB) and Cyan, Magenta,
Yellow, Black (CMYK).
Generally, most office documents you print will be in RGB format.
This is the most common, and, if you do not know your document’s
color mode, assume that it is RGB.
Typically CMYK documents are only used in professional Desktop
Publishing and Graphics applications.
80
Matching Photographic Images
RGB Only
The standard Color Matching (found in the printer driver under
Printer Features → Feature Set 2) is generally a good choice.
Select a matching method appropriate to your monitor.
RGB or CMYK
If you are printing photographic images from a graphics application
such as Adobe Photoshop, you may be able to use Soft-Proofing to
simulate the printed image on your monitor. To do this, you can use
the ICC-Profiles provided by Oki Data, and then print using the ICC
profiles as the Print Space (or Output space).
Matching Specific Colors
(For instance, a company logo.)
RGB Only
• OKI Color Matching, and the sRGB setting.
• PostScript Color Matching using the Absolute Colorimetric option.
RGB or CMYK
• If you are printing from a graphics application such as Adobe
Photoshop, you may be able to use Soft-Proofing to simulate the
printed image on your monitor. To do this, you can use the
ICC-Profiles provided and then print using the ICC profiles as the
Print Space (or Output space).
• Alternatively, use PostScript Color Matching with the Absolute
Colorimetric setting.
Printing Vivid Colors
RGB Only
• Use OKI Color Matching, with either the Monitor 6500k Vivid,
sRGB or Digital Camera settings.
RGB or CMYK
• Use PostScript Color Matching with the Saturation option.
81
Driver Options
OKI Printer Features
To access Feature Set 1:
1. Click File → Print and select your printer.
2. Open the drop-down menu and select Printer Features.
Mac10.3_SelectPrinterFeatures.jpg
82
Feature Set 1
Mac10.3_FeatureSet1.jpg
Select from the following options:
Quality
• Fast: 600 x 600 dpi, both models
• Fine:
Model C7350: 600 x 1200 dpi
Model C7559: 1200 x 1200 dpi
83
Collate
1pg_2pg.jpg
Collating can be carried out with or without a hard disk drive
installed. However, printers with a hard disk drive provide greater
performance. This option is useful when printing multiple copies of
large documents and you want to print them in sequence.
NOTE
If your software application has a collate option, use it
instead of the collate option in the printer driver.
Media Type
Many options are available for selecting the media type. Normally
the Printer Setting is used.
Mac10.3_MediaType.jpg
Any selection, other than Printer Setting, will override the
printer’s menu setting.
84
MP tray is handled as manual feed
MPTrayandBlackOverprint.jpg
Select the option desired: the default is No. The MP tray cannot be
used for duplex printing.
Black Overprint
This option prevents registration errors and only works for 100%
black text.
Click the checkbox to enable the option.
Color Control
Mac10.2AND3_ColorControl
.jpg
OKI Color Matching
Affects RGB data only. This is the default setting and provides the
fastest, best color matching for your printer.
Postscript Color Matching
Uses PostScript Color Rendering Dictionaries built into the
printer, and affects both RGB and CMYK data.
PANTONE®
Uses PANTONE color definitions built into the printer.
No Color Matching
No color correction occurs when selected. This option is beneficial
when other matching regimens are used, specifically if you select
a Color Simulation option.
Print In Grayscale
No color will print. The printer will interpret all colors as a variation
of grays.
85
Feature Set 2
Mac10.3_FeatureSet2.jpg
Select from the following options:
Black Finish
This setting determines Black Toner usage only.
BlackFinishOSX.jpg
Auto
This option is best for an office environment, with the printer
determining which style is better.
Glossy
This option uses more CMYK and less black while producing a
shinier black.
Matte
This option uses more black and less CMYK while producing a
flatter black.
86
Color Setting
This option allows you to select your color settings as they appear
on your monitor.
ColorSetting.jpg
Monitor(6500k) Auto
The default setting that selects the best options for your printer.
This selection works best for office situations.
Monitor (6500k) Perceptual
Optimized for printing photographs when using a monitor with a
color temperature of 6500K, This is best for printing photographic
images.
Monitor (6500k) Vivid
Optimized for printing bright colors when using a monitor with a
color temperature of 6500K. Ideal for office graphics and text.
Vivid or Digital Camera settings produce brightest colors.
Monitor (9300k)
Optimized for printing photographs when using a monitor with a
color temperature of 6500K.
Digital Camera
Optimized for printing photographs taken with a digital camera.
This tends to produce prints with lighter and brighter colors. For
some photographs, other settings may be better depending on the
subjects and the conditions under which they were taken. Vivid or
Digital Camera settings produce brightest colors.
sRGB
Optimized for matching specific colors, such as a company logo
color. This option attempts to simulate RGB color. The colors
within the printer's color gamut are printed without any
modification, and only colors that fall outside the printable colors
are modified.
87
Rendering Intent
When a document is printed, a conversion takes place from the
document's color space to the printer color space. The rendering
intents are essentially a set of rules that determine how this color
conversion takes place.
RenderingIntent.jpg
Auto
The best default select as this selects the optimal settings for a
general office environment.
Perceptual
Best choice for printing photographs. Compresses the source
gamut into the printer's gamut whilst maintaining the overall
appearance of an image. This may change the overall appearance
of an image as all the colors are shifted together.
Saturation
Best choice for printing bright and saturated colors if you don't
necessarily care how accurate the colors are. This makes it the
recommended choice for graphs, charts, diagrams, etc. Maps fully
saturated colors in the source gamut to fully saturated colors in the
printer's gamut.
Relative Colorimetric
Good for proofing CMYK color images on a desktop printer. Much
like Absolute Colorimetric, except that it scales the source white to
the (usually) paper white; i.e. unlike Absolute Colorimetric, this
attempts to take the paper white into account.
Absolute Colorimetric
Best for printing solid colors and tints, such as Company logos etc.
Matches colors common to both devices exactly, and clips the out
of gamut colors to their nearest printed equivalent. Tries to print
white as it appears on screen. The white of a monitor is often very
different from paper white, so this may result in color casts,
especially in the lighter areas of an image.
88
Printer Halftone
This option prevents the halftone of a high-end graphic application
from printing. Click the checkbox to enable the option.
PrinterHalftone.jpg
Color Simulation
Affects CMYK output only and is usually used in offset printer
environments only.
ColorSimulationOSX.jpg
This option simulates what the output will look on a printing press
using the ink types SWOP, Euroscale or Japan. If using CMYK Ink
Simulation, it is recommended that you switch off all other Printer
Color Matching by selecting the No Color Matching option under
the Color Match option in the printer driver.
Separations
This option affects output only, allowing you to print all colors or
separate plates.
SeparationsOSX.jpg
NOTE
You must select a non-generic PostScript Printer
Description (PPD) file for a printer that supports color
separations.
89
Feature Set 3
M
10 3 F
t
S t3 j
Select from the following options:
Media Check
Sets whether the printer checks the matching of paper size to that
of the tray. Only standard sizes are checked.
Toner Saving
Checking this enables toner saving but reduce print quality.
Page Rotate
Checking this rotates the printed material on the page 180
degrees.
Apg_Apg.jpg
90
Printing Multiple Pages on One Sheet (N-up
Printing)
1. Click File → Print and select your printer.
2. Open the drop-down menu and select Layout.
Mac10.3_SelectLayout.jpg
3. From the Layout screen, select the options desired.
a
b
c
Mac10.3_Layout.jpg
a. For Multiple Pages, access Pages per sheet
b. Select the desired Layout Direction.
c. Select a Border between the sheets, if desired.
91
Duplex Printing (Printing on Both Sides of the
Paper)
1. Click File → Print and select your printer.
2. Open the drop-down menu and select Layout.
Mac10.3_SelectLayout.jpg
3. Under Two Sided Printing, select the binding.
Mac10.3_DuplexOff.jpg
92
Long Edge Binding
Mac10.3_LongEdge.jpg
Short Edge Binding
Mac10.3_ShortEdge.jpg
NOTES
• Duplex printing can only be carried out on standard
paper sizes and paper weights between 20 and 28 lb. (75
and 105 g/m²).
• The optional duplex unit must be installed in the printer
and enabled before duplex printing can be carried out.
• Paper must be loaded into the paper tray with the print
side facing upwards. The multi purpose tray cannot be
used for duplex printing.
93
Collating
Collating can be carried out with or without the optional hard disk
drive. However, using the HDD improves performance.
If the software application being used has a collate print option, it is
recommended to use only one collate option to prevent any conflicts
in printing, i.e. collate from the software application or collate from the
printer driver.
1. Click File → Print and select your printer.
2. The Copies & Pages dialog box should display. If not, select
Copies & Pages from the menu.
3. Select Collated.
Mac10.3_CopiesandPages.jpg
4. Click Print.
94
Mac OS 10.3
Utilities
With the exception of Job Accounting, the utilities on the Drivers CD
are unavailable for Mac OS 10.3 and will only run on Mac 9.x or
Classic OS.
Once the Job Accounting utility has been set up by your Network
Administrator, it is transparent to the operation of the printer driver on
your OS 10.3 system.
For more information on Job Accounting, see the “User’s Guide,
Windows” on the Manuals CD supplied with your printer.
95