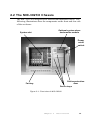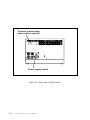
1
MIC-3021/8 6U/7U CompactPCI ® Industrial Computer for Rackmounting Copyright Notice This document is copyrighted, 1999. All rights are reserved. The original manufacturer reserves the right to make improvements to the products described in this manual at any time without notice. No part of this manual may be reproduced, copied, translated or transmitted in any form or by any means without the prior written permission of the original manufacturer. Information provided in this manual is intended to be accurate and reliable. However, the original manufacturer assumes no responsibility for its use, nor for any infringements upon the rights of third parties which may result from its use. Acknowledgements PICMG, CompactPCI and the PICMG, CompactPCI logos are trademarks of the PCI Industrial Computers Manufacturers Group All other product names or trademarks are properties of their respective owners. Part No. 2003302100 Printed in Taiwan MIC-3021/8 User's Manual 1st Edition April 1999 Product warranty Advantech warrants to you, the original purchaser, that each of its products will be free from defects in materials and workmanship for one year from the date of purchase. This warranty does not apply to any products which have been repaired or altered by persons other than repair personnel authorized by Advantech, or which have been subject to misuse, abuse, accident or improper installation. Advantech assumes no liability under the terms of this warranty as a consequence of such events. Because of Advantechs high quality-control standards and rigorous testing, most of our customers never need to use our repair service. If an Advantech product is defective, it will be repaired or replaced at no charge during the warranty period. For out-of-warranty repairs, you will be billed according to the cost of replacement materials, service time and freight. Please consult your dealer for more details. If you think you have a defective product, follow these steps: 1. Collect all the information about the problem encountered. (For example, CPU speed, Advantech products used, other hardware and software used, etc.) Note anything abnormal and list any onscreen messages you get when the problem occurs. 2. Call your dealer and describe the problem. Please have your manual, product, and any helpful information readily available. 3. If your product is diagnosed as defective, obtain an RMA (return merchandize authorization) number from your dealer. This allows us to process your return more quickly. 4. Carefully pack the defective product, a fully-completed Repair and Replacement Order Card and a photocopy proof of purchase date (such as your sales receipt) in a shippable container. A product returned without proof of the purchase date is not eligible for warranty service. 5. Write the RMA number visibly on the outside of the package and ship it prepaid to your dealer. Preface and Table of Contents Packing List Before installing your board, ensure that the following materials have been received: 1 MIC-3021/8 Compact PCI enclosure with backplane 1 box of accessories 1 warranty certificate This user's manual If any of these items are missing or damaged, contact your distributor or sales representative immediately. Technical Support and Sales Assistance If you have any technical questions about the MIC-3021/8 or any other Advantech products, please visit our support website at: http://support.advantech.com.tw For more information about Advantech's products and sales information, please visit: http://www.advantech.com MIC-3021/8 User's Manual Contents Chapter 1: General Information ..................... 7 1.1 1.2 1.3 1.4 Introduction ...................................................................... 8 Features ............................................................................ 9 Specifications .................................................................... 9 Dimensions ..................................................................... 11 Chapter 2: Installation ................................... 13 2.1 Initial inspection ............................................................. 1 4 2.2 The MIC-3021/8 Chassis ............................................. 1 5 2.3 Installation Procedures ................................................. 1 7 2.3.1 Card Installation and Removal ............................ 1 7 2.3.2 Before Operating the System .............................. 1 9 2.3.3 Installing Peripherals ............................................ 2 0 2.3.4 Replacing the Fan Tray and Air Filter ................ 2 2 Preface and Table of Contents Figures Figure Figure Figure Figure Figure Figure 1-1: 2-1: 2-2: 2-3: 2-4: 2-5: MIC-3021/8 dimensions .......................................... 11 Front view of MIC-3021/8 ...................................... 1 5 Rear view of MIC-3021/8 ....................................... 1 6 Installing a card into the chassis ........................... 1 8 Install a device on the top tray .............................. 2 0 Attaching the mounting brackets to a 5.25" device .................................................................................... 2 1 Figure 2-6: Attaching mounting brackets to a half-height device for mounting in device space next to the fan tray module ............................................................... 2 2 MIC-3021/8 User's Manual CHAPTER 1 General Information Chapter 1 General Information 7 1.1 Introduction The MIC-3021/8 is an 8-slot 6U/7U-sized CompactPCI enclosure for rack or panel mounting. It has eight 6U card slots, and has a device bay which can accommodate devices and peripherals such as floppy disk drives and hard disk drives. Its rugged construction and flexible modular design allows users to configure it to meet the requirements of individual applications. The MIC-3021/8 comes in two versions: 6U high without a fan tray or 7U high with a fan tray. The 1U high fan module provides forced air cooling in the system. Two 88-CFM high-speed fans are mounted in a hot-swappable tray directly underneath the card slots. The fan's tachometer output enables the alarm module to monitor the speed of the fans. Tachometer signals are transmitted to the system through a 6-pin connector on the fan backplane. A protective circuit has been designed into the fan backplane to reduce electrical spikes and noise while hot swapping. This design allows users to replace fans safely without turning the system off. The 7U high design also provides an additional space beneath the device bay to install a 5.25" device. The device bay itself accommodates up to five 5.25" or 3.5" devices, or three devices when an ATX power supply unit is installed. It accepts standard HDDs and FDDs; there is no need for expensive special devices. Devices can be removed through the device bay front without the need for disassembling the enclosure, providing the shortest MTTR for device replacement. A lockable door prevents unauthorized access to the devices and to the power on/off switch. 8 MIC-3021/8 User's Manual 1.2 Features Eight 6U card slots Easy rackmount or panelmount installation Accepts an ATX power supply, or two CompactPCI plug-in power modules (optional) Device bay accommodates up to 5 devices, secured by a lockable door Front removable devices Hot-swappable fan tray Optional fault detection and alarm module 1.3 Specifications 1.3.1 General Construction: Aluminum frame and galvanized sheet steel Device bay: Accommodates up to five 5.25" or 3.5" devices (or three devices when an ATX power supply is installed), front removable 12-slot space (48 TE), incl. 7 CompactPCI slots and one system slot. "Hot swappable platform complies with PICMG 2.1 R 1.0 Hot Swap Specification Dimensions (W x H x D, mounting flanges not included): 7U: 440 x 311 x 254 mm (17.3" x 12.25" x 10") 6U: 440 x 267 x 254 mm (17.3" x 10.5" x 10") Weight: 12 kg Operating temperature: 0 ~ 50° C (32 ~ 122° F) Storage temperature: -20° C ~ 70° C (-4 ~ 158° F) Relative humidity: 10 ~ 95% @ 40° C, non-condensing Operating altitude: 0 to 10,000 feet (3048 meters) Chapter 1 General Information 9 Storage/transit altitude: 0 to 40,000 feet (12,190 meters) Shock: 10 G (operating); 30 G (storage/transit) Random vibration:1 Grms (operating) 1.3.2 Fan Tray Module Air flow: Two 88-CFM fans, providing 176 CFM in total Power Consumption: 0.37 A @ 12 V per fan, 0.74 A total Rated fan speed: 2200 rpm Life expectancy: 50,000 hours @ 25° C 1.3.3 ATX Power Supply Input: 90 ~ 135 or 180 ~ 265 VAC @ 47 ~ 63 Hz, switchable Output: +3.3 V @ 15 A, +5 V @ 26 A, +12 V @ 9 A, -12 V @ 0.8 A Minumum load: +3.3 V @ 0.3 A, + 5V @ 2 A, +12 V @ 1 A Max output: 250 W total, 170 W for 5 V and 3.3 V MTBF: 50,000 hours @ 70% load Safety: UL/CUL/CE 10 MIC-3021/8 User's Manual 1.4 Dimensions Figure 1-1: MIC-3021/8 dimensions Chapter 1 General Information 11 12 MIC-3021/8 User's Manual CHAPTER 2 Installation Chapter 2 Installation 13 2.1 Initial inspection We have carefully inspected the MIC-3021/8 mechanically and electrically before shipping. It should be free of marks and scratches and in perfect working order upon receipt. As you unpack the MIC-3021/8, check it for signs of shipping damage (damaged box, scratches, dents, etc.). If it is damaged or if it fails to meet specifications, notify our service department or your local representative immediately. Also notify the carrier. Retain the shipping carton and packing material for inspection by the carrier. After inspection we will make arrangements to repair or replace the unit. Warning! We strongly recommend that only qualified, experienced personnel install or remove components and that they practice extreme caution when doing so. 14 MIC-3021/8 User's Manual 2.2 The MIC-3021/8 Chassis The MIC-3021/8 is designed to be installed and maitained easily. The following illustrations show the components on the front and rear side of the enclosure. Optional system alarm and monitor module System slot Power on/off switch Device protection door Device trays Fan tray Figure 2-1: Front view of MIC-3021/8 Chapter 2 Installation 15 Optional system alarm and monitor module I/O Power supply switch Figure 2-2: Rear view of MIC-3021/8 16 MIC-3021/8 User's Manual 2.3 Installation Procedures 2.3.1 Card Installation and Removal The CompactPCI connectors are firm and rigid, and require careful handling while plugging and unplugging. Improper installation of a card can easily damage the backplane of the chassis. The system card can be installed only in the system slot. The CompactPCI specification allows the system slot to be at any position in the backplane. Do not insert the system card into any other slot, or insert a peripheral card into the system slot. The MIC-3021/8 may accept different backplanes, thus the location of the system slot may vary. The system slot is marked by a triangle enclosing the slot number. Please refer to the backplane user's manual. The inject/eject handles on CompactPCI cards help you to install and remove the cards easily and safely. Follow the procedures below to install a card into a chassis: To install a card: 1. Hold the card vertically. Be sure that the card is pointing in the correct direction. The components of the card should be pointing to the right-hand side. 2. Be sure that the handles of the card are not latched. Release the handles if they are latched. Handles from different vendors may have different latch designs. Caution: Keep your fingers away from the latch hinges to prevent your fingers from getting pinched. 3. Insert the card into the chassis by sliding the upper and lower edges of the card into the card guides. 4. Push the card into the slot gently by sliding the card along the card guide until the handles meet the rectangular holes of the cross rails. Chapter 2 Installation 17 Note: If the card is correctly positioned and has been slid all the way into the chassis, the handles should match the rectangular holes. If not, remove the card from the card guide and repeat step 3 again. Do not try to install a card by forcing it into the chassis. 5. Pull the upper handle down and lift the lower handle up to push the card into place. 6. Secure the card by locking the handles in place. Keep your fingers away from this area. Fig. 2-3: Installing a card into the chassis 18 MIC-3021/8 User's Manual To remove a card: 1. Unscrew the screws on the card front panel. Release the locking latches on the handles. 2. Lift the upper handle up and press the lower handle down to release the card from the backplane. 3. Slide the card out. 2.3.2 Before Operating the System Before operating your system, first check your power supply source. Adjust the switch on the power supply to the correct voltage. Two mounting flanges are included for users who would like to install the MIC-3021/8 on a 19" rack or on a panel. These flanges can be installed on the front side for rack mounting or on the rear side for panel mounting. Four rubber stands can be attached to the bottom of the chassis for desktop operation. They are not required for rack operation. There are ventilation holes on the top and bottom of the chassis for cooling. We advise you not to block these holes when installing the chassis on a rack or placing it on a desktop. Chapter 2 Installation 19 2.3.3 Installing Peripherals The device bay of the MIC-3021/8 accepts up to five devices. However, the actual available space depends on the system configuration. The top tray is designed to accomodate an alarm module (the MIC-3921) and/ or an internal device. See figure 2-4 to install a device on the top tray. Figure 2-4: Install a device on the top tray The lower two trays are occupied by an ATX power supply, therefore they are available only when the system uses an external power supply or plug-in power modules. The mounting brackets shipped with the chassis are designed for mounting 5.25" devices. For mounting 3.5" devices, extension brackets are required. These extension brackets are available in PC shops, or you can contact an Advantech distributor to order them. 20 MIC-3021/8 User's Manual Figure 2-5: Attaching the mounting brackets to a 5.25" device Follow the procedures below to install a device: 1. Fasten one pair of mounting brackets to both sides of a 5.25" device (or a 3.5" device with extension brackets). Note that the guide edge of the mounting brackets should be at the lower side. 2. Unfasten and remove the cover plate of the device tray. 3. Insert the device into the device tray. 4. Fasten the mounting brackets, then fasten the cover plate (for internal devices only). 5. Remove the back cover of the chassis and connect cables to the installed device and to the backplane. 6. Reattach the back cover. One device space is available next to the fan tray module in the 7U high version of the MIC-3021/8, which can be used for installing a 5.25" device. One pair of mounting brackets without guiding flange are included for mounting the device. Since the brackets are not guided, we recommend that users install only a half-height device such as a CD-ROM or a removable drive mount. Chapter 2 Installation 21 Figure 2-6: Attaching mounting brackets to a half-height device for mounting in device space next to the fan tray module 2.3.4 Replacing the Fan Tray and Air Filter The fan tray module of MIC-3021/8 is designed to be "hot-swappable", i.e., users can remove and install the fan tray without turning off the system power. Follow the steps below to replace a fan tray: 1. Unfasten the fan tray. 2. Slide the fan tray out. 3. Insert a new fan tray. 4. Fasten the new fan tray. The air filter can become dirty after a period of use. Follow the steps below to replace a filter: 1. Remove the filter cover. 2. Replace the dirty filter by a clean one. 3. Reattach the filter cover. Repeat steps 1 to 3 to replace the other filter. 22 MIC-3021/8 User's Manual