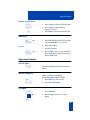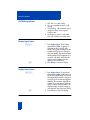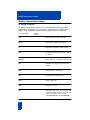
1
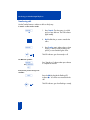
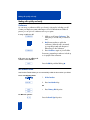
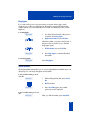
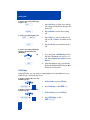
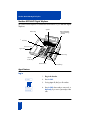
Nortel Knowledge Network
Meridian Digital
Telephones and Options
M2006
M2008/M2008HF
M2616
M2216ACD
M2016S Secure Set
Quick Reference Guide
Enterprise Solutions Documentation
Introducing your Meridian Digital Telephone
Your Meridian Digital Telephone provides easy access to a wide range of business
features. Your telephone system administrator assigns features to your feature keys,
and provides you with passwords and other codes as required.
One of the codes provided by the administrator is the Special Prefix Code (SPRE)
which you need in order to use some features. For other features, the SPRE is optional.
There are three models of Meridian Digital Telephone. The M2006 has six feature
keys. The M2008 has eight feature keys, and the M2008HF includes a built-in
microphone. The M2616, shown below, has 16 feature keys and also includes a builtin microphone. The M2216ACD and M2016S Secure Set also have 16 feature keys.
Many of the features described in this manual are also available on the M2616CT
Cordless Telephone. Please refer to the documentation packaged with the M2616CT.
Introducing your Meridian Digital Telephone
Message Waiting Light
The Message Waiting light turns on to indicate that a message has been left for you.
LCD Indicator
A steady º means the feature or line is active. A flashing º means the line is on hold
or the feature is being programmed.
Meridian Display Option
The Meridian Display Option, with adjustable angle and contrast, shows you
features, instructions, and incoming call information. It attaches to the
M2008/M2008HF or M2616, and is standard on the M2216ACD.
Release
By pressing ®, you can disconnect an active call.
You may also hang up the handset. ® is especially
useful for disconnecting handsfree calls.
Hold
By pressing ˙, you can put an active call
on hold. Return to the caller by pressing the
extension key beside the flashing º.
Microphone
A microphone is an integral part of the M2616 and M2008HF telephone,
allowing you to have a telephone conversation without using the handset.
Volume Bar
Use ® to control the volume of the handset and the speaker. Raise the
volume by pressing the right side of the bar. Lower it by pressing the left side.
Feature keys
You access telephone features and telephone
lines with the feature keys. The keys are labeled for your convenience.
Main Extension key/Primary Directory Number (DN) key
By pressing the lower right-hand key (or lifting the handset), you can make a call on your primary line.
The telephone may also have other line keys. (The M2006 only supports a single line key).
1
Introducing your Meridian Digital Telephone
Auto Dial
lets you dial a specific telephone number by pressing a feature key.
To store an Auto Dial number:
ç
1. Without lifting the handset, press Auto
Dial. The associated LCD
Indicator flashes º.
2. Dial the number.
ç
3. Press Auto Dial again.
To use Auto Dial:
1. Lift the handset or
press a DN Key (see Note below).
ç
2. Press Auto Dial. The stored number is
dialed automatically.
To display the Auto Dial number:
œ
1. Press Display.
ç
2. Press Auto Dial. The number is displayed.
Note: A DN (Directory Number) Key is used to
access a line on your telephone.
Placing a call on hold
Use the Hold feature to place a call on hold. An example of where hold would be
useful would be to answer a call on a second line without disconnecting from your
original call.
To place a call on hold:
˙
Press Hold. The LCD indicator º flashes
beside the line on hold.
The LCD indicator flashes slowly.
The caller may hear music if this is
programmed on your system.
º
To retrieve a call on hold:
∫ 2637
Press the DN Key beside the flashing LCD
indicator º.
2
Introducing your Meridian Digital Telephone
Transferring calls
Use the Transfer feature to redirect a call to a third party.
To transfer a call to another number:
†
1. Press Transfer. The other party is on hold
and you hear dial tone. The LCD indicator
lights steadily.
º
2. Dial the DN that you want to transfer the
call to.
†
3. Press Transfer again, either when you hear
ringing, or after you talk privately to the
person you are transferring the call to.
The LCD indicator goes from steady to off.
º
For MSL-100 systems:
†
orø
Press Transfer or Conference then press release
to complete the transfer.
®
If the person you are calling is not
available:
Press the DN Key beside the flashing LCD
indicator º. You will be reconnected with the
call.
∫ 2637
º
º
3
The LCD indicator goes from flashing to steady.
Introducing your Meridian Digital Telephone
Using Handsfree
If your telephone is a an M2616 or M2008HF model, you can use the built in
microphone and speaker instead of the handset. At ant time during a call, you can
switch to the handset by picking it up. You can also mute your microphone so that the
other party cannot hear you speaking.
To use Handsfree on a call:
©or
∫ 2637
Press Handsfree Mute or a DN Key* instead of
picking up your handset.
* For MSL-100 systems, Handsfree Mute must
be pressed
®
4. Press Release to end your call.
To mute a Handsfree call:
©
1. Press Handsfree Mute. The LCD indicator
flashes.
º
©
2. Press Handsfree Mute again to return to
the two-way conversation.
To switch from the handset to
Handsfree:
©
1. Press Handsfree Mute.
2. Replace the handset.
4
Making calls quickly and easily
Making calls quickly and easily
Conference
You can set up a conference call for up to three (or six) people, including yourself.
Contact your telephone system administrator to find out the maximum number of
persons you can join in a conference call on your system.
To set up a conference call:
ø
1. While on a call, press Conference. The
other party is on hold and you hear dial
tone.
2. Dial the next number to add to the
conference. When the call is answered,
you may talk privately with the person
before they join the conference.
ø
3. Press Conference again to join all callers.
If necessary, repeat the procedure to include up
to six people in the conference.
If the person you are adding to the
conference is not available:
∫ 2637
Press the DN Key with the flashing º.
Last Number Redial
Last Number Redial allows you to automatically redial the last number you dialed.
To use Last Number Redial:
1. Lift the handset.
√
2. Press Last Number Key.
or
∫ 2637
∫ 2637
•
Press Primary DN Key twice.
For MSL-100 systems:
££
5
Press the Pound Sign Key twice.
Making calls quickly and easily
Ring Again
If you receive a busy tone or the person does not answer when trying to reach
someone in your office or private network, Ring Again automatically redials that
number and lets you know when that person is free, or that the person has used his
telephone.
To use Ring Again:
¶
1. You dial a DN and receive a busy tone or
no answer. Press Ring Again.
2. Replace the handset or press Release.
When the number you want to reach is free, or
the person has re-used his set, you hear the
Ring Again signal.
3. Lift the handset or press a DN Key.
¶
4. Press Ring Again to automatically redial
the number.
To cancel Ring Again:
¶
Press Ring Again.
Stored Number
The Stored Number feature allows you to store a single telephone number that you can
dial quickly. You can easily change the stored number.
To store a number when you're not
on a call:
º
1. Without lifting the handset, press Stored
No.
2. Dial the number.
º
3. Press Stored No again. Any number
previously stored is replaced.
To store a number when you're on a
call:
º
After you dial the number, press Stored No.
6
Making calls quickly and easily
To display the stored number:
œ
1. Press Display.
º
2. Press Stored No. The number is displayed.
To call the stored number:
1. Lift the handset or press a DN Key .
º
2. Press Stored No.
Group Call
Group Call automatically calls members of a predefined group, one at a time, until
they have all answered. Ask your system administrator for details on creating a
conference call group. This feature is available on MSL-100 as “Preset
Conference”.
To call group members:
or
1. Lift the handset or press a DN Key.
∫ 2637
≈
2. Press Group Call. The group members
are called automatically. The LCD
indicator beside the Group Call Key
flashes until all members have
answered.
3. When all members have answered, the
LCD indicator stops flashing and
remains on.
º
º
º
Group Listening
The group listening feature allows you to listen to a call through the speaker while
speaking through the handset, thus allowing a third party(ies) to listen to both sides of
the conversation. This feature is not available in all market regions or on MSL-100
systems. Check with your system administrator for availability and information on
local laws governing the use of this feature.
To activate group listening:
∫Group Listen
To turn group listening off:
∫Group Listen or
7
While on a call, press the Group Listen Key.
Press the Group Listen Key again or Replace
the handset.
Handling Calls
Handling Calls
Call Forward
Call Forward allows you to transfer all your calls so that they ring at another DN. You
cannot forward calls while your telephone is ringing.
To forward all your calls:
∑
1. Press Forward. The LCD indicator º
flashes.
2. Dial the DN that you want to forward your
calls to.
∑
3. Press Forward. The LCD indicator º
remains on.
To cancel Call Forward:
∑
Press Forward. The LCD indicator º turns off.
To reinstate Call Forward to the same
number:
∑
∑
Press Forward twice. The LCD indicator º
turns on again.
To display the number to which you
are currently forwarding your
internal calls (on telephones
equipped with an appropriate
display):
œ
1. Press Display.
∑
2. Press Forward. The number is displayed.
You can forward calls to Meridian Mail by
using the Meridian Mail DN as your Call Forward DN.
Call Waiting
If the attendant routes an outside call to you when you are already on a call, Call
Waiting lets you put your current call on hold, allowing you to answer the outside call.
8
Handling Calls
To answer an incoming call during a
telephone call:
˙
1. Press Hold when you hear a tone and the
call waiting indicator flashes during a telephone call.
∆
2. Press Call Wait to answer the incoming
call.
To return to your first telephone call:
˙ or ®
1. Press Hold if you want to put the second
call on hold, or Release to end the second
call.
2. Press the DN Key associated with the first
call.
∫ 2637
To answer an incoming call during a
telephone call without the Call
Waiting Key:
or
®
∫ 2637
1. If you don't have a Call Wait Key and you
hear the Call Waiting tone, end your current call and Replace the handset or press
Release.
2. When the telephone rings, press the DN
Key beside the flashing LCD indicator º to
answer the incoming call.
Call Pickup
Using Call Pickup, you can answer a ringing telephone from any telephone in your
Pickup Group or another Pickup Group.
To answer a ringing call in your own
Call Pickup group:
1. Lift the handset or press a DN Key.
ƒ or
2. Press Call Pickup, or dial SPRE + ‹.
To answer a ringing call in another
Call Pickup group:
1. Lift the handset or press a DN Key.
ƒ or
9
2. Press Call Pickup, or dial
SPRE + ·›.
Meridian Display Option
3. Dial the pickup group number of the ringing telephone.
To answer a ringing call at a specific
extension in any pickup group:
1. Lift the handset or press a DN Key.
ßor
2. Press DN Pickup, or dial SPRE +
·fi.
3. Dial the DN of the ringing telephone.
Meridian Display Option
The 2 line by 24 character display makes the most sophisticated features on your
Meridian Digital Telephone easy to use. Screen prompts take you step by step through
procedures and keep you informed on the status of various features such as Call
Forward and Make Set Busy. Your display can be tilted forward or back to an angle
that allows you to see it best.
Whether your display is factory installed or added on later, your top right function key
will be designated as a P key. This key enters you into the programming
mode, where you can make adjustments to various settings such as volume and
display contrast. When you press the P key again to exit programming
mode, you lock the settings until you reenter programming mode
This section shows you how to use your P key. For complete feature
explanations, refer to you Meridian Digital Telephone user guide.
Programming
When you first press P to enter programming mode, you will see this screen.
This is the first programming selection.
00 VOLUME ADJUSTMENT
SELECT OR SCROLL < < < > > >
You can press ® to scroll forward or back through the available selections. To
make a selection, dial the number shown on the screen. Make the changes and press
P a second time to save them and exit programming mode.
Note: After any programming procedure press P to exit and save the new
setting.
10
Meridian Display Option
Volume Adjustment
Press P and dial ‚ ‚.
1g 2 3 e 4 d 5
SPEAKER VOL.
Dial ⁄ to adjust Ringer Volume
Dial ¤ to adjust Buzzer Volume
Dial ‹ to adjust Speaker Volume
Dial › to adjust Handset Volume
Dial fi to adjust Handsfree Volume (If you telephone has Handsfree activated)
Use ® to increase or decrease the volume for the selection you have made.
Press P to save and exit programming mode.
Predial Recall
Press P and dial ‚ ⁄.
2637
The most recently predialed number appears. Press P to exit. You can the edit
the number using ® and the dial pad or dial the number by pressing a free
line key.
Contrast Adjustment
Press P and dial ‚ ¤.
CONTRAST
<<< >>>
Use ® to increase or decrease the contrast. Press P to save and exit
programming mode.
11
Meridian Display Option
Call Timer Enable
Press P and dial ‚ ‹.
CALL TIMER ON
<<< >>>
Use ® to choose between Call Timer On and Call Timer Off. Press P
to save and exit programming mode.
Idle Screen Format
Press P and dial ‚ ›.
IDLE FORMAT
18 SEP 4:45 P
<<< >>>
Use ® to scroll through the eight possible selections. When you find the Idle
Screen you want to select, press P to save and exit programming mode.
Language Selection
Press P and dial ‚ fi.
01 ENGLISH
<<< >>>
Use ® to scroll through the available selections. Dial the two digit number
which corresponds to your language of choice, and press P to save and exit
programming mode.
Key Click
Press P and dial ‚ ·.
KEY CLICK ON
<<< >>>
Use ® to choose between Key Click On and Key Click Off. Press P
to save and exit programming mode.
12
Meridian M2216ACD Digital Telephone
Meridian M2216ACD Digital Telephone
This section lists the sequence of commands for ACD features on your Meridian Digital
Telephone.
Speaker
Speaker
ReleaseKey
(Rls) key
Release
Message
Message Waiting
lamp
Indicator
Hold
keyKey
Hold
Supervisor
Supervisor Jack
Jack
Agent
Jack
Agent
Jack
Function
Function
keys Keys
Volume
Control Key
Volume
control key
LCD
Indicators
LCD
indicators
In-Calls
In-CallsKey
key
Agent Features
Log in
1. Plug in the headset.
∫In-Calls
2. Press In-Calls.
3. If using Agent ID, dial your ID number.
∫In-Calls
∫Not Ready
13
4. Press In-Calls when ready to start work, or
Not Ready if you are not yet ready to take
calls.
Agent Features
Log Out
∫Make Busy
1. Press Make Busy.
2. Unplug the headset.
Answer ACD Calls
∫In-Calls
Press In-Calls.
Emergency
∫Emergency
Press Emergency during a call in progress to
connect your supervisor to an urgent or
abusive call.
End ACD Calls
® or
∫In-Calls
or
∫Not Ready or
∫ 2637
Press Release, In-Calls (if using Call Forcing);
wait for the other party to hang up; press
Not Ready; or press a DN Key.
Headset
Pand
1. Press Program and Dial ⁄‚
2. To select headset:
Dial ⁄ for Plantronics, VXI
Dial ¤ for GN Netcom, Liberation
Dial ‹ for handset.
P
3. Press Program to exit and save changes.
Note: Nortel Networks recommends setting ‹ for all applications. Headsets vary in electrical,
physical and audio characteristics. Performance perception is subjective; so, it is
recommended that the headset user try using their headset with each of the three settings
on both internal and external calls to determine which works best for them. As with all
Meridian Digital Telephones, amplified headsets are recommended.
14
Agent Features
Hold
˙
Press Hold. To take a call off Hold, press the
key beside the fast flashing indicator.
Make Busy
∫Make Busy
Press Make Busy to make your phone appear
busy to callers. If you are using ACD Agent ID,
this will log you out of the system.
Not Ready
∫Not Ready
Press Not Ready. Press In-Calls or Not Ready
when ready to accept ACD calls again.
For MSL-100 systems:
∫Not Ready
Press Not Ready. Enter the 3 digit reason code,
if required, for walkaway. Press Not Ready
again to receive calls.
Answer Supervisor
∫Supervisor
Press Supervisor when the LCD indicator
flashes. If you’re on a call, press Hold before
pressing Supervisor.
Call Supervisor
∫Supervisor
Press Supervisor. This automatically puts an
active ACD call on Hold. Press In-Calls to
return to your ACD call.
Conference with Supervisor
15
∫Supervisor
1. Press Supervisor during a call in progress.
∫Supervisor
2. Press Supervisor again when the
supervisor answers.
Supervisor Features
Transfer to Supervisor
∫Supervisor
1. Press Supervisor during a call in progress.
∫Supervisor
2. Press Supervisor again when the
supervisor answers.
3. Press Release to disconnect from the call.
®
Walkaway
˙or
∫Not Ready
1. Press Hold during an ACD call in progress
or press Not Ready if not on a call.
2. Unplug the headset.
To return:
1. Plug in the headset.
or
∫In-Calls
∫Not Ready
2. Press In-Calls to return to your held call, or
press Not Ready to enter the queue from
the Not Ready state.
Supervisor Features
Answer Agent
Press Answer Agent when the LCD indicator
flashes.
∫Ans Agent
Answer Emergency
˙
When you hear a buzz and the
Answer Emergency indicator flashes:
1. Press Hold if you are on a call.
∫Ans Emerg
2. Press Answer Emergency.
Call Agent
1. Press Call Agent.
∫Call Agent
or
2. Dial the agent’s position ID, or press
Agent.
∫Agent
16
Supervisor Features
Call Waiting Indicator
1. Off - few or no calls waiting.
2. On - an acceptable number of calls
waiting.
3. Slow flashing - calls are backing up in
the queue. Queue not accepting
overflow calls.
4. Fast flashing - queue is overloaded.
New calls overflow to another queue.
Display Agent Status
∫Disp Agent
®
1. Press Display Agent. The first three
digits tell the number of agent positions that are busy on ACD calls
(ACD). The second three digits tell the
number of ACD positions waiting for
ACD calls (WAIT). The next three digits
tell the number of ACD agents busy on
non-ACD calls (DN). The final three
digits show the number of vacant
agent positions (LOGOUT).
2. Press Release to clear the display.
Display Queue Status
∫Disp Queue
®
17
1. Press Display Queue. The first three
digits tell the number of calls waiting to
be answered (WAITING). The second
three digits tell the number of agent or
supervisor positions that are logged in
(MAND). The next three digits tell the
number of seconds the first call in the
queue has been waiting (LWAIT). The
final three digits show the number of
calls that have Time Overload (TOFQ).
2. Press Release to clear the display.
Supervisor Features
Headset Talk/Listen
Pand
®
1. Press Program and Dial ‚°
2. Use the Volume Bar to toggle between
Listen Only and Talk & Listen
P
3. Press Program to exit and save
changes.
˙
Press Hold. To take a call off Hold, press
the key beside the fast flashing indicator.
Hold
Observe Agents
1. Press Observe.
∫Observe
or
∫Agent
2. Dial the agent’s position ID, or press
Agent.
3. Repeat Step 2 to Observe another
Agent.
®
4. Press Release to leave the Observe
state.
18
Meridian Communications Adapter
Meridian Communications Adapter
AT dialing commands
AT dialing commands are similar to those used to make data calls using a Hayes
Smartmodem*. AT dialing is not case sensitive. Commands not found here do not
apply to using the Meridian Communications Adapter, and are not supported.
To user AT dialing:
CTRL - z
AT<CR>
ATA
- Answer (answer incoming data call)
ATDnnn
- Dial (n= 0 - 9, numbers to be dialed)
A/
- Repeat last command (no <CR> needed)
ATO
- On-line (hit three Escape characters rapidly to
go off line)
ATDPnnnn
- Voice Call (n= 0 - 9, * and #, numbers to dial)
ATF3
- Handsfree Mute (toggle between mute and
normal)
ATF4
- Hold (put Voice Call on hold)
ATF5
- Select (take Voice Call off hold)
ATH0
- Hang up Data Call
ATHP
- Hang up Voice Call
ATIn
- Product ID code (n= 0, 1, 4; if n= 0 then send
Smartmodem ID; if n= 1 then send result code
“206;” if n= 4 then send result codes
“a037800C004420” and “b100000000”)
19
Meridian Communications Adapter
ATQn
- Result Code (n= 0, 1; if n= 0 then results are
sent)
ATVN
- Verbal Result (n= 0, 1; if n= 0 then numeric
codes are sent
ATXn
- Result Code Selection (n= 0, 1; if n=1 then
extended results)
ATSn?
- Read S-register (n= number of S-register to
read)
ATSn=x
- Write S-register (n= S-register number, x= new
value)
ATZ
- Soft Reset (reset to default parameters)
ATCn
- Carrier Detect (n= 0, 1; if n= 1 then carrier
detect is enabled)
ATEn
- Echo (n= 0, 1; if n= 1 then commands will
echo back to the terminal)
ATTSP!
- Transparent Mode
AT&Cn
- Carrier Detect control (n= 0, 1; if n= 1 then
Carrier Detect is asserted)
AT&Dn
- DTR response (n= 0 - 3; when DTR status
changes: if n= 0 then ignore;
if n= 1 then go off line; if n= 2 then release the
call; if n= 3 then release the call and return
Hayes parameters to default)
AT&Rn
- Clear-to-send (n= 0, 1; if n= 1 then CTS is
always present)
20
Meridian Communications Adapter
AT&Sn
- Data-set-ready (n= 0, 1; if n= 1 then DSR is
always present)
AT&F
- Factory configuration (n= 0, 1; if n= 1 returns
AT configuration to defaults)
AT&Yn
- Recall user profile (n= 0, 1; if n= 1 returns AT
configuration to defaults)
Note: You must follow each command (except A/) by a carriage return <CR> to execute the
command.
21
Meridian Communications Adapter
Keypad Dialing commands
Keypad dialing refers to the commands you can invoke from your telephone’s keypad.
The top right-hand function key on your telephone is called the Program key or P-key.
To use keypad dialing:
1 PressP.
2 Dial the command number listed below. Follow the screen
prompts for additional command parameters (if needed).
3 Press P to execute.
- Manual Data Call
›¤ - Modem Mode
- Release Data Call
›‹ - Network Mode
‚fi - Language Selection
›› - Internal Clock
¤‚ - Asynchronous Mode
›fi - External Clock
¤⁄ - Synchronous Mode
›fl - PSDS Mode Off
¤¤ - Baud Rate
›‡ - PSDS Mode On
¤‹ - Space Parity
›° - Enable Echo Canceller
¤› - Odd Parity
›· - Disable Echo Canceller
¤fi - Even Parity
fi‚ - SL-1 Mode
¤fl - Mark Parity
fi⁄ - SL-1/DMS-100 Mode
¤‡ - Host Mode
fi› - V.25 bis Mode Off
¤° - Terminal Mode
fifi - V.25 bis Mode On
¤· - Hotline Off
fifl - Bisync On
‹‚ - Hotline On
fi‡ - HDLC On
‹⁄ - Virtual Leased Line Off
fi° - Assert RTS Off
‹¤ - Virtual Leased Line On
fi· - Assert RTS On
‹‹ - Forced DTR Off
fl‚ - Auto Dial Programming
‹› - Forced DTR On
fl⁄ - Auto Dial Call
‹fi - Dynamic Carrier Detect Off
fl¤ - Data Parameter Display
‹fl - Dynamic Carrier Detect On
fl‹ - EIA leads Status Display
‹‡ - Remote Loopback Off
fl› - Monitor Data Call
‹° - Remote Loopback On
flfi - Reset to Default Parameters
‹· - Cancel Data Ring Again
flfl - Emulation Selection
›‚ - Full Duplex
fl‡ - Lock/Unlock Data Parameters
›⁄ - Half Duplex
fl° - VDN Key Assignment
22
Title to and ownership of Meridian SL-1 software shall at all times
remain with Northern Telecom. Meridian SL-1 software shall not be
sold outright and the use thereof by the customer shall be subject
to the parties entering into software agreements as specified
by Northern Telecom.
Information contained in this document is subject to change.
Northern Telecom reserves the right, without notice, to make
changes in equipment design or program components as progress
in engineering, manufacturing or technology may warrant.
Reordering number:NT5F53AC A0773348
(c/o 15 each per package P0902628)
Internal Manufacturing part number:
P0902628
Issue 1.00
Printed in the United States of America
March 1999
www.nortelnetworks.com