1
STILA ENERGY®
Mach2000 SYSTEMS
MODEL: STANDARD
USER'S MANUAL
Rel.: 01-2008
Stila Energy®
STILA ENERGY® S.p.A.
Via Ippodromo, 61 - 20151 MILAN - ITALY
Telephone: +39 02 40918310
Fax: +39 02 40917052
E-mail: top@ stilaenergy.com
www.stilaenergy.com
Mach2000 – User Manual
page 2 / 41
Stila Energy®
1
GENERAL DESCRIPTION OF Mach2000
The systems in the Mach2000 family are electronically controlled
electromechanical appliances designed to optimise the management and
powering of large fluorescent and gas discharge lighting installations, allowing
for the reduction of energy consumption and prolonging the durability of the
lamps.
The operating principle is based on exploiting the characteristic brilliancycurrent curve of gas discharge lamps, through the variation of the voltage feed
after an initial warm up period.
The appliances are composed of the following fundamental parts:
a single-phase autotransformer (for each phase) with various taps at
different voltage values that in combination with one another generate 19
different voltage values
single-phase transformer (for each phase) powered at variable voltage, on
the 'primary' circuit, of the autotransformer;
an 'intelligent' power card, for each phase, dedicated to the switching of the
autotransformer's taps through a relay of adequate power;
an electronic command section (controlled by microprocessor);
a main switch with a manual power by-pass function;
a magnetothermic switch that protects the power section;
a line contactor to turn on the load;
a line contactor for the activation of the automatic by-pass.
1.1
FRONT PANEL
On the front panel or on the inside panel in the case of appliances for outdoor
use, the following can be found;
a serigraphed panel with the microprocessor control commands;
a main switch door-jam with three settings for power by-pass function.
The commands and signals for the micro-controller are found on the front
serigraph:
a keyboard for programmi ng (key functions described in paragraph 2.2);
a LCD display
for the various messages on how the appliance is
functioning, the alarms and the electrical measurements;
a green LED that indicates network power feed;
a yellow LED that indicates an overload situation (not active);
a red LED that indicates an alarm;
Mach2000 – User Manual
page 3 / 41
Stila Energy®
2
MAIN COMMANDS
2.1
MAIN SWITCH DOOR-JAM/POWER BY-PASS
The main switch door-jamb safeguard, prevents the opening of the appliance
when it is operational and allows for manual power by -pass.
The main switch has three settings:
NORMAL OPERATION: machine and is on
OFF: machine and load are off
BY-PASS: restores the power feed by perfoming a total power by-pass (load
is on).
2.2
CONTROLLER PANEL AND KEYBOARD FUNCTIONS
DISPLAY
1
2
3
4
P a t e n te d
M a ch 2 0 0 0
F1
N o rm a l
A larm
F2
O verlo ad
5
6
7
8
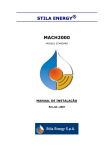
The front panel is divided into two sections:
The part on the left consists of a display (2x16 characters) and three leds
that indicate the operating condition (Normal– Alarm - Overload).
The part on the right consists of a keyboard with 8 keys for the
programming of the appliance.
KEY FUNCTIONS
1 = Key “F1”
:
2 = Key “ ▲”
:
3 = Key “ ▼”
:
4 = Key “F2”
:
5 = Key “ESC” :
6 = Key “ ◄”
:
it is not active on standard models.
increases the values of the parameters to be programd.
decreases the values of the parameters to be programd.
it is not active on standard models.
allows user to exit from the various programming menus.
allows user to scroll back sequentially through the various
steps of the menu or the various parameters.
7 = Key “ ►”
: allows user to scroll forward sequentially through the
various steps of the menu or the various parameters.
8 = Key “ENTER” : allows user to enter into various steps of the menu or to
memorize the value of a parameter after having changed it.
WARNING: Before using Mach2000 check that the appliance was
hooked up according to the format described in the
“INSTALLATION MANUAL“.
Mach2000 – User Manual
page 4 / 41
Stila Energy®
3
INITIAL START UP
The initial start up of the appliance must be done after reading this user's
manual.
In case the appliance has already been turned on, we advise exiting from the
automatic program memorized on the appliance.
Wait for the words "START UP PHASE" to appear on the screen and press the
"ESC" key.
The following screen will appear:
E
N T
- 0
E
1
R
2
3
P
4
A
5
S
6
S W O
7 8 9
R
-
D
In this message, which asks that the PASSWORD be entered, the figure “0” is
flashing.
The PASSWORD programd at the factory is “00000” to enter it hit “ENTER” five
times.
The appliance will interrupt the automatic program and will remain, until new
commands are entered, in the “TEST” mode, showing the following on the
display:
T
E
S
T
M
E
N
U
At this point, with the lamps on and Mach2000 on hold, the "User's Manual"
can be read starting from the "TEST MENU".
Mach2000 – User Manual
page 5 / 41
Stila Energy®
4
TEST MENU FUNCTION
4.1
OPERTATING GOALS AND PRINCIPLES
The test function is very important, above all if Mach2000 is installed in a
previously existing plant.
This function was created in order to check:
1) The minimum voltage to keep the lamps on, avoiding annoying flickering
and/or accidental shut down;
2) The energy savings at the various voltage levels, with the goal of selecting
the best balance between brilliancy values and energy savings;
3) The state of the lamps to eliminate the ones that are too old that, during
the test, are shut off (gas discharge lamps) Fluorescent lamps will flicker,
making them easy to identify.
The "principle" that is taken advantage of by the "test" is the same that causes
the gas discharge lamps to be shut down when the quantity of gas in them is
too low to maintain the electrical arc.
The shut down/flickering of the lamps that are close to burning out is evident,
at least initially, only when there are decreases in the network voltage feed
that occur at certain times of day. (Usually in the middle of the day)
The phenomenon progressively deteriorates, until the lamps remain
permanently shut off. Based on this same principle, a sudden reduction in
voltage and current, created aritficially by Mach2000, will shut off the lamps
that would have burned out in the following weeks.
A specific example can be made with HPS lamps (high pressure sodium):
these lamps can tolerate, when they are new, a minimum voltage of less than
170 V.
The test can be set so that, after an adequate warm up period for the lamps at
nominal voltage, it calls for a sudden decrease in voltage from 230 V. to 195 V.
The lamps that go out at 195 V. because of the test have been operating for at
least 15.000 hours and it might be best to replace them. The lamps that have
reached this "uneconomic" phase of their lifespan, can burn out within the
following few months or weeks and their brilliancy levels are 3540% lower
than a new lamp while consuming the same amount of energy (100%) and
continuing to turn them on and off causes damage to the reactors and ignitors.
Replacing these lamps allows for the restoration of higher average lighting
values, decreasing the number of maintenance calls and the realization of
greater energy savings, maximizing the management of lighting plants.
There are three test methods:
MANUAL
AUTOMATIC
CYCLICAL
It is advised that initially only the "manual" test method be used, then after
gaining some experience, proceed to using the "automatic" test which allows
the user to activate the test and then go on site and observe the behaviour of
the lamps.
The shut down of the lamps, caused by the test, is not permanent and they
can be used normally until their planned replacement; even though the test
does not damage the lamps, to avoid unnecessary stress, it is advised that this
program is not used repeatedly and to wait at least six months between one
test and the next.
Mach2000 – User Manual
page 6 / 41
Stila Energy®
4.2
MANUAL TEST
There are two main goals for this test:
1- To define the minimum operating voltage of the lamps connected to
Mach2000, especially in the case of very long feed lines and/or different
types of lamps on the same line.
2- To identify the lamps that are close to burn out in order to replace them
to improve the average lighting values and/or increase the energy
savings.
The test allows for manual and sequential scanning, both in the decreasing and
increasing, of all the voltage levels available on Mach2000.
The are two ways to carry out the manual test:
1 – TEST “A”: must be used to define the minimum operating voltage of the
lamps
and carries out voltage variations in steps of 1.6 V (2.2 V for certain
models of Mach2000 on request).;
2 – TEST “B”: must be used esclusively to identify the lamps that are close to
burn out and carries out voltage variations in steps of 6.4 V (8.8 V on certain
models of Mach2000 on request).
WARNING: The manual test, particularly “TEST B”, causes a sudden
reduction in the voltage that is being supplied to the lamps. This
procedure, if repeated often, could influence the lamps behaviour. It is
therefore advised, that this test method be used only when Mach2000
is installed and afterwards when necessary to identify the lamps that
need to be replaced.
During the scanning of the voltage thresholds, starting at nominal voltage, it is
possible to check (shown on display*) the progressive reduction of energy
consumption in order to determine the best balance between the energy
savings desired and the brilliancy values that are wanted.
*: The described function is optional and must be requested when the order is
placed.
4.3
PRELIMINARY OPERATIONS
The variation in the voltage feed, can cause the shut down of the lamps if they
have not had and adequate warm up period before the test.
Before proceeding with the test it is advised that the lamps be allowed a few
minutes to warm up at the nominal voltage that is available on the network
(220/230 V):
Fluorescents
Sodium Vapour
Mercury Vapour :
Metallic Iodide
: 2
: 5
: 7
: 10
minutes
minutes
minutes
minutes
In the case of ambient temperatures below 5 C° it is advised that the times be
increased by at least 30%.
Mach2000 – User Manual
page 7 / 41
Stila Energy®
4.4
SELECTING THE MANUAL TEST
WARNING: The test menu can be accessed, after turning on Mach2000, only
after the initial “check” and the beginning of the “start-up” phase (description
in Chapter 5). To return to the automatic program from the test menu press
"ESC".
To exit from the “start-up” phase hit “ESC” and key in the password (see
Chapter 3), at this point the first test menu screen will appear.
T
E
S
T
M
E
N
U
Hit ENTER to see the next screen that allows the selection of the desired test
method.
M
A
N
-
A
U
T
O
-
C
Y
C
L
I
C
By using the arrows ◄ or ►, go to “MAN” (it will flash) and hit ENTER to
make the selection.
The next screen, which appears automatically, offers the choice of test: “TEST
A” or TEST B”.
It is advised for the first time that test "A" be used or to read the
instructions very carefully before proceeding with test "B".
T E
M
S
A
T
N
U
A
Once again using the arrows ◄
make the selection.
A
L
T
E
T
S
E
T
S
T
B
► go to the test desired and hit ENTER to
NOTE: The voltage steps are 1.6 V for test “A” and 6.4 V for test “B”, but in
some versions (on request) the values are 2.2 e 8.8 V respectively.
IMPORTANT:
the initial test is also necessary to establish, with reasonable accuracy, the
amount of energy savings that can be obtained.
For this purpose test "A" must always be used with steps of 1.6 V (2.2 V).
If the brilliancy values should be insufficient because of the condition of the
lamps, then it is advisable to perform another test (test “B”) to identify the
lamps close to burn out and in the "uneconomic" phase of their lifetime and
replace them.
N.B.: The lower the final test voltage is and the faster that value is reached,
the more lamps will shut down, to be if desired, replaced. The lamps that shut
down do not have to be necessary replaced; the decision is left to the
discretion of the consumer who will choose the ideal balance between costs
and benefits received from the operation of lamps replacement.
Mach2000 – User Manual
page 8 / 41
Stila Energy®
4.4.1
RUNNING THE MANUAL TEST
TEST “A”:
after the “TEST A” selection press ENTER and the data relative to the test will
appear on the screen.
I
R
1
1
1
8
5
2
P
S
9
1
9
8
9
1
9
T
9
1
U
8
-
3
0 8
The upper line of the display, shows the voltage for the single phases R-S-T.
The lower line of the display shows, in succession , the following values:
I = Three-phase interlinked current (Amperes);
P = Active triple-phase power absorbed by the load (Watt);
U = Mach2000 active tap (the system has 39 voltage levels: -19
corresponds to the minimum voltage level and 20 to the maximum
level).
*NOTE: the measures of current and active power are only available as options
and at an extra cost and require the installation of specific hardware at the
factory.
*WARNING: On the special version of the Mach2000 TEST "A" allows
the achievement of elevated voltage values (at taps 20 a boost of
approximate 12 V is obtained with respect to the input voltage), if the
supply voltage is 230 V more than 240 V will reach the load and this
could be damaging to the durability of the lamps.
ALWAYS CHECK THE OUTPUT VOLTAGE ON THE DISPLAY AND UNDER
NO CIRCUMSTANCES EXCEED THE NOMINAL VALUE OF 230V.
At this point it is possible to begin the operative phase of the test:
The suggested procedure, calls for increasing (using the ▲ key) the voltage
indicated on the display, until a value between 220 and 230 V. inclusive is
reached, wait approximately 30 second and proceed, only after this operation,
to the actual test decreasing the voltage to the desired value.
To reduce the voltage, use the ▼ key.
To increase the voltage use the ▲ key (never exceed 230V).
TEST "B"
If test "B" is chosen then it is necessary to wait until the system automatically
reaches nominal voltage (around 230 V); in the mean time the following will
appear on the display:
R
M
2
A
2
N
8
U
A
S
L
2
2
T
9
E
S
T
T
2
3
0
When all three phases will have reached nominal voltage (around 230 V), the
following screen will appear (identical to the one for test "A"):
I
R
1
1
1
8
5
2
P
S
9
1
9
8
9
1
9
T
9
1
U
8
-
3
0 8
At this point it is possible to begin the operative phase of the test, that already
starts from 230 V, using the ▼ key to decrease the voltage.
Mach2000 – User Manual
page 9 / 41
Stila Energy®
WARNING: at the beginning of the test never press the ▲ key
because in test "B" the voltage steps are 6.4 V (8.8 V for some
models of Mach2000) and values of over 236 V can be reached.
To replay the test, it is advised that the procedure be carried out
from the beginning (Mach2000 will automatically reach nominal
voltage of 230 V avoiding possible errors).
ALWAYS CHECK THE OUTPUT VOLTAGE ON THE DISPLAY AND UNDER
NO CIRCUMSTANCES EXCEED THE NOMINAL VALUE OF 230V.
ATTENTION: the use of the ▲ and ▼ keys must be controlled and
not overindulged. Wait at least
2 second between one
commutation and another. To each press of ▲ and/or ▼
corresponds a voltage variation to the load and a state variation
on Mach2000. Excessive solicitations are useless and could be
stress the lamps.
4.5
AUTOMATIC TEST
The automatic test is different from the manual test in that there is the
possibility to establish and reach automatically the minimum desired voltage
for the test to run.
The minimum voltage (V.MIN) of the test can be set in the range 160-230 V.
4.5.1
SELECTING AND RUNNING THE AUTOMATIC TEST
To select this test, repeat the procedures described in Chapter 3.2.2, with the
keys ◄
► move the cursor to “AUTO” and press ENTER to select the
automatic test; the following screen will appear automatically, insert the
desired voltage value with the keys ▲ ▼ and confirm the choice by pressing
“ENTER”.
M
I
N
V
O
L
T
A
G
E
=
1
8
0
V
To start the automatic test it is necessary to press “ENTER” again.
Mach2000 will automatically select the various voltage levels in steps of 1.6 V
(2.2 V) at intervals of around 2 seconds until it reaches the indicated voltage
value and will then stop to wait for further instructions allowing the user in the
mean time to go on site and check the behaviour of the lamps.
The Test will stop as soon as all three of the phases reach the programd value.
NOTE: even though the test can be run with any starting voltage value, it is
best to start by setting the Mach2000 at the voltage value of 230 V.
Suggested procedure: use the manual test “A” or "B" (see previous chapters)
to reach the voltage value of 230 V. (check the display in the case of test "A")
and only at this point start the automatic test, repeating the whole procedure
for setting the desired minimum voltage and starting the test.
4.6
CYCLICAL TEST
This mode is not available to clients and is reserved exclusively for factory
testing.
Mach2000 – User Manual
page 10 / 41
Stila Energy®
5
START-UP FUNCTION
The start-up function, is essential to correctly turn on and warm up the lamps;
it is comprised of two distinct phases:
1) Start-up
2) Warm up
The Start-up phase is the cycle for turning on the lamps and giving them the
initial current feed they need and is generally a critical procedure; the Warm
up phase is the cycle needed by the lamps for them to reach maximum
brilliancy efficiency.
Only after running the two cycles can the operating voltage of the lamps be
reduced, according to the automatic program set by the client.
The two phases each have two parameters to program: Voltage (in Volts) and
Time (in minutes).
5.1
PROGRAMMING THE START-UP FUNCTION
From the main menu, using the ◄ ► keys, go to the following screen.
S
T
A
R
T
-
U
P
Press ENTER to access the next screen and proceed to the programming of the
parameters.
The screen will appear automatically and the first parameter will be flashing
(SUPT) and then in sequence the others will flash once the preceeding one has
either been accepted or modified.
S U
W U
P
P
T
T
=
=
0
0
1
5
S U
W U
P
P
V
V
=
=
2
2
1
2
0
0
The set program has default values for each parameter:
Start-up time (SUPT) = 1 minute
Start-up voltage (SUPV) = 210 V
Warm up time (WUPT) = 5minutes
Warm up voltage (WUPV) = 220 V.
To leave the default parameters unchanged, press "ESC" or press “ENTER” 4
times (each time one of the parameters is flashing on the screen).
The values that can be programd (minimum definition of 1 volt and 1 minute)
for each parameter are the following:
SUPT = 1-3 minutes
SUPV = 200-230 V
WUPT = 1-99 minutes
WUPV = 200-230 V
To change one or more default parameters:
the flashing parameter can be increased or decreased by using the ▲ ▼ keys,
once the desired value has been reached it must be confirmed by pressing
ENTER; pressing ENTER automatically brings up the next parameter and so on
until the last one is reached (WUPV).
S U
W U
P
P
T
T
Mach2000 – User Manual
=
=
0
0
1
5
S U
W U
P
P
V
V
=
=
2
2
1
2
0
0
page 11 / 41
Stila Energy®
After the last parameter (WUPV) has been confirmed/changed, by pressing
Enter, a new screen will appear where you can setup a cooling time (between 0
and 15 minutes).
This feature is recommended when you use for example metal halide lamps
that require a certain time to cool-down before you are able to turn them on
again.
The duration of this time is set in the following screen:
C
L
T
D =
I M
0
E
0
S
C
E
O
T
O
T
L
I
I
N
N
G
G
If you set CLD = 0, the feature is turned off. When you set a time, its duration
is shown in seconds as in the screen below:
C
O
C
M
O O
P L
L
E
I
T
N
E
G
s
T
e
I
c
M
E
1
2
0
The requested countdown will begin before turning on the lights through the
usual Start-Up phase.
After confirming the cooling time by pressing Enter, the START-UP screen
appears again
S
T
A
R
T
-
U
P
WARNING: Mach2000 does not run the start -up phase when going
from test mode to the automatic program, but rather only when the
appliance is turned on or when i t receives external consent to activate
the load.
At this point using the ► key access the next screen which is CONFIGURATION
in order to set the basic operating parameters for the automatic programs.
Mach2000 – User Manual
page 12 / 41
Stila Energy®
6
CONFIGURATION
The "configuration" parameters are the operating foundations for all the
automatic programs for Mach2000 and they always condition the management
of the appliance.
There are three fundamental "parameters":
1- RUPT (Ramp UP Time) = voltage increase speed to desired value;
2- FACT (FAlling Commut ation Time) = voltage decrease speed to
desired value;
3- STAB (STABilisation %) = precision in voltage stabilization.
The choice of values to program is closely connected to the type of lamps that
are to be managed and to the reactivity to be given to the Mach2000:
minimum RUPT and FACT times determine high reactivity and speed with
which the desired voltage values are reached, but higher stress for the
lamps;
the best stabilization values (0,5%) allow for optimal management and
protection for particularly delicate lamps (metallic iodide) but force
Mach2000 to perform an elevated number of operations (in the case of
very unstable power feeds) that could reduce the durability of some
components.
WARNING: It is advised, at least at the beginning, to use the default
parameters set in the factory; then check the need to change one or
more of these parameters.
6.1
PROGRAMMING THE CONFIGURATION PARAMETERS
The factory settings for the default parameters are as follows:
RUPT = 5 seconds
FACT = 5 seconds
STAB = 1.5%
If so desired, to change one or more parameters access the following screen
using the ◄ or ► keys.
C
O
N
F
I
G
U
R
A
T
I
O
N
Press "ENTER" to access the screen to change the parameters:
R
U
P
T
S
=
T
1
A
0
B
=
F
1
A
.
C T =
5 %
0
6
“RUPT” will be flashing: to keep this value press “ENTER”, to change it use the
▲ ▼ keys until the desired value appears: range = 2-10 seconds = 48-10 V.
per minute (66-13 V).
To confirm the new value press “ENTER”.
Now the next parameter, “FACT” will be flashing: to keep this value press
“ENTER”, to change it use the ▲
▼ keys until the desired value appears:
range = 5-30 seconds = 19-3 V per minute (26-4,5 V).
To confirm the new value press “ENTER”.
Mach2000 – User Manual
page 13 / 41
Stila Energy®
Now the last parameter, “STAB” will be flashing: to keep this value press
“ENTER”, to change it use the ▲ ▼ keys until the desired value appears:
the possible values to program are as follows:
0.5%
1.0%
1.5%
2.0%
After selecting the desired value press “ENTER”.
WARNING: the most precise stabilization value ( 0,5%) causes a sharp
increase in the number of commu tations of the power cards and must
be used only for lamps that require them. This option must be used
only in case, prior to the installation of Mach2000, an elevated number
of burn outs due to the not stabilized voltage.
The next screen, which appears automatically:
E
N
T E
Y E
R
S
P
O W
N O
E
R
“NO” will be flashing, press “ENTER” to finish the configuration programming.
The selection of “NO” is compulsory because the option to select yes is
protected by a special “password”. The information is entered in the factory
and determines the alarm threshold for a power overload, to be sent by remote
control in case this option is on the appliance.
Mach2000 – User Manual
page 14 / 41
Stila Energy®
7
AUTOMATIC PROGRAMS
The automatic programs, a total of 6, can be divided into three main families:
1 – STABILIZED VOLTAGE (SUPVB)
2 – STABILIZED BRILLIANCY (LUMIN)
3 – VARIABLE LIGHTING GENERATOR FOR TUNNELS (TABC)
"Stabilized voltage" programs are the only ones that can be used by the
"standard" version of the Mach2000.
The "Stabilized brilliancy" programs can be used only if the version of
Mach2000 with brilliancy sensors and the relative digital interface is purchased.
The programs for tunnels (TABC) are not dealt with in this manual because the
appliances that are used (MachROAD) are special, they have special hardware
and are built exclusively to order.
7.1
POSSIBLE SETTINGS TO RUN THE PROGRAMS
There are two possibilities for running the programs at constant voltage or
brilliancy:
CONSTANT:
three voltage values (one per phase) or one brilliancy value
can be programmed for the operation of the plant;
TIME BANDS:
from a minimum of 2 up to 12 different voltage or brilliancy
values can be programmed in as many time bands that can
be modified, with a minimum resolution of 10 minutes;
7.2
SELECTING THE PROGRAMS AND THE DIFFERENT SETTINGS
To change one or more parameters
7.3.
To select and start the program
specifically changed and memorized,
from the main menu, with the ◄ ►
S
P
E
R
L
O
of the program desired, go to paragraph
with the default parameters or those
use the following procedure:
keys go to the following screen:
E
G
C
R
T
A
M
Press "ENTER" and the next screen will appear:
V
O
L
T
B
R
S
I
T
L
A
L
B
I
I
A
L
N
I
C
The default program that comes up is: STAB. VOLT.
To move on to the other two programs press ◄
program is flashing, press "ENTER" to select it.
Z
Y
E
D
► and when the desired
Once the choice has been made, the screen that allows the user to select the
operating method will automatically appear:
C
O
N
S
T
A
N
T
-
T
B
A
N
D
The default selection that comes up is: CONSTANT.
Mach2000 – User Manual
page 15 / 41
Stila Energy®
To move from one possibility to the other use the ◄ ► keys until the desired
option is flashing and press "ENTER" to select. Once this is done, the initial
screen will appear again:
S
P
E
R
L
O
E
G
C
R
T
A
M
IN ORDER TO ACTIVATE THE PROGRAM WITH THE SELECTIONS MADE PRESS THE
“ESC” KEY AND THE FOLLOWING SCREEN WILL APPEAR:
W A
M E A
I
S
T
U
R
F
E
O
M
R
E
N
T
During this time the CPU will update the data in its memory
7.3
ENTERING OR CHANGING WORKING PARAMETERS
In order to perform this task press the ◄
► keys until the following screen
appears:
M O D I F Y
P R O G R A M
Press “ENTER” and proceed as described in paragraph Par. 7.2, to select the
program and the setting for which the parameters will be changed.
The working parameters that can be changed and the way to program them is
described in the following paragraphs.
NOTE: from this screen to activate the automatic program previously
selected simply press the "ESC" key
Mach2000 – User Manual
page 16 / 41
Stila Energy®
8
PROGRAMS AT STABILIZED VOLTAGE
8.1
STABILIZED VOLTAGE PROGRAM: "CONSTANT"
To enter the working parameters in the "constant" setting follow the steps
described in paragraph 7.3.
After pressing “ENTER”, “MODIFY PROGRAM” will disappear and the following
screen will appear:
V
O
L
T
B
R
S
I
T
L
A
L
B
I
I
A
L
N
I
C
Z
Y
E
D
The default program that will be flashing is "STAB. VOLT", to select it simply
press “ENTER”.
Once the choice of program has been made, the screen to select the settings
appears automatically:
C
O
N
S
T
A
N
T
-
T
B
A
N
D
The default setting that will be flashing is "CONSTANT" to select it simply press
“ENTER”.
At this point the following screen will appear where the voltage value relevant
to phase R will be flashing.
V
V
.
2
S
=
T
2
A
3
B
0
.
V
V
V
1
3
=
=
2
2
3
3
0
0
V
V
To change the voltage use the ▲ ▼ keys until the desired value is reached and press
“ENTER”. V2 will now be flashing; after setting the voltage press Enter again to set the
value for V3 and press Enter again to confirm the changes.
The constant stabilized voltage program will keep the output voltage stable for
each phase with the precision selected in the "CONFIGURATION" menu for the
entire time that the Mach2000 is on and running.
IMPORTANT: all the voltage stabilized programs allow for values
between 160 e 230 V. inclusive with a minimum resolution of 1 V.
8.2
STABILIZED VOLTAGE PROGRAM: “BANDS”
To enter the working parameters in the "BANDS" setting follow the steps
described in paragraph 7.3
After pressing “ENTER”, “MODIFY PROGRAM” will disappear and the following
screen will appear:
V
O
L
T
B
R
S
I
T
L
A
L
B
I
I
A
L
N
I
C
Z
Y
E
D
The default program that will be flashing is "STAB. VOLT.", to select it simply
press “ENTER”.
Once the choice of program has been made, the screen to select the settings
appears automatically:
Mach2000 – User Manual
page 17 / 41
Stila Energy®
C
O
N
S
T
A
N
T
-
T
B
A
N
D
2
:
3
0
Use the ◄ ► keys to go to "TBAND" and press “ENTER”.
At this point the following screen will appear automatically:
T
F
0
R
1
0
0
2
:
3
0
0
0
2
T
3
O
0
0
8
0
0
The voltage value relevant to phase R will be flashing. To change the voltage
use the ▲
▼ keys until the desired voltage is reached and then press
“ENTER”. To proceed to next phase use the ◄
► keyes, change the voltage
and press Enter. Repeat this operation for the last phase.
Allowed V values: from 160 to 230 V with a minimum resolution of 1V.
At this point the finishing time of the band will be flashing on the (bottom)
right side of the display.
T
F
0
R
1
0
0
2
:
3
0
0
0
2
T
3
O
0
0
8
2
:
3
0
0
0
PLEASE NOTE: the starting time for band 1 cannot be changed and
corresponds to 00:00 (midnight).
To confirm the time for the end of the band press “ENTER”.
To change the time (intervals of 10 minutes) use the ▲
▼ keyes and then
confirm the new setting by pressing “ENTER”.
NB: the minimum resolution for the times is 10 minutes, it is therefore not
possible to set the finishing time of the band atr 08:34 but, for example, at
08:30 or at 08:40.
Band 2 and the subsequent bands, must be programmed with the same
settings as band 1, keeping in mind that the starting time of each band
corresponds automatically to the finishing time of the previous band. For
example: if the finishing time for band 1 is set at 08:00, this will be the
starting time for band 2 and it will appear automatically. It will only be
necessary to program the finishing time.
In the last time band that will be programmed, the finishing time must be
00:00 and press "ENTER" to finish programming.
At this point the MODIFY PROGRAM screen will automatically appear.
TO ACTIVATE THE PROGRAM SELECT PROGRAM AND RUNNING SETTINGS
(see paragraph. 7.2) AND PRESS “ESC”
Mach2000 – User Manual
page 18 / 41
Stila Energy®
9
STABILIZED BRILLIANCY PROGRAMS
This program can only be used with versions of Mach2000 equipped with
brilliancy sensors and relative electronic interfaces that are options that can be
ordered at an extra cost.
There are two programs in this group:
“CONSTANT ”:
“BANDS”:
Only one lighting value can be programd and maintained for
the entire period that the plant is running;
From 2 to 12 different lighting values can be programd is as
many time bands, they can be modified in width with a
minimum resolution of 10 minutes.
The aim of these programs, which can be considered "advanced", is to take
advantage of any natural lighting (where present) to improve the energy
savings and/or make the most of the lighting plants by stabilizing a set lighting
value regardless of the condition of the lamps.
This application is excellent both for internal plants (factories - shopping
centres) and for lighting plants in public areas; for the latter it is possible to
improve the energy savings with a reduction of upto 50% in the brilliancy flow,
only, of course where atmospheric and visibility conditions make it possible.
In cases of drastic reductions in visibility (mist - fog - heavy rain), the
brilliancy sensor connected to Mach2000 would immediately increase the
voltage feed, in order to maintain stable lighting values that are considered
"safe" regardless of atmospheric conditions.
For instructions relative to the most advantageous positioning of the brilliancy
sensors refer to the "INSTALLATION & MAINTENANCE MANUAL".
IMPORTANT: even for these programs, for proper operation, START –
UP
and CONFIGURATION parameters must be set following the
procedures described in the previous chapters.
9.1
STABILIZED BRILLIANCY PROGRAM : “CONSTANT”
There are four operating parameters for the stabilized brilliancy programs:
- V MIN (minimum voltage): with a range of 160-230V, must be determined
by using the test and prevents accidental shut down of the lamps, caused
by voltage feeds that are too low, reached by Mach2000 to compensate for
an excess of natural light;
- V MAX (maximum voltage): with a range of 160-230V, defines the voltage
level that Mach2000 must never exceed, to guarantee an adequate balance
between lighting values (without any natural light) and minimum energy
savings (NOTE: suggested value 200-215 V. based on the type of lamps
being used and the performance of the lighting plant);
- HYST (hysteresis): with a range of 2-15 points, defines the value of the
variation in brilliancy, for example 10 points, within which Mach2000 does
not react; for example: lumen output programd at 200 points with
hysteresis 10, the system does not react modifying the voltage for values
between 190 and 210 points inclusive.
This parameter avoids continuous voltage fluctuations, compensating only
for significant variations in the lighting values and in this way improving on
the durability of the lamps and Mach2000 (NOTE: suggested value 10
points);
Mach2000 – User Manual
page 19 / 41
Stila Energy®
-
BRI (brilliancy): with a range of 0255 points, defines the best lighting
value to be stabilized notwithstanding the amount of natural light.
This value, to be memorized, can be defined only experimentally, through
the following.
FOREWORD: to enter the correct parameters, it is necessary to perform
the trials at night (amount of natural light = 0):
1- Check the "minimum voltage" needed by the lamps to stay on, using
MANUAL TEST "A" (paragraph. 3);
2- Increase the voltage value obtained by 3-5V and take note; (this figure
will be memorized later as the "minimum voltage”).
3- Remain in MANUAL TEST “A” and increase the voltage until the desired
brilliancy value is reached;
4- Increase the voltage value obtained by 3-5V and take note (this figure
will be memorized later as the "maximum voltage”).
NOTE: For an accurate check of the lighting values (point 3) the use of
a digital luxmeter w ith lighting source selection is advised.
At this point, it is possible to move on to programming: using the ◄
select “MODIFY PROGRAM” and press “ENTER”.
M
P
O
R
D
O
I
G
F
R
Y
A
► keys
M
The following screen will appear automatically:
V
O
L
T
B
R
S
I
T
L
A
L
B
I
I
A
L
N
I
C
Z
Y
E
D
With the ► key move to the option "BRILL" (it will flash) and press “ENTER” to
select.
The following screen will appear automatically:
C
O
N
S
T
A
N
T
-
T
B
A
N
D
With the ► key go to "CONSTANT" and press “ENTER”
The following screen, which will appear automatically, calls for the entering of
operating parameters for the program.
B
V
R
M
I
A
=
X
2
=
5
2
5
2
V
0
M
H
I
Y
N
S
=
T
2
=
0
1
0
0
The first parameter which will be flashing is “LUM” and must be increased with
the ▲ key, to the maximum allowable value of 255 points (temporary
regulation), press “ENTER” to confirm.
Automatically the parameter “VMIN” will be flashing, with the keys ▲ ▼ enter
the value obtained in the preliminary check (point 2 of the PREMISS) and press
“ENTER” to confirm.
Now “V-MAX” will be flashing and using the ▲
▼ keys enter the value
obtained in the preliminary check (point 4 of the PREMISS).
Mach2000 – User Manual
page 20 / 41
Stila Energy®
At this point “HYST” will be flashing, press “ENTER” to confirm the default
value = 10 points (if during automatic operation there are many voltage
variations caused by Mach2000, the value can be increased to 12/15 points; if
instead maximum precision and reactivity is desired from the system, the
hysteresis can be reduced to the minimum allowable value of 2 points).
Select the program in the desired setting and activate it by pressing
“ESC”
Since, in this phase of adjustment of the system, the maximum brilliancy value
was programd, Mach2000 will surely reach the V MAX voltage value.
At this point the brilliancy value (in points) that has been reached at the
voltage value = V MAX previously defined can be read on the display.
The brilliancy value in points that can be read on the display at this point, is
the minimum value that can be guaranteed even in the total absence of natural
light. Mach2000 will automatically provide for the reduction of voltage in
proportion to the increase of natural light that will arrive during daylight hours.
Exit the automatic program by pressing the “ESC” key and repeat the
programming described on the previous page, memorizing the last parameter
(LUM) obtained.
B
V
R
M
I
A
=
X
2
=
5
2
5
2
V
0
M I
H Y
N
S
=
T
2
=
0
1
0
0
After changing the “LUM” with the ▲ ▼, keys press “ENTER” to confirm.
Press “ENTER” three more times to confirm the VMIN – VMAX and IST
parameters.
TO ACTIVATE THE AUTOMATIC PROGRAM PRESS “ESC”
9.2
STABILIZED BRILLIANCY PROGRAM : “BANDS”
The "BANDS" program allows for the programming from 2 to 12 different
lighting values, to be established in as many time bands, that can be modified
in width with a minimum resolution of 10 minutes.
The most valid application is in public lighting of roads and motorways, where
safety conditions must be respected without giving up on saving energy.
Obviously the flow reduction, generated soley on time, does not take into
consideration weather conditions or particularly unfavourable visibility
conditions.
The stabilized brilliancy program "BANDS" allows for energy savings that are
very consistent but at the same time respects the minimum security conditions
for traffic by reacting in real time to any possible unfavourable weather
conditions.
The possibility of programming upto 12 different lighting values, takes full
advantage of the performance of the plant in relation to predictable differences
in traffic flow that can be in as many (12) time bands.
WARNING: this program can be used only after all adjustments and
checks of the parameters described in chapter 9.1 have been done.
Mach2000 – User Manual
page 21 / 41
Stila Energy®
NOTE: the time bands in this program do not have any relationship to the time
bands for the stabilized voltage program, therefore, the times have to be
entered and memorized once again.
At this point after having entered and checked all the parameters, proceed to
entering the different desired lighting values and the times.
From the “PROGRAMS” menu, press “ENTER”.
With the ► go to the program “BRILL” and select it by pressing “ENTER”.
The following screen will appear automatically and using the ► key go to the
option “BANDS” and select it by pressing “ENTER”.
At this point, the screen below will appear, where all the parameters except for
"BRILL" can be memorized.
VMIN will be flashing, with the ▲ ▼ change the voltage value and confirm it
by pressing “ENTER”.
The “IST” and “VMAX” parameters must be either changed or confirmed with
the same procedures previously described.
V
V
M
M
I
A
N
X
=
=
2
2
0
2
0
0
H
I
S
T
=
1
0
After having pressed “ENTER” to memorize the desired value for “VMAX”, the
following screen will appear:
T
F
B
R
A
N
0
D
0
:
0
0
0
1
T
=
O
0
2
0
1
:
0
0
P
8
The desired brilliancy value in points will be flashing.
With the ▲ ▼ keys change the value to reach the one desired and confirm
by pressing “ENTER”.
Now the finishing time for band 1 will be flashing, the starting time (cannot be
changed) is at 00:00.
With the ▲
▼ keys change the time to the one desired and confirm by
pressing “ENTER”.
To program the subsequent bands use the same procedure described in
chapter 9.2, remember that the parameter entered is a brilliancy value and not
a voltage value.
Mach2000 – User Manual
page 22 / 41
Stila Energy®
10
CLOCK
Setting the clock is fundamental for the running of the time band programs
and is set following the same procedures:
with the ◄ ► keys go to the following screen.
T
I
M
E
S E
T
T
I
N
G
2
5
.
.
0
1
4
2
.
.
Press "ENTER" to go to the next screen.
T
D
I
A
M
T
E
E
1
2
3
0
3
0
The hour will be flashing and can be changed by using ▲
▼ to get to the
desired value.
Confirm the selection by pressing “ENTER”, then automatically the minutes will
begin to flash and can be changed in the same way.
All the information regarding the date can be programd sequentially following
the same procedure described above.
Once the year has been entered and memorized the following screen will
appear:
S
Using the ◄
U
M M
Y E
E
S
R
T
I M
N O
E
► keys go to the desired option and press “ENTER” to confirm.
If "YES" is selected the clock will automatically switch to daylight savings time;
"NO" must be selected for countries where daylight savings time is not in use.
At this point the program will return automatically to the menu “TIME
SETTING”.
11
PASSWORD
The password is in place to prevent unauthorized people from exiting from the
automatic program or changing data/programs that have been entered into
Mach2000.
The password is required each time“ESC” is pressed to exit from the
automatic program.
The default password is “00000” (five zeros), but can be changed to any other
five digit number.
NOTE: decide the new five digit number to insert (for example 83100)
and write it down before proc eeding to change the password.
With the ◄
► keys go to the following screen.
P
C
A
H
S
A N G
S W O
E
R
D
Press "ENTER" to move on to the next screen.
N
E W
- 0
Mach2000 – User Manual
1
2
P
3
A
4
S
5
S
6
W O
7 8
R
9
D
-
page 23 / 41
Stila Energy®
The cursor will position itself on the number "5" and that number will be
flashing, using the ◄ ► to move the 'flash' to the desired number and then
press “ENTER” to confirm.
Repeat the operation 5 times to enter the 5 numbers of the new password.
After entering the 5th and last number and confirming it by pressing “ENTER”,
the following screen will appear:
N
E W
2
P
2
A
0
S
3
S
3
W O
R
D
After 2 seconds the screen automatically returns to:
P
C
A
H
S
A N G
S W O
E
R
D
WARNING: before memorizing the new password by pressing “ESC”,
check to make sure the new password has been written down. In case
it has not, and the number has been forgotten, DO NOT PRESS “ESC”
because at this point it is still possible to enter a new password.
Only at this point press “ESC” and confirm the new password that has been
carefully noted.
11.1 PASSWORD: EMERGENCY PROCEDURES
The "active" password must be kept in a safe place by the Client.
If for any reason the password is lost or forgotten it will be necessary to
activate the emergency procedure.
The emergency procedure unblocks the access to the appliance and can be
performed only by technicians from Stila Energy® S.p.A.
The password is in place to prevent the modification of the information
programmed; in case of any problems, set Mach2000 to by-pass and call Stila
Energy® S.p.A. directly at +39 02 40 91 83 10.
The operation of unblocking the appliance is never covered by the
warrantee and the relevant cost will be invoiced.
Mach2000 – User Manual
page 24 / 41
Stila Energy®
12
SELECTION OF THE LANGUAGE
There are four languages available: ITALIAN – ENGLISH – FRENCH – GERMAN.
Depending on the final destination it is possible to ask for the Italian/French
version or the English/German version.
With the ◄
► keys go to the screen for the selection of the language:
The 2 possible screen will be the following:
I
F
T
R
A
A
L
N
I
C
A
A
N
I
E
D
N
E
G
U
L
T
I
S
S
C
H
H
O
S
Press “ENTER” and the cursor will flash.
Using the ◄ ► go to the desired language and press “ENTER” to confirm.
The default language is "ITALIAN” when Italian/Franch software is installed
The default language is "ENGLISH” when English/German software is installed
13
VISUALIZATION OF ELECTRIC DATA
The Mach2000 appliances offer as a standard feature, the visualization
of input and output voltage.
The other electric data that require special hardware, are available as
extra cost options and must be requested when ordering the appliance.
Voltage is always shown, while the other information (linked current,
active power and cos) can be called up only during the automatic
operating of Mach2000.
The visualization of the screens with the electric data is sequential and
operated by using the ▲ ▼ keys.
Next page show the general diagram of Mach2000 programming.
Mach2000 – User Manual
page 25 / 41
Stila Energy®
g
n
i
m
m
a
r
g
o
r
P
0
0
0
2
h
c
a
M
f
o
m
a
r
g
ia
D
l
a
r
e
n
e
G
Mach2000 – User Manual
page 26 / 41
Stila Energy®
ALARMS
14.
The system shows on the display and with the help of two red and yellow LEDs
on the front panel, some alarm conditions which can, in some cases, disable
and/or automatically by-pass (if present) the Mach2000.
14.1.
TEMPERATURE ALARM
This alarm is generated following a condition of prolonged overloading, when
one or more temperature sensors, located inside each transformer (one per
phase) detect a temperature higher than the preset value (120 °C).
After the abnormal condition is detected, the electronic controller activates the
"automatic power by-pass" (if present), or it simply shuts down the appliance,
to protect it from any damages.
The alarm condition is indicated by a message on the display and by the
flashing of the red LED on the front panel.
Once the cause of the overload has been eliminated you can restart the
Mach2000 by resetting the thermal breaker located inside the device by
turning the door-locking switch to OFF.
If the load conditions, in amps per phase, were returned within the rated
values of the appliance and the temperature alarm is nevertheless generated,
the following controls are necessary:
i. check if the technical room, where the Mach2000 is installed, has a
reasonably good air exchange and make sure that the room temperature
does not exceed 50°C;
ii. check if connectors J9.1 and J9.2, of the controller on the door of the
electrical cabinet of the Mach2000, are properly connected.
If the connectors are correctly connected, put the appliance
definitively in by -pass and contact your nearest se rvicing center or
directly contact STILA ENERGY S.p.A at +39 02 40 91 83 10.
14.2.
RELAY ALARM
Mach2000 has a real-time electronic control system which controls the
switching operations performed by the power boards.
This control is carried out on each relay in order to signal a fault or the excess
of time-out specified for every power switching operation.
During switching operations, the system's electronics continuously controls the
three phases, so if a problem is detected, it activates the switching alarm.
The alarm trips the automatic power by-pass and is indicated by the flashing
red LED and by a message on the display indicating which phase failed to
switch as in the following sample:
*
R
E
*
L
A
A
Y
L
O
A
P
R
E
M
N
*
*
F
.
1
In this case it shows that a relay on phase 1 (F.1) didn’t work properly.
*
R
E
*
L
A
A
Y
L
C
A
L
R M
O S
*
E
D
*
F
.
2
In this case it shows that a relay on phase 2 (F.2) didn’t work properly.
*
*
R
E
Mach2000 – User Manual
L
A
A
L
Y
A
R
B
M
Y
P
*
F
*
.
3
page 27 / 41
Stila Energy®
In this case it shows that a relay connected to the by-pass resistance on phase
L3 (F.3) did not switch properly.
You should try to restart the Mach2000 by resetting the thermal breaker
located inside the device by turning the door-locking switch to OFF.
If the alarm continues, leave the appliance definitively in by -pass and
contact your nearest servicing center or directly contact the STILA
ENERGY S.p.A servicing center at +39 02 40 91 83 10 .
14.3.
FUSE ALARM
This alarm is generated if a failure occurs to fuse F3 (10,3 x 38) which protects
the primary section of the autotransformer. The electronic controller detects
the abnormal situation and triggers the "automatic by-pass".
This alarm situation is indicated by means of a red led on the front panel as
well as a corresponding message on the display.
To reset the Mach2000 to a normal condition you will need to replace the fuse
with one of same type and caliber. To do this, turn the main switch on the
front door to OFF, open the device, replace the fuse and re-arm the internal
magnetothermic switch (MT1) by taking it to ON. Close the door and turn the
main switch back to Normal Operation.
If, after the fuse has been properly replaced, the "Fuse Alarm"
condition remains, please check that the voltage input is present o n all
three phases. If that is the case please contact the nearest Service
Center or Stila Energy S.p.A. directly at +3902 4091 8310.
14.4.
INTERNAL SELF-DIAGNOSES
When powered up, the system runs a series of internal tests on the
functionality of certain components and on the correctness of the stored
parameters.
In case of a fault, and if the automatic by-pass is installed, the latter is
immediately activated or the system goes into safety shut-down status and no
longer supplies power at output.
Remember that, if the programmed parameters are not consistent with the
work fields, the program is not accepted.
Mach2000 – User Manual
page 28 / 41
Stila Energy®
15.
AUTOMATIC BY-PASS
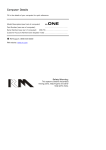
1
4-
electronic control panel with:
2 - green indicator light: normal operation ;
3 - red indicator light : by-pass;
master switch (door locking).
1
2
3
4
3
2
DESCRIPTION OF CONTROLS
Master switch
it has three positions:
central position (0)= Mach2000 is on OFF condition.
right-hand position (N.O.: Normal Operation) powers up the Mach2000,
activating all controls on the electronics panel as well as the automatic bypass if necessary.
left-hand position (Byp: by-pass) = manual forcing of the by-pass condition
(status: electronics OFF and load ON). This condition (by-pass) allows for
the replacement of the electronics in safe conditions.
IMPORTANT : the by-pass position maintains power on the input and
output terminals, and on the power contactors as well as on fu ses F6,
F7, F8. Any maintenance jobs, with load ON and Mach2000 in by -pass,
must be carried out by STILA ENERGY S.p .A. or by specifically trained
personnel only.
The automatic by-pass function enables load ON to be restored in case of
trouble on Mach2000.
Mach2000 – User Manual
page 29 / 41
Stila Energy®
15.1.
AUTOMATIC BY-PASS and ALARMS
The "system" reacts to all alarm conditions which may occur while the
Mach2000 is in operation, namely:
Temperature alarm
Relay alarm
Fuse alarm
If an alarm is generated, the by-pass is activated. A warning message appears
on the display of the red LED on the front panel flashes.
The automatic by-pass can be reset as follows: turn OFF ("0") the master
switch, restore the closure of the thermal breaker inside the appliance and,
finally, close the appliance and re-position the switch to the "NORMAL
OPERATION" position .
If the automatic by-pass is tripped again (red LED flashing), turn the master
switch definitively on BY-PASS and contact your nearest servicing center or
directly contact the STILA ENERGY S.p.A at +39 02 40 91 83 10.
Mach2000 – User Manual
page 30 / 41
Stila Energy®
ROUTINE MAINTENANCE
16.
WARNING: IT HAS TO BE CARRIED OUT WITH THE DEVICE TURNED
OFF. THEREFORE MAIN SWITCH MUST BE ON ZERO (0) POSITION
The routine maintenance required by the Mach2000 systems consists of a few,
simple operations to be periodically carried out by Technical Personnel, with
the necessary professional qualifications for electrical systems.
The frequency of the maintenance jobs varies according to machine model and
installation place.
Temperature, dust, and vibrations have negative influence, making more
frequent overhauls necessary.
The recommended intervals are from 6 to 12 months (short intervals for very
powerful machines and/or for dusty, high temperature places, long intervals
for low power machines installed in places with good climatic conditions ).
Operations to be carried out:
external inspection of the appliance;
check the efficiency of handles (if present) and/or locks (if present)
and of the door-locking selector switch;
check correct operation of doors (if present);
check condition of the electronic control unit and check the relevant
connectors;
eliminate dust or particles accumulated inside;
clean and, if necessary, replace the filters of the ventilation fans;
check the operation of the ventilation fan;
check and tighten all internal terminals;
check general operation, and the efficiency of the set time and date
controls;
check the condition of the power boards and the relevant connectors;
check and measure the continuity of the protective circuit (earth
connection) between the masses of the container and the earthing
splitter of the electrical system on which the machine was installed;
check the condition of the transformers and auto-transformers;
check the condition of the safety components;
generally check the internal condition, focussing on any oxidation on
the power terminals.
Both the power and "controller" electronic boards of Mach2000 are protected
against dust and other external agents by a special insulating paint.
However, caution would suggest "exhausting" conductive dust from the
appliance's internal parts which may be particularly exposed, especially if
installed in places saturated with conductive dust, for example:
Road and motorway tunnels;
Car parks;
Tube or railway stations;
Roads and motorways with a high density of heavy traffic;
Heavy industry: foundries, mechanical metal working, Chemical
industries.
Mach2000 – User Manual
page 31 / 41
Stila Energy®
Appendices
Mach2000 – User Manual
page 32 / 41
Stila Energy®
Mach2000 – User Manual
page 33 / 41
Stila Energy®
Appendix A
Multi-power-up module
INT-MAxx
DESCRIPTION AND INSTALLATION
Rel.: 01-2006
STILA ENERGY S.p.A. Via Ippodromo, 61 - 20151 MILANO - ITALY
Phone:+39 02 40 91 83 10 – Fax: +39 02 40 91 70 52
e-mail: [email protected]
Mach2000 – User Manual
page 34 / 41
Stila Energy®
A
Multi-power-up modules INT-MAxx – General Description
The main function of the multi-power-up module is to verify the (ON/OFF)
position of the switches protecting the illumination lines.
When a switch is in OFF position and is then changed to ON, the INT-MAxx
module notices the change of state and signals the event to Mach2000.
Mach2000 gradually takes the output voltage to the warm-up value and
performs the start of the lamp warming cycle as per set program.
The time required to reach the warm-up voltage depends on the settings of
Mach2000 and on the time when the INT-Maxx interface is activated.
The INT-MAxx modules can be used also for controlling the status of the
switches of any electrical panel and, therefore, for general signalling of line
faults.
Three possible versions can be composed with each other.
INT-MA05 for controlling 5 lines (therefore with 5 inputs)
INT-MA10 for controlling 10 lines (therefore with 10 inputs)
INT-MA15 for controlling 15 lines (therefore with 15 inputs)
The can be used in parallel and in any possible combination (e.g., if there are
20 switches, you can associate a 5-input and a 15-input module, or two
modules with 10 inputs or even four of 5 inputs):
Whatever the model, the dimensions are 70X156X90 mm = 9 DIN units
The power supply of INT-MAxx is 230V (+ Neutral) and the switch inputs are
always 230V in the standard version, but a version with 24Vac potential inputs
can be obtained on request.
Installation procedure: connect the cable commanding the coil of the
contactors of the illumination lines, whose status you wish to check (on the
control electrical panel) and the cables powering the interface (from the 230
Volt auxiliary circuits).
Relays can be used in the absence of the power-up contactors. In any event
we advise you contact Stila Energy S.p.A. to agree on alternative
configurations.
The INT-MAxx modules are totally automatic. Their use does not entail any
modification or setting of the Mach2000 software.
A.1
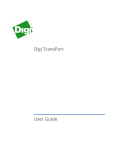
Standard connection of module INT-MAxx
To connect the INT-MAxx modules, consult the wiring lay -out below.
Take the single-phase power supply received from the switch which
protects the auxiliary circuits and connect it to the fused terminals FN
(neutral fuse) and FL1 (Phase fuse): respectively the 0V neutral on fuse
FN and the 230V phase on fuse FL1.
Mach2000 – User Manual
page 35 / 41
Stila Energy®
Connect each coil of the contactors, 230V phase side, located
downstream of the regulator, to each of the available inputs: F9
(11/MA), F10 (13/MA) etc.
At every closure of the line contactors, the INTMAXX module commands
Mach2000 to automatically return the power supply voltage to the value
set for lamp warm-up (warming voltage) for the programmed time.
When this initial stage is over, Mach2000 resumes the automatic work
program.
NB.: All the inputs must be connected to a phase, L1, L2 or L3, at each
line contactor.
You can request the INTMAxx module for use with contactors on a
24Vac power supply.
INT-Maxx WIRING LAY-OUT
SUPPLY
ALIMENTAZIONE
INPUTS
INGRESSI
A3
A1
A5
A7
A15
A10
A12
A14
A9
A11
A13
A2
A4
A6
A8
F26 F25F24F23F22F21F20
F19F18F17F16F15F14F13F12
41/MA
43/MA
45/MA
47/MA
49/MA
51/MA
53/MA
25/MA
23/MA
21/MA
19/MA
17/MA
15/MA
13/MA
11/MA
F10F9
N
L1
ST2000/C
33
35
41
43
53
45
47
49
51
INTMA15
3
5
15
11
Mach2000 – User Manual
13
17
19
21
23
25
page 36 / 41
Stila Energy®
Mach2000 – User Manual
page 37 / 41
Stila Energy®
Appendix B
Logical bypass option
TECHNICAL DESCRIPTION
Rel.: 01-2006
STILA ENERGY S.p.A. Via Ippodromo, 61 - 20151 MILANO - ITALY
Phone:+39 02 40 91 83 10 – Fax: +39 02 40 91 70 52
e-mail: [email protected]
Mach2000 – User Manual
page 38 / 41
Stila Energy®
B
Logical bypass option
This option allows the Mach2000 to shift from any working modes (excluded
the stabilized voltage one) to the stabilized voltage mode.
The shift occurs simply with the closing of a 0 Volt clean contact normally
open. When this contact reopens, the Mach2000 will go back into it’s initial
operating mode.
Such an option is useful when, in some situations, like an emergency one, you
may want to move from a low voltage situation with reduced luminosity to a
temporary one with an output voltage close to the nominal one and therefore
maximum light output.
This command can be generated automatically or manually by the user. For
instance it could come from:
- starting-up of a UPS or a generator
- anti-theft system
- manual override
- BUS system
- intrusion detector
- Clock or timer
All these systems, no matter their type, either already have such a clean
contact or it is possible to easily connect one through a relay. With this solution
you can rely on high savings with the assurance to be able to return to the
maximum luminosity level in case of an extraordinary event.
Apart from the physical connection of the contact you also need to make a
specific software setup: programming the Mach2000 in time bands
or
stabilized brilliancy (refer to §8.n and §9.n of this manual) and use the
stabilized voltage “constant” program for the emergency situation. The logical
bypass allows the user to set the output voltage, per each phase, to any value
between 160 and 230V as for the other programs.
With the contact normally open the Mach2000 will work according to the time
band/luminosity program. In the event the contact closes, the program will
automatically shift to the preset constant voltage (for ex. 230V) and maintain
this voltage fixed during the whole duration of the contact closure. When it
reopens, the Mach2000 will revert automatically to the initial working
condition.
Mach2000 – User Manual
page 39 / 41
Stila Energy®
INDEX
CHAPTER TOPIC ................................ ...... Page
1
1.1
2
2.1
2.2
3
4
4.1
4.2
4.3
4.4
4.4.1
4.5
4.5.1
4.6
5
5.1
6
6.1
7
7.1
7.2
7.3
8
8.1
8.2
9
9.1
9.2
10
11
11.1
12
13
14
14.1
14.2
14.3
15
15.1
16
A
B
General description of Mach2000 .................................................3
Front Panel ................................................................................3
Main Commands......................................................................... 4
Main switch door jam/Power by-pass ........................................... 4
Controller panel and keyboard functions....................................... 4
Initail start up ............................................................................ 5
Test menu function..................................................................... 6
Operating goals and principles.....................................................6
Manual test................................................................................7
Preliminary operations ................................................................7
Selecting the manual test............................................................8
Running the manual test.............................................................9
Automatic test............................................................................ 10
Selecting and running the automatic test...................................... 10
Cyclical test................................................................................10
Start up function ........................................................................ 11
Programming the start up function............................................... 11
Configuration ............................................................................. 13
Programming the configuration parameters.................................. 13
Automatic programs ................................................................... 15
Possible settings to run the programs........................................... 15
Selecting the programs and different settings...............................15
Entering or changing working parameters..................................... 16
Programs at stabilized voltage.....................................................17
Stabilized voltage programs: Constant.......................................... 17
Stabilized voltage programs: Bands.............................................. 17
Stabilized brilliancy programs ......................................................19
Stabilized brilliancy programs: Constant........................................ 19
Stabilized brilliancy programs: Bands............................................ 21
Clock.........................................................................................23
Password...................................................................................23
Password: emergency procedures................................................24
Selection of the language............................................................25
Visualization Of Electric Data .......................................................25
PROGRAMMING CHART ..............................................................26
Alarms.......................................................................................27
Temeprature Alarm..................................................................... 27
Relay Alarm ............................................................................... 27
Fuse Alarm ................................................................................28
Automatic By-Pass...................................................................... 29
Automatic By-Pass and Alarm ......................................................30
Routine maintenance .................................................................. 31
APPENDICES ........................................................................... 32
Appendix A – Multi power up module INT-MAxx ............................34
Appendix B – Logical by-pass option ............................................ 38
INDEX .......................................................................................40
Mach2000 – User Manual
page 40 / 41
Stila Energy®
Stila Energy®
All rights reserved 2002 - 2009
STILA ENERGY® S.p.A.
Via Ippodromo, 61 - 20151 MILAN - ITALY
Telephone: + 39 02 40918310 Fax: + 39 02 40917052
E-mail: top@ stilaenergy.com
www.stilaenergy.com
Mach2000 – User Manual
page 41 / 41


![[Silk Gimbal User Manual]](http://vs1.manualzilla.com/store/data/005969411_1-2c584c7da53e0ea80ffb995f6422f5dc-150x150.png)