1
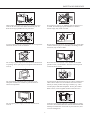
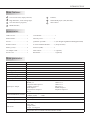
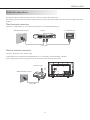
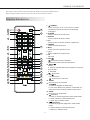
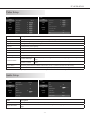
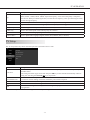
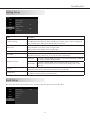
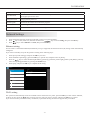
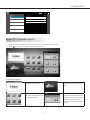
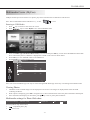
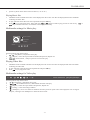
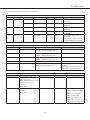
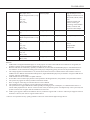
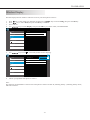
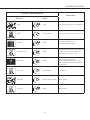
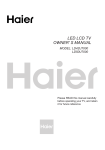
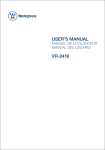
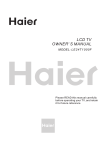
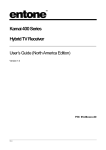
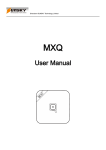
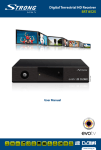
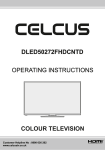
LED LCD TV
OWNER' S MANUAL
MODEL: LE43B7600A
Please READ this manual carefully
before operating your TV, and retain
it for future reference
Contents
1.
SAFETY AND WARNINGS�������������������������������������������������������������������������������������������������������������������������� 2
2.
INTRODUCTION������������������������������������������������������������������������������������������������������������������������������������������ 4
3.
REMOTE CONTROLLER��������������������������������������������������������������������������������������������������������������������������� 11
4.
TV OPERATION������������������������������������������������������������������������������������������������������������������������������������������ 13
5.
TROUBLE SHOOTING������������������������������������������������������������������������������������������������������������������������������� 23
-1-
SAFETY AND WARNINGS
IMPORTANT SAFETY INSTRUCTION
1) Read these instructions.
2) Keep these instructions.
3) Heed all warnings.
4) Follow all instructions.
5) Do not use this apparatus near water.
6) Clean only with dry cloth.
7) Do not block any ventilation openings, install in
accordance with the instructions.
8) Do not install near any heat sources such as radiations,
heat registers, stoves, or other apparatus (including
amplifiers) that produce heat.
9) Do not defeat the safety purpose of the polarized plug. If
the provided plug does not fit into your outlet, consult an
electrician for replacement of the obsolete outlet.
10) Protected the power cord from being walked on or
pinched particularly at plugs, convenience receptacles,
and the point where they exit from the apparatus.
11) Only use attachments/accessories specified by the
manufacturer.
12) Unplug this apparatus during lighting storms or when
unused for long periods of time.
13) Refer all servicing to qualified service personnel.
Servicing is required when the apparatus has been
damaged in any way, such as power-supply cord or plug
is damaged, liquid has been spilled or objects have fallen
into the apparatus, the apparatus has been exposed to
rain or moisture, does not operate normally, or has been
dropped.
14) Mains plug is used as the disconnect device, the
disconnect device shall remain readily operable.
15) The ventilation should not be impeded by covering the
ventilation openings with items, such as newspapers,
table-cloth, curtains, etc.
16) No naked flame sources, such as lighted candles, should
be placed on the apparatus.
17) Attention should be drawn to the environmental aspects
of battery disposal.
18) The use of apparatus in moderate climate.
19) The apparatus shall not be exposed to dripping or
splashing and that no objects filled with liquids, such as
vases, shall be placed on the apparatus.
CAUTION
RISK OF ELECTRIC SHOCK
DO NOT OPEN!
CAUTION
TO REDUCE THE RISK OF ELECTRIC SHOCK, DO
NOT REMOVE COVER (OR BACK).NO USER
SERVICEABLE PARTS INSIDE. REFER SERVICING
TO QUALIFIED SERVICE PERSONNEL.
The symbol indicates that dangerous voltages
constituting a risk of electric shock are present
within this unit.
The symbol indicates that there are important
operating and maintenance instructions in the
literaturaccompanying this unit.
WARNING:
To reduce the risk of fire or electric shock, do not expose
this apparatus to rain or moisture.
WARNING:
The batteries shall not be exposed to excessive heat such as
sunshine, fire or the like.
Please act according to your local rules and do not dispose of
your old products with your normal household waste.
Correct disposal of your old product helps to prevent
potential negative consequences for the environment and
human health.
This product complies with all implemented RoHS type
regulations worldwide, including but not limited to, EU,
Korea, Japan, US States (e.g. California), Ukraine, Serbia,
Turkey, Vietnam and India.
We continue to monitor, influence and develop our processes
to comply with upcoming proposed RoHS type regulations,
including but not limited to, Brazil, Argentina, Canada.
Restriction on Hazardous Substances statement (India)
This product complies with the “India E-waste Rule 2011”
and prohibits use of lead, mercury, hexavalent chromium,
polybrominated biphenyls or polybrominated diphenyl ethers
in concentrations exceeding 0.1 weight % and 0.01 weight %
for cadmium, except for the exemptions set in Schedule 2 of
the Rule.
This symbol indicates that this product incorporates
double insulation between hazardous mains voltage and
user accessible parts. When servicing use only identical
replacement parts.
-2-
SAFETY AND WARNINGS
High voltages are used in the operation of this television
receiver. Do not remove the cabinet back from your set.
Refer servicing to qualified service personnel.
Never stand on, lean on, or suddenly push the television or
its stand. You should pay special attention to children.
Serious injury may result if it falls.
To prevent fire or electrical shock hazard, do not expose the
television receiver to rain or moisture.
Do not place your television on an unstable cart, stand, shelf
or table. Serious injury to an individual, and damage to the
television, may result if it falls.
Do not drop or push objects into the television cabinet slots
or openings. Never spill any kind of liquid on the television
receiver.
When the television receiver is not used for an extended
period of time, it is advisable to disconnect the AC power
cord from the AC outlet.
Do not block the ventilation holes in the back cover.
Adequate ventilation is essential to prevent failure of
electrical components.
Avoid exposing the television receiver to direct sunlight and
other sources of heat. Do not stand the television receiver
directly on other products which give off heat, e.g. video
cassette players and audio amplifiers. Do not place naked
flame sources, such as lighted candles on the television.
Dim:515*320mm(不包括底座)
Do not trap the power supply cord under the television
receiver.
If the television is to be built into a compartment or similar
enclosure, the minimum distances must be maintained. Heat
build-up can reduce the service life of your television, and
can also be dangerous.
-3-
INTRODUCTION
Main features
1
Used as Television, display terminal;
5
Ethernet;
2
High luminance, wide viewing angle;
6
Multi-Media player (USB, SD Card);
3
Can store 200 TV programs;
7
Web Camera
4
HDMI interface;
Accessories
LED LCD TV.................................1
User Manual....................................1
Bottom Stand.................................1
Warranty Card.................................1
Screws...........................................4
Quick Set Up Guide........................1 (For Hong Kong/Indonesia/Philippines/India)
Remote Control.............................1
E-waste Guideline Booklet.............1 (Only for India)
Battery (AAA)...............................2
SD Card (4GB)...............................1
AV Adapter Cable..........................1
Web Camera....................................1 (optional)
Power Cord....................................1
RF Remote.......................................1 (optional)
Main parameter
Model Name
Resolution
Aspect Ratio
TV System
Video Signal System
Receiving Channel
Input Power Voltage
Power consumption
Audio Output Power(THD≤7%)
LE43B7600A
1920 x 1080
16:9
PAL B/G
Ambient Temperature
PAL/SECAM/NTSC
1-200
AC 100-240V 50/60Hz
110W
2 x 10W
High-Definition Multimedia Interface
(HDMI) x 3
Composite Video Input x 1
Y Cb(Pb ) Cr(Pr) x 1
Audio Input x 1
Composite AV Output x 1
RF x 1
Composite Video input >=350
Y Cb(Pb ) Cr(Pr)
>=400
0 to 45 degree Celsius
Base screw type
M4 x 20
Signal Input / Output
Horizontal definition (TV line)
Wall mount
Ethernet x 1
USB 2.0 x 1
USB 3.0 x 1
SD Card x 1
SPDIF Output x 1
Earphone Output x 1
VESA mount pattern (W x H): : 200 x 200mm
Screw: M6
Length: 18mm
Torque : 12 ±2 kgf.cm
This product does not include wall-mount braket module.
-4-
INSTALLATION
Front panel
Keyboard
3
SOURCE
1
MENU
2
VOL
VOL
1
2
CH
30
CH
30
3
4
5
1.
1:
Remote control sensor.
2:
Indicator LED: RED
3:
Key board
2.
3.
STANDBY
4.
Back side
5.
Power On state
Power Off state
Power switch
1. Turn on the power switch on the side of the TV.
2. If the standby indicator is not lighted, the TV is on.
3. If the standby indicator is red, press
(Standby-On) on
the side of TV or remote control.
-5-
SOURCE :
Display the input source menu.
MENU :
Press to show the on-screen menu.
VOL+/ VOL- :
Adjust sound level.
In Menu mode, press " VOL+" or "VOL-" to adjust the
item that you selected.
CH / CH :
In TV mode, press CH or CH to change the channel
up and down.
In MENU mode, press CH or CH to select items.
(POWER) :
Press this button to turn the unit ON from STANDBY
mode.
INSTALLATION
Attaching The Stand
IMPORTANT: The stand of the TV must be assembled prior to usage.
1. Extract all cables and cords connected to the TV.
2. Carefully place your TV face-down on a cushioned, clean surface to protect the screen from damages and scratches, then
insert the bottom stand into the TV.
3. Secure the bottom stand to the TV with the four provided M4x20mm screws.
Step 1
Step 2
Step 3
Preparing Your LCD TV For Wall Mounting
We suggest that you keep your TV at least 2.36 inches (60 mm) from the wall to prevent cable interference. Before mounting
your TV on the wall, you need to remove the stand.
For your safety, please use only with a UL listed wall mount bracket with minimum weight of the TV without stand. To attach a
wall mount bracket to your TV:
1. Remove the screws holding your TV to the stand.
2. Remove the stand from your TV.
3. Secure the wall mount bracket to the back of your TV using four screws (see page 4 for the size of the screws). Follow
the instructions of the user manual that came with the wall mount bracket to install.
Step 1
Step 2
NOTE
The wall mount bracket and the screws are not included.
-6-
Step 3
INSTALLATION
Rear AV Connections (Side)
Ear-phone
USB 3.0
HDMI 1
SD Card
SPDIF out
USB
All the terminals are (from down to up):
AV Output, Ear-phone, USB 3.0, HDMI 1, SD Card Slot, USB, SPDIF Output.
Rear AV Connections
Y/CVBS
Ethernet
HDMI 3
HDMI 2
L
- audio -
R
Component /AV Input
Antenna
All the terminals are (from left to right):
Ethernet, HDMI 3, HDMI 2, Component Input/AV Input (Y/Pb/Pr, AUDIO L/R), Antenna.
Antenna
An outdoor antenna
Plug
An outdoor antenna
CATV net
Adaptor
(NOT SUPPLIED)
ANT 75Ω
TWIN-LEAD FEEDER(300Ω)
Loosen the screws
Note:
Aerial connections: IEC (female).
Input impendance: 75Ω unbalanced.
-7-
Insert the feeder in Wires
Tighten the screws
INSTALLATION
DVI/ PC HDMI Input Signal Reference Table
When DVI port is being used: connect the DVI port of video device to your TV set with a DVI-to-HDMI line and set up the
output signal of the video device in accordance with table below.
When HDMI port is being used: connect the HDMI ports of your computer and TV set with one HDMI wire and set up the
output signal of the video device in accordance with table below.
Default HDMI Mode
Standard
Resolution
Horizontal Frequency (kHz)
1
640 × 480
31.469
Vertical Frequency(Hz)
59.94
2
800 × 600
37.879
60.317
3
1024 × 768
48.363
60.004
4
1360 × 768
47.72
59.799
5
1920 × 1080*
66.587
59.934
*Recommended resolution
Video Input Signal Reference Table
Connect the component signal or HDMI port of video device to your TV set and set up the output signal of the video device in
accordance with table below.
If your computer display card supports signals of video format then you can set up following output signal.
Default Component or HDMI Mode
Standard
Resolution
Horizontal Frequency (kHz)
Vertical Frequency (Hz)
SD
640 × 480p
25.175
60
SD
720 × 480i
15.734
60
SD
720 × 480p
31.5
60
SD
720 × 576i
15.625
50
SD
720 × 576p
31.25
50
HD
1280 × 720p
37.5
50
HD
1280 × 720p
45
60
HD
1920 × 1080i
28.125
50
HD
1920 × 1080i
33.75
60
FHD
1920 × 1080p
56.25
50
FHD
1920 × 1080p
67.5
60
Video System Supported in TV and Video Modes
PAL B/G
Standard Definition Interface
You can also enjoy traditional program by using a DVD player or VCR Player. Connect this equipment to your TV via the
Composite Input on the back of your TV.
YPbPr can support these video fomats: 480i, 480p, 576i, 576p, 720p, 1080i, 1080p.
-8-
INSTALLATION
AV Equipment
This TV can be connected to the following appliances: VCR, multi disc player, DVD, camcorder, video game or stereo system,
etc...
Please refer to the owner's manual of the equipment to be connected as well.
You can use the input terminals on TV set rear as follows.
Y Yellow (video)
VIDEO EQUIPMENT
R Red (audio R)
W White (audio L)
R Red (Pr or Cr)
G
B Blue (Pb or Cb)
B
G Green (Y)
R
W
R
COMPONENT
CABLE
G
B
R
Y/CVBS
Ethernet
HDMI 3
W
R
L
- audio -
R
Component /AV Input
HDMI 2
Y
SPDIF out
AUDIO CABLE
Antenna
W
USB
VIDEO CABLE
R
AUDIO CABLE
W
R
SD Card
Y
VCR PLAYER
HDMI 1
HDMI
Ear-phone
USB 3.0
AV EQUIPMENT
AV ADAPTER
CABLE
R
R
W
Y
TO VIDEO OUTPUTS
W
Y
MONITOR
Notes:
1. AV and YPbPr share one audio channel.
2. When HDMI port get DVI signal, the "PC Audio" channel is changed to receive the audio for HDMI port.
3. Sometimes it will not support in different device because the device supplys nonstandard signal.
4. When current source is TV, AV OUT signal is TV; when current source is AV, AV OUT signal is AV; other sources have no
AV OUT signal.
5. TV system supports HDMI CEC feature which involves One Touch Play, Auto Standby and Audio Return Channel (ARC).
-9-
INSTALLATION
Network connections
This machine supports network function, be sure to correctly connect the network first.
The following are two network connection modes, and you can select the most suitable connection mode according to the actual
situation.
Wired network connection
Connect to a wired routher, so as to connect to the Internet via a wall mounted LAN port.
Wall mounted LAN port
Router
TV Ethernet port
LAN cable
Wireless network connection
Connect to the Internet via a wireless router.
* This machine has a wireless network adapter built in, so no externally connected adapter is needed.
For the setup of the wireless router, please refer to the wireless router operation instructions.
Wireless router
Wall mounted LAN port
LAN cable
-10-
REMOTE CONTROLLER
The remote control cannot be operated unless the batteries are properly loaded inserted.
When using the remote control, aim it at the remote control sensor on the TV.
Function Introduction
1.
1
2
3
(POWER)
Press to turn the TV on or off. The TV is never
completely powered off unless it is physically
unplugged.
2. S.MODE
Press to select the sound mode.
3. P.MODE
Press to select the picture mode.
4. 0-9
Press to enter a channel number or password.
5. FREEZE
Press to freeze the picture.
6. Mute
Press to turn the sound on or off.
7.
+/Press to adjust the volume level.
8. 3D
No used.
9. FAV/
:Freeze the picture in Teletext.
FAV:Press to open favourite channel list.
10. MENU/
MENU:
a. Press to activate OSD menu and back to previous
level of OSD.
b. Exit OSD.
:No function.
11. CC/
CC :No function.
: Press to turn on/off TTX.
12. PAGE+
Press to go to the next item.
13.
a. Press to navigate the OSD menu;
b. The cursor RIGHT key perform confirmation as
well as precede next level of OSD in Main menu.
14. PAGEPress to go to the last item.
15.
(reverse)
a. Press to reverse playback in multi-media mode.
b. Insert chanels in Channel Edit menu.
c. Green key in Teletext mode.
16.
(play/pause)
a. Press to play/pause playback in multi-media
mode.
b. Swap chanels in Channel Edit menu.
c. Red key in Teletext mode.
19
20
4
5
6
21
7
22
8
9
23
24
25
10
11
26
12
13
OK
27
14
28
15
16
29
30
17
31
18
32
HTR-A18H
-11-
REMOTE CONTROLLER
17. P. SIZE
Press to change the screen display aspect ratio
setting.
18.SLEEP
Press to set sleep timer.
19. SOURCE
Press to select source.
20.
Press to open (Smart TV) launcher mode.
21. Q. VIEW
Press to switch to the last viewed channel.
22. CH
Press to browse through the TV channels.
23. CH.LIST/
CH.LIST: Press to show channel list.
: Press to REVEAL TTX.
24. I/II/MTS/SAP
Press to select the audio mode (depend on
broadcast signal).
25. INFO/
INFO: Display information of current signal.
: Press to update TTX.
26. BACK/
Back: Press to return to previous menu.
: Mixed mode in Teletext.
27. OK
a. Press to confirm a selection.
b. Enter EPG in DTV source.
28. EXIT/
EXIT: Press to leave Main Menu, Source Menu or
Setup Wizard APP only. This key do not work on
other APPs.
: No function.
29.
(fast forward)
a. Press to fast forward playback in multi-media
mode.
b. Yellow key in Teletext mode.
30.
(stop)
a. Press to stop playback in multi-media mode.
b. Delete chanels in Channel Edit menu.
c. Blue key in Teletext mode.
31.
/
(Sub-MENU)
: Subtitle in Teletext.
: No function.
32.
(H.LOCK)
No function.
-12-
TV OPERATION
Video Setup
Video
Video
Video
Picture Mode
Video
Sharpness
50
Audio
Backlight
60
Audio
Saturation
50
Brightness
50
TV
Hue
50
Contrast
50
Sharpness
50
Saturation
50
Hue
50
TV
Setting
Lock
Natural
Setting
Lock
Standard
Color Temperature
Advanced Video
Aspect Ratio
16:9
NR
Off
Items
Description
Picture Mode
Select picture mode from User, Vivid, Natural, Sports, Lightness, Standard, or Soft.
Backlight
Control the brightness of the backlight.
Brightness
To brighten the dark parts of the picture.
Contrast
To sharpen the picture quality.
Sharpness
To improve details.
Saturation
To decrease or increase saturation.
Hue
Compensates colour variations in NTSC encoded transmissions.
Color Temperature
Selet the color temperature mode from Standard, Warm, Cool.
Dynamic Backlight
Advanced Video
Dynamic Contrast
Dynamically adjusts backlight level based on average brightness of the picture
frame.
Dynamically enhance the details in the dark, medium and light areas of the
picture.
Aspect Ratio
Select the picture ratio to suit the video source (16:9, 4:3, Zoom1, Zoom2 or Full Screen).
NR
Select the amount of noise reduction for the picture (Off, Low, Medium or Strong).
Note: Certain screen setups may be unavailable or have different options in accordance with the input sources.
Audio Setup
Audio
Audio
Video
Sound Mode
Audio
Digital Surround
TV
Setting
Lock
Standard
Video
EQ
Off
Audio
AVL
EQ
TV
AVL
Off
Balance
50
SPDIF Output
PCM
Setting
Lock
Audio Only
Balance
SPDIF Output
Off
50
PCM
Audio Only
Prefer Audio 1
English
Prefer Audio 2
English
Items
Description
Sound Mode
Select sound mode from User, Standard, Music, Movie, or News.
Digital Surround
Create vivid and connotation-rich surround sound experience through speakers. Provide ON and OFF
setup.
-13-
TV OPERATION
Items
Description
EQ
Adjust the volume of the left and right speakers.
120Hz, 500Hz, 1.5KHz, 5KHz, 10KHz: Adjust the frequency so that the sound quality is adapted to
your favorite. When pre-enhancing the bass, increase the low frequency; when pre-enhancing the treble,
increase the high frequency.
AVL
Automatically reduces sudden volume changes,for example,when switching between the channels.
Balance
Adjust the balance between left and right speakers to adapt to your listening position.
SPDIF Output
Select the digital audio output mode (PCM, RAW or Off).
Audio Only
Select to turn off the panel screen and keep only the sound on.
Prefer Audio 1
Select a digital audio language (English, Arabic, Persi, Hebrew, Thai, or French).
Prefer Audio 2
Select a digital audio language (English, Arabic, Persi, Hebrew, Thai, or French).
TV Setup
The TV setup menu only shows when the input source selected to DTV or ATV.
TV
Video
Auto Scan
Audio
DTV Manual Scan
TV
Signal Information
Setting
Channel Edit
EPG
Lock
Items
Auto Scan
DTV Manual Scan /
ATV Manual Scan
Channel Edit
Signal information
EPG
Description
TV automatically searches for the channel in the available frequency band and stores sequentially.
Select TV menu.
After setting the Search Type, select Start and press OK key to tune channels automatically and store.
During auto searching Press BACK/ key to stop search.
Scan the channels manually and store it to the desired channel number.
It can also be used for editing of channels searched by auto search if required.
Edit the selected channel, including Move, Delete, Favorite.
Show the information of the TV signal.
EPG is an on-screen guide that displays scheduled digital TV programmes. You can view the information
of programmes.
Note: Make sure you have connected RF signal cable before performing channel search.
-14-
TV OPERATION
Setting Setup
Setting
Video
Advanced Setting
Audio
Scheduled Time
TV
Setting
Lock
Sleep Time
Off
HDMI CEC Setting
Location
Home
Reset Default
Items
Description
Advanced Setting
Blue Screen
Access advanced settings.
Press OK key to select Ethernet, WiFi, WiFi Hotspot, Display, Apps, Location, Language &
input, Update & reset, Add account, Date & time and About TV.
To show Blue or Black screen when no signal input for all sources except ATV and DTV.
Select Off: Black screen display when no signal input.
Select On: Blue screen display when no signal input.
Scheduled Time
Set a scheduled time to power on the TV when TV is in Standby mode.
Sleep Time
Set a time period after which the TV will be turned off and enter standby mode.
Sleep timer can be set to Off,10, 20, 30, 60, 90,120, 180 or 240 Minutes.
HDMI CEC
Set enable or disable HDMI CEC feature. Once this item disabled, all HDMI
CEC features would be disabled either.
Auto Standby
Set enable or disable HDMI CEC Auto Stanby feature. Once this item
enabled, all connected CEC device would be enter standby after TV DC
power off.
HDMI CEC Setting
Location
When set to Home, the Picture mode automatically switches into the Natural mode. When set
to Shop, the Picture mode automatically switches into the Vivid mode
Reset Default
You can restore the factory default video and audio settings of your TV.
The channel installation settings remain the same.
Lock Setup
The Lock setup menu only available for DTV, and shows when the input source selected to DTV.
Lock
Video
Enter Password
Audio
Change Password
TV
Setting
Lock Off
Block Program
Child Lock
Clear All
Lock
-15-
TV OPERATION
Items
Description
Enter Password
Enter the 4 numbers code to access the Lock setup menu.
The original password is 9443.
Change Password
Change parental password.
Block Program
Select from the channel list to block the program..
Child Lock
Select the age for child lock.
Clean All
Clear the lock status of channels and the age of child lock.
Network Settings
1.
2.
3.
Select the desired network connection mode and correctly set up the parameters.
Press
key to enter (Smart TV) launcher mode and use
keys to select Setting, then press the OK key.
Press
key to select Ethernet or Wi-Fi, then press the OK key.
Ethernet setting
If LAN cable is connected and DHCP (automatically set up) is supported, the Internet Protocol (IP) setting will be automatically
configured.
If you want to manually set up the IP, operate according to the following steps:
1.
2.
3.
4.
Select [Proxy & IP settings], and press the OK key to access.
Select the field of [IP settings] ,press the OK key to open the list, and please select to [Static].
Press the
keys to select the field of [IP address], [Gateway], [Network prefix length], [DNS 1] and [DNS 2]. Directly
enter corresponding parameters by pressing the number keys.
Select [Set], and press the OK key to complete the IP setting.
Ethernet
Ethernet
Wi-Fi
Wi-Fi Hotspot
Display
IP address
None
Ethernet MAC address
cc:cc:cc:cc:cc:cc
Proxy & IP settings
Disconnected
Apps
Location
Language & input
Update & reset
Add account
Date & time
About TV
Wi-Fi setting
The system will automatically search for available wireless network access points; press the OK key to enter into the submenu,
set Wi-Fi to [On], press the
keys to select an access point you want to connect, and press the OK key to connect.
If you select an access point with security certification, a password entering interface will appear after you confirm.
-16-
TV OPERATION
Wi-Fi
ON
Ethernet
Wi-Fi
Wi-Fi Hotspot
Display
CMCC-AUTO
Secured with 802.1x
TP-Test
Secured with WPA/WPA2
TP-LINK_124228
sECURED WITH WAP/WPA2
Guest
Apps
Location
Language & input
Update & reset
Add account
Date & time
About TV
Smart TV (Launcher mode)
1.
2.
Connect your TV to ethernet. Parts of TV function will not work without network.
Press
key on remote control to enter smart TV screen.
Screen description:
TV:
Broadcast the TV picture.
Weather:
Synchronously view the weather
status.
Applications:
The basic shortcut function in
the Android system.
User Apps:
Display the Android applications
installed via network or installed
via an external storage device
(Ex:USB) by the user in a shortcut
manner.
-17-
TV OPERATION
Multimedia Center (MyFun)
USB port and SD port can be used to view photos, play music and video files in USB device and SD card.
Note: The recommended width of USB device is ≤ 17 mm.
≤ 17 mm
Entering to USB Media
key on remote to enter smart TV screen.
keys to select Myfun icon to enter multimedia menu.
1.
2.
Press
Press
3.
Select the Media type (All/Picture/Music/Video) to be viewed and press OK key to enter into USB Media and when USB
drive is detected by the TV, USB drive is displayed as a folder on the screen as shown below.
Press OK key to view subfolder or files in the USB driver.
Press BACK key to return last layer item.
4.
5.
multimedia
ALL
local disk device
back
ALL
family
folder
pictures
folder
Hi.avi
avi
I’m yours.mp3
mp3
7MB
3MB
Taipei_2014.mp4
mp4
928MB
thumb.db
db
6KB
CHRIS
BROAM
DEIBS
AFGS AFGS
MISBCDH
1/1
Note: Files of selected Media type can only be viewed through USB. Media type can be any one amoung Picture/Music/Video.
Viewing Photos
1.
2.
3.
Thumbnail of the available images will be displayed on the screen. If no images are displayed then select the folder
containing the Photos.
When a photo is displaying, press OK or navigation key to show infomation bar which lists photo information and help bar.
Once information bar displays on the bottom, press
key to start or pause photo slideshow.
Multimedia settings for Photo Slide show
current picture is 0045.jpg
1920x1080
677KB
Start slide show
Following Menu setup shown above.
1.
: Play/Pause photo play.
2.
: Press to exit.
-18-
Exit
OK
Zoom in
TV OPERATION
3.
[Zoom in]: Zoom in the Photo with scale factor (1×/2×/4×/8×).
Playing Music files
1.
Thumbnail of the available music files will be displayed on the screen. If no files are displayed then select the floder
containing the music files.
To play particular music file select the required file and press OK key.
Press
key to play/pause music. Select and click
or
button on OSD to play previous or next track. (
key on remote control are not available in music playback mode.)
2.
3.
Multimedia settings for Music play
Wherver You Will Go
Camino Palmero
The Calling
00:43/03:22
Following Menu setup shown above.
1.
/
( Play/Pause ): Play/Pause music play.
2.
( Repeat ): Select the repeat mode as Random, Repeat One, Repeat All.
3.
/
( Previous/Next ): Jump to previous or next music play.
Playing Video files
1.
Thumbnail of the available video files will be displayed on the screen. If no files are displayed then select the folder
containing the video files.
To play particular video file select the required file and press OK key.
Press
key to play/pause video.
2.
3.
Multimedia settings for Video play
1x
00:00:14/00:03:26
AB
[MV] GangnamStyle
Following Menu setup shown above.
1.
/ ( Play/Pause ): Play/Pause movie play.
2.
/
( Rewind/Fast Forward ): Rewind/Fast Forward video play.
3.
( Repeat ): Select the repeat mode as Repeat One, Repeat All.
4.
( Settings ) : Enter the settings of Menu.
5.
( AB Repeat ) : Press it to enable or disable A-B section period to repeat video content playback. Do not support
"Repeat", "Settings" and "AB Repeat" in Network device mode.
AB
-19-
or
TV OPERATION
Files encoded in the following formats are supported.
Picture
Image
JPEG
PNG
BMP
File Extension Photo Format
.jpg, .jpeg
Base-line
.png
Suggest Resolution Max Width
1920×1080 (8-bit) 15360
Progressive
1024×768
6500
Non-interlace
4000×4000
15360
Interlace
1200×800
6500
9600×6400
15360
.bmp
Max Height Remark
8640
Max resolution depends on
DRAM size.
6500
Max resolution depends on
DRAM size.
8640
Max resolution depends on
DRAM size.
6500
Max resolution depends on
DRAM size.
8640
Max resolution depends on
DRAM size.
DLNA (DMP / DMR) mode do
not support BMP format display.
Audio
Audio Codec
MPEG1/2 Layer1
File extension
.mp3
Bit Rate
32Kbps ~ 448Kbps (Bit rate)
16KHz ~ 48KHz (Sampling rate)
MPEG1/2 Layer2
.mp3
MPEG1/2 Layer3
.mp3
AAC-LC (AAC)
WMA
.m4a / .aac
.wma / .asf
8Kbps ~ 384Kbps (Bit rate)
16KHz ~ 48KHz (Sampling rate)
8Kbps ~ 320Kbps (Bit rate)
16KHz ~ 48KHz (Sampling rate)
8KHz ~ 48KHz (Sampling rate)
128 bps ~ 320Kbps (Bit rate)
8KHz ~ 48KHz (Sampling rate)
Video
Video Codec
MPEG 1/2
MPEG 4
Container (File Extension )
Resolution
MPEG program stream (.dat
1080p@30fps
/.vob /.mpg /.mpeg)
MPEG transport stream (.ts /.trp
/.tp) MP4 (.mp4 /.mov)
AVI (.avi)
MKV (.mkv)
MP4 (.mp4 /.mov)
1080p@30fps
AVI (.avi)
MKV (.mkv)
-20-
Remark
Follow WMA 7, WMA 8, WMA 9
Standard.
Partial support WMA M0 format.
Do not support WMA M3 format.
Bit rate
40 Mbps
Profile
MP@HL
40 Mbps
.Simple Profile
.Advanced Simple Profile@
Level 5
.GMC is not supported
.MPEG-4 ASP video
decoding up to HD level
.Support FLV version 1
video format decoding
TV OPERATION
H.264
FLV (.flv),
1080P@60fps
MP4 (.mp4 /.mov)
1080Px2@30fps
MPEG transport stream (.ts /.trp
/.tp)
ASF (.asf)
AVI (.avi)
MKV (.mkv)
62.5 Mbps
MVC
MPEG transport stream (.ts /.trp 1080p@30fps
/.tp)
62.5 Mbps
AVS
MP4 (.mp4 /.mov)
MPEG transport stream (.ts /.trp
/.tp)
MPEG transport stream (.ts /.trp
/.tp)
ASF (.asf)
AVI (.avi)
MKV (.mkv)
MP4 (.mp4 /.mov)
AVI (.avi)
MKV (.mkv)
RM (.rm /.rmvb)
MKV (.mkv)
1080P@30fps
40 Mbps
Jizhun profile@Level 6.0
1080p@30fps
40 Mbps
.Advanced Simple Profile@
Level 3
.Simple Profile
.Main Profile
640x480@30fps
10 Mbps
1080p@30fps
40 Mbps
VC-1
Motion JPEG
RV30 / RV40
.Main Profile
.High Profile@Level 4.2
.Supports resolutions for all
DVB, ATSC, HDTV, DVD,
VCD
.Supports CABAC and
CAVLC stream types
.Processing of ES and PES
streams, extraction and
provision of time stamps
Remarks:
1. USB interface of digital multimedia player is not all-purpose. So when some USB devices could not be recognized, the
problem is usually not the performance failure but due to device driver.
2. Because USB devices and memory capability are different, the time needs for multimedia player to read information are
also different. So the information reading speed of the player temporarily getting slow are not the performance failure.
3. The voltage supplied to USB interface is 5V, and the most electrical current is 500mA. When some interface criteria of
USB devices are different from standard USB protocol, digital multimedia player may be unable to recognize USB devices
correctly, which is normal status.
4. USB could be used as an interface to update software.
5. If some files source could not play because of the parameter decoding-limitation, the problem is not performance failure.
6. The system only applies to memory medium with FAT32 format.
7. Does not support connecting of removable devices to the USB hub.
8. The USB device does not support copying and pasting for FAT32 system.
9. The system doesn't support USB devices which possibly need larger power consumption, ex: USB hard-drive device or
certain media playback device. Device “with more than 2.5W (5V/500mA) power consumption may cause system off, and
system can not be turn on again until the USB device be removed.
10. USB 3.0 port supports USB 3.0 and USB 2.0 devices, but doesn't support USB 1.1 device. USB 2.0 port supports USB 2.0
and USB 1.1 devices, but doesn't support USB3.0 device.
* Haier is not responsible for any quality problems or data loss of the external digital storage devices.
-21-
TV OPERATION
Wireless Display
Wireless Display function enable to share the screen of your smart phone on the TV.
1.
2.
3.
4.
Press
key to enter (Smart TV) launcher mode and use
keys to select Setting, then press the OK key.
Press
key to select Wi-Fi, and press the OK key to confirm.
Turn on Wi-Fi.
Use
keys to select Display, and press the OK key to confirm. Then, enter Cast screen.
Display
Cast screen
Ethernet
Deta media controller
Wi-Fi
Set DMR Service On/Off
Wi-Fi Hotspot
Display
Apps
Location
Language & input
Update & reset
Add account
Date & time
About TV
5.
Use
keys to selet
, and check [Enable wireless display].
Display
Ethernet
Wi-Fi
Wi-Fi Hotspot
Display
Samsung Galaxy Note3
Enable wireless display
Wireless display
SONY Z2
Wireless display
MIUI 2S
Wireless display
Apps
Location
Language & input
Update & reset
Add account
Date & time
About TV
6.
Choose your prefered smart phone to connect.
Note:
This function recommended to connect to the smart phone as follows: SONY Z2, Samsung Galaxy J, Samsung Galaxy Note3,
MIUI 2S or MIUI 3.
-22-
TROUBLE SHOOTING
Trouble phenomenon
Inspection
Picture
Audio
Snow
Noise
antenna position, direction or connection
Ghost
Normal audio
antenna position, direction or connection
Interfere
Noise
electronic equipment,car/
motorcycle,fluorescent light
Normal Picture
Mute
Volume(inspect wether the mute function
on the remote control are started , or
audio system are correct or not)
No picture
Mute
Power cord is not inserted
Power switch is not opened
Contrast and brightness/volume setup
Press standby key on the remote control
for inspecting
No color
Normal audio
color control
Scramble
Normal audio or weak
retune channel
No color
Noise
Audio system
-23-
X41G40MV67202E